

Results 161 to 180 of 376
Thread: 1967 GTO project thread
-
10-11-2014 #161

 -Moderator/Sponsor-
- Join Date
- Apr 2001
- Location
- The City of Fountains
- Posts
- 16,117

The calipers looks great. What was the deal with the Richmond 5 speed? Why the rebuild?
Andrew1970 GTO Version 3.0
1967 Cougar build
GM High-Tech Performance feature
My YouTube Channel Please Subscribe!
Instagram @dr__efi
I deliver what EFI promises.
Remote Holley EFI tuning.
Please get in touch if I can be of service.
"You were the gun, your voice was the trigger, your bravery was the barrel, your eyes were the bullets." ~ Her
-
10-11-2014 #162
 Registered User
- Join Date
- Feb 2005
- Location
- Waterloo, Ia
- Posts
- 1,408
It was leaking oil and was scratching horribly on a hard shift into 2nd. Its a 15 year old tranny that's been beat to hell and back so i'm not even mad about synchros and seals. The work was actually fun and its like a new transmission now. Well worth my time. Originally Posted by andrewb70
 -Nick
-Nick
-1967 GTO I drive and race
-Build threads:
-http://forums.maxperformanceinc.com/forums/showthread.php?t=615847&page=23
-https://www.pro-touring.com/showthre...project-thread
-
10-12-2014 #163
-Moderator/Sponsor-
- Join Date
- Apr 2001
- Location
- The City of Fountains
- Posts
- 16,117
My Richmond 6 speed crunches also ifI shift fast into second. Ugh...I am seriously considering sending it off to Liberty's Gear and having them convert it into a dog-ring box. Originally Posted by Nicks67GTO
Andrew1970 GTO Version 3.0
1967 Cougar build
GM High-Tech Performance feature
My YouTube Channel Please Subscribe!
Instagram @dr__efi
I deliver what EFI promises.
Remote Holley EFI tuning.
Please get in touch if I can be of service.
"You were the gun, your voice was the trigger, your bravery was the barrel, your eyes were the bullets." ~ Her
-
10-13-2014 #164
Registered User
- Join Date
- Feb 2005
- Location
- Waterloo, Ia
- Posts
- 1,408
It might be time to toss some synchros in your 6 speed? It really wasn't too hard. Two quick pointers if you decide to do the synchros and seals. Make sure you have access to a hydraulic press for the front bearing and make sure you google shop around the Richmond part #'s. I found seals that Summit wanted 20 bucks for, on autoplicity, for like 7 cents. Yeah 7 cents... and they were even SKF seals. WTF?? I think I saved well over $150 bucks shopping it out. Originally Posted by andrewb70
Dosen't the dog ring conversion require double clutching on downshifts?-Nick
-1967 GTO I drive and race
-Build threads:
-http://forums.maxperformanceinc.com/forums/showthread.php?t=615847&page=23
-https://www.pro-touring.com/showthre...project-thread
-
10-15-2014 #165
Registered User
- Join Date
- Feb 2005
- Location
- Waterloo, Ia
- Posts
- 1,408
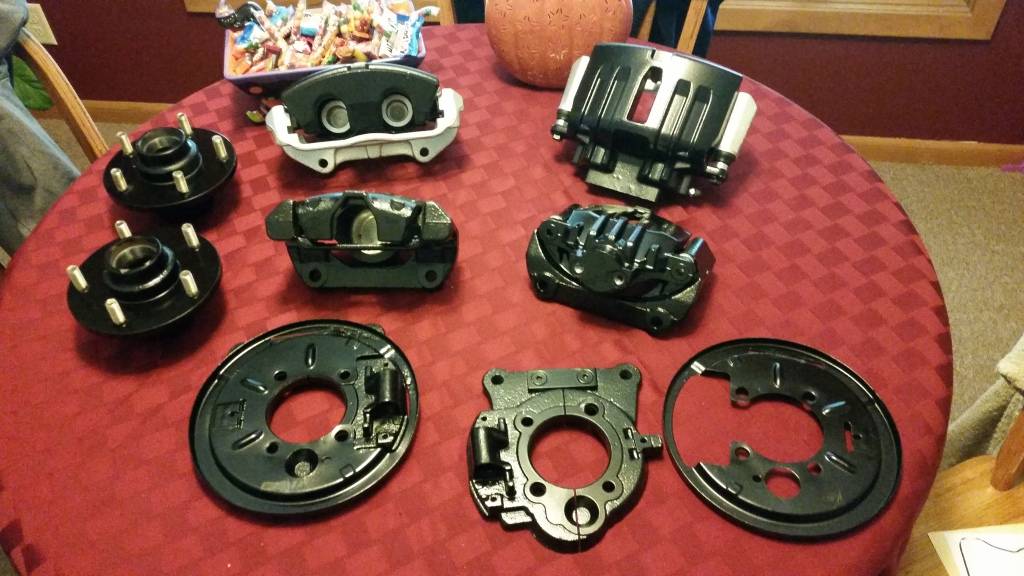
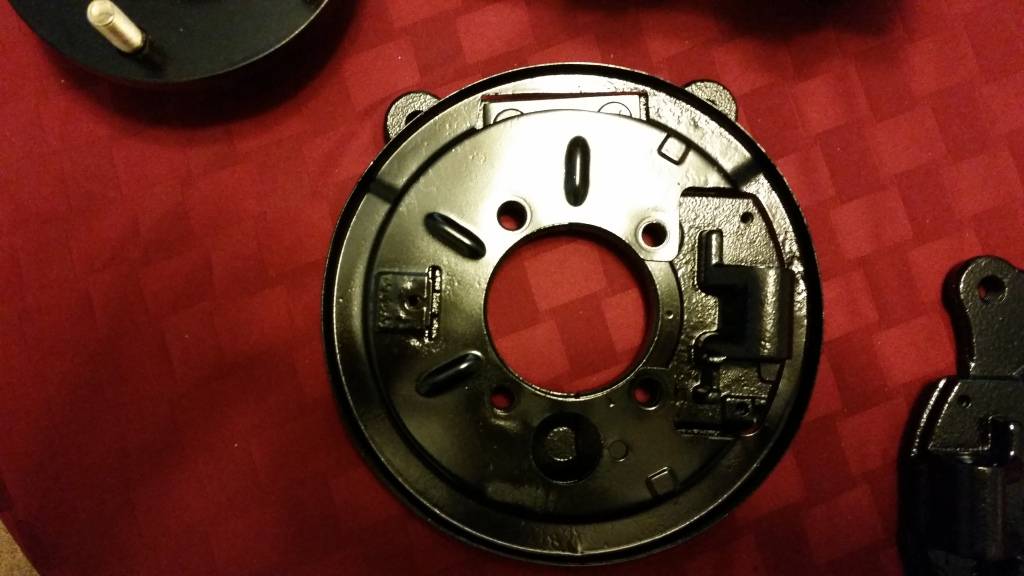
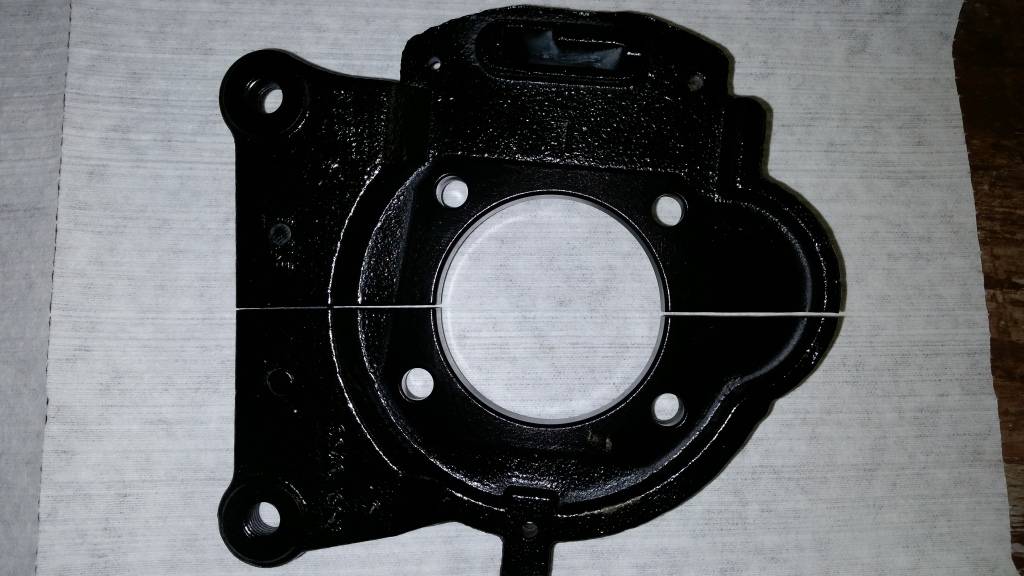
As i'm currently waiting on wheels to show up I thought I would throw a quick few pics of my painted brakes. Nothing overly exciting but progress is progress. Friday i'm going to bake them in a buddies oven to cure. Iv'e got the coolest wife ever but i'm pretty sure she would f'ing kill me if I did that in our oven. Anyhow they turned out pretty good other than the hubs. The hubs look like dog ****...LOL. That's ok I guess as long as they don't rust!? I might end up pulling the front brake brackets back off, then blasting and painting them too if it looks like crap back there behind the wheels. The other day I didn't have access to a blast cabinet so for now they will stay zinc coated.
I have a Moser 9" with #7900 housing ends. That's a 9" Torino bearing inside a 12bolt backing plate pattern. I decided that instead of pressing my old axle bearings off and buying new ones just to get the backing plates on, I would just cut the 02' Camaro backing plate in half. Before I did this I talked to Tobin @ Kore3. He thought it would be just fine but advised that if I cut it in between the caliper bracket bolt bosses that I should somehow brace it. So that's what I did. I braced first. Then made my cut. It turned out nice and shouldn't be an issue......here's a few shots...

 -Nick
-Nick
-1967 GTO I drive and race
-Build threads:
-http://forums.maxperformanceinc.com/forums/showthread.php?t=615847&page=23
-https://www.pro-touring.com/showthre...project-thread
-
10-15-2014 #166
Registered User
- Join Date
- Jun 2012
- Posts
- 427
coolness, i may in the future get the same 9" rear setup so i can still use ls rear brakes... but then if you think about it explorer brakes are like $50 and PBR makes the mustang brakes so it stands to reason they're like the same brakes, from digging aroung my mustang projects i can sure say that the parking brake on an explorer is identical to the ls ones in my 12 bolts....
your brakes look awsome man. trying to piece a getup for the front of my tempest now...
-
10-15-2014 #167
Registered User
- Join Date
- Jul 2012
- Location
- Iowa
- Posts
- 399
Your brakes turned out pretty impressive.
Miles Boyer
The car hobby is dangerous,if the speed doesn't kill you, the cost of parts will.
91 V8 S10
88 Cutlass Pro-Tour
97 Chevy lifted Z-71
96 Corvette
-
10-16-2014 #168
 Registered User
- Join Date
- Apr 2007
- Location
- Austin, TX
- Posts
- 237

pretty cool idea on the caliper bracket
really the 4 bolts on the flange should provide enough clamping force to prevent it from separating, add in the actual caliper and its more than enough, but I think the little bracket that goes between the caliper ears is good as well.
maybe you could have had some one fab a cross brace that used the caliper ears?
-
10-16-2014 #169
Registered User
- Join Date
- Feb 2005
- Location
- Waterloo, Ia
- Posts
- 1,408
When I talked to Tobin about it he just suggested that I reconnect the two halves somehow just to be sure the caliper wouldn't distort anything under pressure. I'm thinking this should do? Originally Posted by captainofiron
-Nick
-1967 GTO I drive and race
-Build threads:
-http://forums.maxperformanceinc.com/forums/showthread.php?t=615847&page=23
-https://www.pro-touring.com/showthre...project-thread
10-16-2014 #170
-Moderator/Sponsor-
- Join Date
- Apr 2001
- Location
- The City of Fountains
- Posts
- 16,117
Thanks for the tips. Dog-rings just need to be rev-matched for quick downshifting or you can double clutch just driving around town. Originally Posted by Nicks67GTO
Andrew1970 GTO Version 3.0
1967 Cougar build
GM High-Tech Performance feature
My YouTube Channel Please Subscribe!
Instagram @dr__efi
I deliver what EFI promises.
Remote Holley EFI tuning.
Please get in touch if I can be of service.
"You were the gun, your voice was the trigger, your bravery was the barrel, your eyes were the bullets." ~ Her
10-20-2014 #171
Registered User
- Join Date
- Oct 2014
- Location
- So Cal
- Posts
- 43
Hey I'm curious about this Jeep steering box swap, haven't seen that before. What other parts did you need to get it to work right? Thanks!
10-20-2014 #172
Registered User
- Join Date
- Apr 2007
- Location
- Austin, TX
- Posts
- 237
Yea I think its more than enough Originally Posted by Nicks67GTO
if you think about it, in order for the halves to separate you would need to shear/yield an axle hub bolt, AND deform the actual caliper/cage
and thats alot of required load
the caliper cage essentially does the same thing the added bracket does
10-21-2014 #173
Registered User
- Join Date
- Feb 2005
- Location
- Waterloo, Ia
- Posts
- 1,408
Hey there. Well It requires the Jeep box, the 1970-later power steering regulator, stock power steering lines and power steering pitman arm work, 2-5 dollar aluminum fittings from Lee Mfg. and an autozone ragjoint. I did a thread on it on another board. Its a bolt in deal. Let me dig for a link. It was a few years ago now and I don't remember all the info but its a really common swap. A quick google search should bring up threads on boards about it..... Originally Posted by HomeBuilt
-Nick
-1967 GTO I drive and race
-Build threads:
-http://forums.maxperformanceinc.com/forums/showthread.php?t=615847&page=23
-https://www.pro-touring.com/showthre...project-thread
10-21-2014 #174
Registered User
- Join Date
- Feb 2005
- Location
- Waterloo, Ia
- Posts
- 1,408
And here is my Jeep box swap post from the performance years board..... Its an awesome upgrade for the $. Any other questions let me know!
http://forums.performanceyears.com/f...=685111&page=4-Nick
-1967 GTO I drive and race
-Build threads:
-http://forums.maxperformanceinc.com/forums/showthread.php?t=615847&page=23
-https://www.pro-touring.com/showthre...project-thread
10-21-2014 #175
Registered User
- Join Date
- Oct 2014
- Location
- So Cal
- Posts
- 43
Thanks, Nick I appreciate it! Originally Posted by Nicks67GTO
David S.
1969 Chevrolet Chevelle
406 SBC, 507hp
700R4 by Monster Transmissions
Hotchkis TVS Extreme
"Slowly building something fast..."
https://www.pro-touring.com/threads/...-1969-Chevelle
10-21-2014 #176
-Moderator/Sponsor-
- Join Date
- Apr 2001
- Location
- The City of Fountains
- Posts
- 16,117
http://www.chevelles.com/forums/showthread.php?t=334534 Originally Posted by HomeBuilt
Andrew1970 GTO Version 3.0
1967 Cougar build
GM High-Tech Performance feature
My YouTube Channel Please Subscribe!
Instagram @dr__efi
I deliver what EFI promises.
Remote Holley EFI tuning.
Please get in touch if I can be of service.
"You were the gun, your voice was the trigger, your bravery was the barrel, your eyes were the bullets." ~ Her
11-04-2014 #177
Registered User
- Join Date
- Feb 2005
- Location
- Waterloo, Ia
- Posts
- 1,408
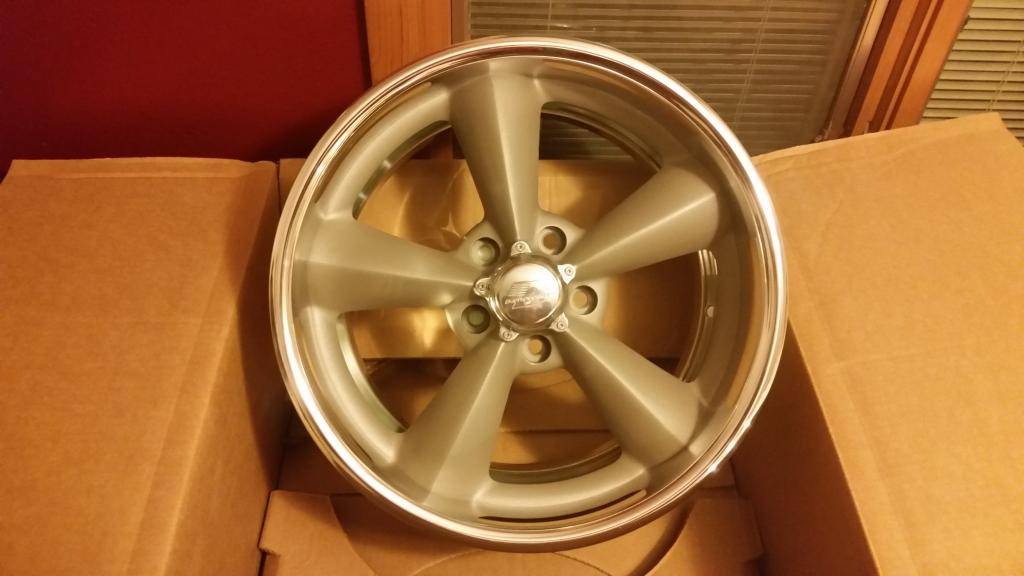
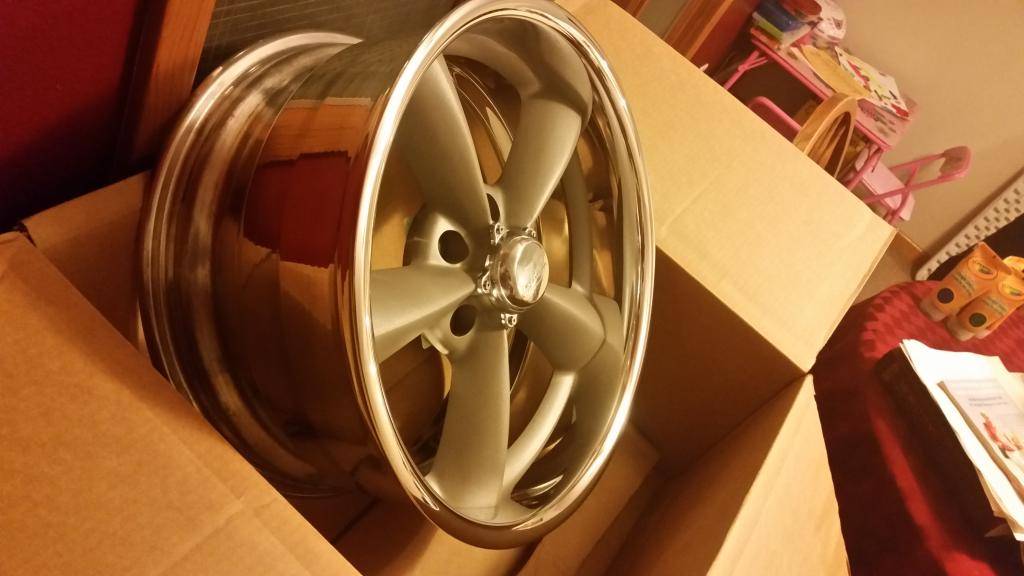
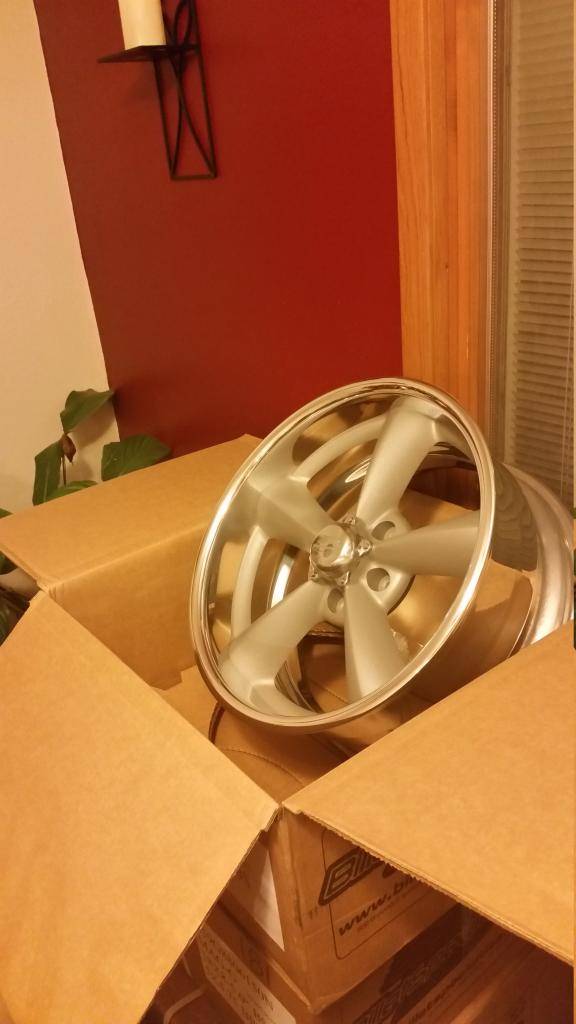
Look what the UPS guy left for me this afternoon! I might take Thursday and Friday off, do my brake project and get these mounted!
 -Nick
-Nick
-1967 GTO I drive and race
-Build threads:
-http://forums.maxperformanceinc.com/forums/showthread.php?t=615847&page=23
-https://www.pro-touring.com/showthre...project-thread
11-05-2014 #178 Registered User
- Join Date
- Apr 2009
- Location
- FRANCE
- Posts
- 683

Very nice !!
11-05-2014 #179
Registered User
- Join Date
- Apr 2007
- Location
- Austin, TX
- Posts
- 237
Nice!
11-12-2014 #180
Registered User
- Join Date
- Feb 2005
- Location
- Waterloo, Ia
- Posts
- 1,408
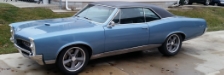
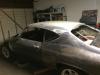
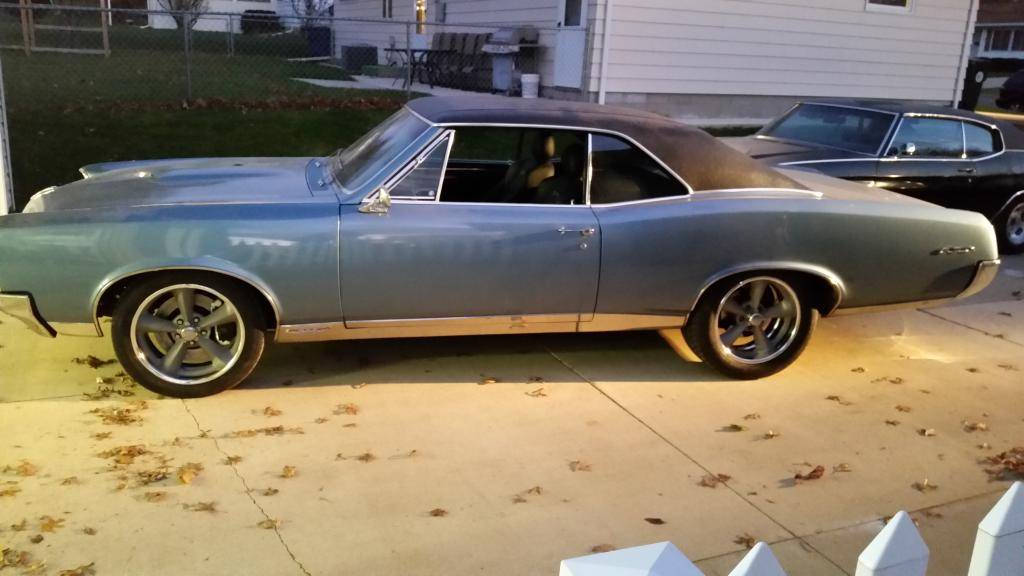
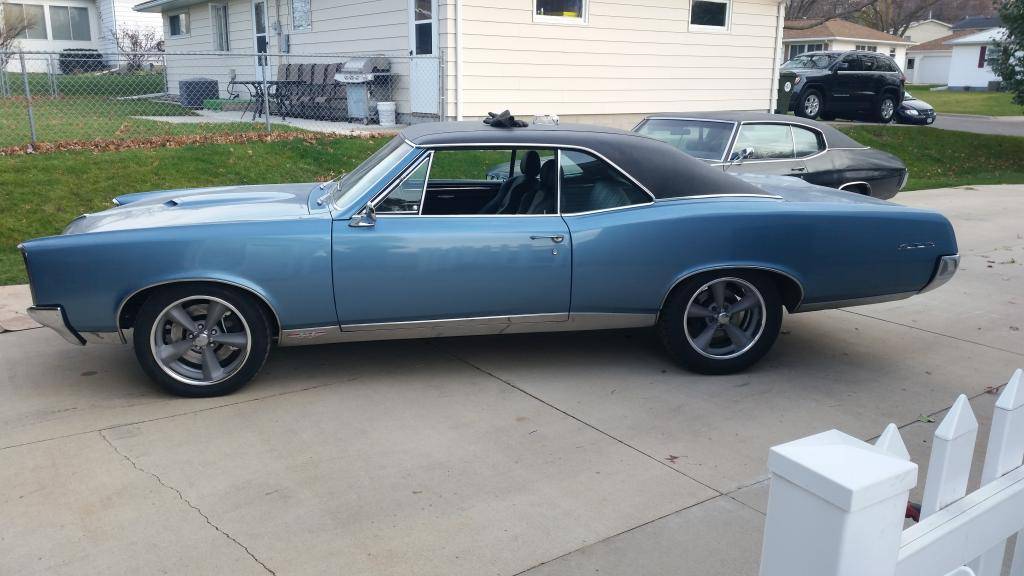
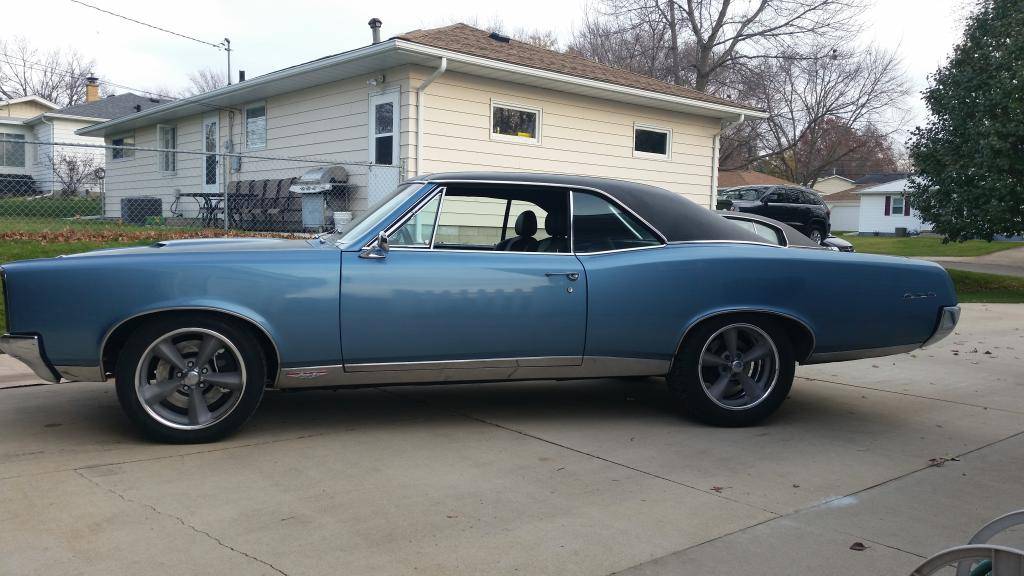
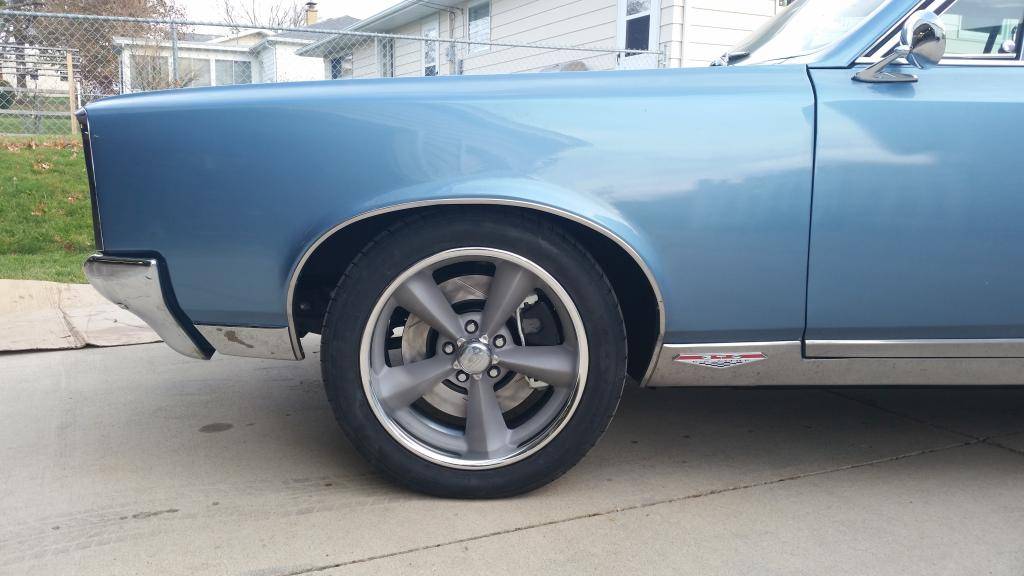
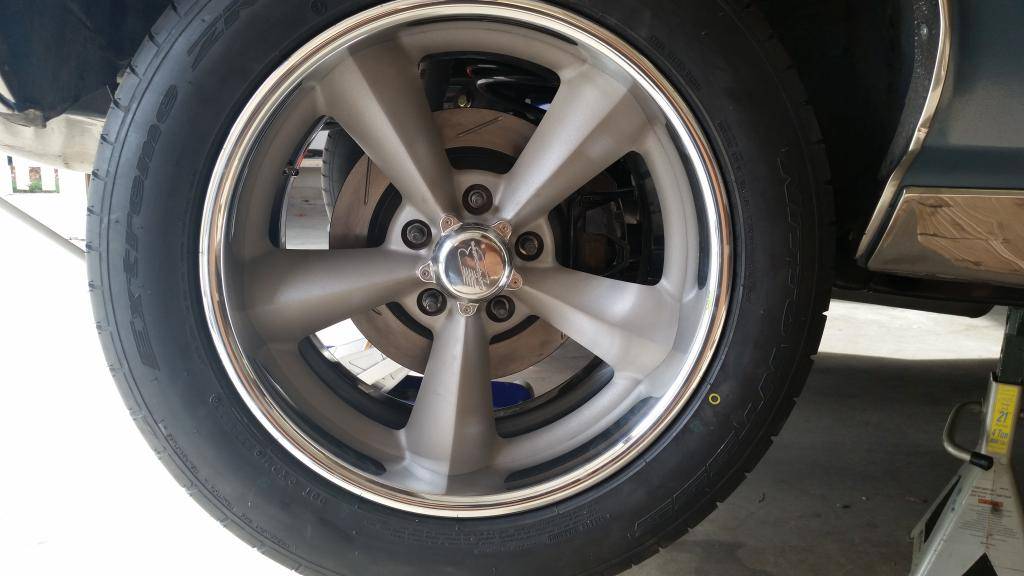
Well its time to post up some shots of the new brakes, wheels and tires. I'm still working on the master cylinder, booster and lines. I should get those done this weekend and ill update.
-Billet Specialty Mag G's
-Fronts are 18x8 with a 5" BS and a 245/45/18 Nitto555
-Rears are 18x9 with a 5.75" BS and 265/50/18 Nittto555
-Front brakes are Kore3 Z51 with Stoptech slotted rotors
-Rear brakes are 2002 Camaro with Stoptech slotted rotors
-Both ends have Hawk HPS pads
I ended up with a 1/4" spacer in the rear. I was torn between 5.5" BS and 5.75"....Well 5.75 worked but 5.5 would have been perfect. I wanted to error on the side of being able to push them out as opposed to having to trim the wells so that's where my decision was made. Fronts are spot on
This spring I might mess with ride height. I'm going to drive it as is for a bit and then lower the front 1" Its sitting a bit high I think....well here she is

 -Nick
-Nick
-1967 GTO I drive and race
-Build threads:
-http://forums.maxperformanceinc.com/forums/showthread.php?t=615847&page=23
-https://www.pro-touring.com/showthre...project-thread

 Reply With Quote


