

Results 121 to 140 of 376
Thread: 1967 GTO project thread
-
05-24-2014 #121
 Registered User
- Join Date
- Jun 2012
- Posts
- 427

i drive manual brakes daily on the street, c5 fronts, ls rears. i'm pretty sure i have a 1" disc disc master... the pedal is firmer than most cars but not so bad you can't get into it. I love it, if you like a firm pedal you'll like it. if you like the soggy pedals todays cars come with you'll hate it...
-
05-27-2014 #122 Registered User
- Join Date
- Feb 2005
- Location
- Waterloo, Ia
- Posts
- 1,408
A couple things.... Originally Posted by darbikrash

-You really need to start a build thread
-If you can figure out how to CNC up some rally 1's in 18" and reuse the stock centercap, for a reasonable price .....you might have a product on your hands that people would go bat**** for. I cannot count how many times ive seen guys looking for these.-Nick
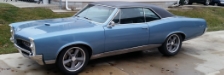
-1967 GTO I drive and race
-Build threads:
-http://forums.maxperformanceinc.com/forums/showthread.php?t=615847&page=23
-https://www.pro-touring.com/showthre...project-thread
05-31-2014 #123
Registered User
- Join Date
- Feb 2005
- Location
- Waterloo, Ia
- Posts
- 1,408
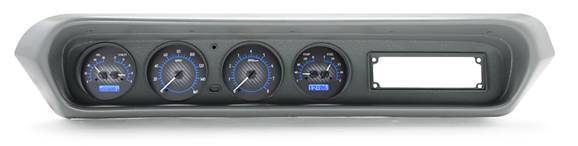
My gauge cluster is in serious need of repair. The speedometer needs fixed asap as it grinds and bounces. The clock doesn't work etc and its just a stock dash. I'm seriously considering this setup to stick behind a stock dash. It bolts in...what do you guys think? Would that look good behind a wood grain dash? Would I need to make a different insert to go over the woodgrain to make it look right?
The link is to the entire product line. I can get all different backing colors, gauge colors etc. It comes bolt in ready and hooks up to everything. The price seems stiff but im sure getting my stock stuff rebuilt or buying a rally setup wouldn't be cheap.
http://www.dakotadigital.com/index.c...rod/prd856.htm
 -Nick
-Nick
-1967 GTO I drive and race
-Build threads:
-http://forums.maxperformanceinc.com/forums/showthread.php?t=615847&page=23
-https://www.pro-touring.com/showthre...project-thread
05-31-2014 #124 Registered User
- Join Date
- Feb 2005
- Location
- Metro Detroit
- Posts
- 865
05-31-2014 #125 Registered User
- Join Date
- Oct 2010
- Location
- Rockaway. NJ
- Posts
- 211
Nick.....
I am also probably going with those Dakota Gauges..... I am going to go with the Black faces and white lettering....
The guys at UMI just installed them in the Green Machine MonteCarlo..... said it was super easy....Troy
67GTO
06-01-2014 #126
Registered User
- Join Date
- Feb 2005
- Location
- Waterloo, Ia
- Posts
- 1,408
If you find any pics of them installed on a GTO dash let me know. Are going to keep your woodgrain or try to stick something else to fill in the dash? Originally Posted by 67gtonut
-Nick
-1967 GTO I drive and race
-Build threads:
-http://forums.maxperformanceinc.com/forums/showthread.php?t=615847&page=23
-https://www.pro-touring.com/showthre...project-thread
06-01-2014 #127
Registered User
- Join Date
- Oct 2010
- Location
- Rockaway. NJ
- Posts
- 211
I am going to stick with the stock woodgrain dash..... I still like the vintage look of the interior....
I have scoured the 'net looking for a good photo in a GTO dash.... none to be foundTroy
67GTO
06-06-2014 #128
Registered User
- Join Date
- Feb 2005
- Location
- Waterloo, Ia
- Posts
- 1,408
Well in a complete turn of events I decided I have driven this car for too long without tunes.... but I haven't had time to work on it myself so for the first time ever...I paid someone to do something to my car. It felt weird. Anyhow I talked to a local audio shop and had them install some stuff for me. It turned out great and i'm really glad I let them do it.
I bought one of those eBay GTO glove box install kits. The install guy said it was awesome and he couldn't believe it was only $60 bucks. He said it saved him a bunch of time and literally fell in with no mods needed.

I went with Memphis audio 6-1/2" speakers inside of custom autosound kick panels in front. I went with 3 way Memphis audio 6x9's in the rear. The kick panels seem like really good quality. The only issue is that the ebrake pedal needed to be moved over quite a bit...yeah actually a lot
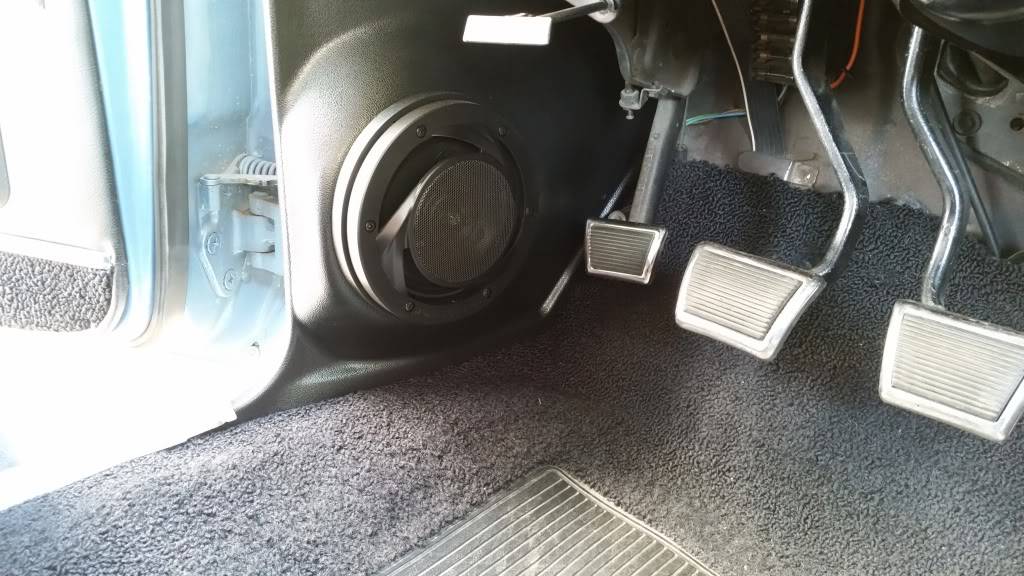
The install guy made a piece of wood that sits on top of the stock shelf just like the package tray but thicker. It aparently is carved out on the back to fit the coutour of the speakers below. The 6x9's are mounted underneath. He insisted he wanted it to have a stock type of appearance with no speakers poking through. I could tell he hated that look so I let him just do his thing. This was his solution and I think it turned out great...
 -Nick
-Nick
-1967 GTO I drive and race
-Build threads:
-http://forums.maxperformanceinc.com/forums/showthread.php?t=615847&page=23
-https://www.pro-touring.com/showthre...project-thread
06-06-2014 #129
Registered User
- Join Date
- Feb 2005
- Location
- Waterloo, Ia
- Posts
- 1,408
I might come back later and add an amp and a sub after I dynamat the whole thing but for now its just nice to have some music!!
-Nick
-1967 GTO I drive and race
-Build threads:
-http://forums.maxperformanceinc.com/forums/showthread.php?t=615847&page=23
-https://www.pro-touring.com/showthre...project-thread
06-18-2014 #130 Registered User
- Join Date
- Oct 2010
- Location
- Vancouver B.C Canada
- Posts
- 175
 Hi Nick- sent you a PM, would like the lowdown on this master cal set up. Originally Posted by Nicks67GTO
72 firebird , SD performance 464" 455,KRE D ports, EZ EFI,Dougs 1 3/4,3.5" custom oval exhaust,TKO600,Kore 3 C5/C6,DSE subframes,Full cage by Radical Rides(Thanks Dave,Johnny,Campbell,Bill,Lee and Gabby!!)
Hi Nick- sent you a PM, would like the lowdown on this master cal set up. Originally Posted by Nicks67GTO
72 firebird , SD performance 464" 455,KRE D ports, EZ EFI,Dougs 1 3/4,3.5" custom oval exhaust,TKO600,Kore 3 C5/C6,DSE subframes,Full cage by Radical Rides(Thanks Dave,Johnny,Campbell,Bill,Lee and Gabby!!)
06-19-2014 #131
Registered User
- Join Date
- Oct 2010
- Location
- Vancouver B.C Canada
- Posts
- 175
Originally Posted by SD455
Thanks for the info Nick- I think I will take you up on the stock A arms, sent you a PM.72 firebird , SD performance 464" 455,KRE D ports, EZ EFI,Dougs 1 3/4,3.5" custom oval exhaust,TKO600,Kore 3 C5/C6,DSE subframes,Full cage by Radical Rides(Thanks Dave,Johnny,Campbell,Bill,Lee and Gabby!!)
06-20-2014 #132
Registered User
- Join Date
- Feb 2005
- Location
- Waterloo, Ia
- Posts
- 1,408
No problem. Always happy to help! Originally Posted by SD455
-Nick
-1967 GTO I drive and race
-Build threads:
-http://forums.maxperformanceinc.com/forums/showthread.php?t=615847&page=23
-https://www.pro-touring.com/showthre...project-thread
06-20-2014 #133
Registered User
- Join Date
- Jul 2013
- Location
- ATL Metro
- Posts
- 8
I second (or third) the comment about Pontiac A-body's needing a lil rake to look right. Hell, even my mom said that the '66 I'm building for my dad better have it, haha!
Subscribed, BTW. The car looks awesome!- Peter -- 66 Le Mans - 93 LX 5.0 --
06-26-2014 #134 Registered User
- Join Date
- Jun 2005
- Location
- Manassas, VA
- Posts
- 124
Subscribed...
Keep up the good work Nick, you're an inspiration for all!
.HWYSTR455 on PY
1971 Lemans Sport 461 bottle fed daily driver
1971 Trans Am 474 blown EFI pro tour car
1972 442 W-30 clone
08-30-2014 #135
Registered User
- Join Date
- Feb 2005
- Location
- Waterloo, Ia
- Posts
- 1,408
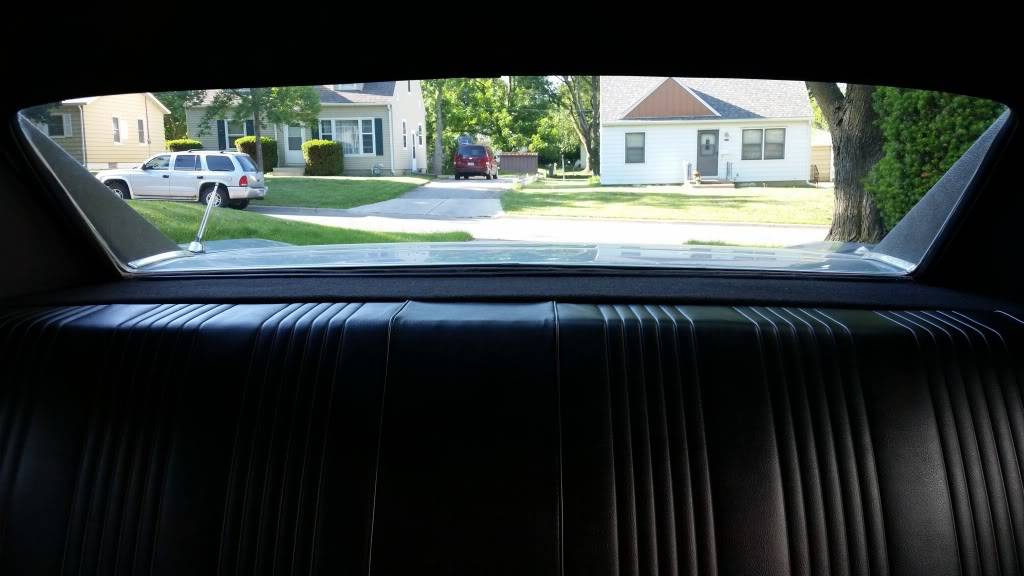
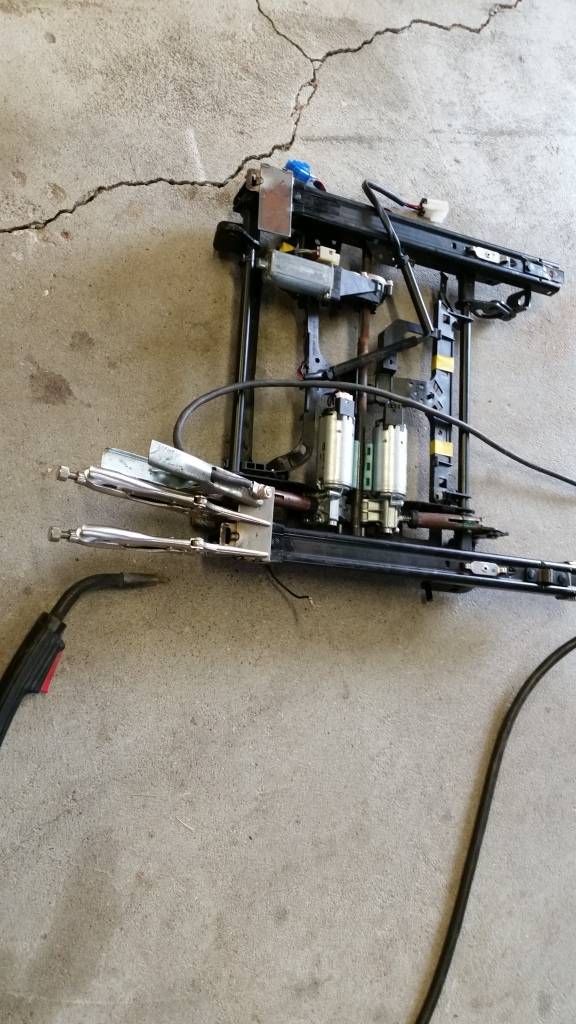
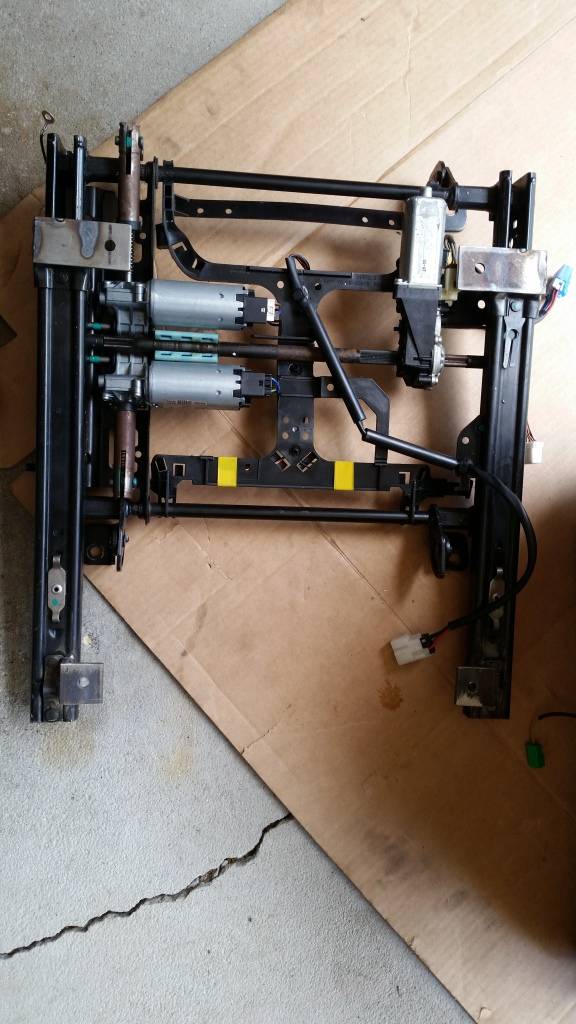
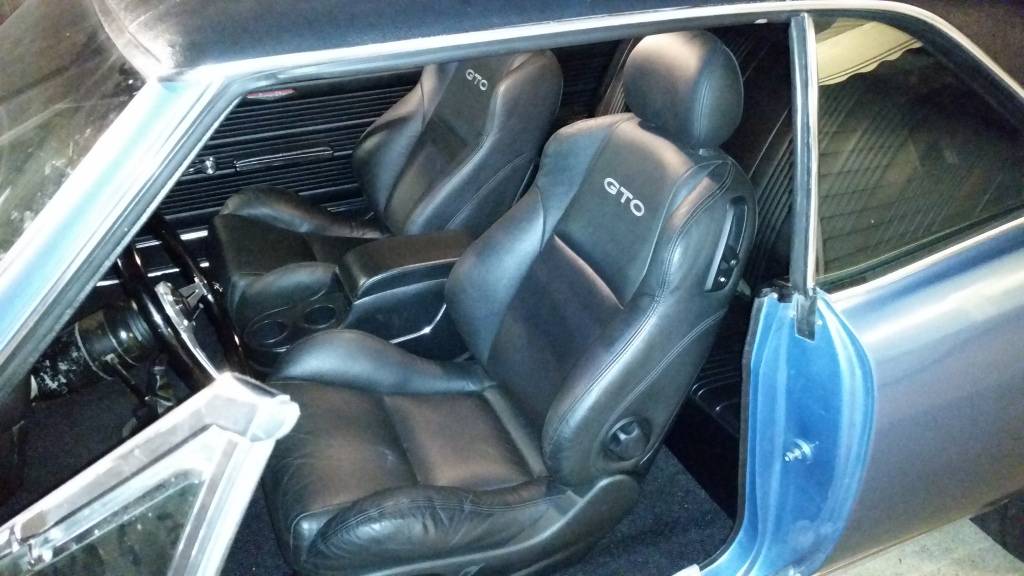
I got some 06' GTO seats from my buddy Bob {old66tiger} I installed them in the old girl today. I'm extremely happy I did this. My maiden voyage with them was fantastic. I'm honestly pissed at myself that I spent a boat load of $ trying to restore the stock seats with the Legendary Rallye setup at this point. I'm trying to decide if i'm going to sell them. I might let someone else have them at a good price instead of storing them for the next 40 years....
Anyhow the 06' GTO seats are awesome. They sit great, have 8 way power mobility and are about the same weight as stock seats based on the lower back-o-meter. Iv'e heard these sit up too high. That's why I was hesitant in the first place. Anyone that says they "sit up too high" must have been 6'9" and had stock buckets with broken springs in the lower seat before. I'm 6'1" + a touch and I sit in them great. They go back far enough that I can't reach the pedals and leave me with a solid 2" above my head which was better than anything I had before. I would say they are a touch lower than my newly stuffed stockers.
I did however reuse my 3" seat relocation brackets I made for the stock buckets. I figured it would allow me to run the seats forward to fit me correctly and hide the bracketry I made. I used a couple pieces of 1/8" x 1.5" wide x 3.25" long steel for the front. I used 3/16" x 1.5" angle iron for the rears. I shaved the rear angle iron down to 1" so it would clear the floor and give max headroom. Then its 12v on the red wire and a ground on the black. The install is pretty easy and straight forward. I'm going to make a thread detailing what is needed to get it done on PY and ill link it here is anyone is interested. If you have tools and and know what to do it's probably like a 4-5 hour job.
Well here's a few pics from the day....

 -Nick
-Nick
-1967 GTO I drive and race
-Build threads:
-http://forums.maxperformanceinc.com/forums/showthread.php?t=615847&page=23
-https://www.pro-touring.com/showthre...project-thread
09-02-2014 #136 Registered User
- Join Date
- Apr 2007
- Location
- Austin, TX
- Posts
- 237
 I bet those seats are way more comfortable too, haha Originally Posted by Nicks67GTO
you should get some custom upholstery to match the original interior. Im going to do that with my 68 Bird, I got some 02 Trans Am seats that Im going to get somebody to redo with comfortweave so somebody who doesnt know what they are looking at will never know. haha
09-02-2014 #137
Registered User
- Join Date
- Jul 2013
- Location
- St Louis
- Posts
- 213
I installed 04 GTO seats in my 72 and used the factory 72 brackets. I lost a few perks of the seat but it still has power recline. I've seen them installed way to often sitting to high and didn't want that. I also had them recovered to match 72 factory style. LOL not many people even notice, Its pretty funny. It would be nice to have all the seat perks and still sit at the correct height but I think that would require altering the floor pan. Love your build and thanks for keeping it Pontiac powered!!
Pontiac Powered 72 GTO
09-02-2014 #138 Registered User
- Join Date
- Mar 2007
- Location
- Mission Viejo, CA
- Posts
- 631
Outstanding work. I read through the entire build. Great information especially on the brake parts. Great project.
1973 Hurst Edition Pontiac Grand Am: 430 CI of ERL built LS7, Tremec Magnum T-56 6-speed, Global West / Speedtech Suspension, Custom rear coil-over suspension, QA1 double adjustable shocks, Wilwood 6/4 piston disc brakes, Modulare C1 19" concave wheels. Shooting for 625 HP and 20 MPG!
09-02-2014 #139
Registered User
- Join Date
- Mar 2008
- Location
- Wichita, KS
- Posts
- 375
go for the Dakota digital gauges! but dont put in any of that terrible wood grain, if anything add in some of the fake carbon fiber decal stuff
67 GTO, LS2, T56
WILWOOD, FORGELINE, RIDETECH
09-03-2014 #140
Registered User
- Join Date
- Feb 2005
- Location
- Waterloo, Ia
- Posts
- 1,408
I cannot comment on how they would fit in a 2nd gen A body, but in my 67' with my 3" relocation brackets and 1" rear angle iron mount the seats clear the floor, I retained all the power functions and I actually sit in them lower than the stock stuffed legendary rallye seats I had. Head room isnt an issue for me and i'm a real 6'1"-6'2", barefoot. Originally Posted by Gratefuldiver
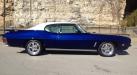
On another note....those seats really look like they belong in there after the recover. I might have to consider that. Nice work!-Nick
-1967 GTO I drive and race
-Build threads:
-http://forums.maxperformanceinc.com/forums/showthread.php?t=615847&page=23
-https://www.pro-touring.com/showthre...project-thread

 Reply With Quote


