


Results 261 to 280 of 587
-
10-23-2010 #261

 Registered User
- Join Date
- Dec 2007
- Location
- Carlsbad, Ca
- Posts
- 1,213
 my brain is small and i try to cram too much info in. in order to make room for new, old must go. so, i dont know exactally how much i notched it, but i can tell you that the axle was almost sitting on the frame before i started. i would guess it went up 2". i started by welding a 3/16" plate to the inside of the frame rail with the correct height and notch built in. i then welded a 3/16" piece to the outboard top side of the rail that matched the same contour. i would have gone to the outside again, but it would take up some needed tire space. i welded on a piece to the top to form the new top of the rail, then i cut the notch from the old bottom of the frame and welded on another filler piece. if you look at some of the side profile pics, there is a line that runs down the side of the frame. this is the old top of the frame.Hey Tim...
I'm just now getting into the measuring and such for the final ride height of my build plan. The "C" notch you did; any elaboration on that? It's the shape that caught my eye, so I am wondering what you did to get the clearance.
By the way, I'm with you on learning to do and doing everything possible in our own garage. My favorite thread for sure!
but, and its a big but, in order to realize the benefits of the frame notch, there needs to be a notch for the pinion yoke, the trunk floor has to go up above the diff and you will need some new tubs unless you run a skinny tire. a crap load of work for the lowered ride height.
let me know if you have any more questions.Tim
The WidowMaker: Garage Built 70 Chevelle
Special Thanks To: Rushforth Wheels, MuscleRodz, Kore3 & SC&C
Build Thread Link
-
10-23-2010 #262
Registered User
- Join Date
- Dec 2007
- Location
- Carlsbad, Ca
- Posts
- 1,213
more specs ive lost. lol. lets see, i started with roughy a 1.5"x 4"x8" chunk of aluminum. i cut it to two equal pieces and bored a 1 3/4" hole in both for the delrin and two 7/16" hole for the cap heads. the 7/16" holes were counter sunk to hide the heads. the delrin started off as a 2" bar. i actually made up a little jig and used my wood router and table to turn down the delrin to 1 3/4". since the router wasnt perfect, i chucked them up in the drill press and as it spun i used 500 grit to finish them. the cutting and sanding left a 1/8" shoulder that seats up against the aluminum. i then had to bore a 1.5" hole through the center for the bar.I am interested in how you made those pillow blocks and delrin bushings, I plan on doing a simular setup with cheap used nascar parts and some good old fabrication. Your frame is very impresive , I went the tubular backhalf route with a overkill rollcage but yours is much more practical.
now that i have a lathe, these will most likely get recut. i plan to put some grease groves in them and add zerks to the aluminum.
most pros would laugh at my methods, but i have to work with what i have.Tim
The WidowMaker: Garage Built 70 Chevelle
Special Thanks To: Rushforth Wheels, MuscleRodz, Kore3 & SC&C
Build Thread Link
-
10-24-2010 #263
Registered User
- Join Date
- Dec 2007
- Location
- Carlsbad, Ca
- Posts
- 1,213
i have the same brand, but two different clamps. i bought them from columbia river along with a bunch of other 304 stuff. the first set i got were all 304 including the bolts. i snapped two bolts about a month apart even with antiseize and without any torque (i would squeeze the clamp with my hand to snug them up and then hand tighten the nuts). the second replacement came with a mild steel bolt of a smaller diameter. i plan to get another smaller bolt one from them to match. they were really good about sending them out, and never asked for me to send mine back.thanks for the pics. I'm using Vbands as well but I got two different brands and one brand wont seal. are you happy with yours? if so which brand are they?Tim
The WidowMaker: Garage Built 70 Chevelle
Special Thanks To: Rushforth Wheels, MuscleRodz, Kore3 & SC&C
Build Thread Link
-
10-29-2010 #264
Registered User
- Join Date
- Dec 2007
- Location
- Carlsbad, Ca
- Posts
- 1,213
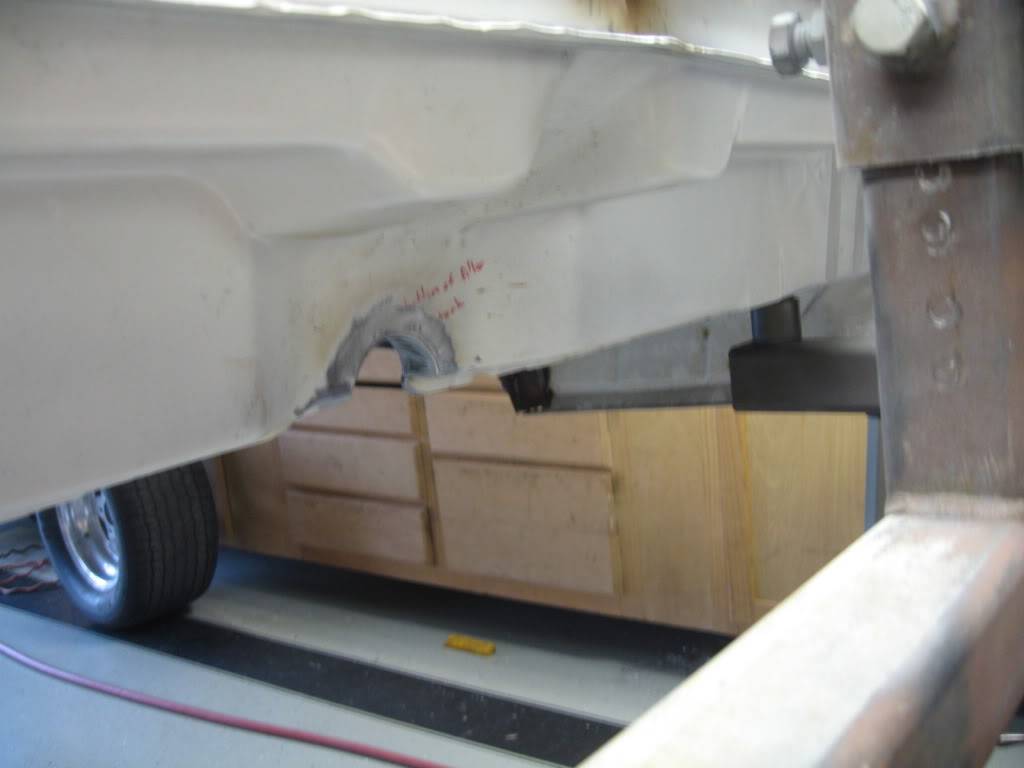
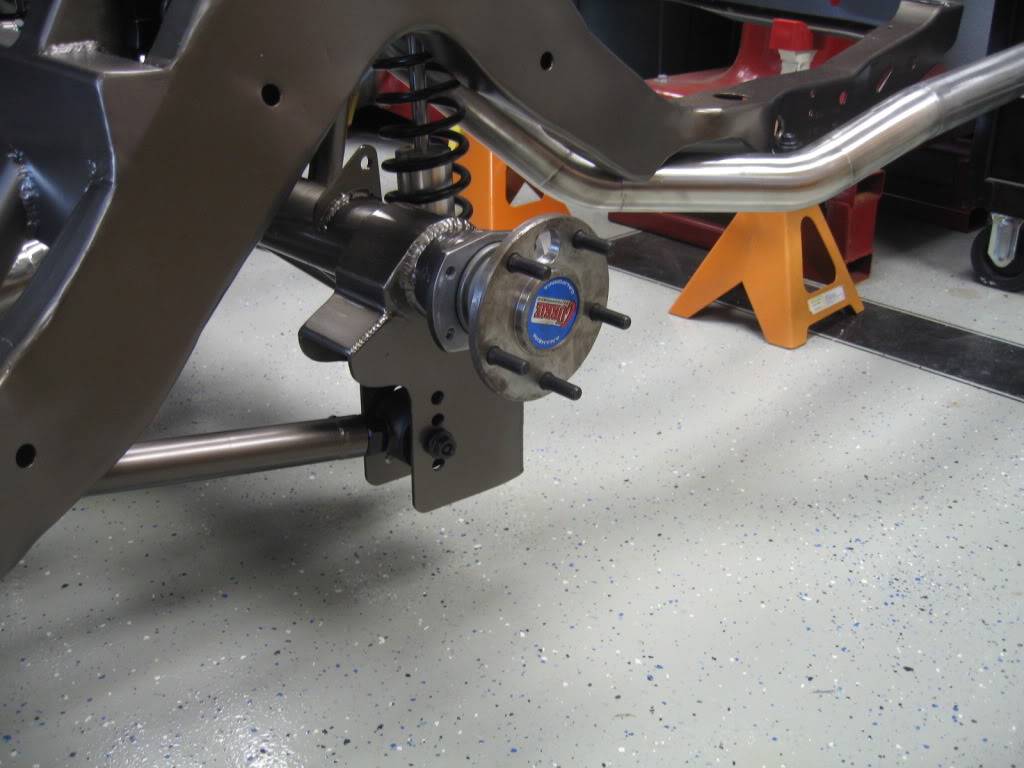
heres a small update. i sent the rear brake brackets back to Tobin at kore3 and he is taking care of the machining. i also took the axles back to currie to have the holes drilled for access to the flange and they were less than happy with me. they ended up having to install new bearings, and it appears that all of the studs are new as well. they had to chuck them up in the cnc machine and that required removing all of that stuff. my position was that i had told them what brakes i was running, the offset, the housing length, the bolt pattern, the stud size, the register dia, the bearing i wanted etc., all because i was prompted with " what do you need for......". they didnt do that for the access hole, and since i dont buy axles everyday and they sell axles everyday, i figured that they knew what i needed by what i had told them. they took care of me though, so ive got two of the issues for the rear solved. the last should just be a spacer and wont take too much time.
i also finished some work on the firewall and cowl. i welded up all of the seams and ground down what i could. its still going to take a TON of work to get it nice and smooth, but its closer. i also ground down the plug welds from the quarter installation and welded in a notch for the filler neck of the raised tank.
i plan one more day cleaning up some welds and stuff on the bottom, then it will get dropped back on next week.
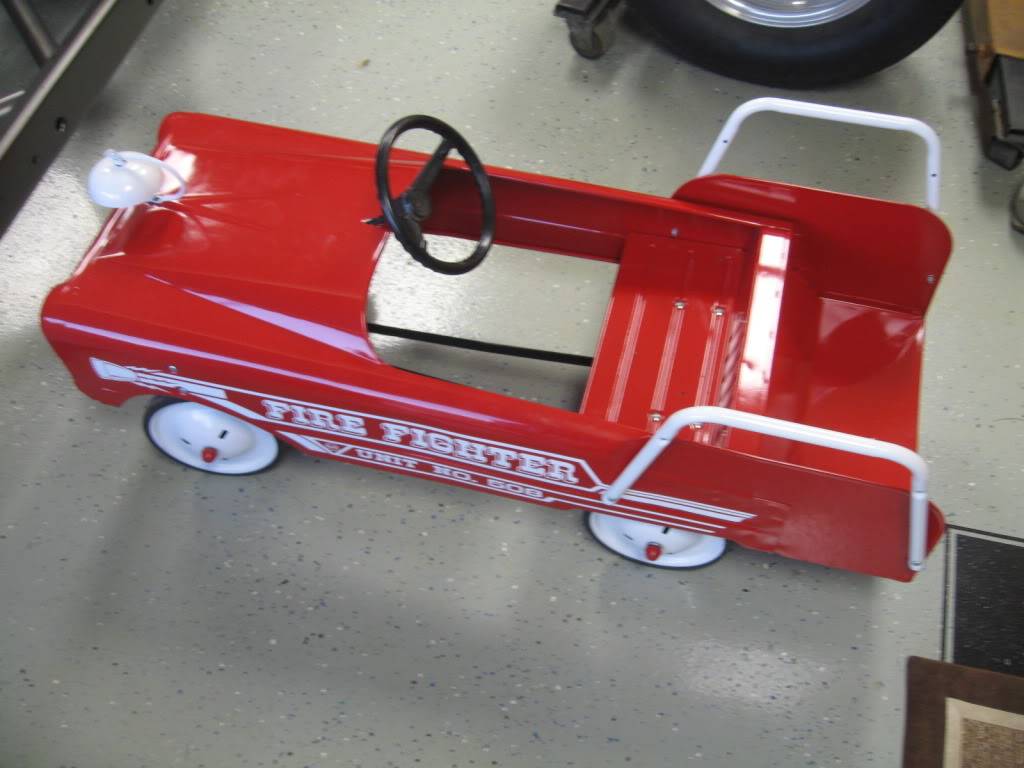
here are some pics. i threw in one of a recent project for my sons 3rd birthday. its a late '70's AMF model 508 fire engine that i had when i was a kid. i guess i crashed it a few times because it was in pretty bad shape. there are still a bunch of dents i left in it, but i'll call that character. i did fill the hood and smoothed it out a bunch. a lot of time, and this is 1/100th of the chevelle. another reason somebody else is going to do it.
 Tim
The WidowMaker: Garage Built 70 Chevelle
Special Thanks To: Rushforth Wheels, MuscleRodz, Kore3 & SC&C
Build Thread Link
-
10-29-2010 #265
 Registered User
- Join Date
- Sep 2005
- Location
- Nor Cal
- Posts
- 2,196
Dude that Fire Fighter is tight!
1968 Camaro widebody project
2004 Mustang LS2
1964 Continental
2014 Keezer
-
11-03-2010 #266
Registered User
- Join Date
- Oct 2010
- Location
- Collinsville, Ok
- Posts
- 44
I would love to paint the car for you...willing to fly out and meet with you and see if we click.
-
11-04-2010 #267
Registered User
- Join Date
- Dec 2007
- Location
- Carlsbad, Ca
- Posts
- 1,213
i'd love to have you paint the car, but its still a long ways off. i'll pm you for a number when i get closer. btw, good to see another chevelle on the forums. good luck with your project.I would love to paint the car for you...willing to fly out and meet with you and see if we click.Tim
The WidowMaker: Garage Built 70 Chevelle
Special Thanks To: Rushforth Wheels, MuscleRodz, Kore3 & SC&C
Build Thread Link
-
11-04-2010 #268
Registered User
- Join Date
- Dec 2007
- Location
- Carlsbad, Ca
- Posts
- 1,213
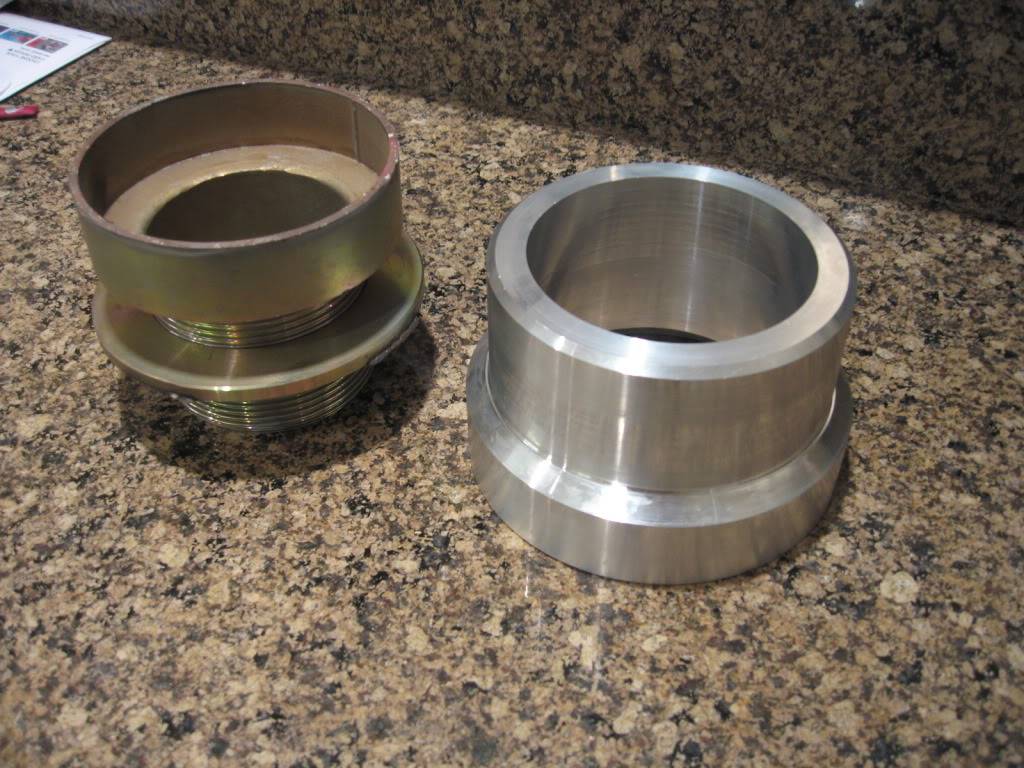
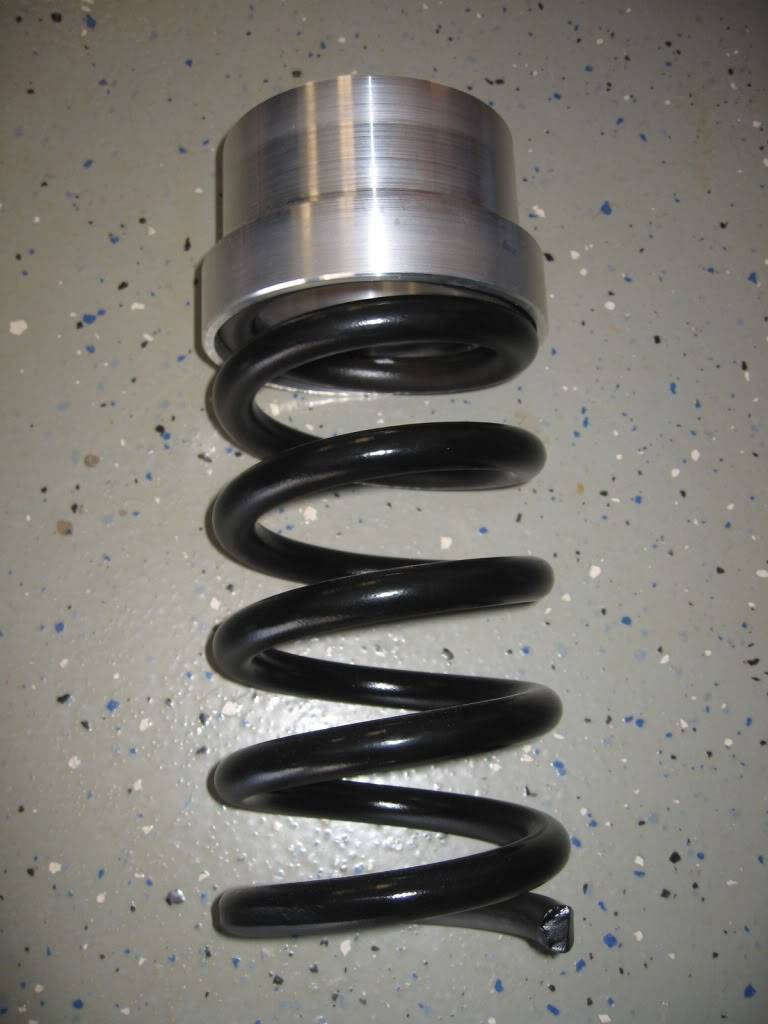
so after spending some time and money on the lathe to get the tolerances a little better and to get something to cut with, i finally got the spring spacers cut. i had been using the hss stuff that came with the lathe, but it doesnt compare to the tool holder and carbide indexable inserts. i spent about $70 bucks for a boring bar, another insert holder and 5 ccmt inserts. money well spent.
so, a little background for those that arent aware of the problem. it is becoming more common for chevelle guys to run a short spring and an adjustable spacer on the front of their cars. all is great, except that the tolerances are tight between the spacer and the shock that has to go through the spacers hole. it gets even tighter when guys run shocks that have a larger diameter, ie. my varishocks. so, the solution is to run a spacer that captures the spring on the od, not the id like the current one. i have to give some credit to bochnak on the chevelle forum for the idea, but we have found through pms that our spacers are completely different lengths. i have a feeling that our different lower control arms are to blame.
the initial idea was to make the spacers the same length as the current ones that are mocked up. i know that i still dont have all the weight on the car so its going to sit a little lower, but my tires are 1" taller which will raise the front 1/2". i ended up making these 1/4" taller than my others which should raise the front another 3/8". the lathe isnt going away, so i will fine tune when the time comes. i also plan to make a few thin spacers that will go under the urethane spring isolator on the lca. the global west arms have a really deep bucket, so i can get a bunch of extra height if needed. i have a feeling that my extra 1/4 will come off in the end.
here are a few pics.
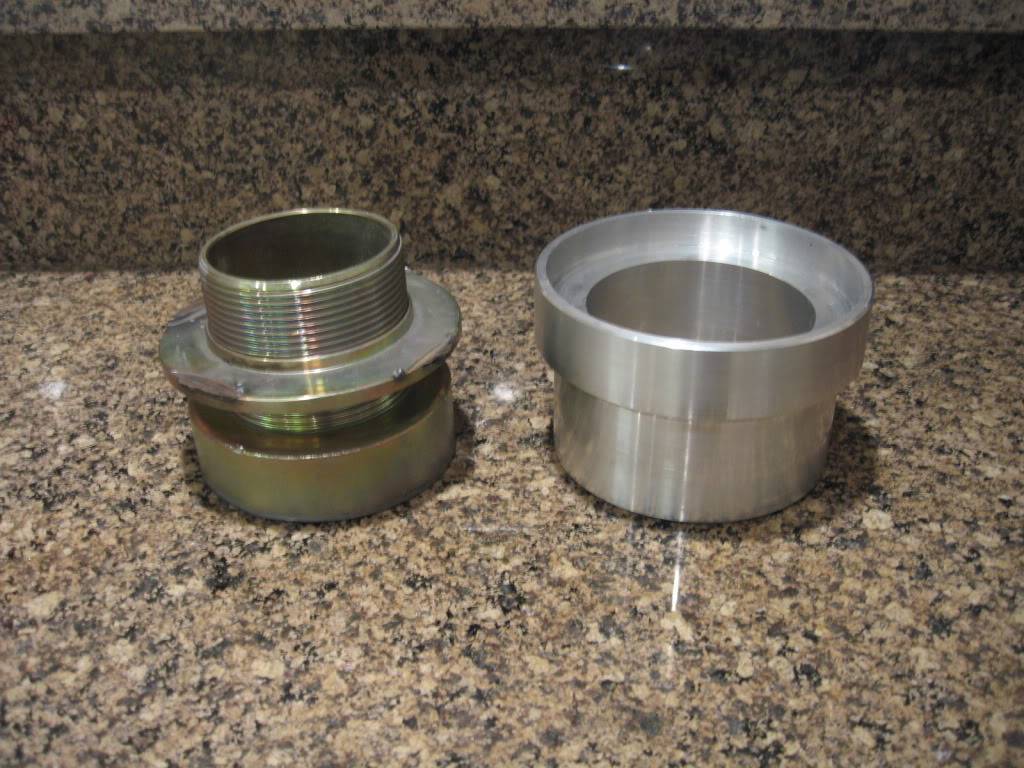
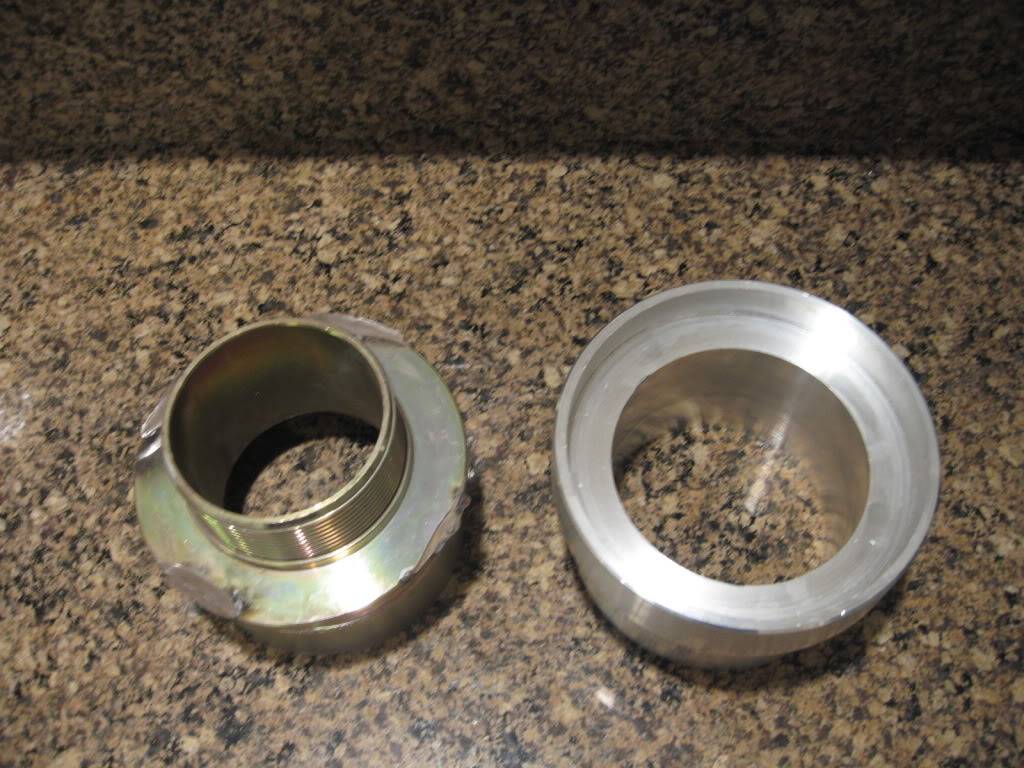 Tim
The WidowMaker: Garage Built 70 Chevelle
Special Thanks To: Rushforth Wheels, MuscleRodz, Kore3 & SC&C
Build Thread Link
-
11-07-2010 #269
Registered User
- Join Date
- Dec 2007
- Location
- Carlsbad, Ca
- Posts
- 1,213
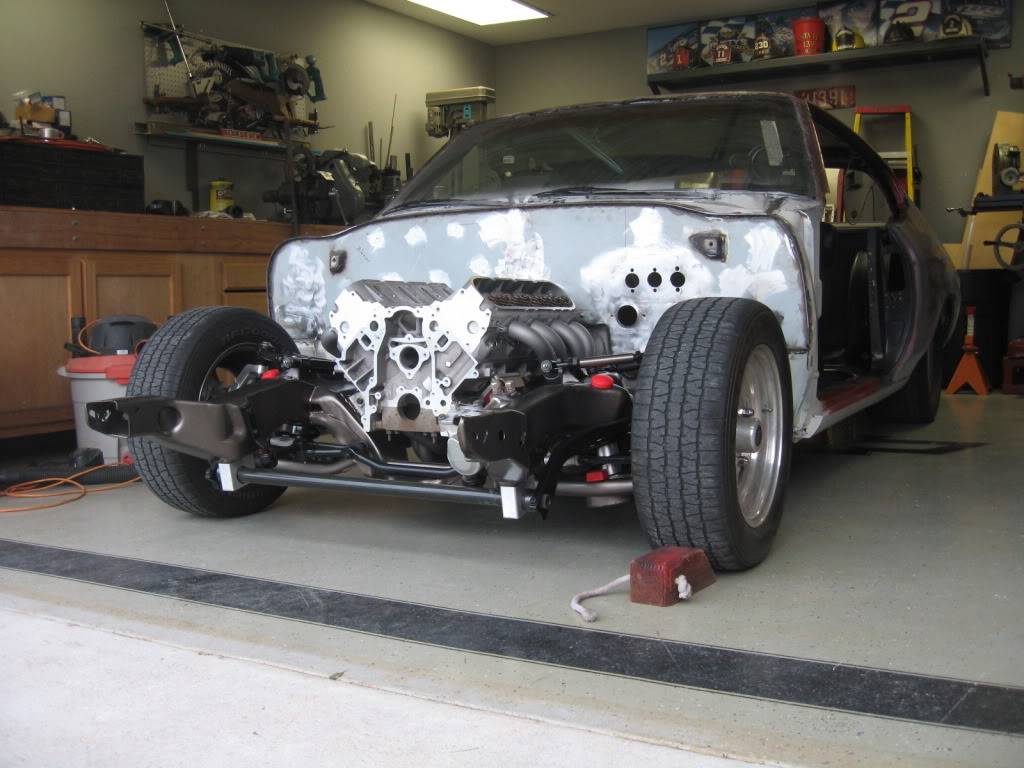
the body went back on the frame today. i plan to get the rear bumper finished and the rear side markers done in the next couple weeks. you can see how much the rear was narrowed with the old wheels on. and thats with them flipped around for more backspace. more to come.....
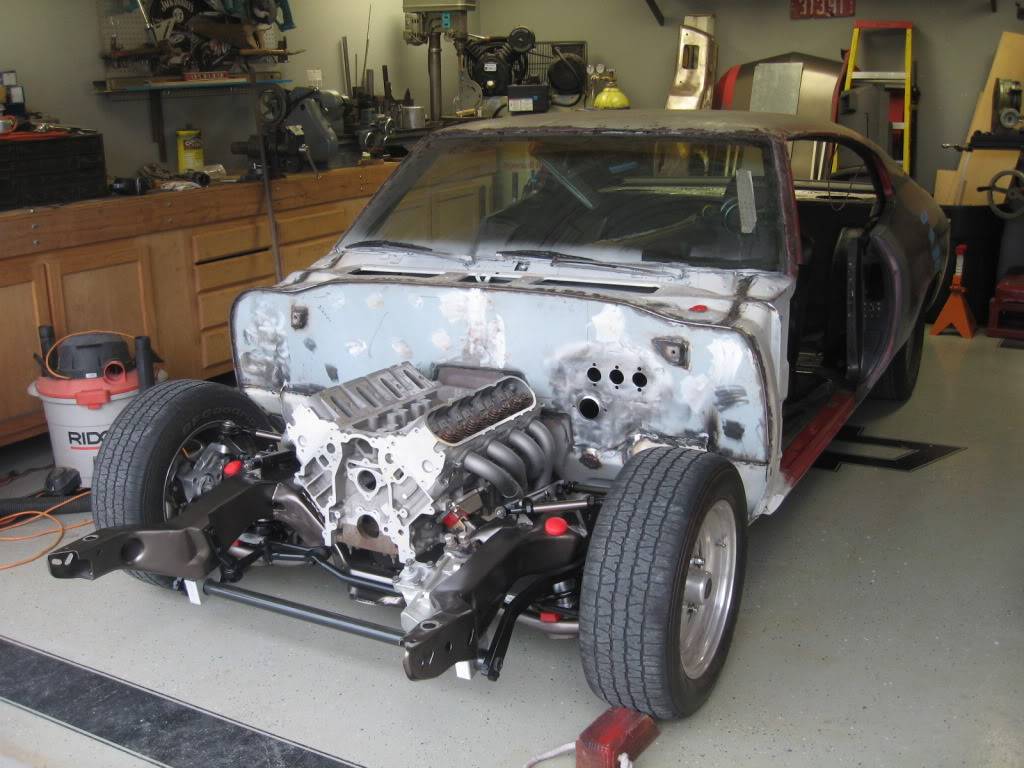
 Tim
The WidowMaker: Garage Built 70 Chevelle
Special Thanks To: Rushforth Wheels, MuscleRodz, Kore3 & SC&C
Build Thread Link
-
11-07-2010 #270
Registered User
- Join Date
- Aug 2007
- Location
- Albemarle, NC
- Posts
- 1,171
that is just so cool. i love the stance, and cant even see the full effect yet!
Michael Crawford
1970 plymouth Duster back under construction:
https://www.pro-touring.com/showthre...uring-makeover
1987 GMC S15 https://www.pro-touring.com/showthre...ct-drivabeater
-
11-08-2010 #271
Registered User
- Join Date
- Jan 2010
- Location
- Tampa, FL USA
- Posts
- 48
I tip my hat to you man! This is going to be one amazing ride when you finish it. I just wish that I had the skills to do my own ride in the same fashion. I know it would save me so much money here in Tampa, FL! Again, Impressive work!
James
-
11-19-2010 #272
Registered User
- Join Date
- Dec 2007
- Location
- Carlsbad, Ca
- Posts
- 1,213
youre not kidding. i dont even want to imagine how much all this stuff would have cost. i know its not as good as a pro could do, but the price is right and im learning. the learning and problem solving are my favorite parts of this entire project.I know it would save me so much money here in Tampa, FL!Tim
The WidowMaker: Garage Built 70 Chevelle
Special Thanks To: Rushforth Wheels, MuscleRodz, Kore3 & SC&C
Build Thread Link
-
11-19-2010 #273
Registered User
- Join Date
- Dec 2007
- Location
- Carlsbad, Ca
- Posts
- 1,213
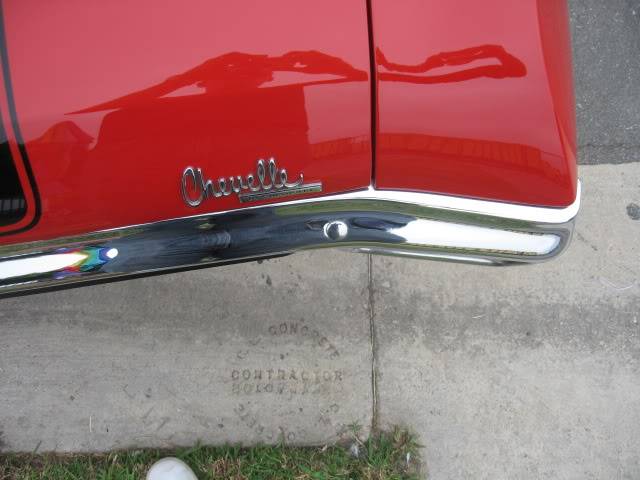
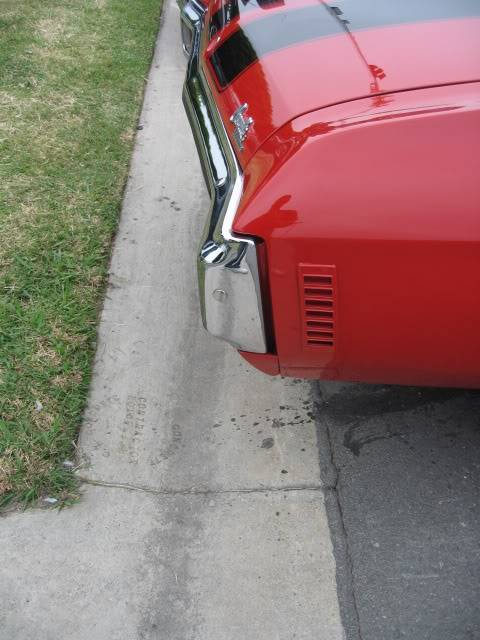
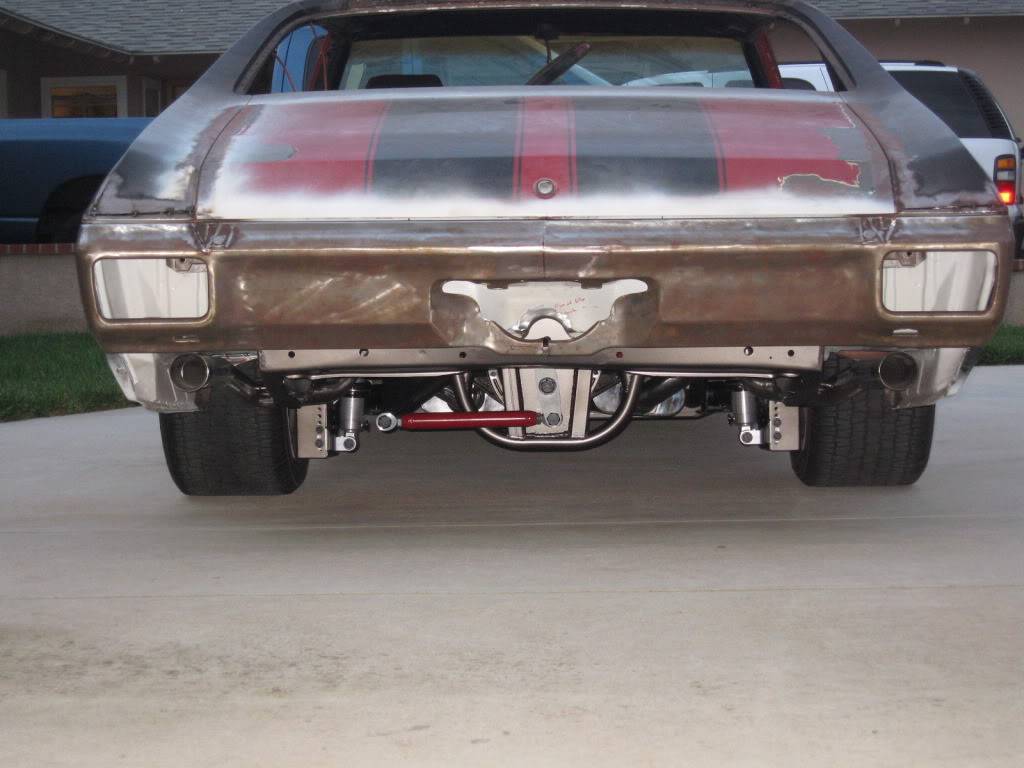
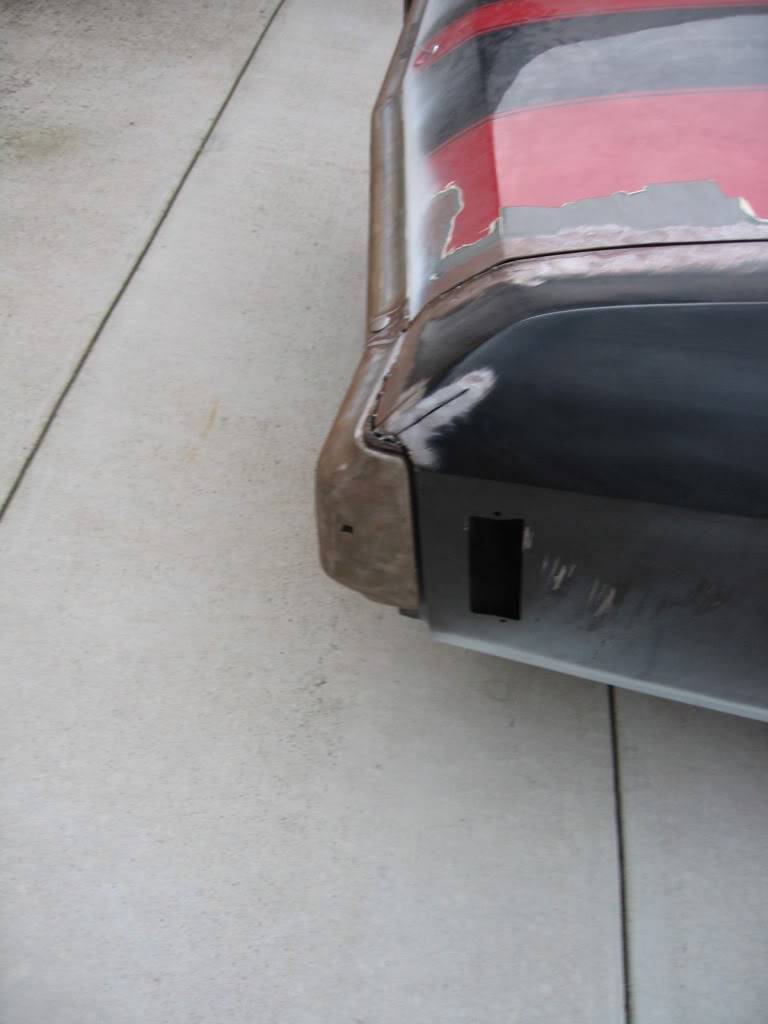
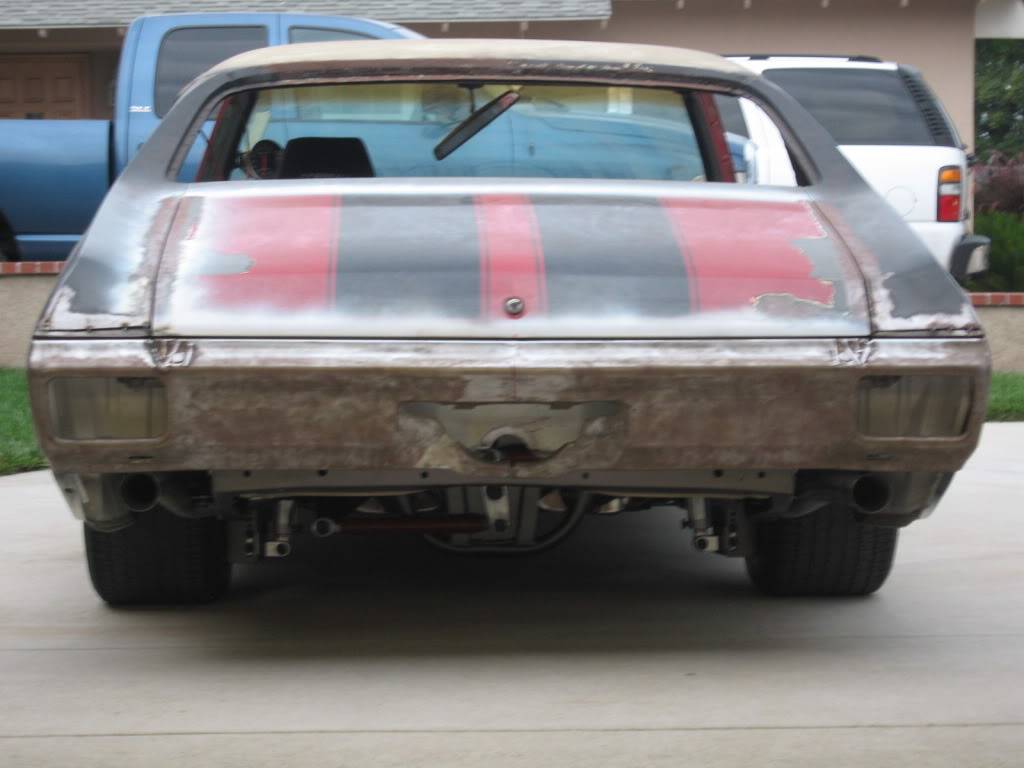
ive been busy between work, family and the promotional classes that ive been taking. but, i got a little more work done on the bumper. i didnt take a whole bunch of good pics before i started, but i did dig up some that i shot last year at a car show. it really shows how much ive been able to suck it up.
i still need to finish working the sides a little more. if you notice in the first pic of the car at the show, the bumper never followed the quarter in stock form. although i got them much closer, there was no way to make this perfect without a huge amount of work to the bumper, and if i want to get it rechromed it may have been too much. but with the bumper not following the quarter perfectly, it gives the illusion of the gap being off when viewed at certain angles. this is bugging the CRAP out of me. i also started with 1/4" gaps, but decided to close them all up to about 3/16". if you look at the side pic you can see how much black hides gaps. i have since shot the quarter white in that area, and the although the gap looks large, its only 3/16.
the last part will be getting the bottom filler piece fit and making a new "bumper pad". the stock one is rubber, but i plan to do something out of aluminum.
here are some pics of the bumper today and the one i shot at the show.
 Tim
The WidowMaker: Garage Built 70 Chevelle
Special Thanks To: Rushforth Wheels, MuscleRodz, Kore3 & SC&C
Build Thread Link
-
11-20-2010 #274
Registered User
- Join Date
- Jun 2005
- Posts
- 79
Looks Great!
Are you planning on smoothing the bolts?
-
11-20-2010 #275
 Registered User
- Join Date
- Dec 2005
- Location
- Birmingham, AL
- Posts
- 3,355
What finish are you going with on the bumper? I think a satin or brushed look would work well with your wheels. Originally Posted by Rob68427

Stephen
-
11-20-2010 #276 Registered User
- Join Date
- Dec 2006
- Location
- SF Bay Area
- Posts
- 463
Great project, love your work.
I see you added an extension to the rear fenders to close the gap, but I don't see an extension on the trunklid. Was the gap from trunklid to bumper different than the gap from fender to bumper? Or were you able to lower the trunklid mounting somehow?chunger
'68 Ranchero 500
'70 Cougar XR-7 Convertible
'98 Mustang GT Convertible
11-20-2010 #277
Registered User
- Join Date
- Dec 2006
- Location
- SF Bay Area
- Posts
- 463
Brushed satin or nickel finish looks awesome, but is a TON of work to maintain. I've looked into it and spoken with several chrome shops, some won't do it, 'cause they know people won't maintain them. Essentially what they do, is the stop at the 2md step of the chroming process. Usually there are 3 stages, copper, nickel and then chrome. You can think of chrome as a clear-ish coating over highly polished nickel. For the satin or nickel look, they don't polish the metal and leave it as is. Problem is, the nickel coating is very susceptible to staining of discoloration from any moisture, such as water, rain, splash, dew, etc. You would need to wipe the metal off immediately to prevent a discoloration of the nickel and for most people that's not practical on a street driven car. Show car, different story. Originally Posted by srh3trinity
chunger
'68 Ranchero 500
'70 Cougar XR-7 Convertible
'98 Mustang GT Convertible
11-20-2010 #278
Registered User
- Join Date
- Dec 2007
- Location
- Carlsbad, Ca
- Posts
- 1,213
ive heard that the nickel can be brushed and then they can put chrome over it and retain the brushed look. im not sure what im going to do at this point.For the satin or nickel look, they don't polish the metal and leave it as is. Problem is, the nickel coating is very susceptible to staining of discoloration from any moisture, such as water, rain, splash, dew, etc.Tim
The WidowMaker: Garage Built 70 Chevelle
Special Thanks To: Rushforth Wheels, MuscleRodz, Kore3 & SC&C
Build Thread Link
11-20-2010 #279
Registered User
- Join Date
- Dec 2007
- Location
- Carlsbad, Ca
- Posts
- 1,213
the stock quarters never lined up, and these were a little worse. plus, the cutting allowed them to me manipulated in and out as well as vertically to follow the bumper.I see you added an extension to the rear fenders to close the gap, but I don't see an extension on the trunklid. Was the gap from trunklid to bumper different than the gap from fender to bumper? Or were you able to lower the trunklid mounting somehow?Tim
The WidowMaker: Garage Built 70 Chevelle
Special Thanks To: Rushforth Wheels, MuscleRodz, Kore3 & SC&C
Build Thread Link
11-20-2010 #280 Registered User
- Join Date
- Nov 2006
- Location
- Ma.
- Posts
- 5,560
Nice work fixing the gaps on the bumper. Its going to make a big difference.
Wayne
Car FINALLY home !!!!!! lol
Project FNQUIK https://www.pro-touring.com/showthre...ghlight=FNQUIK

 Reply With Quote