Results 281 to 300 of 587
-
11-21-2010 #281

 Registered User
- Join Date
- Dec 2007
- Location
- Carlsbad, Ca
- Posts
- 1,213
 i hope so. its now easy to see how paying someone to do this kind of work would be big bucks. i spend a crap load of time getting it all nice and aligned and then need to pull it off to tweak a bracket etc.... then its more time to get it back aligned where it was. all the little stuff takes a ton of time.Nice work fixing the gaps on the bumper. Its going to make a big difference.
Tim
The WidowMaker: Garage Built 70 Chevelle
Special Thanks To: Rushforth Wheels, MuscleRodz, Kore3 & SC&C
Build Thread Link
-
11-21-2010 #282 Registered User
- Join Date
- Apr 2009
- Location
- san diego
- Posts
- 5,101
Nice work on this car!
My build thread: https://www.pro-touring.com/showthre...ing&highlight=
The mustang build thread: https://www.pro-touring.com/showthre...el)&highlight=
11-27-2010 #283 Registered User
- Join Date
- May 2008
- Location
- SoCaL-Pico Rivera
- Posts
- 1,138
Tim did you get your wheels?
---------Fabian Sanchez-----------
71 velle Project Syckness ATS,Rushforth wheels,PRRC, Autometer,UMI, Hotchkis,QA1,hood-latches.com, comp cams,
https://www.pro-touring.com/forum/sh...ad.php?t=43881
11-28-2010 #284 Registered User
- Join Date
- Mar 2009
- Location
- overseas
- Posts
- 3,434
WOW awesome work!!!!
Kevin S. (overseas in Germany)
1963 Chevrolet Impala 2d ht Coupe
www.CruznArt.com
CRUZN - Automotive Artworks
11-28-2010 #285
Registered User
- Join Date
- Dec 2007
- Location
- Carlsbad, Ca
- Posts
- 1,213
not yet. now that sema has passed, im hoping its soon.Tim did you get your wheels?Tim
The WidowMaker: Garage Built 70 Chevelle
Special Thanks To: Rushforth Wheels, MuscleRodz, Kore3 & SC&C
Build Thread Link
12-11-2010 #286
Registered User
- Join Date
- Dec 2007
- Location
- Carlsbad, Ca
- Posts
- 1,213
so another 25 hours later (not kidding), the brackets are welded on the bumper and its been off and on and falls back in place. this thing was a PAIN in the ass. the main problem i had was how the brackets mounted to the bumper. since the mounting surface wasnt flat a slight movement twisted the bumper instead of just moving it up or down. since the bumper has dimension to it, and some areas are closer or futher from the axis, a small twist would send some areas +/- .050 out of spec. this caused so many headaches that i was ready to just give up. but, like i said the bumper is DONE. i still need to finish cleaning up the quarters and i still need to fit the lower valance. this was all supposed to be done weeks ago.
like ive said before, i am breaking all of the purchases up and buying stuff in advance. this has screwed me many times and ive sold and repurchased a ton of parts, but if i dont spend it on the car, it gets spent at friggin Target. this month i picked up my single 10" subwoofer and the ISIS inmotion controller. for the sub, and after a ton of research, i picked up a focal 27v2 to go with the focal components. i narrowed it down to a few, but decided to just stick with one brand for the audio. its not a loud sub, but the quality is supposed to be amazing. i'll be building an enclosed box in the coming months.
i also have a little money left to send to mike a musclerodz. ive given him a few deposits which all should add up to a PRC radiator and ac condensor in the near future. i was stressing about the ron davis/prc choice, but ive decided to add an intank engine oil cooler. rd wanted 700 since they cant fit it in a stock tank and it then makes it a tank custom, and PRC wants 85 and says if it needs a custom tank there will be no charge. i think the $615 difference in oil coolers, plus the $260 in base price has made my decision. i really hope prc delivers on their welds. ive seen some really good and some pretty good. rd usually looks machine done.
hopefully i can get the rest of the bumper buttoned up and some new pics soon!Tim
The WidowMaker: Garage Built 70 Chevelle
Special Thanks To: Rushforth Wheels, MuscleRodz, Kore3 & SC&C
Build Thread Link
12-29-2010 #287
Starting The Transformation
- Join Date
- Aug 2009
- Location
- Langley BC, Canada
- Posts
- 264
I posted on the Lat - G thread but this one gives me email notifications (for some reason the Lat-G forum doesnt) Any way awesome build first off!!!!! What black coating is used on the bolts, swaybars, suspension parts..........? It looks awesome and wouldnt mind doing all mine!!! Keep up the awesome work I wouldnt ever guess this is a garage buildif I didnt see the pics on here!!! Originally Posted by The WidowMaker

Kevin Freund
1961 Impala Drop Top
12-31-2010 #288
Registered User
- Join Date
- Dec 2007
- Location
- Carlsbad, Ca
- Posts
- 1,213
btw, just a quick update. its been raining here and i havent been able to roll the car out to work on the rear bumper, so i started on the wiper motor relocation. i wasnt able to come up with a way to make it work with the stock linkage, so im mounting an arm where the old motors arm was and then connecting my new linkage to that to power the wipers. everything is still hidden, but im on my 3rd design. its been fun playing with the mill and the lathe. ive run into a few snags, but i'll have pictures and an explanation when its all done. im not sure how others have done it on the chevelles, but i couldnt come up with any other good ways.
Tim
The WidowMaker: Garage Built 70 Chevelle
Special Thanks To: Rushforth Wheels, MuscleRodz, Kore3 & SC&C
Build Thread Link
12-31-2010 #289
Registered User
- Join Date
- Dec 2007
- Location
- Carlsbad, Ca
- Posts
- 1,213
here you go. this is all i really know.I posted on the Lat - G thread but this one gives me email notifications (for some reason the Lat-G forum doesnt) Any way awesome build first off!!!!! What black coating is used on the bolts, swaybars, suspension parts..........? It looks awesome and wouldnt mind doing all mine!!! Keep up the awesome work I wouldnt ever guess this is a garage buildif I didnt see the pics on here!!!
Tim at work we use a coating called everlube 6107 gloss or flat black. I had fasteners coated in this for my car.(Link below). I have some bolts I can send you to take a look at. I am sure I can get your bolt coated in this at no charge.
It looks better than zinc and better rust protection.
http://www.metalimprovement.com/coat...cesses.php#cceTim
The WidowMaker: Garage Built 70 Chevelle
Special Thanks To: Rushforth Wheels, MuscleRodz, Kore3 & SC&C
Build Thread Link
12-31-2010 #290
Starting The Transformation
- Join Date
- Aug 2009
- Location
- Langley BC, Canada
- Posts
- 264
Thanks for the help Tim, I will try to search around local here in Canada and see what I can find.
Kevin Freund
1961 Impala Drop Top
12-31-2010 #291
Registered User
- Join Date
- Mar 2008
- Location
- Girard Ks
- Posts
- 71
Ive read ur hole thread and the car is going to look super nice
12-31-2010 #292
Registered User
- Join Date
- May 2008
- Location
- SoCaL-Pico Rivera
- Posts
- 1,138
Kevin just sent you a pm. Originally Posted by 61ragtop
Tim if you need me to redo any of the part just give me a call.---------Fabian Sanchez-----------
71 velle Project Syckness ATS,Rushforth wheels,PRRC, Autometer,UMI, Hotchkis,QA1,hood-latches.com, comp cams,
https://www.pro-touring.com/forum/sh...ad.php?t=43881
12-31-2010 #293
Registered User
- Join Date
- Dec 2007
- Location
- Carlsbad, Ca
- Posts
- 1,213
i really wish i knew more about it, but Fabian is the man. they have held up great to sockets and the coating doesnt add but a few mils to the fastner size. regular nut/bolt/lock washer combos are a breeze, but the pinch nut locking nuts were just a little harder to get on. i'll have to be a little more careful with my torque ratings.I will try to search around local here in Canada and see what I can find.
thanks!!!!!!Tim if you need me to redo any of the part just give me a call.Tim
The WidowMaker: Garage Built 70 Chevelle
Special Thanks To: Rushforth Wheels, MuscleRodz, Kore3 & SC&C
Build Thread Link
12-31-2010 #294
Starting The Transformation
- Join Date
- Aug 2009
- Location
- Langley BC, Canada
- Posts
- 264
Awesome to hear they are good with the sockets that's what I am lookin for. Fabian has filled me in on it. That ms again to both for the info.
Kevin Freund
1961 Impala Drop Top
01-03-2011 #295
Registered User
- Join Date
- Dec 2007
- Location
- Carlsbad, Ca
- Posts
- 1,213
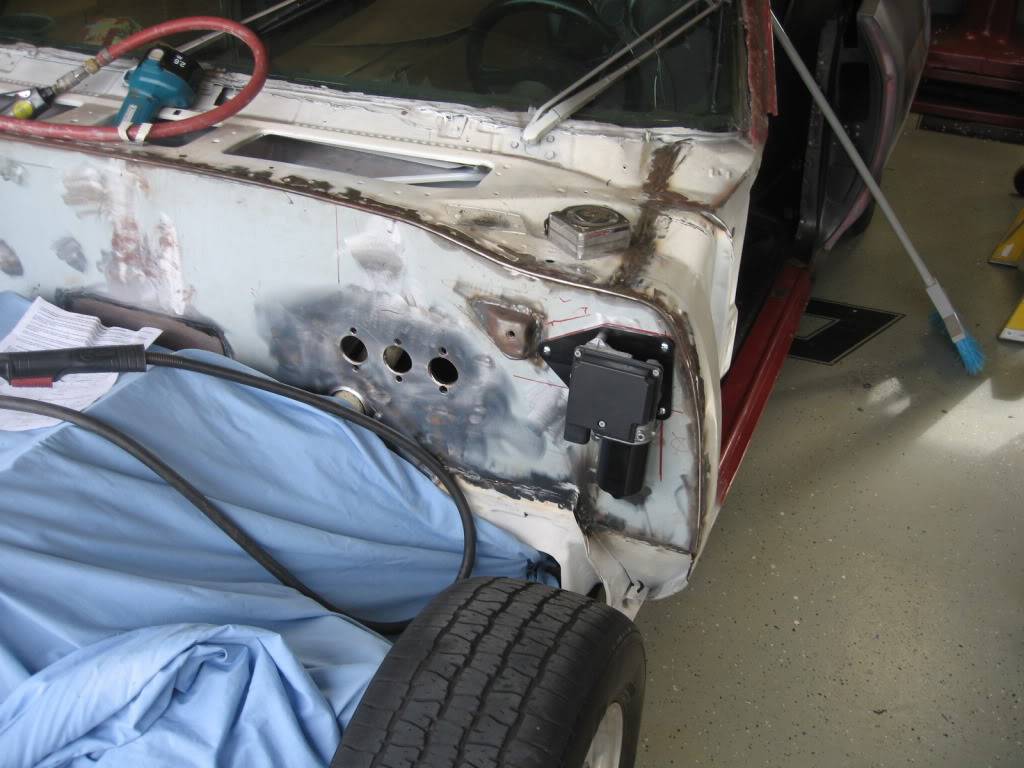
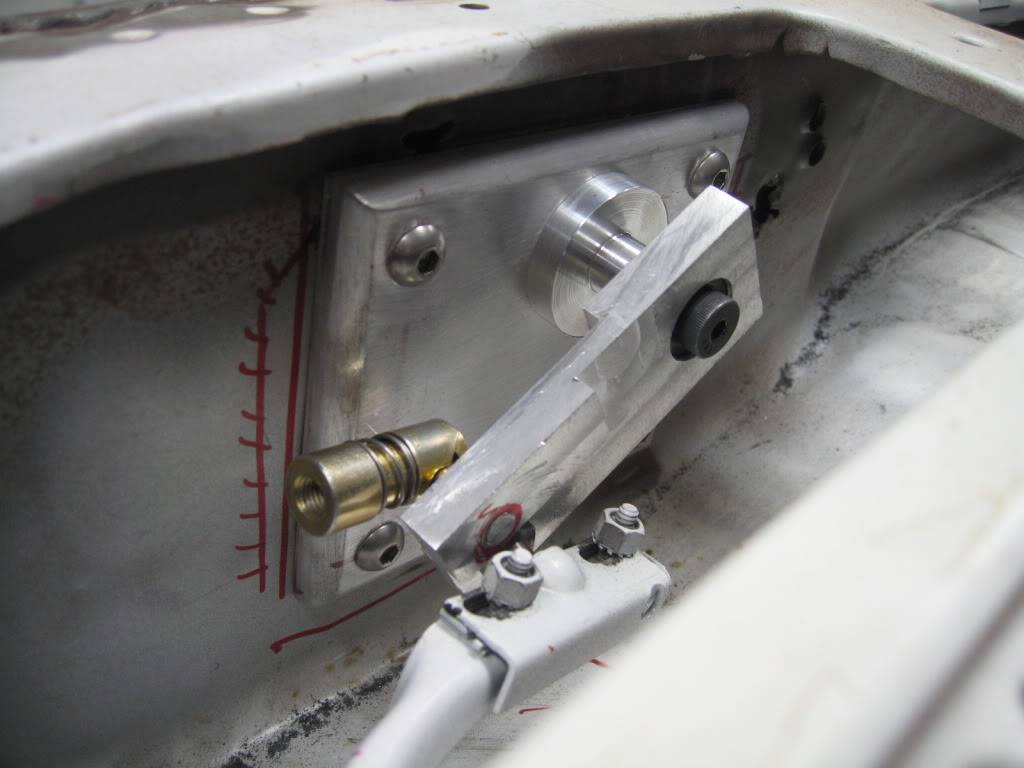
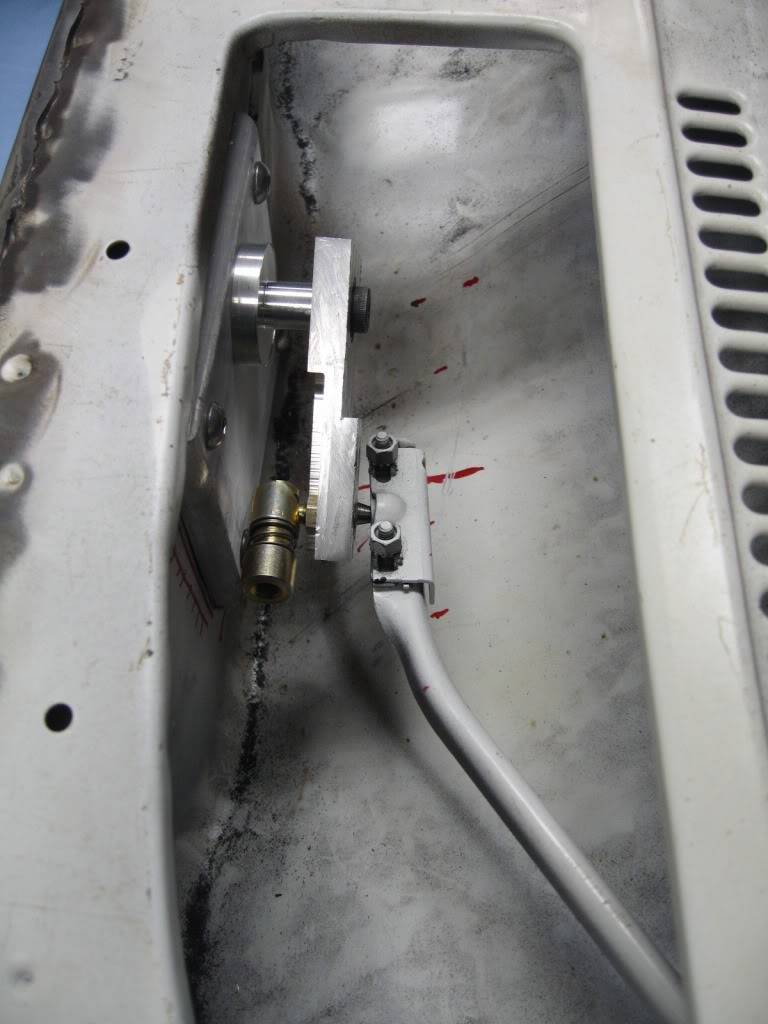
so here are a few pics of the new wiper setup. its still a work in progress, but now all i really need is the linkage from the wiper motor to my new arm and its done. i have an 18" piece of aluminum hex on order from mcmaster and it should be all i need.
so a little vocabulary to keep it all straight. "arm" is the pitman style arm on the motor and the new arm on the firewall. "linkage" is the stock piece from the wipers to the firewall arm and from the motors arm to the firewall arm.
a little background. i originally thought that the motor only spun 180* and then reversed. its the only way my mind could grasp how the motor could "park" the wipers when turned off. i had thought that when turned off the motor just spun backwards a little more sucking them down. i was wrong. using a method still unclear, the motor spins clockwise 360* and then uses a cam action to make the arm longer when turned off. this is how they are sucked down.
so, the original thought was to just rock the new arm back and forth like i thought that the stock arm went. once i found out that it went in circles it posed a slight problem. the new motor would be providing a lateral force, not a rotational one. meaning, if both arms were the same length there would be an issue getting the new arm to pass both 90 and 270 without ripping something apart. since the stock arm was 2.25" and the dse is closer to 2" (still need to call on that), i decided to make my new arm 2.5". this means that my arm will never be forced to make the full circle and instead will just rock as initially intended.
the other issue was the mounting of both linkages on the new arm. i had a few ideas but settled on this one. i had to do some milling to offset the mounting points and to keep the thickness thick enough to tap, but thin enough to keep the stock linkage from pushing too far towards the windshield. the closer to the windshield it gets the more bind that is introduced. this is currently a sweet spot and there is no bind.
here are the pics. like i said, still needs to be cleaned up.
 Tim
Tim
The WidowMaker: Garage Built 70 Chevelle
Special Thanks To: Rushforth Wheels, MuscleRodz, Kore3 & SC&C
Build Thread Link
01-07-2011 #296
Registered User
- Join Date
- Dec 2007
- Location
- Carlsbad, Ca
- Posts
- 1,213
i built arm #3 last night but bored .020 too deep for the bearing seat and the snap ring fits too loose. i dont have enough material to bore another .025 and add a second snap ring, so arm #3 is going in the trash after a couple hours work. i changed some things up a little on this one, but most notably i swapped the side being milled which required a smaller relief and it presents with a solid side when viewed instead of the offset notches that you see now. i also overlapped the area around the notches so its full thickness for .188 instead of being much thinner like the one above.
i did however clean up arm #2 above and it looks much better with the newly radiused corners. since arm #3's main difference was appearance, and since you wont friggin see it anyways, i may not build a #4.
i work the next 48 hours, but plan to get the linkage hooked up on sunday after making a few more small parts. i may also do a short video clip to show how it all works.
TimTim
The WidowMaker: Garage Built 70 Chevelle
Special Thanks To: Rushforth Wheels, MuscleRodz, Kore3 & SC&C
Build Thread Link
01-07-2011 #297
Registered User
- Join Date
- Dec 2010
- Location
- Windy City, IL
- Posts
- 272
Tim,
Highest compliments on the finest example of an A-body that I've ever seen! I'm also attempting to resurrect a '70 GS Stage 1, to be improved similar to yours, but have no sheetmetal/bodywork experience.
With the window channels rusted out like yours, do you have more detail to explain or show how you replaced the metal to the point it is? Looks great, otherwise!
I'm VERY interested to box in my frame, and add the crossmember/driveshaft loop/exhaust/transmission channels, too!
Is your frame a Convertible frame, to start with?
It doesn't look like a Hardtop frame, for some reason.
Link to my project:
https://www.pro-touring.com/showthre...-1-project-car
01-08-2011 #298
Registered User
- Join Date
- Dec 2007
- Location
- Carlsbad, Ca
- Posts
- 1,213
i started off on a very tight budget with a stock rebuild in mind. i was going to strip it and get a cheap paint job and drive the crap out of it. then i found the forums............ so, what started as metal replacement in the channels turned into two new quarters once the budget was raised. the channels were my first body work project and they turned out nice, but the car needed alot of work to the bottom of the quarters as well. it was just easier to start over with the new quarters. what looks like rust on the front is just the underside of the vinyl top mixed with some glue. i havent really dug into it yet to find out the damage, but i think its going to be MUCH better than the rear.With the window channels rusted out like yours, do you have more detail to explain or show how you replaced the metal to the point it is? Looks great, otherwise!
i dont have anything really good to show how the work was done. i used a metal brake to from the 90 and then used a stretcher to form the corners. i test fit everything with the window in place and the chrome strip mocked up to make sure it would all be nice when done.
the frame is the original from the malibu. as far as i know the convertible frames were boxed from the factory.Is your frame a Convertible frame, to start with?
i'll keep an eye on your project.Tim
The WidowMaker: Garage Built 70 Chevelle
Special Thanks To: Rushforth Wheels, MuscleRodz, Kore3 & SC&C
Build Thread Link
01-16-2011 #299
Registered User
- Join Date
- Dec 2007
- Location
- Carlsbad, Ca
- Posts
- 1,213
here is a little video of the new linkage. i am actually making the 4th arm tonight. this will have a little different ratio to get a full sweep on the window. the first few arms assumed that the starting angle and the finishing angle would be the same. since that didnt actually happen, even though the motor was moving the arm 4", it was only moving the stock linkage about 3.75". that .25 was a few inches of the window.
theres one other issue that im working out with a few phone calls, but i hope to have an answer tomorrow.
 Tim
Tim
The WidowMaker: Garage Built 70 Chevelle
Special Thanks To: Rushforth Wheels, MuscleRodz, Kore3 & SC&C
Build Thread Link
01-27-2011 #300
Registered User
- Join Date
- Dec 2007
- Location
- Carlsbad, Ca
- Posts
- 1,213
i finished ironing out the issues tonight with the remote setup. i ended up making another arm.... yep, number 5. this one takes dse's .550 and turns it into about .280. it keeps the wipers much further down using the delay feature. i called them again and spoke about the difference and they cant give me an answer as to why theirs parks the wipers so much more. either way its done.
oh and about 6 months ago i promised myself that i was done swapping unused parts and losing money. but since the brand new tko is up for sale i guess i didnt keep my promise. i have a couple guys interested and the bell housing is already sold. a t56 magnum will be going in its place.Tim
The WidowMaker: Garage Built 70 Chevelle
Special Thanks To: Rushforth Wheels, MuscleRodz, Kore3 & SC&C
Build Thread Link

 Reply With Quote