


Results 321 to 340 of 587
-
02-13-2011 #321

 Registered User
- Join Date
- Dec 2007
- Location
- Carlsbad, Ca
- Posts
- 1,213

so im thinking something along the lines of jcg's camaro build except centered in height instead of the half moon style cutout.
 Tim
The WidowMaker: Garage Built 70 Chevelle
Special Thanks To: Rushforth Wheels, MuscleRodz, Kore3 & SC&C
Build Thread Link
-
02-13-2011 #322 Registered User
- Join Date
- Dec 2005
- Location
- Birmingham, AL
- Posts
- 3,355
That would look nice. I think it would look good if you used the lines of the taillights as a guide for the exhaust tips.
Stephen
02-15-2011 #323 Registered User
- Join Date
- Nov 2005
- Posts
- 827
X2! That's exactly what Kris did with the Camaro so just modify the shape of yours to do something similar following the outer line of the valance. Originally Posted by srh3trinity
 Jason
02-15-2011 #324
Registered User
- Join Date
- Dec 2010
- Location
- Windy City, IL
- Posts
- 272
I've always been a fan of the '70-'72 GM A-bodies (with a 25 year collection of '70 Buick GS's to prove it), and as much as I do like the '70 Chevelle, I always thought it would look better with the '71 rear bumper, just to be uniform (4 round headlights, and 4 round taillights; instead of 4 round headlights & 2 small/square taillights).
As far as the exhaust tips, the Buick had an N-25 (exhaust through bumper) option in '71/'72, which I'd also like to modify/improve (as I'll be incorporating it into my '70 GS Stage 1, which never had the exhaust through the bumper option), similar to what you're doing with the Widowmaker, Tim!
Now that I see this pic of the '69 Camaro, that is very appealing and inspiring for cars like ours!
I actually get goosebumps every time I go through this thread, Tim, looking forward to seeing the Chevelle finished, and excited to begin my similar build of my '70 GS, now that the 6' snowdrifts are finally beginning to melt away!
02-16-2011 #325
Registered User
- Join Date
- Dec 2007
- Location
- Carlsbad, Ca
- Posts
- 1,213
protourgsx, thanks for all the kind words. i am a little weird though, and i love the 70 rear bumper. dont know why, just havent liked the 4 tail light look. but i like the 4 head lights.......... i couldnt really give you a good reason why though.
thanks for the help. i laid out some ideas today and now have something in mind. i just need to hit the metal shop and pick up some stainless sheet to play around with.X2! That's exactly what Kris did with the Camaro so just modify the shape of yours to do something similar following the outer line of the valance.Tim
The WidowMaker: Garage Built 70 Chevelle
Special Thanks To: Rushforth Wheels, MuscleRodz, Kore3 & SC&C
Build Thread Link
02-17-2011 #326 Registered User
- Join Date
- Sep 2009
- Location
- Oxnard, CA
- Posts
- 446
Let me know if you need any help their Tim!! Your doing a fantastic job on your car..
Originally Posted by The WidowMaker
02-18-2011 #327
Registered User
- Join Date
- Dec 2007
- Location
- Carlsbad, Ca
- Posts
- 1,213
Thanks Cris! im headed up north either the 3rd or 4th of next month and would love to stop by. i'll shoot you a pm when the date is a little closer.
Tim
The WidowMaker: Garage Built 70 Chevelle
Special Thanks To: Rushforth Wheels, MuscleRodz, Kore3 & SC&C
Build Thread Link
02-19-2011 #328
Registered User
- Join Date
- May 2010
- Location
- kitchener,Ontario,Canada
- Posts
- 2,358

Tim
great build ... and still a inspiration for me to remove my ass from the couch and put mine together lol...back to your exhaust I've always loved the stock tips and exhaust location. I think with the tank location and how the trunk drops off on the sides its the best locale..thanks for all the great ideas ...mainly the rear bumper
02-19-2011 #329
Registered User
- Join Date
- Sep 2009
- Location
- Oxnard, CA
- Posts
- 446
Stop on by Tim! Look forward to meeting you & giving you a little shop tour..
Originally Posted by The WidowMaker
02-19-2011 #330
Registered User
- Join Date
- Dec 2007
- Location
- Carlsbad, Ca
- Posts
- 1,213
a question for the metal experts; i picked up my new door shells and am acutally impressed with the rear fit of the drivers side so far (still a lot to go). the gap is really consistent and the profile matches the quarter well. i was prepared to weld an 1/8th" round rod to the edge of the door to assist in working the gap, but found that i only need to take off a little in one area. so, would you prefer to weld a rod the entire length of the door, or just remove some material? doing so will likely split the skin, but i can either mig or tig it back closed and then file to fit.
which would you prefer?
i do have to weld a rod to the bottom. the gap is a little too wide (~.320), although very consistent since its within .015 front to back.
also, what do you guys do to build an edge up to get panels to flow better across the gap (height not width)? would you rather build with a weld bead of tacks, weld a rod or do the work with filler?Tim
The WidowMaker: Garage Built 70 Chevelle
Special Thanks To: Rushforth Wheels, MuscleRodz, Kore3 & SC&C
Build Thread Link
02-19-2011 #331
Registered User
- Join Date
- Sep 2009
- Location
- Sandy, OR
- Posts
- 383
Tim I would remove material and where it splits just weld it back up. Originally Posted by The WidowMaker
As far as if you need to add material I use 1/8" plate welded and ground filed to create a consistent gap. You NEVER want to use filler on an edge. If it is a slight gap in spots I just put down a few beads w/ the mig and grind/file to even the gap up. There are several ways to do it. if I need to fill a long gap I add plate. If there are a few smal spots then I put some mig beads. HTH
02-20-2011 #332
Registered User
- Join Date
- Dec 2007
- Location
- Carlsbad, Ca
- Posts
- 1,213
thanks for the info Luke. i worked on the rear gap today and have it looking really good. i'll shoot some pics and post them up tomorrow.
Tim
The WidowMaker: Garage Built 70 Chevelle
Special Thanks To: Rushforth Wheels, MuscleRodz, Kore3 & SC&C
Build Thread Link
02-21-2011 #333
Registered User
- Join Date
- Dec 2007
- Location
- Carlsbad, Ca
- Posts
- 1,213
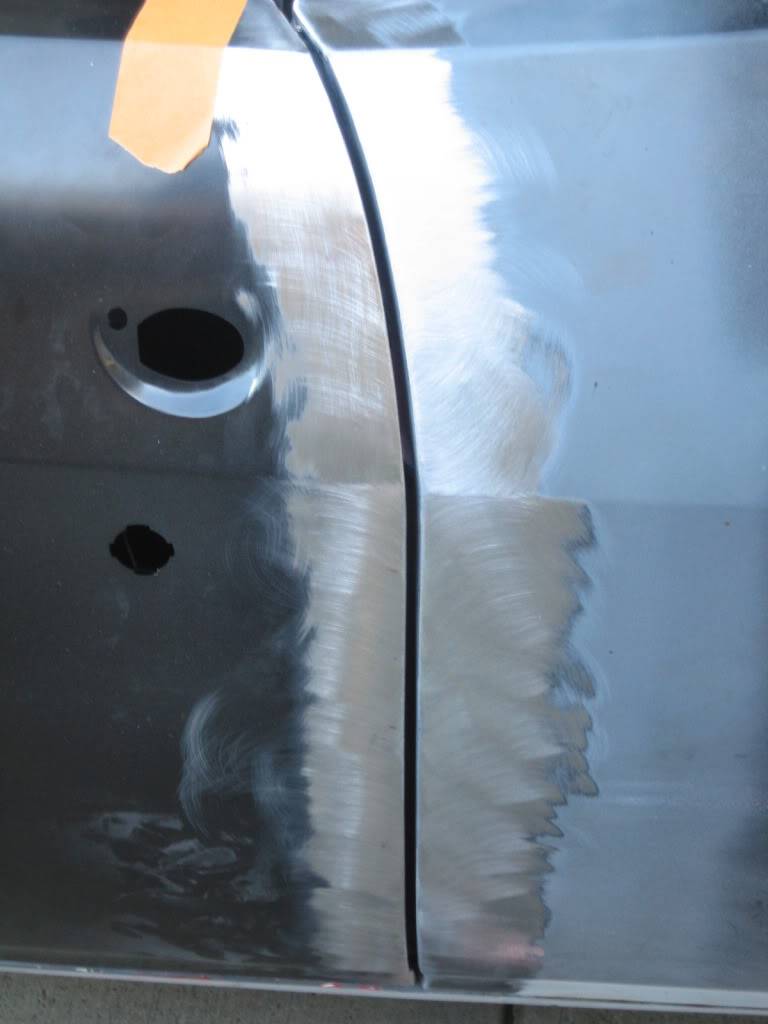
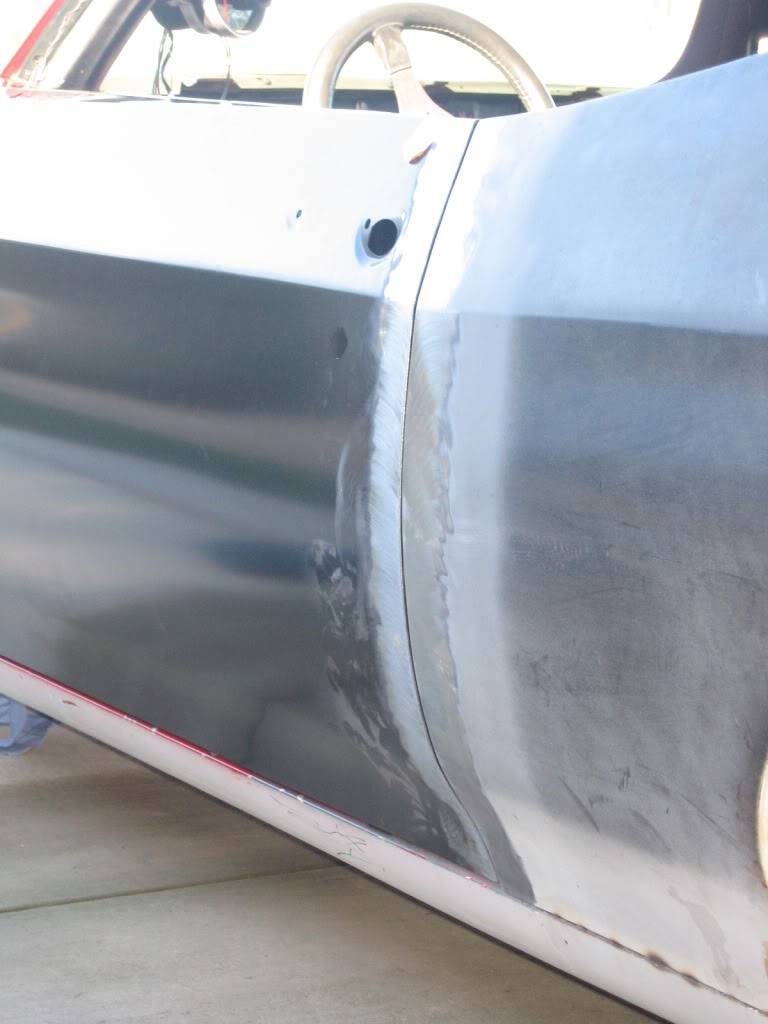
i finised working the rear gap of the drivers door today. i filed it down until it was perfect yesterday and then went back and welded it all up to make sure it wasnt going to split. today i filed the weld down until it was perfect again. it measures .190-200 all the way down. the quarter makes it hard to measure since it doesnt angle in 90* but i tried to do it as consistent as possible.
i am still pretty amazed at how well it all lined up. you can see in the second pic that the profile matches the quarter very well for having no work. its in about .015 right under the body line and also a little more at the bottom. i plan to work those areas when i get back to the car next week.
 Tim
The WidowMaker: Garage Built 70 Chevelle
Special Thanks To: Rushforth Wheels, MuscleRodz, Kore3 & SC&C
Build Thread Link
02-21-2011 #334 Registered User
- Join Date
- Oct 2006
- Location
- McKinney, TX
- Posts
- 899
what do you use to straighten up the gaps? I used steel rod for my trunk, but it looks like whatever you are using has a straighter edge.
Looks really good!Confucius says, "Choose a job you love, and you will never have to work a day in your life"
My build Beast
02-22-2011 #335
Registered User
- Join Date
- Dec 2007
- Location
- Carlsbad, Ca
- Posts
- 1,213
it was all a weld bead and a file. i would have added a rod, but the gap needed to be smaller, not larger. it filed down pretty nice, but i wasnt comfortable taking .020 off of .035 sheetmetal. so i welded it back up to get the penetration deeper to seal it back up and then filed it down again.what do you use to straighten up the gaps? I used steel rod for my trunk, but it looks like whatever you are using has a straighter edge.Tim
The WidowMaker: Garage Built 70 Chevelle
Special Thanks To: Rushforth Wheels, MuscleRodz, Kore3 & SC&C
Build Thread Link
02-22-2011 #336
Registered User
- Join Date
- Jan 2007
- Location
- Yardley, PA
- Posts
- 163
I had to do the same with my one 64 Chevelle vert. I had to grind down, and weld it back up, to keep the skin from coming off the inner frame.it was all a weld bead and a file. i would have added a rod, but the gap needed to be smaller, not larger. it filed down pretty nice, but i wasnt comfortable taking .020 off of .035 sheetmetal. so i welded it back up to get the penetration deeper to seal it back up and then filed it down again.
Looks great, a time suck, but worth it in the end.
02-22-2011 #337
Registered User
- Join Date
- Oct 2006
- Location
- Corona, CA
- Posts
- 1,948
Keep up the good work Tim! Car is looking amazing. Radiator looks nice, and the gaps on that door look stellar. Best part is you are doing all the work yourself! Kudos bud...
02-22-2011 #338
Registered User
- Join Date
- Dec 2010
- Location
- Apex, NC
- Posts
- 1,020
I love this build! Great work!I am doing all of mine in my garage and hope I can weld anywhere close to this good.
02-22-2011 #339 New to Pro-Touring
- Join Date
- Feb 2011
- Location
- North Idaho
- Posts
- 57
those door gaps are top notch
02-22-2011 #340
New to Pro-Touring
- Join Date
- Feb 2009
- Location
- caly
- Posts
- 96
thats is a nice chevelle

 Reply With Quote



