


Results 121 to 140 of 587
-
02-20-2010 #121
 Registered User
- Join Date
- Aug 2004
- Location
- cookeville, tennessee
- Posts
- 117

The mount issue has always confused me about the Ididit columns, as if they are not expensive enough and then you have to buy a kit to install it.
Thanks
-
02-20-2010 #122
Registered User
- Join Date
- Aug 2004
- Location
- cookeville, tennessee
- Posts
- 117
Also I forgot to ask, what part number will that column be?
Thanks
03-05-2010 #123 Registered User
- Join Date
- Dec 2007
- Location
- Carlsbad, Ca
- Posts
- 1,213
just a couple updates. the trunk floor is now finished and only needs some paint and dynamat to be complete. the floor was raised a total of 3 3/4" and gives me a ton more ground clearance. i still need to attach the rear bumper and work out the fill tube, but i made sure not to raise it high enough to cause an issue.
this is the before pic

the after pic

this shows the amount of room between the tank and the watts. if you are running the fays2 kit, you will have plenty of room with this tank. although i raised it, i didnt move the tank back any. it would sit in the same spot if i had the stock floor. hector is making some new straps that are a little longer for my mounts.

this shows how the trunk floor was done. almost all the seams are full welded. the only ones that didnt get a solid bead were the filler panels on the sides. the bottom will be ground smooth before getting a bed liner product, but the top will be covered with upholstery


this is how i mounted the battery. the sheetmetal is reinforced so the bolts dont pull it up. the top bar was just a piece of aluminum and i routed the edges so they are now rounded over. once the bolts are tightened (i dont have them tightened here), the battery doesnt move at all.
 Tim
Tim
The WidowMaker: Garage Built 70 Chevelle
Special Thanks To: Rushforth Wheels, MuscleRodz, Kore3 & SC&C
Build Thread Link
03-05-2010 #124
Registered User
- Join Date
- Dec 2007
- Location
- Carlsbad, Ca
- Posts
- 1,213
i mocked up the tires for the last time today and got my measurements to send off to jon. i spent a lot of time making sure the tire was square and centered, and double checked my measurements with a little device i made up. he originally just wanted to know the measurement to the tightest spot and that would have been simple with the old ride height and set of tires since it was just in the middle of the quarter lip. but with the new ride height, and because tires dont have square edges between the sidewall and tread, and the tighest spots were at this radius, it was much easier to just mock the tire up.
so with all that said, i plan to give him the exact spot i want the outside of the tire, and im confident he can take that and figure out where that would place the wheel.
here is a pic of how it will sit

now i just need to decide what i want to do about a style. they will either be the livewires or rated x's, and they will have a dark satin grey center and brushed outer. ive also narrowed the car down to either the prowler orange (with a little more red tint added) with the same dark satin gray stripe, or the whole car in dark gray with a black satin stripe.
more to come later.
TimTim
The WidowMaker: Garage Built 70 Chevelle
Special Thanks To: Rushforth Wheels, MuscleRodz, Kore3 & SC&C
Build Thread Link
03-05-2010 #125
Registered User
- Join Date
- May 2007
- Location
- Las Vegas
- Posts
- 670
Looks great Tim... I want to raise my trunk floor too... Is there floor pan bracing weleded to the the underside? Do you have any pics looking up from underneath without the tank??? I would like to see how everything fits together...
Rich
1969 Camaro (in hibernation)
1972 K5 Blazer - LQ9, 4L80e, NP205, D60, AAM 14BFF => http://67-72chevytrucks.com/vboard/s...d.php?t=423432
03-05-2010 #126
Registered User
- Join Date
- Dec 2007
- Location
- Carlsbad, Ca
- Posts
- 1,213
ill have to check. the upper portion of my column does not appear stock (because i didnt want it to), so that was something they were still working on. they should have a number by now though.Also I forgot to ask, what part number will that column be?
thats the best part about installing this column; you only need a lower firewall mount, and they want you to use the one that works with the collapsible column. its something like 30 bucks. the upper mount is just your stock mount, and they will have the tabs welded on in the correct place so you dont have to use an adapter like on the flaming river stuff.The mount issue has always confused me about the Ididit columns, as if they are not expensive enough and then you have to buy a kit to install it.
ill have pics of the lower mount next week when i get around to welding it in.Tim
The WidowMaker: Garage Built 70 Chevelle
Special Thanks To: Rushforth Wheels, MuscleRodz, Kore3 & SC&C
Build Thread Link
03-05-2010 #127
Registered User
- Join Date
- Dec 2007
- Location
- Carlsbad, Ca
- Posts
- 1,213
one page back, post 118 has all the good stuff that i think youre looking for. let me know if you need any more specific pics.Is there floor pan bracing weleded to the the underside? Do you have any pics looking up from underneath without the tank??? I would like to see how everything fits together...Tim
The WidowMaker: Garage Built 70 Chevelle
Special Thanks To: Rushforth Wheels, MuscleRodz, Kore3 & SC&C
Build Thread Link
03-05-2010 #128
Registered User
- Join Date
- May 2007
- Location
- Las Vegas
- Posts
- 670
The only thing I dont get/see is how the frame fits next to the trunk floor and drop offs....
Rich
1969 Camaro (in hibernation)
1972 K5 Blazer - LQ9, 4L80e, NP205, D60, AAM 14BFF => http://67-72chevytrucks.com/vboard/s...d.php?t=423432
03-06-2010 #129 Registered User
- Join Date
- Sep 2007
- Location
- Southern California
- Posts
- 566
Looks great Tim! I really like that tire mock up shot. This car is going to have a great stance! Keep up the good work!
Jon
03-06-2010 #130 Registered User
- Join Date
- Mar 2009
- Location
- overseas
- Posts
- 3,434
nice work! looking good!
 Kevin S. (overseas in Germany)
1963 Chevrolet Impala 2d ht Coupe
www.CruznArt.com
CRUZN - Automotive Artworks
03-07-2010 #131 Registered User
- Join Date
- Jun 2009
- Location
- Cassopolis, Mi
- Posts
- 103
What size are the rear tires?
03-07-2010 #132
Registered User
- Join Date
- Dec 2007
- Location
- Carlsbad, Ca
- Posts
- 1,213
right now they are nitto 555r 305/35/20's, but im looking to sell these new tires and get a set of the nt05 315's if i decide to go with 20x11's.
Tim
The WidowMaker: Garage Built 70 Chevelle
Special Thanks To: Rushforth Wheels, MuscleRodz, Kore3 & SC&C
Build Thread Link
03-07-2010 #133
Registered User
- Join Date
- Dec 2007
- Location
- Carlsbad, Ca
- Posts
- 1,213
these are the only pics i have right now that kind of explain it. if you look at the very right side of the first pic, youll see a piece of the old floor brace. this is the brace that the frame sits on, and was the old height of the floor.The only thing I dont get/see is how the frame fits next to the trunk floor and drop offs....

the second pic kind of shows the same thing, but right side up. you can see how the floor was raised right next to the floor brace that sits on the frame. when looking from under the car, the raised portion almost exactally follows the frame.

i'll see if i can get some better pics when i get home tomorrow.Tim
The WidowMaker: Garage Built 70 Chevelle
Special Thanks To: Rushforth Wheels, MuscleRodz, Kore3 & SC&C
Build Thread Link
03-07-2010 #134
Registered User
- Join Date
- Aug 2004
- Location
- Dunwoody, GA
- Posts
- 4,983
Very nice. How will you fill the gas tank?
Trey
"The early bird may get the worm, but the second mouse gets the cheese."
~ Jon Hammond
1979 WS6 Trans Am stock LT1/T56 drive train out of my Formula. BMW M-parallel rims. C5/C6 brakes
build thread https://www.pro-touring.com/showthre...ghlight=begins
03-07-2010 #135
Registered User
- Join Date
- Dec 2007
- Location
- Carlsbad, Ca
- Posts
- 1,213
same as stock. the filler neck has a pretty good bend and it extends up about 5-6" above the tank. since i raised it almost 4, the bottom of the opening is still 1-2" above the top of the tank. i just need to make the opening and a new filler neck. i plan to mock the bumper up and get that done in the next couple weeks.How will you fill the gas tank?Tim
The WidowMaker: Garage Built 70 Chevelle
Special Thanks To: Rushforth Wheels, MuscleRodz, Kore3 & SC&C
Build Thread Link
03-08-2010 #136 Registered User
- Join Date
- Nov 2006
- Location
- Ma.
- Posts
- 5,560
Nice work it looks great, a lot more clearance.
Wayne
Car FINALLY home !!!!!! lol
Project FNQUIK https://www.pro-touring.com/showthre...ghlight=FNQUIK
03-09-2010 #137 Registered User
- Join Date
- Nov 2008
- Location
- iceland
- Posts
- 1,859

Wow awesome project
 Bjarni B
My Chevelle project The Awakening
http://www.1971chevelle.net/

http://www.kvartmila.is/smf/index.php?topic=27028.0
CHEVY POWER RULES!
03-29-2010 #138
Registered User
- Join Date
- Dec 2007
- Location
- Carlsbad, Ca
- Posts
- 1,213
well the inside of the trunk has been coated, and i have the trunk lid aligned and gapped. btwn adding and subtracting a little metal, i have a straight 3/16 gap. now the plan is to make the bumper fit the rear.
here are a couple of pics i threw up on the paint and body forum


as you can see, its a long way from being "tucked" in nicely. it is acutally hitting the body in the middle (if the car is looked at from the rear), so the sides cant move any further forward. you can kind of see from the second pic that it doesnt follow the contour of the rear sheet metal very well. again its flush in the middle of the deck lid, but sticks out towards the quarters.
it also does the same thing on the vertical gaps as well. the middle of the deck lid contacts the top of the bumper when closed, but the outsides are sitting about 1/2" below the quarters.
so the plan is to start working it from the middle. i'll make some relief cuts that allow the ends to go in and up and see where that gets me. then the plan is to narrow, shave and move the brackets to the proper locations. if i need to add metal to the quarters, that will be done as well.
i have a feeling that this is going to take a while though. the plan is to send the bumper out to be stripped, then get working on it. hopefully i will have it done in a few weeks.Tim
The WidowMaker: Garage Built 70 Chevelle
Special Thanks To: Rushforth Wheels, MuscleRodz, Kore3 & SC&C
Build Thread Link
04-25-2010 #139 Registered User
- Join Date
- Aug 2005
- Location
- Astoria N.Y.
- Posts
- 70
any updated pictures? the car is comming along very nicely and i love the attention to detail very nice and should really be one bad ass chevelle
1966 Buick GS 401 Nailhead POWER!!
1968 Dodge Coronet R/T G-Machine
04-25-2010 #140
Registered User
- Join Date
- Dec 2007
- Location
- Carlsbad, Ca
- Posts
- 1,213
actually i do have a small update. i paid the final balance on the wheels and tires. i still havent selected the style, but they will be 19x9.5 and 20x10.5 3 piece rushforths. ive added the wildsides back in to the choices, so its between the livewire, rated x and the wildside. i know most people hate the 7 spoke 5 lug combo, but the rendering looks sick and jason being the designer and the guy behind the wheels wouldnt steer me wrong.any updated pictures? the car is comming along very nicely and i love the attention to detail very nice and should really be one bad ass chevelle
the tires will be nitto nt05 275/30/19's up front and 315/35/20's in the rear. i sold my 305/35's since i really wanted a 200 treadwear tire for the autocross stuff. im sure they will change that rule before my car is done though.
i also did a spray out of colors. i shot one red and 6 greys all in the new water based stuff. after all the color comparisons, the red will be mercedes mars red and the grey will be off of a range rover. i brought the samples into the guys at work, and every one of them tossed the range rover grey out in the first round. obviously their vision isnt the same as mine, especially since i hate blue greys. i was going to shoot a few more, but im sticking to my decision for now.
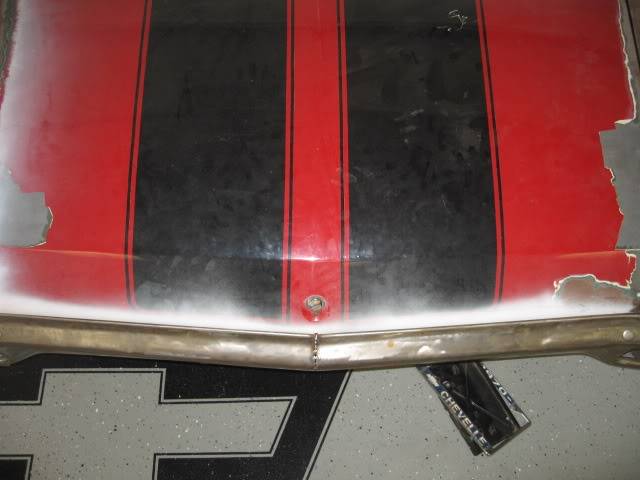
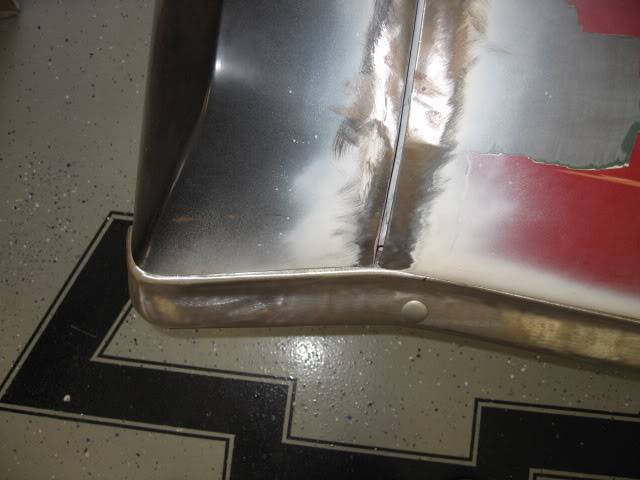
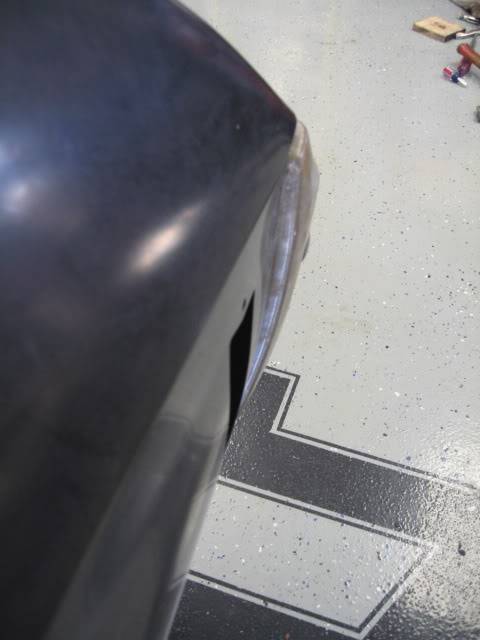
lastly, i got a little work done on the rear bumper. its a real pain in the ass, but progress is being made. i first sliced it in the middle to get the angles corrrect. originally, it was too high and too tight right in the middle, but by slicing it, it took care of this. the issue im having now is the bend right at the last outer foot. it starts to curve about 2" too early and its keeping the bumper from flowing nicely into the quarters.
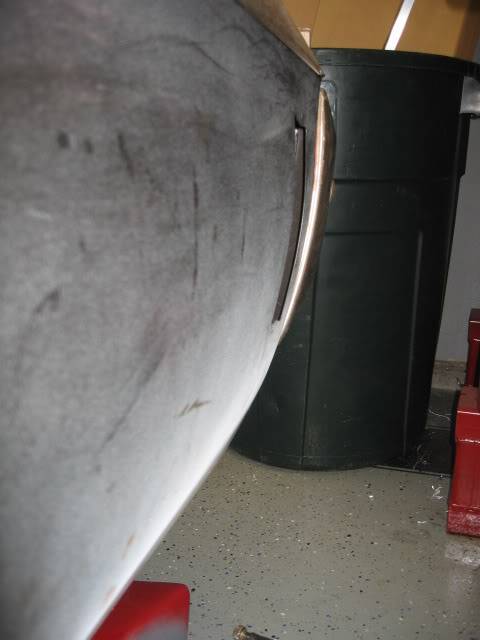
today, i cut the bumper again in the middle and took out 3/4". this sucked the sides in nicely, but opened up a whole bunch of new problems. so by the time i'm done, its going to look sick, but probably wont be able to be chromed with the amount of work that im needing to do.
here are some pics
bumper and trunk lid flowing nicely
you can see here how the bumper curves a little early. it also makes it difficult since the tail light is right below this, meaning that an easy correction would place a bend where the light is. you can also see how the corner of the quarter and the corner of the bumper flow nicely. they no longer do this with the bumper moved in 3/8" per side. although the side flows perfect, this corner is an area thats going to need some serious surgery.
bumper sticking out before narrowing
bumper moved in 3/8". i need to get one at the same angle as the above pic for a better comparison. it really made a HUGE improvement.
 Tim
Tim
The WidowMaker: Garage Built 70 Chevelle
Special Thanks To: Rushforth Wheels, MuscleRodz, Kore3 & SC&C
Build Thread Link

 Reply With Quote



