


Results 361 to 380 of 451
Thread: TwinTorino
-
11-16-2011 #361

 Registered User
- Join Date
- Dec 2008
- Location
- Detroit
- Posts
- 2,665

What a build! Your fab skills and ingenuity are amazing. I'm sure this car will be a joy to drive for year to come..
Big dreams, small pockets....
Chris--
'72 Cutlass S LSA/T56 Magnum
Bowler Performance, Forgeline, Speedtech, ATS, Speartech, KORE3, Ridetech coilovers
Project Motor City Madness
-
11-16-2011 #362 Registered User
- Join Date
- Aug 2004
- Location
- Rustburg, Virginia
- Posts
- 3,436
Enjoyed the vids.....nice little whine that will keep them guessing, in that last vid.
1970 RS/SS350 139K on the clock:
89 TPI motor w/ 1pc rear seal coupled to a Viper T56 via Mcleod's modular bellhousing w/ hydraulic T/O bearing from the Viper, 12 bolt rear w/ 3.73 gearing, SC&C upper control arms, factory lowers with Delalums, C5 brakes at all four corners, Front Wheels 17x8's with Sumi 255/40/17 and Rear Wheels 17x9's with Sumi 275/40/17.
Brief description of the work done so far can be found here: http://www.nastyz28.com/forum/showthread.php?t=112454
11-16-2011 #363 Registered User
- Join Date
- Jan 2008
- Location
- Charlotte
- Posts
- 1,295
Sounds awesome!
2005 LeMans Blue Corvette w/ T56 & Z51 & C6Z06 Brakes, Build Thread: https://www.pro-touring.com/showthread.php?64496
2005 GMC Sierra 2500HD LLY / Allison
2014 Chevy SS LS3 / 4 Door
11-20-2011 #364 Registered User
- Join Date
- Nov 2005
- Location
- Motorcity, Canada
- Posts
- 292
Thanks guys!! Sure is easier to keep motivated now with a car that actually does something other than just sit there. We have the winter to get everything ironed out so we can start hitting the track in the spring. Can't wait for the Motorstate Challenge!
You get any pics of this? Would be curious to see how they fit in a Falcon. Originally Posted by chunger

11-20-2011 #365
Registered User
- Join Date
- Nov 2005
- Location
- Motorcity, Canada
- Posts
- 292
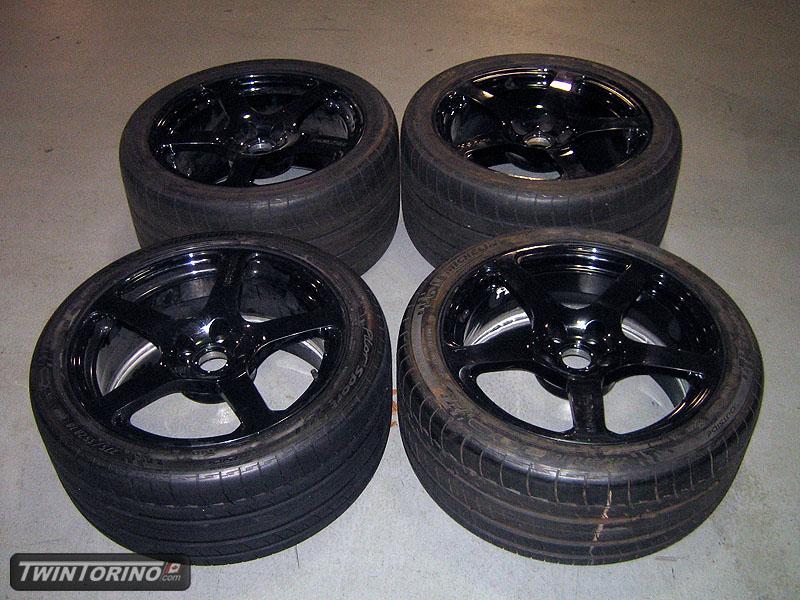
Since one car has an end in sight.. time to move onto #2. Got the rims and tires mounted over the weekend. Hoping to get that car up on the chassis jig shortly to start chopping.
Same tires as the other car - Michelin Pilot Sport Ps2 275/35/18 front, 315/30/18 rear. Rims are forged and from a Roush "Blackjack" edition, with one set narroed for the front.
11-23-2011 #366 Registered User
- Join Date
- Dec 2006
- Location
- SF Bay Area
- Posts
- 463
Yes, I'll be taking a buncha pics off the camera this weekend, so I'll pm some to you. Short answer is: this is a clean setup. Originally Posted by SVTforme
chunger
'68 Ranchero 500
'70 Cougar XR-7 Convertible
'98 Mustang GT Convertible
11-25-2011 #367
Registered User
- Join Date
- Jan 2011
- Location
- Ontario,Canada
- Posts
- 27
hey does this mean torino tuesdays are back on?
12-04-2011 #368
Registered User
- Join Date
- Nov 2005
- Location
- Motorcity, Canada
- Posts
- 292
Since winter is basically here.. time to move back into the interior and work on all of the electrical items that have been neglected. For the past while, we have been driving around with a new Mustang cluster buried behind the original dash. If the spacing between gauges were similar this would be OK for now, but they are far off which make seeing anything next to impossible. That brings back the dash design we started years ago.
Several goals with this design:
- Maintain overall original 1968 looking gauges - this was a one year only color
- Backlight with LED's instead of the original front lighting (requires transparent faces)
- Integrate Mustang air core gauges into cluster so they can be hooked up to the Mustang cluster electronincs
- Use newer style Mustang digital odometer
- Add more real gauges instead of idiot lights
- Integrate all of the Mustang dash lights like ABS, check engine, traction control etc..
- House everything in a modified original Torino gauge cluster housing
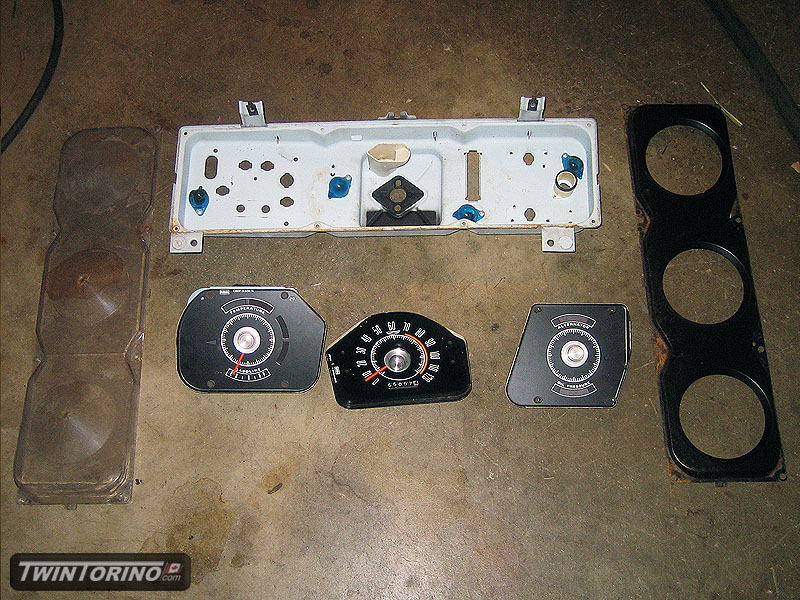
First a look at the oringal parts and pieces. Here are the references - an original 1968 cluster with the tach option, and the "donor" 2003/2004 Cobra cluster with a boost gauge. After that, some spare clusters we have for mock-up - a Mustang GT gauge cluster and a base 1968 Torino cluster.

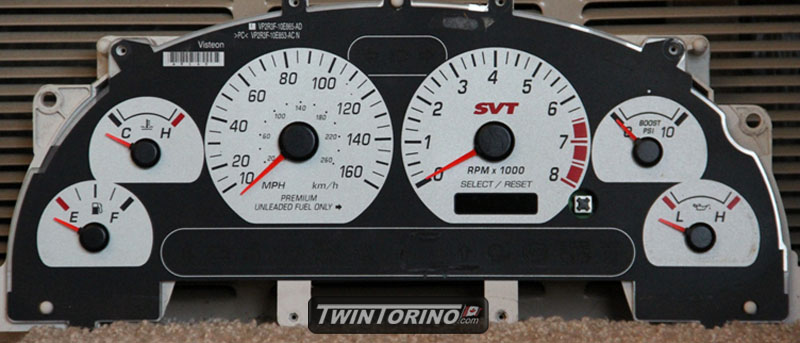
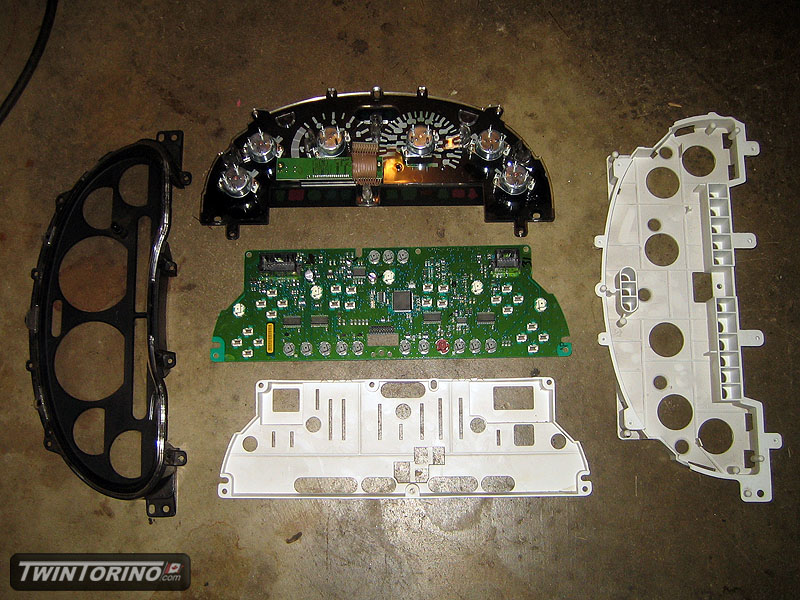
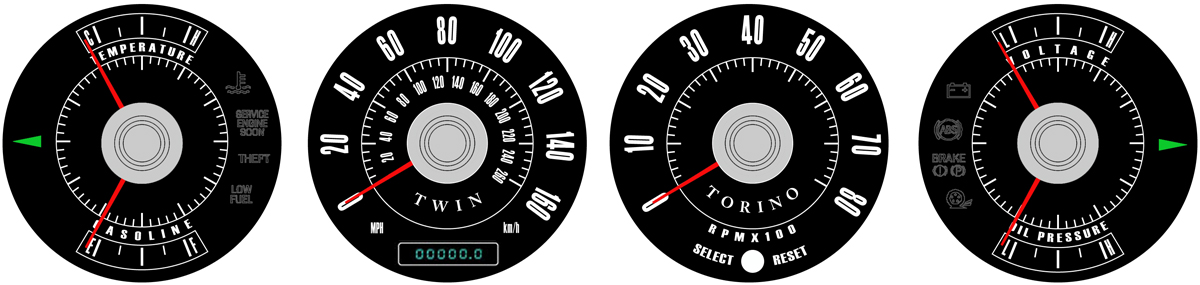
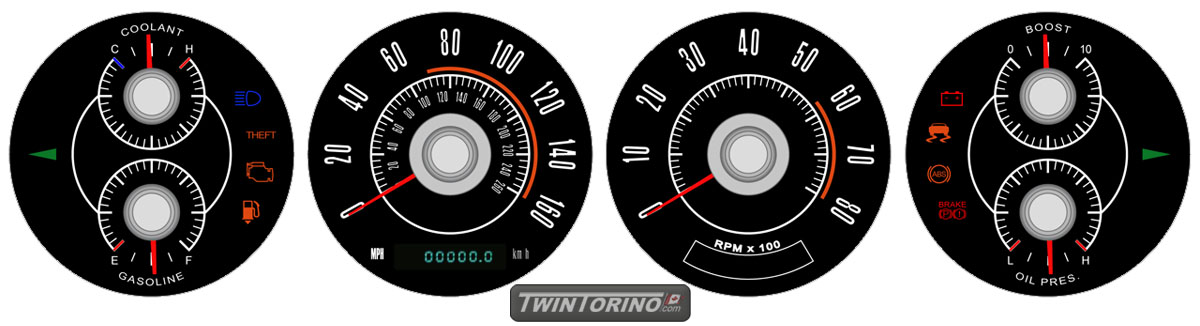
After countless hours of work using Adobe Illustrator, the first image is what we came up with in the beginning. After some more time and taking into consideration of how the Mustang gauges are set up and how they work, we came up with the last one which we will run with for the time being. The hardest part here was accomadating the Mustang smaller gauges into the package. The lower design also matches the dimensions of the original cluster exactly.
12-04-2011 #369
Registered User
- Join Date
- Nov 2005
- Location
- Motorcity, Canada
- Posts
- 292
OK - this all sounds great in theory.. but how do we make it work?
Largest challenges include:
- Making up transparent faces with LED backlighting.. and on a budget
- Reversing the direction of the gas gauge and oil pressure gauge on the cluster so they follow a logic direction of rotation
- Packaging everything together
- Remotely connecting gauges and odometer to circuit board. This has to be done since the gauge spacing is different.
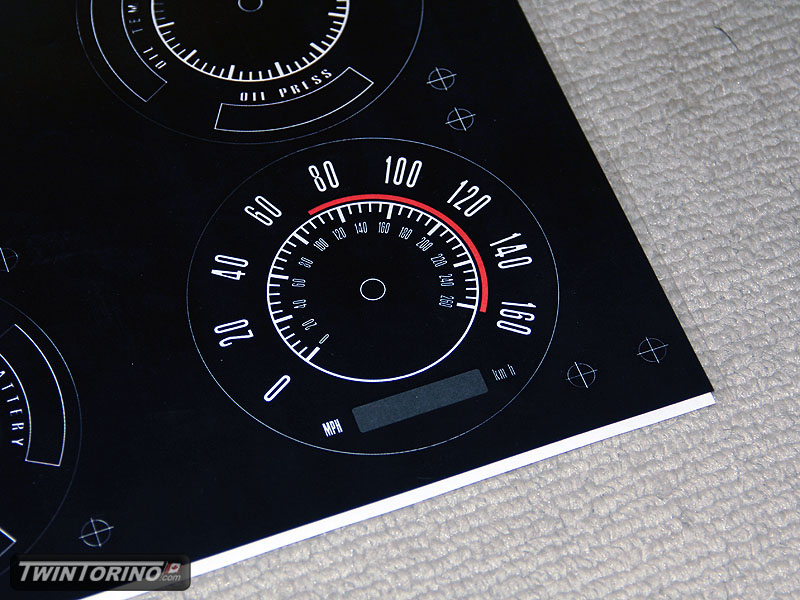
First task is working with gauge faces. After doing some extensive research on the web.. we came up with this solution. Since everything is done in Illustrator, it exists as a vector graphic. In a nutshell this means that you can increase the size of the images as large as you want an they will not distort (unlike normal rasterized images). In theory I could print this out large enough to put on the side of a building if I really wanted to ). This provides for some very sharp images which is necessary for print out things like the text and tick marks.
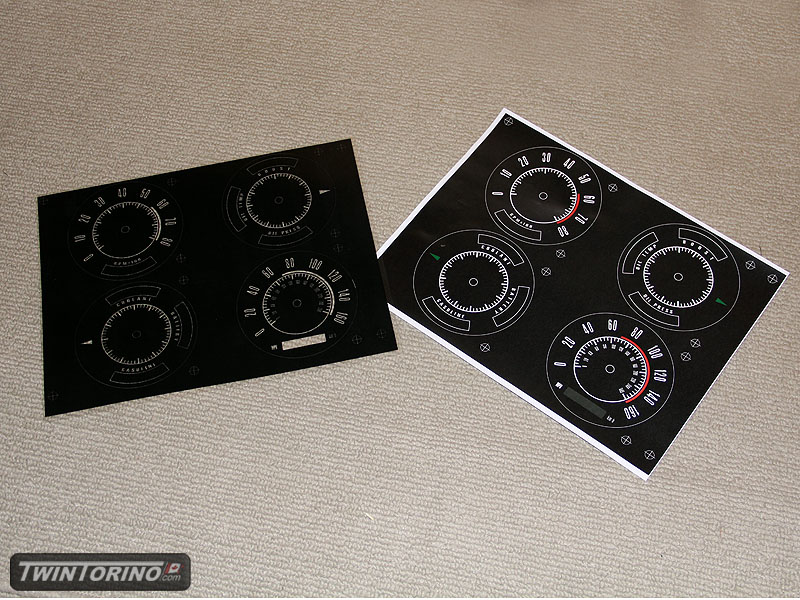
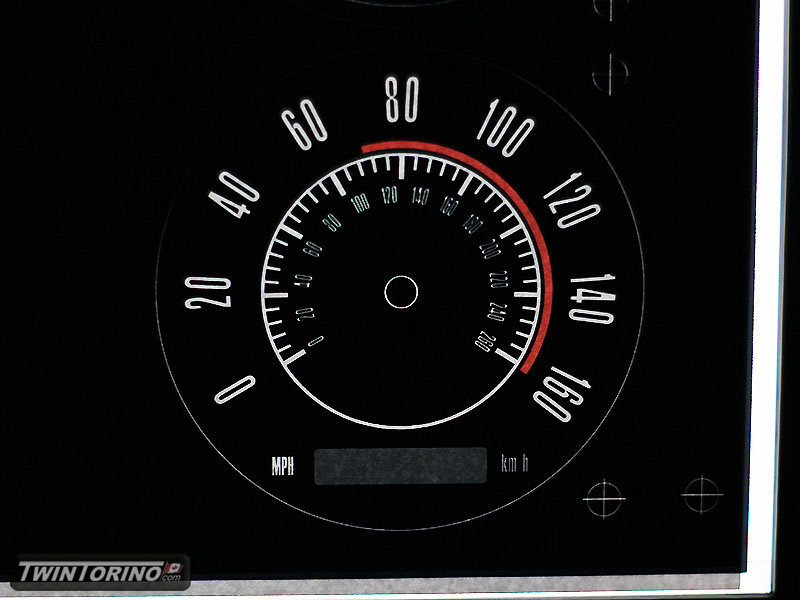
By making up a set of layered images with a high res laser jet printer, we can get the transparent/opague effect. Top layer is a standard transparency sheet printed on the backside (image reversed). The bottom layer is a standard 20lb piece of white paper. Both of these sheets are bonded together to make one piece. Since I did not have the photo mount spray adhesive at the time of making these pictures up, you will have to use your imagination of what things will look like when they are perfectly aligned.
The final picture shows using an LCD computer monitor at night for backlighting. Little to no light passes through the black sections. Looks very similar to a modern cluster. This was relatively easy for the effect it gives. Ideally, we would silkscreen the parts on appropriate materials like auto manufacturers would.. but this will have to do for now until we lock in the design. For under $10, it sure does the trick.
For adding the check engine, ABS lights etc, we will simply add another transparency sheet and omit these images from the front layer. This way you will not be able to see them unless they are illuminated.
More to come as we progress.
12-04-2011 #370 -Moderator/Sponsor-
- Join Date
- Apr 2001
- Location
- The City of Fountains
- Posts
- 16,127
Very nice work with the gauges. I have been trying to bring a more modern touch to my older Autometer gauges without having to replace the gauges which are working perfectly. I contacted Autometer and of course they weren't incredibly helpful since they just want to sell more gauges. I was thinking of going down the same path as you and doing custom faces, etc....
Can you please offer up some of the web links that you found helpful?
Andrew1970 GTO Version 3.0
1967 Cougar build
GM High-Tech Performance feature
My YouTube Channel Please Subscribe!
Instagram @dr__efi
I deliver what EFI promises.
Remote Holley EFI tuning.
Please get in touch if I can be of service.
"You were the gun, your voice was the trigger, your bravery was the barrel, your eyes were the bullets." ~ Her
12-04-2011 #371 Registered User
- Join Date
- Nov 2008
- Location
- TN
- Posts
- 959
I would be interested as well... Originally Posted by andrewb70
Benjamin
Twin Dusters
'72 Plymouth Duster "Aero Duster" project
'72 Plymouth Duster "Daily Duster" project
https://www.pro-touring.com/showthre...RO-DUSTER-quot
12-04-2011 #372
Registered User
- Join Date
- Nov 2005
- Location
- Motorcity, Canada
- Posts
- 292
For DIY gauge faces, I found these helpful. This obviously requires some knowledge in graphics software and patience/time more than anything. You can print the faces at any printing place if you don't have access to a laser jet printer. Getting into the more complicated and detailed faces will require Illustrator knowledge. For the first round, I actually found that Solidworks (or any other CAD program) was really handy until I got the hang of Illustrator. The nice thing is you can import 2D CAD drawing files into Illustrator.
http://revlimiter.net/mods/gauges.php
http://www.cubefx.com/smart/speedo/
http://forums.acuralegend.org/custom...les-t7422.html
For custom LED backlighting, this is the one I found to be the best. Most others just involve taking a string of LED's and packing them behind the cluster. This requires you to make your own PCB (printed circuit board). Still well within the DIY catagory, just a little more complicated. Once I get the faces figured out, I will move onto something like this. I will run a string of LED's in the meantime as there are plenty of other things to do on the car.
http://www.escape-city.com/viewtopic.php?f=13&t=1361
All of this is much easier if you are simply replacing newer backlit gauges as you have something to go by. The older front lit gauges on 60's/70's cars throw in a twist as you have to re-do all of the lighting and backing to the faces. You have to switch to something clear instead of the existing metal for obvious reasons. Older clusters also have plastic closeouts behind them to divert light to things such as high beams, which makes backlighting even more challenging.
Once I get this all figured out and have something that is near completed and presentable - I will put together a how-to.
12-06-2011 #373
Registered User
- Join Date
- Nov 2005
- Location
- Motorcity, Canada
- Posts
- 292
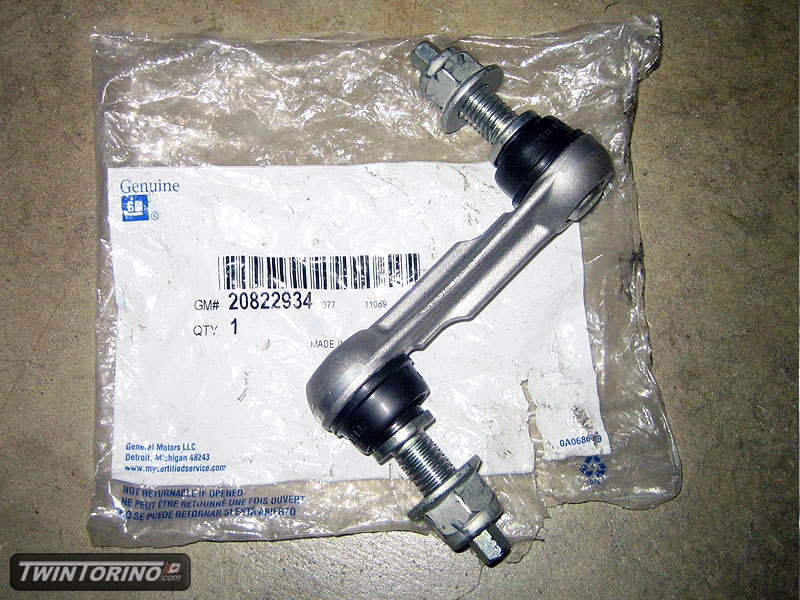
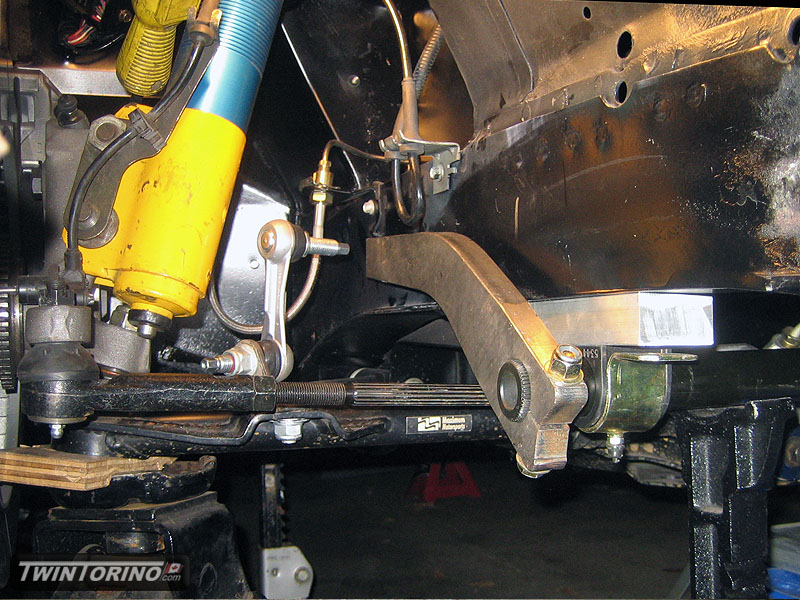
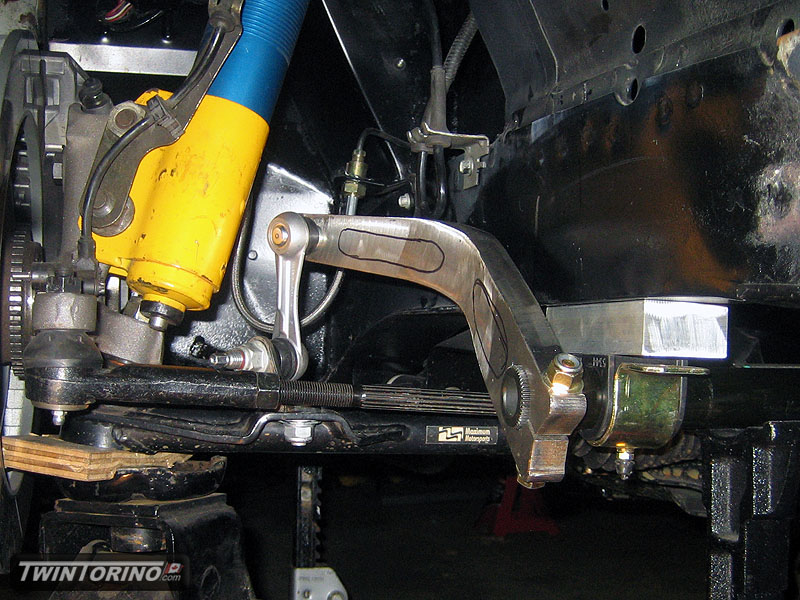
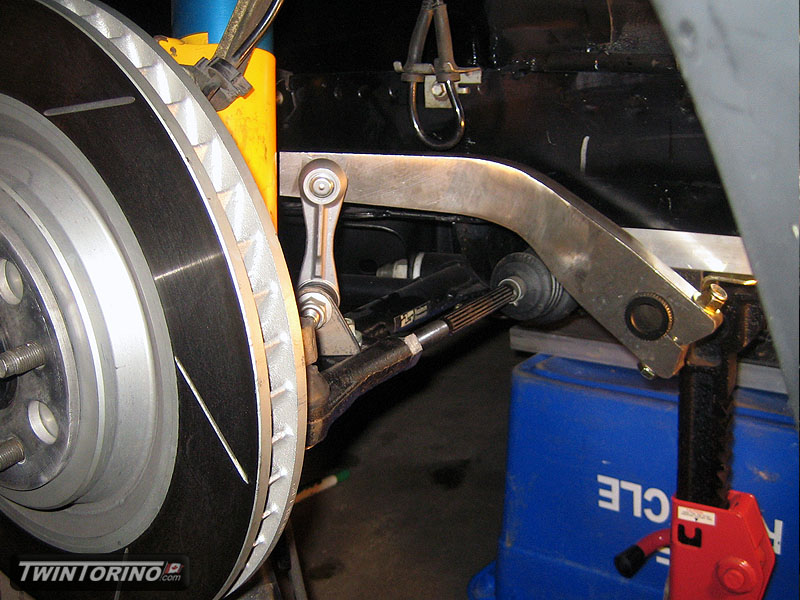
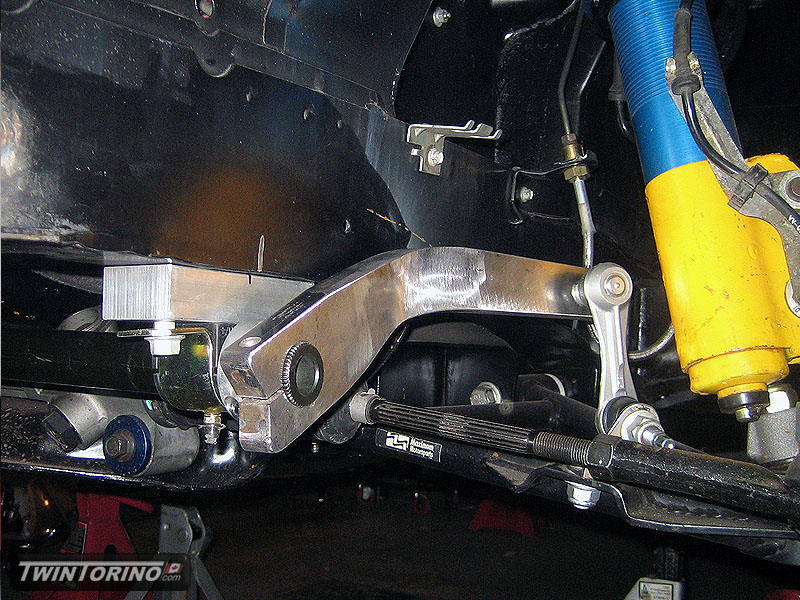
Back to the front suspension once again.. one last item to take care of - the sway bar. Since there is clearly nothing out there that would bolt right up.. we had to modify one to make it work. We are using a Speedway swaybar setup with 30deg steel arms. We have upgraded to using one of our first GM parts on this build. In this case, and aluminum C5/C6 Corvette end link. Since they do not bolt up directly to the control arms (of course not), we had to make up some interface brackets. The arms fit quite well, the only mod we really had to make is bending them 30deg to mate up with the end link. To clear the 275 tires up front, we had to notch the frame to be able to go full lock. After some cutting, v-notching, bending and welding, they kinda look like they came like that.
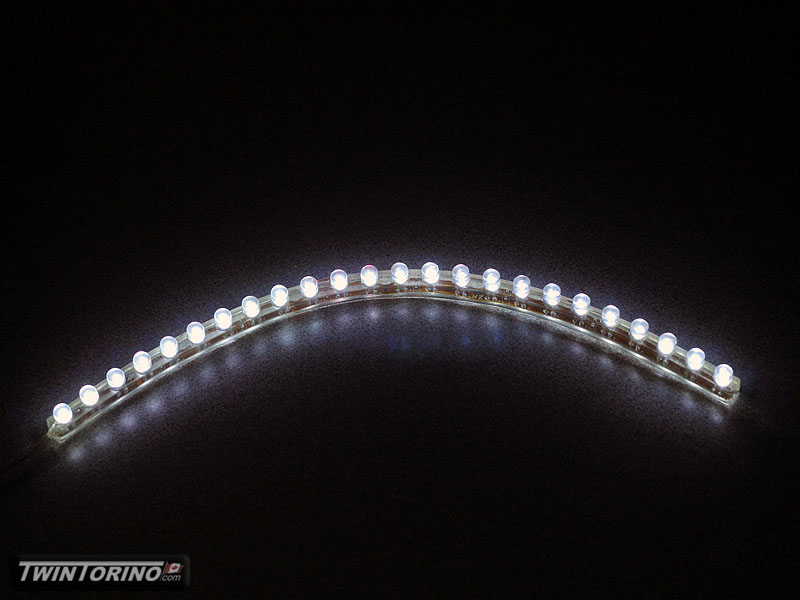
Also got in some LED's for cluster backlighting. Will be interesting to see how they illunimate things.
12-07-2011 #374
Registered User
- Join Date
- Aug 2004
- Location
- Rustburg, Virginia
- Posts
- 3,436
sway bar and end links....Nicely done!
1970 RS/SS350 139K on the clock:
89 TPI motor w/ 1pc rear seal coupled to a Viper T56 via Mcleod's modular bellhousing w/ hydraulic T/O bearing from the Viper, 12 bolt rear w/ 3.73 gearing, SC&C upper control arms, factory lowers with Delalums, C5 brakes at all four corners, Front Wheels 17x8's with Sumi 255/40/17 and Rear Wheels 17x9's with Sumi 275/40/17.
Brief description of the work done so far can be found here: http://www.nastyz28.com/forum/showthread.php?t=112454
12-07-2011 #375 Registered User
- Join Date
- Mar 2008
- Location
- Brisbane Australia
- Posts
- 410

I agree the sway bar and end links look the biz
Hot rodder's recycle, wheres those prius' going when the tree huggers have a new fad.
12-07-2011 #376
Registered User
- Join Date
- Jan 2008
- Location
- Charlotte
- Posts
- 1,295
Wooohooo.... Corvette parts on your Torino! LOL - looking great!
2005 LeMans Blue Corvette w/ T56 & Z51 & C6Z06 Brakes, Build Thread: https://www.pro-touring.com/showthread.php?64496
2005 GMC Sierra 2500HD LLY / Allison
2014 Chevy SS LS3 / 4 Door
12-09-2011 #377
Registered User
- Join Date
- Nov 2005
- Location
- Motorcity, Canada
- Posts
- 292
If an LS9 didn't cost more than I have into the entire car.. I would have one of those under the hood too
.
12-09-2011 #378
-Moderator/Sponsor-
- Join Date
- Apr 2001
- Location
- The City of Fountains
- Posts
- 16,127
Ha! I can definitely understand that... Originally Posted by SVTforme
Andrew1970 GTO Version 3.0
1967 Cougar build
GM High-Tech Performance feature
My YouTube Channel Please Subscribe!
Instagram @dr__efi
I deliver what EFI promises.
Remote Holley EFI tuning.
Please get in touch if I can be of service.
"You were the gun, your voice was the trigger, your bravery was the barrel, your eyes were the bullets." ~ Her
12-14-2011 #379
Registered User
- Join Date
- Nov 2005
- Location
- Motorcity, Canada
- Posts
- 292
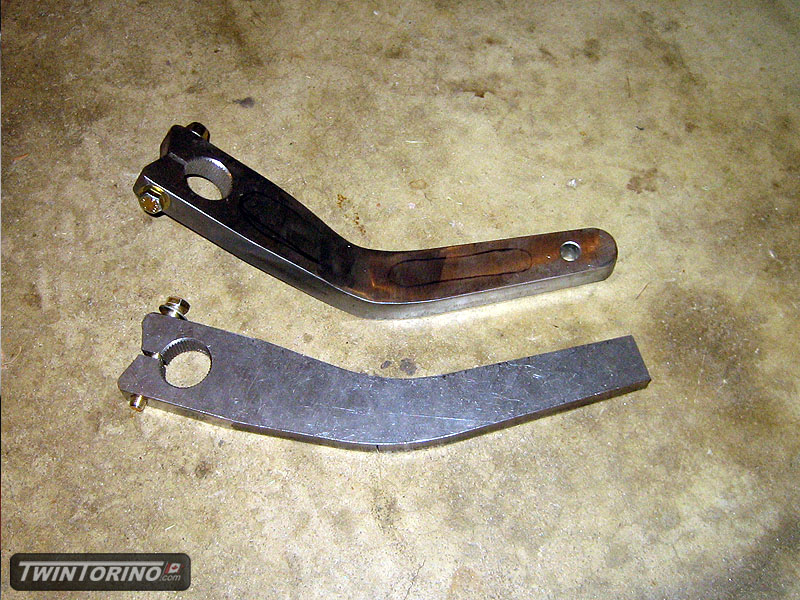
Drivers side sway bar bend up and completed. Sway bar mounts attached, collars installed and ready to go.
With this.. front and rear suspension design and fabrication = DONE! Finally.
12-15-2011 #380 Registered User
- Join Date
- Mar 2005
- Location
- Texan Back in Texas!
- Posts
- 675
Awesome work, does bending the arm change the effective swaybar stiffness or is it so minor as not to be of concern?
1965 Falcon Hardtop
However long you think your project will take, double it and you might be halfway right.
Build Thread: https://www.pro-touring.com/showthre...847#post798847

 Reply With Quote


