


Results 81 to 100 of 366
Thread: Introducing - Project 1/2-TRAK
-
10-22-2008 #81

 -Moderator-
- Join Date
- Jul 2005
- Location
- Mountain View, CA
- Posts
- 9,583

I'll be routing it to intakes mounted in the openings in the front valance.
Similar to this
Last edited by Damn True; 10-22-2008 at 03:42 PM.
True T.
Whats new with Project 1/2-Trak?
Follow my wisecracks on Sports, Food, Politics and other BS on Twitter.
My blog
When they kick out your front door, How you gonna come?
With your hands on your head, Or on the trigger of your gun?
-
10-22-2008 #82 -Moderator-
- Join Date
- Nov 2001
- Location
- Sacramento Ca
- Posts
- 6,827
Sick. I really like that idea.
Tony Langlois
1966 Corvair Monza
10-23-2008 #83
Registered User
- Join Date
- Apr 2001
- Location
- La La Land, CA
- Posts
- 2,241
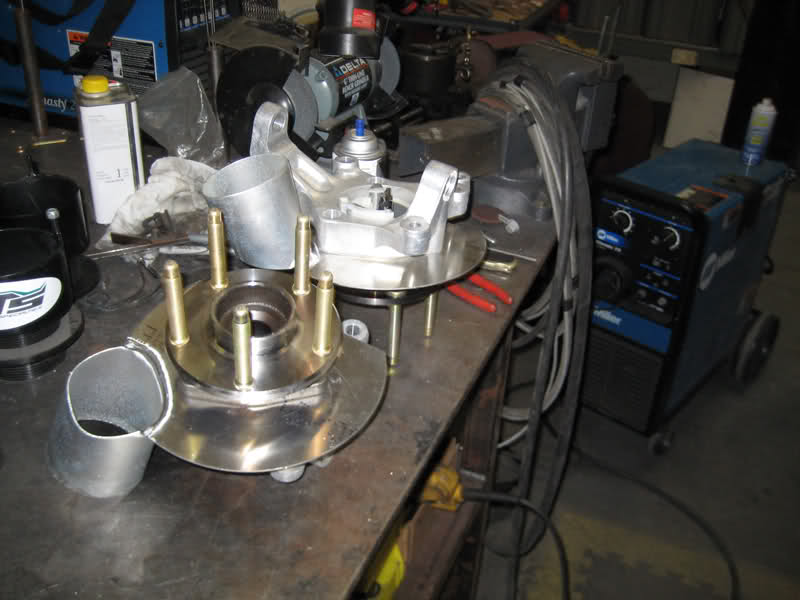
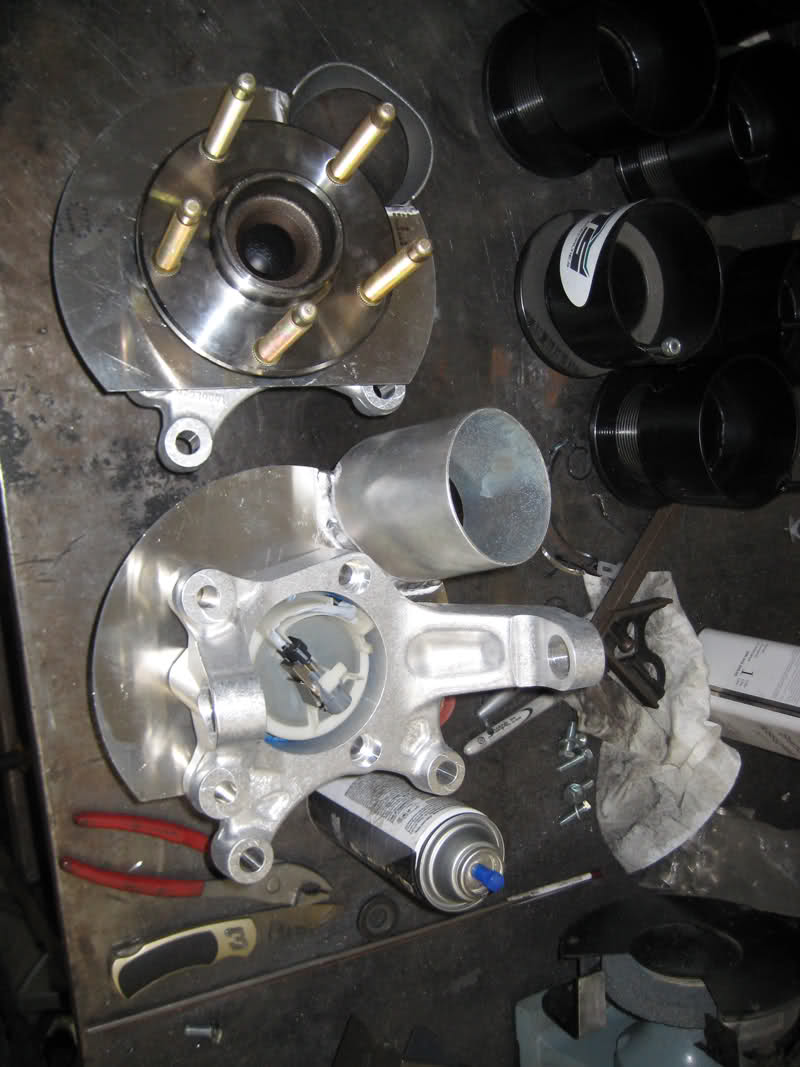
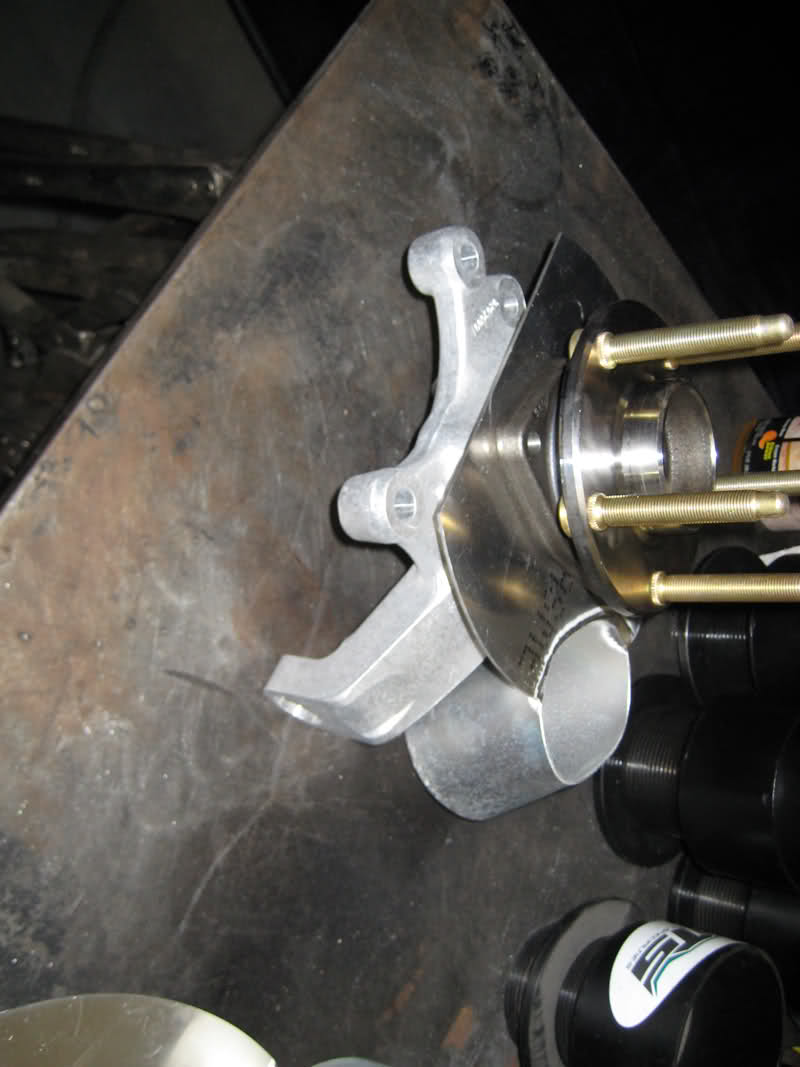
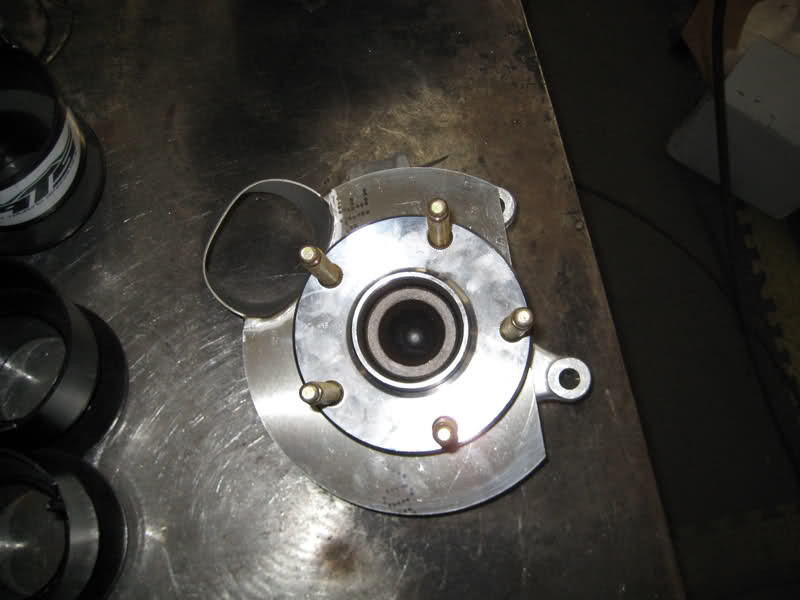
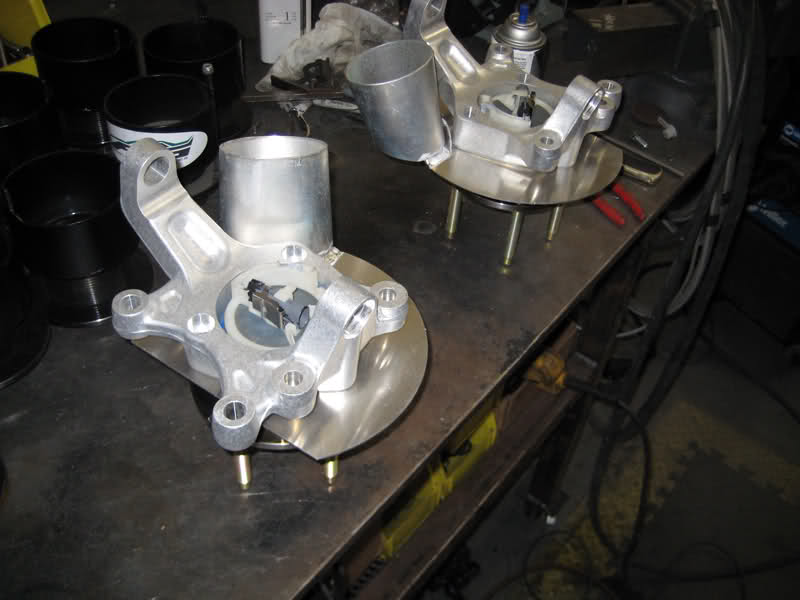
So we have new goodies at the shop. The guys at LG Motorsports drop shipped a set of their C5/C6 Corvette spindle brake ducts. We will be adding them in place of the wheel speed sensor bracket on our forged aluminum AFX spindles. The only issue we had was that during our engineering process of making the AFX spindle we needed to rotate the forged in brake bracket so we could tie it into a fillet gusset while adding about 50% more material to it to eliminate brake flex. This makes the cut of the duct interfere with the upper brake bracket hole due to our redesign. No big deal, the bolts go in from the back side anyways.
Here are the spindles as we test assembled them with the 1/2"x20x3" long ARP stud upgrade. Hope to have this stuff out to you in the morning True!
Tyler
10-23-2008 #84
-Moderator-
- Join Date
- Jul 2005
- Location
- Mountain View, CA
- Posts
- 9,583
Note to self:
Order axles that are compatible with BIG A$$ WHEEL STUDS!True T.
Whats new with Project 1/2-Trak?
Follow my wisecracks on Sports, Food, Politics and other BS on Twitter.
My blog
When they kick out your front door, How you gonna come?
With your hands on your head, Or on the trigger of your gun?
10-23-2008 #85
-Moderator-
- Join Date
- Nov 2001
- Location
- Sacramento Ca
- Posts
- 6,827
what's the sensor inside the hub for?
Tony Langlois
1966 Corvair Monza
10-23-2008 #86
Registered User
- Join Date
- Dec 2005
- Posts
- 161
abs?
the afx spindles come with abs ****e.... so maybe those are it?The Gutless Cutlass, is no more.
'73 Chevy C10, Low with lots of GO!!!!
10-23-2008 #87
-Moderator-
- Join Date
- Jul 2005
- Location
- Mountain View, CA
- Posts
- 9,583
Flux capacitors. Ssssh Originally Posted by TonyL
 don't tell anyone.
True T.
Whats new with Project 1/2-Trak?
Follow my wisecracks on Sports, Food, Politics and other BS on Twitter.
My blog
When they kick out your front door, How you gonna come?
With your hands on your head, Or on the trigger of your gun?
10-23-2008 #88
-Moderator-
- Join Date
- Nov 2001
- Location
- Sacramento Ca
- Posts
- 6,827
when you get back to 1985, tell me to break up with the girl I'd be dating. You'll save me tens, possibly hundreds of thousands of dollars!
I might even still have a full head of hair!Tony Langlois
1966 Corvair Monza
11-04-2008 #89
Rat Pack Member

- Join Date
- Aug 2002
- Location
- Waleska Ga.
- Posts
- 2,722
Thats funny shiiiiit!! make sure an find me an do the same. Originally Posted by TonyL
Thanks!!David Sloan
If you’re suggesting sending men with weapons of war to take my weapons of war,then I’m fairly certain that’s what’s called an act of war… and the definition of tyranny.which coincidentally is the reason for the second amendment to begin with!
https://www.pro-touring.com/showthre...ght=fun+camaro
https://www.pro-touring.com/threads/...lcamino-build!
11-06-2008 #90
-Moderator-
- Join Date
- Jul 2005
- Location
- Mountain View, CA
- Posts
- 9,583
As stated, the next step is to install the ATS double shear coilover bracket. I've gotten the sense from some that this is percieved as a difficult task. I mean, it's one thing for Tyler to install these in his shop with a bunch of quality tools and equipment but perhaps another for someone to do at home. Tyler bills this thing as an easy to install upgrade. Well.....let's see.
Here is the bracket:
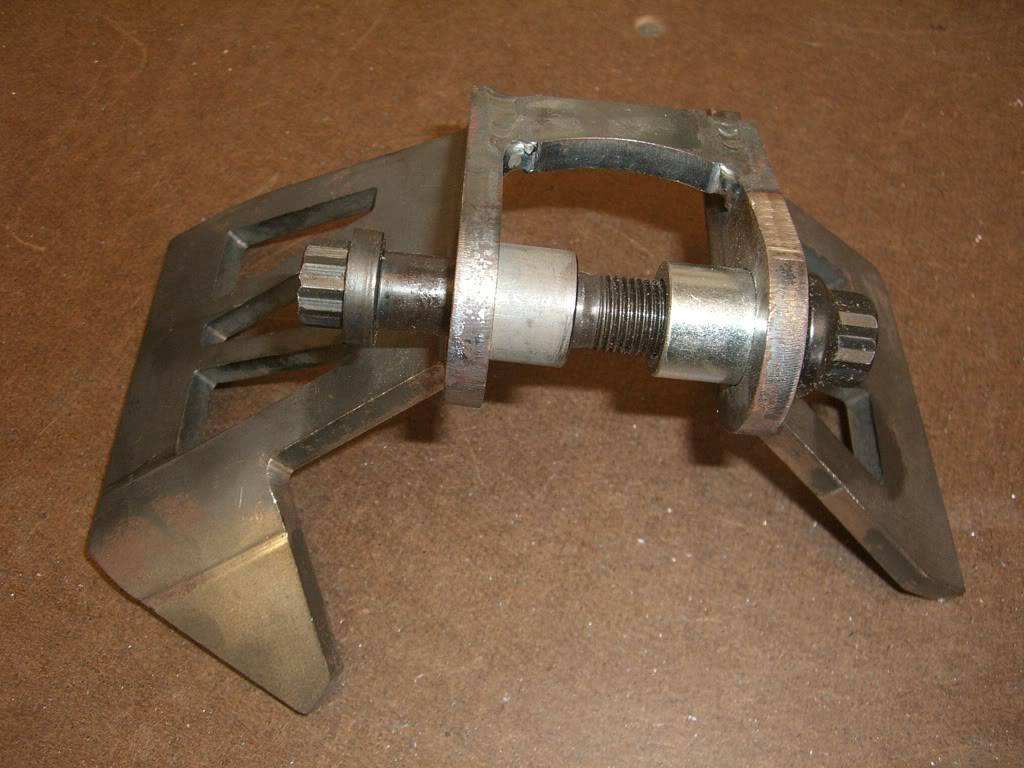
A darned robust little item if I do say so. 1/4" steel plate (how do you bend this stuff?) nicely mig welded into an assembly that I'm pretty sure could support the weight of the car a couple times over.
I have at my disposal a small Kobalt air compressor and cutoff tool. A cheap Sears Craftsman grinder (with cutoff, grinder, wire and flap-disk wheels), a sawzall, a Miller 175 welder and a little something I borrowed from work that we'll get to later. By no means professional quality stuff. IMO your basic homebrew fab tools.
Since this the install is done twice (left side and right) I've decided to examine two different ways of accomplishing the task.
Here is what we start with:
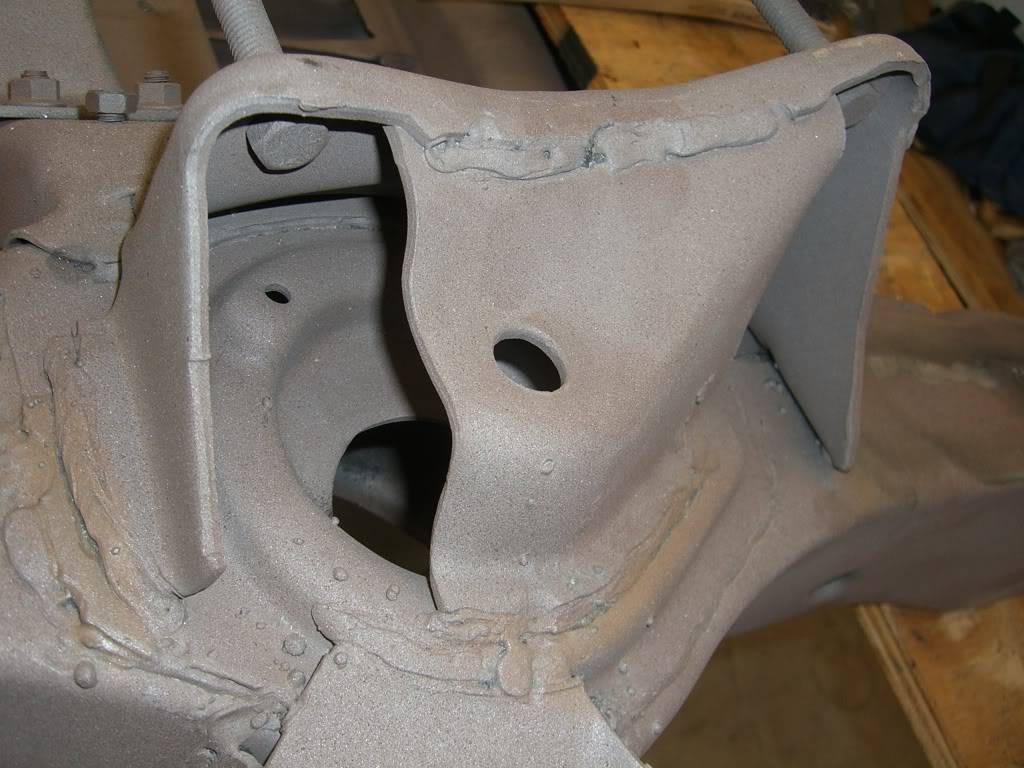
The sandblasted subframe and it's OE single shear shock mount and upper control mount.
The first step is to remove the single shear shock mount. At first I tried using the pnematic cutoff tool......lesson learned here. Cheap air compressors and pneumatic tools are just that....cheap. The $200 compressor from Lowes (Kobalt brand) just does not have the ooomph to handle this. It couldn't keep up with the cuttoff tool. So I switched to ol' reliable. Sears.
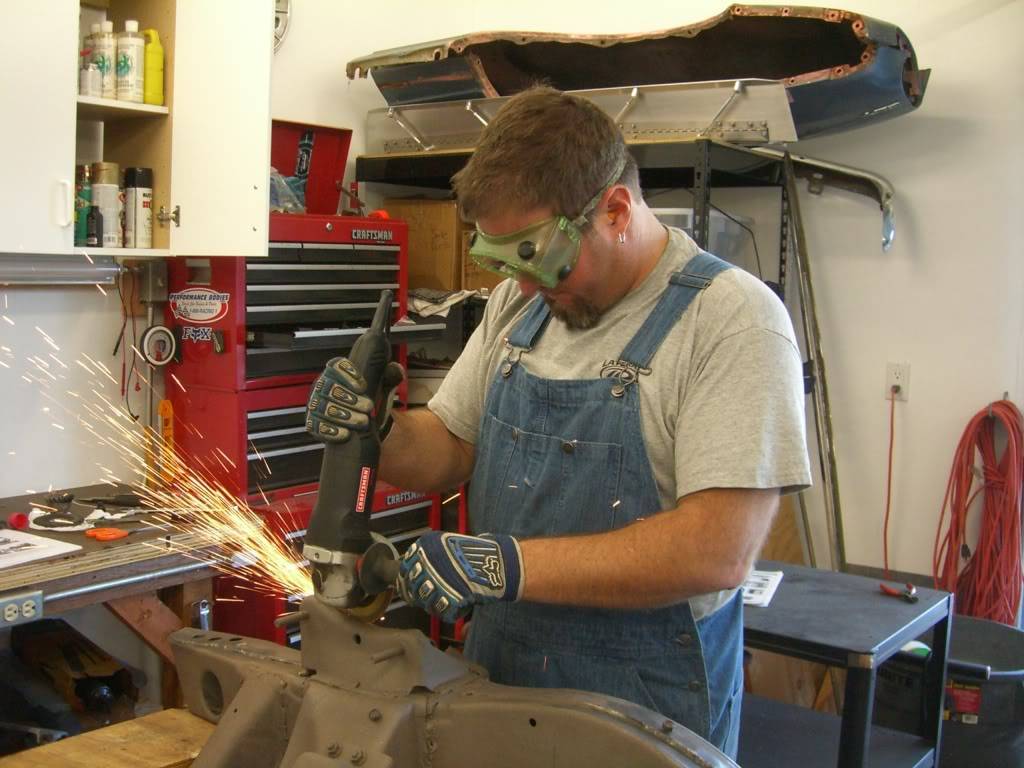
The Craftsman grinder with a 4.5" cuttoff wheel made quick work of the shock mount.
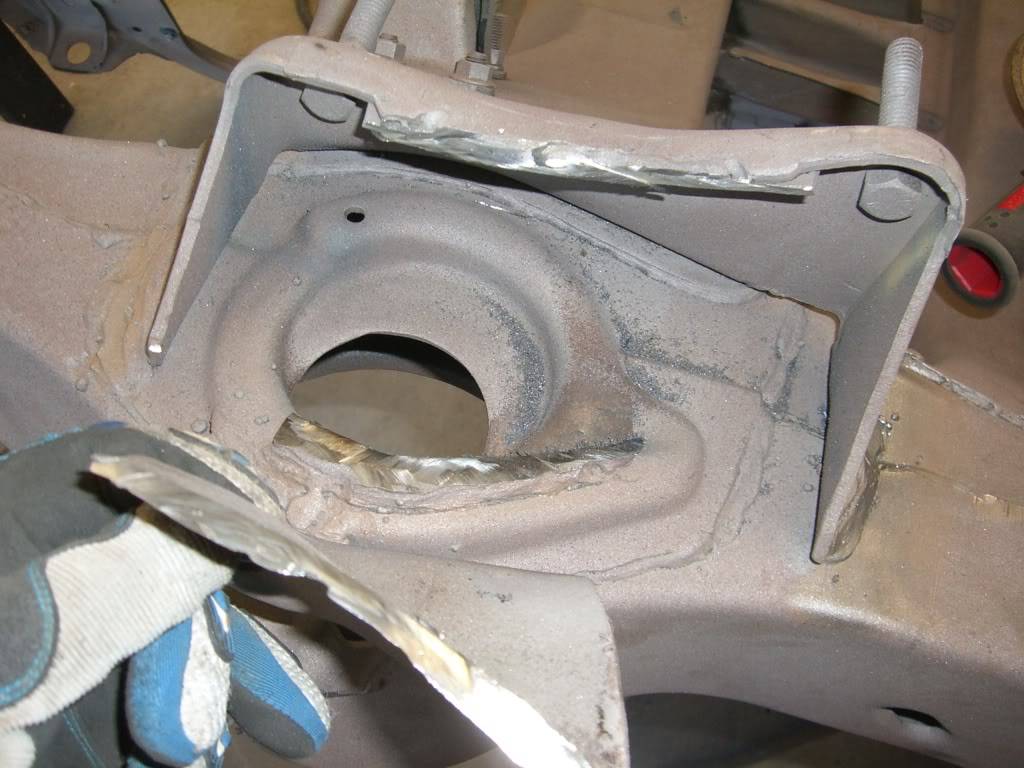
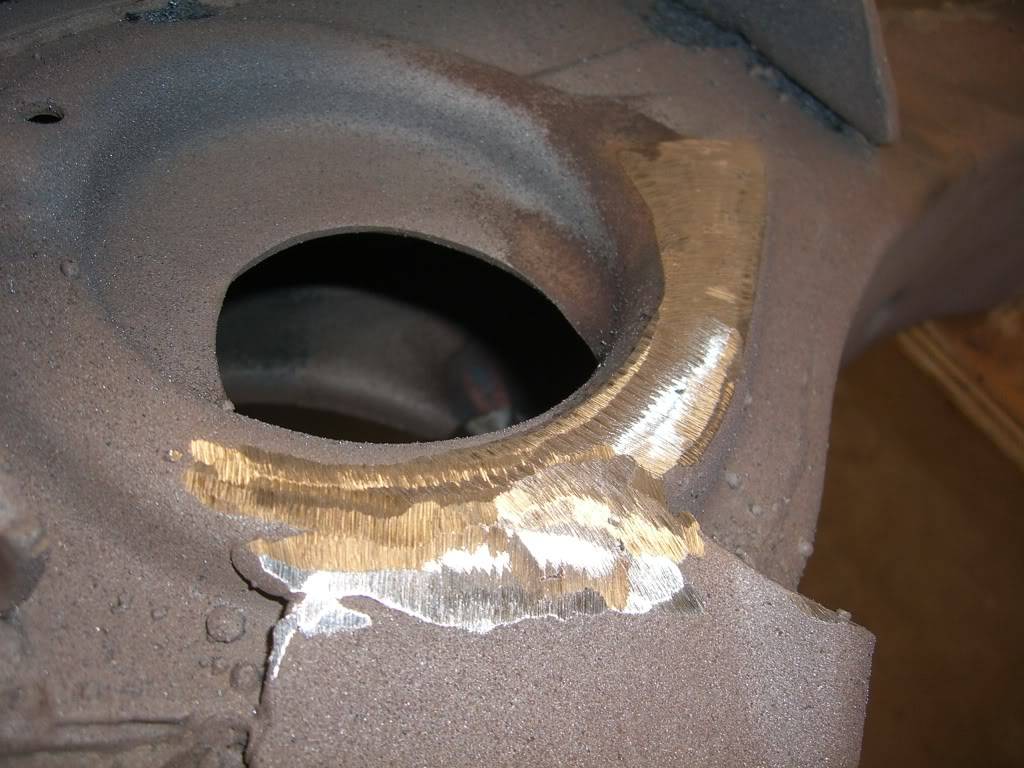
But it does leave a lot of material behind. The lap-welded portion on the subframe arm partially surrounding the spring pocket and the portion still attached to the UCA mount need to be cleaned up.
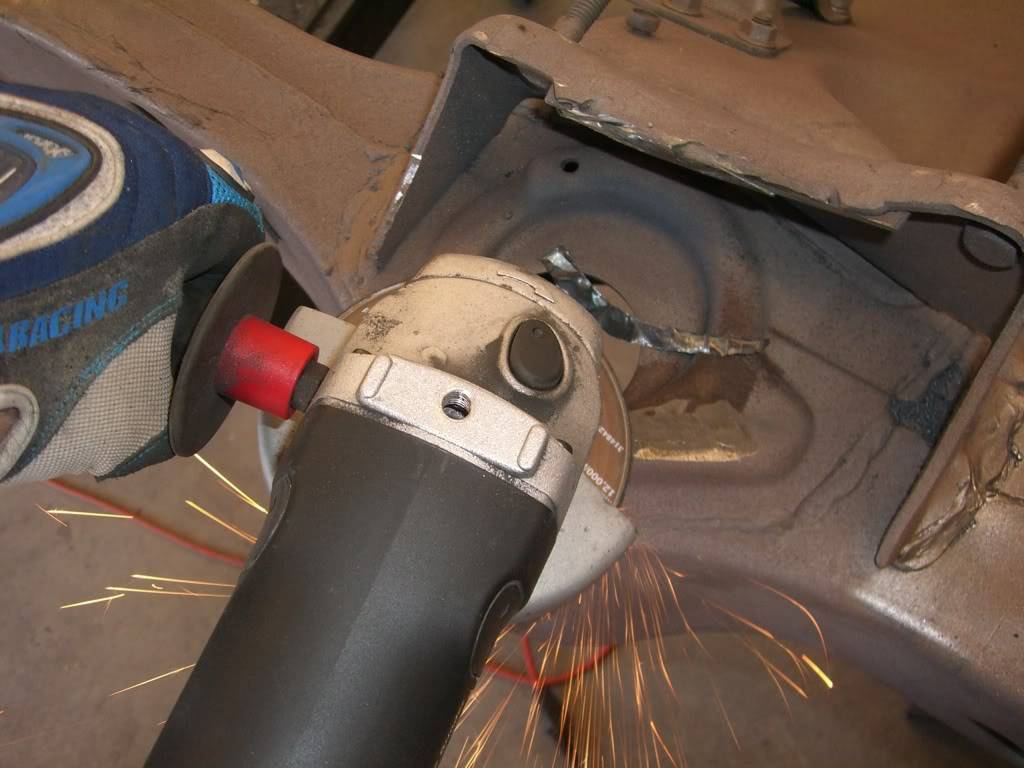
No worries...I am using both hands on the grinder (with eye and ear protection). My wife leaned over my shoulder with the camera to take the photo.
Still grinding away the mess
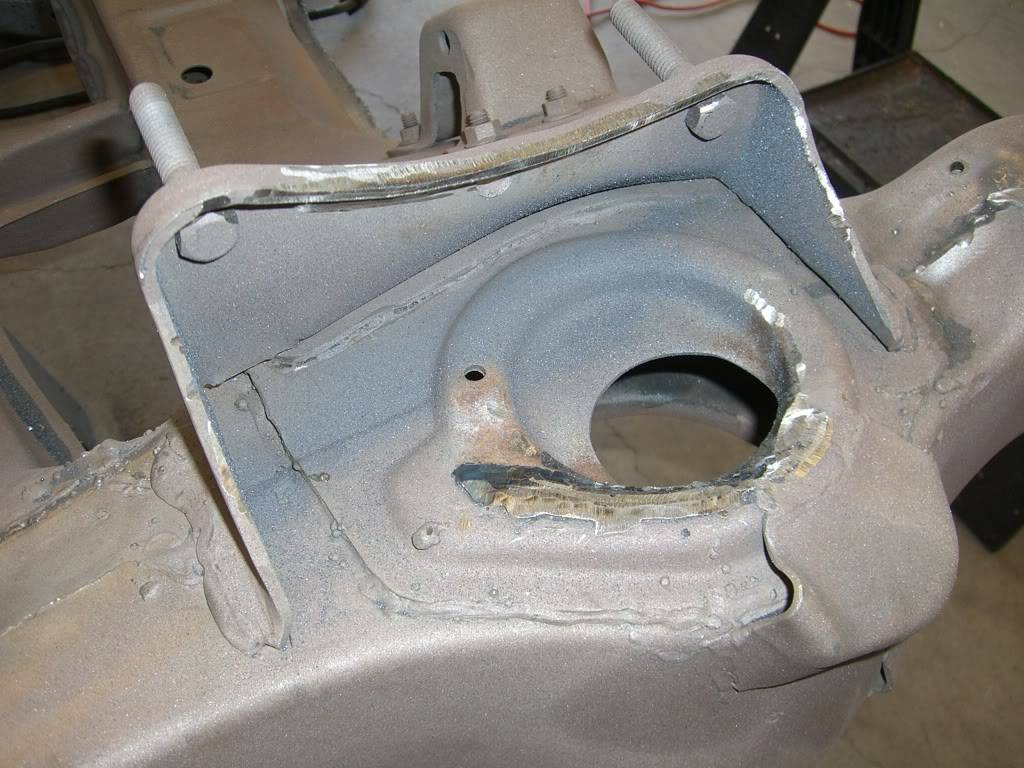 True T.
Whats new with Project 1/2-Trak?
Follow my wisecracks on Sports, Food, Politics and other BS on Twitter.
My blog
When they kick out your front door, How you gonna come?
With your hands on your head, Or on the trigger of your gun?
11-06-2008 #91
-Moderator-
- Join Date
- Jul 2005
- Location
- Mountain View, CA
- Posts
- 9,583
Getting rid of the last of the junk attached to the UCA mount
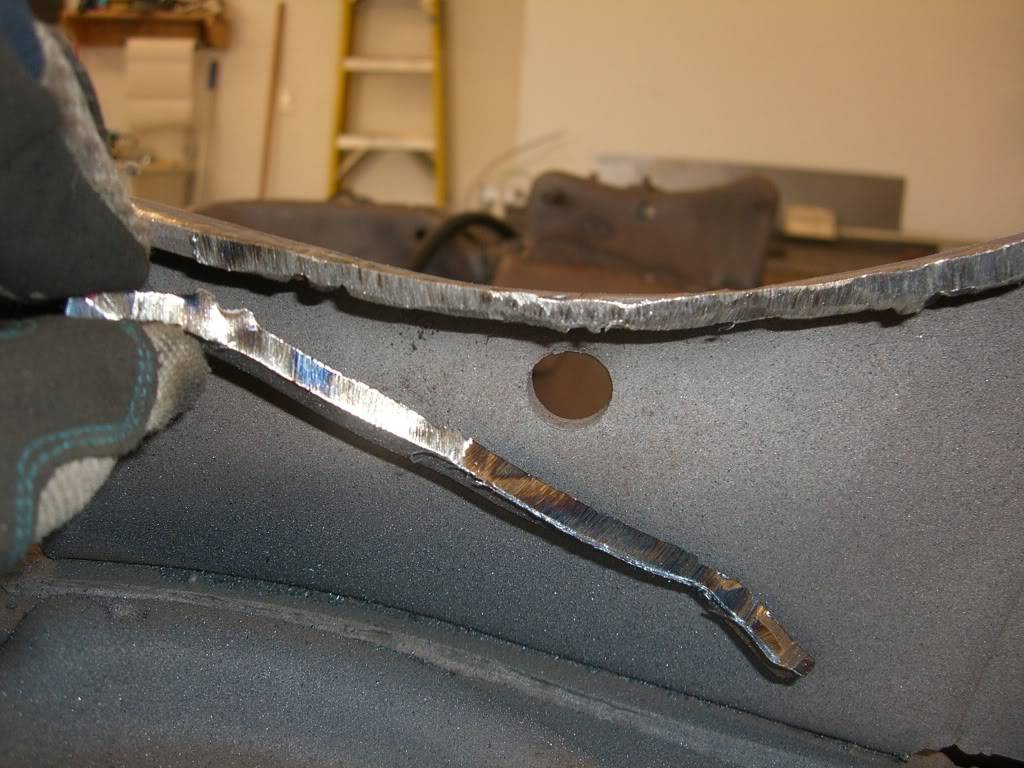
.....and finally all cleaned up.
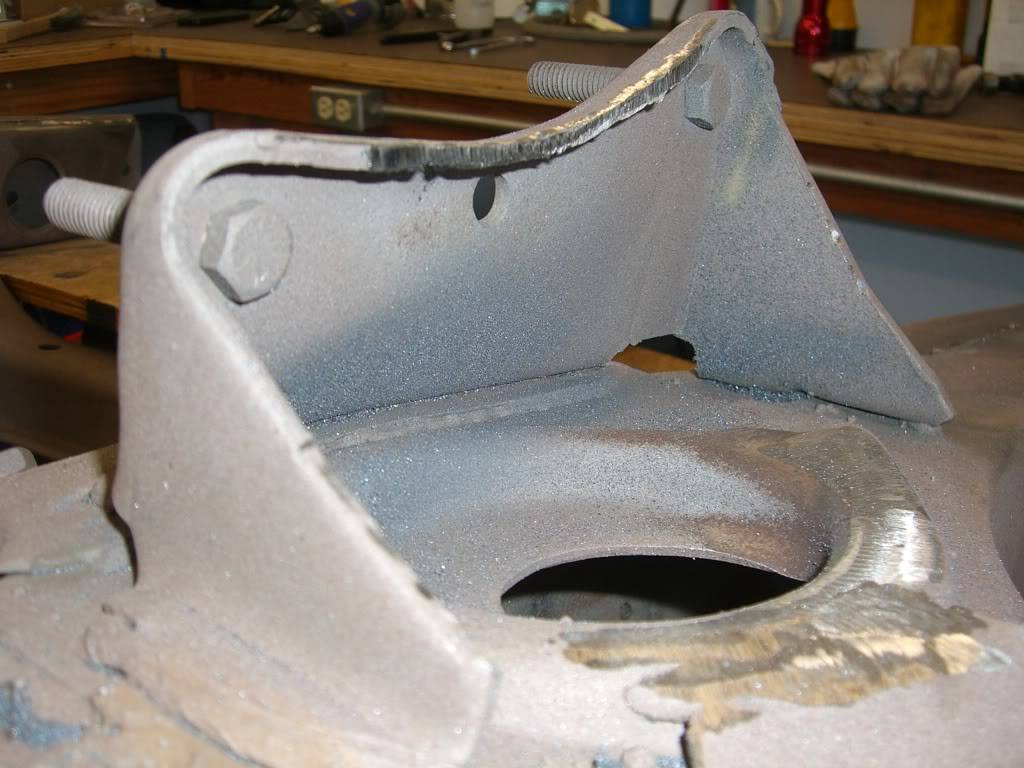
The next step is to remove a portion of the spring pocket. This will open up the top of the subrame and allow enough room for the coilover to pass through to the bracket after we attach it.
You'll need to open this up to roughly 4 inches in diameter. I went a little wider for an extra margin of clearance for the shock/spring. You can see the red line guiding my cut below.
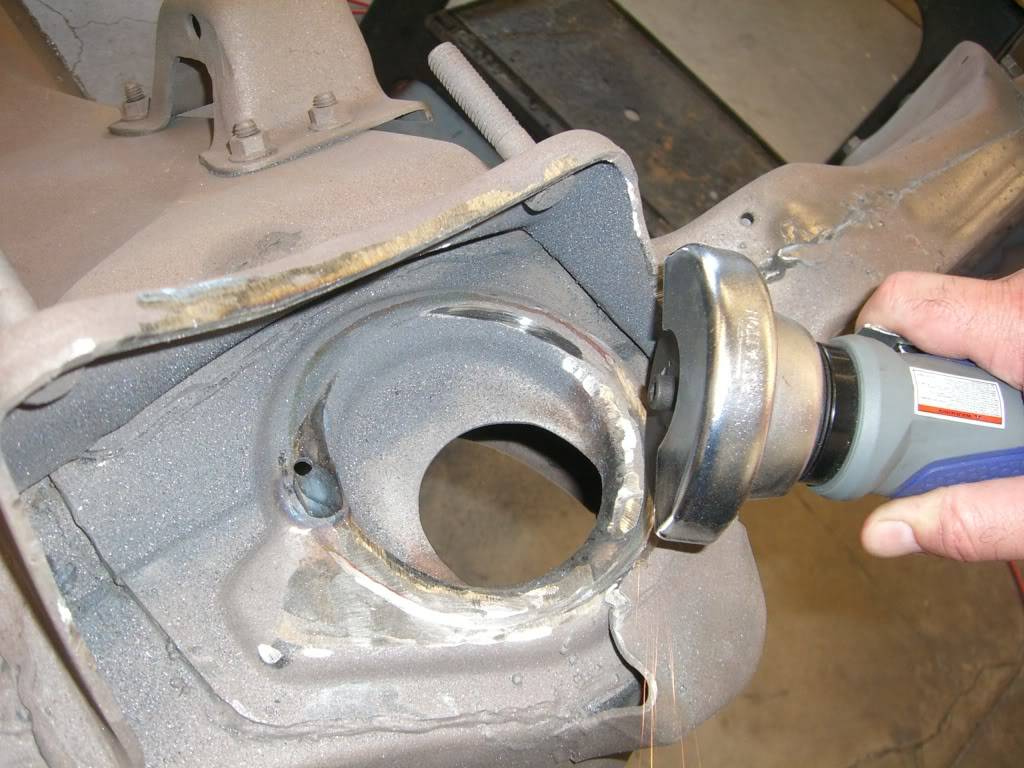
Again I tried the pneumatic cuttoff tool. Again I was dissapointed. So I tried an alternate method. I used the sawzall to take small pie cuts out of the material. Sorta nibbleing away at it until the hole was "mostly round" then finished it with a grinder. No pictures of the middle of the process here.......it was ugly. But once cleaned up with the grinder it looks fine.
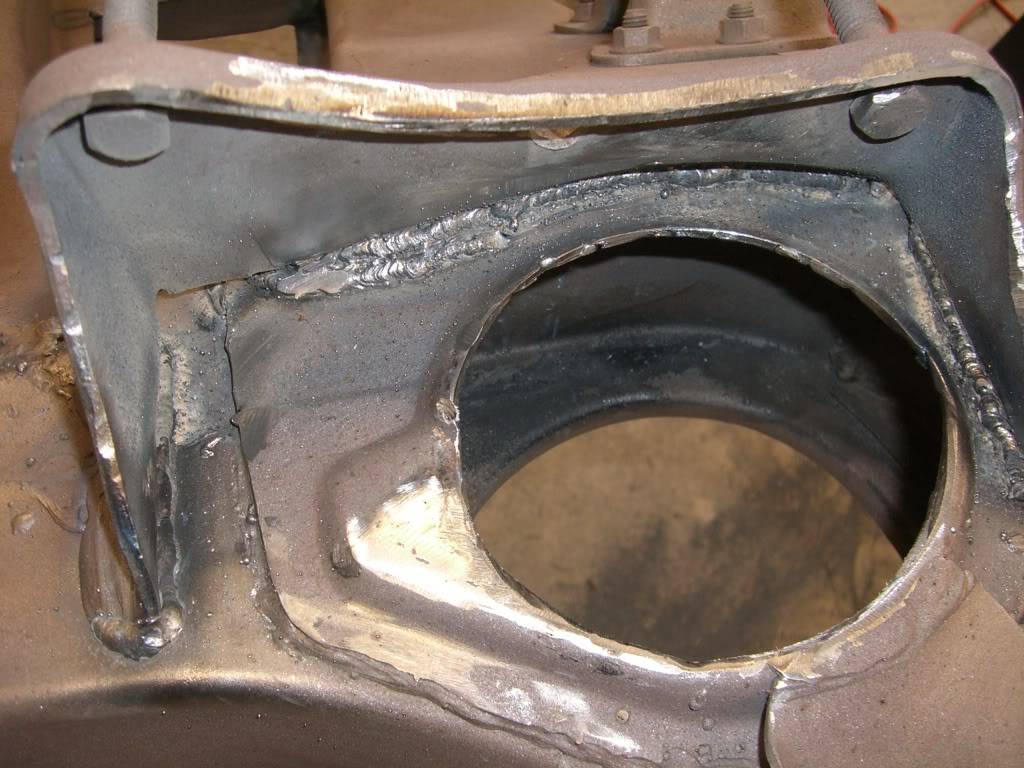
I also took the time at this point to add a little extra weld to the UCA brakets. Nearly impossible to get that joint in there clean and it's tough to get the torch close enough for good puddle control and see what you are doing. The welds reflect that but they are fully penetrated.....just ugly.
On the other side I decided to try something different to see if the process could be sped up a bit and improve the quality. It involved a slightly more sophisticated tool than the sawzall.
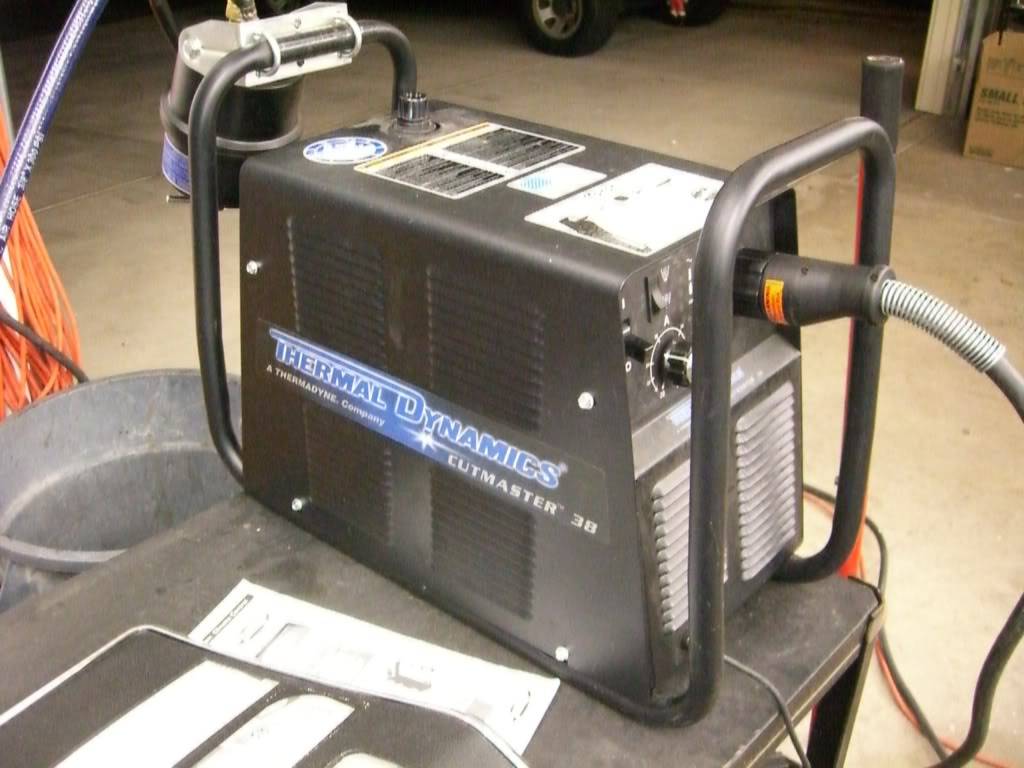
Boy do I like this thing!
Where it took me nearly an hour to cut away the other spring pocket with the sawzall bit by bit, the plasma cutter did the job in about 45 seconds leaving a muuuuuch nicer hole...
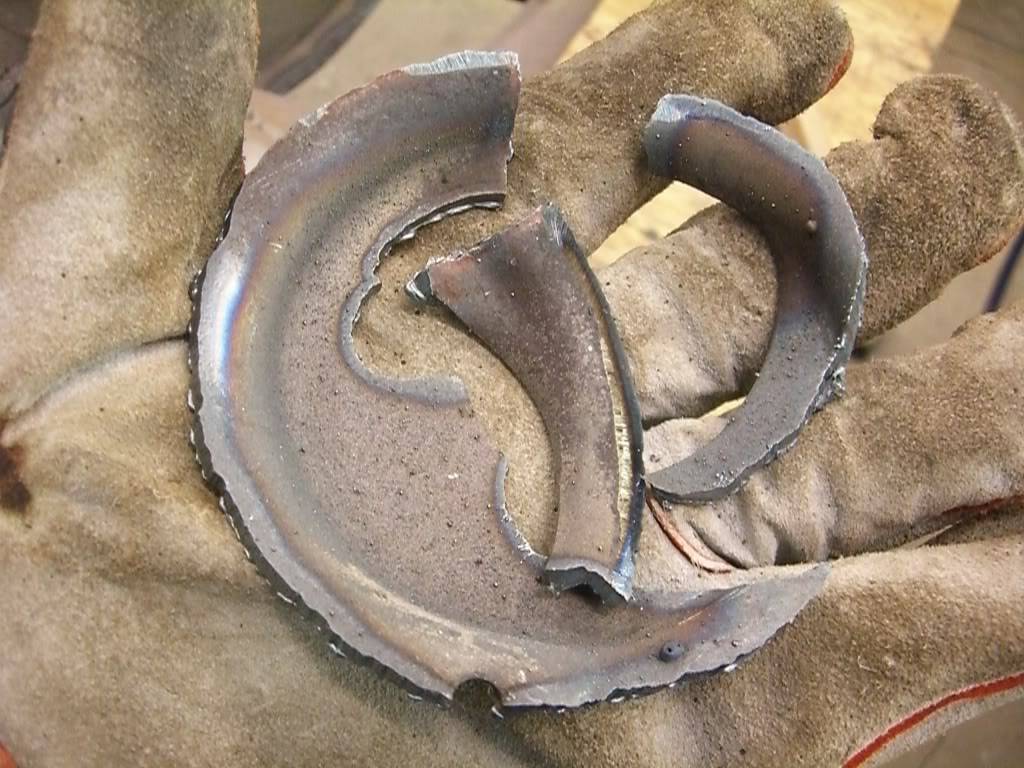
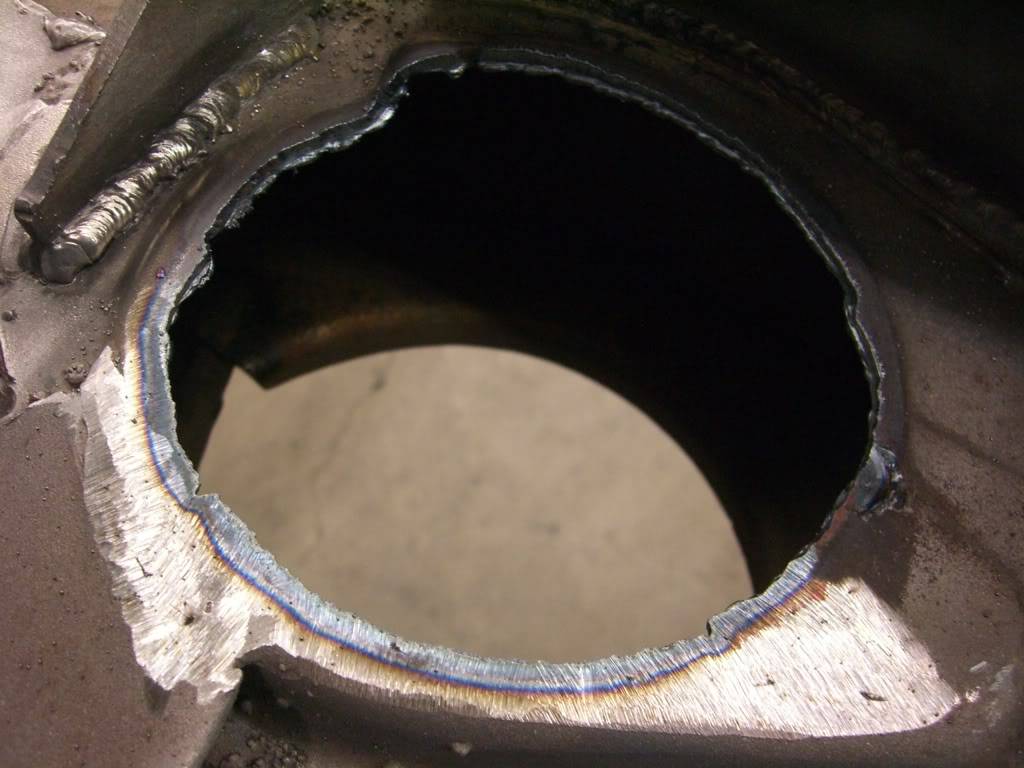
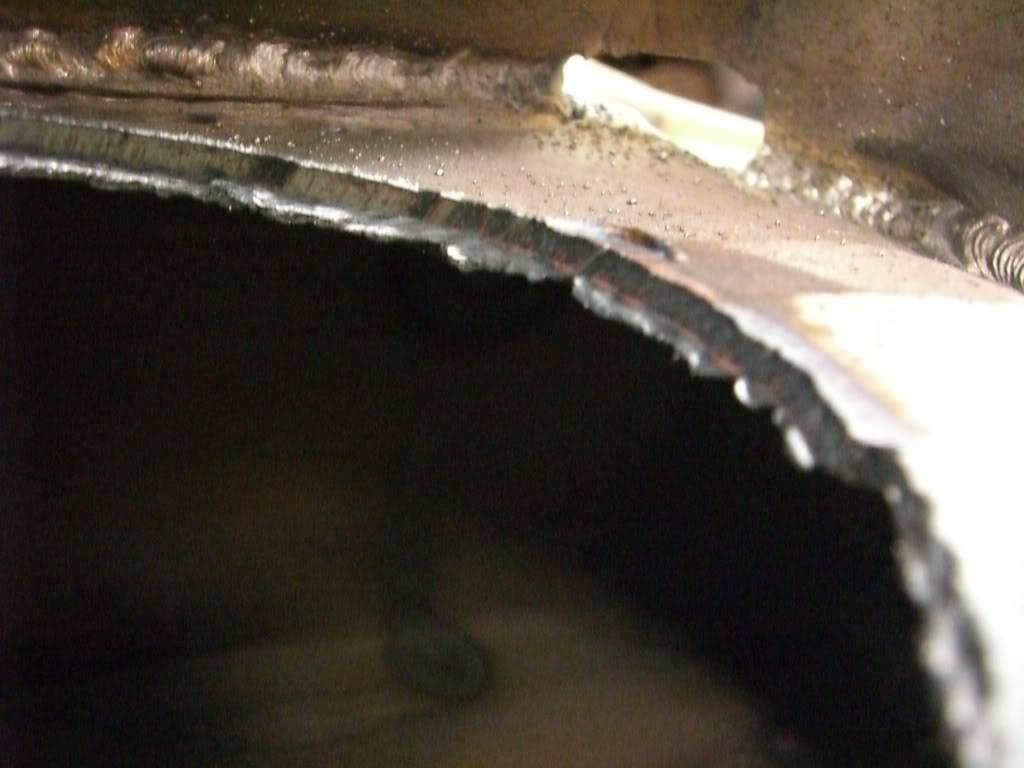
....and with far less cleanup with the grinder required as well. All told a much better result with the plasma.
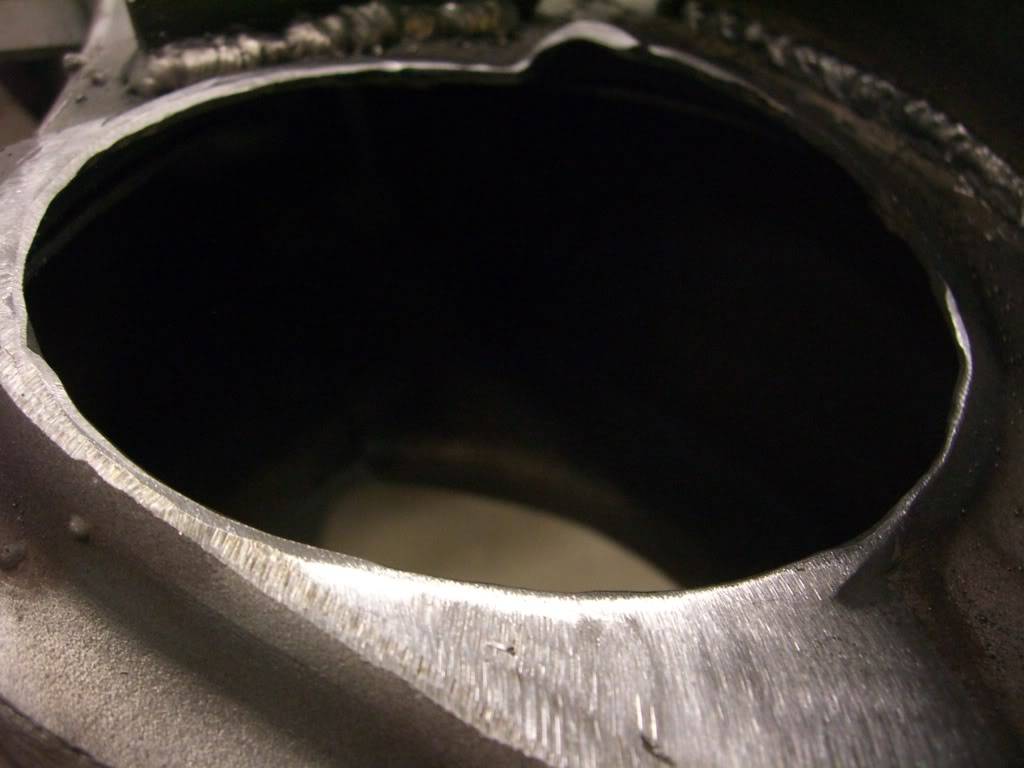
The next step is to begin trial fitting the coil over bracket to the UCA mount. Now remember, we are dealing with a 40 year old car. Tolerances on these things when built were shall we say........loose. The bracket will have to be trimmed here and there to fit.
Here is the bracket as delivered. You can see that the gaps around the bracket are big.
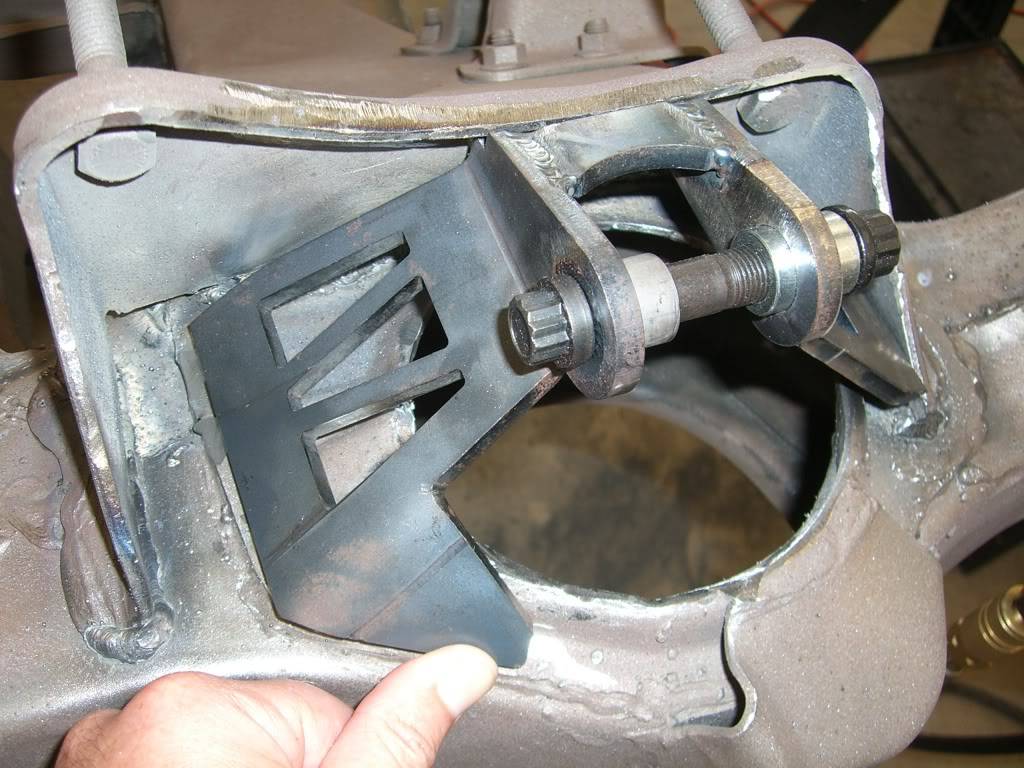
You'll have to nip away at the c/o bracket and perhaps the UCA bracket some to get your joints tight enough to weld and to locate your shock in the hole such that the spring perch or spring wont make contact with the subframe. There is no sense in me decribing where you'll have to trim he bracket as it will be different on your car. It was differnet on mine from left side to right.
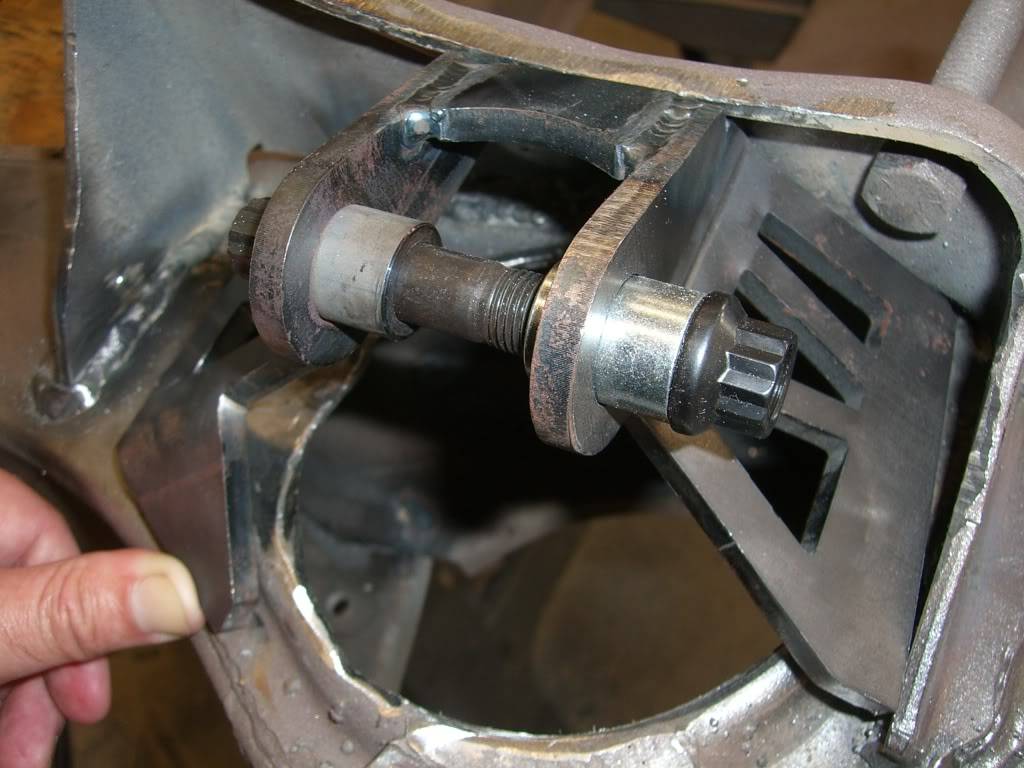
.True T.
Whats new with Project 1/2-Trak?
Follow my wisecracks on Sports, Food, Politics and other BS on Twitter.
My blog
When they kick out your front door, How you gonna come?
With your hands on your head, Or on the trigger of your gun?
11-06-2008 #92
-Moderator-
- Join Date
- Jul 2005
- Location
- Mountain View, CA
- Posts
- 9,583
....and after considerable trimming
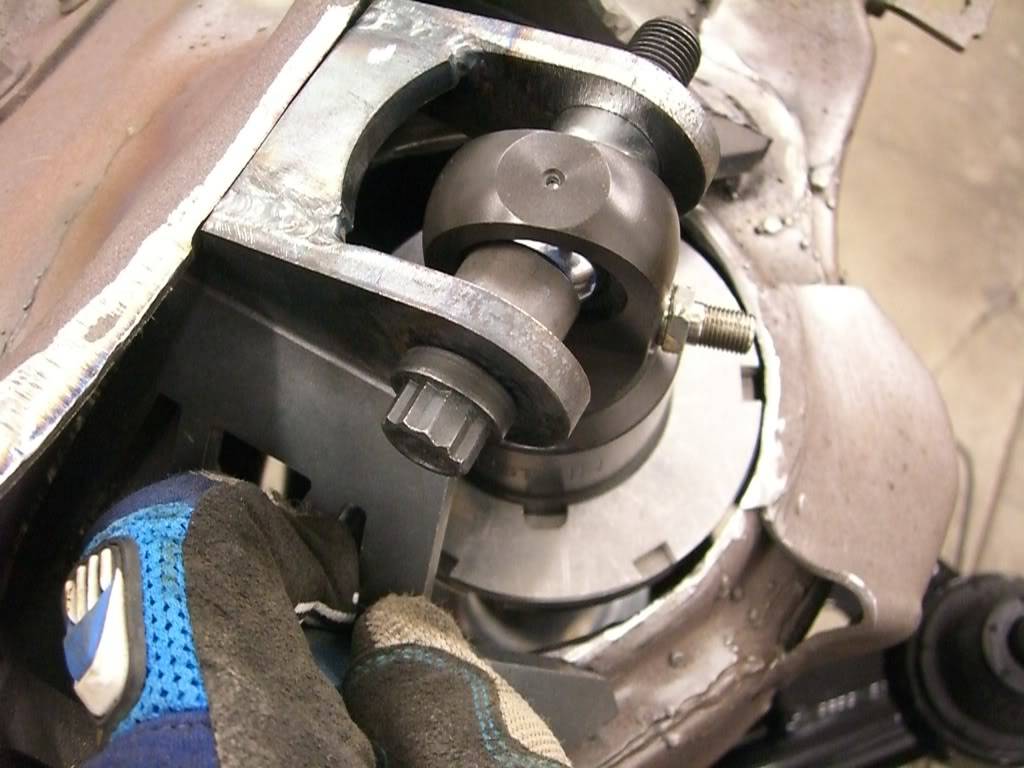
Yes I know the shock is upside down. The adjustable perch is slightly larger than the fixed one and I assumed closer to the OD of the spring.
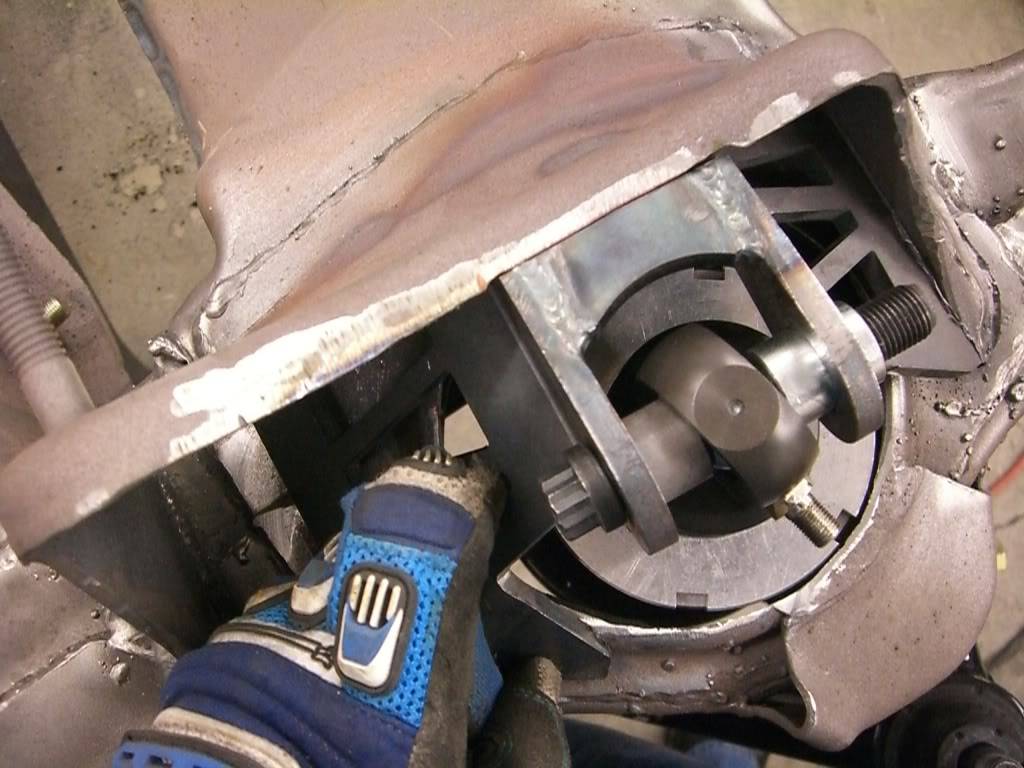
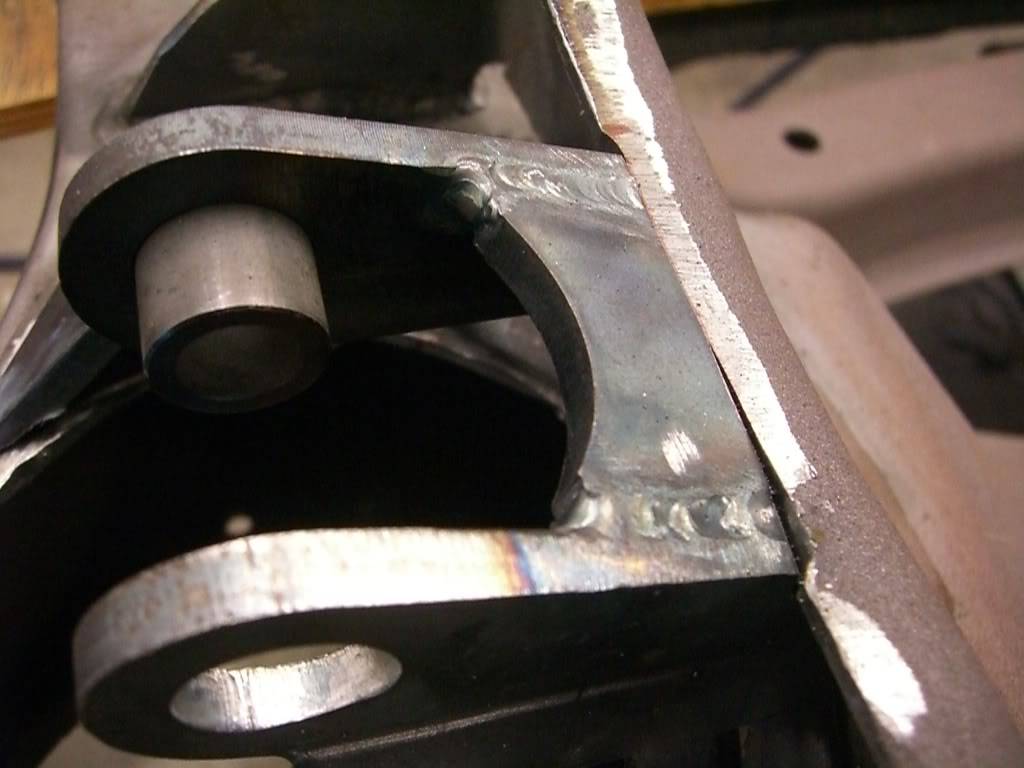
Again, YMMV on the trimming required. This is just what had to happen to get it to fit up nicely on MY particular subframe. It isnt hard. Just time consuming. You grind a little, then test. Rinse and repeat until you get a nice fit then tack the sucker in place.
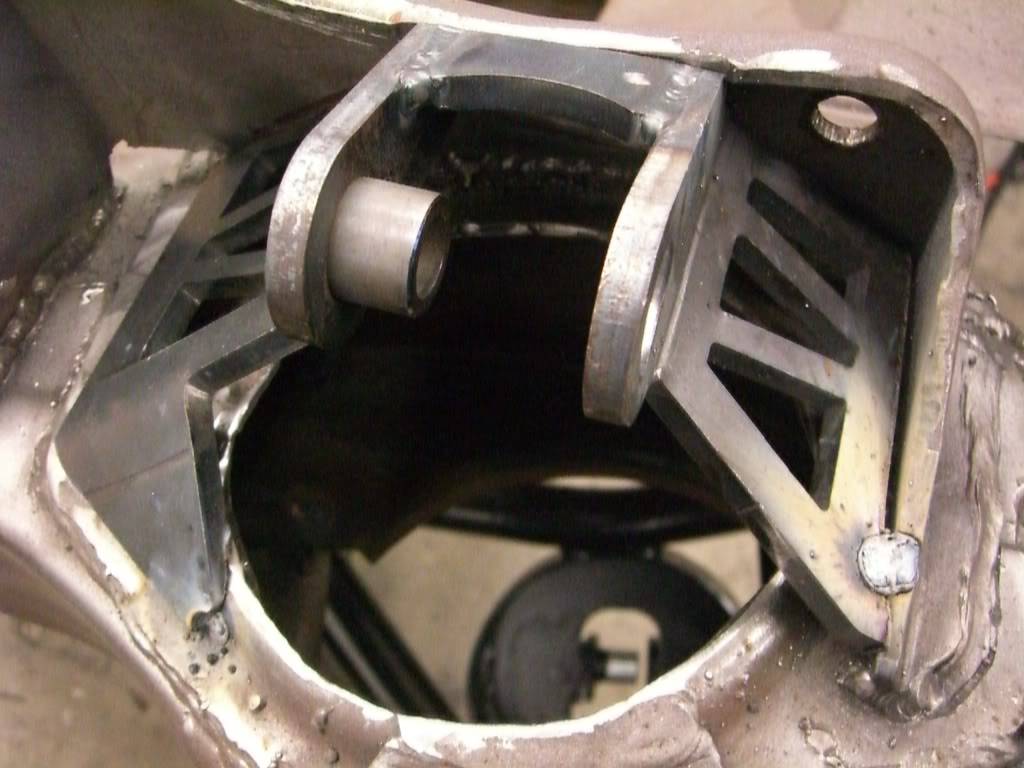
Then weld it up...
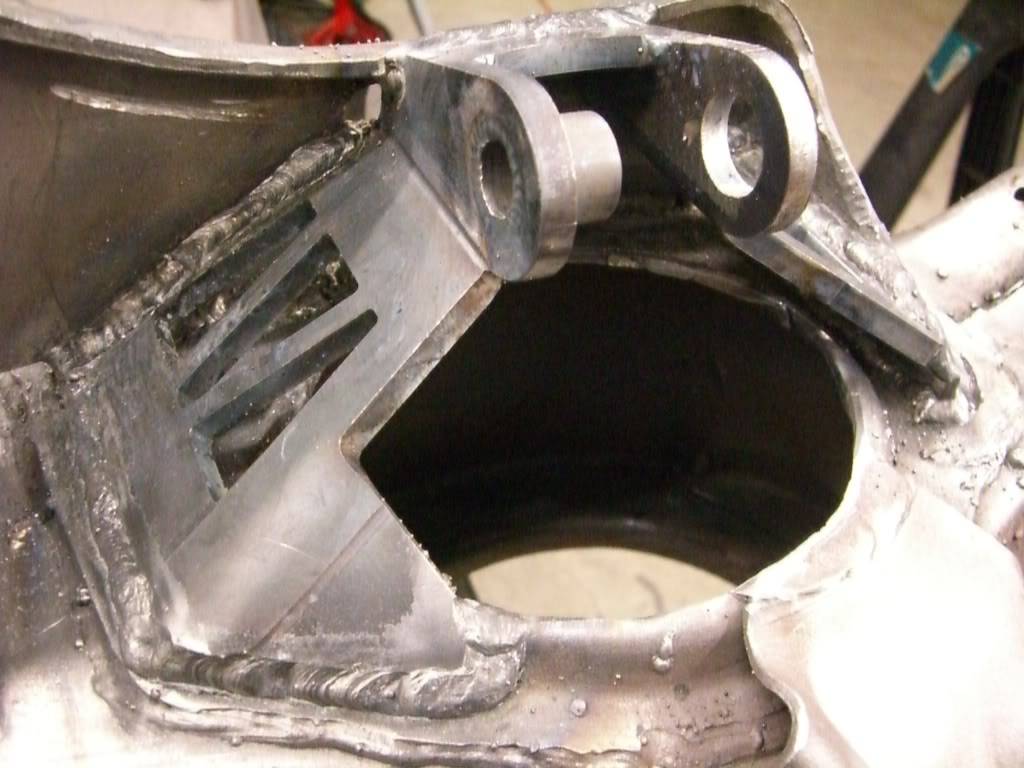
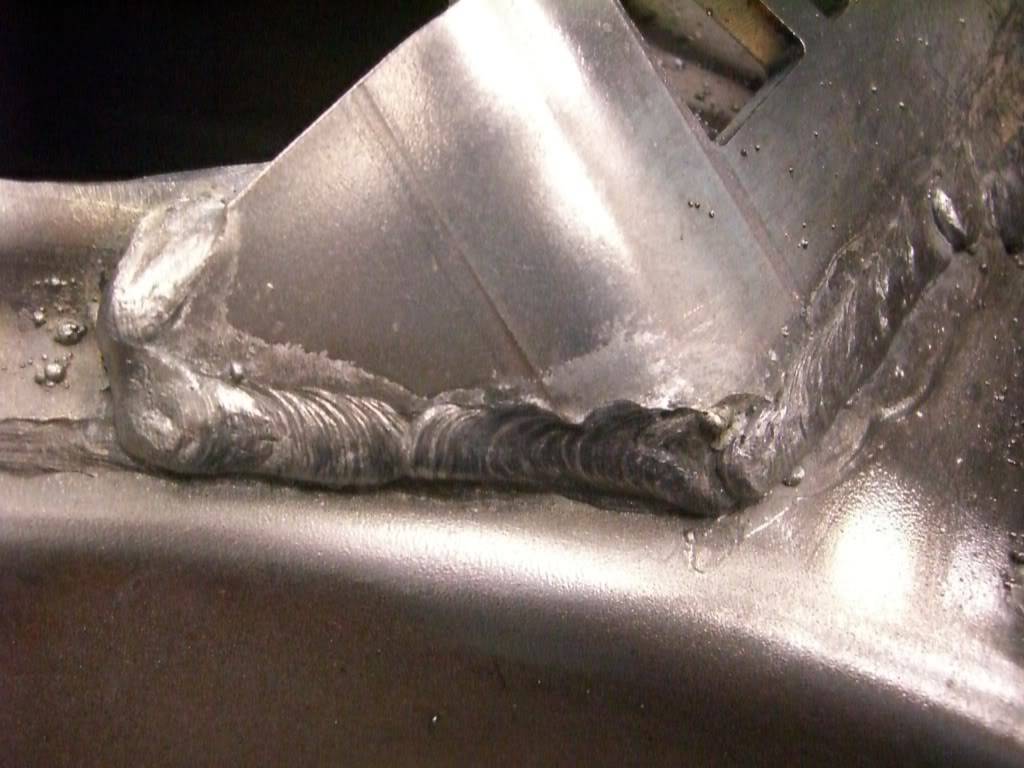
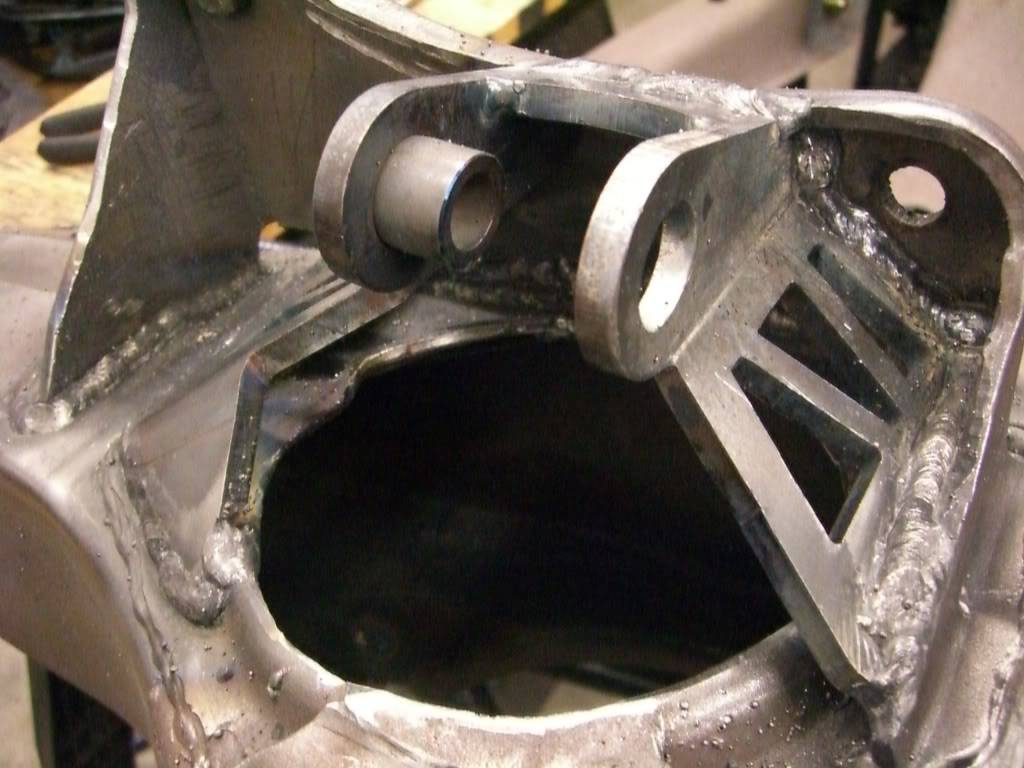
Still pretty messy with spatter and the goo from the flux-core wire but it got late and I needed dinner. Now it's even later and I need to go to bed, so more tomorow if I get home from work early enough to work on it.
Thanks for watching.......True T.
Whats new with Project 1/2-Trak?
Follow my wisecracks on Sports, Food, Politics and other BS on Twitter.
My blog
When they kick out your front door, How you gonna come?
With your hands on your head, Or on the trigger of your gun?
11-06-2008 #93 Registered User
- Join Date
- Jan 2007
- Location
- CT
- Posts
- 782
Excellent detail I always wondered what it took to get this conversion done. I am toying with this or the Varishock conversion. Thanks for sharing.
11-06-2008 #94
Registered User
- Join Date
- Apr 2006
- Location
- Huntington Beach, CA
- Posts
- 2,420
very cool walkthrough
Please Subscribe to the AutoXandTrack YouTube Channel
Autocross and track blog about running autocross and track events with pro touring cars
11-06-2008 #95 Registered User
- Join Date
- May 2007
- Location
- Houston, Tx
- Posts
- 2,200
very cool, out of curiosity did you TIG or MIG weld those brackets on? looks great!!
Colin Russ
11-06-2008 #96
-Moderator-
- Join Date
- Jul 2005
- Location
- Mountain View, CA
- Posts
- 9,583
Are you making fun of my welds?
The brackets are assembled by Tyler via TIG. I installed them using a MIG.True T.
Whats new with Project 1/2-Trak?
Follow my wisecracks on Sports, Food, Politics and other BS on Twitter.
My blog
When they kick out your front door, How you gonna come?
With your hands on your head, Or on the trigger of your gun?
11-06-2008 #97
Registered User
- Join Date
- Aug 2004
- Location
- Dunwoody, GA
- Posts
- 4,983
Good job True. What's the next step from here?
Trey
"The early bird may get the worm, but the second mouse gets the cheese."
~ Jon Hammond
1979 WS6 Trans Am stock LT1/T56 drive train out of my Formula. BMW M-parallel rims. C5/C6 brakes
build thread https://www.pro-touring.com/showthre...ghlight=begins
11-06-2008 #98
-Moderator-
- Join Date
- Jul 2005
- Location
- Mountain View, CA
- Posts
- 9,583
I'll be cleaning up the spatter where possible then painting the subframe before putting it back on the car.
Then a Firewall blockoff panel followed by DSE subframe connectors.....then the biggie....the Lateral Dynamics 3-link.True T.
Whats new with Project 1/2-Trak?
Follow my wisecracks on Sports, Food, Politics and other BS on Twitter.
My blog
When they kick out your front door, How you gonna come?
With your hands on your head, Or on the trigger of your gun?
11-06-2008 #99
Registered User
- Join Date
- Apr 2006
- Posts
- 1,027
true you make it sound so easy and quick,lol. great work... Originally Posted by Damn True
oh ya, get some c-25 gas and reg wire for doing the sheetmetal work on the lat d
11-06-2008 #100
-Moderator-
- Join Date
- Jul 2005
- Location
- Mountain View, CA
- Posts
- 9,583
Yeah I have real wire and gas for that stuff. I'm only using the flux-core because of the filth in the old joints on the subframe. Looking forward to a spatter / flux goo free existence from here on out.
It is easy. Just a little time consuming. I probably have 6-8hrs into this task. It'd have been far less if I had started with the plasma cutter. Again, the point was to show that this is totally within the realm of the homebuilder with basic fab tools. IMO it is, but it'll take about 30% longer if you don't have access to a plasma cutter. I suppose the uptick in time would be less if someone had better pneumatic tools than I have.Last edited by Damn True; 11-07-2008 at 09:12 AM.
True T.
Whats new with Project 1/2-Trak?
Follow my wisecracks on Sports, Food, Politics and other BS on Twitter.
My blog
When they kick out your front door, How you gonna come?
With your hands on your head, Or on the trigger of your gun?

 Reply With Quote



