


Results 21 to 40 of 573
-
12-25-2011 #21

 Registered User
- Join Date
- Jan 2011
- Location
- Boston, MA
- Posts
- 1,180

And that more or less brings me up to date. I have a set of Hotchkis Subframe connectors that I tried to have welded in by my mechanic and we discovered the rear frame rails were completely rotten. After 2-3 months of waiting to get into a body shop, they finally told me to go elsewhere. I just dropped my Camaro off at a new shop and they are working on replacing both frame rails and repairing any other rot they come across. It will be there for several weeks before the new rear goes in.
Here's the list of things going on this winter:
1) replace rear frame rails
2) replace mono leafs with Hotchkis 1.5" drop multi leafs
3) install Hotchkis Swivel Max Bushing kit
3) replace rear shocks with new matched Bilstein's
4) install new to me 12 bolt posi (from a '67 with 3.31's)
5) install new Hotchkis rear sway bar/Chassis Max Sway bar brace
6) replace fuel tank and sender (with stock replacements)
7) replace fuel lines with stainless Inline Tube lines
8) replace fuel pump with new Holley Black pump
9) install new ridetech billet fuel cap
10) install new Magnaflow mufflers
11) weld in new Hotchkis subframe connectors
-
12-25-2011 #22
Registered User
- Join Date
- Jan 2011
- Location
- Boston, MA
- Posts
- 1,180
Hotchkis Chassis Max Brace and Rear Sway Bar:

And their Swivel Max Bushing kit
,
-
12-25-2011 #23
Registered User
- Join Date
- Aug 2004
- Location
- Greenwood, IN
- Posts
- 54
With the series of pics coming in a short time, you make it look easy! Looks goo so far. I'll be watching for updates.
-
12-25-2011 #24
Registered User
- Join Date
- Jan 2011
- Location
- Boston, MA
- Posts
- 1,180
LOL, yeah it took a year to do all the projects, and less than an hour to cut an paste from my other thread! Originally Posted by workbenchracer

-
12-25-2011 #25
 Registered User
- Join Date
- Apr 2004
- Location
- OKC, OK
- Posts
- 3,739
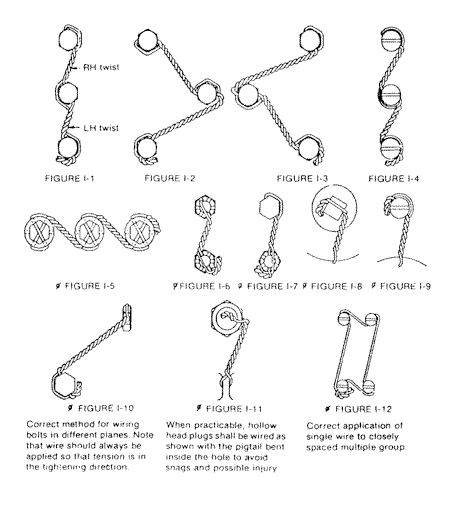
Everything looks great but your mechanics saftey wire job. Wilwood show how they are supposr to be done in their instructions. this is not wilwood instructionns but technique the same.
Mike Redpath
Musclerodz & Customz
405-288-0189
pro-touring parts specialists
Musclerodz.com
facebook page
http://www.facebook.com/#!/pages/Mus...73054649402015
instagram
Musclerodz
-
12-25-2011 #26
Registered User
- Join Date
- Jan 2011
- Location
- Boston, MA
- Posts
- 1,180
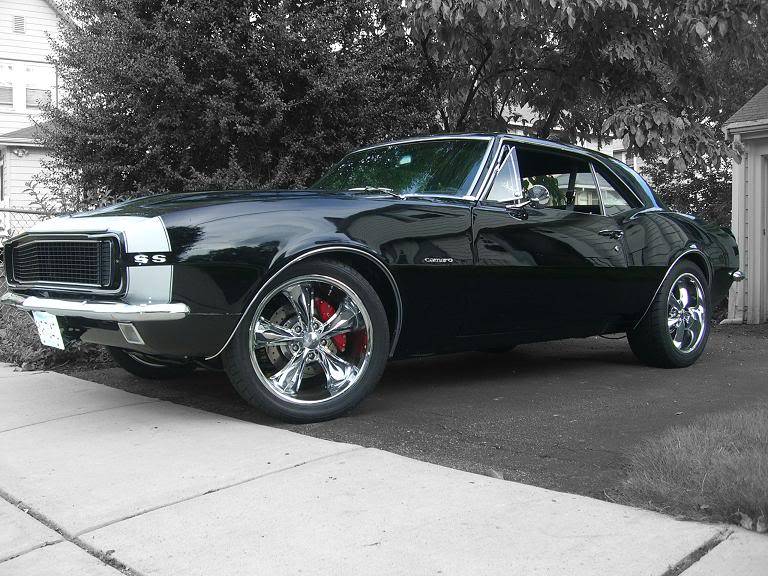
One more pic. This one has been posted here and a couple other sites, but I'll post it again. Here's how it looked before going in for sugery:
12-25-2011 #27
Registered User
- Join Date
- Jan 2011
- Location
- Boston, MA
- Posts
- 1,180
Thanks Mike. Yeah, he said he was going to use a different technique. He's said he's wired a ton of cars, so hopefully it's fine. Originally Posted by MuscleRodz
12-26-2011 #28
Registered User
- Join Date
- Nov 2011
- Posts
- 8

 Looking very good, will be a totally different ride now.
12-26-2011 #29
Registered User
- Join Date
- Jul 2011
- Posts
- 10
Not to bang on the car...It looks Great!...but that safety wire job has to be redone for safety reasons, that is just a bad job will allow the bolts to turn. Originally Posted by 67rally
12-26-2011 #30
Registered User
- Join Date
- Jan 2011
- Location
- Boston, MA
- Posts
- 1,180
Alright, thanks guys. I'll pull the rotors when I get it back from the body shop and rewire it myself. Thanks for the heads up. Originally Posted by RobSSS
12-26-2011 #31 Registered User
- Join Date
- Feb 2005
- Location
- Sydney, Australia
- Posts
- 1,797
Originally Posted by MuscleRodz
Was going to mention the same thing....as an ex airforce SNCO, if one of my guys wired a set of bolts like your mechanic, I'd have stood him down on the spot.
Will they work, probably....are they right? No.
Car is looking great. I like those trick Hotchkiss rear shackles...going to have to look into those.Regards,
Leigh
Sydney, Australia
1971 Firebird 455
https://www.pro-touring.com/showthre...Project/page27
12-26-2011 #32 Registered User
- Join Date
- Jul 2006
- Location
- Michigan
- Posts
- 123
Killer build going on here! Since you drove the Camaro for a while with all of the O.E suspension you NEED to post up a before and after ride quality. Im curious how much of a difference keeping the stock frame but switching out all of the other components will make. Plus the car is beautiful!
12-26-2011 #33 Registered User
- Join Date
- Jun 2009
- Location
- Cape Coral, FL
- Posts
- 323
Awesome build, +1 with that Orbit said, I wish I did upgrades one by one; I feel you appreciate the difference that much more.
12-27-2011 #34
Registered User
- Join Date
- Jan 2011
- Location
- Boston, MA
- Posts
- 1,180
Originally Posted by orbit
Thanks guys. I haven't done the rear suspension yet, so I can't comment on it. However, the rear passenger shackle was completely rusted out of the frame rail and just clunking around when I dropped it off at the body shop, plus the rear leafs are monos, and the shocks look to be 45 years old. The guy before me replaced the floors, quarters and partial trunk, but left both frame rails full of rot and covered in bondo. When it gets out of the shop, it'll get a whole new rear end. Originally Posted by Chris 68
First, the Fesler solid body mounts took away a lot of the "looseness" that I felt. It just seemed to repsond a little better even with the old suspension still in place.
Next, going from 195/75/15's and 235/60/15's to 245/40/18's and 275/40/18's was one of the biggest impacts I have felt. The car just went where I aimed it. The tires didn't feel like the were going to roll over the side of the wheels, it definitely gave it a more modern feel to the drive.
The last few inches of the driver's front coil was broken off and just sitting in the pocket. The old springs and shocks just squeaked a lot, but didn't do much else for handling. So replacing those, along with a new sway bar took away a lot of body roll, and made it much more responsive. I also did the PS conversion and new steering linkage at the same time which was a major improvement. The old manual steering was as slow as it got, I think it was something like 4 turns lock to lock. The 670 box is 2.5 turns. At this point, the front end felt better than a lot of modern day cars that I have driven.
12-27-2011 #35
Registered User
- Join Date
- Jan 2011
- Location
- Boston, MA
- Posts
- 1,180
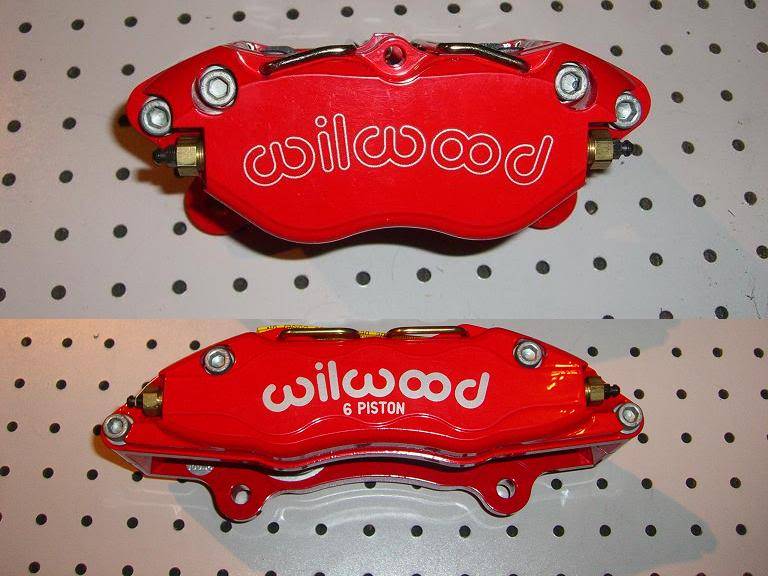
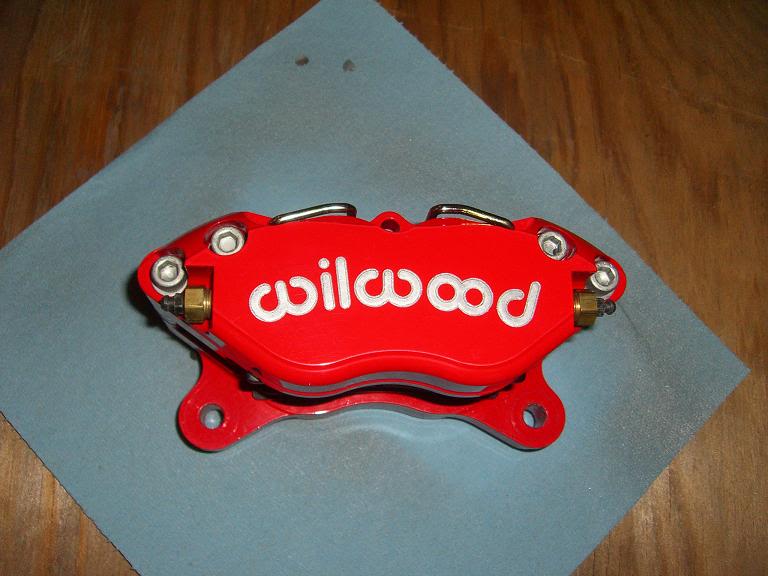
Forgot that I posted this on TC over the weekend. The logos on the front and rear calipers were not the same, and I knew it was going to eat at me.
Rear caliper on top, front on bottom:
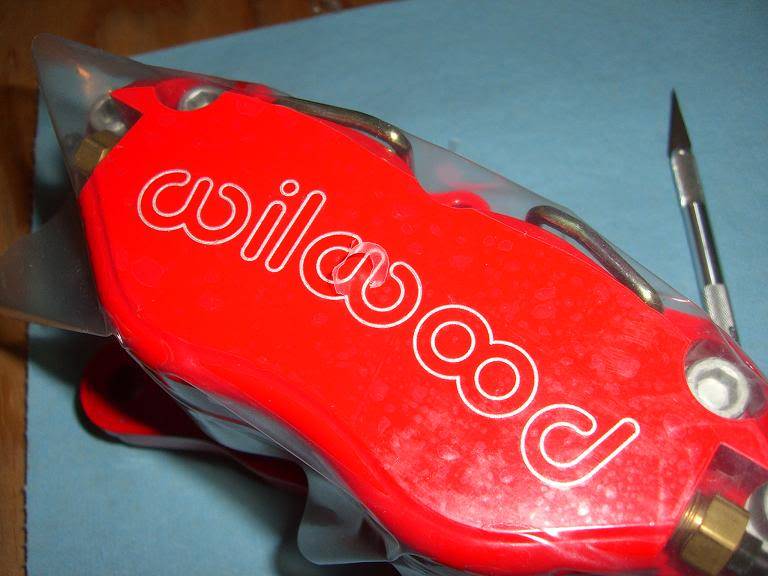
So I masked off the caliper, cut out the Wilwood logo with an exacto knife and hit it with a couple of coats of silver caliper paint. Not perfect, but closer to the front's now.
12-27-2011 #36 Registered User
- Join Date
- Jan 2006
- Location
- Snohomish, Washington
- Posts
- 2,235
Cool project, painting the logo on the caliper made a huge difference!
Matt
01-01-2012 #37
Registered User
- Join Date
- Jan 2011
- Location
- Boston, MA
- Posts
- 1,180
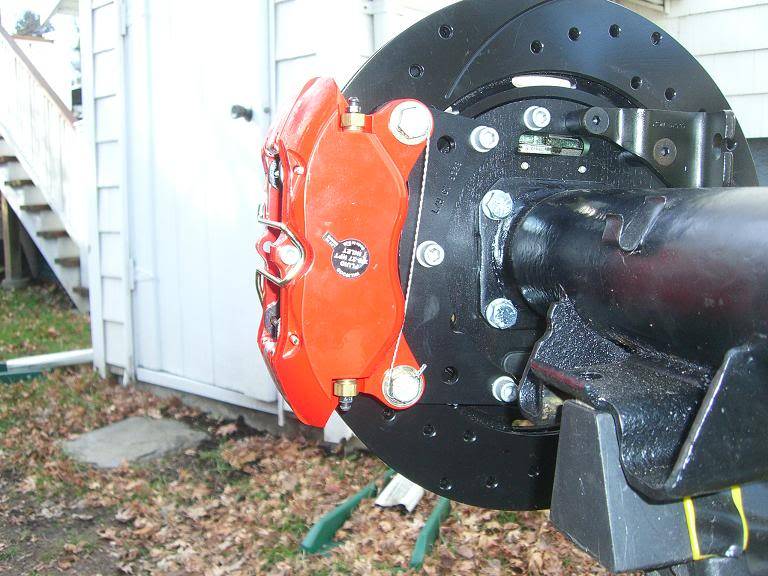
Rear brakes are back on. I decided to safety wire the bolts while I was at it just to get a little practice before I do the front rotor to hub wiring job.
I was at the body shop yesterday and the job is coming along quicker than expected. The new frame rails are in, and now they are just cutting out a few areas on the outer wheel wells that had some pinholes in them and creating some patch panels. The rear should be completed and painted by next Saturday. Then the new fuel system, rear end and rear suspension will go in. I'll update again next weekend.
01-09-2012 #38
Registered User
- Join Date
- Jan 2011
- Location
- Boston, MA
- Posts
- 1,180
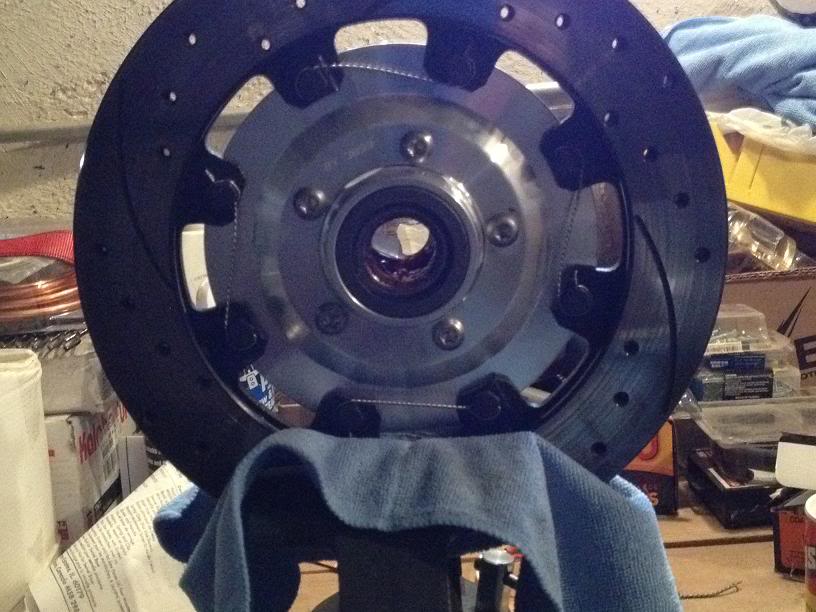
I got my car back from the body shop on Saturday, a couple of weeks early, and my main garage can't take it yet, so I'm plugging away at small projects while I still have it.
New safety wire done on the driver's side. I tried doing this while the brakes were still on the car and it would have taken forever. Much easier just to pull the rotor and do it on the bench. I actually re-did the wire on the right side of the picture after I took the photo, because I thought it was a little loose, but didn't take another photo.
01-09-2012 #39
Registered User
- Join Date
- Jan 2011
- Location
- Boston, MA
- Posts
- 1,180
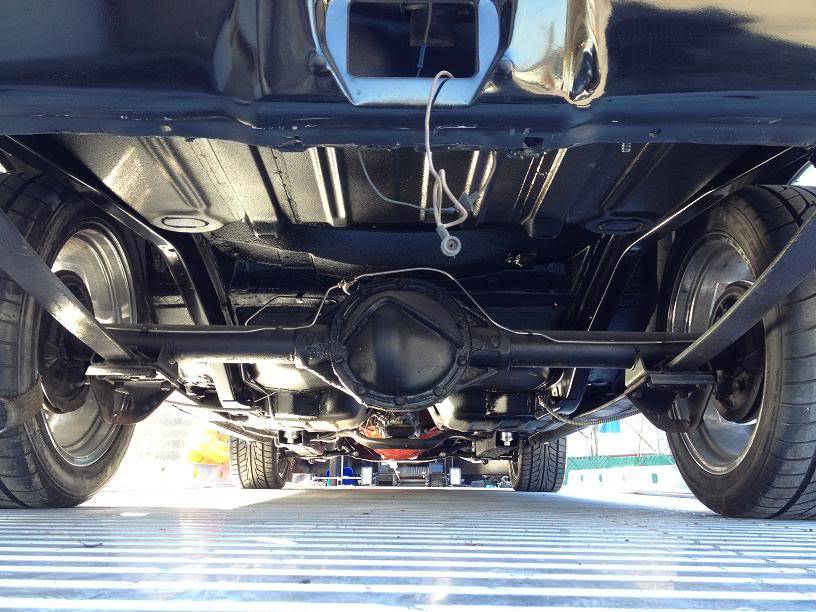
Here's a shot of the new frame rails while the Camaro was on it's way back from the body shop. They also cut out some rusty areas on the outer wheel houses and patched those and then re-painted the underside. The 10 bolt and mono leafs are just in for transport. New 12 bolt and Hotchkis multi leafs go in next week.
01-09-2012 #40
Registered User
- Join Date
- Jan 2011
- Location
- Boston, MA
- Posts
- 1,180
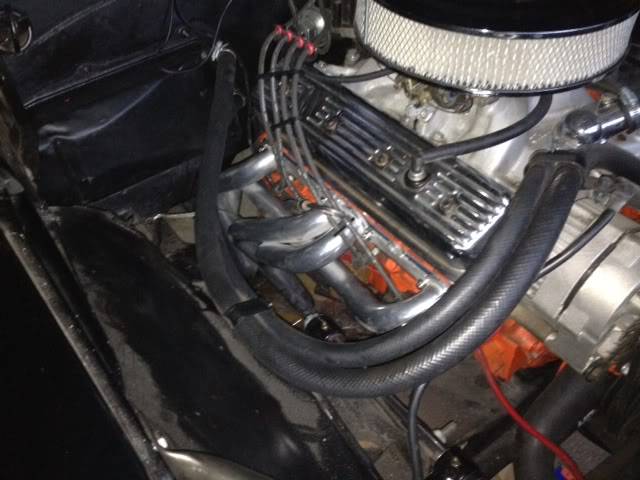
I installed a set of Summit Racing's headers yesterday. I didn't want to spend any money on this motor, but probably won't be able to do the LS conversion until next year. I had the old manifolds on the 350, and one of the bolts had snapped at the heat riser. I am having my garage do a full Magnaflow X-pipe system next week, so I decided to add the headers at this time as well.
Sorry about all the dust and grime. The car came back from the body shop pretty dusty. I will give it a full cleaning once the next round of upgrades is done.


 Reply With Quote


