Results 341 to 360 of 412
Thread: '66 Pontiac Resto-Mod Update
-
09-17-2010 #341

 Registered User
- Join Date
- Aug 2008
- Location
- Pgh, PA
- Posts
- 2,177
Well, weather looks good, and while I'd rather be attending RTTH that just wasn't in the cars for this year. Next year there are a few events including RTTH that I plan to attend. So tomorrow we're off to Pittsburgh Raceway Park for Nostalgia day. I've been cleared tech wise for 1/8 mile passes assuming when I show up my description matches what they see. Last night we disconnected the microswitch on the end of my turn signal lever from my high beam relay, and wired in my line lock temporarily. Won't need high beams this weekend, but the line lock will help. I have new levers with switches from Ididit but doing it permanently will require pulling the column and spending more time, so this is just temporary. Permanent plan has high beams operated by the switch on the tilt lever, and line lock via the turn signal lever. I have a secondary option of using a toggle to select the action of the turn signal switch. I could have it default to high beams, except when I want to use the line lock and then make it activate that.
More to come. Planning to trailer to the track tomorrow. First time with the car there, may as well have some insurance in the event that I break something.
 '66 GTO Vert Project "Red Ink", 462ci of stroked pontiac power, TKO600, SC&C Stg II+, Tubular lowers, Currectrac Rear suspension, Moser 12bolt w/Truetrack, Wilwood Master and discs all around, too much fun for words...
-
09-20-2010 #342
Registered User
- Join Date
- Aug 2008
- Location
- Pgh, PA
- Posts
- 2,177
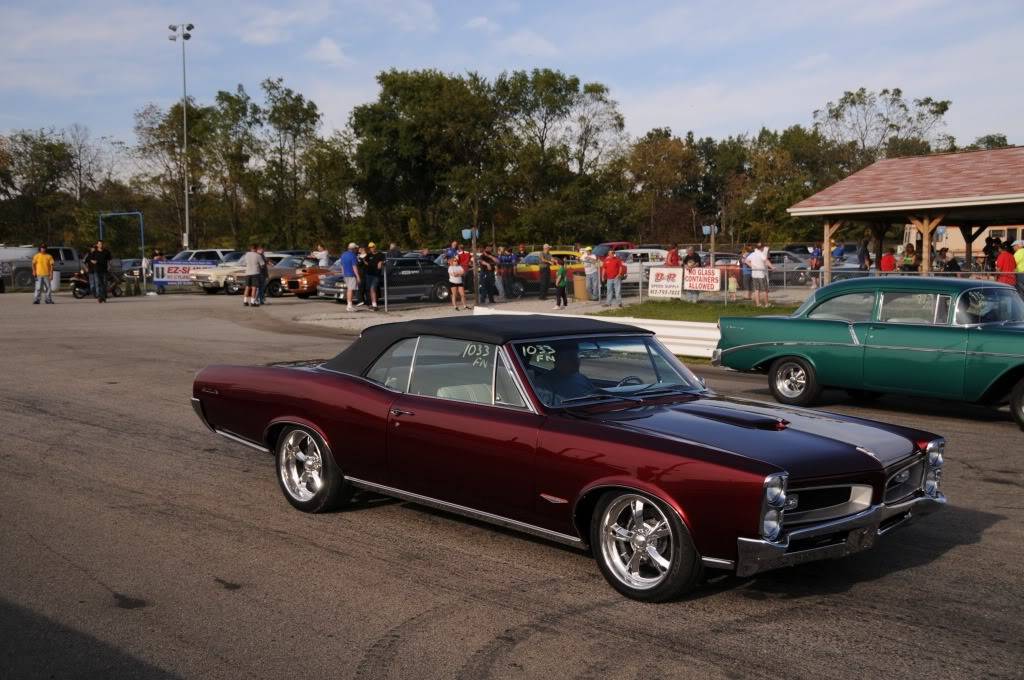
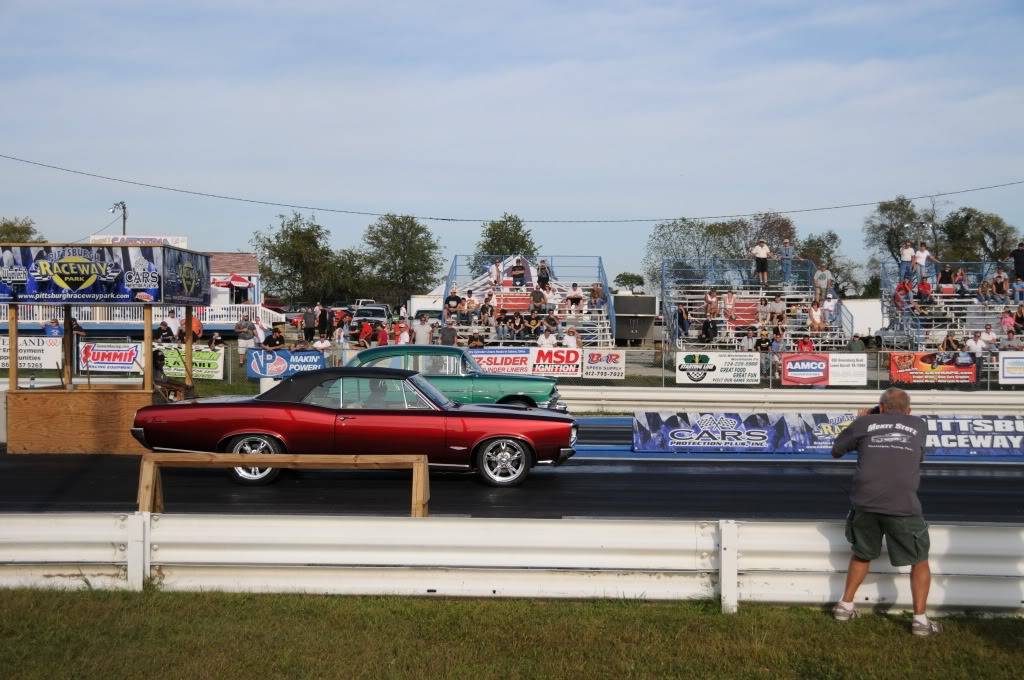
Well, weather was good and made it to Nostalgia Nationals at Pittsburgh Raceway Park this past saturday. Unfortunately, the track wasn't very organized (as usual) so the day was somewhat limited.
Showed up first thing in the AM, setup the car in the field for the "show" area, and tried to find out the story about how they would tech us and let us run. The flyers showed being able to make passes between different classes. But, nobody at the track that we could find had a clue what was going to happen. We had to pay the same $25 entry for a tech card that anybody entered in the stock or super stock classes paid. They did qualifiers, then they started racing. By 3:30pm, after asking a bunch of times, no word yet. Finally, at around 5pm they told us to get in the lanes with our cars and cards. Probably 50% of the people intending to do this had already left the track and gone home. Those of us who remained made an 1/8 mile pass, no time slips, and didn't have an opportunity to make another pass. Chalk up another gotcha from PRP. Oh well.
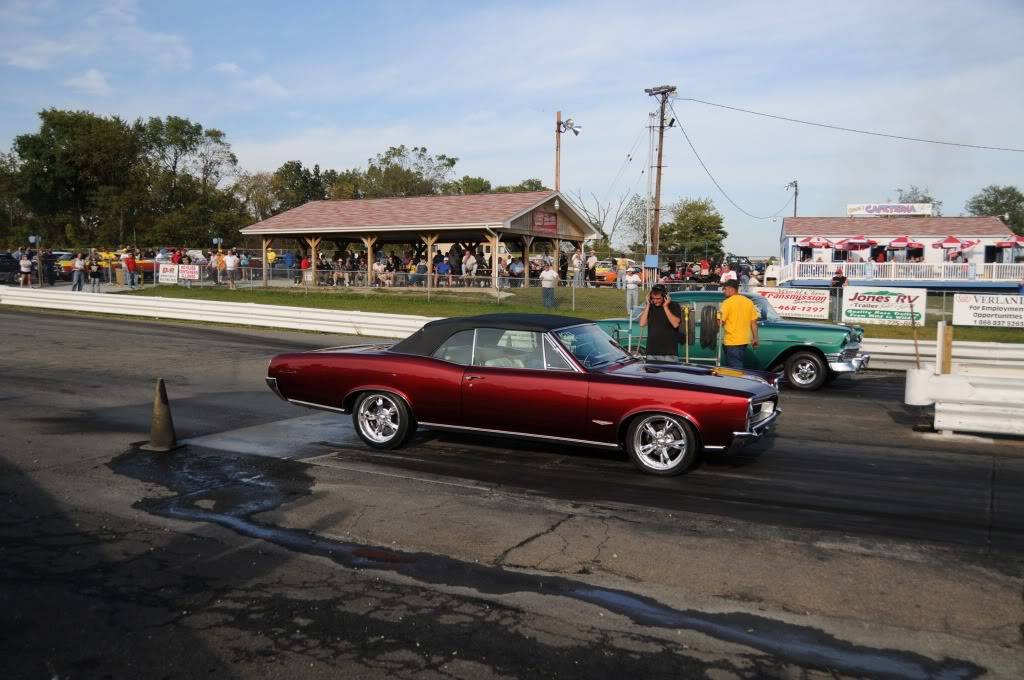
The pass itself was pretty uneventful. At PRP there isn't enough room to go around the water box, and they sprayed liberally. So, street tires, lots of water, a track that wasn't terribly sticky, and it was impossible to control wheel spin. The car ran great, but.... I staged with the line lock at around 2000, tried to feather the throttle off the line, but was still spinning WELL through the 60'. Just couldn't get traction. I would really liked to have been able to make a couple more passes. I'd probably have tried launching at 1500 and try to pedal through 1st and 2nd. Unfortunately, never got the opportunity.
Here are a few pics. Last two pics are actually with wheels spinning pretty hard. Shutter speed was on the Nikon was 1/1600.
 '66 GTO Vert Project "Red Ink", 462ci of stroked pontiac power, TKO600, SC&C Stg II+, Tubular lowers, Currectrac Rear suspension, Moser 12bolt w/Truetrack, Wilwood Master and discs all around, too much fun for words...
09-20-2010 #343
Registered User
- Join Date
- Feb 2006
- Posts
- 478
OMG!!!!!!!!!!!! That car is so beautiful in the sunlight. Those are the best pictures I have seen of it for showing off how good the body is! Man, I can;t get over how straight that GTO is.
Alex Godsey
Somerset, KY
Pro Touring 67 GTO
461 Pontiac Power
09-20-2010 #344
Registered User
- Join Date
- Aug 2008
- Location
- Pgh, PA
- Posts
- 2,177
Thanks, Alex! It really turned out nice. You know how it is. When it's yours, you focus on every little detail and flaw that you know is there, but few others ever notice.
I was pretty focused on trying to KEEP the car straight especially in the 2nd pic. It's hard to notice, but in trying to burn the water off the tires with the line loc on, the rear end was swinging to the right (passenger) side.
It's also strange how I can roast the Nitto NT05s at will, but they really don't smoke that much. Kind of a "smokeless roast"......
BTW, the majority of the fun on Saturday was surprising all the people who thought (still think) I'm crazy for running the car hard. People just don't really get the idea that I built it to drive and not just look nice until they see spinning tires and getting the motor about 5k. I trailered the car to the track just because I wanted to take tools, and figured one of us might break our cars and need a ride home. So people figured it was just a "show" car.'66 GTO Vert Project "Red Ink", 462ci of stroked pontiac power, TKO600, SC&C Stg II+, Tubular lowers, Currectrac Rear suspension, Moser 12bolt w/Truetrack, Wilwood Master and discs all around, too much fun for words...
09-20-2010 #345 New to Pro-Touring
- Join Date
- Jul 2010
- Location
- Jacksonville NC
- Posts
- 14

That is such a beautiful car, you must be very proud!
09-21-2010 #346
Registered User
- Join Date
- Feb 2006
- Posts
- 478
Awesome man, I know what you mean. Cars are only cool when they are being driven. Everybody is telling me right now that I won't ever drive mine because I have made it too nice. But there is no question in my mind, the first place it is going is to the drag strip!
Alex Godsey
Somerset, KY
Pro Touring 67 GTO
461 Pontiac Power
09-21-2010 #347
Registered User
- Join Date
- Mar 2009
- Posts
- 5
That's a very, very cool car. With all of the chrome trim, the Pontiacs are just so "sexed up" and the color just sets it all off.
I also like your avatar.
09-22-2010 #348
Registered User
- Join Date
- Aug 2008
- Location
- Pgh, PA
- Posts
- 2,177
Thanks. I think the color really fits the car. It just seems right.
Now, if I could only get the back end to hook up.....'66 GTO Vert Project "Red Ink", 462ci of stroked pontiac power, TKO600, SC&C Stg II+, Tubular lowers, Currectrac Rear suspension, Moser 12bolt w/Truetrack, Wilwood Master and discs all around, too much fun for words...
10-15-2010 #349
Registered User
- Join Date
- Sep 2010
- Location
- Carstairs, AB
- Posts
- 7
Hey man your car is Sick, LOVE IT! I have a '66 LeMans as well that is going to completely overhauled... May I ask where you got your renderings from? Also would you care to share your build specs and where you got most your parts from? I've read some of the names through out the thread but would like to get your opinion now that you have it all together and have tested it all out.
Thanks
11-13-2010 #350
Registered User
- Join Date
- Aug 2008
- Location
- Pgh, PA
- Posts
- 2,177
Grim66 - sorry - for some reason I didn't notice your post. Please PM me and I'd be happy to give you any info I've got. Lots of people helped me with advice during the build. Originally Posted by Grim66
 '66 GTO Vert Project "Red Ink", 462ci of stroked pontiac power, TKO600, SC&C Stg II+, Tubular lowers, Currectrac Rear suspension, Moser 12bolt w/Truetrack, Wilwood Master and discs all around, too much fun for words...
11-13-2010 #351
Registered User
- Join Date
- Aug 2008
- Location
- Pgh, PA
- Posts
- 2,177
Well, it's on to the next phase of this project. I think most of the real big issues have been sorted out, and I've had my fun playing with the car this season. Now I'm prepping for next year. I was talked into letting the car go to Autorama in late Jan (indoor 3 day show), but other than that I'm prepping for RTTH, MMCC, MSC, etc.
The low oil pan (7 qt Moroso) kept hitting the ground every once in a while, and it looks like it. I have a very small leak that I can't get rid of. So, I'm replacing it with a Milodon 7qt road race pan that's about 3/4" less deep. The ceramic header coating didn't hold up that well on top of the primary tubes (I think it was my fault) so they're going back to be recoated. Thermal-Tech has a great warranty. A Ricks baffled fuel tank is going in. I'm talking to Frank about 13" or 14" front brakes going in as opposed to the 12.2" 4 pistons that are in there. I'm in the process of designing a removable "roll-over protection" system that'll be OK for SCCA tracks (but not for NHRA/IHRA). And I need to get another seat to bolt in for when I'm tracking the car.
I just warmed the car up a bit ago and now it's up on the lift, with fluids draining. I plan to get everything ready for the motor to come out today, and probably pull it tomorrow (fingers crossed - darned smoothed pretty firewall). I'm planning to pull the tranny, clutch, pressure plate and flywheel with the motor in the car. Yet one more good reason to run solid motor mounts.
Monday evening my glass guy is stopping over to pull my vent window assemblies. When I built the car, I replaced every piece of glass, weather stripping and seals - except for what was already in the vent window assemblies (doh!). I have the replacement glass and seals so he's going to help me out with that at his place while the car is being worked on.'66 GTO Vert Project "Red Ink", 462ci of stroked pontiac power, TKO600, SC&C Stg II+, Tubular lowers, Currectrac Rear suspension, Moser 12bolt w/Truetrack, Wilwood Master and discs all around, too much fun for words...
11-13-2010 #352 Registered User
- Join Date
- Dec 2007
- Location
- Lombard, IL
- Posts
- 545
Love your car! I can't wait to see it next summer!!!
What are you thinking of doing for your roll-over protection? I was also thinking of something like that I could put in my Chevelle. I was trying to come up with somthing that I could remove afterward, put things back the way they were and nobody would ever know it was in there.
I'm thinking something , that requires removing the botttom cushion out of the back seat along with the rear seat belts and the outer seat belts in the front.
Then make the rollbar bolt in to those 6 seat belt holes (and couple more strategically placed). Then have seatbelts attached to the rollbar.
What were you thinking of doing?Dan
1971 Chevelle Maliboo Convertible 496/4L80E
1956 210 2 door Sedan 8-71 blown 468/T400
11-14-2010 #353
Registered User
- Join Date
- Aug 2008
- Location
- Pgh, PA
- Posts
- 2,177
I've got a few ideas but I'm not far enough along for details yet. However, I've got the beginnings of an idea that would connect everything to the frame and not require the removal or modification of the back seats. I have some more investigating to do.
'66 GTO Vert Project "Red Ink", 462ci of stroked pontiac power, TKO600, SC&C Stg II+, Tubular lowers, Currectrac Rear suspension, Moser 12bolt w/Truetrack, Wilwood Master and discs all around, too much fun for words...
12-13-2010 #354
Registered User
- Join Date
- Aug 2008
- Location
- Pgh, PA
- Posts
- 2,177
It's been a while since I've been here. Life kind of gets in the way sometimes. Anyway, things continue.
I pulled the entire drivetrain (rad, driveshaft, tranny, hydraulic clutch, scattershield, clutch/pressure plate, flyweel, starter, and engine). It was a major PITA because of three things. First, I had a heck of a time with the Keisler Hydraulic clutch - the "captured" hydraulic line going to the fitting into the tranny main bearing retainer goes through the scattershield hole (where the clutch fork would normally be) and there is NO room. My 12mm snapon flare crowsfoot simply wouldn't loosen the fitting. I tried fabbing a couple tools, but eventually gave up and cut the line. Additionally, two other issues. The oil filter housing the the passenger side of the engine had a clearance issue trying to get above the header flange. No room to move the headers aside. The front bolt on the housing is impossible to get at while in the car with the headers on. Also, where I had placed the coil passthru on the firewall created a issue - it stuck out forward enough to create a problem lifting the motor out of the way. So....
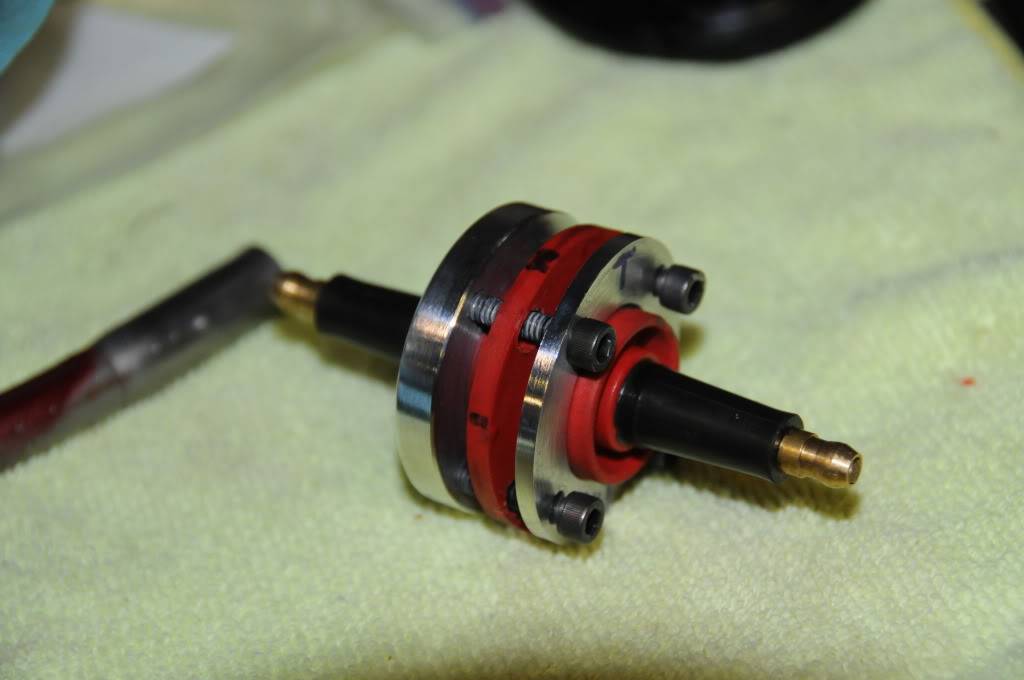
For the coil, I decided to make a couple fittings allowing me to easily remove the passthru while looking as clean as possible. In the pic below you can see the two aluminum rings, one of which is drilled and tapped. I'm showing both front and back here, but essentially the ring with no visible "bolts" goes on the smoothed firewall. The MSD device goes through the firewall from the dash area, and the other drilled ring "sandwiches" everything - with 4 machine scres to secure it as shown.
Front side (firewall will be in the "gap" area where you can see the machine screw threads)
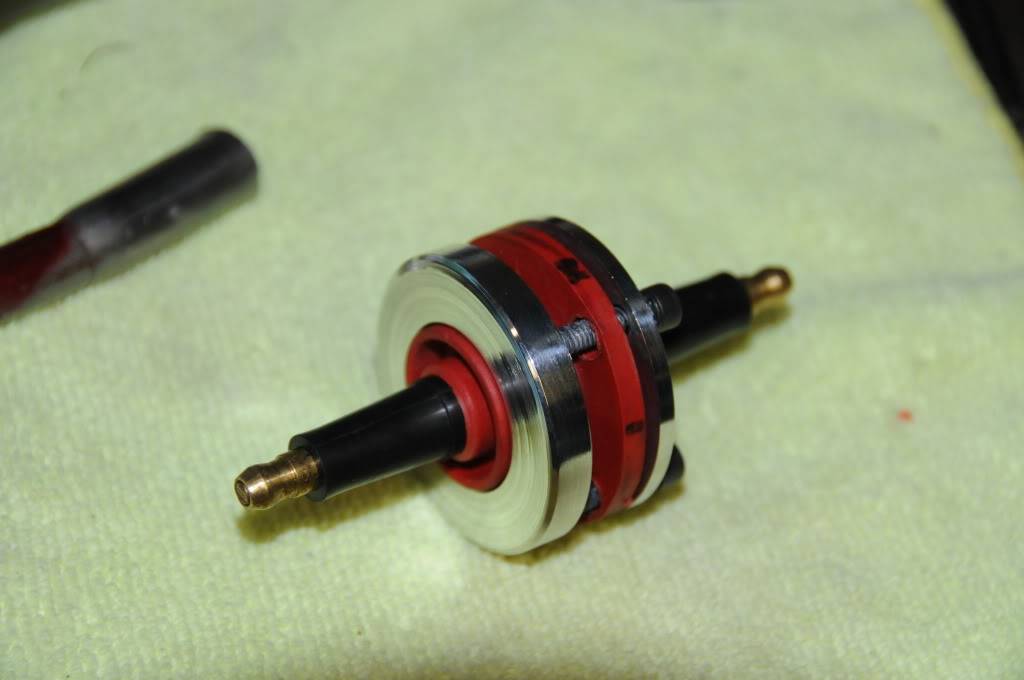
Back side:
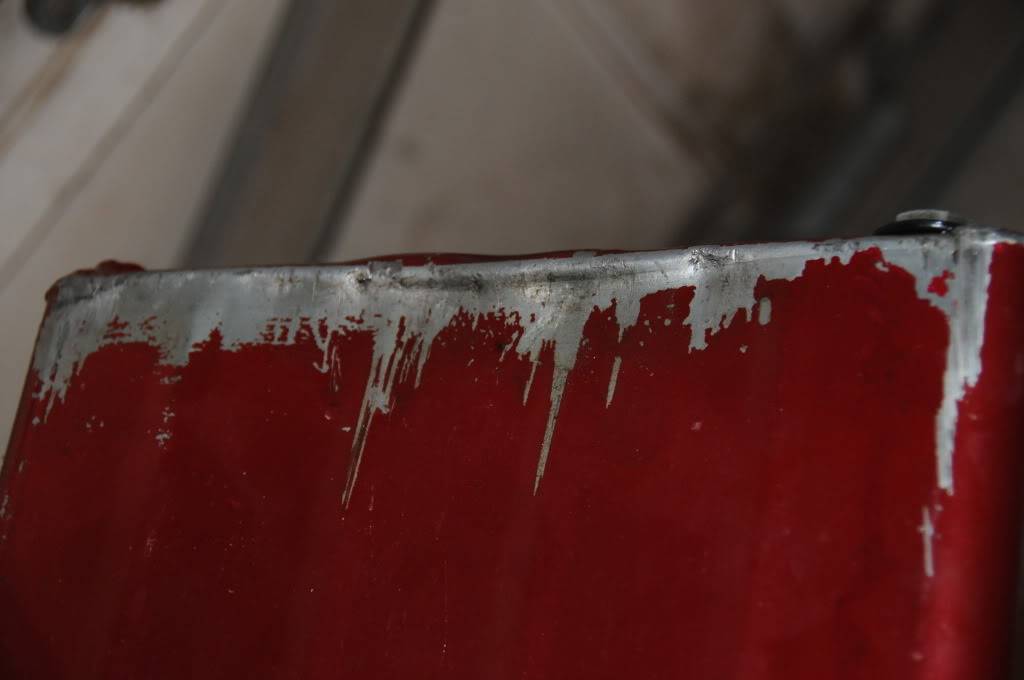
Below you can see how much I smacked my oil pan around. This pic should be enough to prove the car isn't a trailer queen. This shows the rearward bottom portion of the pan.
Thsi is the Moroso pan. I'm replacing it with a Canton Road Race pan. Unfortunately, the Canton pan also has a clearance issue with my Tomahawk Windgage Tray. The windage tray really doesn't do much except stabilize the lower dispstick tube. Fortunately, the Canton pan also happens to have a built in dipstick port, so I'm switching to a flexible stainless dipstick - which also eliminates a slight clearance issue with the front side of the passenger header flange. But it also means that I needed to remove and plug the "stock" dipstick. After moving the old press-fit dipstick tube I got together with a friend who helped by making this o-ringed press-fit plug.
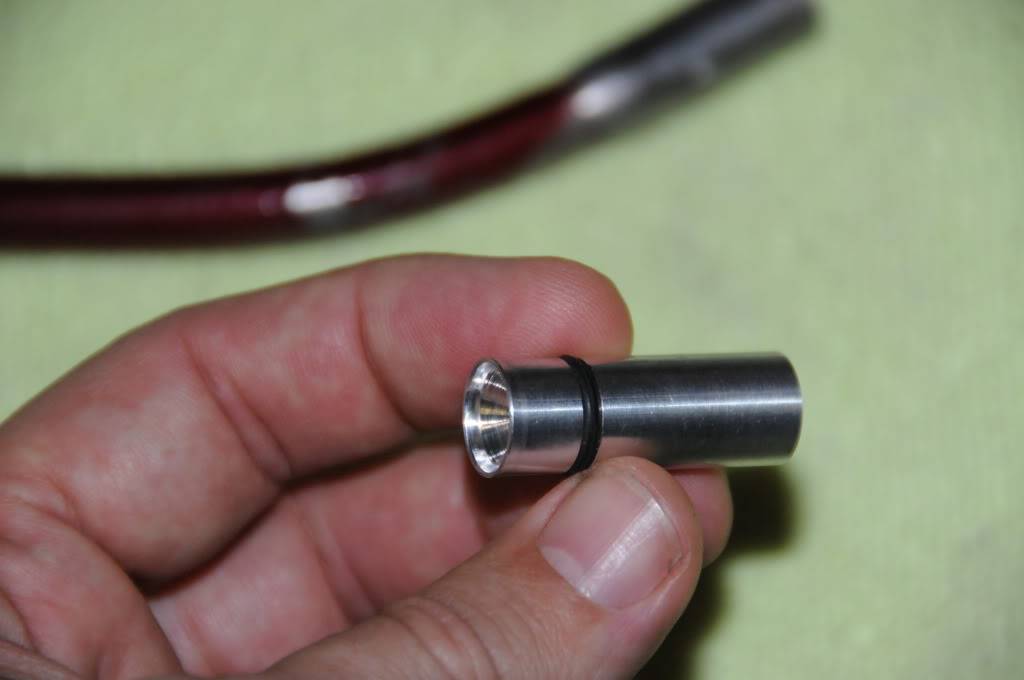
The 1/8" NPT bung is TIG welded in the new Canton pan for the oil temp sending unit, and the pan is painted. The oil pickup on the Melling M54D pump for the Moroso pan was tack welded in place. Removed the pump, ground the tack off, and replaced the pickup with the new Canton specific unit. Test fit and measured to insure correct placement, and re-installed the assembled pump and pickup.
I'm thinking about relocating my oil filter using a Canton inline unit mounted on my frame rail, and am experimenting now. Just got the headers back, so I can play around with the motor on the stand before re-installing.'66 GTO Vert Project "Red Ink", 462ci of stroked pontiac power, TKO600, SC&C Stg II+, Tubular lowers, Currectrac Rear suspension, Moser 12bolt w/Truetrack, Wilwood Master and discs all around, too much fun for words...
01-04-2011 #355
Registered User
- Join Date
- Aug 2008
- Location
- Pgh, PA
- Posts
- 2,177
Progress continues. The Canton oil pan is on, modified a dipstick housing using a Canton universal 1/4" compression design, and buttoned up the motor. Engine went back in. Had an issue with clutch installation - the old input shaft I was using as an alignment tool had a small imperfection on the front end which prevented it from cleanly sliding into the pilot bearing. Took about 45 minutes to figure out it wasn't an alignment issue - Doh! Took about a thousanth off the very end of the shaft, and the bearing slid fine. Installed scattershield, then the TREMEC went in as easy as butter. Accidentally broke one of the header gaskets (just fiber based). Whoops.
Finished the dash (again). I think this is the last time. Here's the before and after shots....
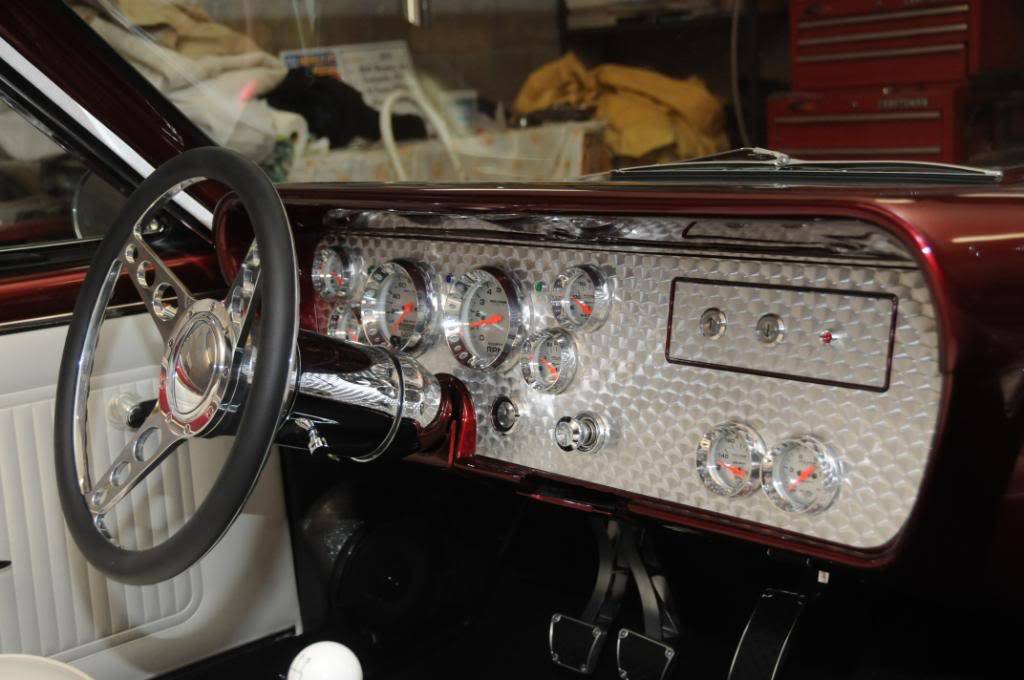
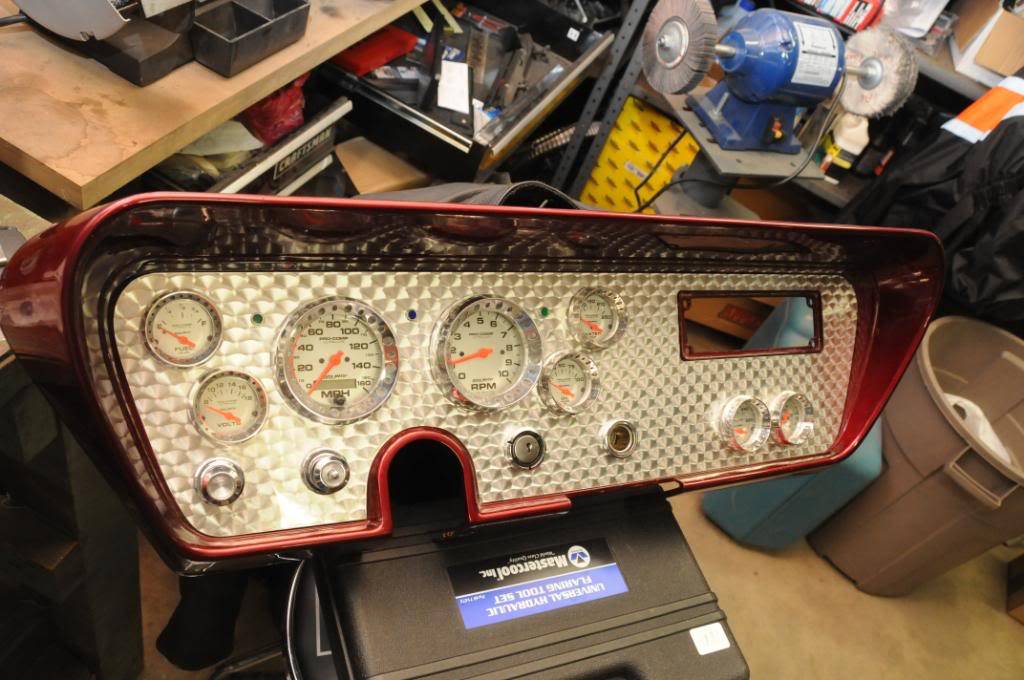
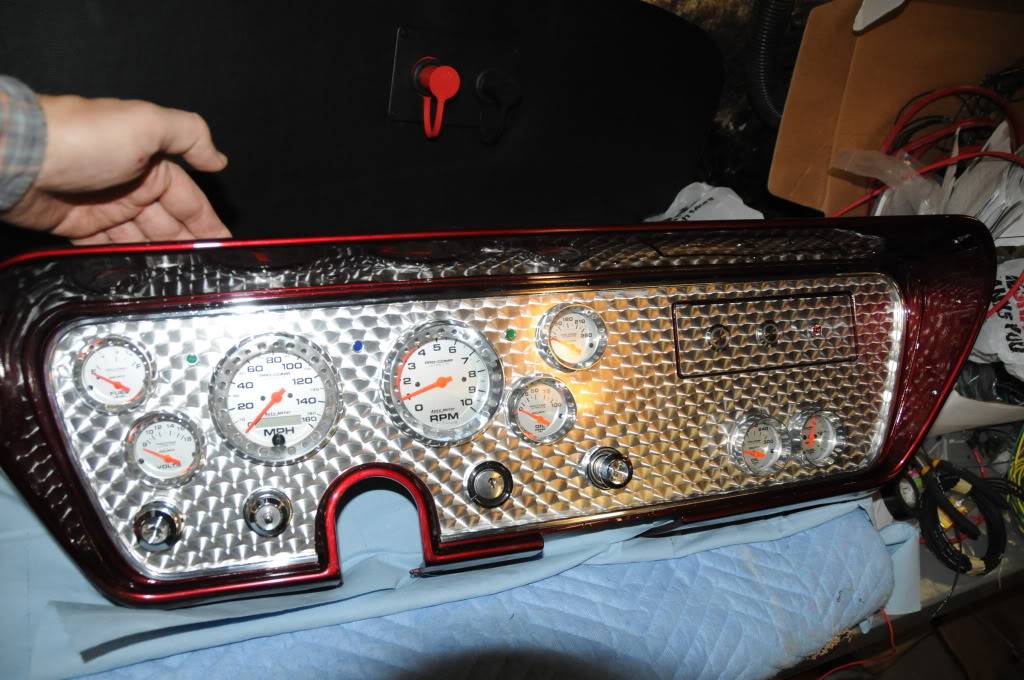
The outer aluminum bezel just makes the unit look more "finished".
Installed a Ricks stainless tank. The tank is of excellent quality! However, it is MUCH deeper than OEM to the point that I'm concerned about how far down it hangs. There's another post out there where I'm asking for feedback. Is it too low?

In the pic above, the car is on the lift and the suspension is extended to full travel. So, on the ground the bottom of that tank will probably be down around the rear sway bar....
Also, pretty much finished up the minor wiring changes. There is not a safety covered toggle under the dash. In the normal position, it allows the microswitch on the end of my turn signal lever to operate my high/low beam relay. However, if I flip open the cover and switch the toggle position, the same microswitch on the turn signal lever engages the line lock, and the red light on my dash will light up when the line lock is engaged. Nice and clean. Works great.'66 GTO Vert Project "Red Ink", 462ci of stroked pontiac power, TKO600, SC&C Stg II+, Tubular lowers, Currectrac Rear suspension, Moser 12bolt w/Truetrack, Wilwood Master and discs all around, too much fun for words...
01-05-2011 #356 Registered User
- Join Date
- Nov 2008
- Location
- Iceland
- Posts
- 896

looking very good and clean
01-24-2011 #357
Registered User
- Join Date
- Nov 2006
- Posts
- 15
Great seeing you down at the World of Wheels this weekend! The car looks fantastic and as always it was a pleasure to BS awhile. Can't wait to go for a ride this summer. Give me a ring when you want to work on that new little addition! Teaser!!!!! LOL
Later,
Chad
01-24-2011 #358
Registered User
- Join Date
- Aug 2008
- Location
- Pgh, PA
- Posts
- 2,177
Hey Chad. Good to see you and your dad too. Like I told you, I took the car as a favor but ended up glad I did. Had very unexpected results - can you believe I made money? Then got home without hearing any news and watched the entire afc game to see the steelers win.
I'm going to take a breather for a week or so and then start on that secret project. We will certainly talk! Kurt offered some materials on Sunday, so I'm feeling more confident.'66 GTO Vert Project "Red Ink", 462ci of stroked pontiac power, TKO600, SC&C Stg II+, Tubular lowers, Currectrac Rear suspension, Moser 12bolt w/Truetrack, Wilwood Master and discs all around, too much fun for words...
01-24-2011 #359
New to Pro-Touring
- Join Date
- Jun 2007
- Posts
- 34
Beautiful car! Love the dash
03-13-2011 #360
Registered User
- Join Date
- Aug 2008
- Location
- Pgh, PA
- Posts
- 2,177
It's been a while since an update. In late Jan/early Feb, I spent some time talking to a bunch of people getting advice for prepping for Motor State, Heidts, RTTH, etc. Having a convertible makes things a little more complicated.
I was finally able to determine that the "rollover protection" I had in mind would comply with any of the optima type events, including Heidts, Motor State, etc. Talked to Jimi Day, Bill Howell, Scott from Motor State, etc. Last week I started on the solution. I'm using 1 3/4" .120 wall mild steel for the main hoop, and 1 3/4" chrome moly for the rear supports - just because I had a prebent main hoop that would only require trimming available to start with. Otherwise I'd have used chrome moly for the entire assembly.
There is a 3/16" pad, about 6"x10" mounted near the b pillar area. It's secured by MIG welding to the floor pan as well as 3/8" grade 8 bolts to the pan, with 3/16" pad under the pan where the bolts are. Welded to that is a 1/4" 4 bolt flange, with grade 8 nuts welded into the flange holes. The main hoop has another 1/4" 4 bolt flange welded to it. 4 3/8" grade 8 bolts secure the main hoop mounting flange to the floor bracket flange. Main hoop is one continuous piece of 1 3/4" with 4 bends. The rear support is provided by clearing the top of the rear crossmember body mount points through the top of the cage nut. A 1/2"-13 grade 8 bolt then goes from under the rear crossmember, through solid body mounts, through the cage nut and the rear floor pan (on either side of the convertible top pump) and then through the rear rollbar mounts. One section of 1 3/4" chrome moly extends from left to right, connecting the left and right mounting points of the crossmember and the rear bar support. Then, from that connection point, 2 straight sections of 1 3/4" .120 wall go straight to the top sides of the main hoop. Then one cross/shoulder bar across the main hoop.
The entire assembly is close to being done as of today. There can be a discussion of whether it does or doesn't meet SCCA/NASA strict requirements because of the manner in which the rear support connects. However, it meets our requirements and frankly is far stronger than a factory hardtop. The nice thing is that 2 people can remove it in less than 10 minutes, and it'll be very hard for anyone to notice it was ever there. When it's done, I'll likely powdercoat it semigloss black. No pics yet - sorry!
For seats, talked to Mark at Arizen (thanks for the suggestion Payton) and got in one black seat to test. For my purposes (the events only) it is perfect. Fabbed up a mount for the seat and sliders, and was able to use it for positioning both the seat and the main hoop. The seat is a bit snug in the shoulders, which will be perfect for the track. For non-track use, I'll retain my original seats - only 4 bolts and the seats are swapped. Mark is shipping the second seat this week now that I know it will work the way I want.
Need to get my harnesses, and then do some cosmetic stuff (trim the carpet and seam it, rear well cover needs modified) and then that stuff is done!
I hope to start on the front brake changes in 2 weeks. 14" Superlite 6Rs for the front. Starting with Carbotech AX6s for street and Autox, front and rear. They're ready to ship, but I'm also ordering pads for my DD which I need to research something first, so they're holding until I tell them to ship.
I have one small oil leak in the remote filter -10AN lines I made. Looks like ANOTHER bad fitting :( . Have to fix that and deal with finishing up an improvement to the PS lines.
Making progress though. No big problems as of now. I'll try to have pics soon.'66 GTO Vert Project "Red Ink", 462ci of stroked pontiac power, TKO600, SC&C Stg II+, Tubular lowers, Currectrac Rear suspension, Moser 12bolt w/Truetrack, Wilwood Master and discs all around, too much fun for words...

 Reply With Quote