


Results 361 to 380 of 763
Thread: 1970 GTO Version 2.0
-
07-14-2008 #361

 Registered User
- Join Date
- Feb 2005
- Location
- SouthTX
- Posts
- 1,233
 Andrew, I also have the same wheels on my 69 and they also need a freshening up. Where are you having your centers anodized and teflon coated? Also, are you replacing any hardware or are you satisfied with what is on the wheels? Thanks in advance.
 Originally Posted by andrewb70
Frank
-
07-14-2008 #362 -Moderator/Sponsor-
- Join Date
- Apr 2001
- Location
- The City of Fountains
- Posts
- 16,120
Frank, Originally Posted by 4MuscleMachines
I was going to replace the hardware on the wheels, but after taking them apart it is obvious that these aren't just regular bolts. They have a 1/2" splined section just below the head, like a wheel stud. The bolts are metric with a 6mm shank. I am ballin on a budget so finding 160 new fancy bolts is sort of out of the question right now. I am soaking the bolts and nuts in some WD 40 and that seems to make them look pretty nice.
The place that is going to do the anodizing is in Orlando, Florida. This is the same place that the anodizing on various parts on John Parsons Nova. Maybe he will chime in with the name, since I don't know it. :/
Andrew1970 GTO Version 3.0
1967 Cougar build
GM High-Tech Performance feature
My YouTube Channel Please Subscribe!
Instagram @dr__efi
I deliver what EFI promises.
Remote Holley EFI tuning.
Please get in touch if I can be of service.
"You were the gun, your voice was the trigger, your bravery was the barrel, your eyes were the bullets." ~ Her
07-14-2008 #363 Registered User
- Join Date
- Jul 2007
- Location
- So Cal
- Posts
- 263
Andrew, Are you happy with the rear spring adjusters? I still have to get rear springs and I believe I will also get the same adjusters as it seems like the way to go.
Tom
1969 Chevelle
07-14-2008 #364
-Moderator/Sponsor-
- Join Date
- Apr 2001
- Location
- The City of Fountains
- Posts
- 16,120
The spring adjusters work great Tom. My only complaint is that they are starting to rust. Black oxide is not a very durable finish. I really don't know what they can do. I am just going to lube them up liberally. Make sure to get shorter springs to compensate for the height of the adjusters. What springs are you going to use? Single pigtail? Originally Posted by tom_a
Andrew1970 GTO Version 3.0
1967 Cougar build
GM High-Tech Performance feature
My YouTube Channel Please Subscribe!
Instagram @dr__efi
I deliver what EFI promises.
Remote Holley EFI tuning.
Please get in touch if I can be of service.
"You were the gun, your voice was the trigger, your bravery was the barrel, your eyes were the bullets." ~ Her
07-14-2008 #365
Registered User
- Join Date
- Jul 2007
- Location
- So Cal
- Posts
- 263
Andrew, I don't know what kinda springs. I have the Vari shock coil overs in front with 650lb rate. I was gonna look back through your thread as you may have listed the source, height and rate for the rears.
Tom
1969 Chevelle
07-14-2008 #366
-Moderator/Sponsor-
- Join Date
- Apr 2001
- Location
- The City of Fountains
- Posts
- 16,120
I am using 9" springs, 175lb/inch. If you have 650's in the front, I would not hesitate to go with 200-250s in the rear. I got my springs from Coleman. They are the only company that I have found that sell the 9" single pigtail spring. You will also need to do some kind of axle retention so the springs don't wall out when the rear suspension extends. Originally Posted by tom_a
Andrew1970 GTO Version 3.0
1967 Cougar build
GM High-Tech Performance feature
My YouTube Channel Please Subscribe!
Instagram @dr__efi
I deliver what EFI promises.
Remote Holley EFI tuning.
Please get in touch if I can be of service.
"You were the gun, your voice was the trigger, your bravery was the barrel, your eyes were the bullets." ~ Her
07-14-2008 #367
Registered User
- Join Date
- Jul 2007
- Location
- So Cal
- Posts
- 263
Thanks. I will check into Coleman
Tom
1969 Chevelle
07-15-2008 #368
-Moderator/Sponsor-
- Join Date
- Apr 2001
- Location
- The City of Fountains
- Posts
- 16,120
The rear Falkens showed up today.

I am also getting a good handle on the vibration that I have been having above 75 mph. I have narrowed it all down to insufficient engagement between the output shaft and the slip yoke. The lack of engagement is allowing enough up and down movement of the yoke to cause a vibration. I got a new Strange Engineering slip yoke and tomorrow I am having a new driveshaft made that will slide the slip yoke further inside the transmission. There are some pictures and more discussion on the subject here:
http://www.chevelles.com/forums/showthread.php?t=232582
Andrew1970 GTO Version 3.0
1967 Cougar build
GM High-Tech Performance feature
My YouTube Channel Please Subscribe!
Instagram @dr__efi
I deliver what EFI promises.
Remote Holley EFI tuning.
Please get in touch if I can be of service.
"You were the gun, your voice was the trigger, your bravery was the barrel, your eyes were the bullets." ~ Her
07-15-2008 #369 -Moderator/Sponsor-
- Join Date
- Jun 2001
- Location
- Orlando, FL
- Posts
- 10,604
Yeah, it's a hard name to remember: Orlando Plating. Originally Posted by AndrewB

jpJohn Parsons
UnRivaled Rides -- Modern upgrades for your ride.
UnRivaled Rides recent project -- LS9-powered 69 Camaro
07-15-2008 #370
-Moderator/Sponsor-
- Join Date
- Apr 2001
- Location
- The City of Fountains
- Posts
- 16,120
Some people have asked me to elaborate more on the driveshaft issue. Here is what the driveshaft looked like when installed into the transmission:

By the looks of it most people would say that it looks OK. I thought so too. Here is what it looked like "inside."

The seal sits at the edge of the shiny part of the yoke. The bushing is about 13/16" from the seal. My yoke was cut down some in order for it not to hit the speedometer gear. The gear is located exactly 3.5" from the end of the output shaft. My yoke as cut too much I think:

This is what it looked like with the driveshaft installed and the tailshaft housing removed. You can see there is plenty of room before the yoke hits the speedometer gear. I also wanted to see just how much the slip yoke actually moves with suspension travel. That is what the zip tie is for. I placed it firmly against the edge of the yoke and moved the car through about 7-8" of suspension travel. 3-4" up and 3-4" down. That is as far as the yoke moved. A whopping 1/8"!!!
So my new driveshaft will position my slip yoke much closer to the seal and it will give me barely enough room to install the driveshaft. I also installed 2 tailshaft bushings.
Andrew1970 GTO Version 3.0
1967 Cougar build
GM High-Tech Performance feature
My YouTube Channel Please Subscribe!
Instagram @dr__efi
I deliver what EFI promises.
Remote Holley EFI tuning.
Please get in touch if I can be of service.
"You were the gun, your voice was the trigger, your bravery was the barrel, your eyes were the bullets." ~ Her
07-16-2008 #371
-Moderator/Sponsor-
- Join Date
- Apr 2001
- Location
- The City of Fountains
- Posts
- 16,120
This morning I took my slip yoke to Precision Driveline in Glasgow, KY. This is a one man operation and Terry was kind enough to let me snap some pictures while he made a new driveshaft.
The first thing that Terry did was slide my old driveshaft into a big lathe and cut off the old weld yokes. This was not nearly as dramatic as I thought it might be.

I made some very careful measurements last night and the slip yoke needed to be trimmed just a little bit. Interestingly enough, the Strange yoke didn't have splines cut in it for the first 3/4" or so. According to my measurements that whole section without the splines needed to be trimmed off. Terry had a CNC Bridgeport that he used to mill the yoke.

After the yoke was trimmed a new Neapco solid u-joint was mated to the weld yoke.

Terry then measured and cut the tube, assembling it on his fixture, making sure that the ends of the shaft are indexed correctly.

Once he was happy with the alignment and the straightness of the tube is was time to MIG weld the yokes to the tube.

After the yokes were welded Terry allowed the shaft to cool down before balancing it. Here is the new finished shaft.

The careful measuring really paid off. I was able to slide the slip yoke inside the transmission and the rear u-joint BARELY slipped into the pinion yoke. This is about as long as the driveshaft can be without being TOO long.

After the driveshaft was installed there was no more noticeable lateral movement at the slip yoke. I don't know if this was my sole source of the driveline vibration, but I am 100% sure it was a contributing factor. I will know for sure once the car is back on the road in a couple of weeks.
Andrew1970 GTO Version 3.0
1967 Cougar build
GM High-Tech Performance feature
My YouTube Channel Please Subscribe!
Instagram @dr__efi
I deliver what EFI promises.
Remote Holley EFI tuning.
Please get in touch if I can be of service.
"You were the gun, your voice was the trigger, your bravery was the barrel, your eyes were the bullets." ~ Her
07-17-2008 #372 Registered User
- Join Date
- Jun 2007
- Location
- St. Pete FL
- Posts
- 934
Nice work & write up!
I need to have one made as well. What does he charge?HELP!!!
1973 TA 4 spd #'s match red/white = STOLEN
https://www.pro-touring.com/threads/...55#post1106255
07-17-2008 #373
-Moderator/Sponsor-
- Join Date
- Apr 2001
- Location
- The City of Fountains
- Posts
- 16,120
My total bill was $160, but keep in mind that he reused my weld yokes, I brought my own slip yoke, and the rear u-joint was reused as well. for me the value was in being there personally, seeing the work, and making sure the length was what I specified. I've run into other driveshaft builders that have actually argued with me about the length. Originally Posted by cdoggy81

Find a good shop locally. Ask around, see who has a good reputation, and go visit the shop. If it looks like a s**t hole, with a bunch of grease monkeys running around, go elsewhere. Terry obviously takes pride in his work. I felt very comfortable with his methods and procedures.
AndrewLast edited by andrewb70; 07-17-2008 at 08:49 AM.
1970 GTO Version 3.0
1967 Cougar build
GM High-Tech Performance feature
My YouTube Channel Please Subscribe!
Instagram @dr__efi
I deliver what EFI promises.
Remote Holley EFI tuning.
Please get in touch if I can be of service.
"You were the gun, your voice was the trigger, your bravery was the barrel, your eyes were the bullets." ~ Her
07-17-2008 #374
-Moderator/Sponsor-
- Join Date
- Apr 2001
- Location
- The City of Fountains
- Posts
- 16,120
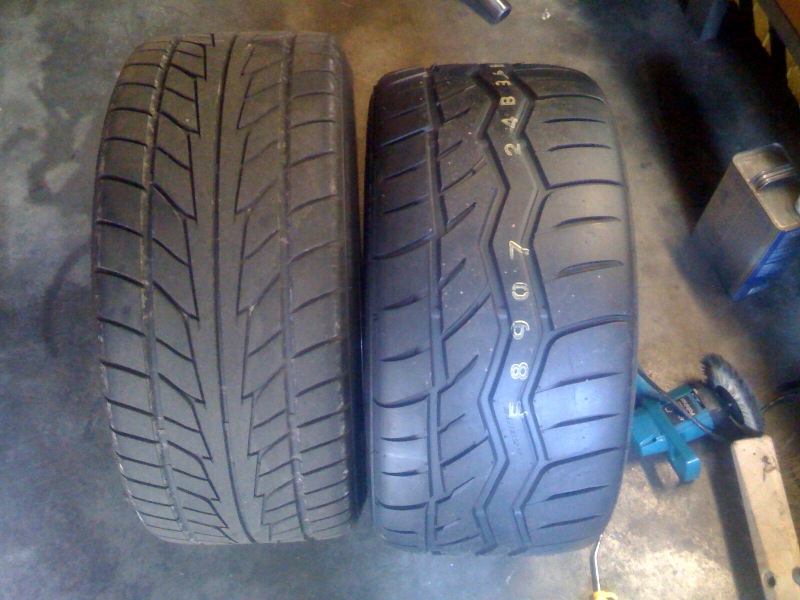
Here are the Falkens compared to the Nitto 555s. The Nitto 295/45 is about an inch bigger in diameter than the 295/40 Falken. This will translate to about a 1/2" drop in ride height, which is no big deal.

The more interesting part is that the Falkens have just over an inch more actual tread width! The advertised section width on the Falkens are stated to be about .4" wider than the Nittos. I can't wait to see how these tires work.
Andrew1970 GTO Version 3.0
1967 Cougar build
GM High-Tech Performance feature
My YouTube Channel Please Subscribe!
Instagram @dr__efi
I deliver what EFI promises.
Remote Holley EFI tuning.
Please get in touch if I can be of service.
"You were the gun, your voice was the trigger, your bravery was the barrel, your eyes were the bullets." ~ Her
07-17-2008 #375
Pro-Touring Veteran
- Join Date
- Nov 2006
- Location
- Washington, MO
- Posts
- 2,363
Yeah, I think the Nitto's always run a bit on the narrow side.
07-18-2008 #376
-Moderator/Sponsor-
- Join Date
- Apr 2001
- Location
- The City of Fountains
- Posts
- 16,120
Today I got my ATS spindles:

ATS did an awesome job of packaging the spindles for safe shipping. I ordered mine with some new billet steel hubs from Vansteel. These use a tapered bearing design that is more durable and I also got the optional GM Racing wheel studs. These hubs are assemblies are being used on SCCA World Challenge cars with great success.
Before taking my spindles off I wanted to test for myself the bump steer that everyone has talked about with the b-body swap. I certainly felt it on my road trip. So I got my dial indicator out and attached the base to the frame and positioned the tip against the rotor. I made sure the rotor had a couple lug nuts on it to keep it steady.

This was a very limited test because I did not take the coilover off and run the suspension through its full range of travel. However, I was able to measure the bump steer from approximately ride height through 1.5" of travel in rebound. Here are the numbers.
Ride height-------dial indicator set to zero
1/2" rebound-----.1" toe in
1" rebound-------.2" toe in
1.5" rebound-----.320" toe in
I am no suspension expert, but I am pretty sure the above numbers suck ass. Once my brakes are here, I will do the same test with the ATS spindles installed.

On a side note, since the rear end was on jack stands I wanted to see if my vibration was gone. I started the engine, ran it up in 5th gear (1:1) and at about 3200 RPM I am still getting that buzzing vibration. I messed around with the pinion angle and nothing made any difference. I finally put a dial indicator on the driveshaft at the rear to measure the run-out. I watched Terry do this on his fixture and I knew the shaft was within .002". To my surprise I saw .038" on the dial indicator. I suspect that my pinion yoke is off. This is driving me insane. Tomorrow I may try the old "hang big hose clamps on the driveshaft test."
I am open to suggestions. :/
Andrew1970 GTO Version 3.0
1967 Cougar build
GM High-Tech Performance feature
My YouTube Channel Please Subscribe!
Instagram @dr__efi
I deliver what EFI promises.
Remote Holley EFI tuning.
Please get in touch if I can be of service.
"You were the gun, your voice was the trigger, your bravery was the barrel, your eyes were the bullets." ~ Her
07-18-2008 #377
Registered User
- Join Date
- May 2005
- Location
- St. Augustine, FL
- Posts
- 1,529
Andrew you need to be a tech guy at a magazine or write a book or something. You are doing a great job of covering everything your doing.
Andrew Petty

07-18-2008 #378 Registered User
- Join Date
- Sep 2006
- Location
- Chicago
- Posts
- 355
What brakes did you end up going with? Looks great by the way.
Tony L
07-18-2008 #379
-Moderator/Sponsor-
- Join Date
- Apr 2001
- Location
- The City of Fountains
- Posts
- 16,120
Thanks Andrew. I figure that someone might get some useful information out of my tinkering...LOL
Tony,
I went the OEM route. Tobin at Kore3 is setting me up with a C6 Z06 system. I upgraded the rotors to the DBA 4000 series, one piece slotted rotor. That was only like a $60 option so it made sense. People forget that rotors are wear items so getting the bling, bling DBA 5000 2 piece rotor is kind of a waste. Which is not to say I haven't purchased parts just for looks...LOL
Andrew1970 GTO Version 3.0
1967 Cougar build
GM High-Tech Performance feature
My YouTube Channel Please Subscribe!
Instagram @dr__efi
I deliver what EFI promises.
Remote Holley EFI tuning.
Please get in touch if I can be of service.
"You were the gun, your voice was the trigger, your bravery was the barrel, your eyes were the bullets." ~ Her
07-19-2008 #380 -Moderator-
- Join Date
- Jul 2001
- Location
- Detroit, Michigan
- Posts
- 6,854
The tech in this thread is great, Andrew...but your issue with vibration in your drivetrain is causing me some anxiety due to the fact that I just set mine up over the winter dialing in the trans angle and having a new driveshaft built. If you're having these kinds of issues...I can just imagine what's in store for me.
1968 Pro-Touring Camaro LS1
Project: Next Year
- Start date; June '01
- Completion; Sometime next year or the year after.....

 Reply With Quote


