


Results 381 to 400 of 536
Thread: Project 70 RS
-
12-20-2014 #381
 Registered User
- Join Date
- Feb 2014
- Posts
- 779

I see what you mean about the lines on the trunk. There are also too many of them. Might look better if you not only straighten the crooked ones, but also make the one between the spoiler and decklid go away. That would slicken things up a bit too.
Just a thought. Great project though, and thanks for the photos.
-
12-20-2014 #382
 Registered User
- Join Date
- Feb 2009
- Location
- N.J.
- Posts
- 690
I don't mind the correct factory lines, I actually kind of like them. I really hate the imperfect factory lines. I may play around with pulling the bumper in tighter though. Originally Posted by Bob in St. Louis
 - Paul
70 Camaro RS Project Build
https://www.pro-touring.com/showthre...-Project-70-RS
90 Mustang GT Project Build
https://www.pro-touring.com/threads/...ang-Gt-Project
My Garage Project
http://garagejournal.com/forum/showthread.php?t=189511
-
12-21-2014 #383
Registered User
- Join Date
- Feb 2009
- Location
- N.J.
- Posts
- 690
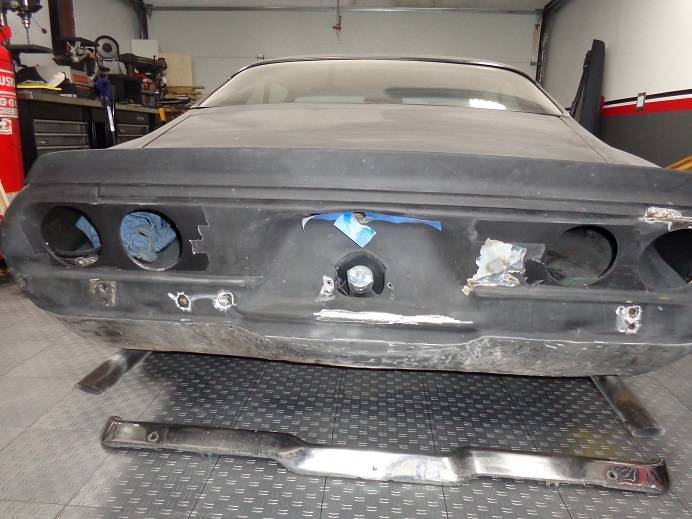
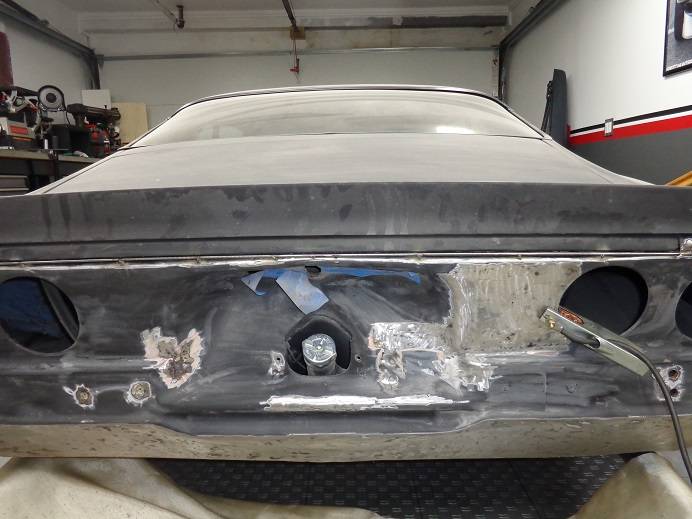
Started to correct the trunk area today. I used my new toy, the stud gun, to correct the lower panel & tail section that was quite wavey. A little more work and it will just need a thin skim coat to make it perfect. Used some round bar to make a nice line to match the curvature of the trunk lid. Much more work to do on that, but I like the line much better now.
 - Paul
70 Camaro RS Project Build
https://www.pro-touring.com/showthre...-Project-70-RS
90 Mustang GT Project Build
https://www.pro-touring.com/threads/...ang-Gt-Project
My Garage Project
http://garagejournal.com/forum/showthread.php?t=189511
-
12-26-2014 #384
Registered User
- Join Date
- Apr 2009
- Posts
- 87
Awesome project.
You've definitely come a long way. I can't wait to see it done. Keep it up!!
-
12-30-2014 #385
Registered User
- Join Date
- May 2013
- Posts
- 8
Getting the seams out
What size round bar did you use? I am working on the same area on my 71 RS and planning to fill and smooth out allot of the seams on the roll pan where the qtr panel meets the roll pan.
Been following your post for a long while now and really appreciate your posts. Thanks
Originally Posted by aps63
-
01-10-2015 #386
Registered User
- Join Date
- Feb 2009
- Location
- N.J.
- Posts
- 690
Sorry for the delayed response. Just got back from vacation. Originally Posted by CamaroDaddy
I'm using 3/16" round bar.- Paul
70 Camaro RS Project Build
https://www.pro-touring.com/showthre...-Project-70-RS
90 Mustang GT Project Build
https://www.pro-touring.com/threads/...ang-Gt-Project
My Garage Project
http://garagejournal.com/forum/showthread.php?t=189511
-
01-16-2015 #387
Registered User
- Join Date
- Apr 2013
- Posts
- 99
 Originally Posted by aps63
I was going to do the same thing but ending up getting an entire rear pan for $120. Well worth the investment and time savings

-
01-16-2015 #388
Registered User
- Join Date
- Feb 2009
- Location
- N.J.
- Posts
- 690
Yes, but look at the top line of your new piece. It has the same uneven line right above the 2 inner taillight housing's. It won't match up with the curvature of your trunk. Originally Posted by Zapper
Looks like a nice piece though. Who made it?- Paul
70 Camaro RS Project Build
https://www.pro-touring.com/showthre...-Project-70-RS
90 Mustang GT Project Build
https://www.pro-touring.com/threads/...ang-Gt-Project
My Garage Project
http://garagejournal.com/forum/showthread.php?t=189511
01-16-2015 #389
Registered User
- Join Date
- Apr 2013
- Posts
- 99
That's an optical illusion from the lighting against the black panel
You shouldn't use old panels as reference to the new ones, especially if they join together at some point
The trunk lid was bent too. I put on a new trunk lid as well for $140.
I finished all that work last summer....laser straight with little effort
Panels are from Dynacorn
01-16-2015 #390
Registered User
- Join Date
- Feb 2009
- Location
- N.J.
- Posts
- 690
That's different, thanks. I'd love to see a picture of the final result. Originally Posted by Zapper
- Paul
70 Camaro RS Project Build
https://www.pro-touring.com/showthre...-Project-70-RS
90 Mustang GT Project Build
https://www.pro-touring.com/threads/...ang-Gt-Project
My Garage Project
http://garagejournal.com/forum/showthread.php?t=189511
01-17-2015 #391
Registered User
- Join Date
- Feb 2009
- Location
- N.J.
- Posts
- 690
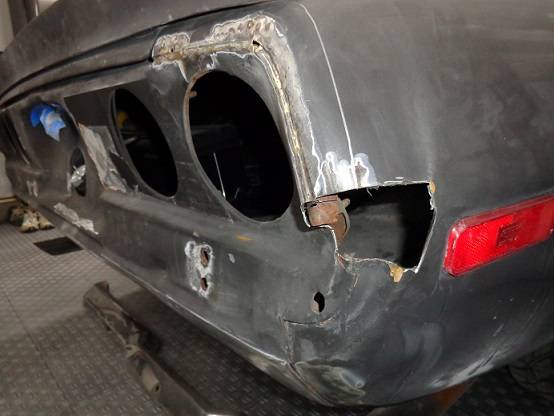
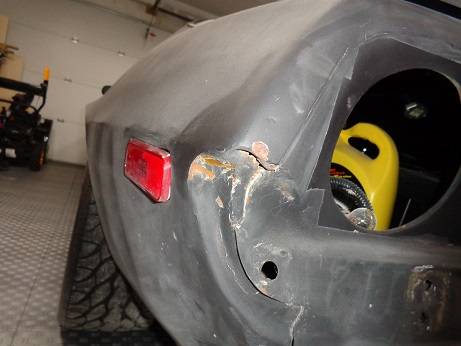
Got the trunk lid section mostly welded up. Now for the pocket tthat the rear bumper fits into(not sure what it's called).
Looks like the bumper got pushed into it. Passenger side if too far gone. Bought a rear patch panel and cut out what I need to repair it.
Cut out the damaged section now just have to trim the new piece to go in. These pictures are from before I started the trunk section.
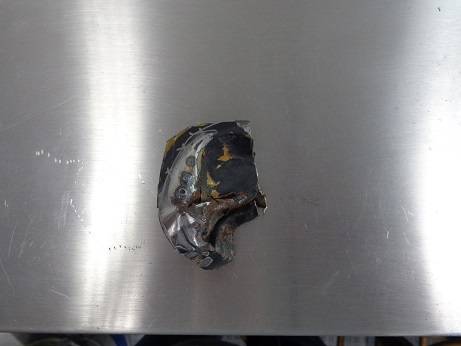
This was the piece that came out.
Drivers side is better, I will see if I can pull & hammer it out first.
 - Paul
70 Camaro RS Project Build
https://www.pro-touring.com/showthre...-Project-70-RS
90 Mustang GT Project Build
https://www.pro-touring.com/threads/...ang-Gt-Project
My Garage Project
http://garagejournal.com/forum/showthread.php?t=189511
01-26-2015 #392
Registered User
- Join Date
- May 2010
- Posts
- 42
Nice work. Subscribed.
My Project Progress http://www.nastyz28.com/forum/showthread.php?t=237233
03-05-2015 #393
Registered User
- Join Date
- Feb 2009
- Location
- N.J.
- Posts
- 690
Just started another of my winter projects for the Camaro.
Replacing the weak open 8.2 for an 8.5 10 bolt, upgrading to 30 spline, installing a posi and upping the gears to 3:42. Plus I already have a Moser stud girdle for it from the 8.2.
I wanted a 12 bolt but it just wasn't in my budget right now. Picked up this housing for $75, I couldn't pass on it. A little cleanup, a coat of POS and it will be ready for some great new parts.
 - Paul
70 Camaro RS Project Build
https://www.pro-touring.com/showthre...-Project-70-RS
90 Mustang GT Project Build
https://www.pro-touring.com/threads/...ang-Gt-Project
My Garage Project
http://garagejournal.com/forum/showthread.php?t=189511
03-05-2015 #394 Registered User
- Join Date
- Nov 2012
- Posts
- 373
Awesome work. Lovin' another 2nd gen coming together. Keep it coming!
1970 Camaro restomod power tour ride
1966 Buick Special restomod, the never ending project
1970 GTO My newest retirement project, time to gather parts!
03-05-2015 #395 Registered User
- Join Date
- Aug 2009
- Location
- Chandler, Az (from west NE)
- Posts
- 240
Have you decided what type of limited slip to use. I also acquired an 8.5 rear end with 30 spline axles, an auburn "posi" and 3.42 gears for $25 a couple of years ago at Pick-N-Pull on a half price day when their prices were still reasonable. I plan on narrowing it to use in my S10 DD to replace the govlock 7.625 in it now. Just need to decide on brakes and housing ends to order axles. The bodywork on the Camaro is looking very good so far.
Ric
2002 s10, DD and AutoX.
1966 Malibu owned since 1971. Drag car converting to track toy!
03-05-2015 #396
Registered User
- Join Date
- Feb 2009
- Location
- N.J.
- Posts
- 690
Thanks Originally Posted by Bygblok
WOW!!! You got some deal, all that for $25. Originally Posted by rixtrix1
I have read a lot about both the Eaton & Auburn, and I'm going with an Eaton style posi.- Paul
70 Camaro RS Project Build
https://www.pro-touring.com/showthre...-Project-70-RS
90 Mustang GT Project Build
https://www.pro-touring.com/threads/...ang-Gt-Project
My Garage Project
http://garagejournal.com/forum/showthread.php?t=189511
03-05-2015 #397
Registered User
- Join Date
- Aug 2009
- Location
- Chandler, Az (from west NE)
- Posts
- 240
Between the two, I like the Eaton also. Haven't disassembled the housing completely to see if the Auburn is good yet. Too much else going on right now to work on toys, but soon I hope.
Thanks for all the updates on your toy!Ric
2002 s10, DD and AutoX.
1966 Malibu owned since 1971. Drag car converting to track toy!
03-11-2015 #398
Registered User
- Join Date
- Feb 2009
- Location
- N.J.
- Posts
- 690
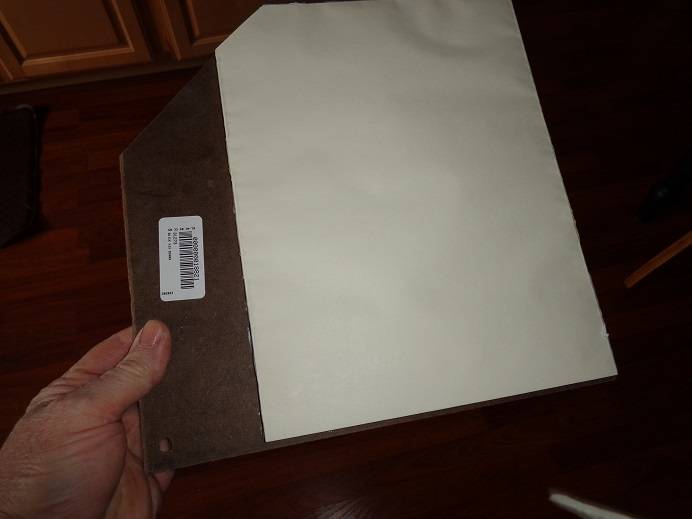
I've been doing some bodywork on the rear of the car lately, and I'm always looking for something to mix the filler on. In the past I've used cardboard(I know, not good), thick plastic boards, etc.....
I found this on Eastwoods website and MAN!!!! I love this thing. No more messy cleanup(except for the spreaders). Just tear off the sheet and throw it away. I think if I did bodywork all day long, it would get expensive. But for me, $19 for 100 sheets, well worth it.
 - Paul
70 Camaro RS Project Build
https://www.pro-touring.com/showthre...-Project-70-RS
90 Mustang GT Project Build
https://www.pro-touring.com/threads/...ang-Gt-Project
My Garage Project
http://garagejournal.com/forum/showthread.php?t=189511
03-11-2015 #399
Registered User
- Join Date
- Aug 2009
- Location
- Chandler, Az (from west NE)
- Posts
- 240
Interesting. Is it a kind of "wax" paper so the filler comes off easy to your spreader? I just use a drywall mud hawk I happen to have, But I only use body filler about once every 20 years. We'll see as I will probably be slinging more mud this year than I ever have. Have to replace a bad repair job on my S10 box as well as all over my Malibu.
Ric
2002 s10, DD and AutoX.
1966 Malibu owned since 1971. Drag car converting to track toy!
03-11-2015 #400
Registered User
- Join Date
- Feb 2009
- Location
- N.J.
- Posts
- 690
It's hard to discribe, It's not very waxy. But it does not soak through at all. There is also a rubber strap on the back that you can slide your hand into to hold it. Very handy piece.
- Paul
70 Camaro RS Project Build
https://www.pro-touring.com/showthre...-Project-70-RS
90 Mustang GT Project Build
https://www.pro-touring.com/threads/...ang-Gt-Project
My Garage Project
http://garagejournal.com/forum/showthread.php?t=189511

 Reply With Quote



