Results 21 to 40 of 412
Thread: '66 Pontiac Resto-Mod Update
-
04-02-2009 #21

 Registered User
- Join Date
- Aug 2008
- Location
- Pgh, PA
- Posts
- 2,177
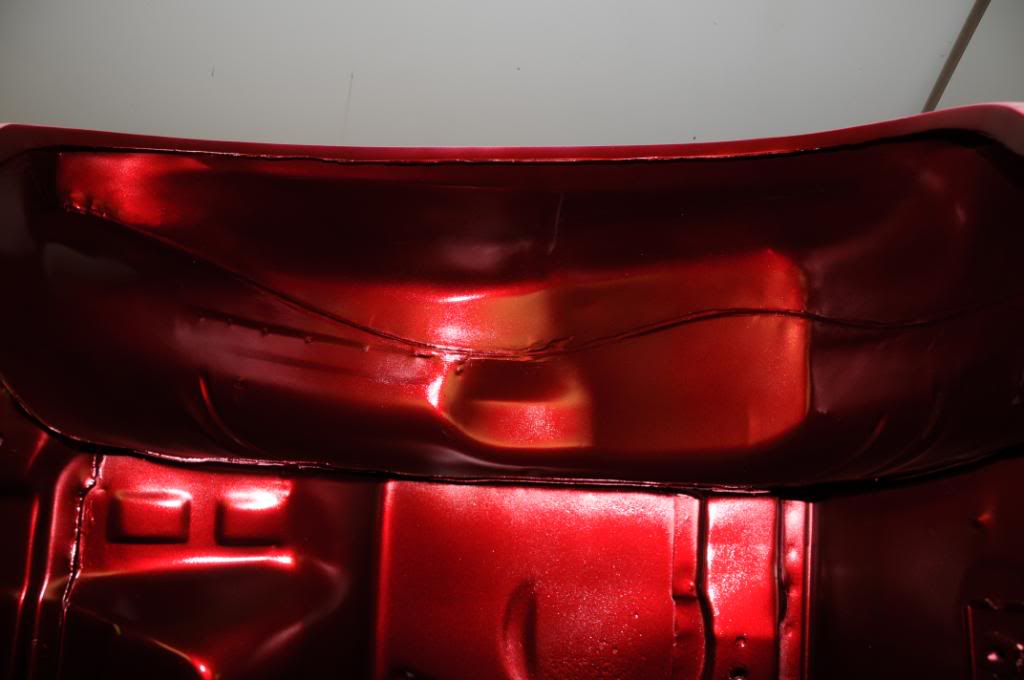
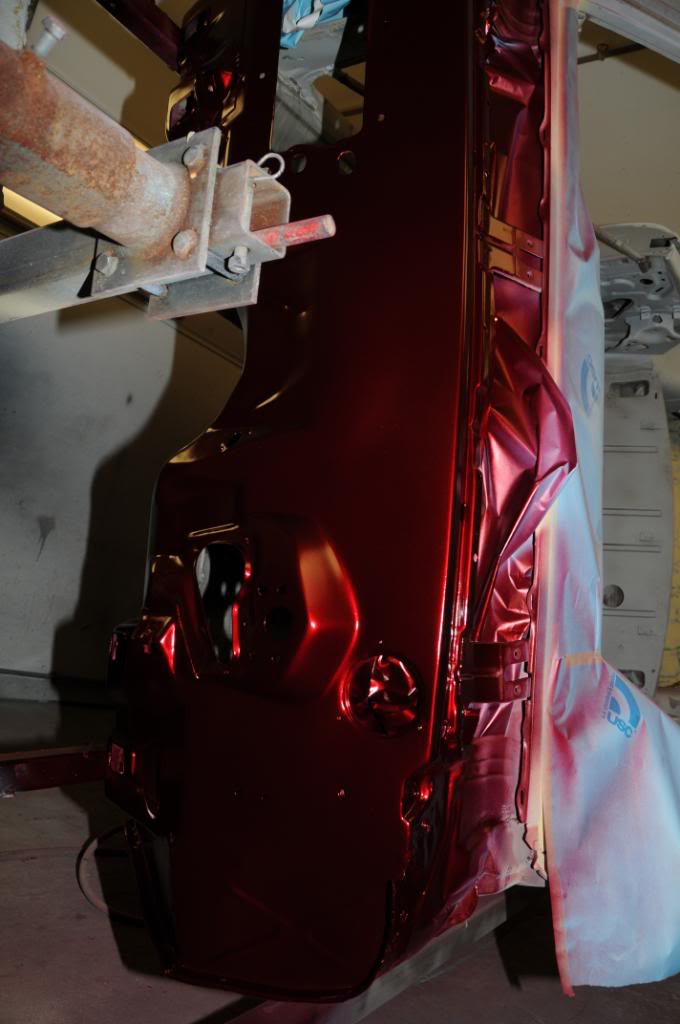
New pics of progress as of first thing this morning. Paint is PPG Tri-Coat cabernet. The first two layers are down on the underneath and firewall. No clear on it yet. Pics don't do it justice. I'm starting to get real excited. Just about ready to get the frame/drivetrain back down and get the body off the rotisserie.
Before I do that, I need to finish up with the oil filter housing. Having a little issue with clearance due to the headers. Can't reach the front bolt on the housing, so the headers may need to come loose on the passenger side (again). Rebent stainless brake lines were delivered, so the final touches on the rear brakes will be completed. Got the hardened (17-4) stainless bolts for rear sway bar, front sway bar bushings, and tranny crossmember mounts that need to go on. Finish getting lube in the rear end, and get lube in the TKO600. Then it's ready for the body to go back on (for the final time!).


-
04-02-2009 #22
Registered User
- Join Date
- Jan 2005
- Location
- Dallas TX
- Posts
- 1,633
looking real good

04-02-2009 #23 Registered User
- Join Date
- Mar 2009
- Location
- overseas
- Posts
- 3,434

loving the update! very nice
 Kevin S. (overseas in Germany)
1963 Chevrolet Impala 2d ht Coupe
www.CruznArt.com
CRUZN - Automotive Artworks
04-02-2009 #24 Registered User
- Join Date
- Nov 2006
- Location
- Ma.
- Posts
- 5,560
Awesome color . thats going to look sweet, nice work.
Wayne
Car FINALLY home !!!!!! lol
Project FNQUIK https://www.pro-touring.com/showthre...ghlight=FNQUIK
04-03-2009 #25 Registered User
- Join Date
- Nov 2008
- Location
- Iceland
- Posts
- 896

04-03-2009 #26 Registered User
- Join Date
- Nov 2008
- Location
- iceland
- Posts
- 1,859
Awesome color
 Bjarni B
My Chevelle project The Awakening
http://www.1971chevelle.net/

http://www.kvartmila.is/smf/index.php?topic=27028.0
CHEVY POWER RULES!
04-03-2009 #27
Registered User
- Join Date
- Feb 2006
- Posts
- 478
How did you get away without modifying the tunnel for the TKO?
I have a 67 hardtop that is almost the exact project you are doing.Alex Godsey
Somerset, KY
Pro Touring 67 GTO
461 Pontiac Power
04-03-2009 #28
Registered User
- Join Date
- Aug 2008
- Location
- Pgh, PA
- Posts
- 2,177
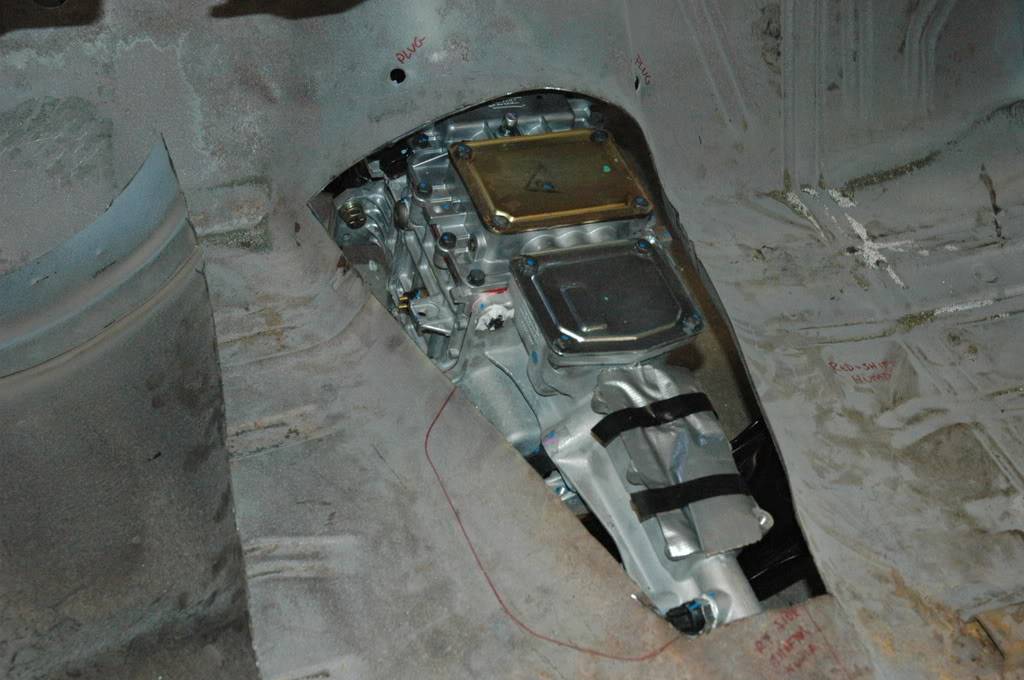
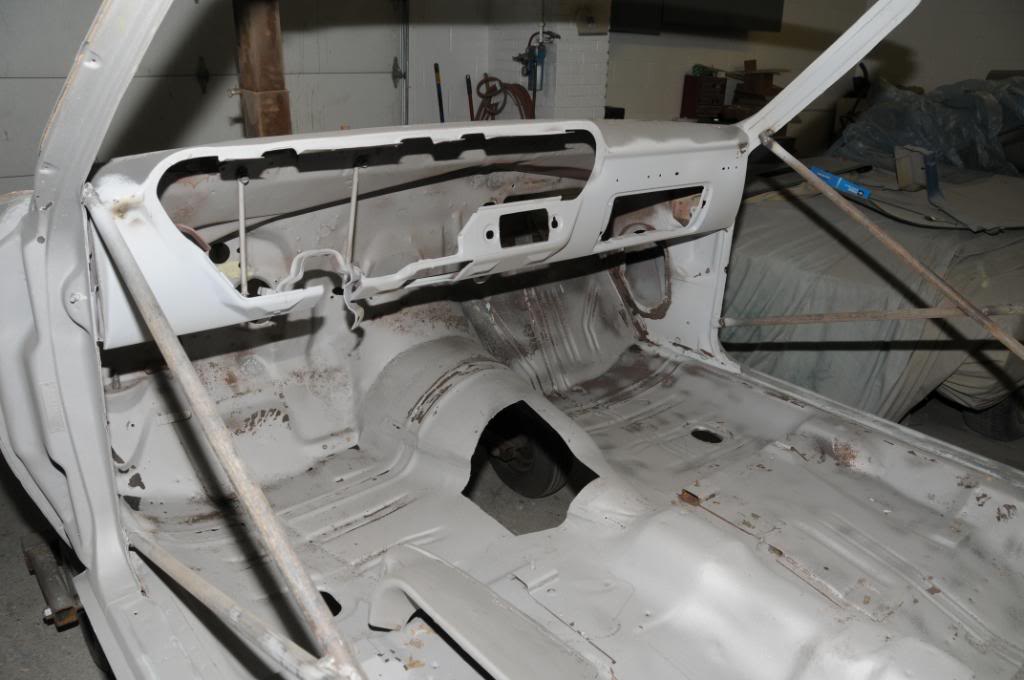
I did not get away with it. If you look at the pic below you can see where I measured 1" up from the base of the floor, made a template, cut out the tunnel, and then mounted the body on the frame using the new Energy Suspension poly bushings to make sure fitment would be good with the mocked up tranny/scattershield in place... Originally Posted by gearbanger

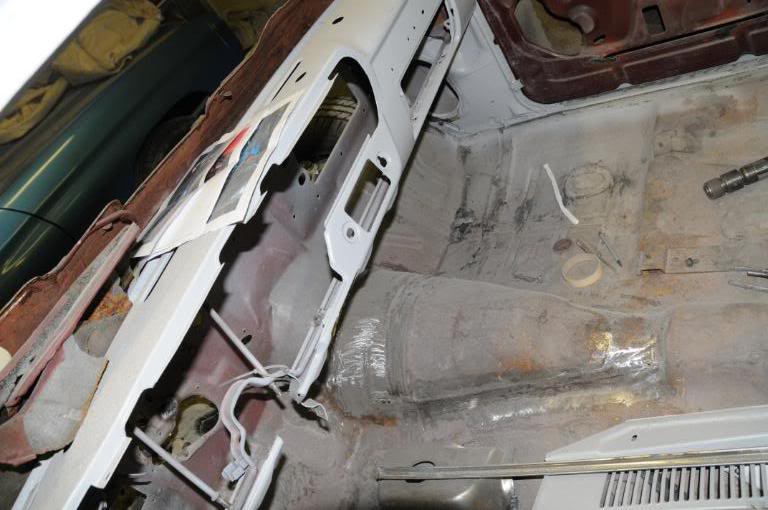
Then approximately 1" was added to both side at the base, the tunnel was raised about an inch, and then the front and rear were transitioned in, welded and ground flat
Then the shifter mount "perch" was fitted. Holes were drilled to mount it and nuts were welded under the floor to allow the mount to be bolted down and/or unbolted for open access to the tranny from the floor
04-03-2009 #29
Registered User
- Join Date
- Jan 2005
- Location
- Dallas TX
- Posts
- 1,633
(^^^ edit never mind he types faster than me)
I'll let him answer but I will say they have modified it and just did a good job hiding it. You can look at my build thread and see how I did mine. There is no way you won't cut a 64-67 A-body especially a low one where you need to raise the back to get the correct driveline angles. Originally Posted by gearbanger
04-03-2009 #30
Registered User
- Join Date
- Aug 2008
- Location
- Pgh, PA
- Posts
- 2,177
Oil Pressure Sending Unit
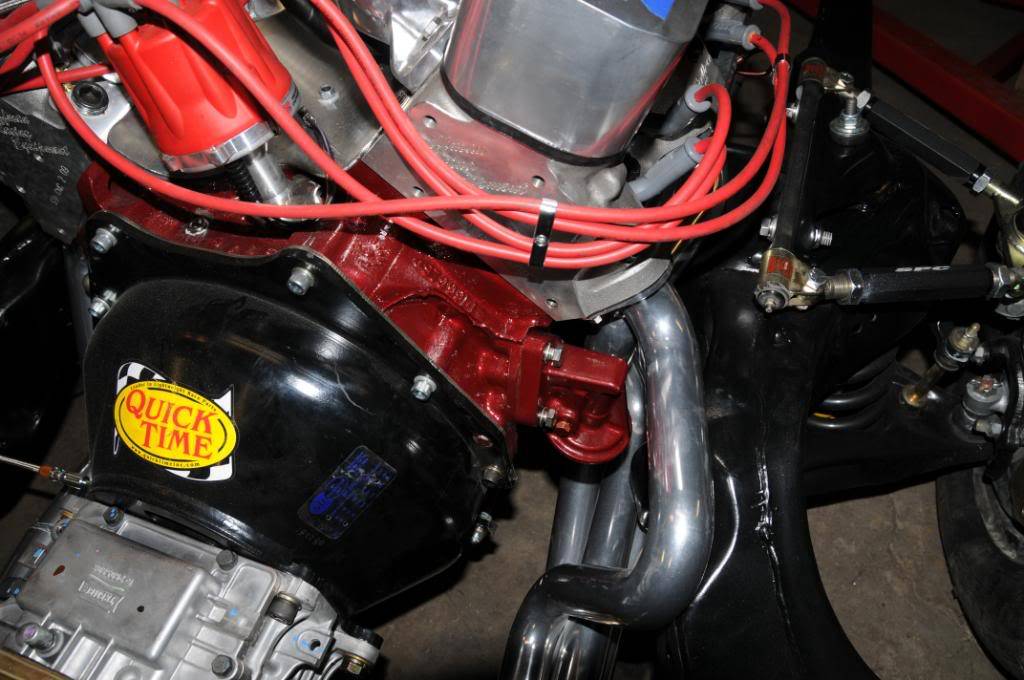
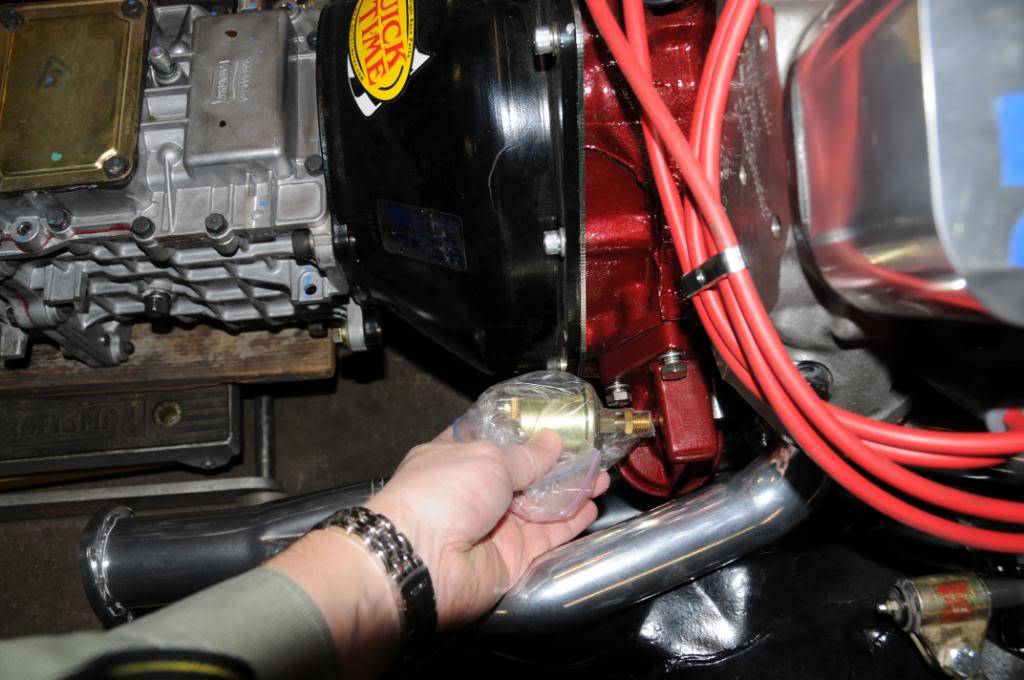
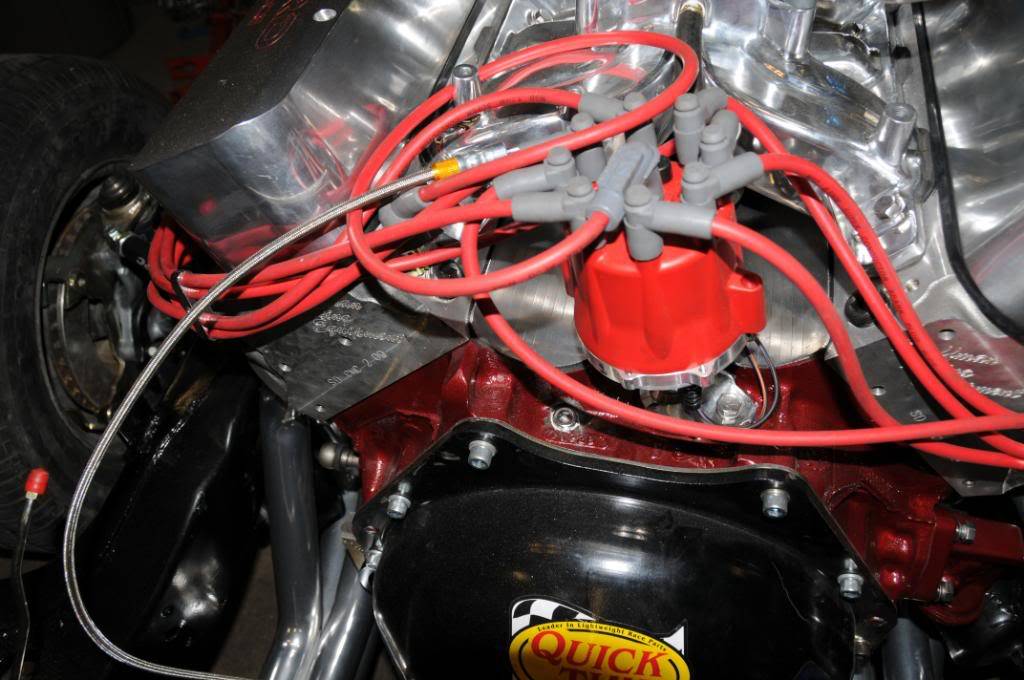
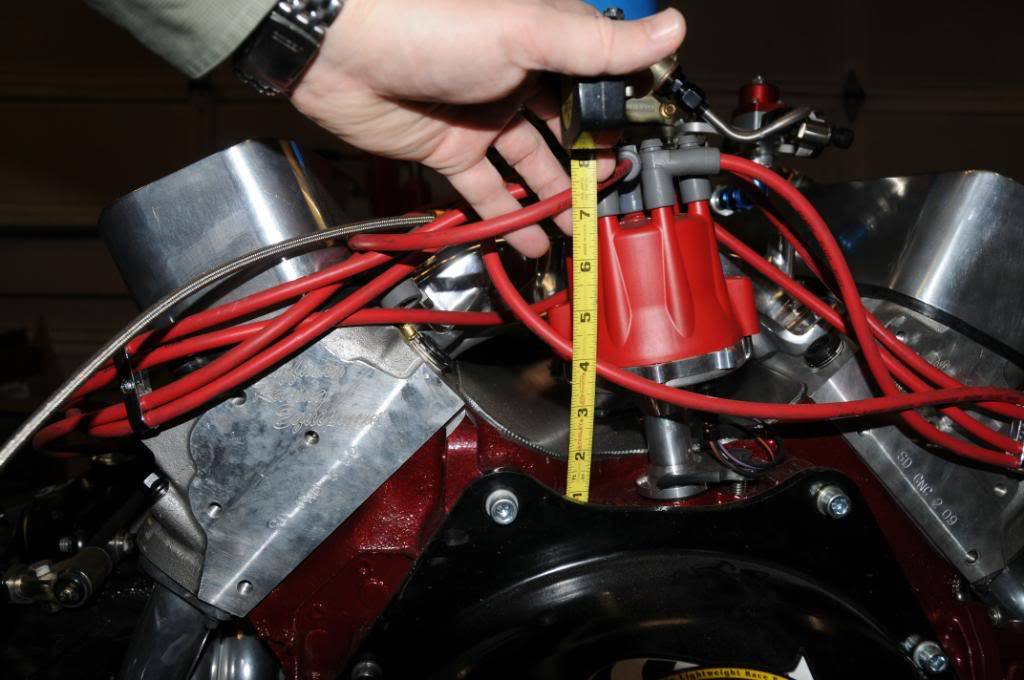
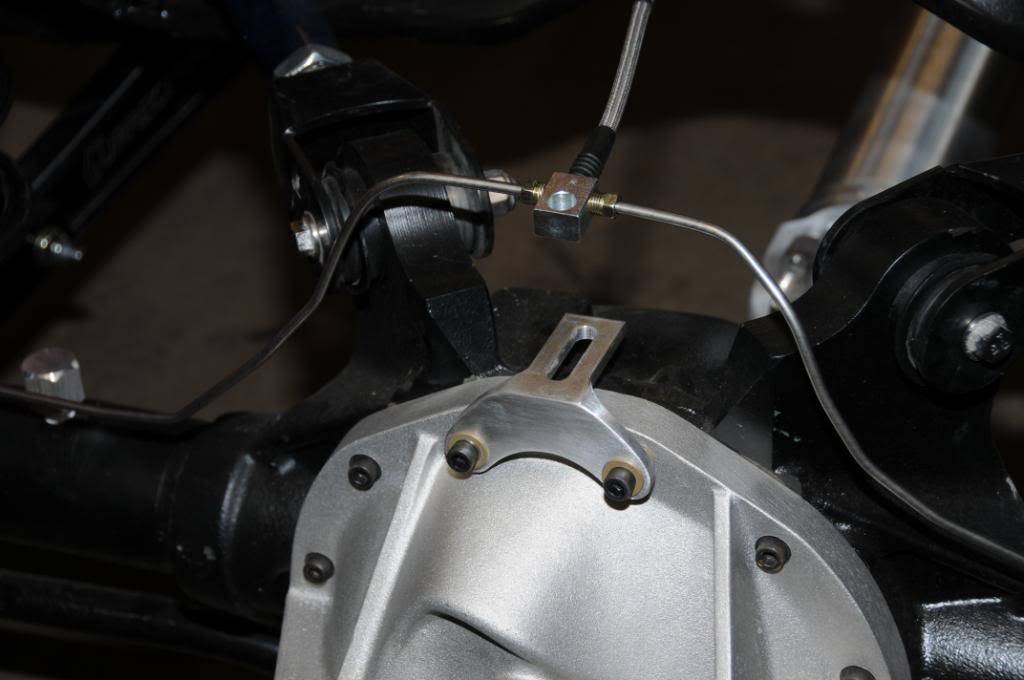
Now I'm trying to fit the oil pressure sending unit in. The body will go back on the frame early next week, so I've only got tomorrow to button things up with everything exposed. The new 3.5" 1350 yoke aluminum driveshaft arrived yesterday. I made an aluminum mounting bracket to go on the rear end cover and secure the two brake hard lines (I'll try to post a pic tomorrow). Need to get those new stainless hard lines and the stainless flex line connected up tomorrow. Got the tranny crossmember brackets blasted and repainted. Need to bolt them back up with the 17-4 stainless bolts. Need to somehow get the oil filter housing bolted back up (argh!), and mount the oil pressure sending unit. I'm going to stop tonight on my way home and get an assortment of stainless or brass fittings and try to work it out in the AM.
As you can see, if I put the sending unit on the oil filter housing I'll ever be able to get the filter through the opening in the headers. The 8.5 qt deep oil pan prevents getting it through from the bottom.
Going to have to put together some sort of adapter assembly to allow the sending unit to clear the distributor and valley pan. Maybe a 45 and bring it up and toward the drivers side slightly forward away from the distributor.
04-03-2009 #31
Registered User
- Join Date
- Feb 2006
- Posts
- 478
Man, you really did a fine job on those floor mods. I did mine and it was more of a patch job, but now that it is on the rotisserie, I am going to do it right.
Alex Godsey
Somerset, KY
Pro Touring 67 GTO
461 Pontiac Power
04-03-2009 #32
Registered User
- Join Date
- Feb 2006
- Posts
- 478
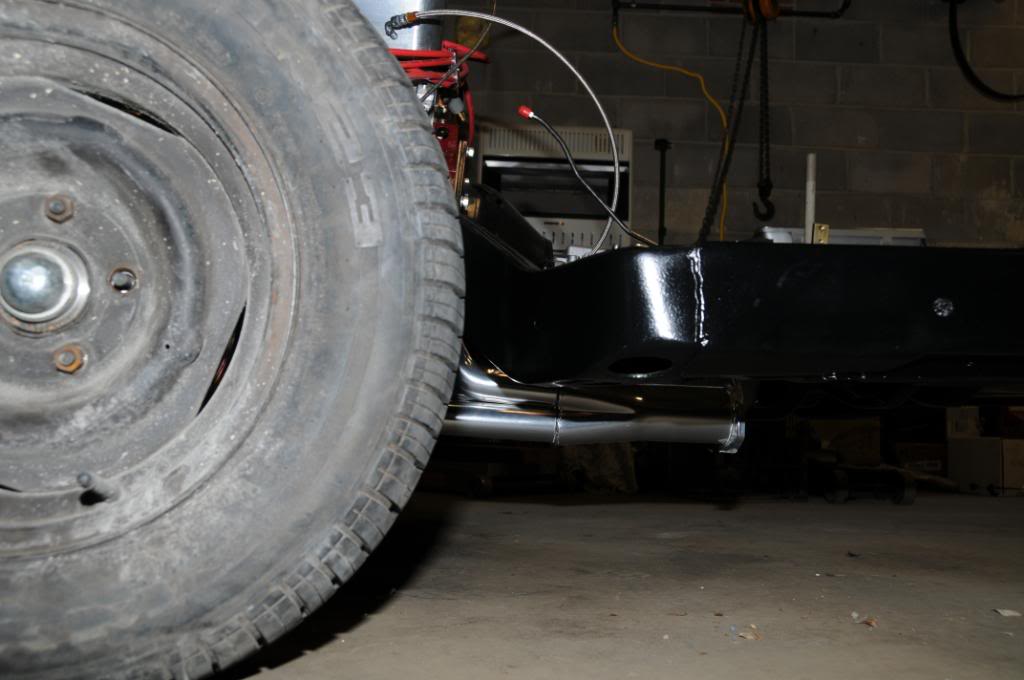
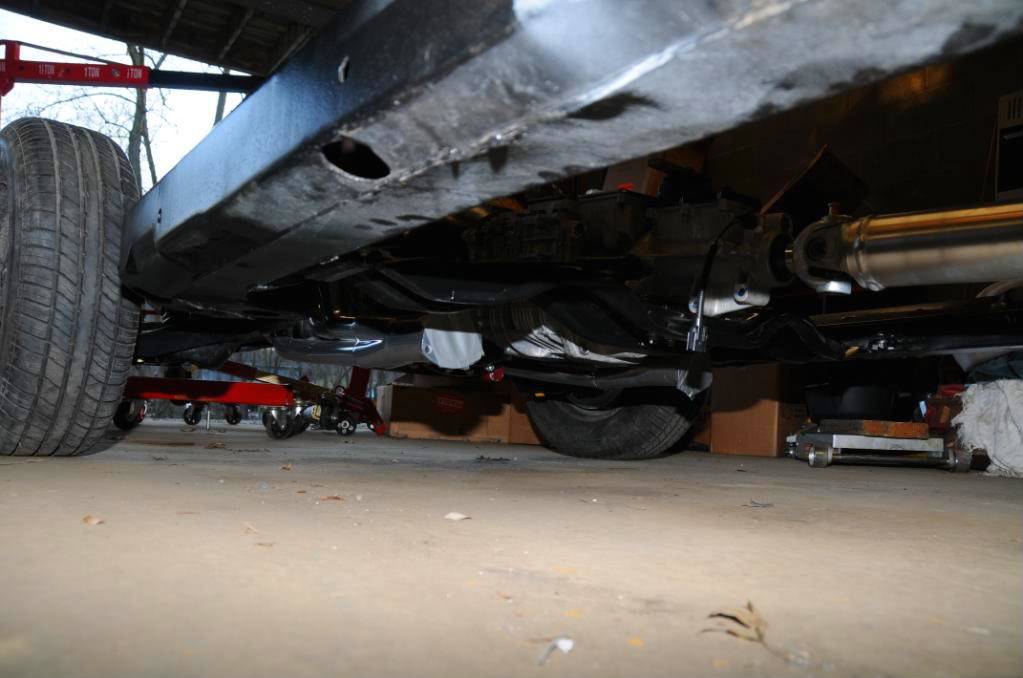
Could you post a pic of how far below the frame that those headers hang? I have a set of 2" headers, and among other things, they hang to low and I don't like them. I am thinking of getting a set of Dougs 1-7/8" headers for round ports and sawing the flanges off and making them fit my Ds.
Thanks!Alex Godsey
Somerset, KY
Pro Touring 67 GTO
461 Pontiac Power
04-03-2009 #33
Registered User
- Join Date
- Aug 2008
- Location
- Pgh, PA
- Posts
- 2,177
I'll make a note to try and do that tomorrow. I just got off the phone from my paint guy. I'll have tomorrow to finish up everything I can and I'm taking the roller back to his shop on Sunday. I will sincerely try to get a pic looking flat along the side before I move it. Remember, though - mine will drop a little more once the body is on it. You should be able to see how much lower the flanges are below the frame, but I'm not sure that the 1 7/8 will fit the same as the 1 3/4 that I have.
We've decided to try and christen the car at Good Guys in July. I'm not sure if we're going to make it or not. If we do, it probably won't be all that driveable - front end probably not aligned yet, pinion angle probably not set. It'll run, steer, go forward and back, but will still be a trailer queen even if I can make that date. We'll see.
04-04-2009 #34
Registered User
- Join Date
- Feb 2006
- Posts
- 478
Thanks wmhjr
That is a really cool car. I dont know if you are already familiar with those strokers but that thing is going to be scary powerful. You will love it!Alex Godsey
Somerset, KY
Pro Touring 67 GTO
461 Pontiac Power
04-04-2009 #35
Registered User
- Join Date
- Aug 2008
- Location
- Pgh, PA
- Posts
- 2,177
OK, today started of pretty rocky but I was able to salvage it. I proved today that no matter how much you plan, if you're not a pro that does this all the time you can really screw up simple things that result in a ton of extra work.
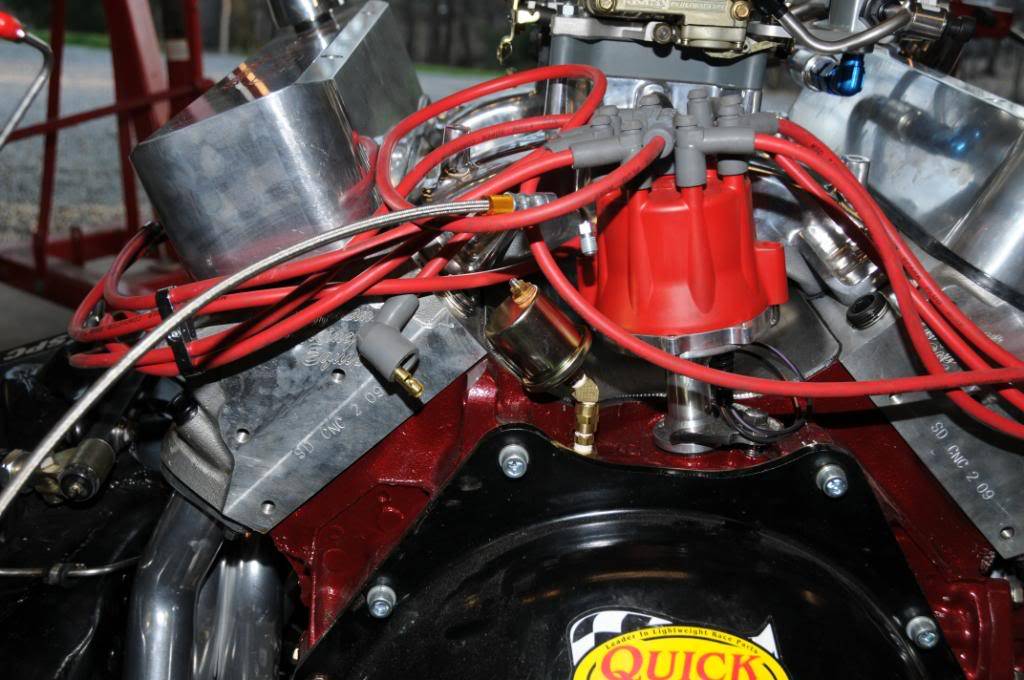
Case in point: I really didn't think much about having to get the hard brake line in the front (that crosses with the crossmember) before installing the drivetrain. I started thinking about it and the 8.5 quart oil pan last night, and when I looked at it, sure enough there was no way it was going in with the engine in place. So, unfortunately headers had to come off, and drivetrain back out. I called a couple friends to stop over and give me a quick hand after getting the line in because the headers have to be in place but held off to the side while the engine is dropped in - more than a 1 man job. Bottom line is that it's in and all is well. I also rigged up some fittings to allow the oil pressure gauge clearance, cleaned up and installed the fabricated aluminum rear brake bracket, lubed the rear end, replaced the sway bar and tranny crossmember bolts with stainless as well as the front sway bar bracket bolts. Finally, also sealed off the rear fuel tank lines, water connections and header outlets to keep the dust/dirt out for the next few weeks. I test fitted the new driveshaft (very nice!) and tomorrow I'll get fluid in the tranny, and then we're taking the entire assembly to the body shop.
Oil Pressure Sending Unit is in!
Rear brake lines in, driveshaft in...

Aluminum bracket - I'm going to make a stainless or aluminum 2.5" spacer to go between the flex line and the bracket. Plenty of clearance, and plenty of room for adjustment.
04-04-2009 #36
Registered User
- Join Date
- Aug 2008
- Location
- Pgh, PA
- Posts
- 2,177
OK, I hope these pics help you out. Remember, these are 1 3/4" Dougs Headers so your may not fit exactly the same Originally Posted by gearbanger
One view from the side
A view from the front
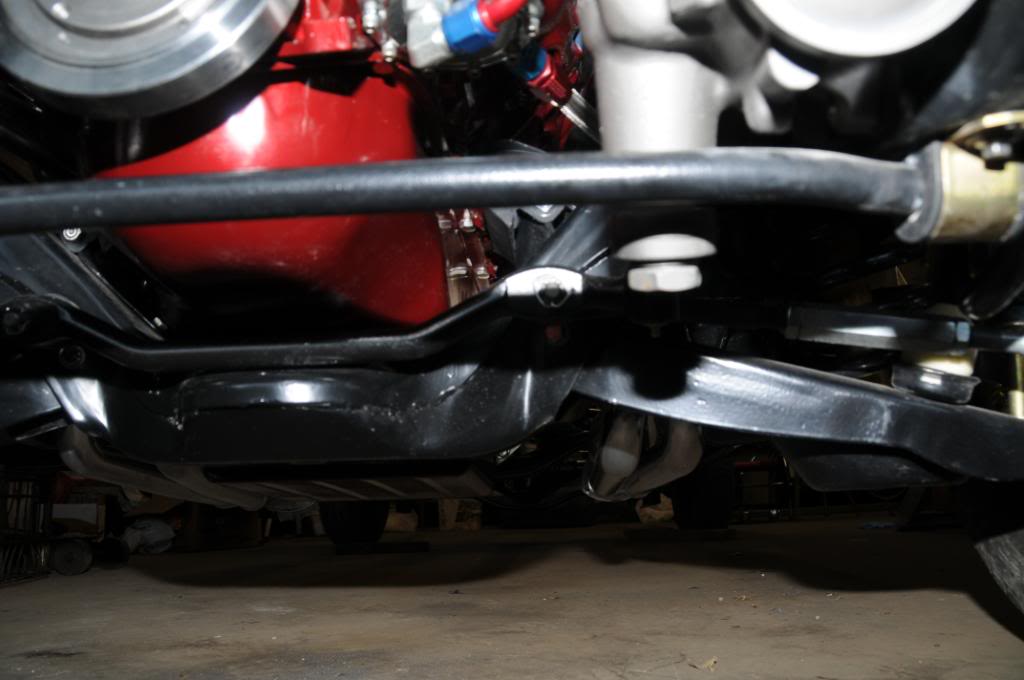
A view more or less from the side
04-04-2009 #37
Registered User
- Join Date
- Jan 2005
- Location
- Dallas TX
- Posts
- 1,633
those tuck up really nice
04-04-2009 #38
Registered User
- Join Date
- Aug 2008
- Location
- Pgh, PA
- Posts
- 2,177
They do tuck in pretty well. I got the Dougs because there isn't much room and Dougs do have the reputation for best fitment. I didn't really understand just how tight the clearance is in there. This is my first Poncho that I've done. There is almost NO room whatsoever! BTW, my first set of Dougs was coated by them, and the finish was really poor. I returned them and bought a set from Thermal Tech, and the quality of the finish is far better. Thermal Tech buys raw headers from Dougs and does their own coatings. I've got pics of the original Dougs to show how bad they were in case you're interested. Let me know and I'll PM you with the link.
04-04-2009 #39 Registered User
- Join Date
- Jun 2007
- Location
- Dayton Ohio
- Posts
- 1,283
getting there man
GTO Project https://www.pro-touring.com/showthre...-The-Great-One
Colorado Project https://www.pro-touring.com/showthre...cab-CodeRedZQ8
Check Out My YouTube Channel http://www.youtube.com/c/geedsgarage
04-05-2009 #40
Registered User
- Join Date
- Mar 2009
- Location
- overseas
- Posts
- 3,434
sweet
Kevin S. (overseas in Germany)
1963 Chevrolet Impala 2d ht Coupe
www.CruznArt.com
CRUZN - Automotive Artworks

 Reply With Quote