

Results 1 to 20 of 27
Thread: Garage fabbed Door Panel Build
-
10-02-2011 #1
 Registered User
- Join Date
- Nov 2006
- Posts
- 867

Garage fabbed Door Panel Build
There have been a lot of people that asked for a build thread of my Garage fabbed Door Panels after I initially posted them a few months ago. I FINALLY found the time to do it, so here it is........
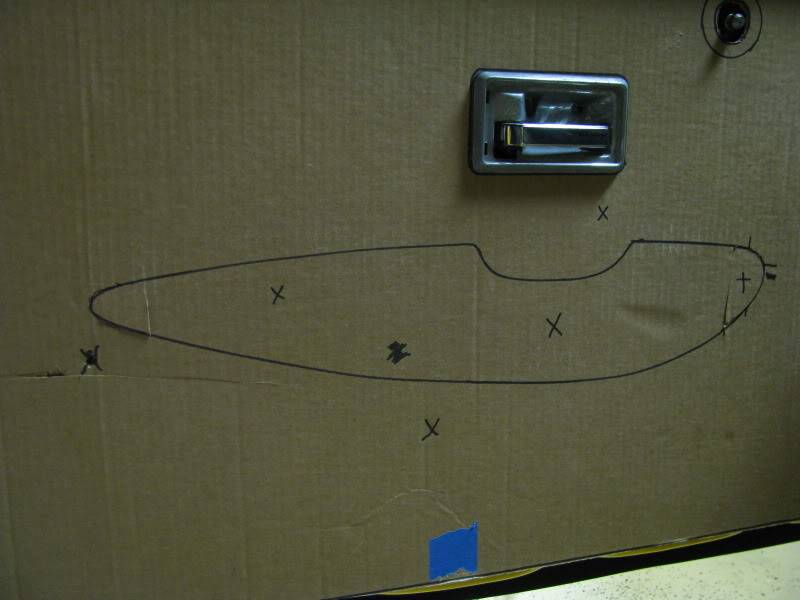
The initial pattern was just mocked up out of cardboard. The most important markings are the Black X's. They mark where the armrest would be located on the panel, secured to the panel and also where the base panel would be secured to the door. I also marked 2 reference points on the upper door panel and on the template so that the template would always be aligned correctly when it is removed from the door while marking all of the different fastener locations.

Next I positioned the location of the 2 insert panels. I actually secured the armrest to the template as this was my master reference point.
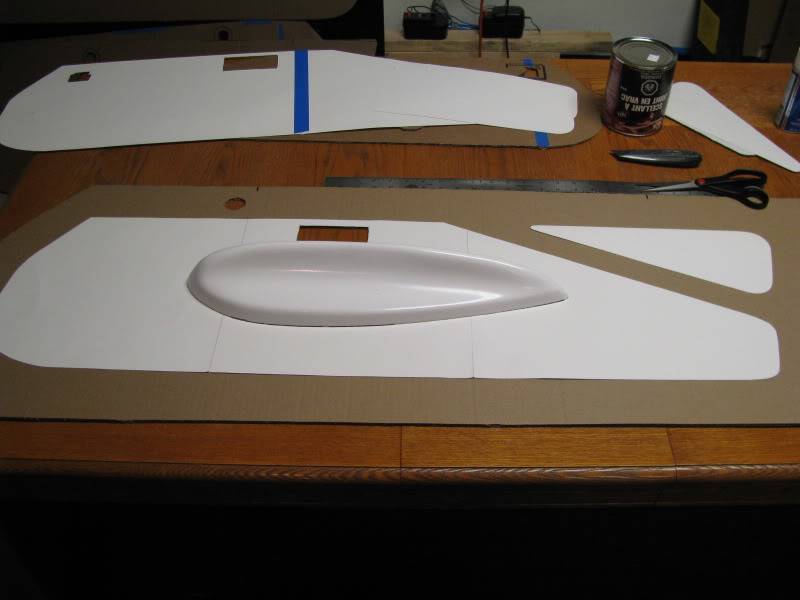
The material used to make the panels was black 1/8" ABS plastic. Then I traced out the door panel on the ABS material using a white grease pencil. Initially I used the sabre saw to cut the ABS material, but there was a ton of ABS chunks (read sawdust) all over the place, plus it was difficult to make straight cuts. HINT-I discovered after reading about working with ABS that you can score it like drywall and bend it away from the score and basically it snaps at the scoring line. It leaves a MUCH cleaner line that requires very little touch up of the edge.
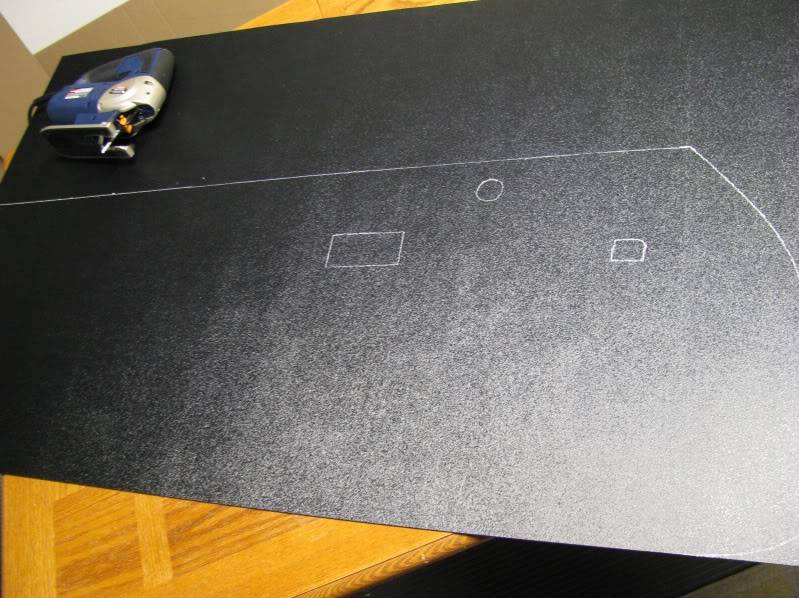
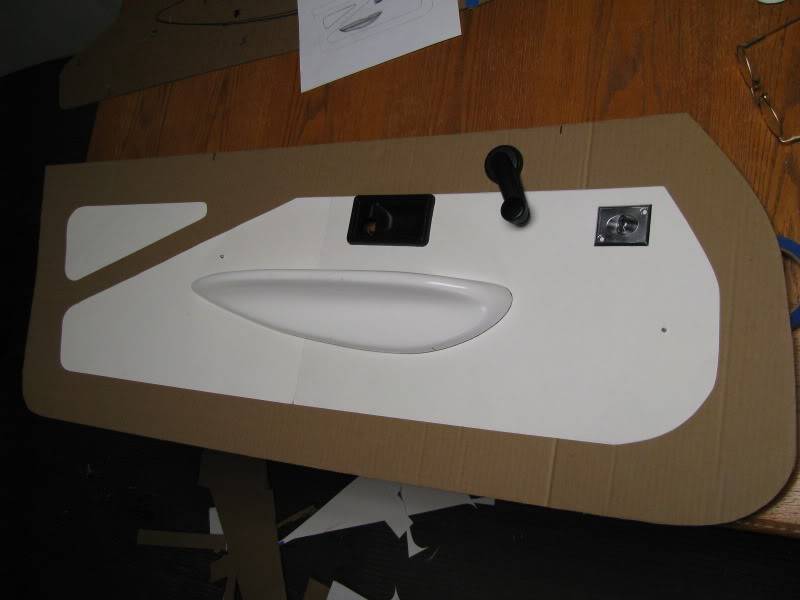
As you can see, I transferred my reference marks to the new ABS panel for perfect positioning back on the door. I transfered the marks from the template of the armrest fasteners, onto the ABS panel and drilled holes, then attached the armrest to the ABS panel using stainless screws that came with the armrests. Then I drilled the holes for the screws that secure the panel to the door. My whole design allowed me to eliminate traditional fastener clips. The screws are all contained within the perimeter of the large insert panel and holds the panel very tight ot the door all of the way out to the edge.
After making sure the new door panel fit well, I laid out and positioned the 2 insert panels on the new door panel and marked them with the white grease pencil.

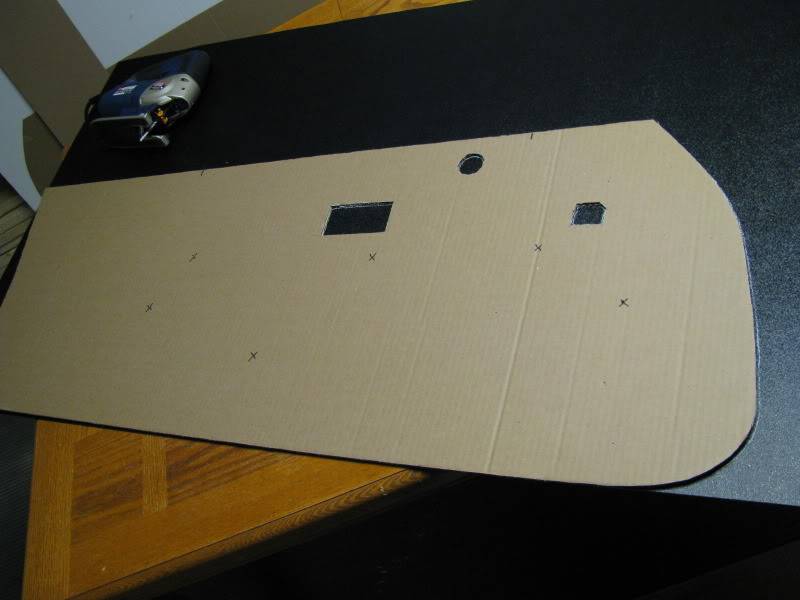
Then I cut out the insert panels and laid them out on the main panel to make sure they were sized correctly.
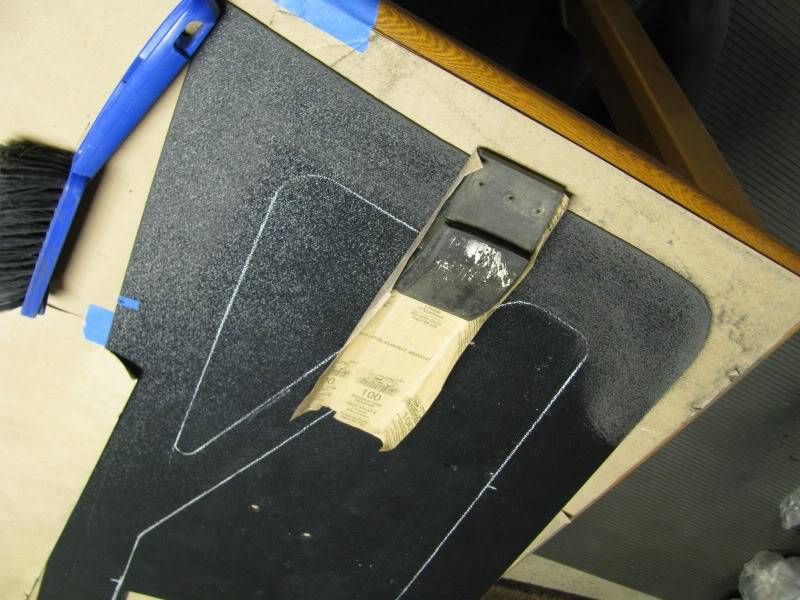
Then in preparation of starting the glue up of the foam, I scuffed the entire panel with medium grit sandpaper so that the glue had a good surface to hold to.
Last edited by andrewb70; 12-11-2011 at 08:13 AM.
-
10-02-2011 #2
Registered User
- Join Date
- Nov 2006
- Posts
- 867
Garage fabbed Door Panel Build - Part 2
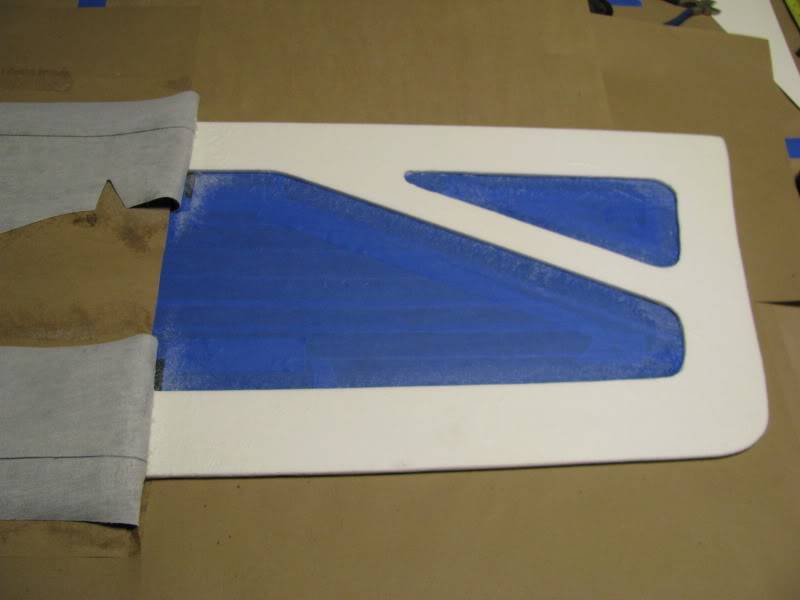
To make things much easier after the glues is sprayed, I taped off all of the places on the panels that I did NOT want glue to be.
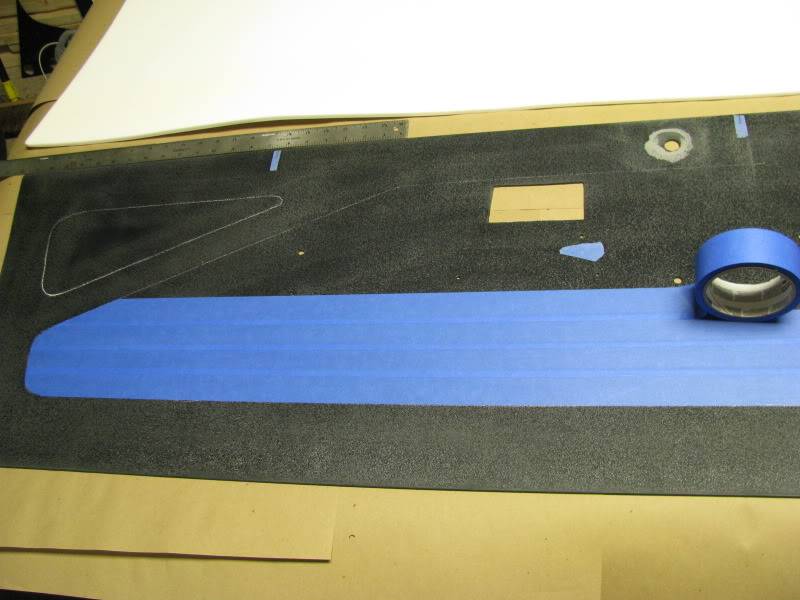
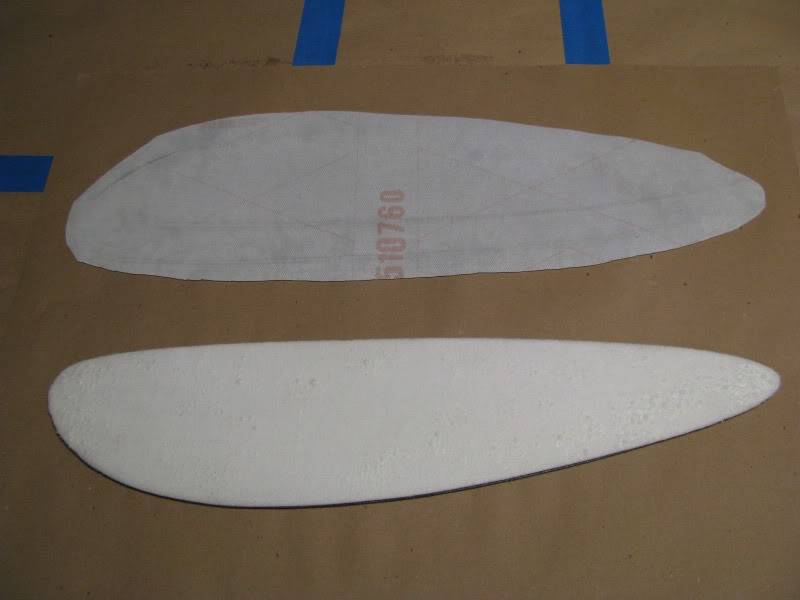
The foam used for the main panel was 1/4" closed cell foam. I laid the main panel on the foam and cut around the ABS panel using an Exacto knife. I cannot stress enough, to ALWAYS use a fresh blade in the knife when cutting the foam or you will just end up tearing the foam. It also leaves a very nice clean edge on the foam.
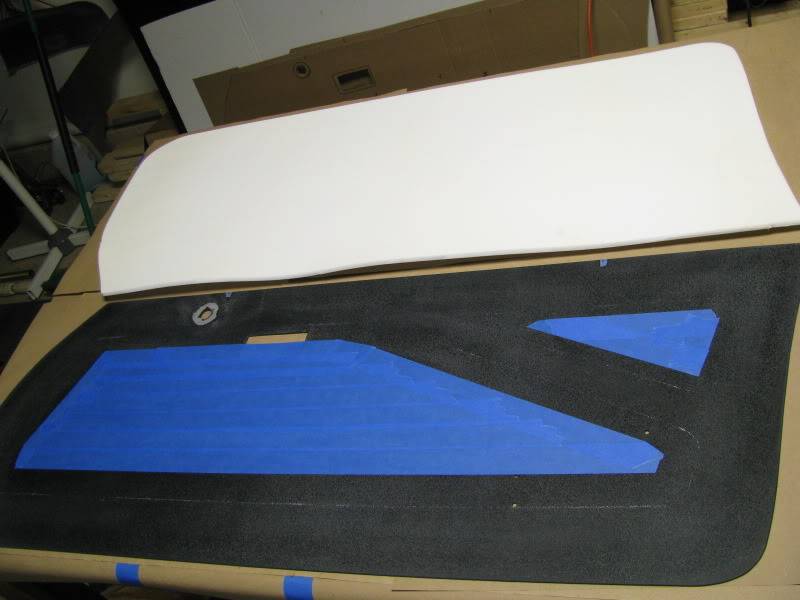
I scuffed the perimeter of the panel with the sandpaper prior to gluing. Sprayed the glue on the panel and the back side of the foam, let it sit the required 2-3 minutes until tackless to the touch and carefully placed it on the panel. I got a huge pile of 2'x3' kraft paper from work that's used as packing material. I used it to cover my work table and a lot of it came in handy for gluing. In this case I put it in between the ABS panel and the foam. Once the 2 glued surfaces touch each other, you are pretty much committed!!!! I perfectly positioned the insert panel over the glued foam and cut around the perimeter. I then removed the foam that was where the insert panel would be. You can see how handy that tape was for covering the area that didn't need glue.
It would seem that these pictures are out of sequence but I learned as I went. As a result, in my haste of removing the tape in the above pics, I had to replace it in the pic below!! I cut the material oversized to be able to wrap around to the back of the panel. Sprayed the glue on the foam surface and the back of the material and waited for it to setup. After it goes tackless you can the start smoothing the material carefully with your hand making sure not to press too hard or you'll leave handprint indentations.
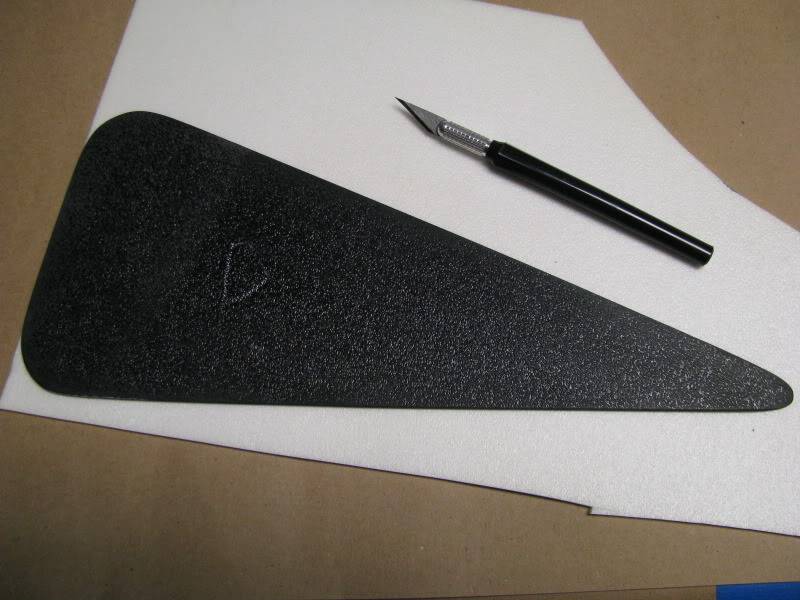
Here is the whole process again. 1- First place the piece to be covered on the foam and cut around the perimeter of the piece........
2-Scuff the surface of the ABS to be glued, wipe clean, spray both pieces with glue, wait 2-3 minutes until the glue is tackless. If it's wet or tacky it's NOT ready.....
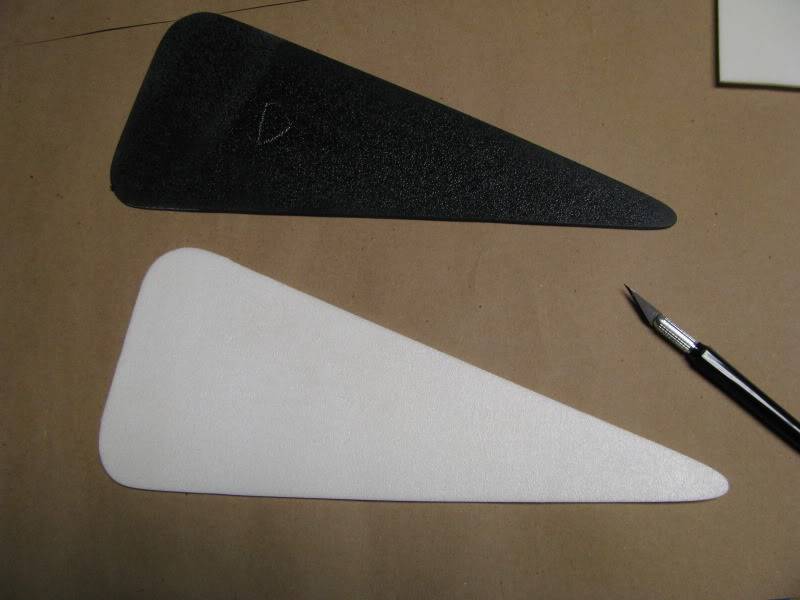
Ready to be covered with material........

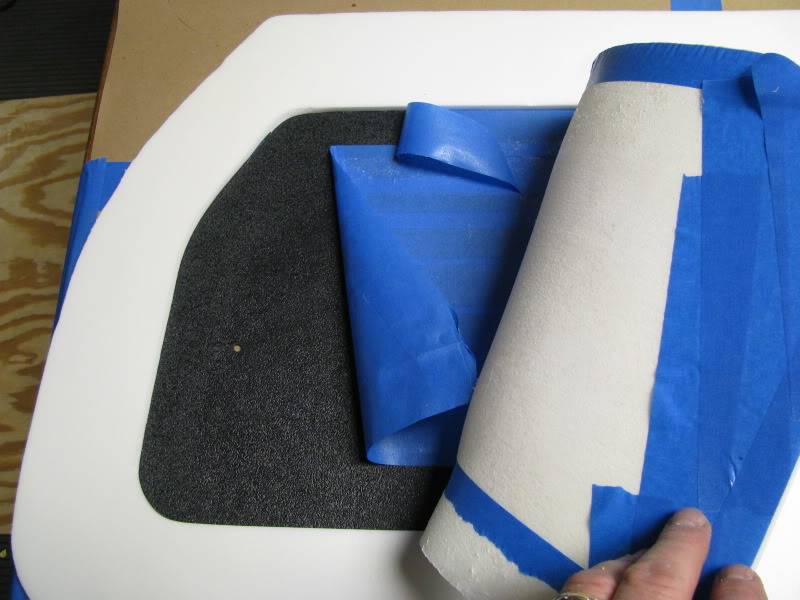
3-Cut your material oversized, large enough to have the material wrap around to the back side of the piece to be covered, after the material is glued in place on the front side of the piece, this will be the view of the next step
4-Spray the overlap edge of the material and the backside of the panel with glue, and let it setup.........
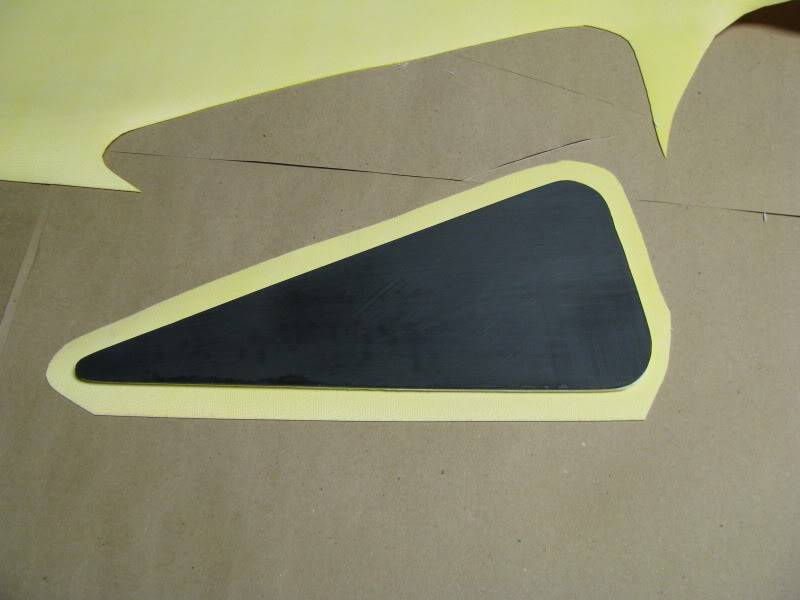
As you will notice this is a different piece......... when you are doing this you will find that you DON'T have time to sit there and take pictures!!! So this shows the material that will cover the piece and the ABS panel already with the closed cell foam glued to it, waiting for the glue to set.......
-
10-02-2011 #3
Registered User
- Join Date
- Nov 2006
- Posts
- 867
Garage fabbed Door Panel Build - Part 3
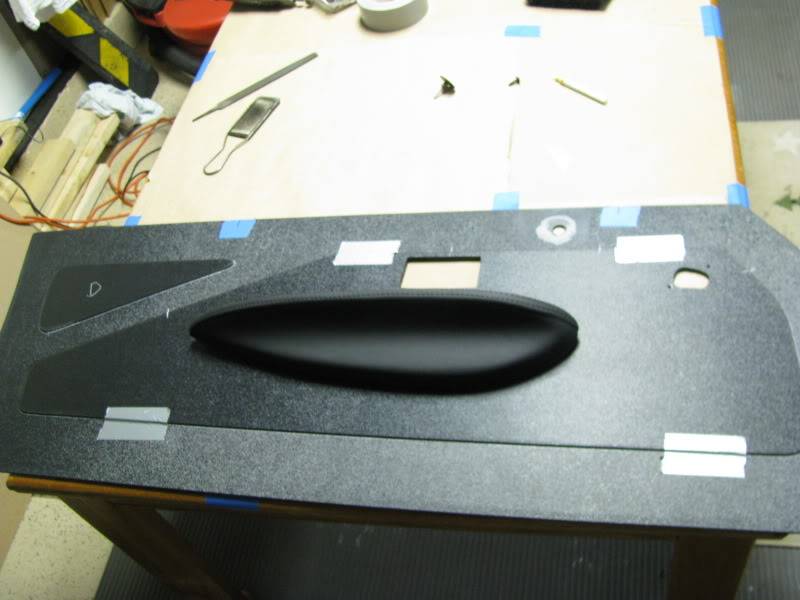
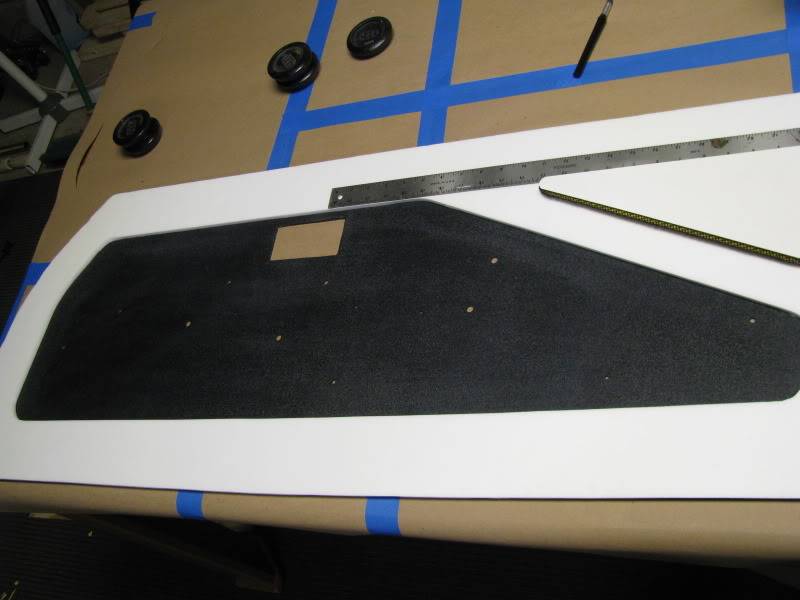
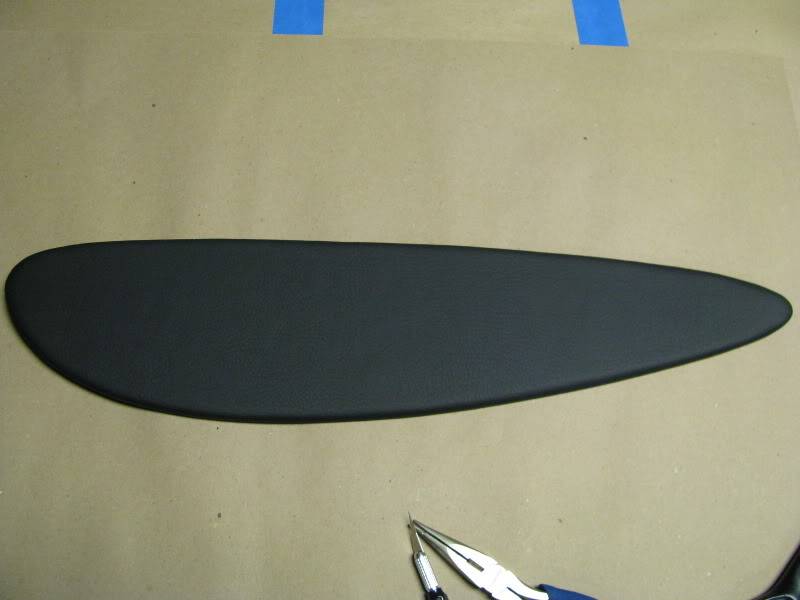
After the front side has been smoothed out of any bubbles or puckers and is nice and flat and you have sprayed the glue for the wrap to the backside of the piece carefully start pulling the material over the edge and smooth out on the back of the panel. Around round edges you will have to pinch the pucker of the extra material to keep the material tight around the edge. After you have gone around the entire perimeter you can go back with sharp scissors and cut off that extra material of those pinched areas so that your panel lays flat. You will see how nice and smooth the flat edges lay.

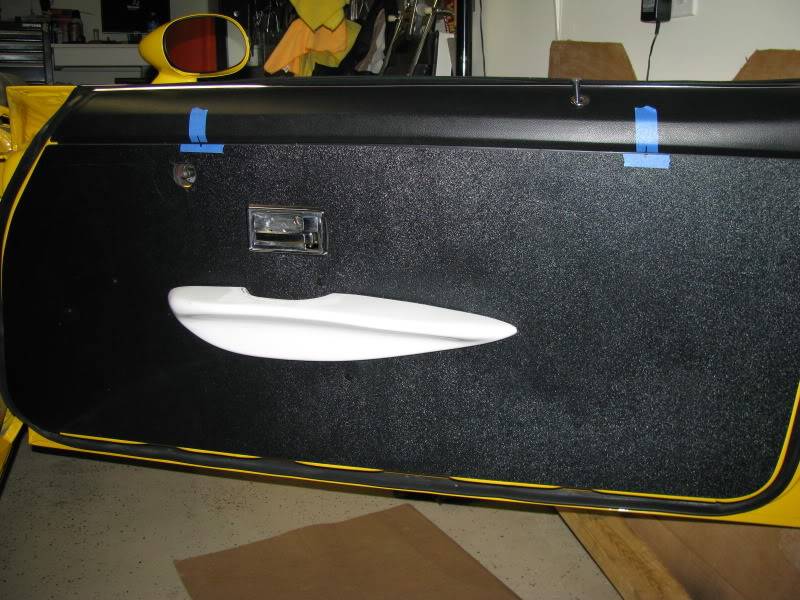
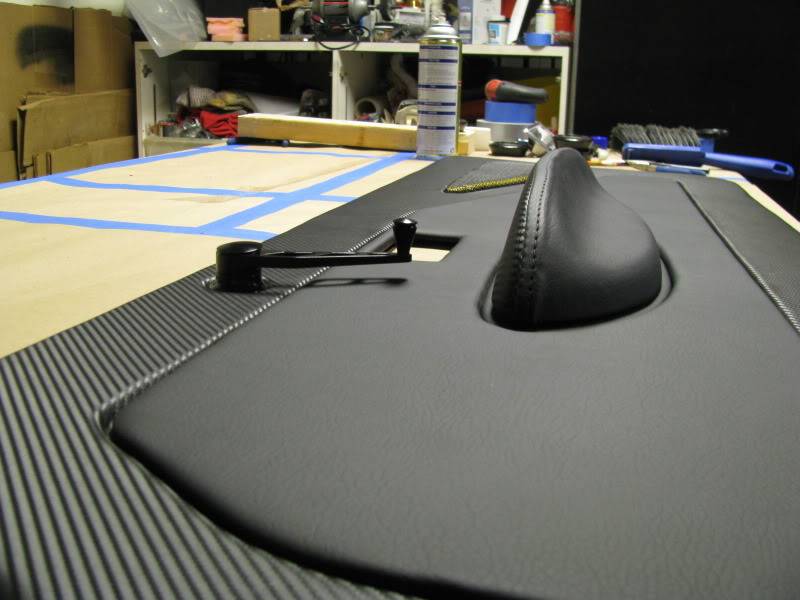
The finished panel.............
After spending a couple hours putting this build thread together, I realized how many gaps I have in my pictures to support more detailed instruction on how I did this. If you have any questions at all, just post them up and I will be more than happy to answer them or PM me. I will do my best to answer them all.
Hopefully your project turns out well and you are as happy as I am with the finished product. It's fun to try something like this. The best part is, if you screw it up you can just do it over, you'll be out a couple bucks for new material or foam, but it can all be done over again if need be.
Here is a brief list of materials and seller links:
5 cans of Performance Hi-Temp Adhesive $49.75
2 yards of 1/4" regular 2-A VOLARA Closed Cell Foam $19.90
2 yards of 1/8" regular 2-A VOLARA Closed Cell Foam $13.90
Pick your own material, according to your color, texture taste, and cost.
All of the above were from http://www.yourautotrim.com/ (great people to deal with)
The base of the panel material is 1/8" ABS plastic from http://www.e-tplastics.com/
I posted that link for local Chicago people. You are better off sourcing the ABS locally, because shipping costs would kill you!!
The armrests are the " Boattail " Part# S3059 $99.95 pair from http://www.gemstreetrods.com/arm_rests.htm
They have many styles to choose from. They are made from fiberglass and can be covered however you like.
I had mine professionally covered at http://www.riggsbros.com/ in Naperville, IL....I figured this was beyond my lack of skill.
Last edited by andrewb70; 12-10-2011 at 02:17 PM.
-
10-02-2011 #4
 Registered User
- Join Date
- Sep 2004
- Location
- Metamora, Illinois
- Posts
- 1,619
Nice write up!!!! Awesome set of panels!! Do you have any pics showing the panel installed? Also how did you finish the perimeter of the panel?
-
10-02-2011 #5
 Registered User
- Join Date
- Mar 2010
- Location
- Clovis NM, 88101
- Posts
- 329
Thanks Scott...off to part 2.
73 Camaro
Gene
-
10-02-2011 #6
Registered User
- Join Date
- Mar 2010
- Location
- Clovis NM, 88101
- Posts
- 329
Where Did you get the closed cell foam from? Does upholstery shops have it?
73 Camaro
Gene
-
10-02-2011 #7
Registered User
- Join Date
- Mar 2010
- Location
- Clovis NM, 88101
- Posts
- 329
Thanks Scott. it really will help me on mine.
73 Camaro
Gene
-
10-05-2011 #8
Registered User
- Join Date
- Nov 2006
- Posts
- 867
HELP from a MOD!!!! thanks for merging these 3 threads but they are merged out of sequence, can you sort them from Part 1 at the TOP to Part 3 at the bottom?
Thanks!!!
-
10-05-2011 #9
Registered User
- Join Date
- Jun 2010
- Location
- Georgia
- Posts
- 2,177
what did riggs charge to upholster the armrests? did you provide them with the leather as well?
-
10-06-2011 #10
Registered User
- Join Date
- Sep 2011
- Location
- Tacoma, WA
- Posts
- 102
good info
Used to be known as a2coupe2a
11-05-2011 #11
Registered User
- Join Date
- Nov 2006
- Posts
- 867
I think they charged about $200 to have both armrests covered and I did provide them with the material. Originally Posted by SparkyRnD

11-06-2011 #12
Registered User
- Join Date
- Nov 2006
- Posts
- 867
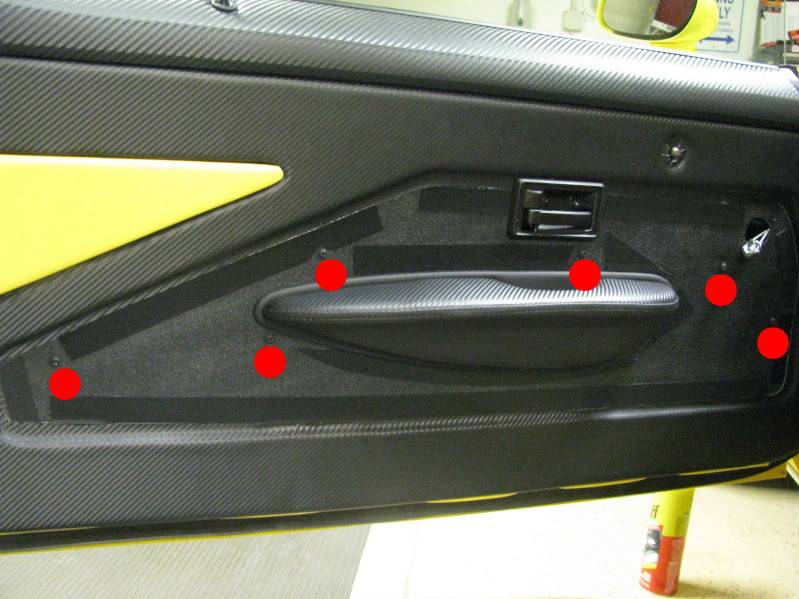
A lot of people have asked how the panel actually attaches to the door. I used #10 X 3/4" Phillips Flat Top, Washer Head Screws. An eBay purchase http://www.ebay.com/itm/50-10-X-3-4-...#ht_3168wt_905
I marked the attachment points
11-12-2011 #13
Registered User
- Join Date
- Oct 2011
- Location
- Thief River Falls, MN
- Posts
- 74
wow makes my door panels look like crap. looks great.

I dont like to make people worried...but that abs plastic backing panel makes me nervous. Have you looked up the heat expansion coefficient of that material? I believe abs plastic is really good, but me, being an idiot, made the inlays in my door panel out of uhmw, terrible material. The second it got into the sun it warped soo bad. I ended up scrapping them and doing them over with wood.Second Gen F-body
11-12-2011 #14
Registered User
- Join Date
- Nov 2006
- Posts
- 867
I've used a heat gun on it to do some forming, so I'm not worried about any warping Originally Posted by jordanh
Dude, those look nice!!! Just fix whats wrong and use them!!
Where'd you get that hardware?? I like it.
11-13-2011 #15
Registered User
- Join Date
- Oct 2011
- Location
- Thief River Falls, MN
- Posts
- 74
I do believe most plastic interiors in cars are made from abs plastic, now that I think of it. I am fixing the plastic parts on mine, It was just a frustrating mistake.
I am a machinist by trade and made the aluminum trim washers and door pulls myself.Second Gen F-body
11-14-2011 #16
Registered User
- Join Date
- Nov 2006
- Posts
- 867
Would you be interested in making some of those trim washers to sell? If so PM me!! Originally Posted by jordanh
11-14-2011 #17 Registered User
- Join Date
- Feb 2009
- Location
- N.J.
- Posts
- 690
If you are interested in making a batch of the trim washers to sell, you have a customer here also.
- Paul
70 Camaro RS Project Build
https://www.pro-touring.com/showthre...-Project-70-RS
90 Mustang GT Project Build
https://www.pro-touring.com/threads/...ang-Gt-Project
My Garage Project
http://garagejournal.com/forum/showthread.php?t=189511
11-15-2011 #18
Registered User
- Join Date
- Oct 2011
- Location
- Thief River Falls, MN
- Posts
- 74
Sorry, didnt mean to hijack the thread with that. I would love to help you guys out but I am SWAMPED at work. Yes, I felt the need to underline that. I run around with my head cut off half the time. If you go to ebay and search you can usually find some nice anodized ones, they are a bit spendy though.
Second Gen F-body
11-15-2011 #19
Registered User
- Join Date
- Feb 2009
- Location
- N.J.
- Posts
- 690
Thanks, it was worth a try.
Your stuff is nicer then the stuff on ebay though.
Great job on the door panels and hardware.- Paul
70 Camaro RS Project Build
https://www.pro-touring.com/showthre...-Project-70-RS
90 Mustang GT Project Build
https://www.pro-touring.com/threads/...ang-Gt-Project
My Garage Project
http://garagejournal.com/forum/showthread.php?t=189511
12-11-2011 #20 -Moderator/Sponsor-
- Join Date
- Apr 2001
- Location
- The City of Fountains
- Posts
- 16,117
Scott,
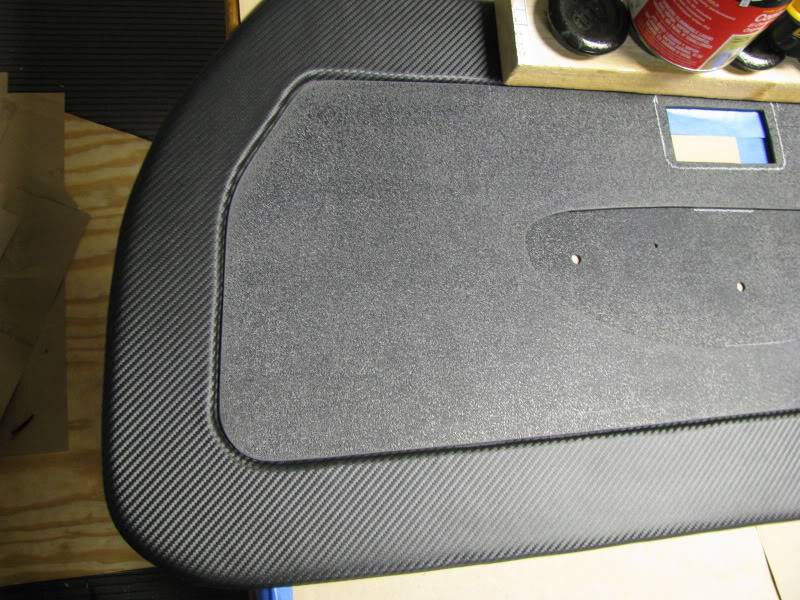
I am a little confused. Can you elaborate more on how you did covered the larger piece that is covered in the faux carbon fiber looking vinyl (I assume).
Andrew1970 GTO Version 3.0
1967 Cougar build
GM High-Tech Performance feature
My YouTube Channel Please Subscribe!
Instagram @dr__efi
I deliver what EFI promises.
Remote Holley EFI tuning.
Please get in touch if I can be of service.
"You were the gun, your voice was the trigger, your bravery was the barrel, your eyes were the bullets." ~ Her

 Reply With Quote


