

Results 21 to 27 of 27
Thread: Garage fabbed Door Panel Build
-
12-15-2011 #21
 Registered User
- Join Date
- Nov 2006
- Posts
- 867

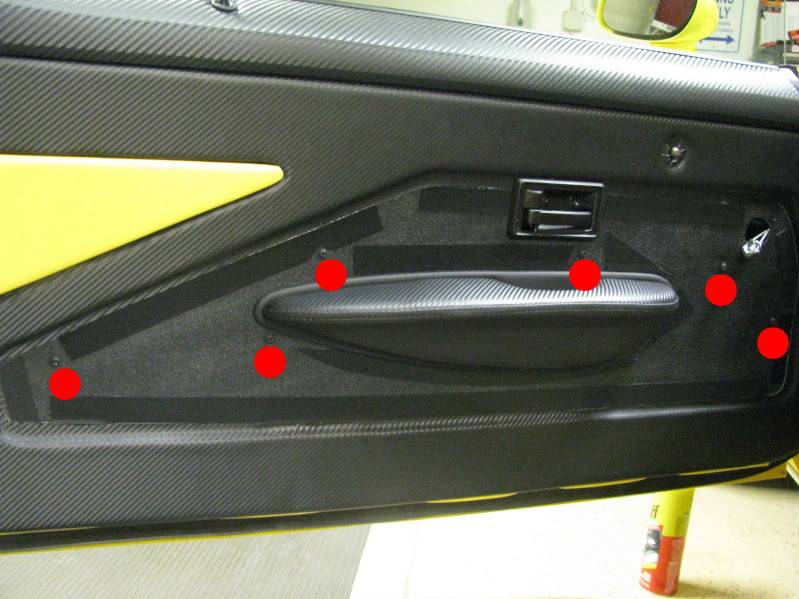
Andrew, you can see in this picture where that material ends. Then the insert panel with the smooth leather is placed onto this main panel and held in place with the industrial strength Velcro. You can see at each of the red dots, the screws that hold the main panel to the door.
Does that answer your question?
-
12-16-2011 #22 -Moderator/Sponsor-
- Join Date
- Apr 2001
- Location
- The City of Fountains
- Posts
- 16,117
Sort of :-/
I am looking at this picture:
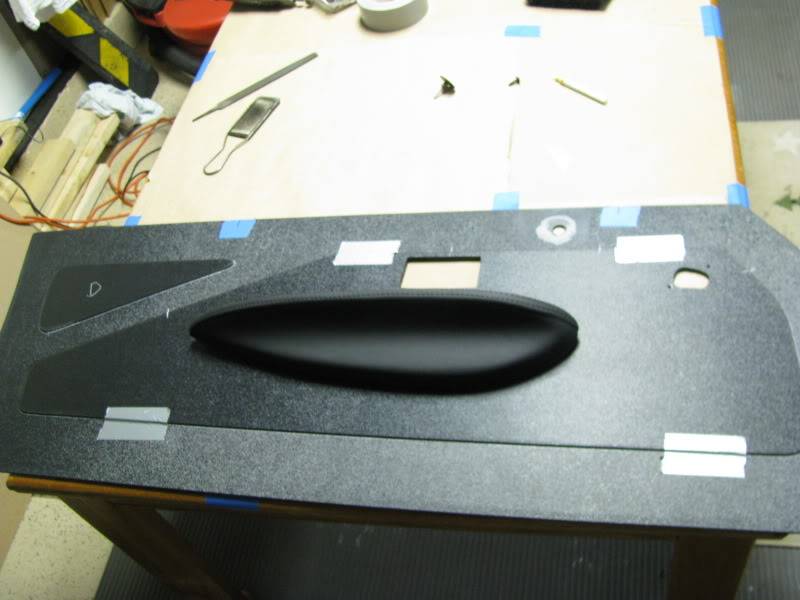
I see the outline for the inserts, but I still don't understand how you raised the perimeter of the panel and gave it such a nice edge. Was that just done with foam? If you look at the picture that you posted, look at how the carbon fiber looking material is raised up lets say at the area above the door handle trim.
Andrew1970 GTO Version 3.0
1967 Cougar build
GM High-Tech Performance feature
My YouTube Channel Please Subscribe!
Instagram @dr__efi
I deliver what EFI promises.
Remote Holley EFI tuning.
Please get in touch if I can be of service.
"You were the gun, your voice was the trigger, your bravery was the barrel, your eyes were the bullets." ~ Her
12-17-2011 #23
Registered User
- Join Date
- Nov 2006
- Posts
- 867
The perimeter is raised using 1/4" closed cell foam. The edge is simply just a very careful 90* cut with a fresh sharp razor blade. The outside edge was the same 90* cut, but it was sculpted, or carefully rounded using sandpaper for a smoother edge than a 90*. Originally Posted by andrewb70

09-23-2013 #24 Registered User
- Join Date
- Mar 2010
- Posts
- 232
So I've probably read this thread about 50 times. Finally got the materials together & tried my hand at doing my upholstery in my 67 camaro. I took some styling queues from your build. Your step by step instructions helped tremendously. Mine didn't turn out perfectly but they look sweet. I'm also going to be doing the upholstery on my new kick panels with speakers & tweeters. Thanks!
09-23-2013 #25 Registered User
- Join Date
- Nov 2011
- Location
- Livermore, CA
- Posts
- 668
Very cool , will have to come back to this later. Great write up!

Livermore, CA
American:
1966 Chevelle SS "Tribute" Retro / Pro-Tour
For Sale
10-20-2013 #26
Registered User
- Join Date
- Aug 2004
- Location
- Dunwoody, GA
- Posts
- 4,984
This is a good write up. Thanks, Scott.
Also, you mentioned covering the rest of the interior plastic in vinyl. How did that turn out? I've got to do something with the plastic in my car too.Trey
"The early bird may get the worm, but the second mouse gets the cheese."
~ Jon Hammond
1979 WS6 Trans Am stock LT1/T56 drive train out of my Formula. BMW M-parallel rims. C5/C6 brakes
build thread https://www.pro-touring.com/showthre...ghlight=begins
10-24-2013 #27 Registered User
- Join Date
- Sep 2013
- Location
- Chicago suburbia
- Posts
- 228
I love that window crank! Where did you find that, if I can ask?

 Reply With Quote


