


Results 1,081 to 1,100 of 1610
-
07-14-2016 #1081

 Registered User
- Join Date
- Nov 2007
- Location
- Dayton, Ohio
- Posts
- 443
 I recently had a similar problem with a fuse holder on my 06 mustang. Low speed fan circuit is dead coming from PCM so I bought some relays and fuse holder, all 14 ga. Tapped into the low speed wire just up stream of the fan. Got it all hooked up and was running the engine to see if the fan was running right and cutting off the low speed when the high speed circuit kicked on via one of the relays. Well, everything started feeling real hot so disconnected. Replaced all wiring with 10 ga. The fuse holder is plastic so I removed the wires, pryed open the crimps, soldered 10 ga to the terminals and re-inserted into the fuse holder. Been working fine since last weekend.
 Originally Posted by andrewb70
 Roger
Roger
69 Mustang coupe, under construction
2011 Mustang - DD
https://www.pro-touring.com/threads/...ang-SuperCoupe
Freedom Of Speed!

-
07-18-2016 #1082
 -Moderator/Sponsor-
- Join Date
- Apr 2001
- Location
- The City of Fountains
- Posts
- 16,127
So I got that part this morning and it was a total bust. The damn thing is huge!!! No way it will fit anywhere, except on a bus, which is probably where they get used. Originally Posted by andrewb70
I decided to hit the localish Pull-A-Part in Birmingham. I don't know why I thought going to a junk yard at 2:00pm on a day when it was 99 degrees was a good idea, but that's what I did. I scored a bunch of electrical parts that I think will come in handy, but for the Cougar I am most excited about this:
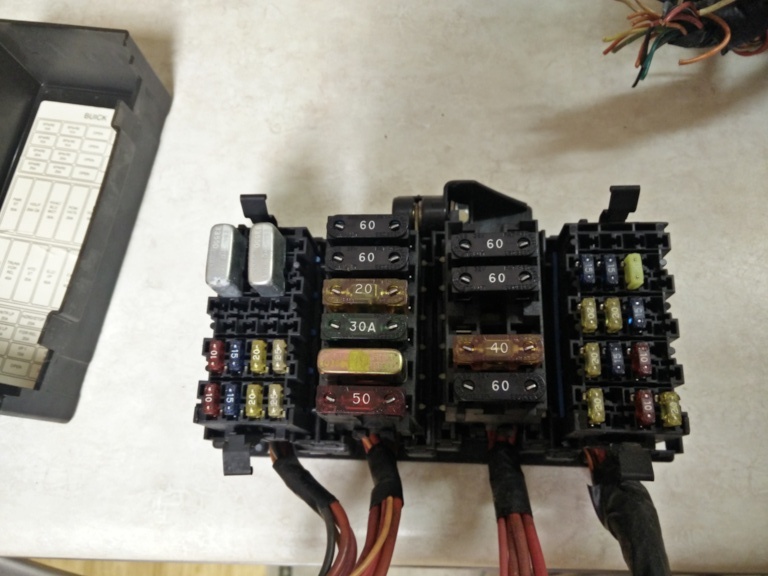
Pulled that from under the back seat of a late 90s Buick Riviera. The two middle modules are all Maxi fuses and have a bus bar that connected right to the battery. I should be able to find a place for it and feed it directly from the battery and bring in the high draw circuits under the dash.
Andrew1970 GTO Version 3.0
1967 Cougar build
GM High-Tech Performance feature
My YouTube Channel Please Subscribe!
Instagram @dr__efi
I deliver what EFI promises.
Remote Holley EFI tuning.
Please get in touch if I can be of service.
"You were the gun, your voice was the trigger, your bravery was the barrel, your eyes were the bullets." ~ Her
-
07-20-2016 #1083
-Moderator/Sponsor-
- Join Date
- Apr 2001
- Location
- The City of Fountains
- Posts
- 16,127
Decided to really clean some of this stuff today and see what I got here. I also downloaded the Delphi catalog (section 7) which really helped with sourcing the various parts that I need. These modules and parts are all available through Mouser.
Here is a 4 position base with the battery post connection.
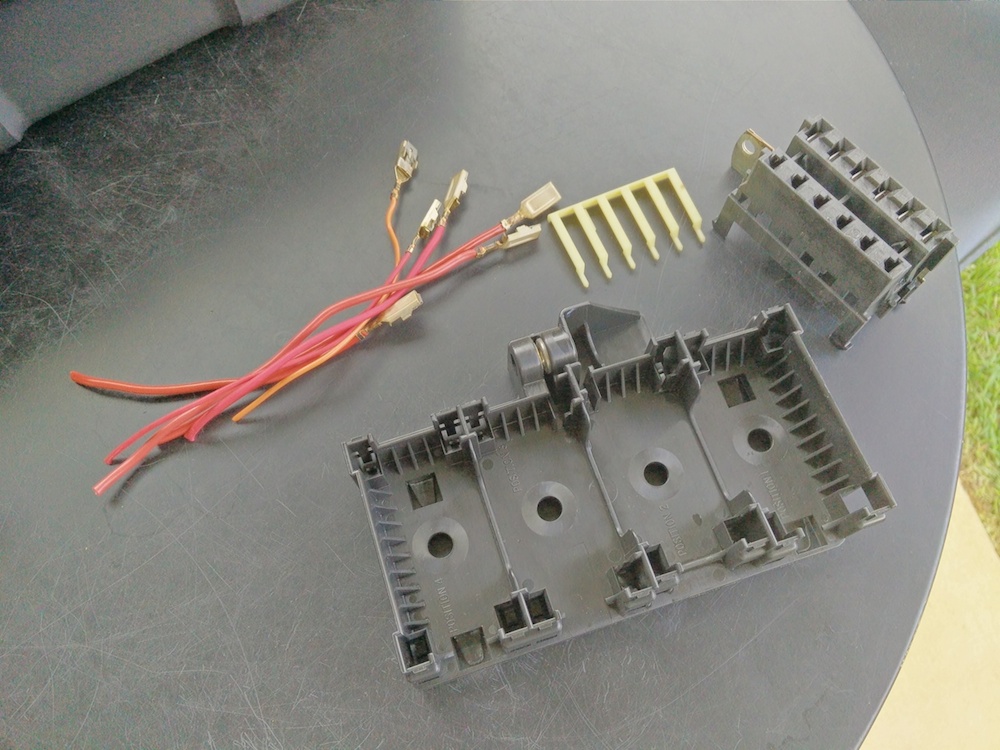
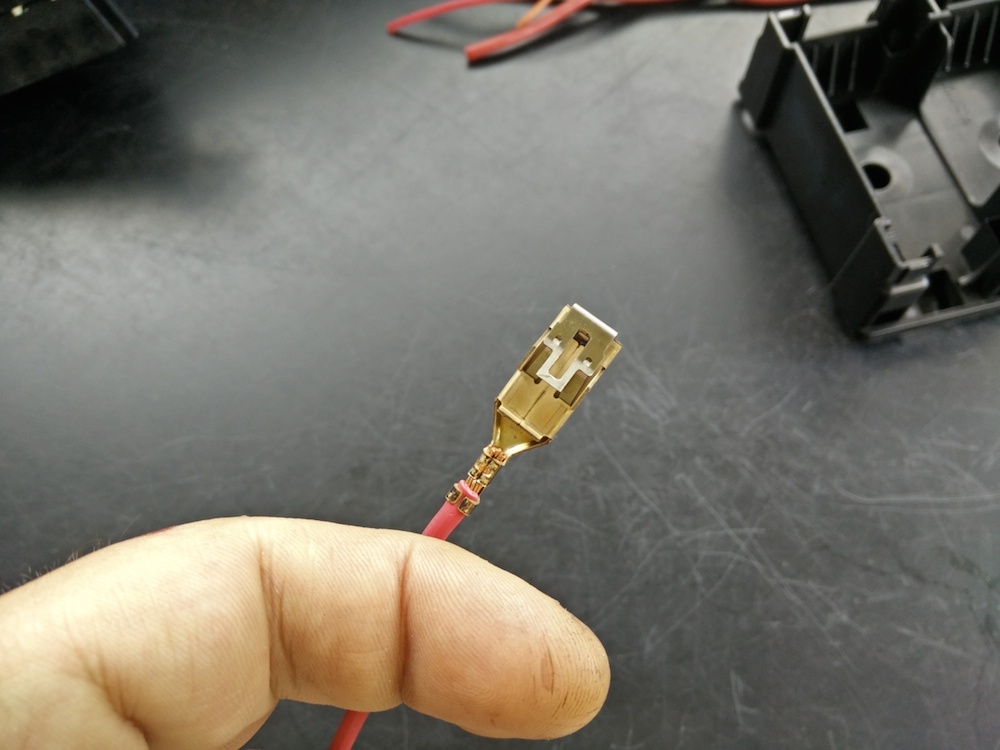
The terminals are easily removable and have a secondary retaining clip (the white thing in the above photo). These are Delphi MetriPack 800 terminals and are rated at 60 amps.
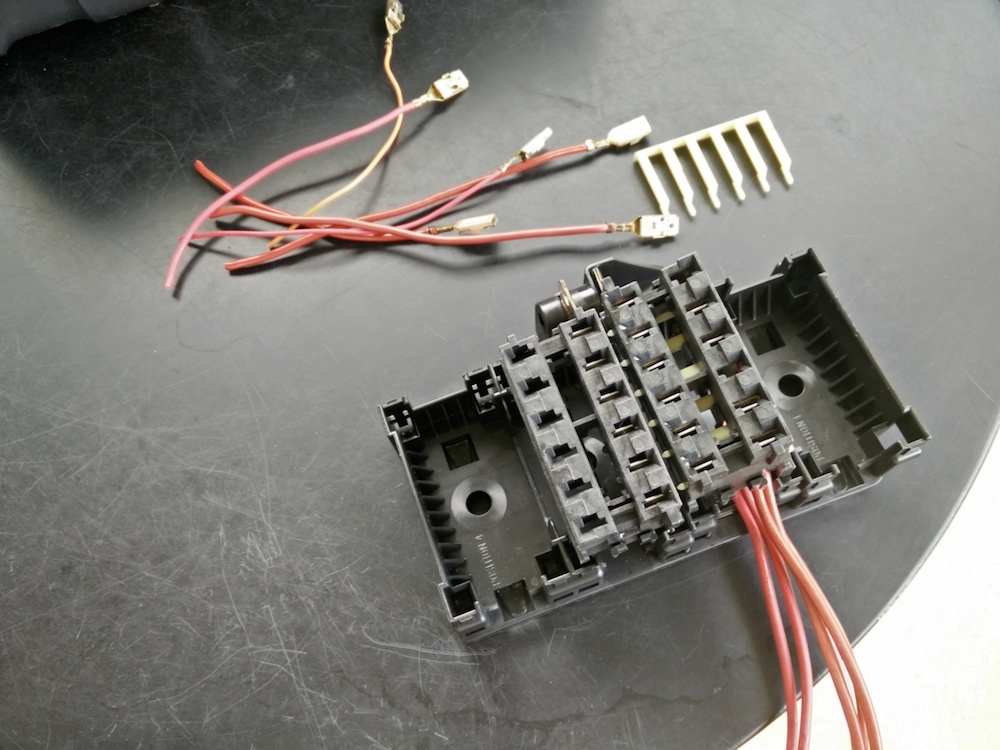
The individual modules just pop in place and are retained by clips to the base.
I really don't have room for a 4 position box under the hood, so with a little creative trimming, I have a 2 position base with the battery lug (Delphi doesn't make such a beast).
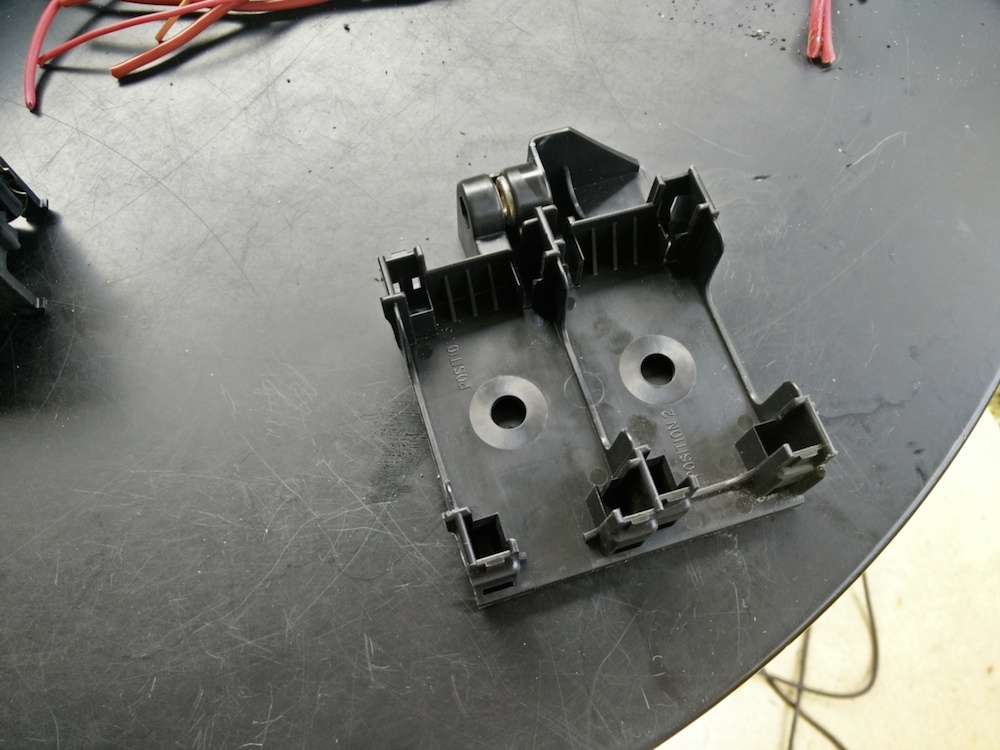
Presto...
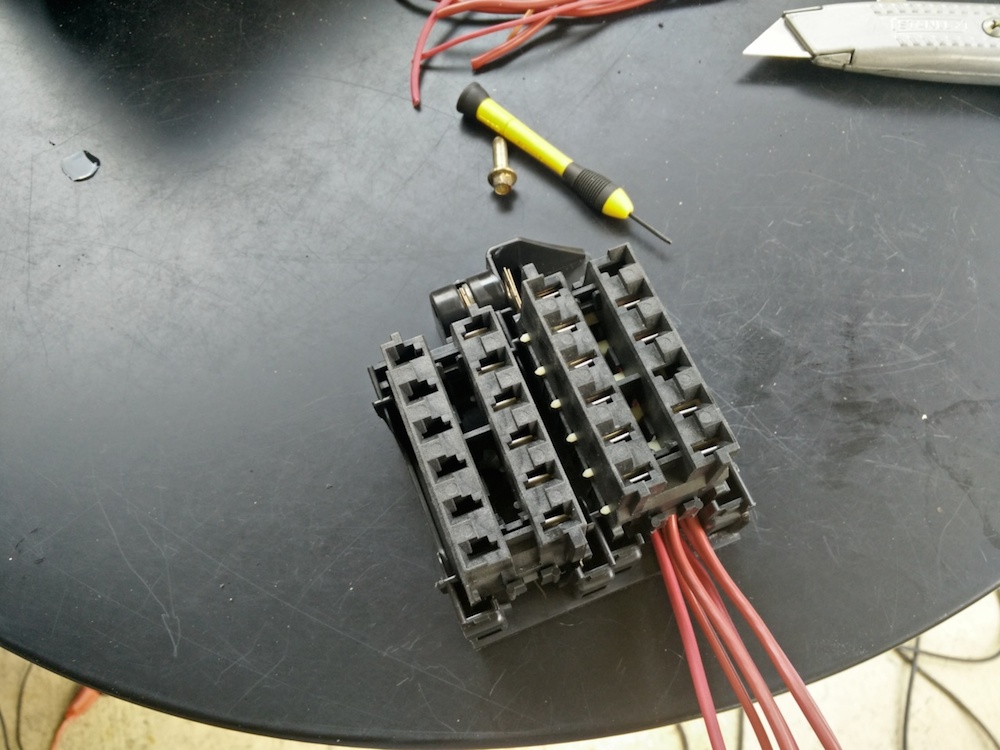
In the Delphi catalog they have a 6 Maxi fuse module, but as I said, there is no appropriate base for it. Delphi does make a 8 fuse holder and a single position base with a battery lug, but it's longer than the 6 fuse module, so I like this better.
Andrew1970 GTO Version 3.0
1967 Cougar build
GM High-Tech Performance feature
My YouTube Channel Please Subscribe!
Instagram @dr__efi
I deliver what EFI promises.
Remote Holley EFI tuning.
Please get in touch if I can be of service.
"You were the gun, your voice was the trigger, your bravery was the barrel, your eyes were the bullets." ~ Her
-
07-22-2016 #1084
-Moderator/Sponsor-
- Join Date
- Apr 2001
- Location
- The City of Fountains
- Posts
- 16,127
I got my little stash of goodies from Mouser today, so it was time to figure out where to mount my new power distribution box.
Initially I thought I would mount it to the front of the shock tower, something like this:

That looked OK but seemed to stick out a little too much and I really didn't want to drill any holes in the shock towers. So I started looking around and I realized that if I moved the starter solenoid a little forward, I will have room between it and the shock tower. Like this...
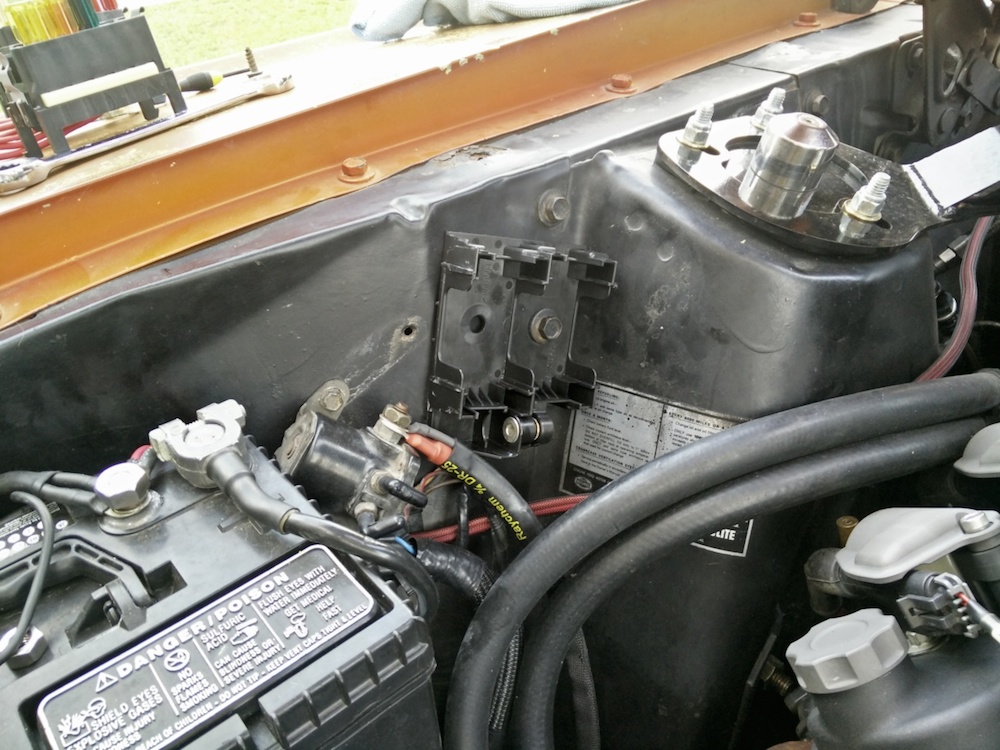
I like that better and I was even able to use one of the existing fasteners for the outside shock tower brace to hold the panel in place. The wires will exit tightly by the shock tower and be loomed along with the other wires that I already have in place.
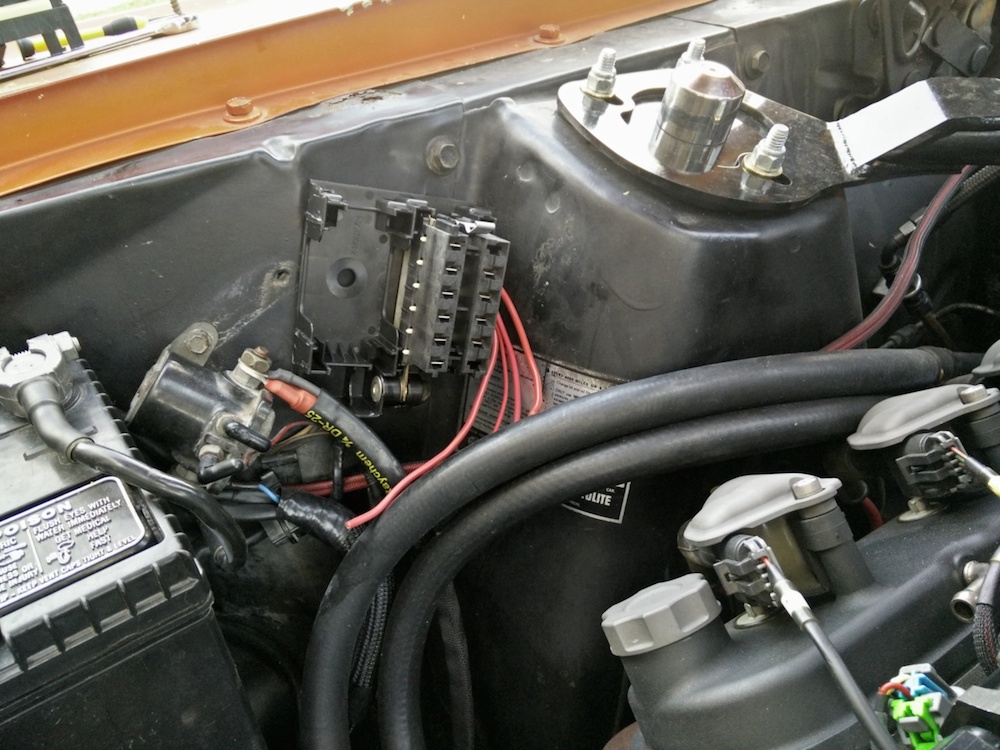
The module on the right is functional, while the module on the left is there to hold spare fuses.
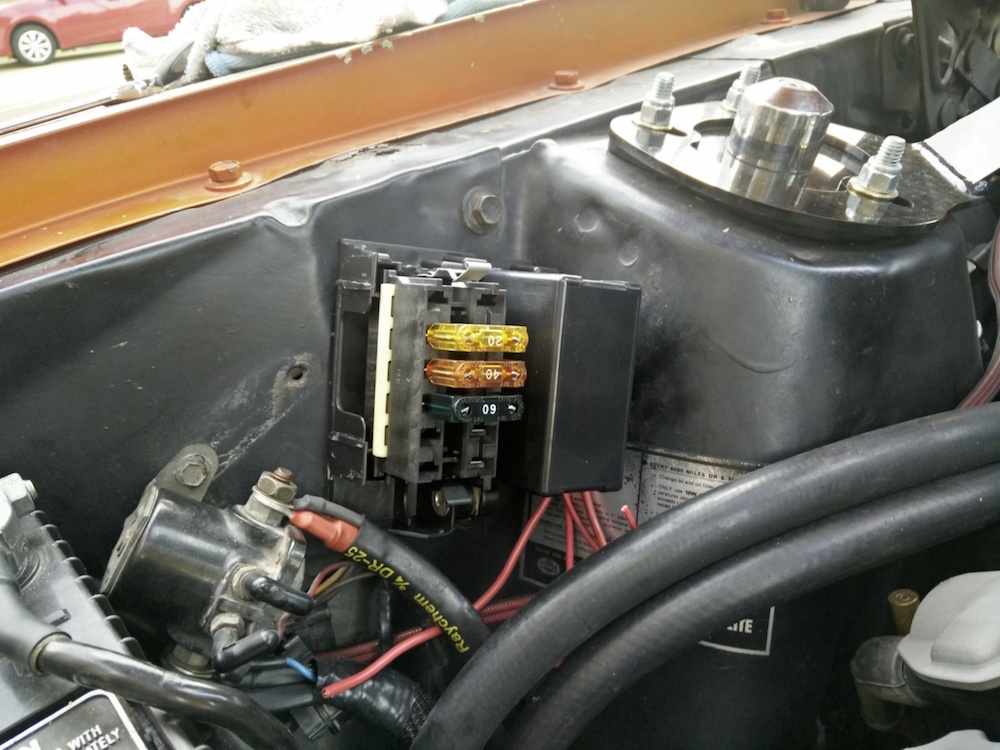
If I need more high draw runs than that, I can always replace the dummy module with one that is functional. I will run a 4 gauge battery cable from the auxiliary post on my battery directly to the bottom post of the power module. I plan to run 5 10 gauge leads from the box to under the dash. This will fix all my current issues and also give me a couple of spare runs for anything else that may need power down the line, like maybe electronic power steering. :-)
Andrew1970 GTO Version 3.0
1967 Cougar build
GM High-Tech Performance feature
My YouTube Channel Please Subscribe!
Instagram @dr__efi
I deliver what EFI promises.
Remote Holley EFI tuning.
Please get in touch if I can be of service.
"You were the gun, your voice was the trigger, your bravery was the barrel, your eyes were the bullets." ~ Her
-
07-26-2016 #1085
-Moderator/Sponsor-
- Join Date
- Apr 2001
- Location
- The City of Fountains
- Posts
- 16,127
Today I decided it was time to get the wiring sorted out on the Cougar. The goal was to install the Delphi distribution blocks and run 5, 10 gauge leads under the dash. So having recently moved, I had to go through some boxes to find my wire, but I managed to dig up the 10 gauge primary wire that I bought from Waytek. I figured out how long each lead needed to be and I cut five pieces...
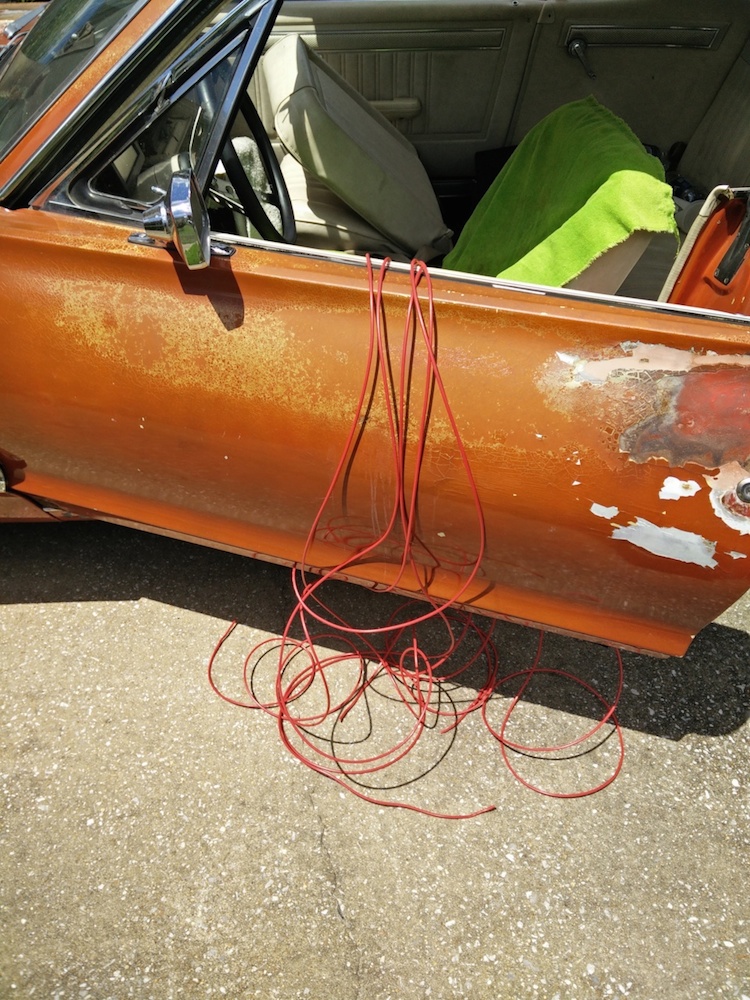
The up side to working in the hot Alabama sun is that the wire gets nice and soft and easy to work with. Drink lots of water kids, when working outside in 95 degree heat!
I made sure to make the wires long enough that I could reach all the way to the other side of the dash so that if I need to add anything in the future, there will be enough length. I also added some electrical tape to keep the wires together.
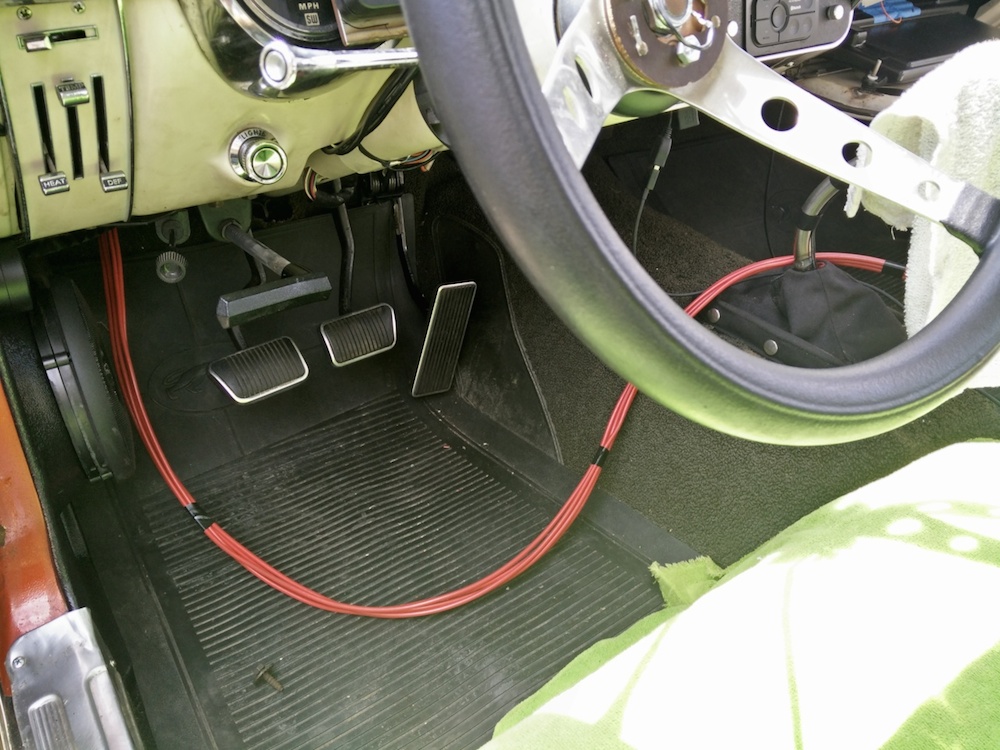
The wires were fed through an existing grommet in the firewall, on the driver's side by the master cylinder. In order to protect the wires and hold them together, I used some fabric style heat shrink for the portion that passes through the grommet and into the engine bay.
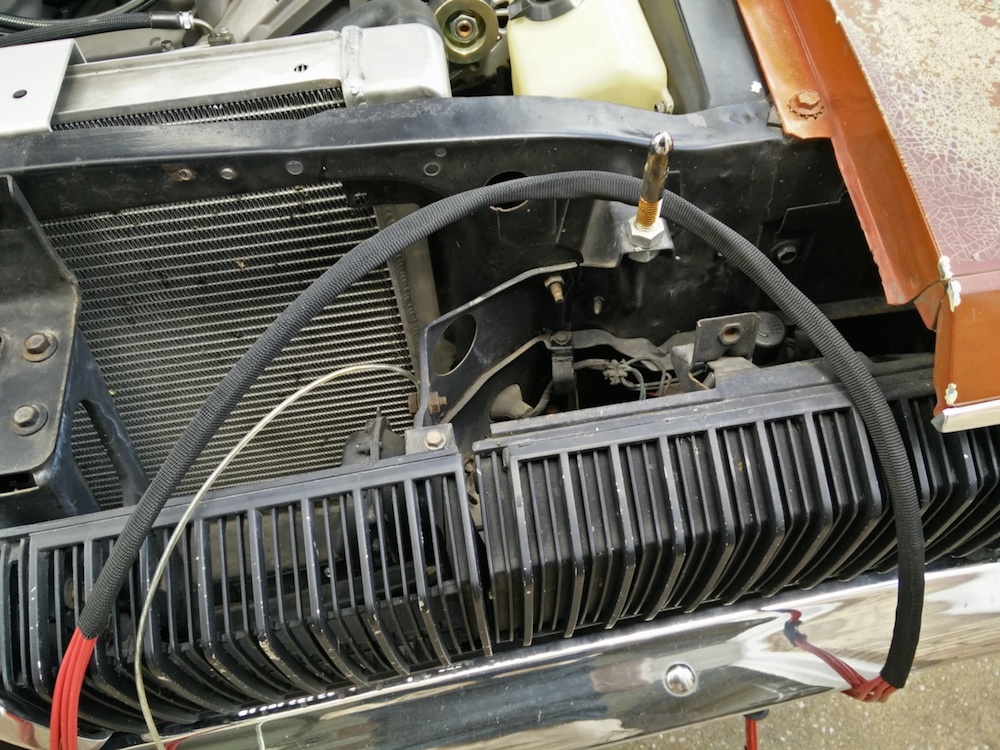
I wish I had more of that stuff, but I only had a small piece that was left over from my previous wiring jobs. I did however have some other loom that I used for the rest of the run along the firewall. This is woven polyester split loom that is easy to work with and looks a million times better than the split corrugated loom that you get at the local parts store.

I ran the loom along the firewall, around the shock tower, and to the power distribution block.
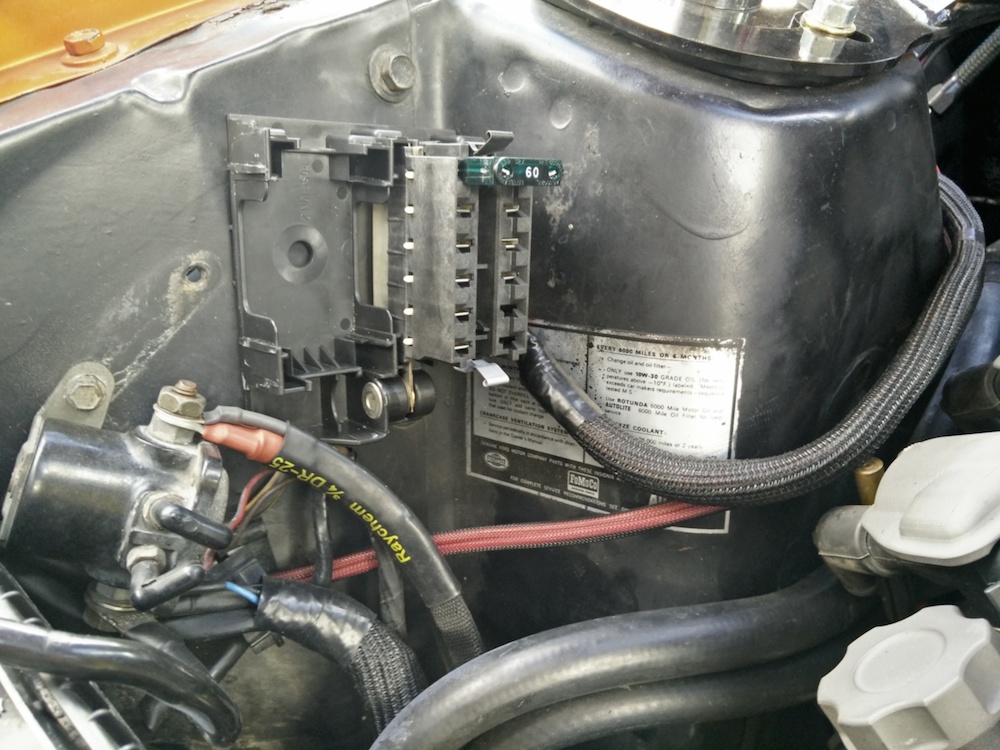
To terminate the wires, I used Metri-Pack 800 terminals and a crimping tool from Waytek PN 560 with dies PN 567. Here is a video I made of the process (sorry about the wind noise...):
The block on the right is the one with the bus bar, while the block on the left is there to hold spare fuses. I can always replace it with another block that also has a bus bar if I need more leads inside the engine back.

Here is the finished product.
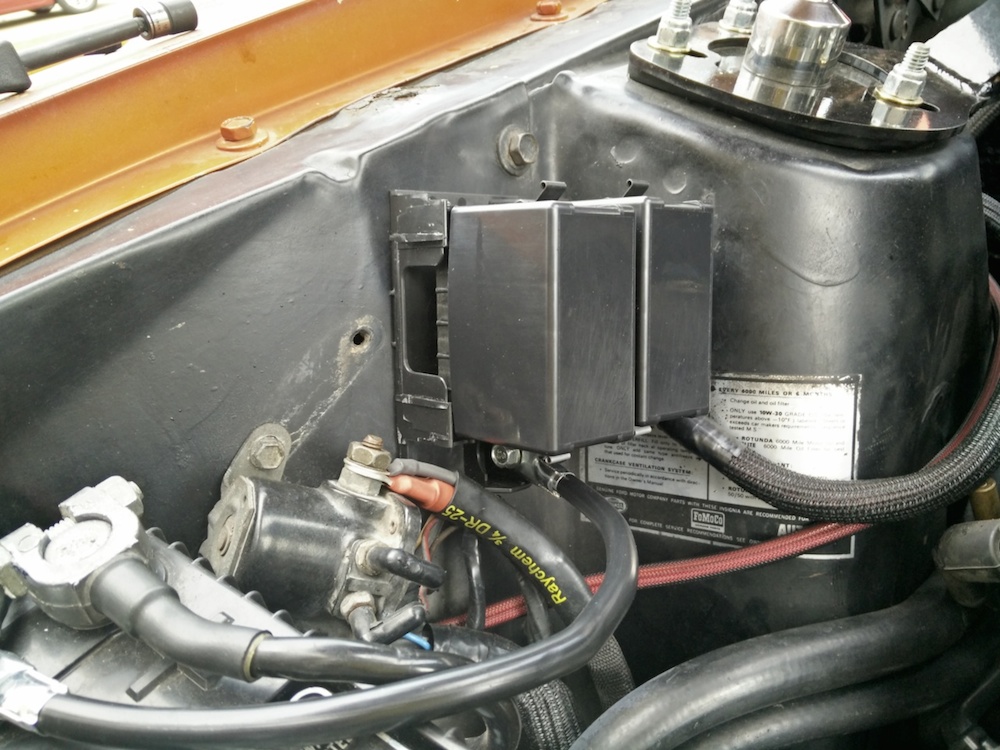
You can see the cable at the bottom of the box which attaches to the battery. I wish I would have done this when I first built the car, but lesson learned!
Andrew1970 GTO Version 3.0
1967 Cougar build
GM High-Tech Performance feature
My YouTube Channel Please Subscribe!
Instagram @dr__efi
I deliver what EFI promises.
Remote Holley EFI tuning.
Please get in touch if I can be of service.
"You were the gun, your voice was the trigger, your bravery was the barrel, your eyes were the bullets." ~ Her
-
07-28-2016 #1086
-Moderator/Sponsor-
- Join Date
- Apr 2001
- Location
- The City of Fountains
- Posts
- 16,127
I still have the shimmy issue, so I installed a Burgesson vibration damper in the steering shaft:

This resulted in approximately zero change. I still plan on trying out a different set of front wheels and tires, and once I do, I will report back.
I am getting some little things done, mostly in preparation for the Holley LS Fest in September. I saw this being done on a another build and I thought I would follow suit. The other builder used some generic LED marker lights for interior lighting. So I bought some from Amazon to see if I can make them fit where the stock bulbs live under the dash. This is the stock light housing (minus the bulb socket):

It simply bolts to the bottom lip of the dash. Here are the LED marker lights that I bought (they were $20 for 10...I know...more cheap Chinese ****...sigh...)

Once I did a little creative trimming with a razor, they popped right into the stock housing...

It's not quite dark yet, but I will attempt to take a picture once it is...
Andrew1970 GTO Version 3.0
1967 Cougar build
GM High-Tech Performance feature
My YouTube Channel Please Subscribe!
Instagram @dr__efi
I deliver what EFI promises.
Remote Holley EFI tuning.
Please get in touch if I can be of service.
"You were the gun, your voice was the trigger, your bravery was the barrel, your eyes were the bullets." ~ Her
-
07-28-2016 #1087
-Moderator/Sponsor-
- Join Date
- Apr 2001
- Location
- The City of Fountains
- Posts
- 16,127
Looks pretty good...

I am tempted to install another one in the middle of the dash, below the stereo controls.
Andrew1970 GTO Version 3.0
1967 Cougar build
GM High-Tech Performance feature
My YouTube Channel Please Subscribe!
Instagram @dr__efi
I deliver what EFI promises.
Remote Holley EFI tuning.
Please get in touch if I can be of service.
"You were the gun, your voice was the trigger, your bravery was the barrel, your eyes were the bullets." ~ Her
-
07-30-2016 #1088
 Registered User
- Join Date
- May 2013
- Location
- Moody,Al
- Posts
- 91
That's a cool idea Andrew. I'd like to see this thing sometime. If you are around Birmingham send me a message. I'll PM you my number.
-
08-05-2016 #1089
Registered User
- Join Date
- Aug 2004
- Location
- San Bernardino, CA
- Posts
- 883
do you have any pictures of the connection pipe and gaskets used? i just picked up a set of hooker manifolds for the turbo swap along with some ebay LS3 camaro flanges and GM gaskets. im just confused looking at all the grooves in the manifolds and flanges. the manifolds look like they accept a donut while the flanges have a wider groove for the factory metal crush gasket.


Andrew
-
08-05-2016 #1090
-Moderator/Sponsor-
- Join Date
- Apr 2001
- Location
- The City of Fountains
- Posts
- 16,127
I don't know that I have any other pictures. The flanges that came with the Hooker manifolds also have a groove in them. I used LS3 5th Gen Camaro gaskets and it all just works together. As I recall, the gasket had writing on it that said which way it goes. Maybe those eBay flanges are not right? Originally Posted by DCx
Andrew1970 GTO Version 3.0
1967 Cougar build
GM High-Tech Performance feature
My YouTube Channel Please Subscribe!
Instagram @dr__efi
I deliver what EFI promises.
Remote Holley EFI tuning.
Please get in touch if I can be of service.
"You were the gun, your voice was the trigger, your bravery was the barrel, your eyes were the bullets." ~ Her
08-11-2016 #1091
-Moderator/Sponsor-
- Join Date
- Apr 2001
- Location
- The City of Fountains
- Posts
- 16,127
Before I go on regarding the installation of the Baer Remaster MC, I want to give a big shout out to the the guys at Bad Obsession Motorsports. They YouTube channel can be found here:
http://www.youtube.com/user/badobsessionmsport
Richard and Nik are funny and are building an outrageous AWD Classic Mini.
I wanted to throw some support their way, so I bought some shwag.

For those that watch their videos, you'll understand...
More about the Baer MC install shortly...
Andrew1970 GTO Version 3.0
1967 Cougar build
GM High-Tech Performance feature
My YouTube Channel Please Subscribe!
Instagram @dr__efi
I deliver what EFI promises.
Remote Holley EFI tuning.
Please get in touch if I can be of service.
"You were the gun, your voice was the trigger, your bravery was the barrel, your eyes were the bullets." ~ Her
08-11-2016 #1092
-Moderator/Sponsor-
- Join Date
- Apr 2001
- Location
- The City of Fountains
- Posts
- 16,127
Now for the Baer Remaster installation. I did a review of this new MC a little while back, which can be seen here:
But due to life events, I really have not had a chance to install it before now. The reason for the swap is that my reman Maverick MC has steadily been getting worse. I noticed the problem first during last year's LSFest. The brake system would loose pressure when holding the pedal steadily pressed down. For instance, when parked on a hill I would have to keep pumping the pedal in order to not roll. There are no external leaks and the MC was not loosing fluid, so I suspect that there is an internal leak in the MC. So to add some more bling under the hood, and for obvious safety reason, yesterday I decided to make the swap. And here it is....

At this point you might be asking "where are all the detailed installation pictures?" Well, the installation was less than smooth and took way longer than expected. It started fine enough, I got the old MC off...

Seem like a simple remove and replace job, but then I had to get fancy...
The Baer Remaster has an integrated prop valve mount, which is a super clever feature, and this required the bending of some new lines. Luckily my W brand prop valve bolted right up...

I also had to be even more fancy and decided to use banjo fittings at the MC. This makes for a slick looking set-up and allows for a very easy 90* exit out of the MC. This of course required bending more lines with a 37* flare. No worries, I have a 37* flaring tool and I already had the right hardware from Earl's to make it all work. Details on making AN flares here:

Well, as we got deeper into the project we were running out of time and for the sake of expediency I decided to not do the banjo fittings on the rear port. Now you're asking yourself, "wait, there are banjo fittings on the rear port!?" Well, yes, and here is what happened...
In order to save time, I decided to just use the existing line from the rear port to my line-lock solenoid. Baer includes little inserts that must be installed in the port in order for the 45 degree flare fitting to seal. We installed it, and proceeded to tighten everything down and start filling the system with fluid. No matter what we did, the rear port kept spewing fluid. Long story short.....USER ERROR!

Pictured above is the insert that was installed into the rear port. During the bolting of the MC to the firewall, it must have gotten dislodged and was not seated squarely. As we tightened the fitting, instead of sealing, it just leaked. To make things worse, the brass fitting distorted it's seat and mangled the MC itself. The shop where I was working (big thanks to Brian and Tom!) happened to have a Snap-On flexible camera. I looked inside the MC port and my heart sank....
Luckily, banjo fittings don't seal on the seat, but instead seal against the aluminum crush washers that you see here...

So in the end we didn't save any time and had to make several new lines. Once it was all bolted up and all fittings tightened, it bled pretty easily and everything is working great.
Andrew1970 GTO Version 3.0
1967 Cougar build
GM High-Tech Performance feature
My YouTube Channel Please Subscribe!
Instagram @dr__efi
I deliver what EFI promises.
Remote Holley EFI tuning.
Please get in touch if I can be of service.
"You were the gun, your voice was the trigger, your bravery was the barrel, your eyes were the bullets." ~ Her
08-11-2016 #1093
Registered User
- Join Date
- Sep 2013
- Location
- sw Kansas
- Posts
- 1,662
You know, Andrew, I don't mind making brake lines and all the associated items necessary to do this. I hate brake fluid. Once you mention redo and I imagine that sticky dodo is all over and I'm getting annoyed for you.

08-11-2016 #1094 Registered User
- Join Date
- Aug 2012
- Location
- Peoria, AZ
- Posts
- 1,758
I've been putting off installing a prop valve on my car for 2 years now...because I'm afraid of issues of some sort like above. We are embarking on that journey this weekend, wish me luck. Those banjo fittings are cool looking...nice work.
Lance
1985 Monte Carlo SS Street Car
08-12-2016 #1095
-Moderator/Sponsor-
- Join Date
- Apr 2001
- Location
- The City of Fountains
- Posts
- 16,127
Man, you nailed it...I really hate brake fluid. It is sticky and just nasty... Originally Posted by wfo guy
Andrew1970 GTO Version 3.0
1967 Cougar build
GM High-Tech Performance feature
My YouTube Channel Please Subscribe!
Instagram @dr__efi
I deliver what EFI promises.
Remote Holley EFI tuning.
Please get in touch if I can be of service.
"You were the gun, your voice was the trigger, your bravery was the barrel, your eyes were the bullets." ~ Her
08-12-2016 #1096
-Moderator/Sponsor-
- Join Date
- Apr 2001
- Location
- The City of Fountains
- Posts
- 16,127
Originally Posted by SSLance
Best of luck Lance! I installed the prop valve when I first did the brakes, but I find that I don't really need it. It's wide open, which makes sense, because I have pretty big rear tires...
Andrew1970 GTO Version 3.0
1967 Cougar build
GM High-Tech Performance feature
My YouTube Channel Please Subscribe!
Instagram @dr__efi
I deliver what EFI promises.
Remote Holley EFI tuning.
Please get in touch if I can be of service.
"You were the gun, your voice was the trigger, your bravery was the barrel, your eyes were the bullets." ~ Her
08-12-2016 #1097
Registered User
- Join Date
- Aug 2012
- Location
- Peoria, AZ
- Posts
- 1,758
I have larger brake rotors in the rear than the front and have got by so far with more aggressive pads in the front, but I'm still just locking up the inside rear tire on an autocross run...so I need to dial the rear brakes back just a touch. At least you didn't have to deal with any metric brake line fittings on your Cougar...
Lance
1985 Monte Carlo SS Street Car
08-20-2016 #1098
-Moderator/Sponsor-
- Join Date
- Apr 2001
- Location
- The City of Fountains
- Posts
- 16,127
I am getting some little projects done before heading off to the Holley LSFest in a few weeks. As you might recall, i installed LED bulbs in the rear and that has made for a huge improvement. I consider good exterior lighting a safety feature and everyone should think about doing the same. There are numerous venders that offer LED bulbs, but I have always used the "Plasma" bulbs that are sold through West Coast Classic Cougar and I really like them. To match the rear LEDs I ordered some amber ones for the front turn signals.

One problem when upgrading to LED lighting is that it tends to render the dash indicator lights sort of inoperable. The indicators light up, but they no longer flash. On the Mustangs and Cougars, this function is handled by the K7 relay that is located under the dash. You can see it here with the big orange and brown wires connected to it.

To fix this, WCCC offers a solid state relay that is a direct replacement for the K7 relay. It can be used with incandescent or LED bulbs and is a direct, Plug-N-Play replacement.

The little potentiometer is there to adjust the relay sensitivity, which when used with LED bulbs, must be turned up a little. Now my dash turn signal indicators work as they should!
Here is a short video showing the difference between the LED and the incandescent turn signals. Driver's side is LED, passenger side is incandescent. I am not sure that there is a obvious difference in brightness, but the LED lights definitely have a crisp flashing action, while the incandescent bulbs sort of slowly glow on and off...
If you like my YouTube videos, please subscribe to my channel. Thanks!
Andrew1970 GTO Version 3.0
1967 Cougar build
GM High-Tech Performance feature
My YouTube Channel Please Subscribe!
Instagram @dr__efi
I deliver what EFI promises.
Remote Holley EFI tuning.
Please get in touch if I can be of service.
"You were the gun, your voice was the trigger, your bravery was the barrel, your eyes were the bullets." ~ Her
08-26-2016 #1099 Registered User
- Join Date
- Jun 2005
- Location
- Manassas, VA
- Posts
- 124
Nice work as usual Andrew! Quick tip, on the mesh loom, to terminate the ends, use shrink tubing with adhesive, and it will never fray or slip out.
Those fuse holders, the one that crapped out on you, are junk, very true. And depending on load, some of the 30 and 40a ATO fuse 'legs' can burn too, and create an intermittent loss of connection. Same with Bosch style relays, the 'legs' can burn and cause intermittent connections. One solution for the relays is to step up to the .375 terminals and 70a relays, which have larger legs, and use a conductive grease.
On the crimpers, I use the MSD ones, they ratchet very easy, smoothly, and have a better angle when crimping. They have a vast assortment of dies too:
https://www.summitracing.com/search?...20crimp%20tool
.HWYSTR455 on PY
1971 Lemans Sport 461 bottle fed daily driver
1971 Trans Am 474 blown EFI pro tour car
1972 442 W-30 clone
09-01-2016 #1100 Registered User
- Join Date
- May 2010
- Location
- British Columbia
- Posts
- 509
Hey Andrew , I've got a question for you . How are you liking the Holley digital dash ?. I'm trying to decide which way to go on my Cougar project .
Mike


 Reply With Quote


