Results 121 to 140 of 299
Thread: 1970 Firebird Twin Turbo Build
-
09-04-2010 #121

 Registered User
- Join Date
- Aug 2004
- Location
- Amsterdam,The Netherlands
- Posts
- 880

Subscribed! That's a sick car! Love the engine!

Cliff
1968 Firebird
Project Cheyenne Pro Performance
-
09-07-2010 #122 Registered User
- Join Date
- Jan 2009
- Posts
- 110
Thanks for the comments on the engine. It is turning out to be a unique piece.
Does anyone have experience with anodizing vs. powder coating?
I want a clean finish, but would like to keep the milling texture exposed through the finish. I am thinking of anodizing the valve covers and very top of the intake black and clearing the remaining parts. I want something that can be wiped clean while maintaining a nice finish. Not sure which way to go.
09-07-2010 #123 Registered User
- Join Date
- Oct 2004
- Location
- Orlando, Fl
- Posts
- 1,229

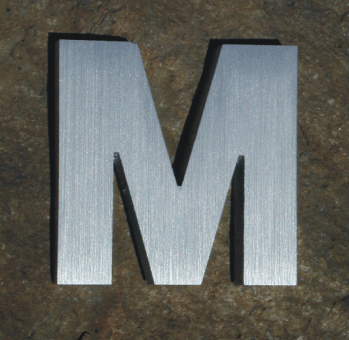
Powder coating will definitely cover the milling texture. Type I anodizing is quite thin (~0.1 mil) and will mostly likely leave a bit of the milling texture depending on what the surface finish is.
You can also have parts clear anodized to make them easier to clean and will also keep aluminum from corroding.
Example:
 Nick DiPrenda
09-07-2010 #124 Registered User
- Join Date
- Jan 2010
- Location
- Delaware
- Posts
- 689
I agree with Nick....powder coating is actually very thick. Anodizing is what you want there. Just remember, anodizing doesnt really add anything protective to the surface as far as scratching goes......think of the red and blue AN fittings and what happens when you use a wrench on them if you arent careful. But, powder coating also scratches, and actually a lot of powder coating leaves fingerprint smudges easily....especially glossy ones....and they are hard to get rid of. I really like powder coating steel and iron. Aluminum is a tossup.
1973 Trans Am 455 SR block, ported 6x-8 heads, solid cam, Victor intake, 830 CSU carb, aluminum rods, 77mm Garrett turbo and methanol injection. 1064hp at the flywheel@5500 rpm
09-07-2010 #125
Registered User
- Join Date
- Oct 2004
- Location
- Orlando, Fl
- Posts
- 1,229
You have far fewer choices with color, but if wear resistance is key, Type III anodizing, or hardcoat, offers fantastic wear resistance.
Nick DiPrenda
09-07-2010 #126 Registered User
- Join Date
- May 2010
- Location
- Newport, Ky
- Posts
- 15
Mad fabricating skills to say the least. One wild build. I love it!
Scroungers CC
09-07-2010 #127 Registered User
- Join Date
- Aug 2009
- Location
- yucaipa, ca.
- Posts
- 107
I all of the sudden want to build a firebird !!!! That thing is NICE!!!!!
 Marc Albright
66 Nova Chevy II
DSE chassis
Engine Builder undecided... Any offers?
Just starting build April 2010
Follow my build at:
https://www.pro-touring.com/showthre...quot-1966-Nova
09-07-2010 #128
Registered User
- Join Date
- Jan 2010
- Location
- Greenwood Lake, NY
- Posts
- 105
I agree with the hard anodizing... tough finish (actually increases the surface hardness of the AL), and it looks tough - dark, but still shows the grain in the metal.
Jeff.
1972 GTO - long term project
1968 Firebird - all original, low mileage
09-07-2010 #129
Registered User
- Join Date
- Oct 2004
- Location
- Orlando, Fl
- Posts
- 1,229
Yup, for those that know a bit about hardness measurements... Type III anodizing results in a surface hardness of Rockwell C 60-70. Originally Posted by Jeffrotech
 Nick DiPrenda
09-07-2010 #130 Registered User
- Join Date
- May 2009
- Posts
- 379
I like the concept and design, very well throught out. I think it all goes together nicely, without going too far from the original.
Can't wait to see it finished
09-09-2010 #131
Registered User
- Join Date
- Jan 2009
- Posts
- 110
Everytime I post a question to the group, I realize how little I know about the details. Great feedback again on the Type III anodizing.
Has anyone had experiece with the anodizing "spotting" or "discoloring" over time? I have heard that it looks great for the first year, but can react with the air and aluminum over time and actually milk or spot - something powder coating does not do.
09-09-2010 #132
Registered User
- Join Date
- Oct 2004
- Location
- Orlando, Fl
- Posts
- 1,229
Originally Posted by tcronkright
Pretty certain that spotting results from poor material prep prior to anodizing. Impurities in the aluminum will leach out over time and cause this issue.
As far as reacting with the air... That is exactly what anodizing is supposed to prevent. Raw aluminum will oxidize over time and on the surface will grow a layer of Al2O3, or aluminum oxide. Anodizing, in a manner of speaking, seals the surface and should prevent the aluminum from reacting with the air.Nick DiPrenda
09-09-2010 #133 Registered User
- Join Date
- Aug 2004
- Location
- Rustburg, Virginia
- Posts
- 3,436
Anodizing:
Be aware if the aluminum to be anodized is a welded part, make sure to use a filler material that will color match the parent material. Otherwise the results may not be what you are expecting.1970 RS/SS350 139K on the clock:
89 TPI motor w/ 1pc rear seal coupled to a Viper T56 via Mcleod's modular bellhousing w/ hydraulic T/O bearing from the Viper, 12 bolt rear w/ 3.73 gearing, SC&C upper control arms, factory lowers with Delalums, C5 brakes at all four corners, Front Wheels 17x8's with Sumi 255/40/17 and Rear Wheels 17x9's with Sumi 275/40/17.
Brief description of the work done so far can be found here: http://www.nastyz28.com/forum/showthread.php?t=112454
09-09-2010 #134 Registered User
- Join Date
- Mar 2010
- Location
- San Gabriel Valley CA
- Posts
- 148


This build just gets better and better. That motor is intoxicating and the roof is simply awesome.Mike Lara
09-09-2010 #135
Registered User
- Join Date
- Sep 2004
- Location
- Fresno, Ca
- Posts
- 379
Is it done yet?? Is it done yet??
09-09-2010 #136
Registered User
- Join Date
- Jan 2009
- Posts
- 110
Is the same true for powder coating? What filler material should they normally use? I need to "big brother" this step based on what you are saying. Thanks for the input, I appreciate it. Originally Posted by John Wright
09-09-2010 #137
Registered User
- Join Date
- Oct 2004
- Location
- Orlando, Fl
- Posts
- 1,229
Not true for powdercoating. Powdercoating is much like paint in its finish. The particles (or powder more specifically) has a positive charge and the parts will be grounded. The powder is then baked on. The material below has no effect. Originally Posted by tcronkright
Since anodizing is an electrolytic process, and you are chemically adhering the dye to the part, the substrate may have an effect on the surface finish depending on conducivity, porosity...Nick DiPrenda
09-09-2010 #138
Registered User
- Join Date
- Aug 2004
- Location
- Rustburg, Virginia
- Posts
- 3,436
Base material 6061?
In Volume 4, Seventh Edition of The Welding Handbook, in Table 8.9, for a 6061 base metal, the recommended filler metal for color match after anodizing is 5654.
I also have a probably outdated (1986) ANSI/AWS D10.7, which is the Recommended Practices for Gas Shielded Arc Welding of Aluminum and Aluminum Alloy Pipe. In Table 1, for a 6061 base metal, the recommended filler is ER5654, but the footnote indicates that ER5183, ER5356, and ER5556 may be used, and in some cases they provide improved color match after an anodizing treatment.1970 RS/SS350 139K on the clock:
89 TPI motor w/ 1pc rear seal coupled to a Viper T56 via Mcleod's modular bellhousing w/ hydraulic T/O bearing from the Viper, 12 bolt rear w/ 3.73 gearing, SC&C upper control arms, factory lowers with Delalums, C5 brakes at all four corners, Front Wheels 17x8's with Sumi 255/40/17 and Rear Wheels 17x9's with Sumi 275/40/17.
Brief description of the work done so far can be found here: http://www.nastyz28.com/forum/showthread.php?t=112454
09-11-2010 #139
Registered User
- Join Date
- Jan 2009
- Posts
- 110
The body modifications are officially done! We finished grinding the rear diffuser and cut the holes and fit the 4" running lights and welded in the trim barrels. We also cut and finished the vents in the lower valance which will help keep the intercoolers cool.
Next week we will seal the metal and start on the finish body work. We are going to put the engine in and mock up the turbo plumbing next week as well.
As for the valve covers and intake, I have decided to keep it natural for now. The black hardware ties the engine together nicely. After SEMA, maybe I will look to anodize a few parts, but it is just too nice looking to mess with right now.
Here are some pics of the front valance with the running lights installed.


09-11-2010 #140 Registered User
- Join Date
- Jan 2007
- Location
- CT
- Posts
- 782
great project!
________________
Nick S.
Gold/Gray 1967 Camaro

 Reply With Quote