


Results 81 to 100 of 102
-
02-12-2015 #81
 Registered User
- Join Date
- Oct 2014
- Location
- So Cal
- Posts
- 43

Loving this build! In hindsight I wish I had attacked my Chevelle in stages the same way you are doing so that I could actually be driving the car, but you know what they say hindsight is always 20/20! Good luck and keep moving forward!
David S.
1969 Chevrolet Chevelle
406 SBC, 507hp
700R4 by Monster Transmissions
Hotchkis TVS Extreme
"Slowly building something fast..."
https://www.pro-touring.com/threads/...-1969-Chevelle
-
05-16-2015 #82 Registered User
- Join Date
- Nov 2013
- Location
- FL
- Posts
- 92
Hey ProTouring,
It has been a long time since I have posted. Of course I am still checking out the site regularly. I like many of the builds going on right now.
I last received some parts and put them on the car. I ran into some issues of course. I will give you a run down of updates and later ask for your help with the issue I am having.1968 Firebird - My Way
https://www.pro-touring.com/threads/...nProEverything
05-16-2015 #83
Registered User
- Join Date
- Nov 2013
- Location
- FL
- Posts
- 92
Front Rotors
I finished up painting the front calipers. but things did not look right with the old rotors. I knew it was past due so I had the new rotors delivered from Jegs. I used stock rotors from Good Stuff detailing.
You can see the pictures below of before and after.
I learned something that I had no clue of before, this tells you that you will learn things the expensive way sometimes.
I like the rotors, they are nice but I did not get any outer or inner bearings with the rotors. Also I did not get the inner seal. That is all extra money. So after new calipers, rotors, brake hose, bearings, seals, pads I know I spent more than a kit. Sure I already had the spindles but I think I could have spent the extra couple hundred dollars for a big break kit and been better off for my end goal.
At this time I will be happy with what I have, because they work and look good.
If you look at earlier posts you will see me replace the drums to old used disc.
end result of the full project of front brakes
1968 Firebird - My Way
https://www.pro-touring.com/threads/...nProEverything
05-16-2015 #84
Registered User
- Join Date
- Nov 2013
- Location
- FL
- Posts
- 92
Light Me U
So a few things I do not like about old cars and with new technology that all can be resolved. Most of us on this site are not a pure restore. I am not a pure restore. I like and appreciate that work but my ride will be a mix of the old and the new.
One of my issues with old cars is the poor lighting. I do not like the dim front lights, so even though I have many other projects to do on my car, I had to resolve the driving lights issue.
I have for a long time, liked halo lights, even before they became cool and adopted onto many stock cars. I have thought about LED lighting for many years, just have not had the extra money to do it. I got a little at Christmas and went for it.
Still have many other thoughts in my head for more lighting, that will just take some time.
Here are some simple pictures of my front lights. I will get some with them light up. It uses a new H4 buld and the outer ring is LED Halo. It uses some type of light refaction as it only has 4 LEDs. You will see that more in the picture I post with the lights on.
I took the time to do the wiring correctly by installing a relay. Everything I read says the relay will help not draw so much power and produce a brighter light.
1968 Firebird - My Way
https://www.pro-touring.com/threads/...nProEverything
05-17-2015 #85
Registered User
- Join Date
- Nov 2013
- Location
- FL
- Posts
- 92
Lice no I mean Lights
Ok, guys, I got the pictures of the lights.
The driving lights still look yellow tin, but much better then stock lights. If you ever can not see the road than you need to update. You can get stock looking lights with new bulbs in them.
Awesome thing about these lights are I can now upgrade to HID lights or even the new LED Plasma bulbs.
Either way the H4 bulbs are way better then the stock.
Also, I have the picture of the HALO glowing.
I think it looks awesome. It is a mix of the old and the new.
yes you can see the chrome is pitted, and I plan on painting it body color. give me some time.....1968 Firebird - My Way
https://www.pro-touring.com/threads/...nProEverything
05-27-2015 #86
Registered User
- Join Date
- Nov 2013
- Location
- FL
- Posts
- 92
Pigeon Toed
So I told you I had a problem and here it is. I installed the Hotchkis tie rod sleeves. Very nice quality, solid and strong feeling. I also installed Right Stuff Detailing outer and inter tie rods. I was excited to have all new steering parts. They look good so I painted and installed them first on the driver side, and something did not look right. I then installed the passenger side. that is when I had serious problems. My car was serious Pigeon Toed!
I know a little angle is good for the direction and alignment of the car but this was NUTZ!. I do not have a picture yet.
Picture of the part installed. (do not mind that the tie rod sleeve was upside down)
Picture of part un-installed and you can see the original on the bottom and new parts on top. I tried different equations with parts by mixing the old tie rod and the new outer/inner tie rods. Either way I go the new parts are longer than the old set up by about 1 inch. That changes my steering!
I read on this site and others that guys had a similiar problem with the tie rods. They ended up putting on a nut, cutting off 1/4 to 1/2 of the end of the tie rod. well this would work if I use a stock tie rod sleeve. If I use the Hotchkis tie rod the whole thing will be still too long, as the sleeve itself is longer than the stock.
tell me what you guys think?
Also, why is the bottom inner tie rod have a bend in it, and the new once does not? It is supposed to be correct part.1968 Firebird - My Way
https://www.pro-touring.com/threads/...nProEverything
05-28-2015 #87
Registered User
- Join Date
- Jan 2010
- Location
- Elk River, MN
- Posts
- 676
You'll often find with aftermarket part suppliers that they take some 'liberties' when it comes to design of their components. The factory did things a certain way for specific reasons, that may or may not have been necessary or right. On occasion, aftermarket parts cure factory problems, on other occasions they create their own problems like what you're seeing here. Originally Posted by FireBeater

It looks to me like the source of your headache is the outer tie rod that's way too long. I'd go to NAPA and all of the other local parts stores and have them take parts out of the box to compare with your original for length, I think that's the only way you'll get the right stuff. Otherwise, Savitske offers Howe tie rod ends that are taller to improve your bump steer. Looks like $85 a pair but that might be each, I'd call him and check to be sure.
http://scandc.com/new/node/114Matt Peterson 84 Monte Carlo - Sold :( | 99 Corvette Racecar | 2001 Z06 Daily Driver
https://www.pro-touring.com/showthre...ng-Bertha-Back
http://ls1tech.com/forums/conversions-hybrids/1499192-84-monte-5-3-build.html
https://www.pro-touring.com/threads/...rvette-Racecar
05-28-2015 #88
Registered User
- Join Date
- Nov 2013
- Location
- FL
- Posts
- 92
Thanks Monteboy84 for the feedback.
I agree with what you are saying about aftermarket parts. I did find some others out on the web that were shorter, but they were for a 1969 Firebird See the Classic link below but not much product info.
I bet I can contact these guys at your link below and get more information and size dimensions.
http://scandc.com/new/node/114
http://www.classicindustries.com/pro...s/es2003r.html
I will check it out and let you guys know.
anybody else have this issue? or feedback?1968 Firebird - My Way
https://www.pro-touring.com/threads/...nProEverything
05-28-2015 #89 Registered User
- Join Date
- Feb 2008
- Posts
- 118
I love these garage builds so much more than the big dollar shop builds. Keep up the good work!
Matt Barr.
06-28-2016 #90
Registered User
- Join Date
- Nov 2013
- Location
- FL
- Posts
- 92
Moving
So I am still reading pro-touring site regularly. I still drool over the hot cars out there and hope for the cars that are like mine to continue life. I have not posted in over a year and just like the others on the site, life happens. I was traveling to Mexico alot for work last year around my last post. Things changed, I am no longer going to Mexico every other week, instead my company offered me a new job and I was relocated from North Florida to the South Charlotte NC area. I am just across the boarder into SC and I love it here. Give me a shout out if you are in the area. This was a major task, we had lived in our home for 9+ years and my car had grown a new life from what it came home like to what it is now. It still has lots of work to be done but I am so very grateful I still have it. I spent many months selling off parts, tools and cool car stuff. The only way I was going to bring my stuff with me was by putting it into my Firebird. We had owned and had room. Now we are in a rental and have almost no garage. WOW that is lots of stuff that had to go because of the move. BUT prior to that I had to do a few things. I was working on striping the body, so I had to put that on hold. I was not going to have the car travel 3 southern states collecting water on bare metal. So it was sprayed a solid black. you can see the pictures below.
1968 Firebird - My Way
https://www.pro-touring.com/threads/...nProEverything
06-28-2016 #91
Registered User
- Join Date
- Nov 2013
- Location
- FL
- Posts
- 92
More stripping going on!
1968 Firebird - My Way
https://www.pro-touring.com/threads/...nProEverything
06-28-2016 #92
Registered User
- Join Date
- Nov 2013
- Location
- FL
- Posts
- 92
Please remember I have hard working hands, not skilled hands.
I needed one color and coverage of paint on the body. I wanted to take the paint off to see how bad the body really is, and yup, it is bad. you can see some of the dents in the pictures.
yes that is newspaper not professional painting paper. It got the job done.1968 Firebird - My Way
https://www.pro-touring.com/threads/...nProEverything
06-28-2016 #93
Registered User
- Join Date
- Nov 2013
- Location
- FL
- Posts
- 92
after it was dried, and put back together. It waited for the trailer to take it away to a new big life adventure.
1968 Firebird - My Way
https://www.pro-touring.com/threads/...nProEverything
07-11-2016 #94 Registered User
- Join Date
- Apr 2007
- Location
- Austin, TX
- Posts
- 237

very cool, hopefully my rust removal phase ends quickly so I can get to the fun stuff
05-14-2017 #95
Registered User
- Join Date
- May 2015
- Location
- Island Lake, IL
- Posts
- 816
Any updates on this build? Looks like a good build coming together.
06-16-2017 #96
Registered User
- Join Date
- Nov 2013
- Location
- FL
- Posts
- 92
Hey, I still have the Firebird. I have not done much on it over the past year. I was focused on work and getting settled in with the move to SC.
My awesome wife snapped this picture during the move. I left before her early in the morning but when she passed me on the highway she captured this moment.
1968 Firebird - My Way
https://www.pro-touring.com/threads/...nProEverything
06-16-2017 #97
Registered User
- Join Date
- Nov 2013
- Location
- FL
- Posts
- 92
I did a generic version of brake lines in the past but now I picked up a full set of The Right Stuff Detailing brake lines. I am installing them now. I will let you know how it goes.
I am thinking of putting on a Holley Sniper EFI system. Any Pontiac engine people using them? Results? Any body using the system with out the timing control? Also, I am leaning toward a full new tank with in-tank pump. This will allow for easier migration to LS later on if I make it that far.1968 Firebird - My Way
https://www.pro-touring.com/threads/...nProEverything
06-17-2017 #98
Registered User
- Join Date
- Feb 2010
- Location
- New Smyrna Beach, FL
- Posts
- 116
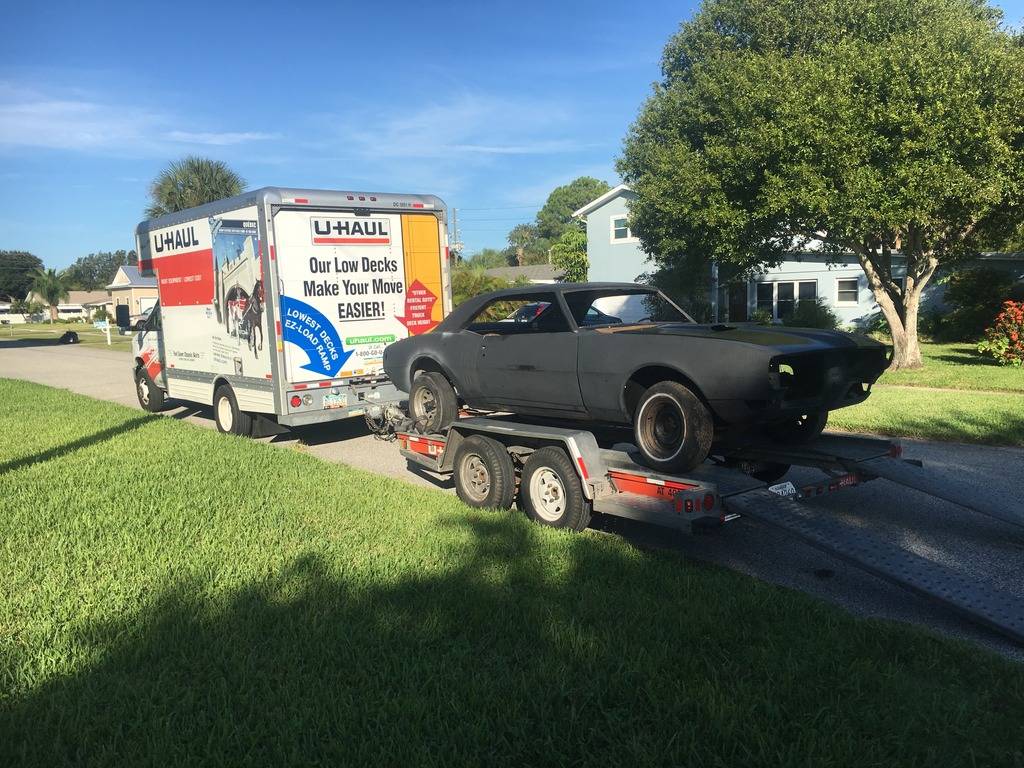
I went with a FiTech, the Holley Sniper looks nice. Unfortunately I'm a ways away from giving any operational feedback. I purchased an in-tank efi fuel tank from Tanks, Inc. thinking a 650 hp LT4 might be in the cards a decade from now... That pic is awesome, looks familiar:
Great job so far, reading through has given me some motivation.Ben
06-18-2017 #99 Registered User
- Join Date
- Mar 2015
- Location
- FL
- Posts
- 318
Very cool. Just noticed this thread and that you were in north FL--that's where I am! I've had my Firebird for a good long time too and was a home built father son resto and my daily in high school back in 99 through 02 with parts exchanged between my brother's and I as well. I like to do it "my way" too! Great project. You're motivating me to finish my project thread. I only recently started it and am only up to about 2008, trying to tell whole story.
-Mitch
G8 GXP, White Hot, Auto, bone stock
68 Firebird, 428 Pontiac, CNC'd KRE Al d-ports, hyd roller, EFI, TKO600, TCI Eng complete chassis, Ridetech, Kore3 C6Z brakes, C5Z 18" with 315 rivals x4, C6zr1 mufflers
RRR, NASA HPDE https://youtu.be/DPp1l9-FuNE
06-21-2017 #100
Registered User
- Join Date
- Nov 2013
- Location
- FL
- Posts
- 92
That looks to familiar! It is like a clone.
Once I am done with the brake lines and a few other catch up items, I will be looking at the EFI, but that will be within the next few months.
- - - Updated - - -
Originally Posted by Bennsb
Default
That looks to familiar! It is like a clone.
Once I am done with the brake lines and a few other catch up items, I will be looking at the EFI, but that will be within the next few months.1968 Firebird - My Way
https://www.pro-touring.com/threads/...nProEverything
Tags for this Thread

 Reply With Quote




