

Results 1 to 20 of 23
-
11-12-2011 #1
 Registered User
- Join Date
- Aug 2009
- Location
- Central California
- Posts
- 132

SPC Upper A-Arm Installation Issue?
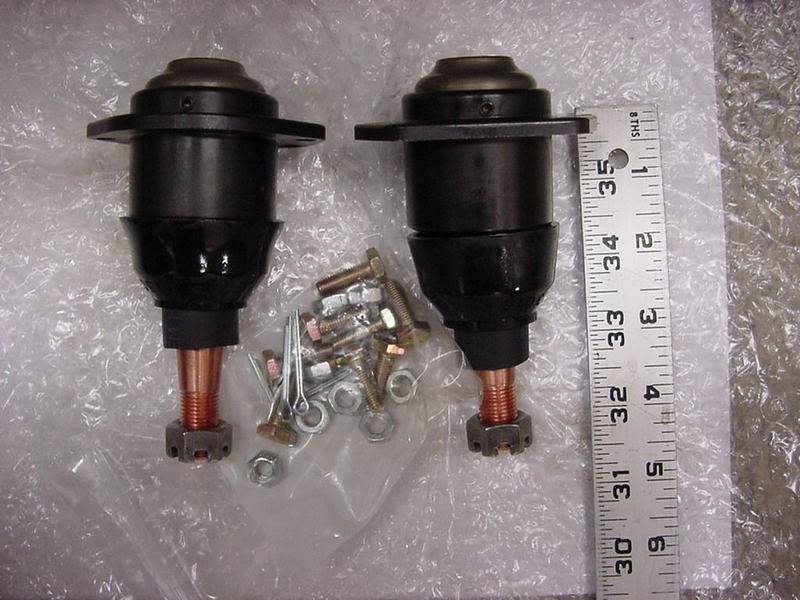
I am in the process of install my new front suspension. I purchased a new set of bolt in upper ball joints to use with the SPC Pro Lite Arms. The holes definitely do not line up with the ball joint plate. Marc from SC&C stated that this would be a problem, he said just clean the holes up with a 1/4" drill bit and you should be good.
One problem is the bolt that came with the upper ball joint require a 5/16" hole. So I proceeded to increase the size in the SPC ball joint plate to 5/16, but even then 2 of the holes did not line up 100%, so I installed two bolts, then reamed the other two holes to get the bolts in. Now my next issue is I am not sure if I took away too much from the ball joint plate, and do not want to have problems down the road. There is less than 1/16" of an inch of metal left, between the ball joints mounting holes and the large ball joint hole. The original space on the plate was 1/16" of an inch. Has anyone who used the SPC Pro Lite had to do something similar? Before I do the other one I would like to here from others.
Another question did you drop in your ball joint from the top, similar to the factory or did your come up from the bottom? Or did you put the ball joint in the top and the retainer/dust cover from the bottom?
One last question, did you repaint, clear coat, etc the cross shaft to keep their color? It looks like the cross shaft has discolored and been in the elements for a while!
First photo is the virgin ball joint plate, second is my attempt at drilling the holes so the ball joint will go in!!!!
-
11-12-2011 #2
 Registered User
- Join Date
- Dec 2004
- Location
- California
- Posts
- 794
I JUST went through this 2 days ago. I used a NAPA premium ball joain and had to enlarge all the holes to 5/16. Only one of the holes needed to be moved out like you did. I put mine ni from the top just like stock. I am gonna clear the area to prevent rusting. Sorry i cant give feedback I am no where near done with the suspension.
-
11-13-2011 #3
 Registered User
- Join Date
- Jul 2005
- Location
- Den Helder, the Netherlands
- Posts
- 1,148

Wouldn't it have been more effective to ream the holes on the BJ itself?
I didn't have a problem with mounting the BJ's to the plate. Both the "originals" and the Howe BJ's lined up with the holes of the plate. You might consider upgrading to the NASCAR screw in BJ's.
Mounting the BJ underneath the plate gives you sligthly more room in drop before you hit the frame. Disadvantage might be that you run out of space with your rims depending on the backspace of the rims. Mounting the BJ underneath the plate also lowers the car slightly since there's less tension on the spring.
BTW mounting the BJ from the top or from the bottom doesn't change anything geometry (camber curve) wise.
-
11-13-2011 #4
 Registered User
- Join Date
- Oct 2009
- Location
- New Derry, PA
- Posts
- 1,265
Rene, Originally Posted by neki67

Mounting the upper ball joint under the arm does not affect spring tension. If you found that this change lowered the car, then something else happened at the same time. BTW, it does not change suspension geometry either. As you stated, it DOES give more up travel if needed.
Ray Kaufman - Wyotech Chassis Fab and High Performance Instructor. Words of Wisdom from an old master... at Asylum Custom Interiors website
-
11-13-2011 #5
Registered User
- Join Date
- Oct 2009
- Location
- New Derry, PA
- Posts
- 1,265
cspecken,
The correct ball joint should fit snug in the center hole. Your fix, while not pretty, should be ok if the center hole isn't loose on the joint body. The pressure should not be on the bolts. Mount it the standard way (on top) and see how it fits the hole.
Ray Kaufman - Wyotech Chassis Fab and High Performance Instructor. Words of Wisdom from an old master... at Asylum Custom Interiors website
-
11-13-2011 #6
Registered User
- Join Date
- Jul 2005
- Location
- Den Helder, the Netherlands
- Posts
- 1,148
Ray, Originally Posted by exwestracer
you're absolutely right (as usual . . . .). When the arms are in total drop, there's slightly less pressure tension in between the arms when the BJ is mounted to the bottom of the plate but this has no effect once the wheels are on the ground and the weight is on the spring since the spring is in between (sub)frame and Lower A-arm. Must have had a brainfart!

My apologies for possibly causing confusion.
11-13-2011 #7
Registered User
- Join Date
- Aug 2009
- Location
- Central California
- Posts
- 132
I am not sure I ordered the correct ball joint or maybe the ball joint plate is incorrect. I was told by Marc at SC&C to purchase the ball joints from Napa for my car. A 1964 Pontiac GTO (Part# 260-1064). There is clearly an even gap around the entire ball joint when placed into the ball joint plate, it is quite loose. There is nothing snug about it! Originally Posted by exwestracer
I will call Marc tomorrow to get his perspective. I would rather get this right and if I have to order replacement ball joints or a new ball joint plate do it now instead of later when the thing fails!

11-13-2011 #8
Registered User
- Join Date
- Oct 2009
- Location
- New Derry, PA
- Posts
- 1,265
Best idea all around...
Ray Kaufman - Wyotech Chassis Fab and High Performance Instructor. Words of Wisdom from an old master... at Asylum Custom Interiors website
11-15-2011 #9
Registered User
- Join Date
- Aug 2009
- Location
- Central California
- Posts
- 132
I followed up with Marc from SC&C, he said that I should be using 1/4" grade 8 bolts and not the 5/16 bolts that were included with my new Napa premium ball joints. He wasn't surprised by the 5/16" bolts. Needless to say I will be buying the correct ones and give that a shot.
11-15-2011 #10
Registered User
- Join Date
- Oct 2009
- Location
- New Derry, PA
- Posts
- 1,265
Also keep in mind that the fit will be much tighter when you put the metal base for the dust boot over the body of the ball joint.
Ray Kaufman - Wyotech Chassis Fab and High Performance Instructor. Words of Wisdom from an old master... at Asylum Custom Interiors website
11-15-2011 #11
Registered User
- Join Date
- Sep 2010
- Location
- Livermore, California
- Posts
- 160
Super surprised the SPC arms are made for 1/4" bolts instead of 5/16". Especially on arms that are MADE and GOING to be raced and most probably equipped with race balljoints that all require 5/16" bolts.
11-15-2011 #12 Registered User
- Join Date
- Aug 2004
- Location
- Rustburg, Virginia
- Posts
- 3,436
IIRC my Howe Tall Ball Joints came with 1/4" grade 8 bolts and they fit nicely onto those SPC UCAs for my 2gen camaro.
 1970 RS/SS350 139K on the clock:
89 TPI motor w/ 1pc rear seal coupled to a Viper T56 via Mcleod's modular bellhousing w/ hydraulic T/O bearing from the Viper, 12 bolt rear w/ 3.73 gearing, SC&C upper control arms, factory lowers with Delalums, C5 brakes at all four corners, Front Wheels 17x8's with Sumi 255/40/17 and Rear Wheels 17x9's with Sumi 275/40/17.
Brief description of the work done so far can be found here: http://www.nastyz28.com/forum/showthread.php?t=112454
11-18-2011 #13
Full Blown G-Machiner
- Join Date
- Sep 2004
- Location
- PA.
- Posts
- 935
SPC arms are drilled 5/16" with GM spec dia. center holes to locate the BJ body. Aftermarket ball joints for these cars have a lot of variation in hole spacing, especially the holes closest to the centerline of the car. Many are slotted, use oversized round or even triangular (!) holes. They`re packages with both 1/4" bolts and 5/16" bolts by the same companys with the same part numbers. There is no "standard flange size" in the industry for this application. Go figure. If you have BJs with 5/16" holes and they line up with the plates then you can just use 5/16" bolts. If 2 or more of the holes don`t line up 1/4" bolts will usually fit and be tight on one side of each hole making locking it in when they`re tightened. Or you can drill the holes out to match. Original GM riveted ball joints have nominal 1/4" holes too. Mark SC&C
01-13-2013 #14 Registered User
- Join Date
- Nov 2010
- Location
- Ventura County CA
- Posts
- 556
How critical is this? Originally Posted by exwestracer
I just went through a similar issue with my Global West uppers. Replacement Napa premium joints use 5/16" instead of 1/4" hardware. I also found the balljoint had a fillet radius that wouldn't let it sit all the way down into the larger hole, so it wouldn't sit flat! I ground off the top edge of the hole on the arms so it would sit flush. Then I attached it with two of the smaller 1/4" bolts, centering it on the large hole. Then I used a drill to get the two open holes sized for 5/16". I droped 5/16" bolts through the newly opened-up holes, then removed the 1/4" bolts to open those holes. Once everything was done, I put the balljoint boot on and torqued everything down.Clint - '70 Nova "restomod" cruiser & autocross family car

01-13-2013 #15 Registered User
- Join Date
- Sep 2012
- Location
- Los Angeles
- Posts
- 216
Im running Howe Tall Ball Joints too for my a body spc arms work perfect!!
01-13-2013 #16
Registered User
- Join Date
- Oct 2009
- Location
- New Derry, PA
- Posts
- 1,265
Well, your screw in ball upper joints sort of eliminate the OP's problem of the bolts not lining up! Originally Posted by shane38
Ray Kaufman - Wyotech Chassis Fab and High Performance Instructor. Words of Wisdom from an old master... at Asylum Custom Interiors website
01-13-2013 #17
Registered User
- Join Date
- Nov 2010
- Location
- Ventura County CA
- Posts
- 556
Ray did you see my post just above the last one?
Clint - '70 Nova "restomod" cruiser & autocross family car
01-13-2013 #18
Registered User
- Join Date
- Aug 2009
- Location
- Central California
- Posts
- 132
I think you should be ok, but I am not a suspension expert. I would suggest calling Marc at SC&C he will be able to answer your questions/concerns. Originally Posted by TheBandit
Chris
01-14-2013 #19 Registered User
- Join Date
- Nov 2008
- Location
- So. Cal.
- Posts
- 1,240
Screw in as well. So far so good... JR
 What I write is opinion, none of it is factual. 2010
Even though I'm conscious it doesn't mean I'm coherent. 2011
I'm getting better with age. Best thing about old age is I don't know any better. 2012
01-14-2013 #20
Registered User
- Join Date
- Oct 2009
- Location
- New Derry, PA
- Posts
- 1,265
Sorry Clint, I didn't look at the date on your post. I wouldn't worry about it. Like any fitment, the larger area we have to spread the load over, the better. So we'd be better off if the ball joint was "leaning" on the large hole, rather than the bolts. Unless it's REALLY sloppy, I doubt very much it's going to shear the bolts off. Originally Posted by TheBandit
Ray Kaufman - Wyotech Chassis Fab and High Performance Instructor. Words of Wisdom from an old master... at Asylum Custom Interiors website
Tags for this Thread

 Reply With Quote


