


Results 41 to 60 of 120
Thread: Project Fool's Gold
-
02-06-2009 #41

 Registered User
- Join Date
- Jan 2006
- Location
- Dallas, Ga.
- Posts
- 439
Trey, you only need to use a narrowed tank when leaf springs are involved. The leaves have to move inward when tubbing, therefore it requires a narrowed tank. I'm using the LD 3-link so there are no obstructions behind the rear axle. This allows me to actually enlarge the tank with no clearance issues. These cars came from the factory with a 15 gallon tank which has been my only dislike in my gray car. You have to refill too often, so I tried to gain 3-5 gallons capacity with this car. Also the LS engine should get better economy, although the way I drive them I think economy goes out the window fast. The DSE qaudra link or the G-bar/air bar rear suspension will provide you with the same clearance advantage.
I just got really lucky with this one Ron. My gray car had to have almost everything but the roof. I guess it's a trade off between the two.Tommy Parker
1973 Camaro- fast burn 385, FAST EFI, Bowler 700R4, Hotchkis,Baer, Forgeline SP3P's, completed 2007, updated 2010
1972 Camaro-Project Fool's Gold- LD 3-link,DSE sub-frame,C6 Z06 brakes,TKO 600, LS2 stroked to 402, Forgeline, in progress
-
02-06-2009 #42
Registered User
- Join Date
- Aug 2004
- Location
- Dunwoody, GA
- Posts
- 4,983

that's right I forgot it was just for a leaf spring car that the narrow tank was required.
How do you only have 15 gallons? My 79 has a 21 gallon tank. Could you not swap in a later tank with maybe a different inlet?Trey
"The early bird may get the worm, but the second mouse gets the cheese."
~ Jon Hammond
1979 WS6 Trans Am stock LT1/T56 drive train out of my Formula. BMW M-parallel rims. C5/C6 brakes
build thread https://www.pro-touring.com/showthre...ghlight=begins
-
02-06-2009 #43
Registered User
- Join Date
- Jul 2004
- Location
- Braselton, Ga.
- Posts
- 1,477
I wish I could weld, My Father -n-law left me his Miller welder and all his tools. So maybe when I get another project I can learn some of these tricks.
Tommy the more I look at the pictures the more I wish I had a 2nd gen.
Your doing a fantastic job!!!
-
02-07-2009 #44
Registered User
- Join Date
- Jan 2006
- Location
- Dallas, Ga.
- Posts
- 439
Trey, GM changed the trunk floor around 74-75 when they put a larger tank in the cars which as you stated is around 21 gallons. These have a trunk floor that is humped up on the right side for the tank which is taller on that side only. The 70-73 models have a flat trunk floor and a smaller tank. I think the aggrevation of only a 15 Gal. capacity may be why GM changed that part of the second Gen. design.
Tommy Parker
1973 Camaro- fast burn 385, FAST EFI, Bowler 700R4, Hotchkis,Baer, Forgeline SP3P's, completed 2007, updated 2010
1972 Camaro-Project Fool's Gold- LD 3-link,DSE sub-frame,C6 Z06 brakes,TKO 600, LS2 stroked to 402, Forgeline, in progress
-
02-07-2009 #45
Registered User
- Join Date
- Jan 2006
- Location
- Dallas, Ga.
- Posts
- 439
Protouring70 The way I learned to weld was, I bought the miller mig welder, got some scrap in the right thickness, a bottle of 75/25 argon/co2, read the label for settings on the machine and self taught myself through practice. I don't do the prettiest welds out there but they are strong with good penetration. I probably do more grinding than welding if the truth be known LOL.
Tommy Parker
1973 Camaro- fast burn 385, FAST EFI, Bowler 700R4, Hotchkis,Baer, Forgeline SP3P's, completed 2007, updated 2010
1972 Camaro-Project Fool's Gold- LD 3-link,DSE sub-frame,C6 Z06 brakes,TKO 600, LS2 stroked to 402, Forgeline, in progress
-
02-07-2009 #46
Registered User
- Join Date
- Aug 2004
- Location
- Dunwoody, GA
- Posts
- 4,983
ah ok I know what you're talking about. I didn't realize that's what the hump was for. I thought they made a recess for me to lay the ttops in. lol guess that's what I get for owning a car that's older than me. I actually kinda wish I had a flat floor. that would make my plans easier.
Trey
"The early bird may get the worm, but the second mouse gets the cheese."
~ Jon Hammond
1979 WS6 Trans Am stock LT1/T56 drive train out of my Formula. BMW M-parallel rims. C5/C6 brakes
build thread https://www.pro-touring.com/showthre...ghlight=begins
-
02-07-2009 #47
 Registered User
- Join Date
- Aug 2005
- Location
- Hamilton, NJ
- Posts
- 4,319
Nice work Tommy, keep up the good work.
Scott from NJ.
Vent Windows Forever! ...
Feather-light suspension, Konis just couldn't hold
I'm so glad I took a look inside your showroom doors
-
02-13-2009 #48
Registered User
- Join Date
- Jan 2006
- Location
- Dallas, Ga.
- Posts
- 439
Topless
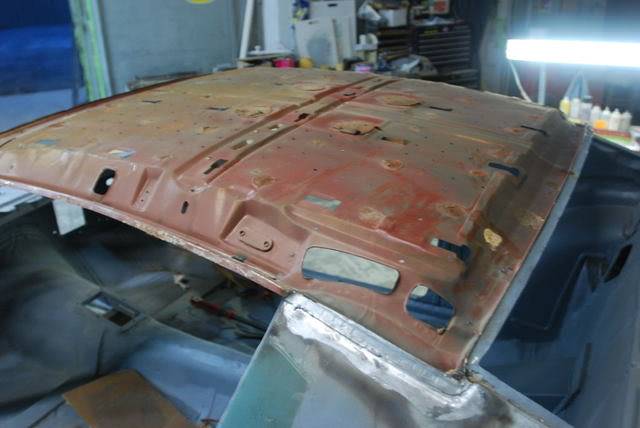
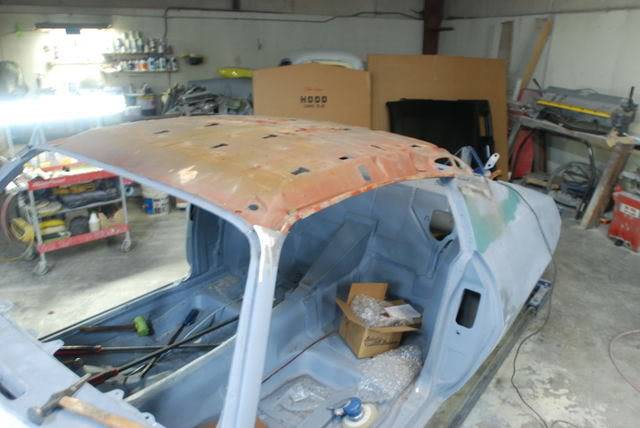
I went by Thunder Valley Tuesday afternoon and got to help Brad swap the bad roof skin that the blaster messed up. They shrunk and stetched different areas of the roof when blasting and made the surface like a washboard. The skin wasn't as bad to change as what I thought it would be. The front windshield area and the rear window area are spot welded, as well as at the qaurters. The rails above the side windows are wrapped and pinched just like a door skin. So all in all not too bad, the worst part is that the inner skin is glued to the outer every sqaure foot with a big dollop of seam sealer. You need some very long pry bars and a hammer and you can tap the outer loose from each dollop and it comes off, this is the step that takes patience and care so not to damage the inner.
New skin trimmed and in position.
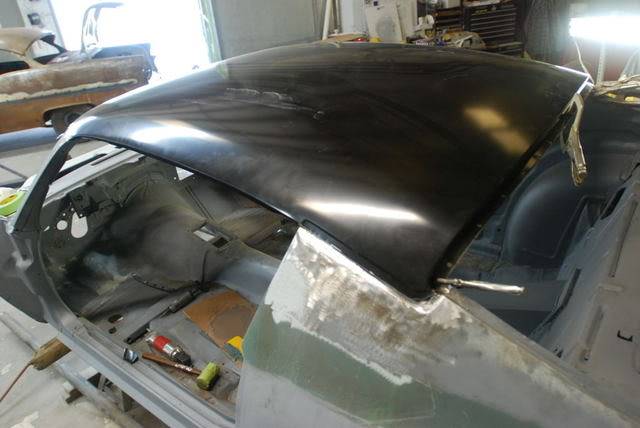
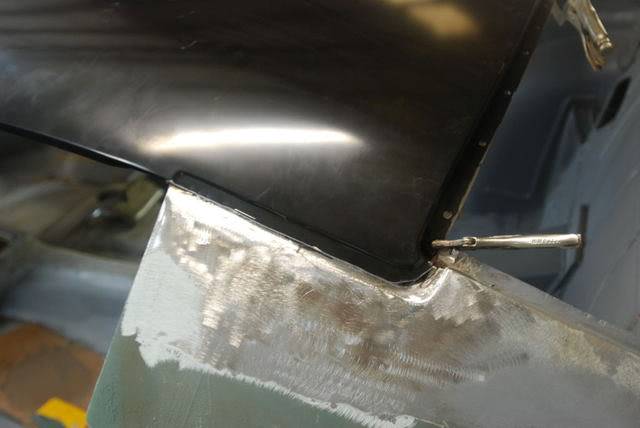
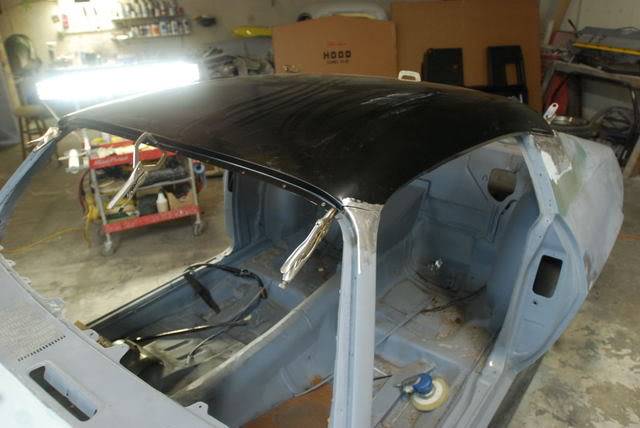
It took about 3 hours to do this with two of us but the welding still needed to be done so figure a couple more hours for that and finishing.
More to come soon.Tommy Parker
1973 Camaro- fast burn 385, FAST EFI, Bowler 700R4, Hotchkis,Baer, Forgeline SP3P's, completed 2007, updated 2010
1972 Camaro-Project Fool's Gold- LD 3-link,DSE sub-frame,C6 Z06 brakes,TKO 600, LS2 stroked to 402, Forgeline, in progress
-
03-13-2009 #49
 Registered User
- Join Date
- Nov 2006
- Location
- Ma.
- Posts
- 5,560
The car looks in real good shape. You have a nice project. Keep the updates coming.
Wayne
Car FINALLY home !!!!!! lol
Project FNQUIK https://www.pro-touring.com/showthre...ghlight=FNQUIK
-
03-13-2009 #50
 Registered User
- Join Date
- Jul 2008
- Posts
- 512
 DAAAAYYYYUUUUMMMMMM Tommy!!! Thanks for keeping the in know people in the know!! The project looks fantastic, I wish I had the experience to run a project that well.
Next time I'm downthere and we're doing this, , I'm taking a break and checking this thing out!!!
Keep it up, awesome work man!
Jeff*Jeff*
Project Salty - 1964 4 door Malibu, beaten, neglected, red headed foster child
Cammed LQ4 / T56 Swap Project Thread <-click to read! 😁
-
03-13-2009 #51
 Registered User
- Join Date
- Sep 2007
- Location
- Buford, GA
- Posts
- 923
:werd: I'm coming over that way to visit some day.
Keep up the good work.
PS - you might have to do some welding on my truck too!!Adam
1985 S10 - LT1 + T56
1964 Chevy II 4-Door - LS1 + T56
-
03-14-2009 #52
 Registered User
- Join Date
- Nov 2008
- Location
- iceland
- Posts
- 1,859

Wow awesome metal work, coming along nicely. Keep posting pics
Bjarni B
My Chevelle project The Awakening
http://www.1971chevelle.net/

http://www.kvartmila.is/smf/index.php?topic=27028.0
CHEVY POWER RULES!
-
03-17-2009 #53
Registered User
- Join Date
- Jan 2006
- Location
- Dallas, Ga.
- Posts
- 439
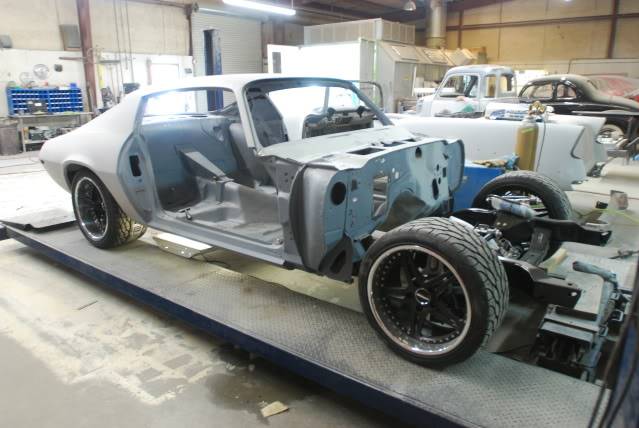
Back on the wheels for mock-up!
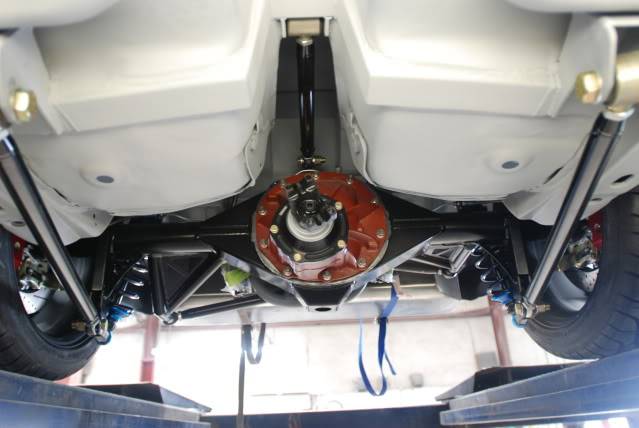
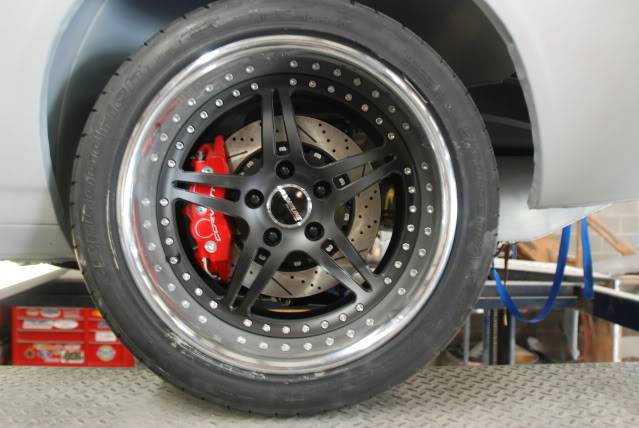
Well it's been a while but myself and the guys over at Thunder Valley have been busy on the car. A lot of what's been done doesn't really show but took hours to do. The trunk pan where it drops down in the center was sectioned to make it narrower for better exhaust clearance then but welded back in and worked. The doors are off it right now to help ease putting the roll bar in but they have been skinned, late model door handles grafted in and fitted. The deck lid and rear spoiler have also been fitted and all panels gapped and blocked twice. The rear housing and links were powdercoated and the center section painted with red DP. Then Shane at Thunder Valley assembled the rear with the new Racing Brake rotors and Tobin of Kore3's kit to adapt C6 Z06 brakes with parking brake. Once this was done the 3-link was put back in the car for final mock-up assembly.
While that was being done I assembled the DSE sub-frame which had been powdercoated and some of the bits painted for color contrast and eye appeal and we installed it complete minus brakes and welding. It will be welded to the DSE sub-frame connectors after painting the bottom during actual final assembly.
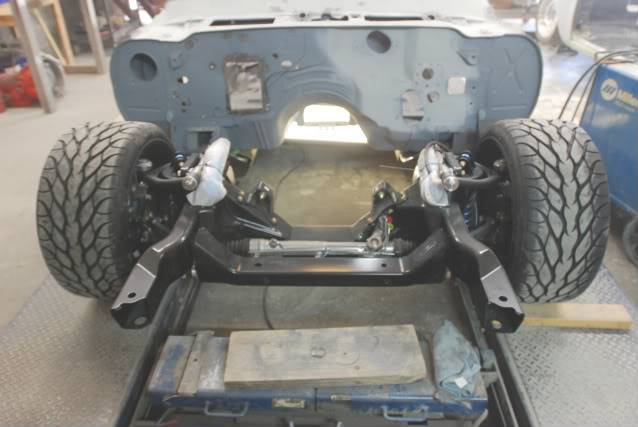
I narrowed the rear just a little too much. It should have been right according to my measurements and math but we all know how that doesn't always translate properly to the vehicle in the real world. Since I already have the maximum outer lip on the wheels and don't want to narrow them I'll be running a 1/2" spacer on the back wheels which my buddy the machinist will make to match the hub of the wheel and I'll powdercoat. That way it will blend in and not be noticed.
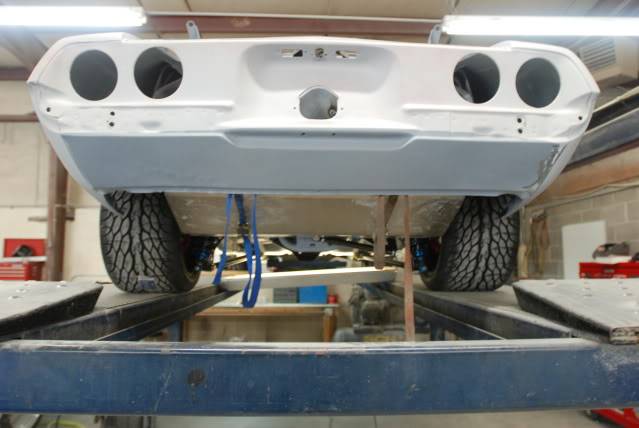
Also notice the Rick's tank is held in with ratchet straps. Rick's sent straps for a first gen. by mistake and we are awaiting the replacements, hopefully they will be in this week. This is how the car sits now while fitting the DSE roll bar.
And I can't resist a picture of the rear wheel and brake combo.
The engine block will be ready for pick up tommorrow from the machinist so I should get started building the engine this weekend. Once that is done I will bring the car to the house to install the engine trans combo. Then the car will go to a local guy who is very well known for the headers and exhaust to be built. After that myself and Sam Freeman will be mocking up and roughing in the custom interior and then back to Thunder Valley to fit the front clip. once it's all fitted we will blow it apart for the last time for paint and final assembly.
If you happen to notice I didn't shave the marker lights the same as the rendering. It's one of those as you go changes. After seeing Jesse Greenings black second gen. SEMA car I called him and had a talk about the custom flush markers he used on that car. He agreed to make another set for me with the trim rings and Brad has massged the openings to accept them. Just one of the small subtle changes that I hope will make this car different and set it apart.
Tommy Parker
1973 Camaro- fast burn 385, FAST EFI, Bowler 700R4, Hotchkis,Baer, Forgeline SP3P's, completed 2007, updated 2010
1972 Camaro-Project Fool's Gold- LD 3-link,DSE sub-frame,C6 Z06 brakes,TKO 600, LS2 stroked to 402, Forgeline, in progress
-
03-17-2009 #54 Registered User
- Join Date
- Mar 2009
- Location
- overseas
- Posts
- 3,434
wow nice build man!!!!
Kevin S. (overseas in Germany)
1963 Chevrolet Impala 2d ht Coupe
www.CruznArt.com
CRUZN - Automotive Artworks
03-17-2009 #55 Registered User
- Join Date
- Oct 2004
- Location
- St.Anne Il
- Posts
- 3,924
damn you really have been knocking it out Tommy..car looks killer...great job !!
Darrin Stalnecker
1969 Camaro Convert full pt pr
2007 Corvette Supercharged
1968 Camaro LS1 T56
http://www.fquick.com/dropit69
03-17-2009 #56
Registered User
- Join Date
- Jan 2006
- Location
- Dallas, Ga.
- Posts
- 439
Darrin, I have to give credit where it's due. The crew at Thunder Valley have been taking most of the monkey off my back since January with the body and assembling the rear. It'll be all back in my lap soon though.
Tommy Parker
1973 Camaro- fast burn 385, FAST EFI, Bowler 700R4, Hotchkis,Baer, Forgeline SP3P's, completed 2007, updated 2010
1972 Camaro-Project Fool's Gold- LD 3-link,DSE sub-frame,C6 Z06 brakes,TKO 600, LS2 stroked to 402, Forgeline, in progress
03-17-2009 #57 Registered User
- Join Date
- Dec 2005
- Location
- Birmingham, AL
- Posts
- 3,355
Nice build, this will be one of my favorite second gen's to date. The Forgelines look great.
03-17-2009 #58
Registered User
- Join Date
- Sep 2007
- Location
- Buford, GA
- Posts
- 923
Is that Buster down in Dallas? Originally Posted by PARKERRS
 Adam
1985 S10 - LT1 + T56
1964 Chevy II 4-Door - LS1 + T56
03-17-2009 #59
Registered User
- Join Date
- Jan 2006
- Location
- Dallas, Ga.
- Posts
- 439
Yes sir!! Buster will be building the headers and the exhaust system. Originally Posted by HectorM52
Tommy Parker
1973 Camaro- fast burn 385, FAST EFI, Bowler 700R4, Hotchkis,Baer, Forgeline SP3P's, completed 2007, updated 2010
1972 Camaro-Project Fool's Gold- LD 3-link,DSE sub-frame,C6 Z06 brakes,TKO 600, LS2 stroked to 402, Forgeline, in progress
03-17-2009 #60
Registered User
- Join Date
- Sep 2007
- Location
- Buford, GA
- Posts
- 923
SCHWEET!! That guy can build some exhaust. I'm proud to say I've got a full system from him!
Adam
1985 S10 - LT1 + T56
1964 Chevy II 4-Door - LS1 + T56

 Reply With Quote



