


Results 1 to 15 of 15
Thread: '94 S-10 Road Racer
-
10-03-2016 #1
 Registered User
- Join Date
- Oct 2016
- Posts
- 5
'94 S-10 Road Racer
Hi all, long time listener, first time caller. I'm sharing the build of my '94 S-10 pickup that my dad and I are working on for your critique and, well, whatever it is you guys do with the information you gather from here...anywho, here's what we're starting with.
I bought the truck in October 2011 with the the hopes of making it a cool drag truck on the cheap. Fast forward a few years, jobs, and garages later, my dad and I went to a NASA event in Summit Point, WV and got bit by the road racing bug. We've done a few HyperDrives, a few HPDE sessions, and have pretty much decided that this is going to be our racing hobby of choice. So what are we going to do with this truck? Cut it up and make a race car (errrr, truck) of course!
So where do we start? Well we hemmed and hawed for a bit on whether it would be best to start with a short cab, or to shorten the extended cab I already had. Ultimately we decided that the latter was a better option for a couple of reasons: First, at 6'2" the short cab doesn't leave much leg room after you move the seat forward when the main hoop is installed. Second, we like custom things. Third, we have the tools and knowledge, so why not?
We marked two lines 10.5" apart, and cut the back shell off of the cab.
The inner floor took a little thinking to get though so that it mated up as easily as possible.
After a grinding disk and some careful measurements, here's the result. All that's left is to cut 10.5" of sheet metal off of the remain cab and stick the rear of the cab back on.
Just like this. We used a pneumatic flanger to provide a lip for the rear of the cab to slide onto.
After a little trimming of various undercuts and corners, we were able to put the cab back together.
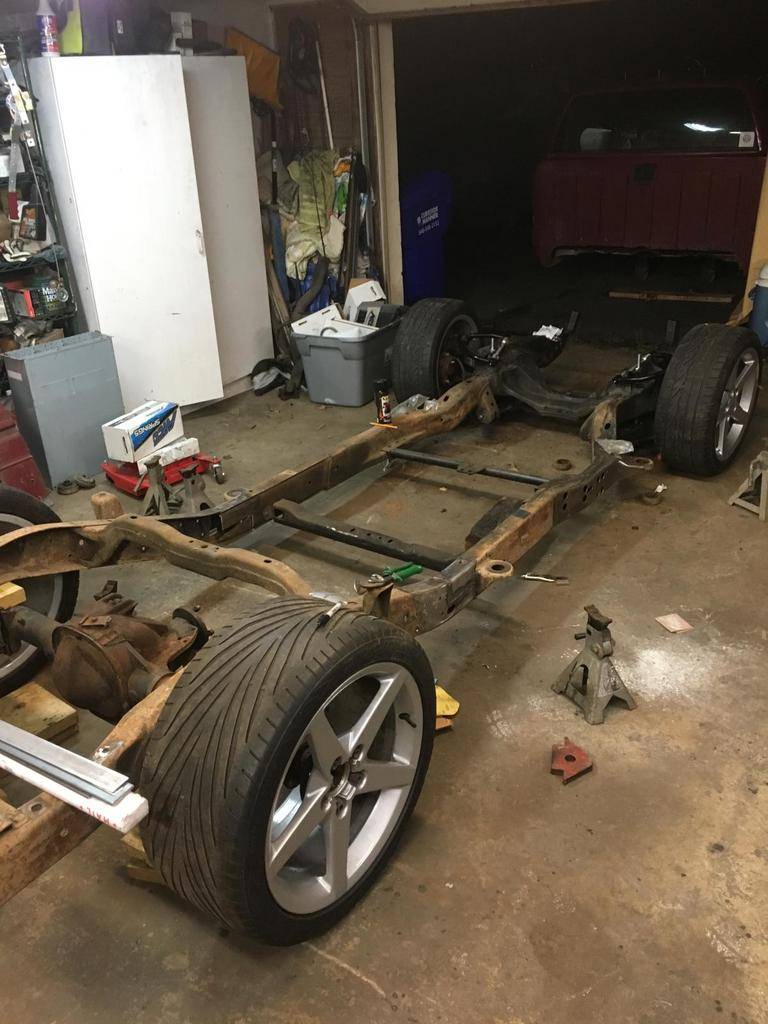
We wanted to remove that terrible gap (of approximately 1.5") between the bed and cab to make things look a little more "aero" and further shorten the truck to have a final wheelbase of 110.9", about 2.5" longer than a regular cab. We accomplished this by taking 12" out of the frame. We removed the front bed/rear cab mount and were then able to find good and straight real estate to take out metal of.
We feel like doing the "Z" cut evens out the stress better than a straight cut would, although I've seen where others don't do the "Z".
It took some time to square the frame back up and get it all lined up correctly, but this is the result.
This is the final weld. We are going to plate it for extra reinforcement because, well, having it crack would suck.
Next we set up the front suspension. We've currently installed DJM 2" drop spindles, Proforged .5" longer upper and lower ball joints, and tubular upper control arms from Speedway. We set the ride by simply using a couple pieces of strap, all-thread and a couple of nuts. Using the 1/3-2/3 rule, the lower control arms pretty much ended up level, and the upper control arms were angled to move the IC towards the opposite tire. Also, as best I could measure with some imaginary lines, this gives me a front static RCH of around 1.5." Pretty acceptable IMO.
After fitting both spindles and control arms for both sides, it was just too irresistible not to set it on the ground...After we did, we measured a clearance height of just under 5.5"...we will probbly have to raise it slightly in order to meet club minimums (5.5" I think)
Next we are going to work on the Satchell link. Waiting on a rear cross-member to arrive, and then I will have more pictures posted.
PS if someone could tell me how to rotate those last two images, I'd appreciate it.
-
10-04-2016 #2
Registered User
- Join Date
- Jun 2014
- Posts
- 160

this build is going to be awesome! more please. what's the plans for rear suspension and drive train? will the truck be full interior or full on race truck?
-
10-04-2016 #3
Registered User
- Join Date
- May 2011
- Location
- Chippewa Falls, WI
- Posts
- 290
Love me some S-10 builds. Keep it coming.....
Justin N.
1966 Chevelle
1992 GMC Typhoon
1989 Jeep Wrangler CJ 6.0 Twin Turbo
1981 Jeep CJ7
-
10-04-2016 #4
 Registered User
- Join Date
- Aug 2016
- Location
- Waconia, MN
- Posts
- 113
Another S-truck fan here.
Will definitely be watching this one come together.
-
10-07-2016 #5
 Registered User
- Join Date
- Jul 2009
- Location
- Sackville, NB, Canada
- Posts
- 166

Looking forward to following this build!
Tyson
'95 Firebird Formula: suspension + 315's
'66 Mustang Coupe, 289
-
10-07-2016 #6
Registered User
- Join Date
- Oct 2016
- Posts
- 5
The rear suspension is going to be a Satchell link. I've spent the couple of nights squaring the truck up in the garage so I could get some good measurements to make sure everything will fit nicely. I've also been working through the geometry a little. Here's the numbers I've come up with. Originally Posted by 2ndroundko

The only thing that's going to be reeeally close is the frame mounts for the lower bars. They're really close to the drive shaft loop, but I'm 95% confident we won't have to change anything once we start cutting and melting steel.
The rear is a Ford 8.8 out of an Explorer with the axles drilled for the Chevrolet bolt pattern. I mainly went with it due to its inherent strength over the GM 10-bolt, the cost ($88 at the Pick-and-Pull) and it has a posi unit from the factory.
The interior is going to be bare-minimum. A seat, harness, a steering wheel, basic controls (switches), and a basic (albeit custom) dash to mount it all on.
We're going to start work on the rear in the next weeks or so. Updates to follow!
-
10-09-2016 #7
 Registered User
- Join Date
- Oct 2007
- Location
- Newark DE
- Posts
- 238
Subscribed.
Like how you did the cab. Had the same thought for a first gen.
-
10-19-2016 #8
Registered User
- Join Date
- Oct 2016
- Location
- Texas
- Posts
- 11
what upper control arms are you using ?
-
10-19-2016 #9 Registered User
- Join Date
- Jul 2013
- Location
- Gilbert, AZ
- Posts
- 934
Now that's awesome! I was less than trilled upon seeing the extended cab, but seeing your plan made me change my tune immediately. Being 6'4", I can definitely relate to the single cabs being small. I can't wait to see the custom cab length! Definitely the way to go!
Josh Campbell- Pushing the limits of my HOA since 2011
71 Firebird- 455, Ridetech front suspension. https://www.pro-touring.com/threads/...04#post1124504
67 Camaro RS/SS clone, Speedtech front suspension, coilovers, soon to get LT1/T56.
82 Z28- cheapie beater, soon to get a 406.
66 Mustang coupe- 393, T-5, sold. https://www.pro-touring.com/threads/...-Coupe-GT393-C
11-28-2016 #10
Registered User
- Join Date
- Oct 2016
- Posts
- 5
It is! We considered getting a standard cab because once you remove the dash, there's actually a good bit of leg room in the truck. But after a little research, it seemed the uncomfortable part would then become having to get the seat low enough, it would put the pedals at a short distance and create a weird angle to sit at. Just not worth being uncomfortable in a custom race machine, you know? Originally Posted by CampbellshotrodsAZ
They're from Speedway Motors. If memory serves me correctly they're the ones for a late model GM metric car. 8" arms I believe. I can get the part numbers later if you're interested. Originally Posted by CharlesW
Anywho sorry for the slow updates, but we finally got the tabs for the Satchell link made and installed. I designed them in Sketchup and exported them so that they can be used in any AutoCAD compatible program. The fine folks at Queen City Fab (someone let me know if I can't mention them for some reason) did AWESOME work getting the mounting tabs cut exactly as we had planned. Installation was pretty simple; measure, measure again, and once more, and melt the steel together.
The (almost) finished product.
We need to clearance some of the tabs so we can get the jam nuts on the heim joints. Someone (me) forgot to account for that when they were design the tabs. Oooops.
Things might be a bit slow due to the holidays and getting my other car ready for the spring, but I will update as frequently as I can work on it. Thanks for sticking around
11-28-2016 #11
Registered User
- Join Date
- Oct 2016
- Posts
- 5
I suppose I should lay out the plan for the build; it will help me keep my thoughts together as well as answer some questions along the way.
The plan is to run TT2 or ST2 in NASA -- maybe a faster/slower class depending on the regional director, but either of those classes is the objective.
Chassis;
The rear links are a custom Satchell link setup and the dimensions are provided above. The Ford 8.8" housing was chosen because of their wide availability, affordable price, and they're the perfect width (from a ~'98 Explorer) to run C6 Corvette wheels. Brake rotors will be from a C6 Z06 and 13.4" diameter, with C5 rear calipers. Rears will have a coil-over setup with double-adjustable shocks.
The upper control arms are Speedway Motors 91031133-R, and the lowers are stock. They will be cleaned up and painted and have urethane bushings installed, but I didn't see any value to going to tubular lowers at this point in time. Like the rear, the front rotors will be from a C6 Z06, but with the C5 calipers putting on the squeeze. I'm going to run springs and a shock (no coil-overs. shocking!!) but have a the coil spring adjusters to set the ride height and move corner weights when the time comes. Like the rear, the front shocks will be double-adjustable.
Engine/Transmission;
The engine is an LS1, and will be placed as far back as reasonably possible. The engine will be mostly stock, but I'm looking to net somewhere in the 320-330hp range at the rear wheels, so I may do the ASA cam swap and maybe a little head work. All-in-all, I just want a moderate amount of reliable horsepower -- the LS will definitely offer me that up to ~6,800 RPMs pretty much all day.
I currently have a Muncie M-21, but since it's going to be a while before it's actually needed, I'm keeping my eye out for a deal on a TKO or other 5-speed. The rear currently has a 4.11 gear in it so I'm on the outside of seeing a lot of top-end speed -- which I need to fix. I did the numbers a few months ago and with my tire size the speed at 6,800rpm is about 130mph, so there will likely need to be an adjustment made to the drive ratio.
Interior;
As previously stated, the interior will be pretty minimal. A cage, seat, fire suppression system, and me. We are going to do the roll cage in-house, but may outsource getting the main-hoop done elsewhere because that's what's easiest for us.
That's all I can think of for now. I will update as I get the time and details. Thanks again!
11-28-2016 #12 Registered User
- Join Date
- Sep 2015
- Location
- Rockvale TN
- Posts
- 402
Right-click on your images, save as to your pc, open with Windows photo viewer and rotate then re-submit.
11-28-2016 #13
Registered User
- Join Date
- Oct 2016
- Posts
- 5
Strange; when I view the pictures with my Mac they have the correct orientation, but on my Windows box they're rotated 90 degrees. Anywho, I rotated them so that the view correctly on the Windows box and that fixed the issue. Thanks! Originally Posted by HandOverFist
11-28-2016 #14
Registered User
- Join Date
- Oct 2007
- Location
- Newark DE
- Posts
- 238
Progress looks good!
Any chance you could measure between the pinch welds on the bottom of the cab for me?
09-24-2017 #15
Registered User
- Join Date
- Mar 2017
- Posts
- 9
Did this project die?

 Reply With Quote