


Results 1 to 20 of 29
-
10-12-2012 #1
 Registered User
- Join Date
- Aug 2012
- Posts
- 68

1969 Firebird "Project InfernoBird"
My 1969 Firebird is long overdue for a protouring build. Having just bought the wife her new jeep, thus making her happy, I can now begin my project. The car was orginally an automatic 2 barrel 350 with an auto trans and factory air. I put a Pontiac 467 Stroker and TKO 600 in about 5 years ago and never really got concerned with handling. This I now know is the backwards way to do it. When I made the decision to upgrade the suspension I decided it would be best to just rebuild the car from the ground up. I have been browsing these forums for awhile and I have taken (stolen) alot of ideas from some of the amazing cars I have seen on this site. My plan for the build is a modern powertrain and interior in an old musclecar body. First on the agenda is the body work. I have already stripped down the car. The car was recently dropped off at the body shop for some personal touches. I am fairly proficient at turning wrenches and learning to fabricate things, but due to the fact that the body work is the most noticable and artistic part of the car I decided not to attempt it myself. The body work/paint will be the only work I plan to farm out.
Body Work ordered:
Custom smooth tail panel with bumper delete
Shaved Drip Rails
welded and smoothed seams
rust repair
smoothed firewall
emblems removed and holes filled
Planned upgrades:
LS motor 550-600 hp
torque arm suspension (BMR with strange 9", 3.70 gears)
chicane kit w/ BMR a arms
ridetech Select shocks front and rear
13" disc brakes
flush mount glass
newer GTO dash and console and interior
Before photos: (I apologize for the grainy photos, I am not a photographer)
And then I began to tear down and uncover some nice "surprises". Although I will say for being over 40 years old I am quite happy its not any worse.
After some disassembly and clean up it is on the trailer ready for the body shop:
Last edited by Dantigan; 01-04-2013 at 10:59 AM. Reason: Changed upgrades
-
10-12-2012 #2
 Registered User
- Join Date
- Jul 2011
- Location
- NC
- Posts
- 461
-
10-23-2012 #3
Registered User
- Join Date
- Aug 2012
- Posts
- 68
Picked up the donor car this weekend. ‘05 GTO with 42k miles. Supposedly has an engine and transmission upgrade. I never trust what people tell me when they are trying to make money, but it does handle quite well. They produced a Dyno sheet showing 488 rwhp. It does have a Fast intake and headers that I can verify, but no way of knowing if it has the head work and cam I was told it did. Drove it home and got a sold 24 mpg cruising at 75 so even if the gearing in my bird drops that a bit its ok for the acceleration gain. Now I get to wait for the car to come back from the body shop to start my mods and mock up.
Last edited by Dantigan; 10-23-2012 at 09:43 AM. Reason: photo size
-
10-23-2012 #4
Registered User
- Join Date
- Aug 2012
- Posts
- 68
On another note, I have finally figured out how to resize photos! They are now a managable size. I apolozige for them being so large before.
-
10-23-2012 #5
Registered User
- Join Date
- Aug 2010
- Posts
- 34
subscribed, need ideas.....
-
01-04-2013 #6
Registered User
- Join Date
- Aug 2012
- Posts
- 68
It has been a few months since project update. Not a lot has changed as the body shop still has the car. They have finished the quarter panels and rear window channel repair. Still need to fix doors, shave drip rails and build custom tail panel.
In the mean time I have been preparing for the actual build when I get the car back. Santa was kind to me this year and brought a few goodies. Motor mount plates, new oil pan, DSE tubs, DSE subframe connectors and aluminum body mounts.
The wife was also kept happy because while I had no car to take up my time I was able to build her a new dining table. She has been begging for one since we bought our house 5 years ago.
The table has been brought home from my dad's shop where I built it in secret. Now it is in my garage taking up car space until I can finish sand and stain it. As I am sure the body shop wont be done anytime too soon I dont think there will be a problem.
The most exciting update is that the Pontiac motor and TKO600 have been sold. I have already redistributed the funds into the build. I went a little overboard and had to dig a little bit further into my pocket but the outcome will be worth it. I contacted Rich at BMR suspensions (who has been a lot of help to work with). I have a complete suspension package being built. New front tubular A-arms with ATS uprights, and a complete rearend torque arm 9" package from BMR and Strange. Strange will build a tru-trac carrier with 3.70 gears. Matt from MCB was also on board to facilitate the puchase of a chicane kit and some ridetech "Select" coil-overs for all four corners. As it will take a few weeks to get things built powdercoated and shipped out I can hardly contain myself from rushing the body shop to get their work done as I now have almost everything I need to get mock up finished. Once parts start pouring in more photos will come. I will also try to get into the body shop today to try and get some updated photos.
-
01-04-2013 #7
 Registered User
- Join Date
- Dec 2012
- Location
- Las Vegas, Nevada
- Posts
- 109
looking foward to more pics on build, funny you should mention buying a jeep for wife and she is totally stoked with it and now you can do your build as you wanted to... i did the same thing for my wife too and now i can do what i want with my 68 camaro lol , she loves her jeep! so it was a win / win ! for me... car is coming along quite quickly too, keep up the great work it will be so worth all the trouble when its finished
-
01-05-2013 #8
 Registered User
- Join Date
- Feb 2006
- Location
- Idaho Falls, Id
- Posts
- 1,342
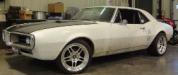
Interested to see what you do with the tail panel.
Was there damage to that GTO? Please don't tell me you bought a good car as a donor rather than spending less on parts lolTraven
-
01-05-2013 #9
Registered User
- Join Date
- Aug 2012
- Posts
- 68
Yes there was body damage to the GTO. Plus whatever I dont use I will part out. Nice thing about the GTO is that new parts are expensive so I can make decent money selling the used parts.
-
05-02-2013 #10
Registered User
- Join Date
- Dec 2011
- Posts
- 17
The interior is more work than what it worth.
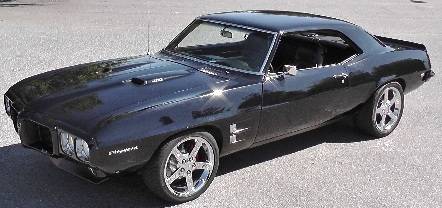
69' Firebird - 2002 T/A interior - LS1/4L60E - C6 wheels - LS brakes
-
07-25-2013 #11
Registered User
- Join Date
- Aug 2012
- Posts
- 68
Car got a furlough from body shop jail! Now I get to begin the task of mock up and remaining modifications. Before sending it back for final finish and paint. So far the body work has exceeded my expectations. Next up install tubs and subframe connectors.
Got the shaved drip rails, welded seams, flush door handles, rot removed and custom tail panel.
-
07-27-2013 #12
Registered User
- Join Date
- Nov 2011
- Location
- Springfield, OH
- Posts
- 58
Daniel,
Great looking car, you are off to a good start. The 69 Firebird is one of my favorite cars. It was a good idea to get the body work out of the way first. Funny how there are always "surprises" found during tear-down!
Check out my 71 Pontiac Lemans convertible build thread (link below) for ideas, I also bought a wrecked GTO for parts; ending up using quite a bit of it and am selling off unused bits. Hopefully it gives you some ideas. PM me if you have any questions.
Phil
-
08-14-2013 #13
Registered User
- Join Date
- Aug 2012
- Posts
- 68
Been a busy couple of weeks but made a little progress. I have noticed I tend to jump around a bit while working on my car as I wait for this or that but things are coming along.
Subframe Connectors in with some help from a friend on the welding.
My first patch in the firewall, a little ugly, nothing a good grinder cant fix
cut out old dash
Set the motor into place. Thing definitely looks like it belongs there. I have the wrong engine stands so the oil pan was hitting the cross member before it would set on mounts. Should have new brackets in by Friday and can get it resting in there without the cherry picker.
I also got the old rear suspension pulled out and already sold the axle housing. Next on my to-do list is cutting out the inner wheel tubs and install the mini-tubs.
-
08-30-2013 #14
Registered User
- Join Date
- Aug 2012
- Posts
- 68
Been hard at it and thought I'd post an update. Got the rear inner tubs cut out and have the drivers side almost in. I need to get the passenger side in place so I can run a clamp for both sides to get a tighter fit.
After a little trial and error with the engine mount I ran into a few snags. My initial assessment was that the engine stands were too short causing the oil pan to hit the cross member. I had the reinforced performance small block stands and the "muscle pan". I also noticed the pan stuck much further below the crossmember than I would be comfortable with. I plan to run the car fairly low and don't want to replace my pan all the time. I got the standard small block stands which lifted the motor mounts about 1/2" but put then they would not line up with the bracket holes and the tranny mount was short about 1/4" from being able to bolt on as well. I got a Mast oil pan to fix the ground clearance issue. When I did so it looked like I had a ton more room between the motor and member. I put the original stands back in and "viola" mounts lined up and bolt fit into the tranny. I was finally able to get the cherry picker out of the way and put into the shed. Its a pain working under the car with the picker legs taking up so much room.
I ordered some Dynatech 1 7/8" headers and got them test fit. I have tons of room between them and the steering box which I was worried about. My Pontiac headers only had about a papers width between the box and headers, now I can easily get my hand between. Plug wires look like they may be a tight fit and may need to be changed out.
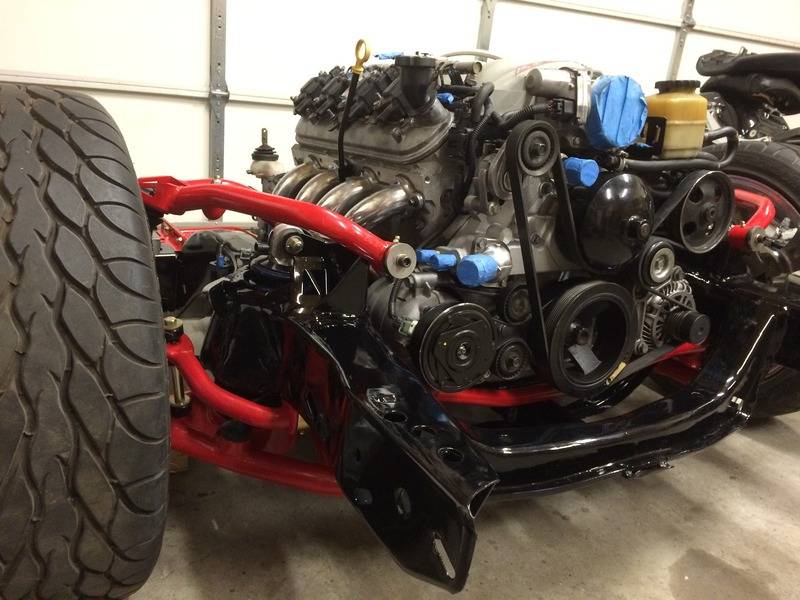
I have also been looking into my front accessory drives. While aftermarket systems look nice I just cant justify the $1-2k when I have a perfectly good stock set up. My alternator and A/C compressor obviously wont fit without some fab mounted low. The alternator will be easy as it only requires a small notch. The A/C will be a task and has taken a lot of planning on my part and I may have it figured out. A typical notch wont work because of the hose inlet/outlet on the compressor. They wont fit in stock location due to them being a side exit right where the frame rail is. I was going to do a relocate bracket to passenger side high. After some research I found that I wont be able to use a stock/factory compressor on the relocate. Seeing as how I plan to use the factory air components in the cabin from the GTO I would like to stick with a stock compressor for compatibility. My plan is to rotate the compressor in the stock location about 45 degrees which should put the connections at about the 11 o'clock position while still maintaining the factory belt set up. After a little mock up and cutting on the factory bracket I have it just about ready to weld. I am also going to have to cut off the top rear mounting tab from the compressor making it a 3 point as opposed to 4 but I think it will still be fine. After I have my bracket I am going to set it in place to see how things line up before I start cutting the crossmember. I'm going to try and get the bracket welded tomorrow but need to take it to a friend's shop because I have no way to work on the aluminum bracket myself.
-
11-18-2013 #15
Registered User
- Join Date
- Aug 2012
- Posts
- 68
Its been awhile, so its time for an update.
Finished up the rear tubs.
-
11-18-2013 #16
Registered User
- Join Date
- Mar 2009
- Location
- Houston, TX
- Posts
- 1,197
What are the red brackets behind the rear seat supports? Seat belt mounts from the GTO?
Tu Ho
Firebird V2-LS swap
-
11-18-2013 #17
Registered User
- Join Date
- Aug 2012
- Posts
- 68
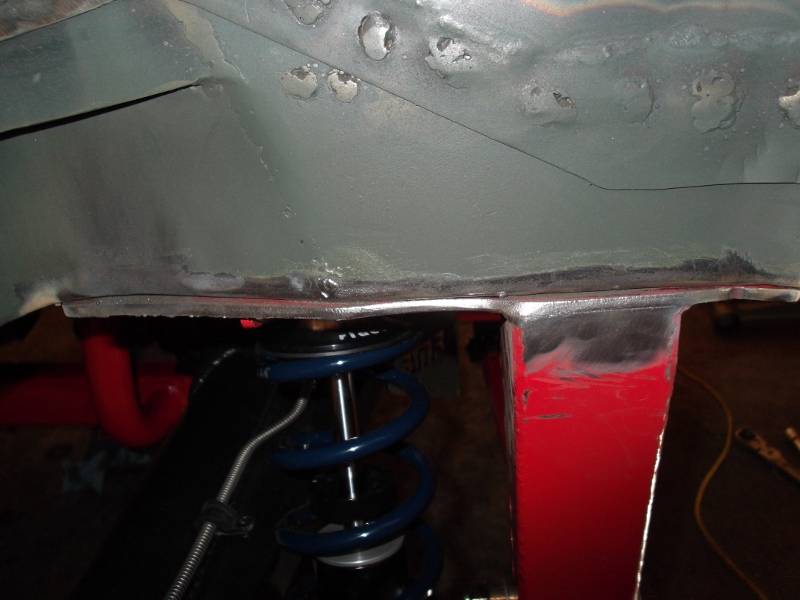
Got the new BMR rearend mocked up. Installed the 13" Wilwood brakes on the strange housing and got it all bolted into place. The tub is still pretty ugly because I plan to do all my cutting welding and grinding for mockup prior to finishing the underside. But the new suspension sure looks pretty!
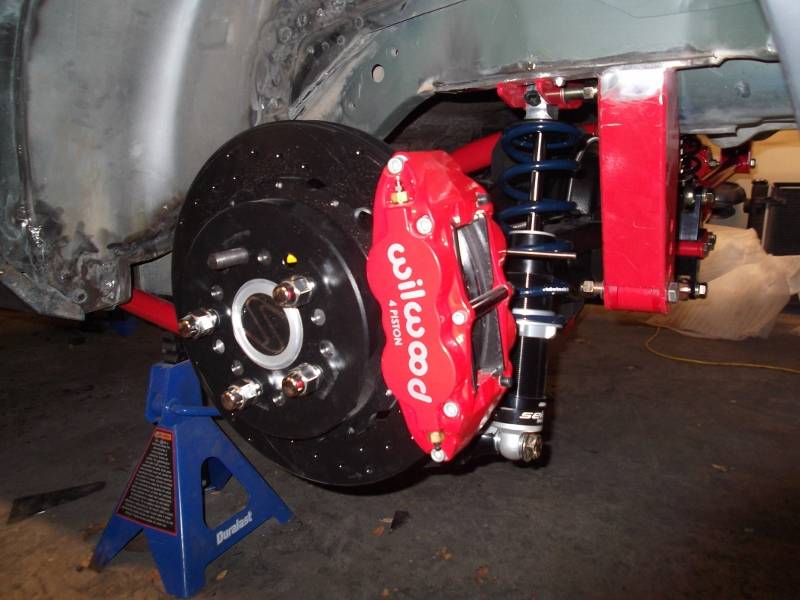
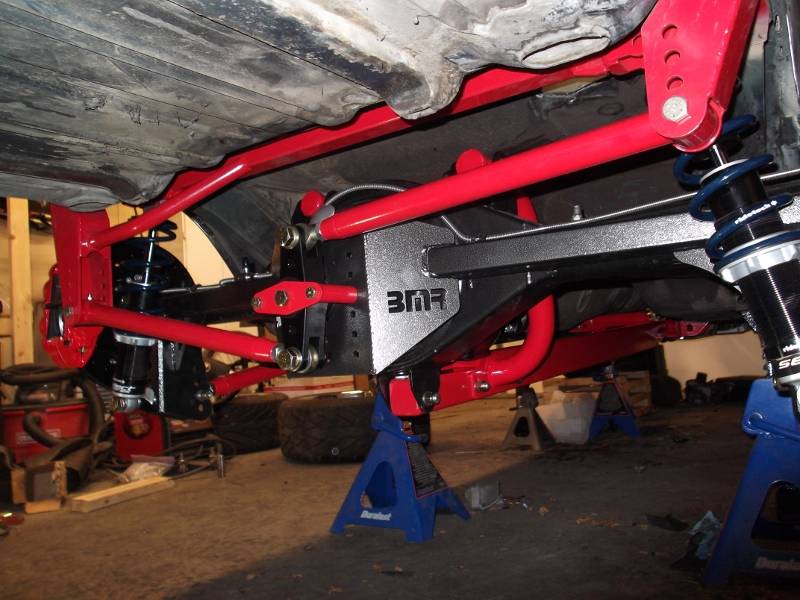
I had to do a little modification due to the notching of the frame. The shock crossmember had to be trimmed to match the notch. It will be welded once I pull everything back apart before paint.
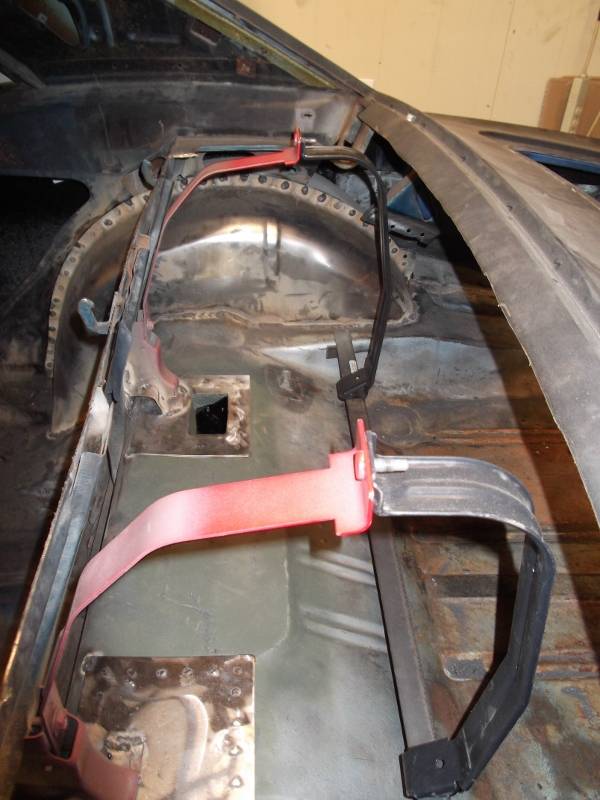
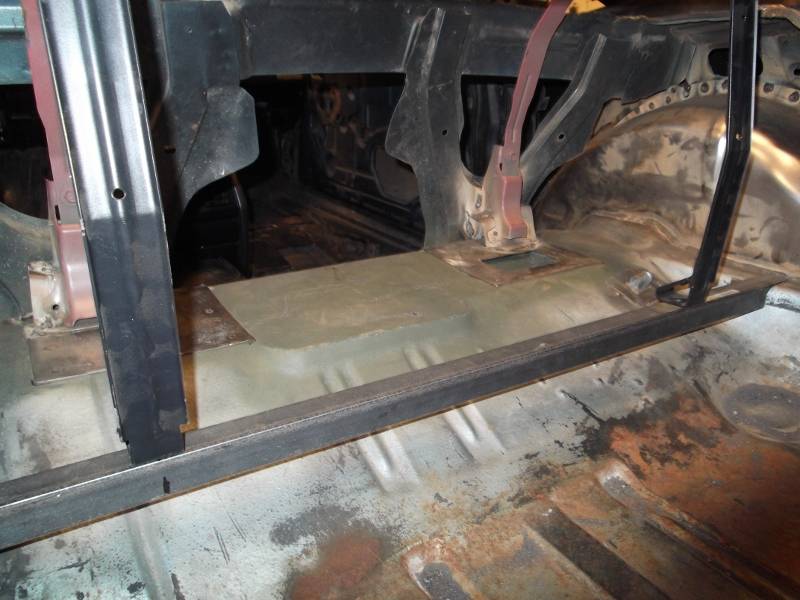
I got the gas tank mount mostly figured out. I cut the straps from the GTO and leveled the rear shelf floor over the axle. I welded the front strap mounts and tried to mount the rear to a piece of angle iron stretched across the tubs. This puts the rear straps about 1/4 inch high so it wont mount the tank flat. I have an idea on how to lower it and will just try to mount it across the floor.
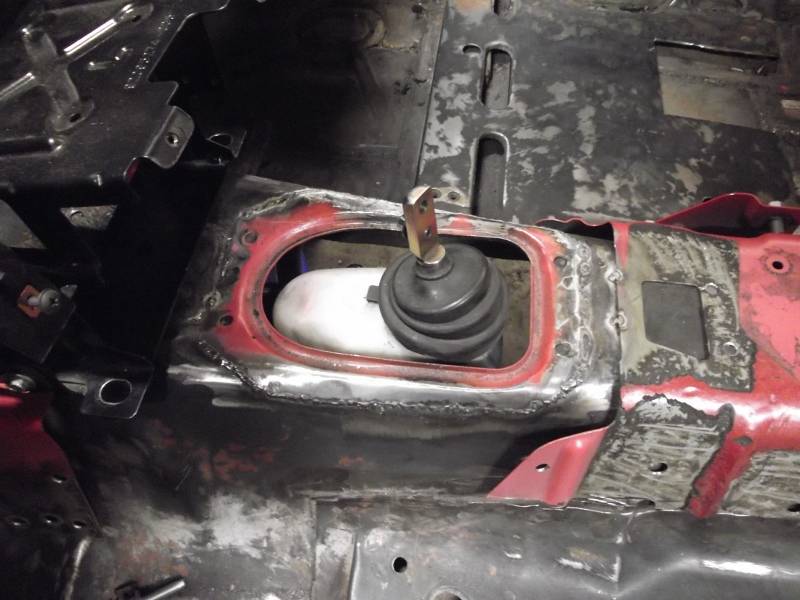
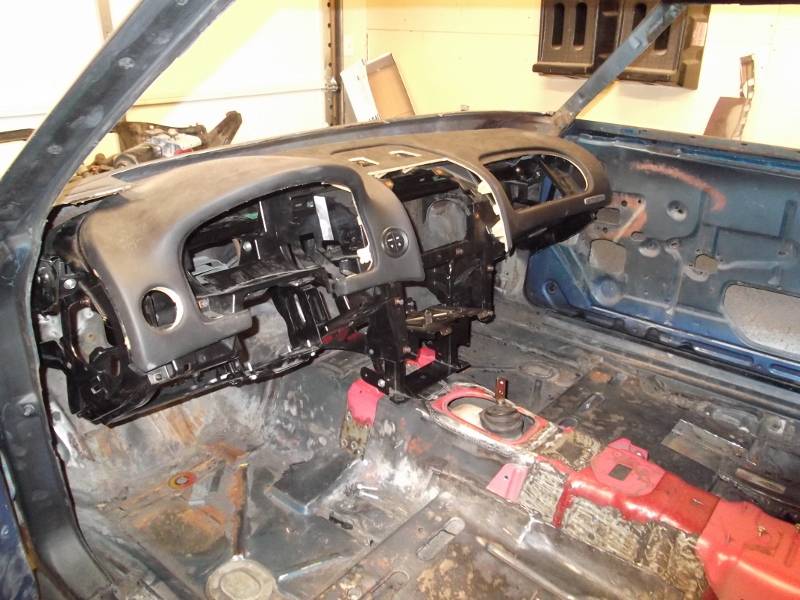
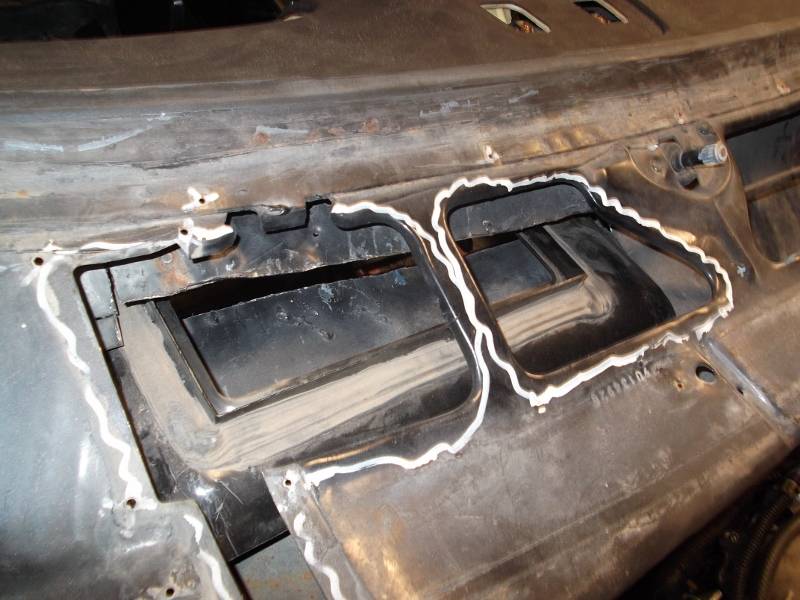
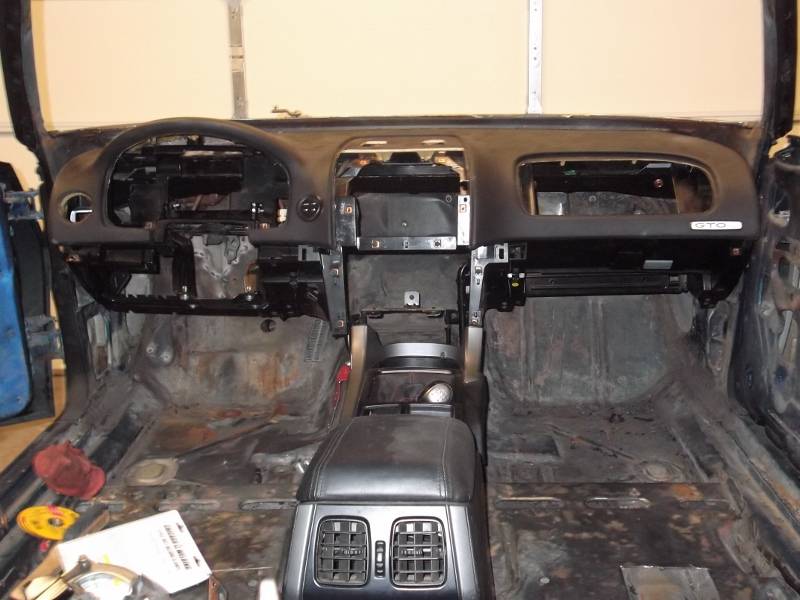
I am currently working on swapping the dash and console. I cut part of the tunnel from the GTO and have it tacked in place for now. I also cut the flange for the shifter boot and welded it in so I can use the GTO shift boot. The dash has been quite the under taking. I have been cutting little by little trying to get it to fit. I plan to use the HVAC from the GTO so I need to graft the fresh air intake into the cowl while I get the dash to fit so it has been kinda a pain. I have also been mulling over the VIN. I talked to a State Police Officer about it and he highly recommended leaving it in place. So I am going to need to notch the dash and find a way to make it look nice when I try to fill the gaps with fiberglass. Here is my progress so far. The dash still needs to go back and up about another inch and is just set in place.
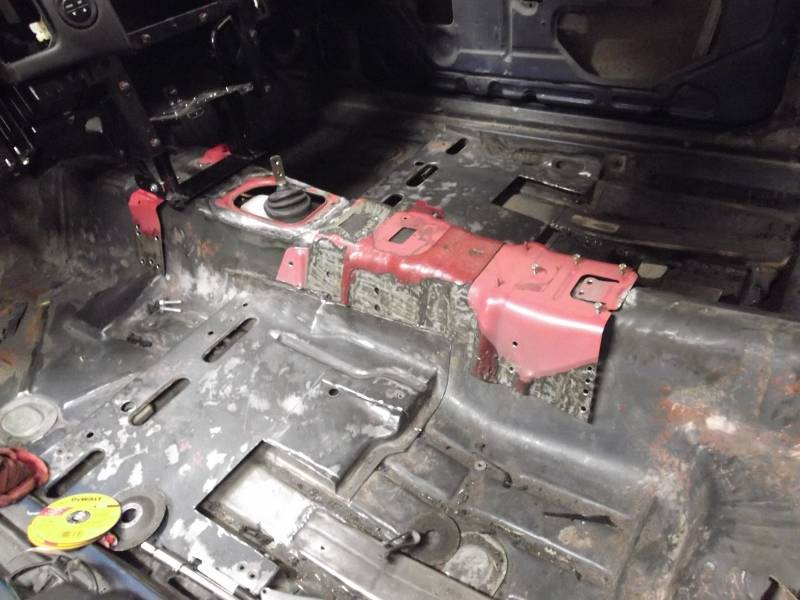
You can see the VIN on the left under the A pillar.
11-18-2013 #18
Registered User
- Join Date
- Aug 2012
- Posts
- 68
They are the gas tank straps. I am using the gas tank from the GTO as well. I still need to alter the straps some. Lower the rear straps and lower the profile of the tabs up top so I can hide them under a package tray. Originally Posted by rickpaw

02-07-2017 #19
Registered User
- Join Date
- Aug 2012
- Posts
- 68
It's been a long time since I have updated. The project has taken longer than I have hoped but is still moving along. Life, work and the body shop slowed things down, but I started fanning the fire and have made a ton of progress in the last few weeks. I will try to post photos closer to each component and not chronologically. This will be helpful with the dash I left off on and barely did the bondo work on last weekend.
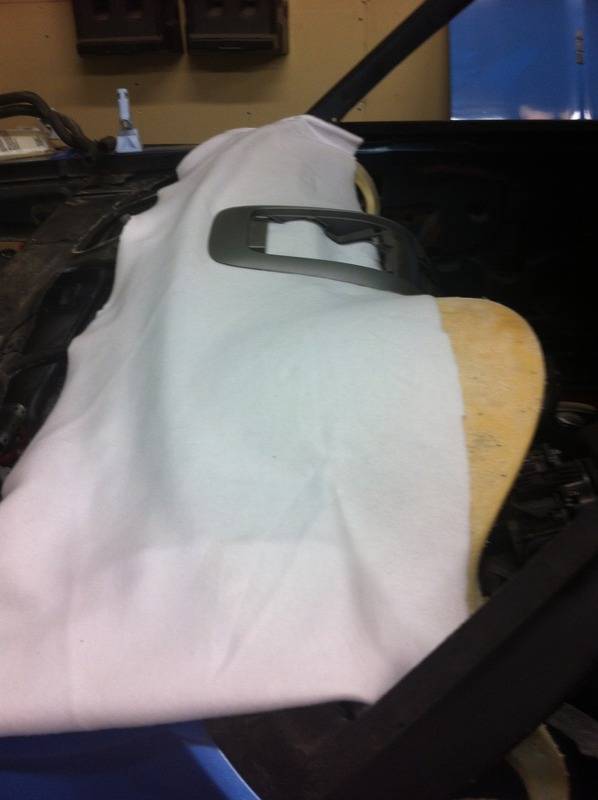
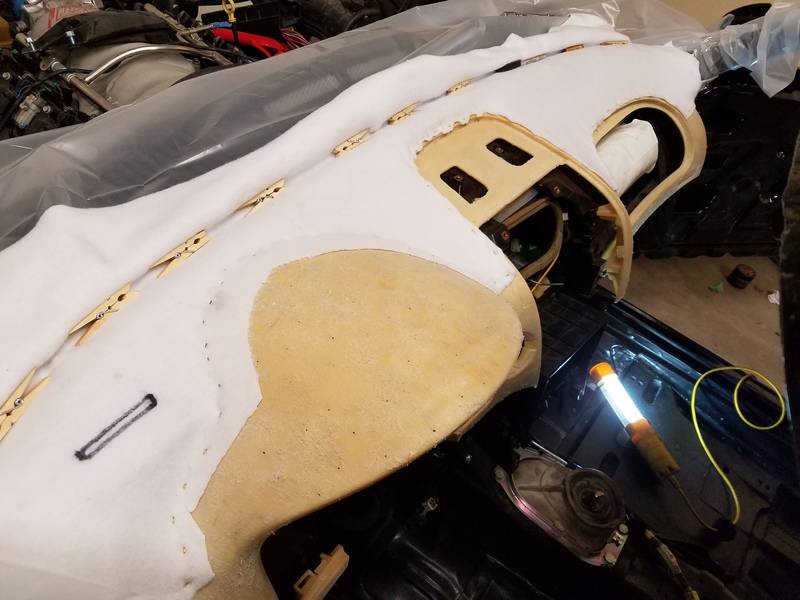
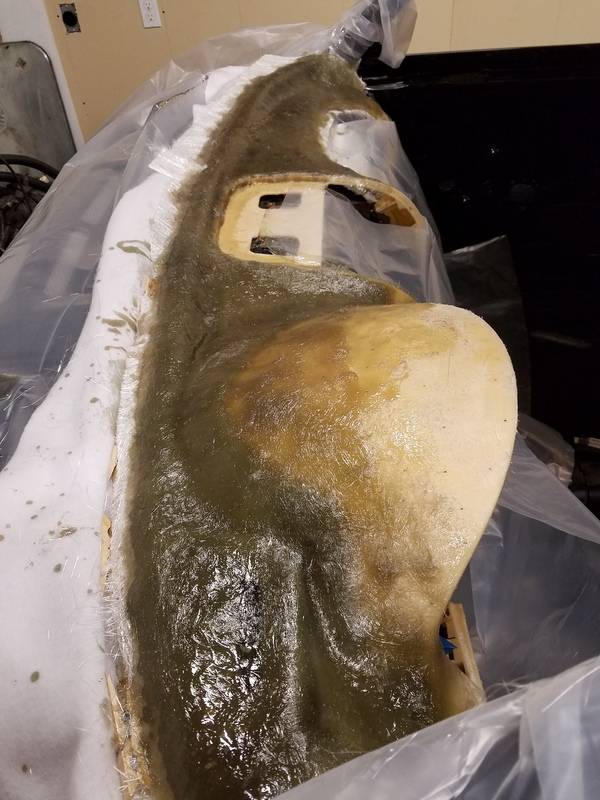
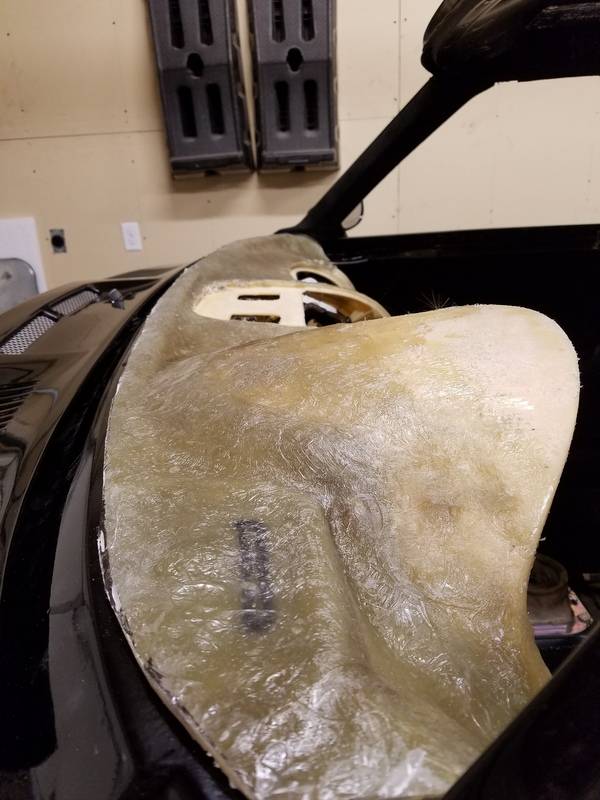
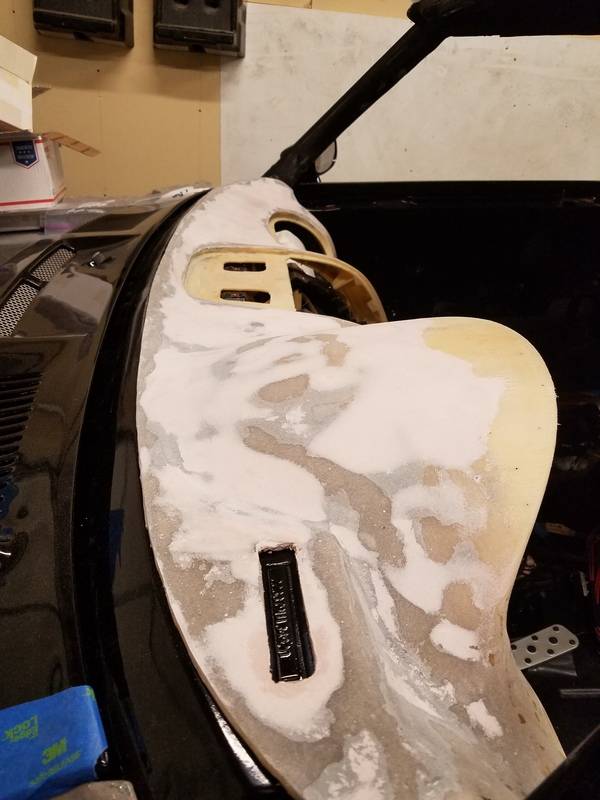
I cut some felt and stapled it to the gto dash. I then stretched it over some plastic to prevent it from gluing to the body. I soaked the felt in resin then added 3 more layers of fiberglass matting to add strength. It was cold in the garage and it took longer than expected to harden but turned out good in the end. I filled in the deeper holes with long strand fiberglass reinforced bondo and then finished it off with a couple coats of regular body filler. I have some whisper vinyl on order and will wrap it when it comes in.
02-07-2017 #20
Registered User
- Join Date
- Aug 2012
- Posts
- 68
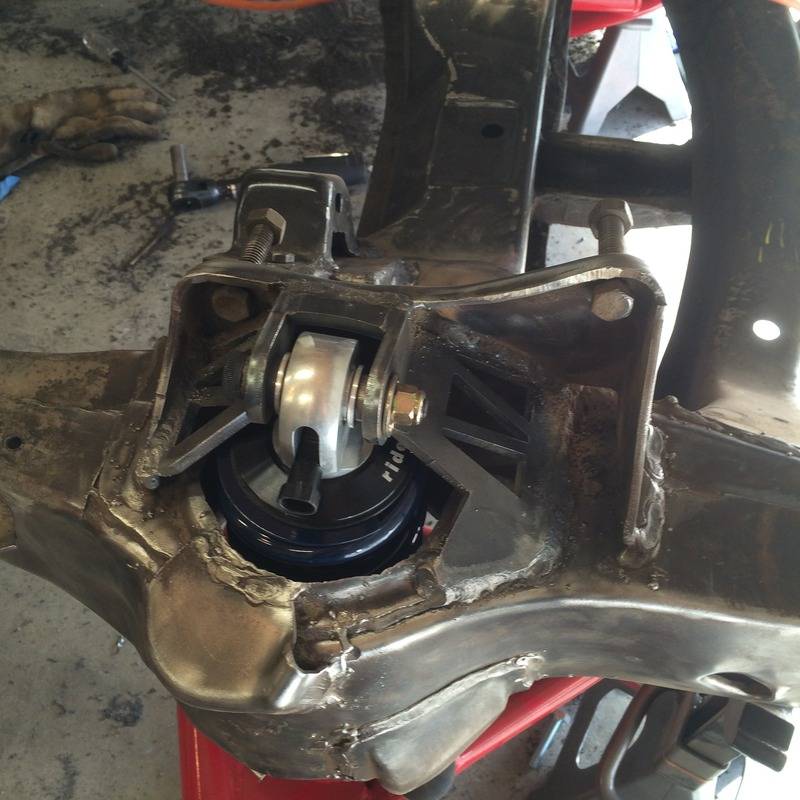
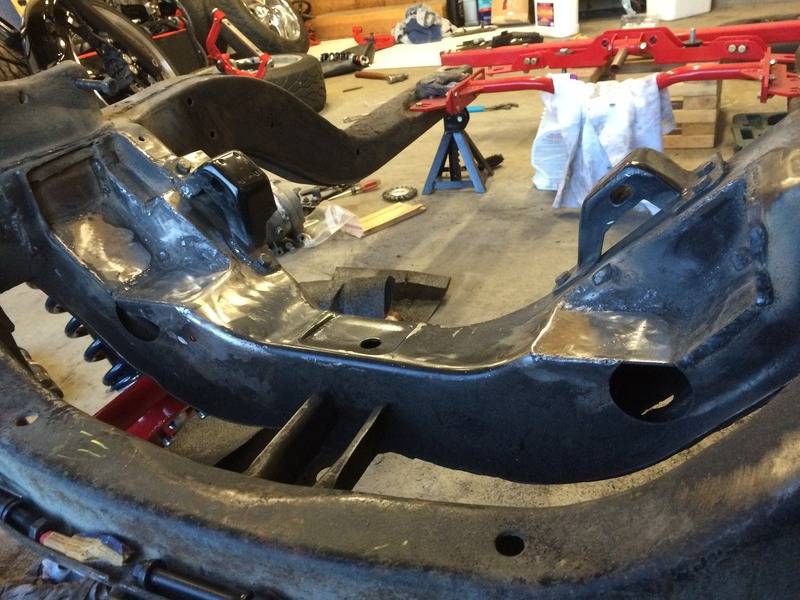
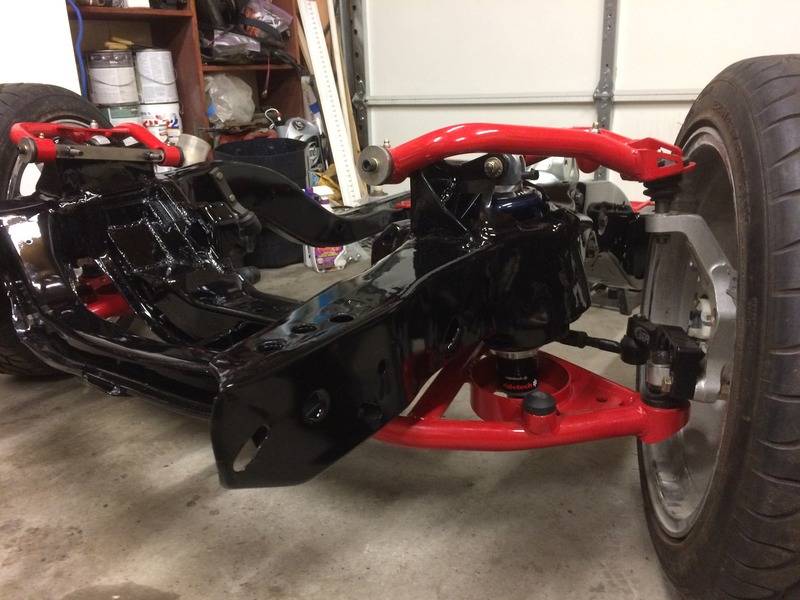
While the body was back in the shop for to smooth out the firewall and get some color I took some time to work on the subframe. I cut out the stock spring pockets and welded in some coilover mounts. I also notched the frame and reinforced it with 1/4 plate to keep the low mount a/c and alternator. Due to clearance issues with the gto compressor I could not find a way to route the a/c lines because they exited the side of the compressor into the frame. I initially tried to clock the compressor toward the motor but still could not get enough clearance. Switched out the gto compressor for a f-body one and got an adaptor to place the line fittings where I needed them.

 Reply With Quote





