Enter your username:
Do you want to login or register?
  • Forgot your password?

    Login / Register


    Page 2 of 3 FirstFirst 1 2 3 LastLast
    Results 21 to 40 of 59
    1. #21
      Join Date
      Dec 2008
      Location
      Lehigh Valley Pa
      Posts
      1,269
      Is it fixed yet? LOL.. Keep doing what your doing. Gonna be a great engine when its done.

      1996 Federal Cadillac hearse
      1988 Eureka Chevy hearse


    2. #22
      Join Date
      Sep 2010
      Posts
      288
      I may be full of beans and am not a Pontiac engine expert but I'd still pay attention to the cam end play or cam walk especially on a roller cam where it may be more crucial.

      As others have said, matched gears in material can also make a difference and both may keep ugly pieces of material out of your oil pump.

    3. #23
      Join Date
      Apr 2004
      Location
      Cedar Rapids, IA
      Posts
      999
      did you go back to a stock cam retainer or did you go with one of the aftermarket ones from nitemare performance or Simm's Engineering retainer plate?
      Some times I'm fast sometimes I'm half-fast

    4. #24
      Join Date
      Nov 2005
      Location
      Little Rock, Arkansas
      Posts
      945
      Simms is on a cross country bicycle trip. I don't blame him. I'd do the same if I could take a year off. Nightmare is on the list of possibles. I'd rather have the Simm's since it incorporates a true roller bearing but I can see where any additional oil flow to the cam end would be beneficial.

      A friend of mine who does a lot of technical writing for HPP put out feelers to 3 of the top engine builders in the Pontiac trade. They all came back with the same answer. Excessive end play is not the fault of the stock Pontiac thrust plate. They say look for another cause.

    5. #25
      Join Date
      Nov 2005
      Location
      Little Rock, Arkansas
      Posts
      945
      I found a little time to be in the garage tonight. I mocked up the crank and main bearings to check the clearances. They checked out fine. I was a little worried about the aftermarket crank being accurate but it was. Next up is mocking up the 4 corner pistons/rods to see how far down in the hole we are and see if we need to deck it. Then I'll be heading up to see Marty one night. With luck I'll have to do is a final hone on this block to get it from .030 over to .035 over for these pistons.

    6. #26
      Join Date
      Apr 2004
      Location
      Cedar Rapids, IA
      Posts
      999
      Did you check the thrust surface on the crank?

      I'm sure you know about the horor stories on wiping out the bearings.
      Some times I'm fast sometimes I'm half-fast

    7. #27
      Join Date
      Nov 2005
      Location
      Little Rock, Arkansas
      Posts
      945
      I had and I did. Nice and smooth. It was my understanding that the thrust surface issue was limited to a few early production pieces but it never hurts to check.

    8. #28
      Join Date
      Feb 2011
      Location
      Kalamazoo, MI
      Posts
      144
      Nice build, I will be following this as I want to do a 461 soon for my GTO.
      1969 Pontiac GTO
      -The Nameless project.

      0331, USMC, Semper Fi.

    9. #29
      Join Date
      Nov 2005
      Location
      Little Rock, Arkansas
      Posts
      945
      Today I spent some time weighing the pistons and rods that were already assembled. It's not scientific but since the seller claimed this stuff was balanced I wanted a quick gut check. I was amazed to see that these assemblies were almost identical. Six of the eight came in at 1526 grams and two came in at 1527. Close enough.


      Next on the list was to mock up the crank and pistons on four corners to check the deck height. I never got to trial fitting those rods and pistons because I found my first issue. I'd read that the crank counterweight might need some clearance on on side. It does.


      The other side is close as well. Looks like it's time for a little grinder work.


    10. #30
      Join Date
      Sep 2004
      Location
      Orlando, FL
      Posts
      1,086
      Country Flag: United States
      Sorry to hear about your engine issues... but it is a good excuse for an upgrade!
      I was hoping you'd go with a 440 stroker but that 461 kit will do the job nicely!

      Subscribed.
      SMSgt Ty Ingle, USAF
      "CF71" - Freedom Bird
      Hoodpins.com, Inland Empire Driveline, Billet Accessories Direct, Modo Innovations, AutoRad Radiators, Morris Classic Concepts, Marquez Design, Anvil Auto, Fesler Billet, US Collision (DOOM), AGR Performance, Pro-touringF-body.com, Phoenix Transmission Products, Shiftworks, ACC Carpet, Hedman Hedders, BMR Fabrication, American Autowire, MityMounts, TIN INDIAN Performance, Kauffman Racing Equipment, Pypes, RobbMc Performance, WMC, Holley, NOS, PST

    11. #31
      Join Date
      Nov 2005
      Location
      Little Rock, Arkansas
      Posts
      945
      I really considered the 440. Perfect rod/stroke ratio but the heads weren't going to work with it. And if I went aftermarket heads I was still going to have to modify those to make good compression for pump gas. I thought long and hard but this is a street car first and a track toy second so I had to build with that in mind.

    12. #32
      Join Date
      Sep 2004
      Location
      Orlando, FL
      Posts
      1,086
      Country Flag: United States
      Completely understand... that's why I still have my ported #13s that Jim and Rocky helped me with!
      There will be another Pontiac project where they'll be perfect I'm sure!

      Are you going to engine and/or chassis dyno/tune the 461 when assembled?
      SMSgt Ty Ingle, USAF
      "CF71" - Freedom Bird
      Hoodpins.com, Inland Empire Driveline, Billet Accessories Direct, Modo Innovations, AutoRad Radiators, Morris Classic Concepts, Marquez Design, Anvil Auto, Fesler Billet, US Collision (DOOM), AGR Performance, Pro-touringF-body.com, Phoenix Transmission Products, Shiftworks, ACC Carpet, Hedman Hedders, BMR Fabrication, American Autowire, MityMounts, TIN INDIAN Performance, Kauffman Racing Equipment, Pypes, RobbMc Performance, WMC, Holley, NOS, PST

    13. #33
      Join Date
      Nov 2005
      Location
      Little Rock, Arkansas
      Posts
      945
      Probably. I have access to both types of dyno but planning that part would be putting the cart before the horse.

    14. #34
      Join Date
      Nov 2005
      Location
      Little Rock, Arkansas
      Posts
      945
      Did a little grinder work last night.


    15. #35
      Join Date
      Nov 2005
      Location
      Little Rock, Arkansas
      Posts
      945
      I had one problem with the block I needed to tend to before going to machine the bores for the extra .005 of clearance. Some of the main cap locating dowels were down in the holes quite a bit. It looked like someone tried putting the caps on wrong and torqued them a bit or something. Anyway, I've seen it before. Since I don't have the slide hammer tool for pulling these I use this method. I weld a washer on the top and use a hammer and cold chisel to pry them out.


    16. #36
      Join Date
      Apr 2004
      Location
      Cedar Rapids, IA
      Posts
      999
      Thats a good tip.
      Some times I'm fast sometimes I'm half-fast

    17. #37
      Join Date
      Nov 2005
      Location
      Little Rock, Arkansas
      Posts
      945
      There has been a lot going on but not much time to post. Marty slapped on the torque plate and took it the extra .005 I needed. He said the bores looked good and finish he put on those cylinders is just so pretty!

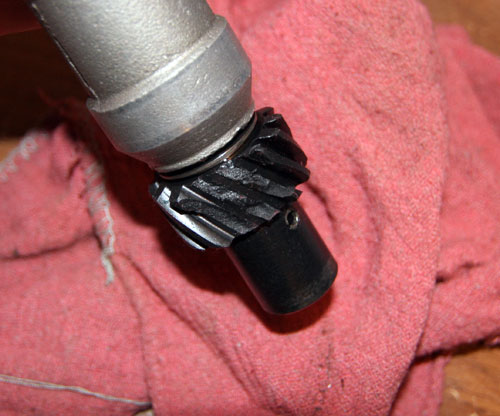
      I had some additional stuff to prep before really cleaning the block so I figured I'd get them out of the way now. First up was removing the passenger side galley plug that is hidden inside the block and drilling it .030 for an oil feed to the distributor gear. This is a common modification on Pontiac blocks to provide direct shot oiling to the distributor gear where it meshes with the cam gear. The first step is to remove (if it's not already out) the freeze plug in the block by driving it out with a drift. Next is to use a long Allen wrench to twist out that 3/8 NPT plug that's down under it.


      Next is to drill a tiny .030 hole through the center. This is harder than it sounds. How small is .030? Here's a photo with my digital caliper, the bit and a plug to give you an idea:


      The trick to this is to drill with a larger bit from the back side of the plug. You have to do this by feel and not break through, then finish the hole with the pin vise and the .030 hole.


      And here's what it looks like when you break through:


      I also wanted to tap the front oil galley holes to use a screw in 3/8 NPT plug rather than the standard plugs you find in a freeze plug kit. Those are only staked in to retain them. I've never had a failure with the staked in plugs but I figured since I had the opportunity I'd step up to the screw in plugs and be sure:


      That was all for tonight. Next on the list is to check the oil feed hole from the pump and open it up if it's needed. Then I'll be ready to clean the block and start working on assembly.

    18. #38
      Join Date
      Sep 2004
      Location
      Orlando, FL
      Posts
      1,086
      Country Flag: United States
      Are you going to polish/debur/coat the lifter valley? What other tricks are you applying to the block? Inquiring minds want to know! LOL
      SMSgt Ty Ingle, USAF
      "CF71" - Freedom Bird
      Hoodpins.com, Inland Empire Driveline, Billet Accessories Direct, Modo Innovations, AutoRad Radiators, Morris Classic Concepts, Marquez Design, Anvil Auto, Fesler Billet, US Collision (DOOM), AGR Performance, Pro-touringF-body.com, Phoenix Transmission Products, Shiftworks, ACC Carpet, Hedman Hedders, BMR Fabrication, American Autowire, MityMounts, TIN INDIAN Performance, Kauffman Racing Equipment, Pypes, RobbMc Performance, WMC, Holley, NOS, PST

    19. #39
      Join Date
      Jul 2008
      Location
      ohio
      Posts
      1,135
      Country Flag: United States
      nice work chris cant wait to see a video of it on a dyne keep up the great work
      keep the wheels a spinning and the Beavers a grinning(burt reynolds-smokey and the bandit)

    20. #40
      Join Date
      May 2011
      Location
      Central FL
      Posts
      216
      Quote Originally Posted by critter View Post
      I had one problem with the block I needed to tend to before going to machine the bores for the extra .005 of clearance. Some of the main cap locating dowels were down in the holes quite a bit. It looked like someone tried putting the caps on wrong and torqued them a bit or something. Anyway, I've seen it before. Since I don't have the slide hammer tool for pulling these I use this method. I weld a washer on the top and use a hammer and cold chisel to pry them out.
      That's worthy of making it into any Hot Rod, Car Craft, etc. mag as one of the best tips/tricks of all time!
      - David
      1967 Camaro - In remembrance of my friend Scott

    Page 2 of 3 FirstFirst 1 2 3 LastLast


    Advertise on Pro-Touring.com