Enter your username:
Do you want to login or register?
  • Forgot your password?

    Login / Register


    Page 4 of 6 FirstFirst 1 2 3 4 5 6 LastLast
    Results 61 to 80 of 108
    1. #61
      Join Date
      Jan 2010
      Location
      Elk River, MN
      Posts
      676
      A little update.....

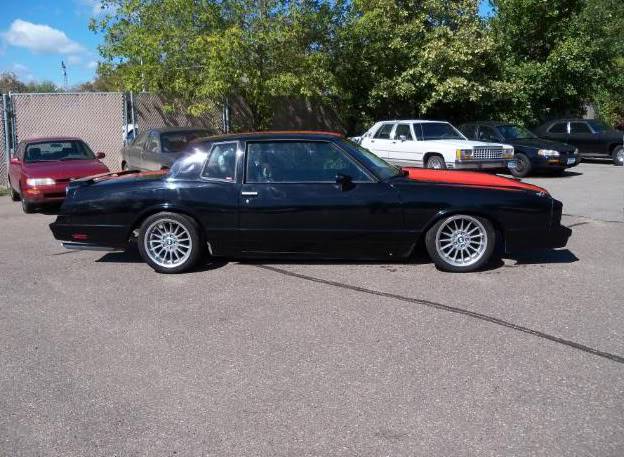
      I'm still driving the car as it was when I got it on the road, it drives great, goes down the interstate beautifully. It handles great, but the rear suspension is still too washy with all the stock garbage in it. Wheel-hop is also an issue from a standing start. I swapped the old Carter in-line fuel pump for the Holley unit I had here, which works fine but is LOUD, really obnoxious. All-in-all I'm really happy with the car, but I'm looking forward to ditching this motor and carburetor for a fuel-injected LS motor in the near future.

      I've added something to my wish list, I'll pick one of these up over the winter. After riding with a buddy who uses a TomTom GPS as his speedometer, I thought that for sure somebody has got to be making an in-dash GPS speedometer. Soo after a quick Google search....
      http://www.speedhut.com/custom_gauge...number-887.htm


      So, why does it make sense? You can change transmissions, senders, gearing, tire size, or anything you want without having to reprogram or re-gear a speedometer. I've got a Nordskog programmable digital speedo in it now, but at some point between parking it in the shed 7 years ago, and getting it on the road now, it decided it didn't want to turn on anymore.

      The price of this isn't bad, for the unit without the turn signals and hi-beam indicator it's $259, plus $50 for the GPS sender (I don't think this is included but I have to call and double-check). Not to mention, these are custom-made to your spec, so I can put the colors and font on them that I want, pretty neat really. You can even have a custom logo put on them, but I'll probably opt to leave them blank and clean.

      -matt


    2. #62
      Join Date
      Jan 2010
      Location
      Elk River, MN
      Posts
      676
      Time for a fuel-injected 5.3 LS swap....

      Here are a few shots of it in the garage, losing its old power(less)plant.


      Vortec 350, all stock internals from a 98 Yukon


      Ready to lift out!


      Much better


      I'll add pictures of my 5.3 a little later, I've got most of the parts in my garage, just a few things left to source.

      -matt

    3. #63
      Join Date
      Mar 2009
      Location
      overseas
      Posts
      3,434
      Country Flag: United States
      nice progress!
      Kevin S. (overseas in Germany)
      1963 Chevrolet Impala 2d ht Coupe

      www.CruznArt.com
      CRUZN - Automotive Artworks

    4. #64
      Join Date
      Jan 2010
      Location
      Elk River, MN
      Posts
      676
      Thanks Kevin, I hope your Monte is moving along too, summer will be here in no-time! Anyway, here are some progress pics to check out.


      Here's the 5.3 when I first got it, with the harness draped on to label all the plugs.


      3 Broken exhaust bolts to fight with, this one will be the worst :bang:


      More messy stock harness routing. Not exactly where it's all supposed to go, but you get the idea


      Getting closer! I used the info on lt1swap.com to a great extent, and used Google to figure out some little bits I couldn't figure out there. Here's the harness with all the unnecessary wires removed. I got rid of the 4l60e wiring except for VSS, since I'll be running my 700R4 for now, and hopefully a T56 in a year or two.


      Jenny Craig would be proud, I lost 5 pounds in two nights!


      Waiting for a harness mock-up:


      Here's my harness mocked onto the motor and rearranged, rebundled. I turned all the fuel injectors in toward the intake and ran the harness along the intake and around the back. More than clean looks, I went this way for serviceability and ease of install. I still have a run off each side of the motor to the rear for the O2's and VSS, and a run under the motor for the starter and crank sensor, but otherwise everything is in this main intake run.


      I'm going to use the C100 connector to tap into the car, this will make it a simple process to remove the harness from the car without cutting any wires, and should make for a clean install.


      C2 connector, for hooking the engine harness to the stock truck fuse block


      Some don't like the truck fuse block, but I'm a fan of it. The more OEM wiring components I use, the better I'll feel about reliability when I'm far from home.


      Anywho, that's where I'm at with it. I need to figure out if these senders (oil press, water temp) will power my stock gauges. If they will, I'll simply wire my gauges to those wires, but if they don't, I need to add senders to the motor and wires to the harness.

      For anyone who's scared of doing their own harness, I've never done anything like this before, and I'm only 2 nights into it at this point, so it's really not as time-consuming as you'd think. I imagine that guys who have done a couple are far faster than this even, but I've been taking my time to keep from screwing it up.

      Thanks for looking.

      -matt

    5. #65
      Join Date
      Jun 2011
      Location
      St. George, Utah
      Posts
      1,629
      Country Flag: United States
      Thanks for posting Matt. I'm a bit intimidated about doing my 5.3 G-body swap at this point, prolly mostly because I don't have any of the wiring yet, only the motor. I appreciate what you said about it not being that tough even for a greenie. I'll keep watching with open eyes...

      You also mentioned the Unlimited hood doesn't fit well. I was going to order my hood from them, their price is better by far but I don't want something that doesn't fit right. Was yours nice before you put it in storage or was it like that new? What exactly is wrong with it? Thanks for the insight.
      -Ben, Your friendly neighborhood Rendering dude

      SRD on Facebook

      79 Cutlass wagon build


    6. #66
      Join Date
      Jan 2010
      Location
      Elk River, MN
      Posts
      676
      Quote Originally Posted by SRD art View Post
      Thanks for posting Matt. I'm a bit intimidated about doing my 5.3 G-body swap at this point, prolly mostly because I don't have any of the wiring yet, only the motor. I appreciate what you said about it not being that tough even for a greenie. I'll keep watching with open eyes...

      You also mentioned the Unlimited hood doesn't fit well. I was going to order my hood from them, their price is better by far but I don't want something that doesn't fit right. Was yours nice before you put it in storage or was it like that new? What exactly is wrong with it? Thanks for the insight.
      No problem, it's really not a bad process. Besides plugs that I've removed, I haven't cut a single wire, so up to this point every functional wire is OEM continuous from the computer to whatever the component is. Pick up a 99-02 5.3 truck wiring harness, they're cheap ($100-200, I got mine for $100) and you can use them with the truck's underhood fuse block, which to me is a huge plus.

      As for the Unlimited fiberglass hood, it's really a mess. I like the look of it with the 2 inch cowl, but the fit is horrendous. The center of the front is too high when I have the front corners flush, the the right side is too low and flat to match the fender, while the left side is even or high in places. It's light, but the build quality is piss poor, on the rear portion of the cowl they need needed extra support, so they glassed in a piece of cardboard, which would be bad enough, but it looks to have come from the bottom of a case of pop, so my cowl has rings on it from where cans had deformed the cardboard. The gelcoat also had voids and air bubbles in various places, and on top of all the flaws it took over a month for it to show up...

      I'm trying to be honest about the hood without being rude, but I could not in good conscience recommend parts from that company to anyone, Harwood is not that much more expensive for a far superior product.

      -matt

    7. #67
      Join Date
      Jun 2011
      Location
      St. George, Utah
      Posts
      1,629
      Country Flag: United States
      Man thanks for the info. Is your hood a race weight pin on or the bolt on? I may just have to reconsider who I order my hood from. Unfortunately finding a hood for the 78-80 Cutlass' is little more tough, 81-88s are easier to find. There are some higher priced ones but I still take a chance with bad fit.

      Pop can rings? Now that takes the cake. Wow.
      -Ben, Your friendly neighborhood Rendering dude

      SRD on Facebook

      79 Cutlass wagon build


    8. #68
      Join Date
      Sep 2009
      Posts
      2,969
      Country Flag: United States
      You have most of the same components I will eventually put on my Trans Am; C5 Brakes w/ LS1 rears, speedhut gauges, and fuel injection. Nice build, I used to have an '88 MC SS and it was a dog with the 305.


      1955 Nomad project LC9, 4L80e, C5 brakes, Vision wheels
      1968 Camaro 6.2 w/ LSA, TR6060-Magnum hybrid and etc SOLD
      1976 T/A LS1 6 Speed, and etc. SOLD
      Follow me on Instagram: ryeguy2006a

    9. #69
      Join Date
      Jun 2011
      Location
      St. George, Utah
      Posts
      1,629
      Country Flag: United States
      Oh yeah, I forgot to say nice ride. I haven't seen too many non SS cars from those years, it's a refreshing look and am looking forward to seeing it all get done and on the track!
      -Ben, Your friendly neighborhood Rendering dude

      SRD on Facebook

      79 Cutlass wagon build


    10. #70
      Join Date
      Jan 2010
      Location
      Elk River, MN
      Posts
      676
      Quote Originally Posted by SRD art View Post
      Man thanks for the info. Is your hood a race weight pin on or the bolt on? I may just have to reconsider who I order my hood from. Unfortunately finding a hood for the 78-80 Cutlass' is little more tough, 81-88s are easier to find. There are some higher priced ones but I still take a chance with bad fit.

      Pop can rings? Now that takes the cake. Wow.
      I wanna say it was the race one, since there's no provision for a stock latch, but it bolts onto the hinges with the springs removed. The old Cutlass definitely presents a problem, I think I would honestly look into lightening the steel hood and adding a cowl. It may have a cool vintage race feel with a bunch of lightening holes in the underside bracing.

      Thanks too for the compliment on the car, when I was younger I always had a goal of giving it an SS nose, but the longer I've owned, the more I've fallen it love with the standard front end.

      -matt

    11. #71
      Join Date
      Jan 2010
      Location
      Elk River, MN
      Posts
      676
      Quote Originally Posted by ryeguy2006a View Post
      You have most of the same components I will eventually put on my Trans Am; C5 Brakes w/ LS1 rears, speedhut gauges, and fuel injection. Nice build, I used to have an '88 MC SS and it was a dog with the 305.
      Thanks man, I'm going for the most practical performance combination I can get into on a budget, using as many OEM parts as I can for the sake of reliability and parts availability. I haven't ordered anything from speedhut yet, but I plan to sometime in the spring, probably just a GPS Speedometer and a Tachometer to match. Your TA looks sharp, I love the second-gen cars.

      -matt

    12. #72
      Join Date
      Feb 2010
      Location
      Central NJ
      Posts
      792
      Nice Monte!

      I like that GPS Speedo... I'm actually going to use my iPod touch with a Speedo app ($.99) to monitor my speed... but I may have to get one of those in the future..

      -Sean

    13. #73
      Join Date
      Jan 2010
      Location
      Elk River, MN
      Posts
      676
      Time for a little update, with a bunch of pictures, 42 to be exact. To start with, I had to remove some broken exhaust manifold bolts . . . hell on earth.

      The first one wasn't too terrible, left-hand drill bit, a little heat, and an Easy-out got it right out.


      Glorious.


      The next pain in my arse.


      On it's way out, now we're rolling.


      This one, not so much. it was a major pain, I ended up drilling down the the center of it with a 1/4" center drill and slowly backing it out with the Easy-out, bit by bit.


      I decided to to do a little clean-up on the block to make sure it'd be easy enough to clean it for paint later. I'm not doing the whole thing right now since it's 30 degrees outside, and I'm doing this in an unheated garage, which isn't exactly good painting weather.


      Secret weapon from Home Depot, works great for block cleanup.


      That'll be enough for now, I'll clean it up more later once it's back out of the car from mocking it up.


      As you can see here, the SBC mount is stamped in the center, which kept it from sitting flat on the adapter plates.


      All better. These will get painted when I do the block later.


      In all her glory, ready to set in for mock-up.


      Another angle. I pulled the harness off to mock it in there. I also pulled off the #8 coil pack in case there were clearance issues.


      Beautiful MN January day to work in the garage. With the door open, no less.


      Looks a little empty in there.


      My messy garage. I'll clean it, tomorrow....


      <Insert Dramatic Theme Song here> Ready to set it in for mock-up.


      If you look closely, you can see it slowly dropping into the engine bay...


      That'll do.


      Lots of room back here!


      Plenty more room over here.


      and back here, good Lord, could fit an Ecotec between the motor and firewall. In all honesty, it looks like more room in the picture than there actually is. I'll probably keep the motor where it's at to keep from having to cut too much up for fitment. Besides, moving the motor back 1" has less of a handling impact than moving the battery to the trunk. so I'll keep it easy to work on.


      This picture is hard to decipher, but what it is showing is how close the pan is to the crossmember. This is from the front passenger side, you can see the tie rod end in the corner of the pic.

    14. #74
      Join Date
      Jan 2010
      Location
      Elk River, MN
      Posts
      676
      This is almost comical. I knew the truck pan would be low, I just didn't know it'd be 2 inches too low. This car sits at 5 inches here already, so the pan would be at 3 inches :eek2:


      This is where I started to use some colorful words, the truck manifold isn't even close to fitting on the driver's size. This means I need LS1 manifolds or headers, but more importantly, something that costs more money.


      Passenger side is a better situation, not that it does me any good.


      Found a cracked weld on the frame while I was down there.


      Now, for some harness clean-up. As you can see, the grounds have extra length from re-routing the harness.


      With the extra length cut out and the wires stripped, they're ready to join.


      Not the most beautiful solder job ever, but it's strong.


      This also looks sloppy, but it's as close to water-tight as I could get it. Thankfully it will be covered by my braided harness wrap when the install is complete.


      This temp sender had a bunch of extra wire.


      Shortened and wrapped.


      Probably where the fuse block and ECM will live.


      Shortened up the knock sensor wires.


      Soldered.


      Heatshrunk and ready for action.


      -matt

    15. #75
      Join Date
      Sep 2009
      Posts
      2,969
      Country Flag: United States
      Looking good man. You can probably find some good used headers for fairly cheap. Looking good though.


      1955 Nomad project LC9, 4L80e, C5 brakes, Vision wheels
      1968 Camaro 6.2 w/ LSA, TR6060-Magnum hybrid and etc SOLD
      1976 T/A LS1 6 Speed, and etc. SOLD
      Follow me on Instagram: ryeguy2006a

    16. #76
      Join Date
      Jan 2010
      Location
      Elk River, MN
      Posts
      676
      Oddly enough, I just bought some used headers after making my post this morning, found a good deal and jumped on it, so I now have headers and a Y-Pipe coming for my swap. They're MAC headers for an F-body, and obviously they're used, but I think they'll fit my car really well. I do a lot of coating with Cerakote and have some high-temp colors here, so these will be media blasted and coated Tungsten Gray.


      The Y-pipe will get butchered to use the Cats for my dual exhaust system.


      -matt

    17. #77
      Join Date
      Jan 2010
      Location
      Elk River, MN
      Posts
      676
      This project is still alive, albeit a bit slow-moving. Since starting this I received a significant promotion at work. Unfortunately this means a lot more hours in the office, but it also made it possible for me to afford a 2001 Z06 this spring, so with driving that I haven't been quite as eager to finish the Monte. With that said, it's winter now and the Z is parked, so I'm back to focusing on the Monte. Having the Z06 also allowed me to focus on what I want from the Monte, so I've been spending more time planning and less time working on it. I have everything I need in order to run it with the 700R4, but as you'll see below I plan to ultimately convert it to a manual T56.

      Updates:
      - Bought and installed an Autokraft oil pan. Very impressive piece, was really a nice install and fits excellent. I have pictures posted on ls1tech, but I need to do a full update post here to match.
      - Bought a Viper T56 this morning, I'm planning to use it with a Quicktime Bellhousing and a modified Viper input shaft, rather than converting to an F-body input (they're expensive and hard to find)

      -matt

    18. #78
      Join Date
      Jul 2012
      Posts
      46
      Country Flag: United States
      Quote Originally Posted by monteboy84 View Post
      Oddly enough, I just bought some used headers after making my post this morning, found a good deal and jumped on it, so I now have headers and a Y-Pipe coming for my swap. They're MAC headers for an F-body, and obviously they're used, but I think they'll fit my car really well. I do a lot of coating with Cerakote and have some high-temp colors here, so these will be media blasted and coated Tungsten Gray.


      The Y-pipe will get butchered to use the Cats for my dual exhaust system.


      -matt
      I bet those fbody mac mid lengths didnt fit. I only say this because I bought those same headers for my 80 monte with a 5.3l swap and I had to cut and reweld the flanges. And honestly I am not happy with them. I should have gone with the ebay fbody stainless longtubes as I heard other gbody owners say fit with minor messaging.

    19. #79
      Join Date
      Nov 2009
      Location
      Colorado
      Posts
      163
      Country Flag: United States
      ooh you going t56 now as well?? I am also switching gears now "literally" on GP's build now.. I recently picked up a 98 t56 for cheap. what are you thinking in regards to clutch pedal, speedo, vss, nss, etc etc?
      Ernesto M.

    20. #80
      Join Date
      Sep 2009
      Posts
      2,969
      Country Flag: United States
      Looks like you are coming along. It is funny though, I looked back at your thread, and I had posted that we have many similar parts on our cars. Now I am halfway through my LS1/t56 swap, and I am running Mac Mid-length headers on my build, lol. Great minds think alike. Mine fit ok, but I had to do quite a bit of massaging to the drivers side, and passenger's side required some frame mods... Now they are installed and I am happy with the way they fit. Look forward to seeing some more updates.


      1955 Nomad project LC9, 4L80e, C5 brakes, Vision wheels
      1968 Camaro 6.2 w/ LSA, TR6060-Magnum hybrid and etc SOLD
      1976 T/A LS1 6 Speed, and etc. SOLD
      Follow me on Instagram: ryeguy2006a

    Page 4 of 6 FirstFirst 1 2 3 4 5 6 LastLast


    Advertise on Pro-Touring.com