


Results 541 to 560 of 860
Thread: 1970 GTO Version 3.0
-
12-15-2022 #541

 Registered User
- Join Date
- Apr 2007
- Location
- New Jersey
- Posts
- 564

 Originally Posted by andrewb70

Cool thanks. So does Holley make custom lids?Doug L.
68 RS/SS Conv. LSA/T56.
67 RS Coupe LS2/T56 named "NutKse"
-
12-17-2022 #542
 -Moderator/Sponsor-
- Join Date
- Apr 2001
- Location
- The City of Fountains
- Posts
- 16,129
Originally Posted by thedugan
Holley does not make any custom lids. I am using regular Holley part numbers, which actually are not working for me, but that is for another post....
Andrew1970 GTO Version 3.0
1967 Cougar build
GM High-Tech Performance feature
My YouTube Channel Please Subscribe!
Instagram @dr__efi
I deliver what EFI promises.
Remote Holley EFI tuning.
Please get in touch if I can be of service.
"You were the gun, your voice was the trigger, your bravery was the barrel, your eyes were the bullets." ~ Her
12-17-2022 #543
-Moderator/Sponsor-
- Join Date
- Apr 2001
- Location
- The City of Fountains
- Posts
- 16,129
I consulted with Todd, who works for Holley and is a great engineer, and he suggested that the poly mount may no do well being so close to the exhaust manifold. So I got these billet aluminum mounts from ICT.
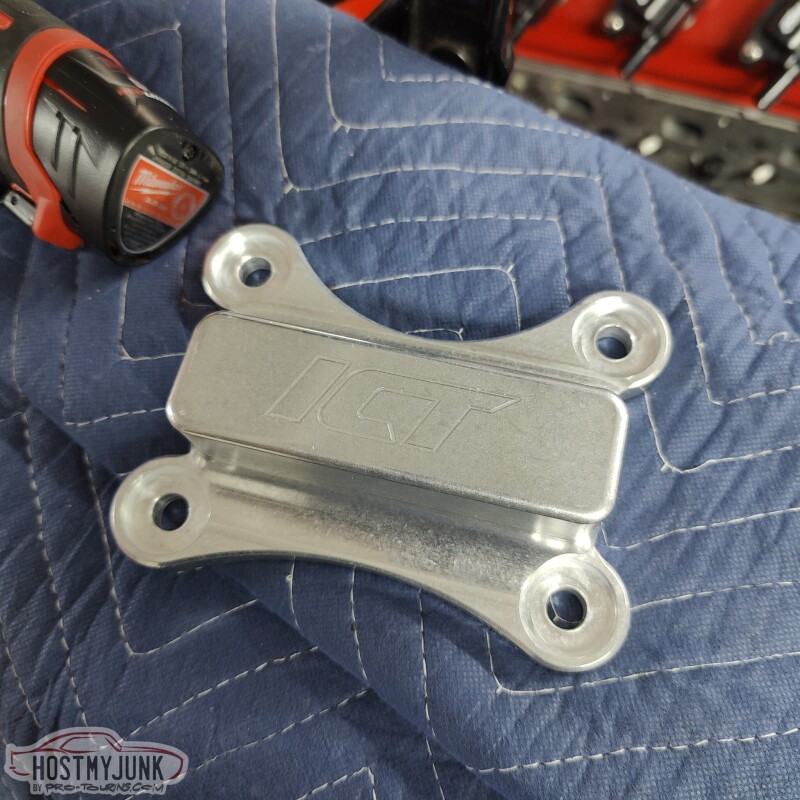
I got a pair, but I only used one on the passenger side, and it fit perfectly, after we milled .050" off each end to give them enough wiggle room between the ear of the frame stands.
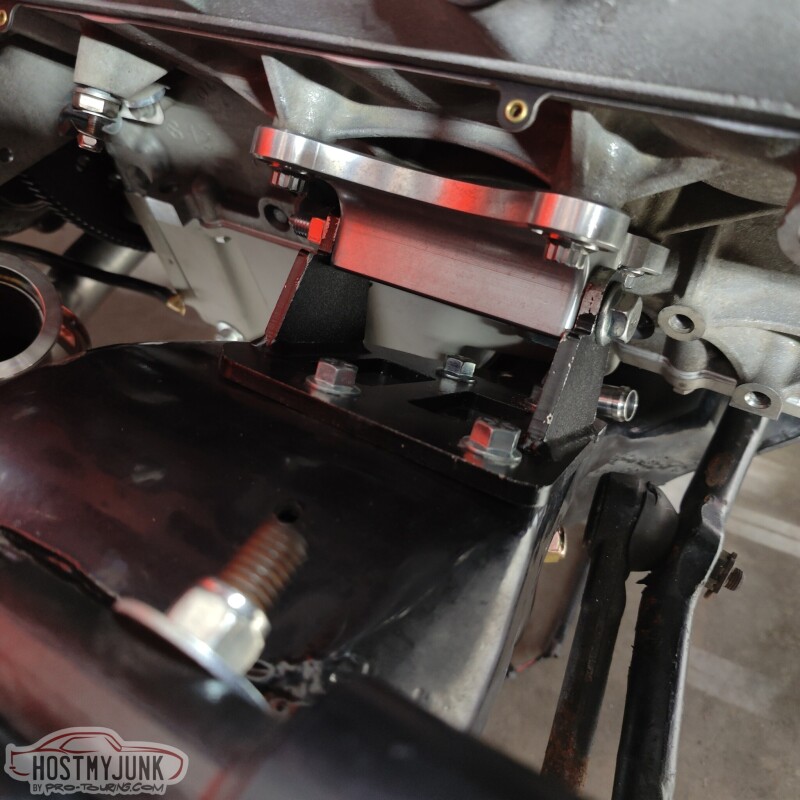
Good to go now! More updates coming really soon.
Andrew1970 GTO Version 3.0
1967 Cougar build
GM High-Tech Performance feature
My YouTube Channel Please Subscribe!
Instagram @dr__efi
I deliver what EFI promises.
Remote Holley EFI tuning.
Please get in touch if I can be of service.
"You were the gun, your voice was the trigger, your bravery was the barrel, your eyes were the bullets." ~ Her
12-18-2022 #544
-Moderator/Sponsor-
- Join Date
- Apr 2001
- Location
- The City of Fountains
- Posts
- 16,129
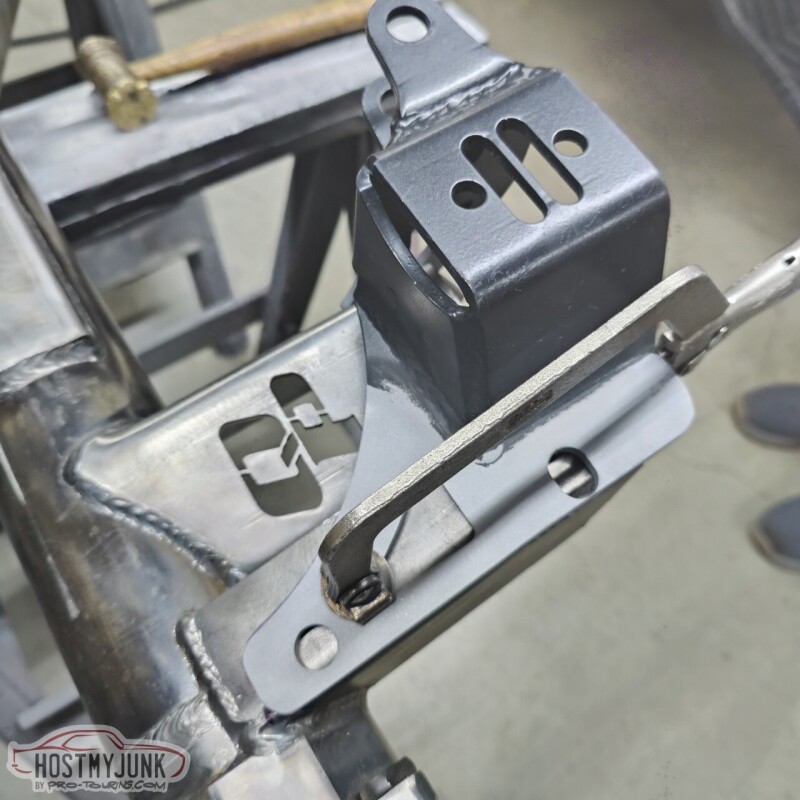
My friend Tom visited me from Alabama and our goal for his visit was to mock up and ultimately install the Quick Performance 9" rear end. I knew that things were not going to just bolt together because the brackets on the QP rear are not exactly the same as an original 12 bolt, plus I ordered mine with multiple holes on the lower control arm bracket.
You can see in this picture how the ridetech coilover bracket is designed to bolt to the original shock mount and then a tab comes around and gets bolted with the lower control arm bolt.
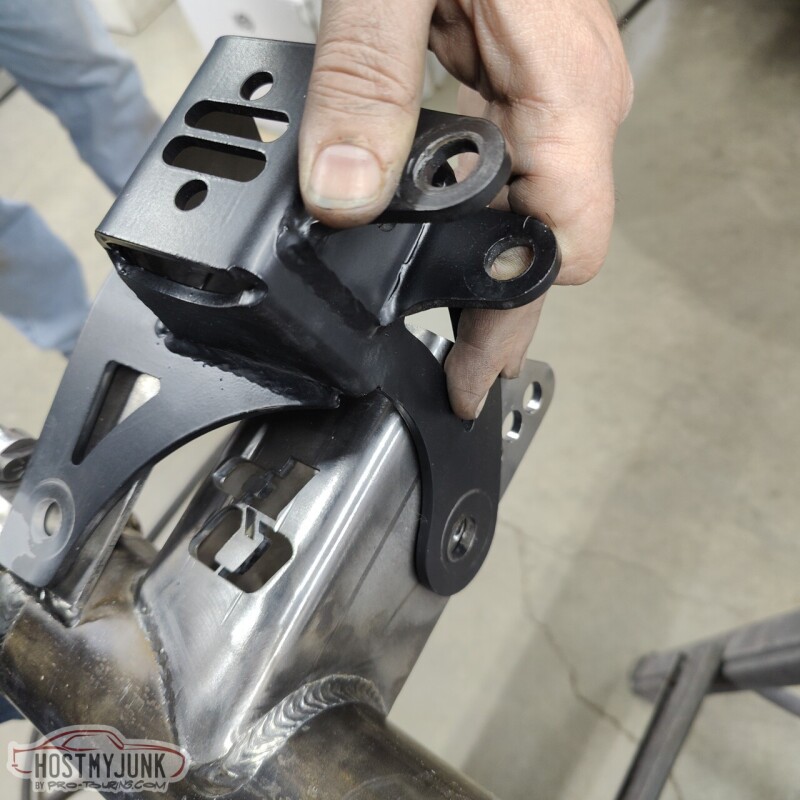
The bracket was trimmed to allow the use of all the holes on the lower control arm bracket.
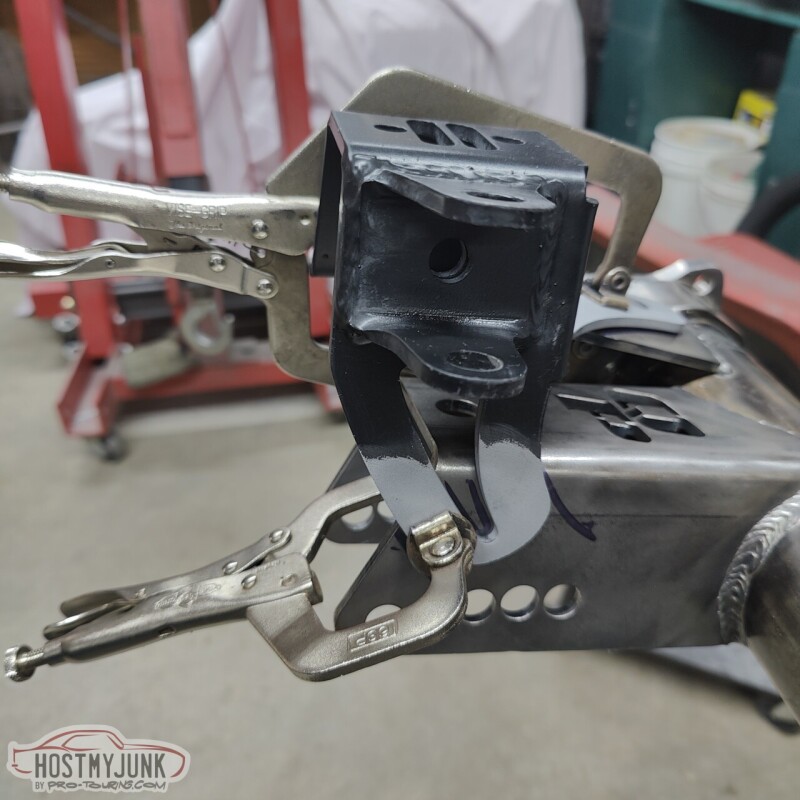
The bracket was also trimmed on the side to remove a little excess material where it rests against the shock mount on the QP housing.
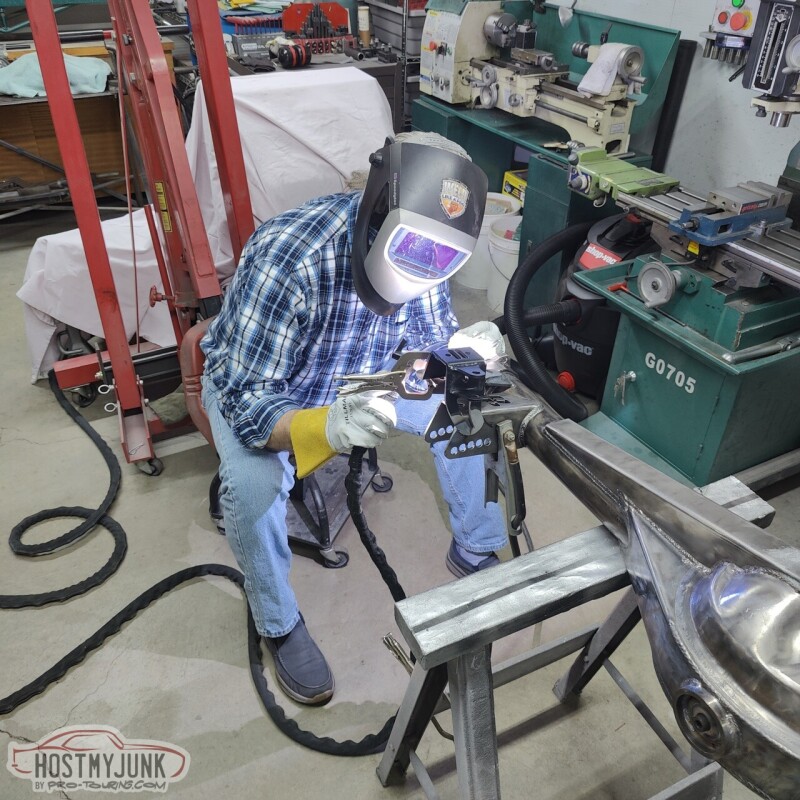
Then Vic went to work doing his thing...
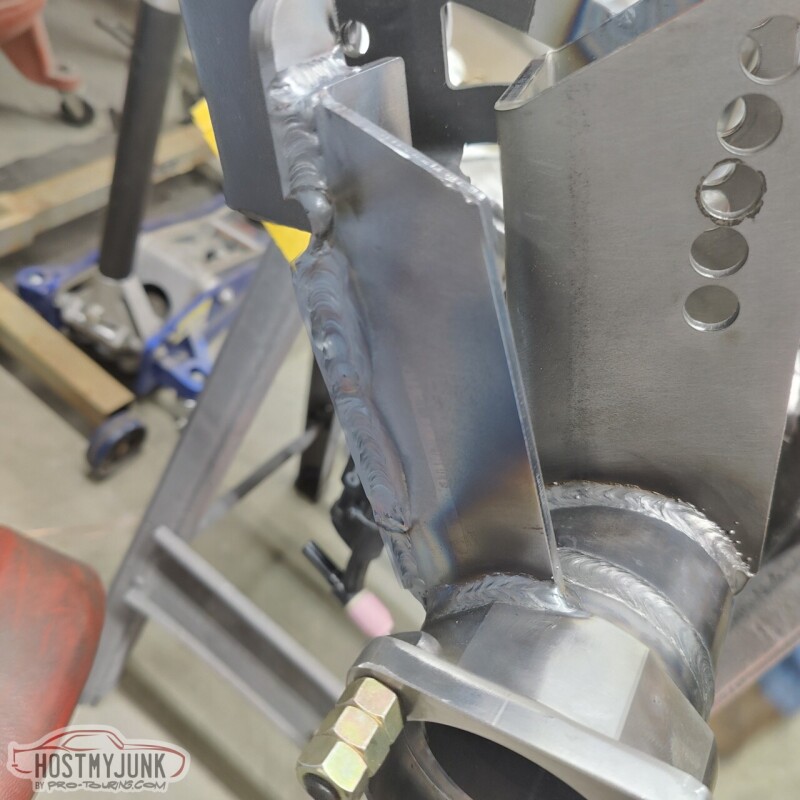
Here is the final result, with the ridetech coilover bracket fully welded to the QP housing.
We also pressed the Ridetech R-joints out of the old 12 bolt and into the QP upper control arm ears. Ridetech included a tool to make this process very straightforward.
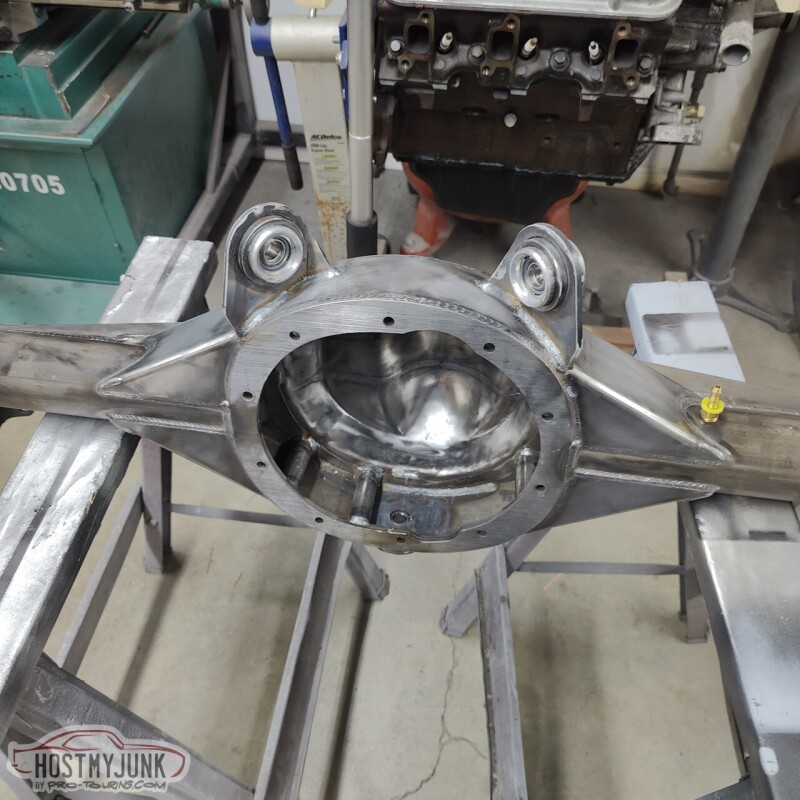
When I ordered the QP housing I checked all the boxes for the extra internal gussets...
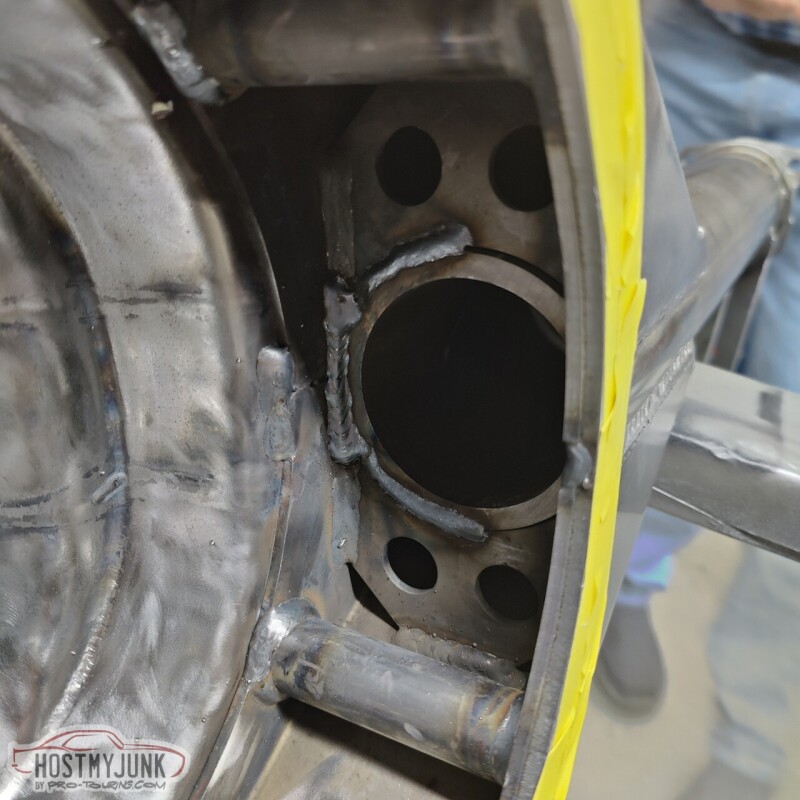
..and the back brace. I also chose the fill and the drain option.
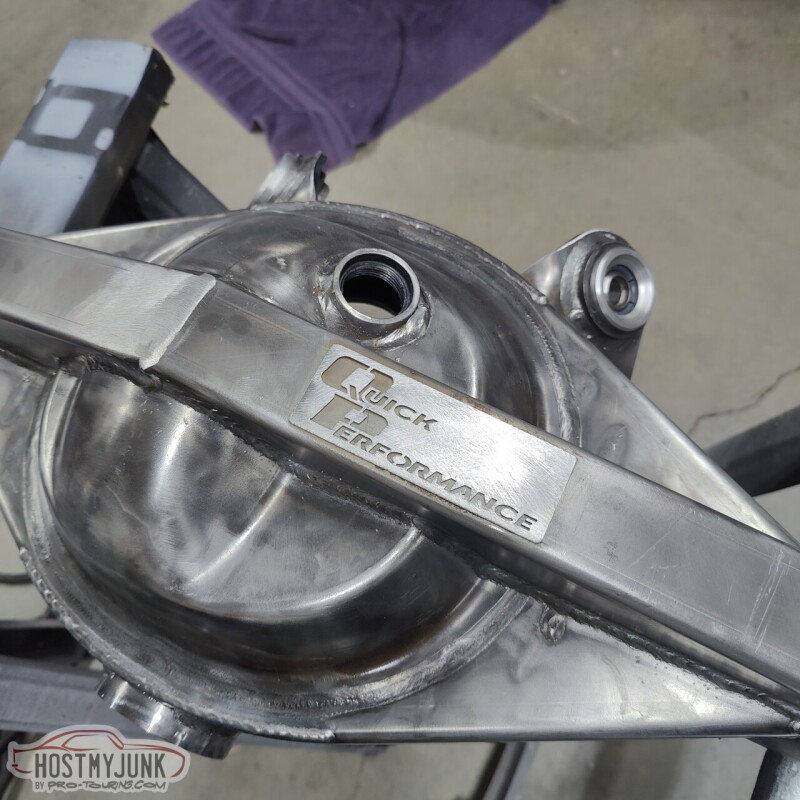
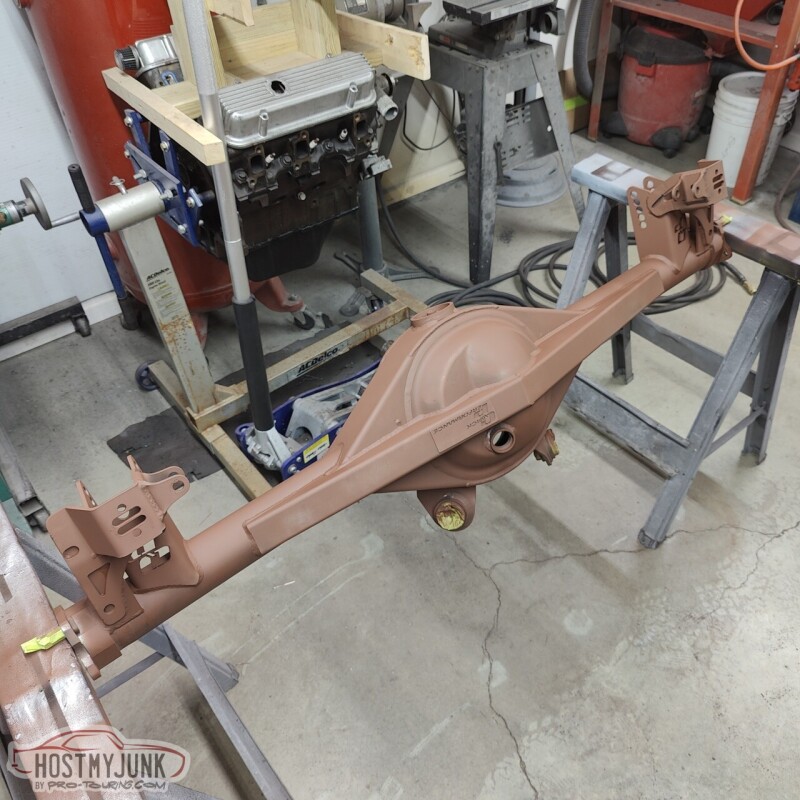
After the Ridetech coilover brackets were welded, I went over the whole housing and softened up all of the hard edges on the brackets and Tom shot a coat of Rustoleum primer.
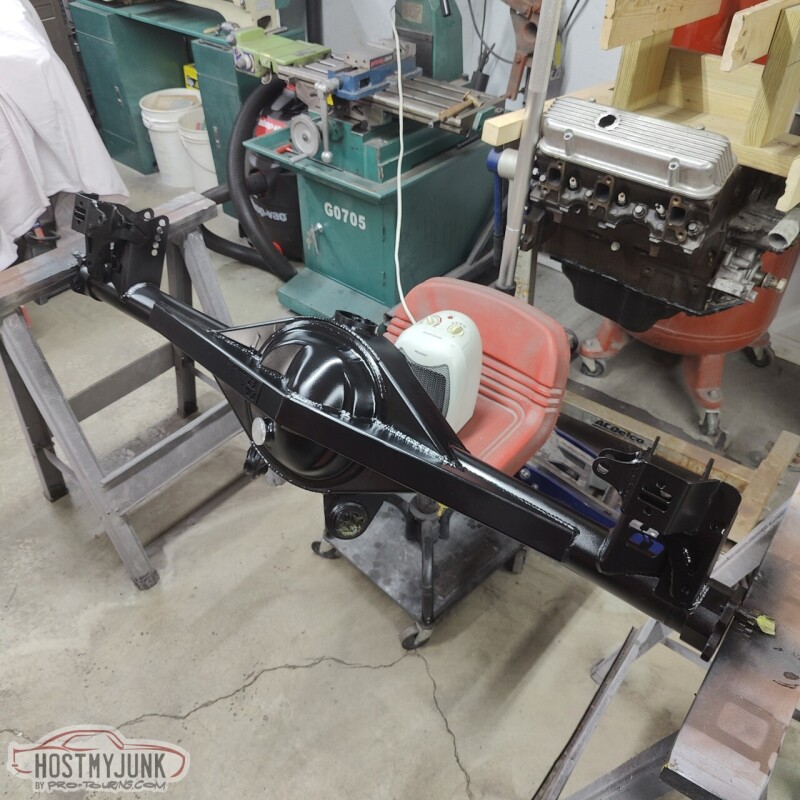
..followed by a couple of coats of Rustoleum semi gloss black.
More to come...
Andrew1970 GTO Version 3.0
1967 Cougar build
GM High-Tech Performance feature
My YouTube Channel Please Subscribe!
Instagram @dr__efi
I deliver what EFI promises.
Remote Holley EFI tuning.
Please get in touch if I can be of service.
"You were the gun, your voice was the trigger, your bravery was the barrel, your eyes were the bullets." ~ Her
12-19-2022 #545
-Moderator/Sponsor-
- Join Date
- Apr 2001
- Location
- The City of Fountains
- Posts
- 16,129
The most expensive tires I have ever purchased showed up as well. If I can get two seasons out of these I'll be happy.
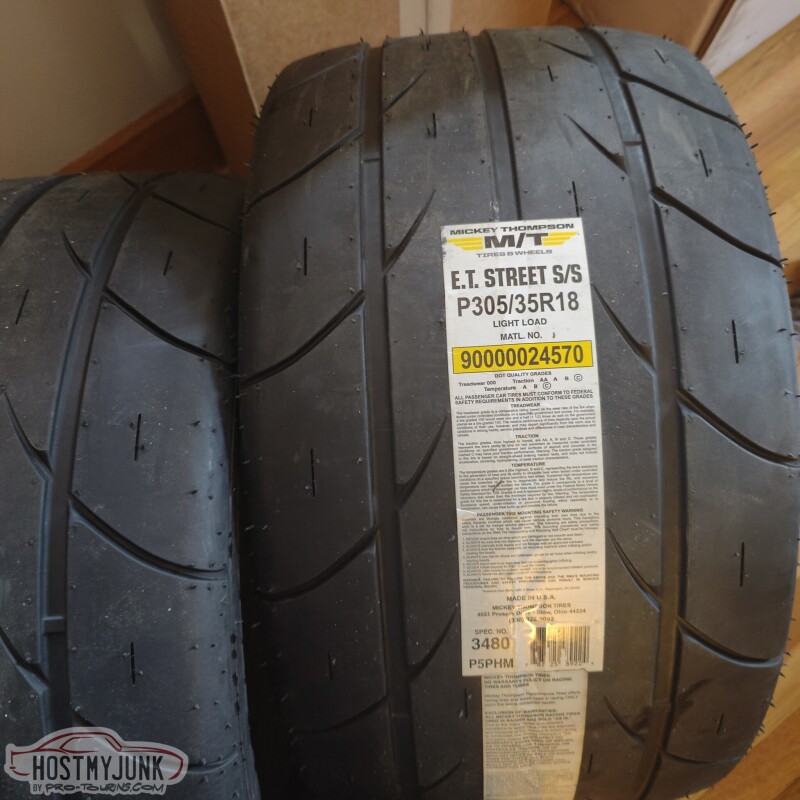
Had them mounted and balanced at my local Discount Tire. They have taken good care of me with the tires for the Cougar.
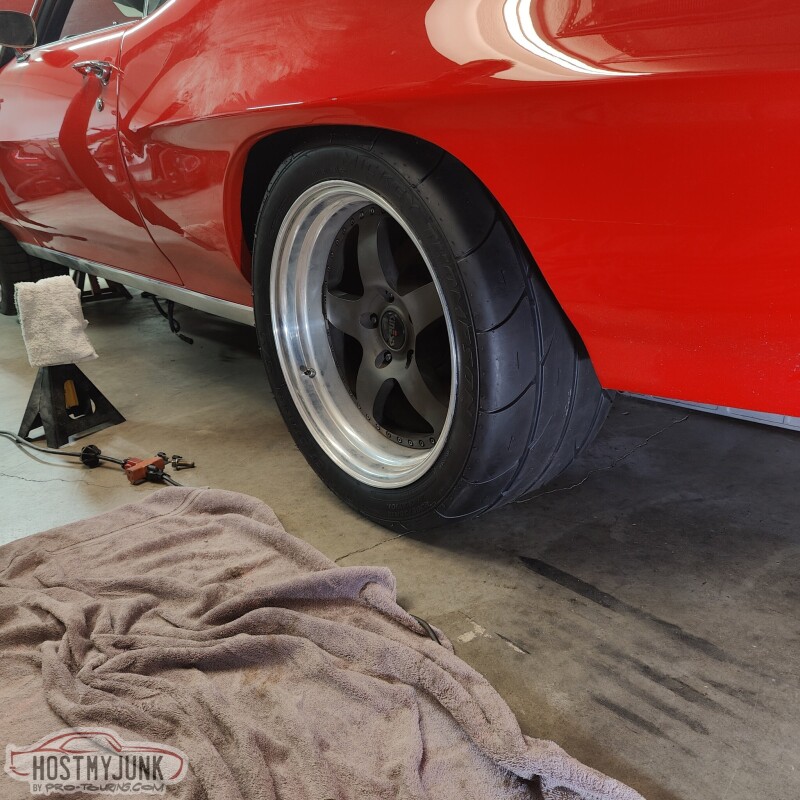
The fit in the wheel wells is pretty good. This rear end was ordered to be 1/2" narrower on each side, but it almost feels like they narrowed it 1" per side. I have not compared the width to my 12 bolt yet. Using a 1/2" spacer will put the tire dead center in the wheel wells.
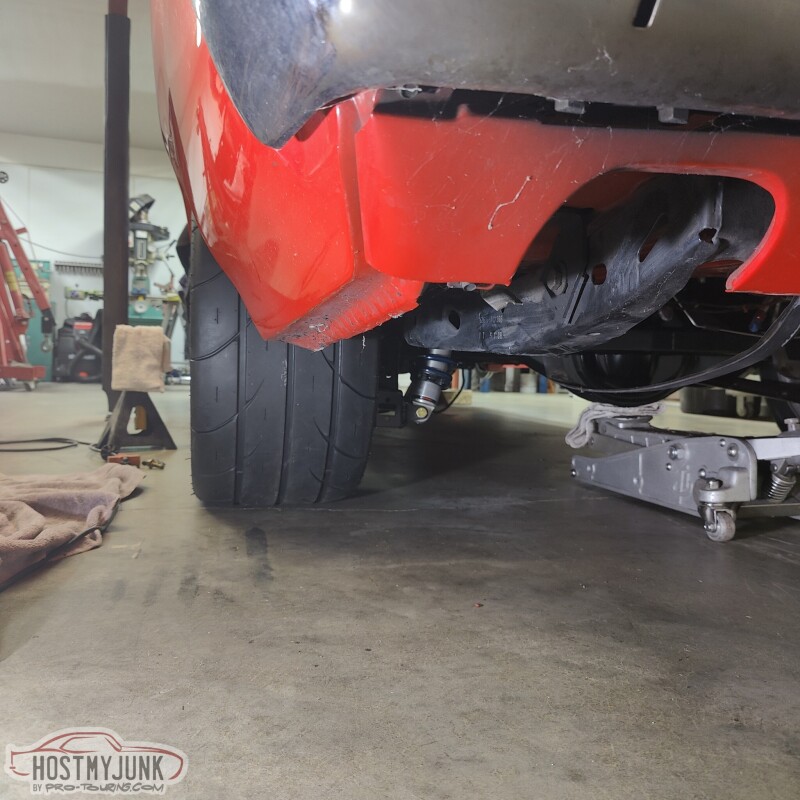
This is with the 1/2" spacer, so the new tires are good to go.
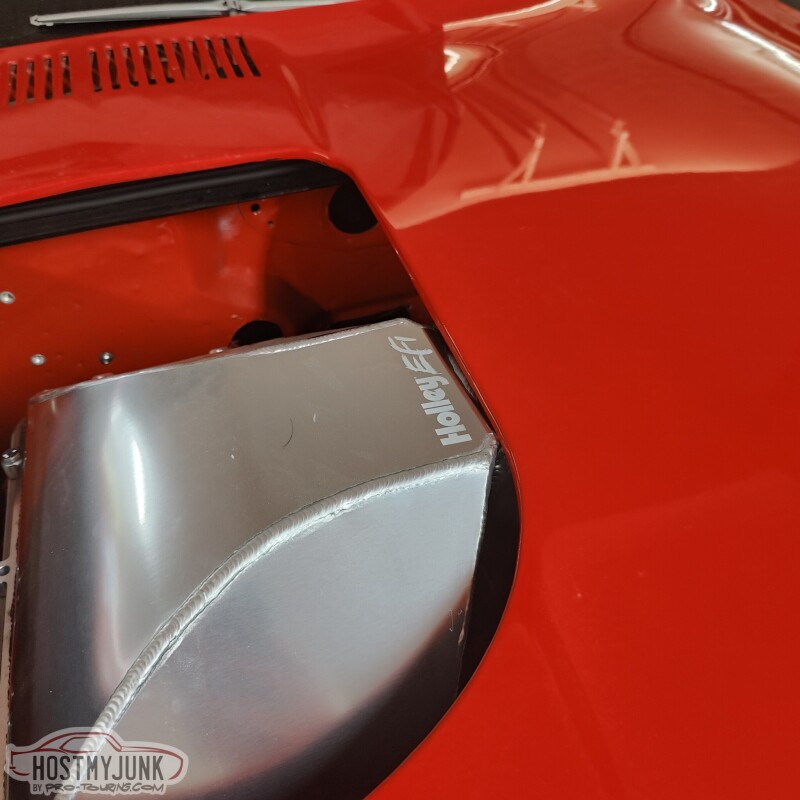
The same can't be said for the hood.
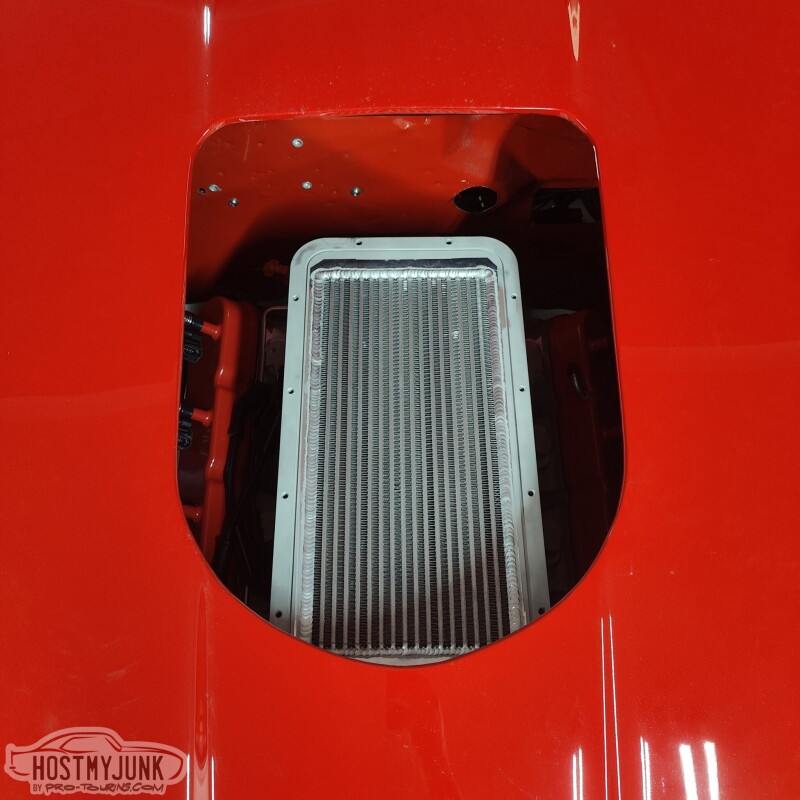
Doh!!!
Andrew1970 GTO Version 3.0
1967 Cougar build
GM High-Tech Performance feature
My YouTube Channel Please Subscribe!
Instagram @dr__efi
I deliver what EFI promises.
Remote Holley EFI tuning.
Please get in touch if I can be of service.
"You were the gun, your voice was the trigger, your bravery was the barrel, your eyes were the bullets." ~ Her
12-19-2022 #546 Registered User
- Join Date
- May 2012
- Location
- Kansas City, Missouri
- Posts
- 668
If u get two years out of them your not driving it right. Especially with that new turbo. Looking forward to a ride
 [QUOTE=andrewb70;1385549]The most expensive tires I have ever purchased showed up as well. If I can get two seasons out of these I'll be happy.
Last edited by andrewb70; 12-20-2022 at 08:10 AM.
12-21-2022 #547
-Moderator/Sponsor-
- Join Date
- Apr 2001
- Location
- The City of Fountains
- Posts
- 16,129
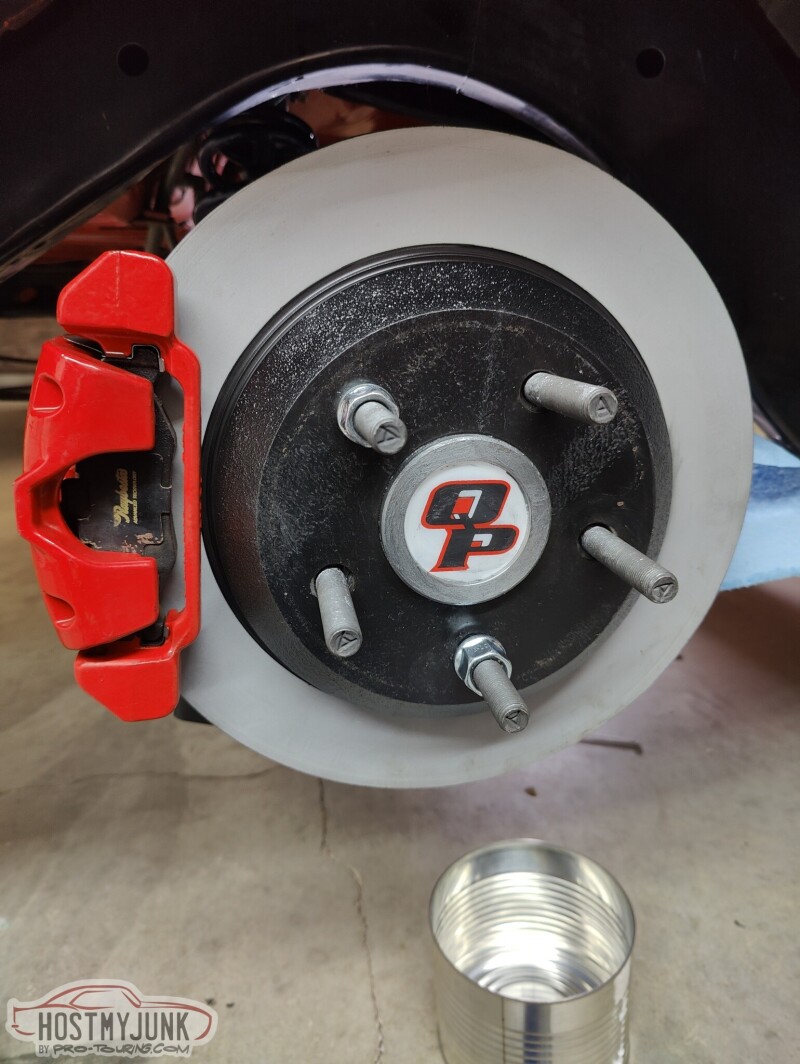
Made a little progress today ahead of the blizzard that is going to hit tomorrow morning. Vic bead blasted the rotors to get the surface rust off and shot then with a coat of paint. I cleaned up the calipers and bolted everything together.
Some of you may notice that the caliper is on the back side of the rotors. These are brakes from a 98-2002 F-body and normally the caliper is on the front side of the rotor. The reason for the swap is that we messed up when we pressed the bearings on the axles. I accidentally installed the caliper brackets on the wrong sides. Instead of battling with pulling the bearings off and possibly damaging something, we decided to move the calipers to the rear. I swapped the calipers side to side so that the bleeder is at the top.
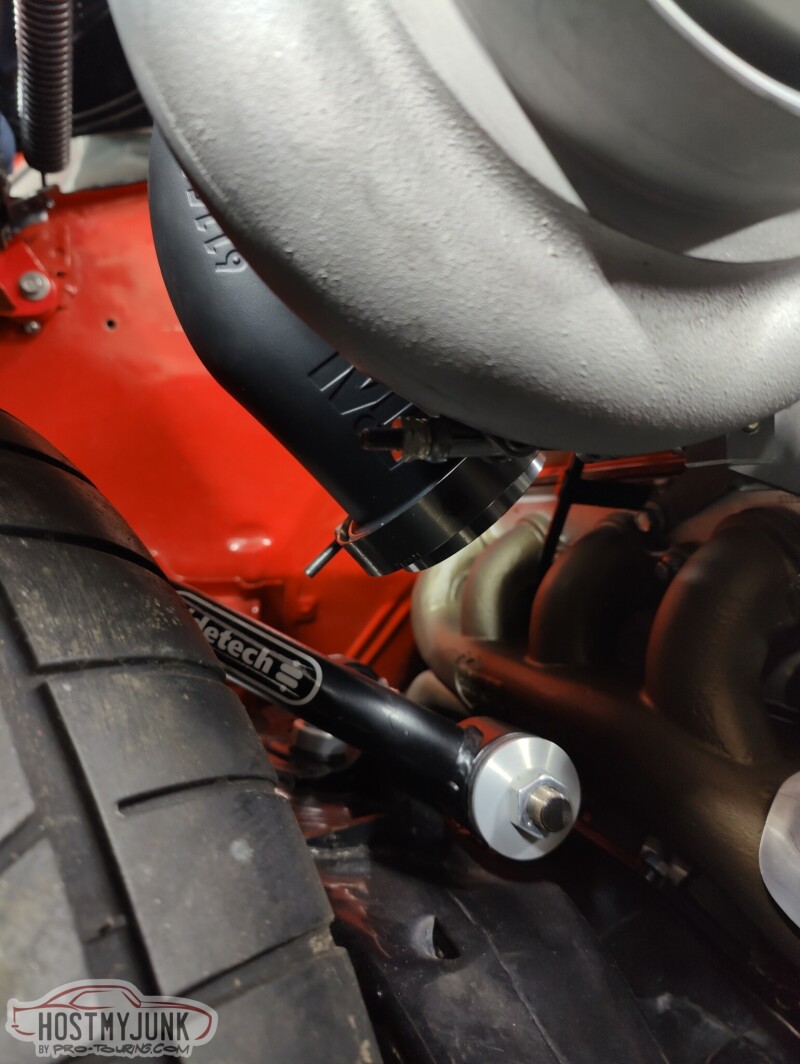
We put the car down on the ground in the front to check clearance with the suspension. The up-pipe is no pictured, but is about 1-1.5" away from the bushings. The ridetech control arms use deleon bushings and I plan to wrap the up-pipe and also put a woven sock over it. I don't expect any issues.
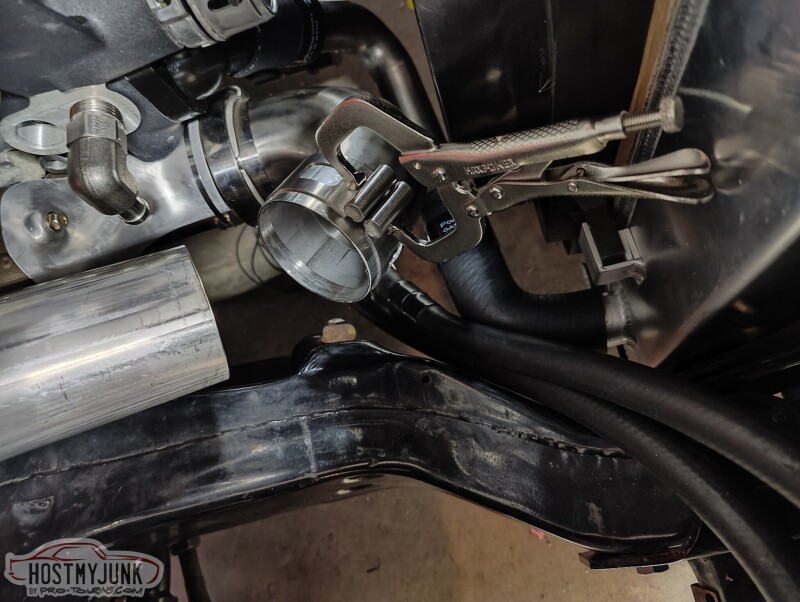
I got these nifty clamps from Australia, made by a company called SS Customs.
https://sscustoms.com.au
They have been super helpful holding the pipes together for mock-up and tack welding.
Andrew1970 GTO Version 3.0
1967 Cougar build
GM High-Tech Performance feature
My YouTube Channel Please Subscribe!
Instagram @dr__efi
I deliver what EFI promises.
Remote Holley EFI tuning.
Please get in touch if I can be of service.
"You were the gun, your voice was the trigger, your bravery was the barrel, your eyes were the bullets." ~ Her
12-24-2022 #548
-Moderator/Sponsor-
- Join Date
- Apr 2001
- Location
- The City of Fountains
- Posts
- 16,129
Progress has slowed down a little bit, but I did manage to completely finish the rear end installation. The rear was installed, but I needed to make some new brake lines from the center, out to the calipers.
A while back I got this tubing straightener.
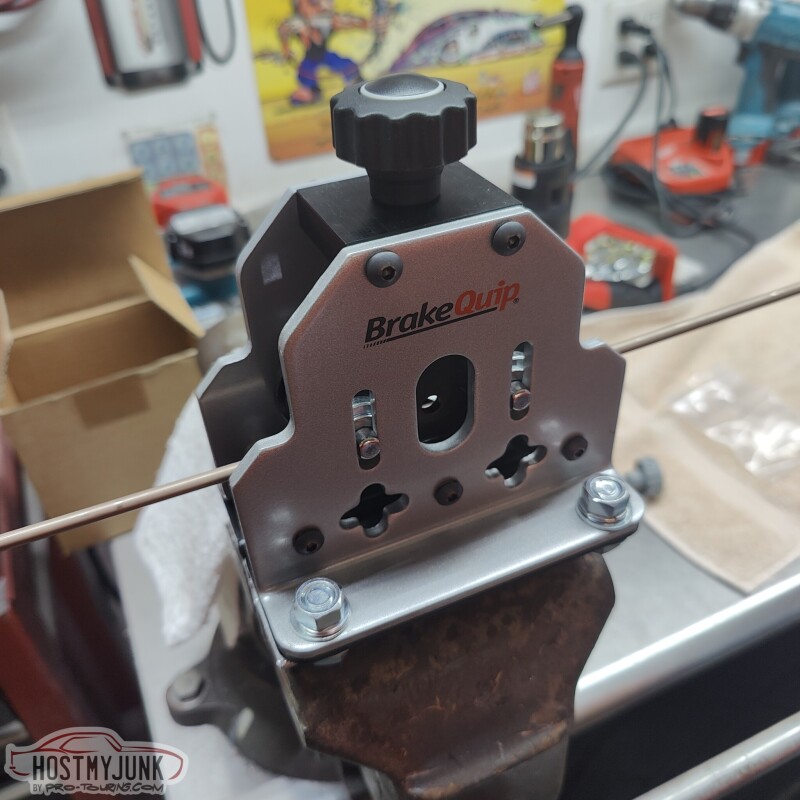
It mounts in a vise and does a really nice job of turning a coil of NiCopp brake like into a straight piece.
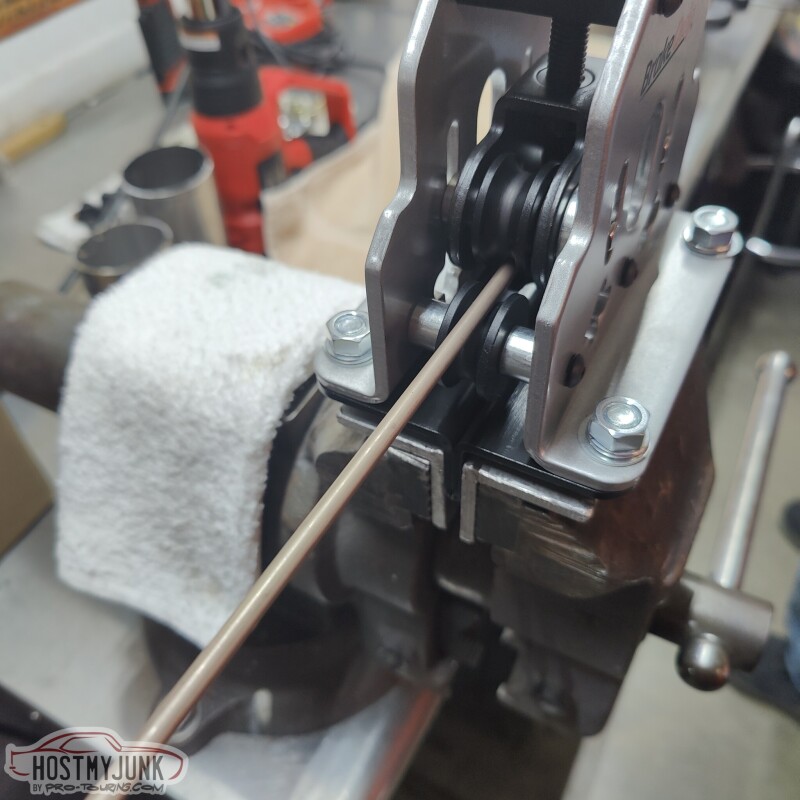
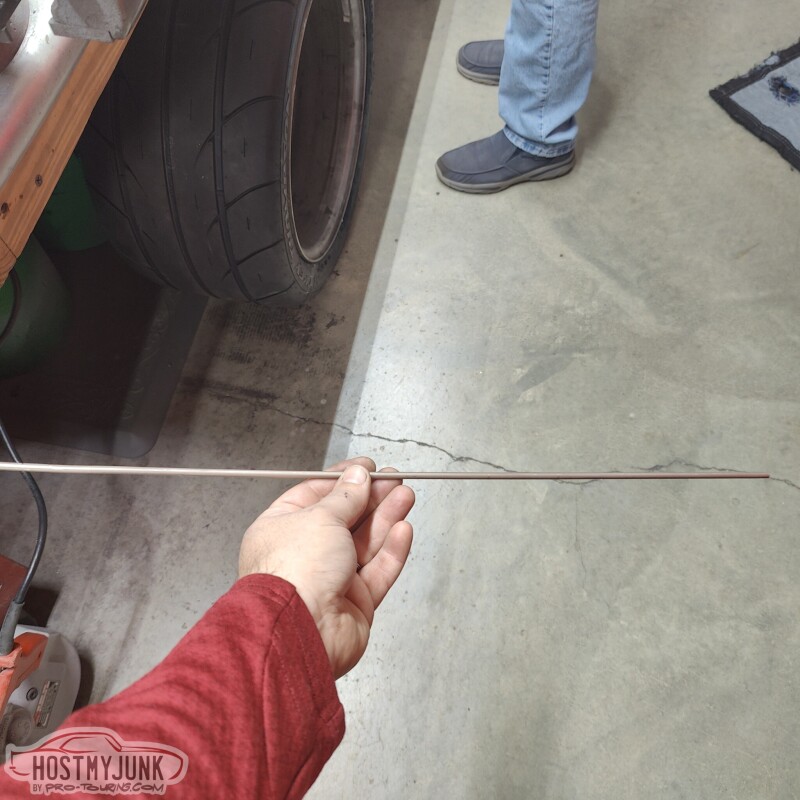
Here is the result after a few minutes of getting it worked through the rollers. I suggest straightening the tube before cutting it because then you can use the coil to manipulate the tubing through the rollers.
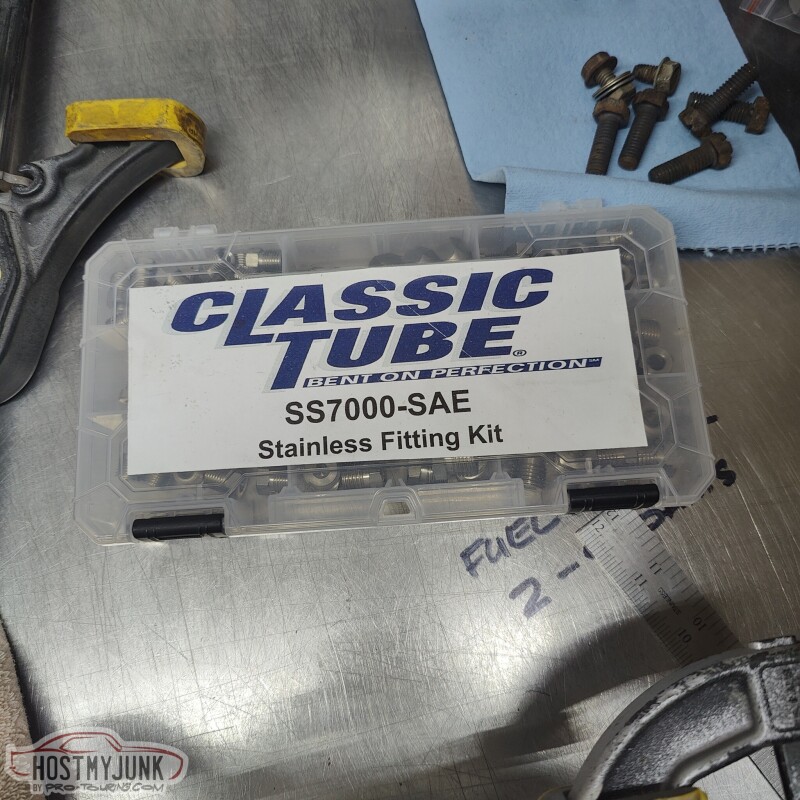
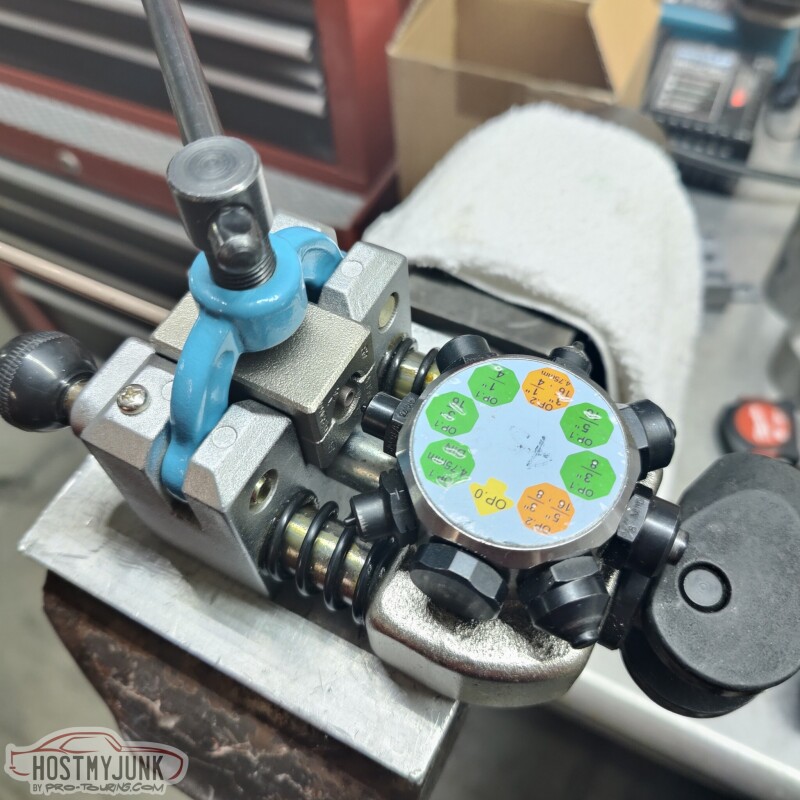
I also picked up this little kit that has a variety of stainless tube nuts for all of the common SAE flares.
Vic had this awesome flaring tool and it worked really well.
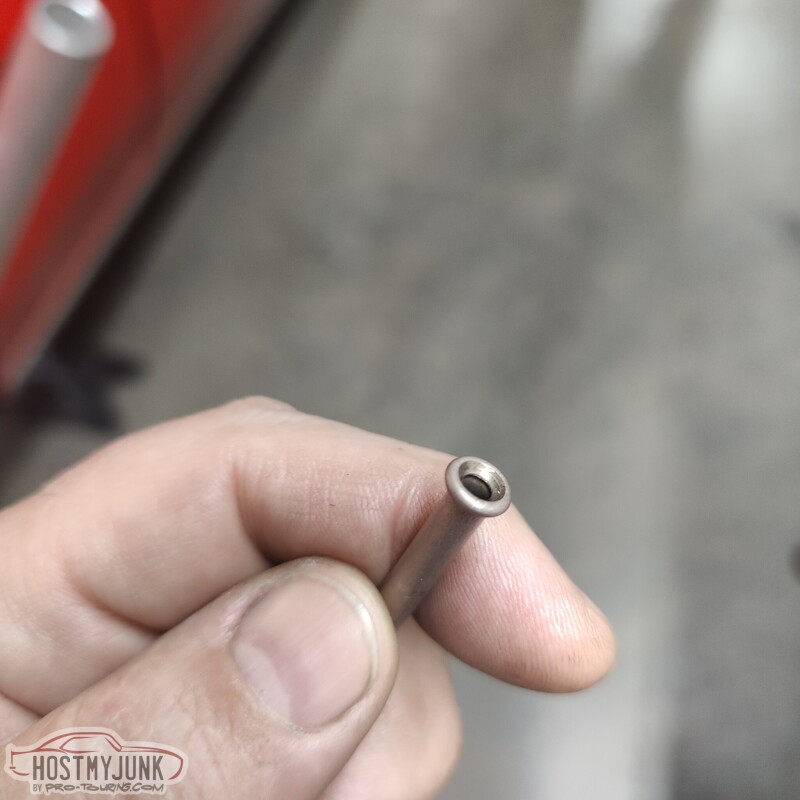
The double flares turns out perfectly.
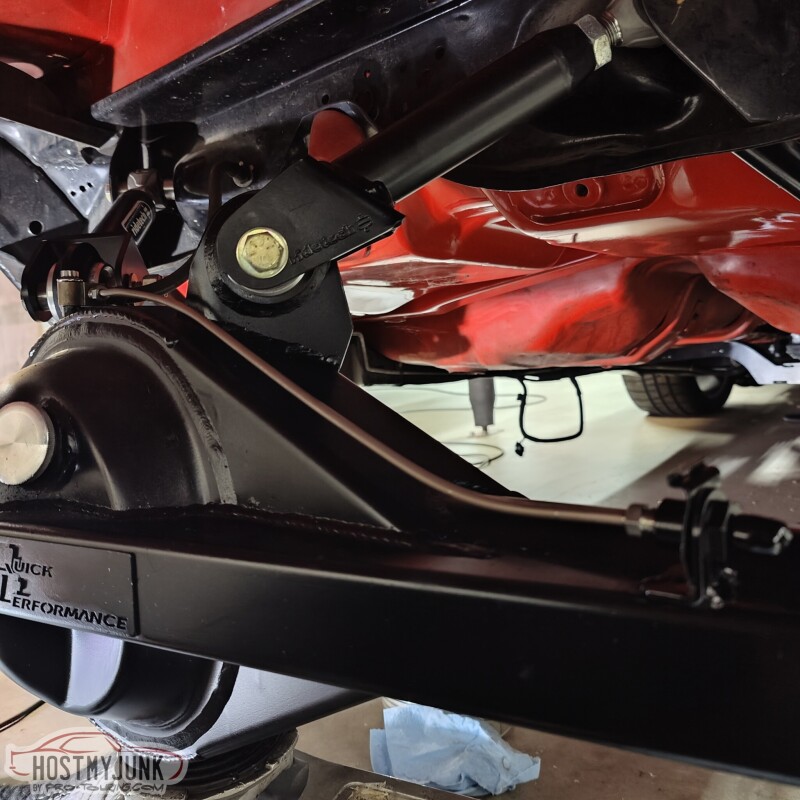
I reused these little brackets and adapters from the old rear end. It is a SAE to AN-3 adapter. We welded it to the housing and I hit it with a little paint. The little brake like wasn't the actual brake line. It was just a piece that I made so the threads would not get painted.
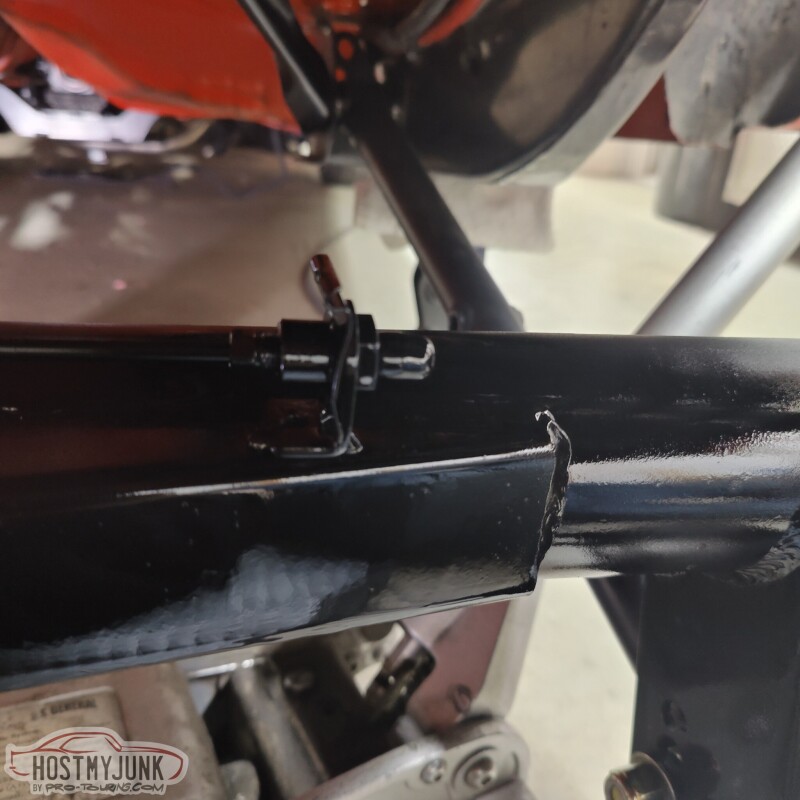
For the center hose support I cut and bevelled a short piece of threaded hex stock and then welded it to the housing.
In other sad new, we trimmed some bracing on the underside of the hood, and it still doesn't close...
Andrew1970 GTO Version 3.0
1967 Cougar build
GM High-Tech Performance feature
My YouTube Channel Please Subscribe!
Instagram @dr__efi
I deliver what EFI promises.
Remote Holley EFI tuning.
Please get in touch if I can be of service.
"You were the gun, your voice was the trigger, your bravery was the barrel, your eyes were the bullets." ~ Her
12-27-2022 #549 Registered User
- Join Date
- Jan 2016
- Location
- Arizona
- Posts
- 169
Looking good!
12-27-2022 #550
-Moderator/Sponsor-
- Join Date
- Apr 2001
- Location
- The City of Fountains
- Posts
- 16,129
Thank you! Originally Posted by Cshenker1121
Andrew1970 GTO Version 3.0
1967 Cougar build
GM High-Tech Performance feature
My YouTube Channel Please Subscribe!
Instagram @dr__efi
I deliver what EFI promises.
Remote Holley EFI tuning.
Please get in touch if I can be of service.
"You were the gun, your voice was the trigger, your bravery was the barrel, your eyes were the bullets." ~ Her
12-27-2022 #551
-Moderator/Sponsor-
- Join Date
- Apr 2001
- Location
- The City of Fountains
- Posts
- 16,129
With Christmas behind us, Vic and I are making slow, but steady progress.
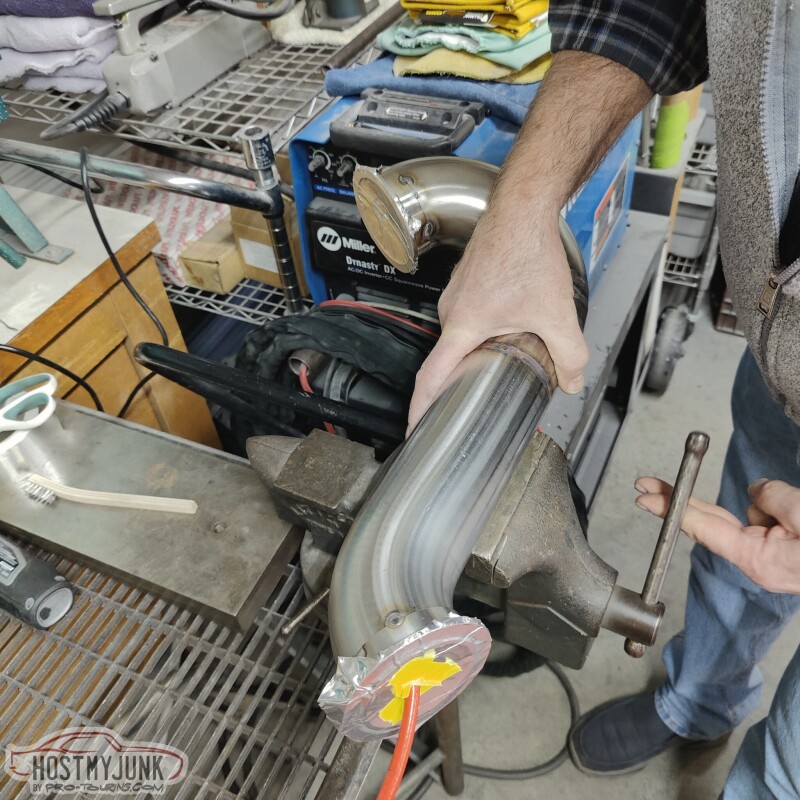
Today he was able to fully weld the up-pipe that goes between the Hooker exhaust manifold and the turbine inlet. He back-purged the pipe to avoid any "sugaring" on the inside.
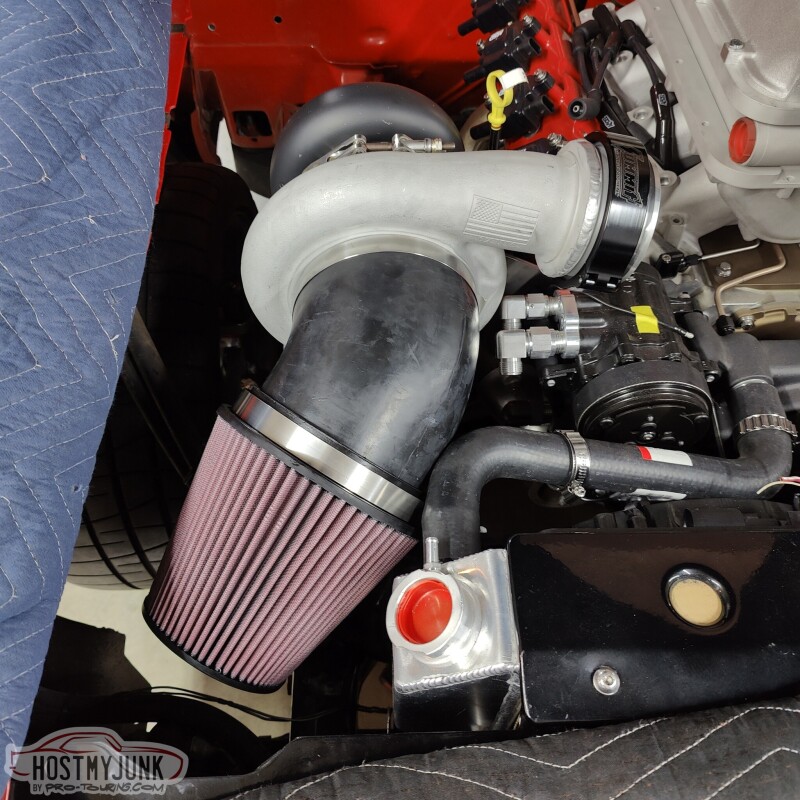
Vic also welded a Summit branded clamp to the compressor discharge. It's one of those split clamps that has o-rings and allows for some movement as everything heats up. We also sorted out the filter situation, although I will be ordering a longer filter element to get as much surface area as possible. This one is 6.5" tall, and K&N has a 10" long version that will fit perfectly in the available space.
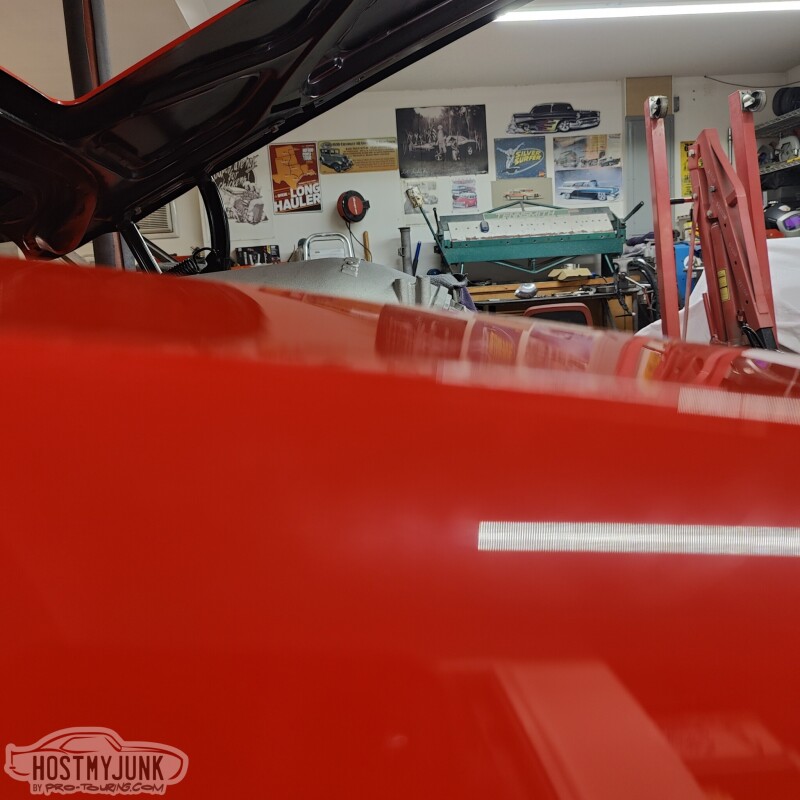
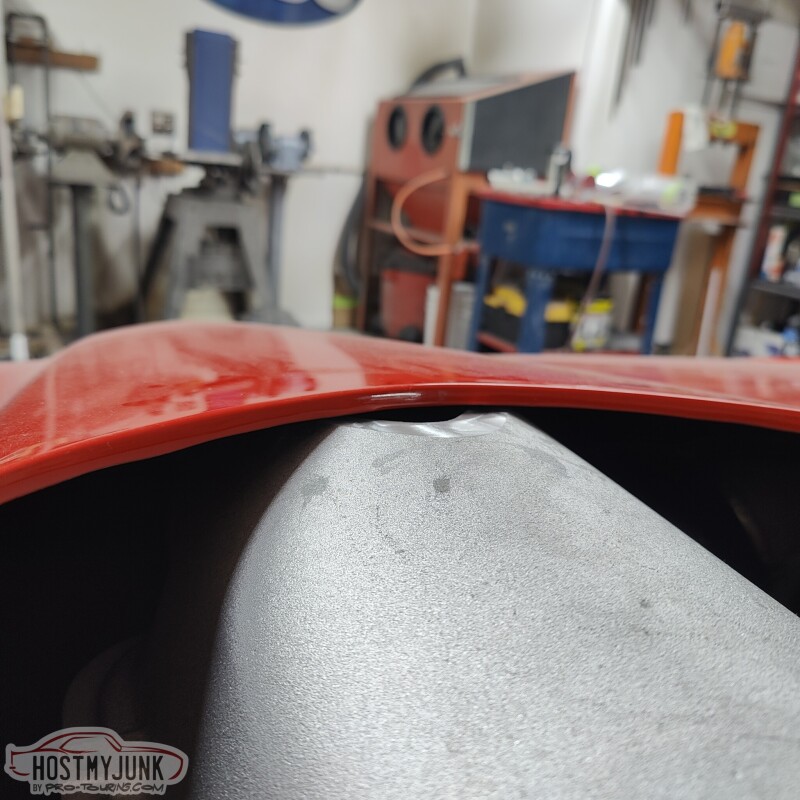
Now for the elephant in the room. The hood still doesn't close. This picture makes the situation look worse than it is, but you get the idea. The "bubble" at the top of the intake is about 1" too tall to allow the hood to close.
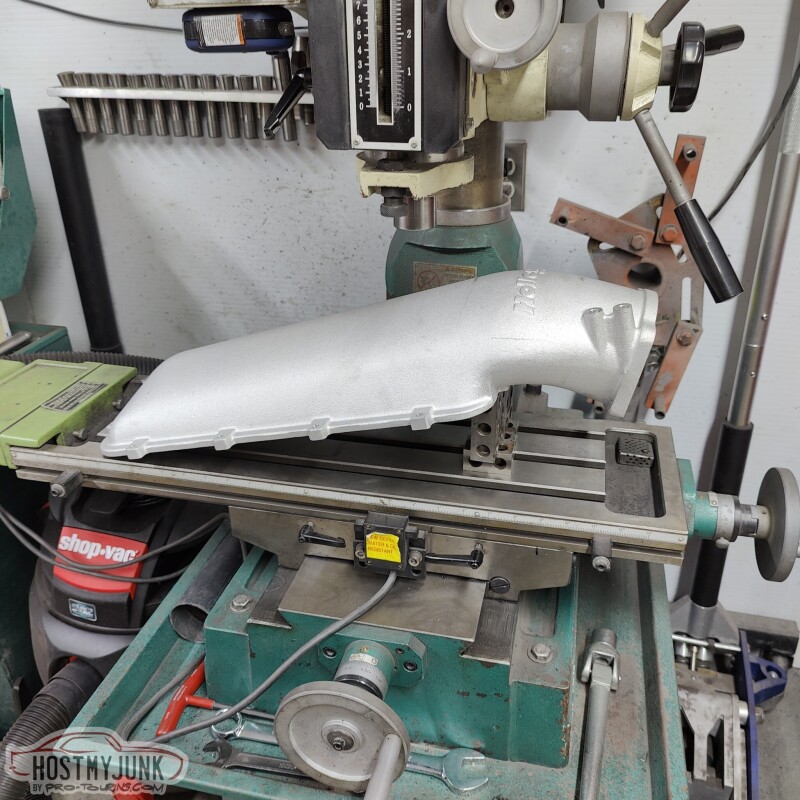
After considering all the options, we are going to start with the simple solution. We are going to mill down the bubble so the hood closes and see what we have left.
Andrew1970 GTO Version 3.0
1967 Cougar build
GM High-Tech Performance feature
My YouTube Channel Please Subscribe!
Instagram @dr__efi
I deliver what EFI promises.
Remote Holley EFI tuning.
Please get in touch if I can be of service.
"You were the gun, your voice was the trigger, your bravery was the barrel, your eyes were the bullets." ~ Her
12-28-2022 #552
-Moderator/Sponsor-
- Join Date
- Apr 2001
- Location
- The City of Fountains
- Posts
- 16,129
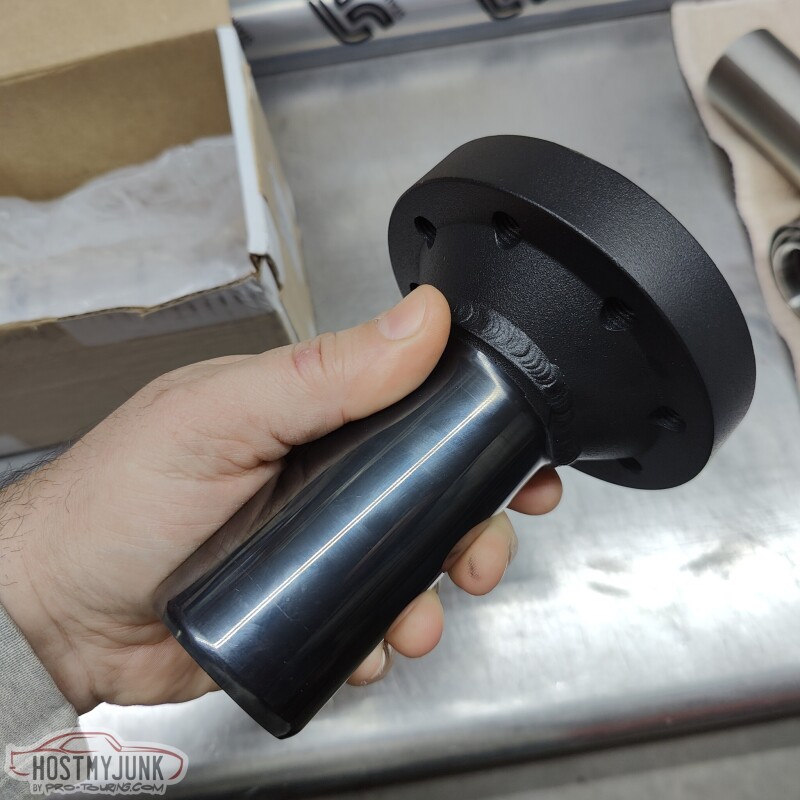
Back in 2010, I contacted The DriveShaft shop to solve a vibration issue in the GTO. They made me a CV driveshaft that use a CV at the slip yoke and a u-joint in the rear, which solved my vibration issues. Since then, many other A-body owners have done the same thing with the same, great results. When I built the Cougar, I wanted to go a step further and do a double CV shaft. That too had amazing results. If you look at any modern, RWD muscle car, that is exactly what you will see.
This version of the GTO will also get a dual CV driveshaft and this is the second part of that puzzle (the first being the CV pinion yoke). This slip yoke will use their new, non-plunging CV. This is the same CV they use on their high HP Nissan GTR and other driveshafts.
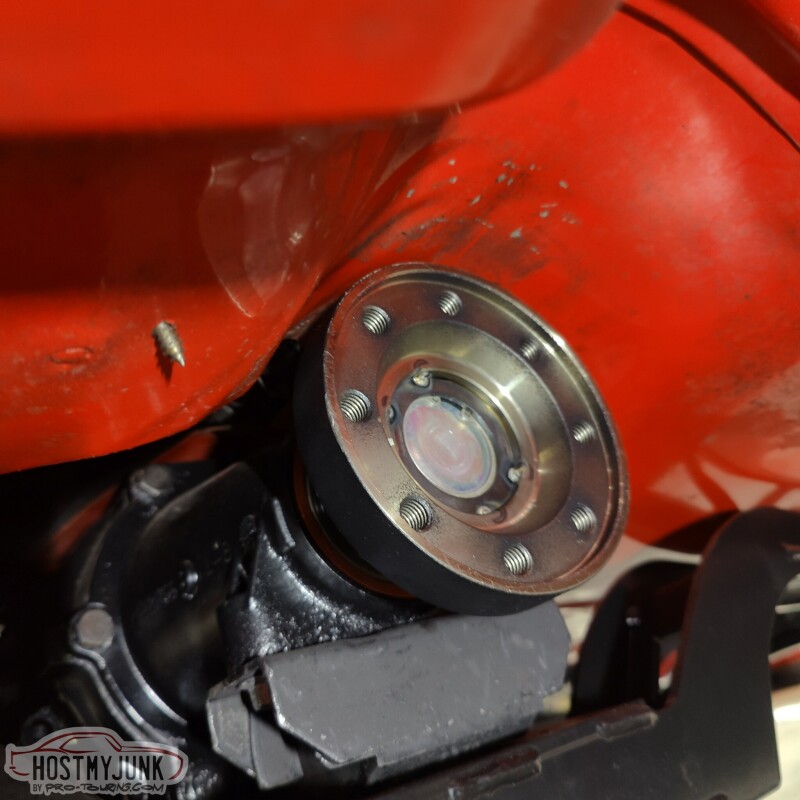
It's a tight fit, but there is a minimum of 3/8" all the way around the yoke. (what the hell was I thinking, twenty years ago, with the sheet metal screw?!)
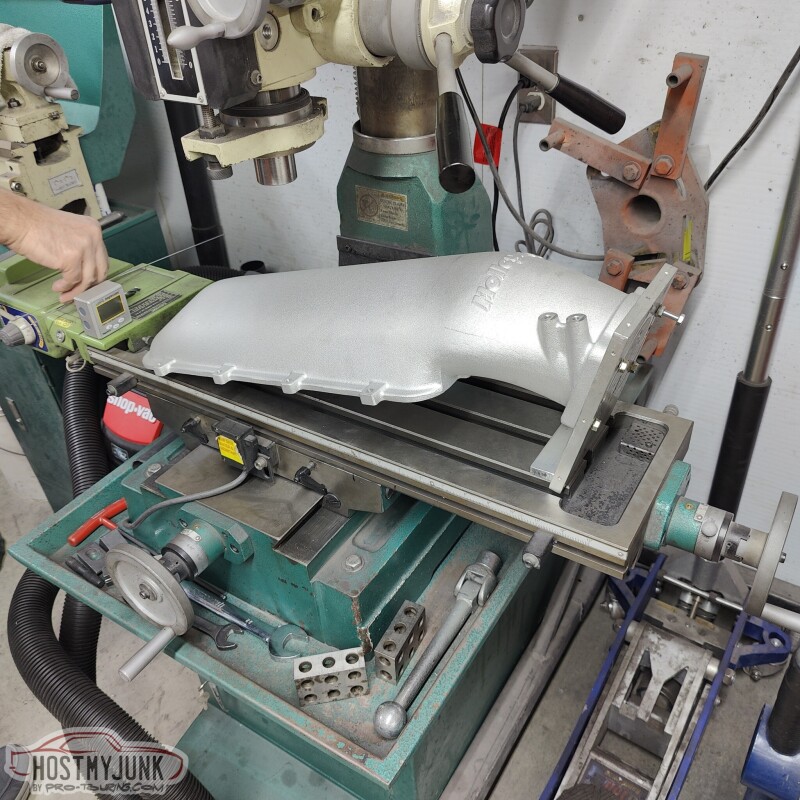
Vic made a fixture to hold the intake lid on the mill. We positioned it at the approximate angle of the hood.
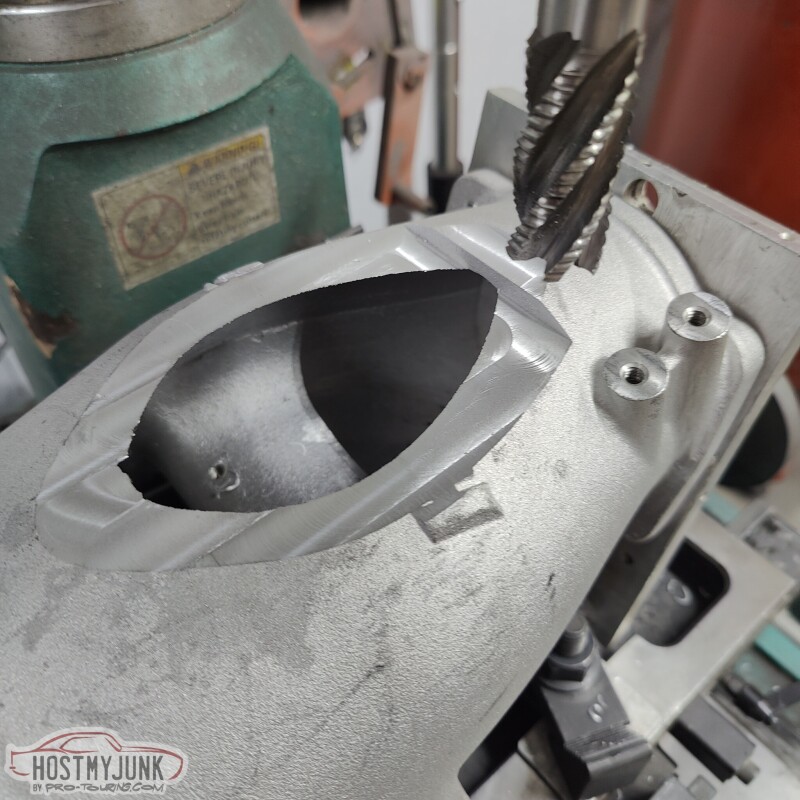
We took about 3/4" off the peak of the bubble and this was the hole that was made.
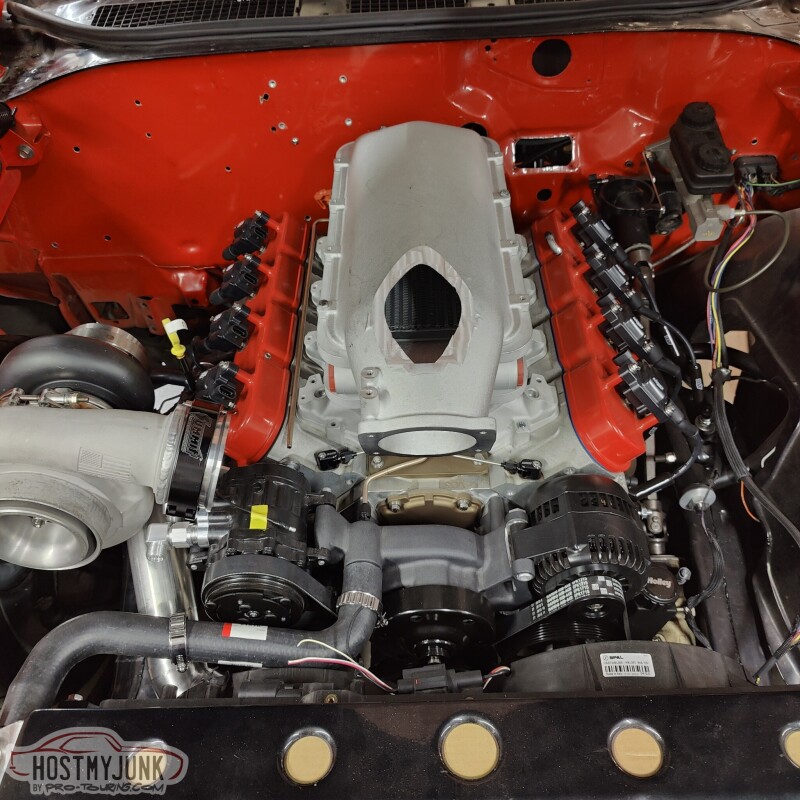
And the hood closed. As you can see, it is really tight, but nothing is touching. We are going to take a little bit more off to make room for the eventual plate that will get welded to cover the hole.
This is the current thinking on wastegate placement. My only reservation is that it be under the downpipe and will be a pain to get to if I have to do something with the wastegate.
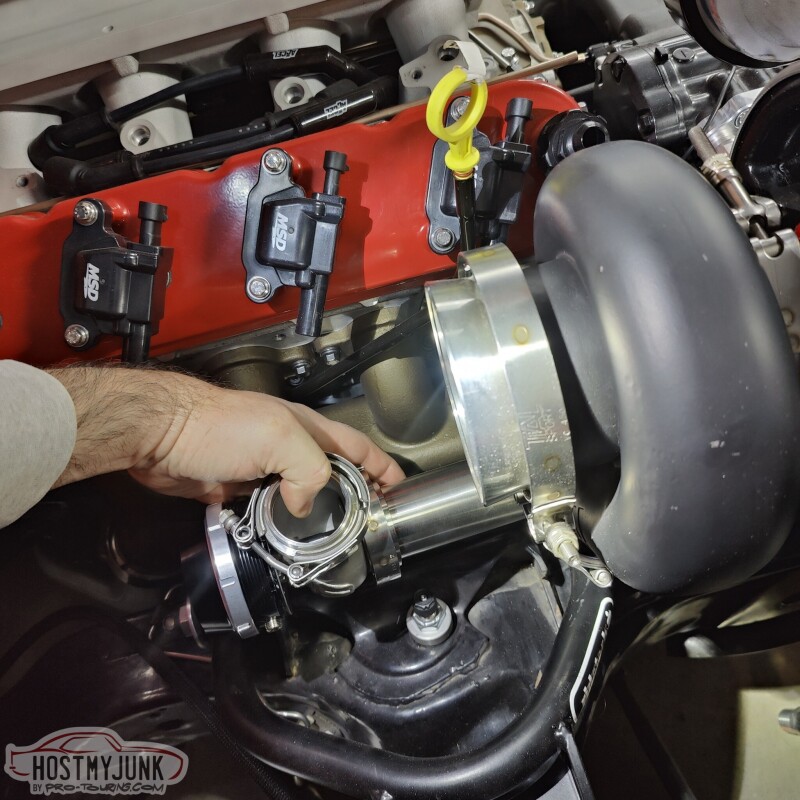
The upside is that it will have excellent, priority flow and will merge back into the downpipe.
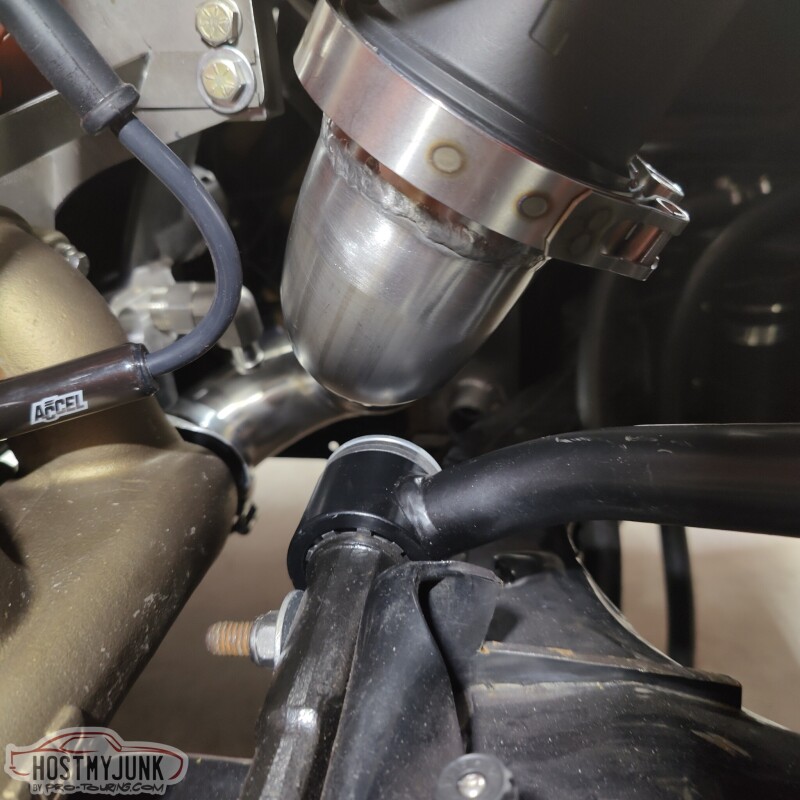
If anyone has thoughts on the wastegate placement, please chime in.
Andrew1970 GTO Version 3.0
1967 Cougar build
GM High-Tech Performance feature
My YouTube Channel Please Subscribe!
Instagram @dr__efi
I deliver what EFI promises.
Remote Holley EFI tuning.
Please get in touch if I can be of service.
"You were the gun, your voice was the trigger, your bravery was the barrel, your eyes were the bullets." ~ Her
12-29-2022 #553 Registered User
- Join Date
- Sep 2005
- Location
- Scottsdale AZ
- Posts
- 294
Looks great Andrew. Thank you for your help with my efi. Steve in AZ.
12-29-2022 #554 Registered User
- Join Date
- Oct 2004
- Posts
- 419
Kinda stinks about having to cut the intake to clear the hood. I assume you will still run the shaker?
For the gate, keep in mind you most likely will have to tune the spring weight. But once it's done it's done. If you want to go with your option, just set the downpipe up to have a joint by the trans. 2 bands and it comes right out giving you full access to the wastegate. The other option is to put the gate into the crossover. I know its controversial, but it works great on the truck applications. With the lightest spring, my setup went down to 3psi. Another benefit is it spreads out some of the really hot parts helping with heat dissipation.
12-29-2022 #555
Registered User
- Join Date
- Sep 2013
- Location
- sw Kansas
- Posts
- 1,662
Every time I have made something difficult to get at, I have regretted it. My knowledge of turbo systems is extremely limited so I have no good input. Hopefully, someone will have a possible solution that will allow access and proper performance.
12-29-2022 #556
-Moderator/Sponsor-
- Join Date
- Apr 2001
- Location
- The City of Fountains
- Posts
- 16,129
Originally Posted by alocker
Thanks for the input. I really appreciate it. Originally Posted by wfo guy
Andrew1970 GTO Version 3.0
1967 Cougar build
GM High-Tech Performance feature
My YouTube Channel Please Subscribe!
Instagram @dr__efi
I deliver what EFI promises.
Remote Holley EFI tuning.
Please get in touch if I can be of service.
"You were the gun, your voice was the trigger, your bravery was the barrel, your eyes were the bullets." ~ Her
12-29-2022 #557
-Moderator/Sponsor-
- Join Date
- Apr 2001
- Location
- The City of Fountains
- Posts
- 16,129
This morning I spent a few hours trying to help a local customer with a Coyote no-start issue, so I didn't have time mess with the car. But Vic sent me these pictures in the afternoon.
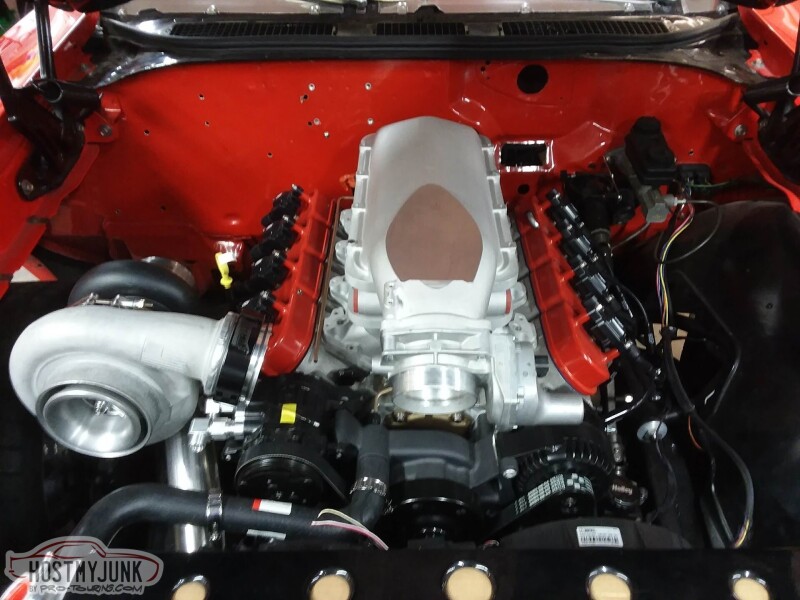
I think as far as looks go, it looks pretty good.
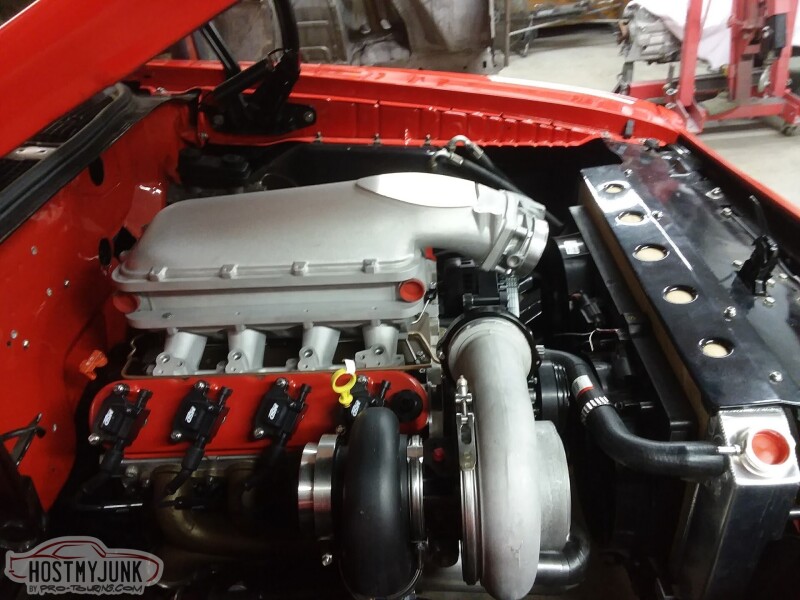
Tomorrow I will have a chance to go se it in person and se what kind of clearance there is with the hood. We are also going to install the Ring Brothers billet hinges, just to make sure everything fits the way it should.
Andrew1970 GTO Version 3.0
1967 Cougar build
GM High-Tech Performance feature
My YouTube Channel Please Subscribe!
Instagram @dr__efi
I deliver what EFI promises.
Remote Holley EFI tuning.
Please get in touch if I can be of service.
"You were the gun, your voice was the trigger, your bravery was the barrel, your eyes were the bullets." ~ Her
12-30-2022 #558 Administrator
- Join Date
- Jan 2000
- Location
- Thousand Oaks California
- Posts
- 10,223
Wow! That looks great.
Way to make it fit.Larry Callahan
Founder/Administrator of Pro-Touring.com, G-Machines.com and HostMyJunk.com
To advertise on Pro-Touring.com click here
12-30-2022 #559
Registered User
- Join Date
- Sep 2013
- Location
- sw Kansas
- Posts
- 1,662
Intake looks good.
12-30-2022 #560
-Moderator/Sponsor-
- Join Date
- Apr 2001
- Location
- The City of Fountains
- Posts
- 16,129
Originally Posted by Larry Callahan
Thanks guys! Originally Posted by wfo guy
Andrew1970 GTO Version 3.0
1967 Cougar build
GM High-Tech Performance feature
My YouTube Channel Please Subscribe!
Instagram @dr__efi
I deliver what EFI promises.
Remote Holley EFI tuning.
Please get in touch if I can be of service.
"You were the gun, your voice was the trigger, your bravery was the barrel, your eyes were the bullets." ~ Her

 Reply With Quote



