

Results 21 to 40 of 61
-
07-24-2015 #21

 Registered User
- Join Date
- Feb 2013
- Posts
- 1,542

Good talking to you, Gus! Glad you got this figured out. Post up some pictures when you're done

Last edited by Josh@Ridetech; 07-24-2015 at 11:08 AM.
-
07-24-2015 #22
Full Blown G-Machiner
- Join Date
- Oct 2008
- Location
- Santa Fe Springs, CA
- Posts
- 625
Could just put the Hotchkis ones back in and call it done
 Hotchkis Sport SuspensionToll Free: 877-466-7655
07-24-2015 #23 Registered User
- Join Date
- Sep 2001
- Location
- Accord, NY
- Posts
- 2,295
I too had the same fitment dilemma with my 69 camaro and Global West LCA's. Same solution too!
69 Camaro convertible, 410, M22, 8-pt cage therapy program. SOLD.
68 camaro - SOLD
67 Bel Air - New street project with perfect floors, frame and trunk!
07-24-2015 #24 Registered User
- Join Date
- Apr 2015
- Posts
- 51
I had the same problem w/ ridetech lowers on my 72 Camaro. For "bolt in" it was the most sweat I've ever broke lol. Used pry bars and sheer will over hours to get them in. Wouldn't wish it on anyone... I'd just make the Hotchkiss work if it fits, and honestly would have shipped these back if there was an alternative that would have fit and I knew it.
If there's that much frame variance they should ship w/ two bushings, a wide and a narrow inner. For the price I don't think that'd be unreasonable...
07-25-2015 #25 Registered User
- Join Date
- Mar 2012
- Location
- Canterbury, CT
- Posts
- 262
As nice as the hotchkiss arms fit, they do not play nicely with the shockwaves. There is a mod that I could probably do involving welding a plate to the hotchkiss a-arms thus eliminating the strong arms from the equation... if the jack screw fix becomes more of a headache than it's worth, then I'll consider the other mod and return the strong arms, but will have to determine if there will be a sacrifice in ride height adjustability and if the HQ shockwaves can still be used with the modified hotchkiss arm.
In the meantime, if anyone is interested in some barely used hotchkiss TVS upper and lower a-arms with ball joints for a 68-72 a-body, let me know.. I may have a set available soon. I have the springs too. ;)
Gus
Connecticut
1971 Cutlass 442 pt tribute project WIP
1971 Cutlass supreme convertible. RIP
1995 Mazda MX5 Miata autocross and track day ride
07-25-2015 #26
Registered User
- Join Date
- Mar 2012
- Location
- Canterbury, CT
- Posts
- 262
Good to know this path had been trod before. Josh at ridetech thought of the same fix and called me yesterday to discuss. We shall see if the screw jacks can compensate for a full 3/16" offset. If not, the Josh and I will have to talk again but these pieces are designed to work together... I don't want any more surprises slowing down my progress. This project has been in the planning stages far to long. Time to move forward.
Appreciate the input guys.
Thanks
ATB
Gus
Gus
Connecticut
1971 Cutlass 442 pt tribute project WIP
1971 Cutlass supreme convertible. RIP
1995 Mazda MX5 Miata autocross and track day ride
07-25-2015 #27
Registered User
- Join Date
- Mar 2012
- Location
- Canterbury, CT
- Posts
- 262
I hear ya RL! Just couldn't understand why there was such a large discrepancy... Seems RT erred on the narrower dimension to facilitate a "universal" fit. IDK. But if the Jack screw fix is too radical and won't make enough room to easily slide in the strong arms without significant distortion, I may have to opt out, but the frame material in that area is fairly thin so hoping for the best. Originally Posted by RLJ676

The bushing options is a good idea. Perhaps many others have had this problem but have never expressed their difficulties with RT?
Thanks for the input. Appreciated.
Jack screw comes today. Guaranteed from amazon to be here by 8pm. If that late, will do tomorrow and update the thread.
atb
Gus
Gus
Connecticut
1971 Cutlass 442 pt tribute project WIP
1971 Cutlass supreme convertible. RIP
1995 Mazda MX5 Miata autocross and track day ride
07-25-2015 #28 Registered User
- Join Date
- Aug 2012
- Location
- Peoria, AZ
- Posts
- 1,758
I think you'll find adjusting the frame ears is no big deal.
Lance
1985 Monte Carlo SS Street Car
07-26-2015 #29
Registered User
- Join Date
- Mar 2012
- Location
- Canterbury, CT
- Posts
- 262
Well, that was what I hoped Lance.... Not the case. Originally Posted by SSLance
(Please excuse the length of this post... but I included pics and a lot of detail to verify my efforts to make this system work. I want ridetech to understand what I've gone through and why I've decided to do a return my purchase)
Now that I've cooled down a bit, here's what happened:
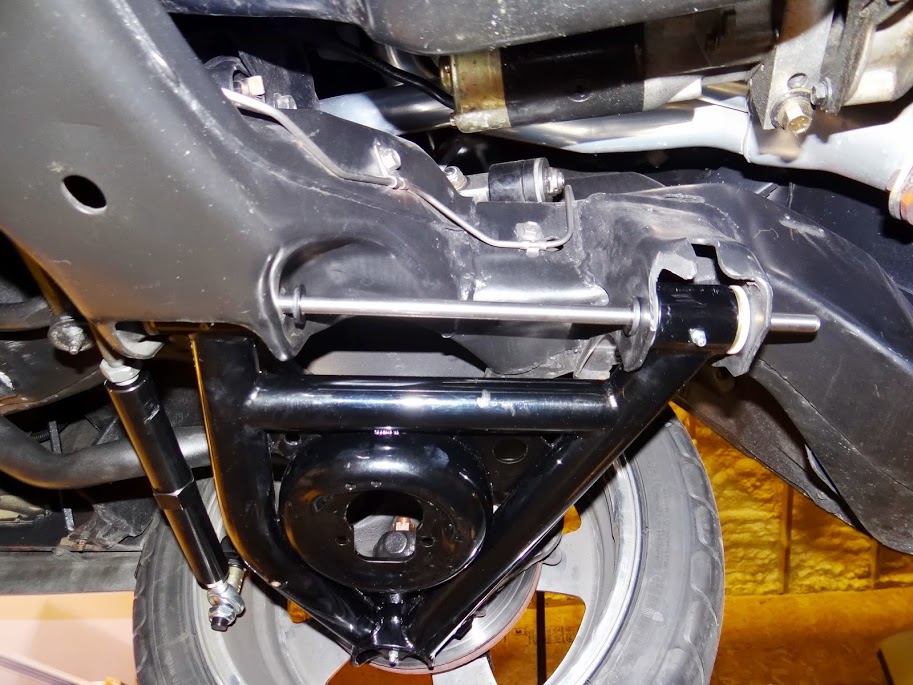
After quite a lot of time working the jack screw, using a big adj. crescent wrench and some upper body muscle, I finally got the drivers side strong arm in. It wasn't pretty and it was a struggle to get the bolts in, but i did it and was happy I was going to be able to use the SA's. Installed the shockwave, marked out where to cut with the plasma cutter and was about to do so, then thought I should do both sides then do all my cutting at once.
Well, the pass side seemed to go a bit faster and before I knew it, I got the strong arm in, but there was still a lot of tweaking with the crescent wrench and jack screw. Put in one bolt (front frame pocket), no problem. Tried the put in the second bolt.... the bolt hole in the SA was at least 3/8" off center! Really? Am I losing it?? So just to check my sanity, I put the hotchkiss pass side arm in. Even with the pockets/ears spread apart, the H arm went right in, no problem, albeit a bit sloppily.
Really? C'mon! this can't be! I attached pics so y'all know I'm not a blithering idiot. I'm no fabricator and this is only a hobby for me, but the only thing that can explain such gross misalignment is that there was a mistake made when welding up the pass side (probably both) arm. Why else would the hotchkiss still line up??
Look at the pic of the hole I'm supposed to put the bolt in (#6).... there is no way I can fix that much of an error without drilling a new hole and some serious fabricating. Then, how can I be sure the car can be aligned after modifying the a-arm mounting holes?? I don't have the patience or the skill to do that. This is supposed to be a bolt in mod, right?
I can't seem to insert comments between pics so here is a description:
1. frame prepped and ready for suspension
2. drivers side finally in
3. really had to bend those ears to get it in. why?
4. marked for plasma cutting drivers side. Man am I glad I didn't cut!!
5 &6. With one bolt in the front pocket, look at how far the rear bushing is off! In pic 6, how am I supposed to get a bolt in there without serious mods??
7. Ironically, even with the mangling of the pockets, the Hotchkiss pass side arm still fits! There is something WRONG with the Strong arm.
I'm done. I give up. Disgusted. Wasted countless hours planning this part of the build, asking for help here (which everyone here graciously provided) and took some time off to dedicate getting the part of the build done, just to be stopped dead with a part so far out of alignment no amount of tweaking with a screw jack and crescent wrench is going to align the rear pocket mounting hole to allow the bolt to go through.
Guys, my hands are up in the air and I've had it. Thanks for all of your input but I'm out of options. I guess the cool ride setup is an option but that requires welding to the hotchkiss arms and i'm not ready to take a chance and ruin those. Looks like I got a bad batch so Josh, you can expect a call from me tomorrow morning asking for a return authorization and 3 prepaid return shipping labels. I expect a full refund and NO restocking fee! Not a reflection on you.. you did your best. Thanks for trying.
Looking at the pics, No one can say I didn't do my best to try and make this work.
I think I'll just put the hotchkiss stuff back on so I have a rolling chassis and continue moving forward with the drive train and body work. I'm sooooooo tired of playing with a-arms that don't bolt in as advertised....
I welcome any suggestions for any options in which I can use the Hotchkiss lower a-arms. I have SPC adjustable upper a-arms and ATS spindles already from Mark at SC&C. Maybe he has some ideas on how to salvage this mess.
Thanks again for all the help guys. You gave me hope,..... for a while anyway.
atb
Gus
Gus
Connecticut
1971 Cutlass 442 pt tribute project WIP
1971 Cutlass supreme convertible. RIP
1995 Mazda MX5 Miata autocross and track day ride
07-26-2015 #30
Registered User
- Join Date
- Apr 2006
- Location
- Des Moines, IA
- Posts
- 598
My Ride Tech lower Strong arms are too narrow!
What bushings are in the H arms?
07-27-2015 #31
Registered User
- Join Date
- Mar 2012
- Location
- Canterbury, CT
- Posts
- 262
Hello Britt,
As mentioned previously in this post, the H arms have a firm rubber bushing I believe.
However, If you look at the pic showing the gross misalignment of the second bolt hole with the front bolt inserted, it's clear that it's not a bushing problem. The problem is the frame pocket hole is not aligned with the SA bushing hole, preventing me from inserting the second bolt. If the SA was dimensionally correct, the second SA hole would line up with the frame pocket hole. It does not. This shows an inherent error in the SA. Again, the stock and Hotchkiss arm still fits without issue, even with the bending/stretching/twisting I had to do to just get the SA into the pocket.
btw: As mentioned earlier in this thread, The initial problem was the SA's are a full 3/16" narrower than the stock or hotchkiss a-arms. Had hoped the mini jack screw would solve the problem, and it did, for the most part, on the drivers side, but the passenger side is beyond hope without major frame alterations, which I cannot and will not do.
Sorry to be so negative Britt, but this whole installation has been far more difficult than it should have been considering it's supposed to be a "bolt in" kit. I've wasted days researching why the kit isn't going in like a true bolt in kit should and have spent additional $ on a tool I'll probably never use again in an effort to make this system work. Others have had similar issues, but they were able to bend and pry their way into a usable scenario. I was not. I know there are some differences between these 45 year old frames since quality control wasn't that great in the day, but the variation is too extreme in this case and the strong arms are just too far out from stock dimensions without additional modifications. I see no options available to make this system usable with my stock Olds Cutlass hardtop frame so I will need to return all components. Unless you have a miracle fix that doesn't require any more bending, twisting, tweaking or frame mods involving cutting, drilling and/or welding, I'm basically sol and way out of patience.
Thanks for reaching out though.
Gus
Gus
Connecticut
1971 Cutlass 442 pt tribute project WIP
1971 Cutlass supreme convertible. RIP
1995 Mazda MX5 Miata autocross and track day ride
07-27-2015 #32
Registered User
- Join Date
- Aug 2012
- Location
- Peoria, AZ
- Posts
- 1,758
Gus, I realize you are probably passed this point by now...but here's a little something I did while fixing the front geometry on my car. I bought some 12mm drill rod and made two pieces to use to align the holes in my front and rear LCA mounts. From the factory, they were off enough that I could not run the rod through all 4 holes at once...on both sides of the car. And I'm positive they were like that from the factory.
I opened up a couple of the holes enough to get the drill rod through all 4 holes (no control arm in place) and then went to work moving the holes to improve the front geometry. The work I did on this can be found here. https://www.pro-touring.com/threads/...92#post1015092
I'll bet if you tried to run a piece of drill rod the same through your 4 LCA mount holes, they wouldn't even be close to lined up either. Like said above, this isn't an issue when you are running rubber bushings in your control arms. Once you put control arms with delrin bushings in, it becomes more important to line everything up so nothing gets in a bind.Lance
1985 Monte Carlo SS Street Car
07-27-2015 #33 Registered User
- Join Date
- Oct 2005
- Location
- Jasper,IN
- Posts
- 540
Gus and I spent some time on the phone this afternoon, just thought I'd let everyone know what we came up with. Having to "massage" the oem spring pockets a tick is not uncommon as the ears can pinch in as bushings wear and bolts get over-tightened. Going to a harder Delrin bushing can amplify this... but the benefits of a Delrin bushing far outweigh this.
Although after listening to Gus's description of the problem, it sounded like what he was experiencing was requiring more than "massaging", so I checked into is a little more. The Factory bushing split should be right at 8 3/4"; verified this on our engineering prints, the jig & the a 66 Chevelle we are restoring. It appears that Gus' arms are about 1/16" out of tolerance. OEM tolerances back there were so wide that in most cases 1/16" one way or another wouldn't matter, but on this car it does. Sending him a new set of lower arms.
07-27-2015 #34
Registered User
- Join Date
- Mar 2012
- Location
- Canterbury, CT
- Posts
- 262
Thanks for the input Lance. Lets see if the brandy new arms Darren sends me is the miracle fix I need to salvage this nightmare. I'll post my results on this thread once I have installed the new arms. Probably in a couple of weeks. Originally Posted by SSLance
Wish me Luck!

atb
Gus
Gus
Connecticut
1971 Cutlass 442 pt tribute project WIP
1971 Cutlass supreme convertible. RIP
1995 Mazda MX5 Miata autocross and track day ride
07-28-2015 #35 -Moderator/Sponsor-
- Join Date
- Apr 2001
- Location
- The City of Fountains
- Posts
- 16,117
Gus, Originally Posted by '71cutlasluvr
All this is hardly a "nightmare." What you are experiencing is fairly common with hotrodding. Old cars were never built very accurately, many have unknown histories and are damaged, manufacturers of parts sometimes have hick-ups. Just be happy that you bought parts from a reputable manufacturer that is clearly standing behind their product, instead of some mystery vendor on eBay and ching-chong parts. Remember, this is supposed to be FUN, damn it!!!!
Andrew1970 GTO Version 3.0
1967 Cougar build
GM High-Tech Performance feature
My YouTube Channel Please Subscribe!
Instagram @dr__efi
I deliver what EFI promises.
Remote Holley EFI tuning.
Please get in touch if I can be of service.
"You were the gun, your voice was the trigger, your bravery was the barrel, your eyes were the bullets." ~ Her
07-29-2015 #36
Registered User
- Join Date
- Apr 2014
- Posts
- 15
^^^^^^ Exactly what he said, this is not a nightmare! Had a similar issue with my strong arms on my 67 Camaro. Alittle persuasion, few cuss words and patience, problem solved. I called their tech line for a different issue with their spindle hardware, no questions asked new hardware arrived within 3 days. Things happen, be happy ridetech is so great to work with
07-29-2015 #37
Registered User
- Join Date
- Feb 2013
- Posts
- 1,542
Thanks for the good words, Matt! Originally Posted by matt816
Gus, be sure to let us know when you get a chance to work with the new Strong Arms.
07-29-2015 #38
Registered User
- Join Date
- Sep 2014
- Posts
- 130
So after opening up bolt holes to allow the drill rod to pass did you weld washers on the tabs to maintain bolt alignment? Originally Posted by SSLance
07-29-2015 #39
Registered User
- Join Date
- Aug 2012
- Location
- Peoria, AZ
- Posts
- 1,758
Yep... Actually I moved the holes even further to help even them out side to side and improve the front geometry, then welded the washers in place. If you click that link in the post, we detailed pretty well what we did.
Lance
1985 Monte Carlo SS Street Car
07-31-2015 #40
Registered User
- Join Date
- Mar 2012
- Location
- Canterbury, CT
- Posts
- 262
Thanks for the input matt, but a little persuasion didn't cut it this time. (read my post and look at how bent up the pocket's ears are in the pics) I am normally a very patient person... losing patience usually leads to breaking stuff, so I try to contain it. But in this case, the SA's I got were not correct for my chassis. Perhaps "nightmare" is a bit too strong of a term, so I retract it, but after several days of hits and misses, sore muscles and bent up frame pockets, cussing just wasn't cutting it and the frustration meter was redlined. So you'll have to forgive my rant... I was not a happy camper and my posts obviously showed that. Originally Posted by matt816
But as you say, ridetech is great to work with and Darren found the fix. With the inside dimension being correct (from 8 5/8" to 8 3/4"), I have no doubt the new SA's will fit like a glove and I can move forward with this long term project.
Gus
Connecticut
1971 Cutlass 442 pt tribute project WIP
1971 Cutlass supreme convertible. RIP
1995 Mazda MX5 Miata autocross and track day ride

 Reply With Quote


