


Results 1 to 17 of 17
Thread: Crap, front wheels won't go on
-
01-02-2011 #1
 Registered User
- Join Date
- Apr 2010
- Posts
- 364

Crap, front wheels won't go on
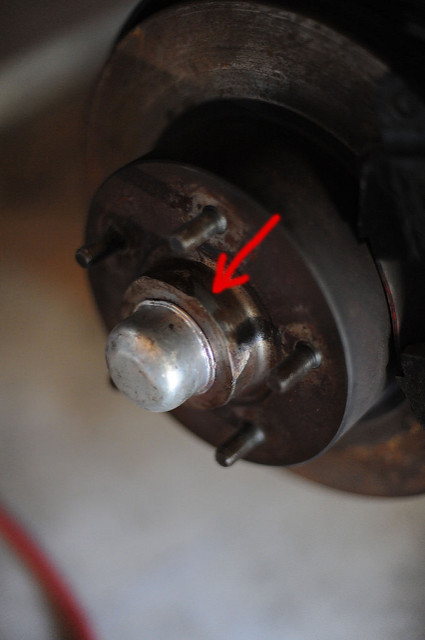
Has anyone ever had an issue with your wheel not sliding over the lugs because the area (pic below) had an outer diameter too large?
I guess the only solution is for me to take the disc off and send it to a machine shop to get it trimmed down a bit. The wheel will go about halfway on, but the area in the pic below is slightly tapered. I figure 1/16" or so off the O.D. will fix the problem.
Wheels are Forgeline DE3P's. I was told that these were the stock discs that came on the car, but I'm not 100% sure.
-
01-02-2011 #2
 Registered User
- Join Date
- Mar 2009
- Location
- SoCal
- Posts
- 1,240
I had this issue on my fox Mustang after I upgraded to Powerslot brand rotors. I simply filed the wheels a bit and it was fine. Of course, I'm guessing you don't want to take a file to your shiny new forgelines. Try cleaning up both surfaces a bit. Removing a little bit of material goes a long way. You might also use a pair of calipers to measure both the wheel and disc to see which one is really at fault.
Brett H.
1979 Pontiac Firebird Trans Am
1991 Mazda Miata
2005 Ford Mustang GT
1987 Ford Mustang GT - Sold 06-29-2014
1988 Oldsmobile Cutlass Ciera - RIP 9-17-2011
1992 Chevrolet Corvette - Sold 10-12-2017
-
01-02-2011 #3
 Registered User
- Join Date
- Mar 2005
- Location
- Texan Back in Texas!
- Posts
- 675
If it is that close maybe just some sandpaper/polishing on the rotor hub is all you need to slip them on. Only caution is that if they are hard to get on they may be even worse to get off later on once they have been seated, just a thought.
1965 Falcon Hardtop
However long you think your project will take, double it and you might be halfway right.
Build Thread: https://www.pro-touring.com/showthre...847#post798847
-
01-02-2011 #4
 Registered User
- Join Date
- Jan 2010
- Location
- Delaware
- Posts
- 689
I agree with 79-TA......if you were able to slide on halfway chances are there is actually very little material interfering, and it could actually just be a matter of cleaning the surface on that area of the rotor hat a bit. If you have a belt sander I'd just pop out the studs, load a medium grit belt on the sander.
With a bench sander (or lay your portable belt sander on its back on a bench) just hold the rotor in your hand while slowly turning that portion of the rotor hat on the belt. With just a sander you really cant mess anything up unless you lay on one spot hard without moving it for an extended period.
It would surprise me if 5 minutes worth of work won't fix that problem. Oh, and a little anti-seize on that surface could prevent it from being locked in place when you go to remove later......or if its still a snug fit just sand a little more.1973 Trans Am 455 SR block, ported 6x-8 heads, solid cam, Victor intake, 830 CSU carb, aluminum rods, 77mm Garrett turbo and methanol injection. 1064hp at the flywheel@5500 rpm
-
01-02-2011 #5
 Registered User
- Join Date
- May 2000
- Posts
- 4,151
Looks like it took a couple blows of a hammer in it's day.
If it spins freely, you might be able to take a 3" sanding disc on a angle grinder to it. Spin it with your hand to get it going, put the grinder to it, and let the disc spin it while taking material off in a consistent manner.
-
01-02-2011 #6
Registered User
- Join Date
- Apr 2010
- Posts
- 364
Good ideas, gents. Thanks.
Yeah, I took a caliper to it and they're basically the same, almost indistinguishable. I'll try the sanding/grinding trick first. Hopefully the fillet where it seats won't be a problem either. I wonder why they'd be those close. Oh, well. I'll get to work and report back.
I did try both sides and they both interfere at approximately the same point.
-
01-02-2011 #7
Registered User
- Join Date
- Jan 2010
- Location
- Delaware
- Posts
- 689
If your filet becomes your final problem just take an agle grinder with a thin metal cutoff disc ($1 at harbor freight, and maybe $1.50 at Lowes) and massage it a little in the crease where the filet is. Honestly if you take your time and go gently you won't screw anything up.
Let us know how it goes. Hopefully no more than a half hour of work....maybe a lot less.1973 Trans Am 455 SR block, ported 6x-8 heads, solid cam, Victor intake, 830 CSU carb, aluminum rods, 77mm Garrett turbo and methanol injection. 1064hp at the flywheel@5500 rpm
-
01-02-2011 #8
Registered User
- Join Date
- Apr 2010
- Posts
- 364
Will do. Thanks!
-
01-02-2011 #9
Registered User
- Join Date
- Aug 2004
- Location
- Roswell, N.M.
- Posts
- 572
Used to be a common problem on early production GM with billet wheels. Beware of grinding due to the fact that some wheel companies design the fit to be hub centric. Check with the wheel mfg...
-
01-03-2011 #10
 Registered User
- Join Date
- Oct 2005
- Location
- Corona, CA
- Posts
- 681
ModernMuseum, measure the center bore of the Forgelines and the OD of your hub. Let me know how close it is.
-
01-07-2011 #11
Registered User
- Join Date
- Apr 2010
- Posts
- 364
IT WORKED!! Originally Posted by Justin@DriverzInc

All I have is a cheapo caliper, but the difference is almost indistinguishable. I used a sander attachment on my grinder to get in there - it takes off just enough material to remove the material evenly. It also helped that the element was a little flexible to get in there between the lugs. A regular grinding attachment would have interfered with the lugs and probably would have messed up my threads.
The last 1/2" or so of pushing the wheel on was almost an interference fit, meaning the ID of the wheel was probably only a handful of thousandths larger than the disc OD. I had to rock it back and forth three or four times while pushing it on, but it did go on flush.
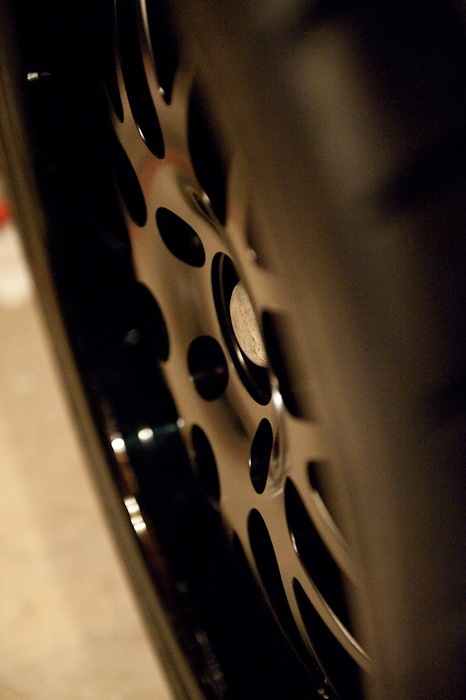
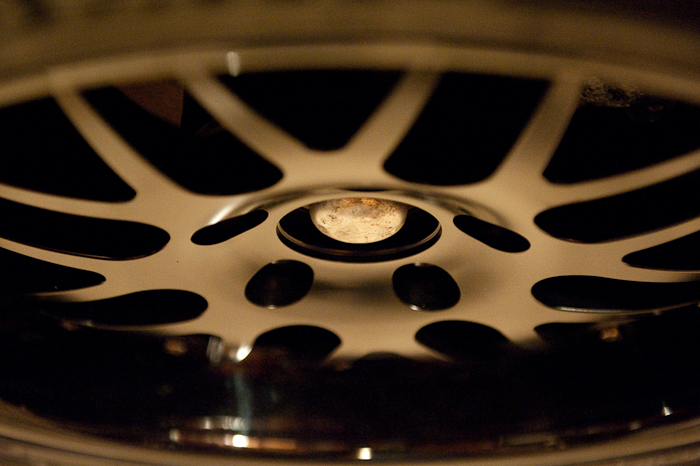
HOWEVER, due to the depth of the cap that goes over the castle nut (approximately 1"), the center pieces popped off (on the front wheels only). What would be the recommendation here?
1) Get a ~1/4" wheel spacer or
2) Try to find a castle nut cap that is less deep (not sure if this is even possible)?
01-07-2011 #12
Registered User
- Join Date
- Aug 2004
- Location
- England
- Posts
- 1,042
I would use some anti rust just to stop any corrosion build up as you might not get them off after some time.
01-07-2011 #13
Registered User
- Join Date
- Oct 2005
- Location
- Corona, CA
- Posts
- 681
Can you post of pic of the center caps you received? If you have the flat caps, you might need to order a set of the tall aluminum caps to help swallow the hub.
01-07-2011 #14
Banned
- Join Date
- Aug 2003
- Location
- Orlando, FL
- Posts
- 8,745
Some spindles have some extra material at the end that can usually be trimmed off. There is also some clearance can be ground off the back of the cap. A teenie here, a teenine there and they will fit.
01-08-2011 #15
Registered User
- Join Date
- Jan 2010
- Location
- Delaware
- Posts
- 689
Glad you got it to work. Probably would have been easier popping out the studs, but you got it anyway. If its a tight fit with the wheel still DEFINITELY use some antiseize on that hub, or later on you'll be smacking the rim and cursing trying to get it off. Also take a look at the recent thread about antiseize on the stud threads.
1973 Trans Am 455 SR block, ported 6x-8 heads, solid cam, Victor intake, 830 CSU carb, aluminum rods, 77mm Garrett turbo and methanol injection. 1064hp at the flywheel@5500 rpm
01-13-2011 #16
Registered User
- Join Date
- Apr 2010
- Posts
- 364
Thanks for the replies, gents. Whenever I take the wheels off to put new lugs on, I'll put some anti-seize on there. Good catch. Anyone know what the lug O.D. / thread pitch is? I need to order some black lugs.
Here's some pics. It looks like I just need about another 3/8" clearance or so...IF I had to chance centers, I'd go with something solid black. I'm don't really care for the chrome "FORGELINE" letters.
01-13-2011 #17 Registered User
- Join Date
- Jul 2006
- Location
- beaverton oregon
- Posts
- 392
hammertime! can ya just dent in the cover abit? probably plenty of room behind it. atleast as much to clear.
Scott R. (vinny)
 misha widebody SL55 highly modded
-67 camaro ttls/viper t56, 350z irs, full frame, in the works
-porsche cayenne turbo 175hp added over stock
-other crap that just hauls me around!

 Reply With Quote


