

Results 1 to 20 of 51
Thread: 68 firebird 400 project
-
08-27-2012 #1
 Registered User
- Join Date
- Sep 2010
- Location
- SoCal
- Posts
- 42

68 firebird 400 project
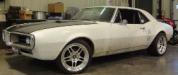
So, after being a member on the PT site for some time, doing a lot of reading, research,etc., I've finally started my own build/restoration. A little history on mycar....
Orignial 68 400 CA car with little rust issues and a fairly straight body. The car belonged to my former boss, who had it as a weekend fun car and gave it to me about 7 years back as a bonus as he knew I liked the car. It's unfortunately not a numbers matching car, but otherwise complete and in overall good shape. He had some HP work done to the motor previously, but didnt retain the documentation. More on that at a later date. The car sat in my driveway, then eventually my garage when I moved. I drove it a few times when I first got it but, it has been sitting an going through slow disassembly the last 4 years. I took more before pics prior to my starting to take apart the front end, but my wife's laptop crashed, and they got dumped.
The car is now at a friend's body shop and starting the first phases of the bodywork. The tail light panel had to be replaced due to a poorly repaired rear end accident and the trunk pan replaced from its beginning to rust. The repair spots you will see onthe sides of the car were not from accidents, but from forklifts bumping into the car when my boss owned it and stored it in the warehouse. Real shame.
Anyway, I'm going to update and document this build as well and as regulalry as I can. I know there are a lot of knowlegable people on here and I've seen others do some very impressive builds. I always appreciate input if you have it.
As you can see, I've had already started removing the grill and front components.
Temporary fix of damage from forklift, but from the inside of the fender it's pretty rough. Going to replace the fender.
Beginning stages of work. Tail panel and trunk pan replaced.
Next step is sanding and prep of the rest of the body and pulling the motor and trans.
-
03-11-2013 #2
Registered User
- Join Date
- Sep 2010
- Location
- SoCal
- Posts
- 42
Update 3-11-13
It's been a good while since any progress on my car. I've read thread after thread of cars being stuck in body shop phase for a while, but just now starting to get it. Got over to the shop this weekend with the crane and tools, and got the motor and trans out. Was kind of a pain in the butt. The way one of the headers was installed, made it impossible to get to one of the bolts attaching it. So we had to pull it with the header attached. It wouldn't get past the a/c and kep catching on the motor mound plate on the subframe. Finally had to remove the plate, and it came right out. I hope to have steady progress from here. The plan is to go back next week and remove the windows and remaining parts in the engine bay to get the car ready for prep and sanding. I'll also start posting the some of the other work I'm doing from home restoring various parts soon.
03-11-2013 #3
Registered User
- Join Date
- Jul 2012
- Posts
- 46
Nice starting point you got there. Are you keeping the factory a/c or are you gonna shave the firewall and go aftermarket?
03-12-2013 #4
Registered User
- Join Date
- Sep 2010
- Location
- SoCal
- Posts
- 42
That's a good question on the a/c. The compressor is long since gone from the previous owner, so really all that's left is the box attached to the firewall and that's seen better days. I would like to probably leave to option open to install maybe a Vintage Air set up later, so I don't think the best think to do would be to completely seal off the openings. I've seen options, like the A/C Delete cover that you can buy, but if there are other ideas or better options, I'm all ears.
03-21-2013 #5
Registered User
- Join Date
- Jul 2012
- Posts
- 46
If you go aftermarket like vintage air or classic auto air, you wont need to purchase the a/c delete box that you mention, as they both have the block-off plates included in their kits.
03-26-2013 #6
Registered User
- Join Date
- Sep 2010
- Location
- SoCal
- Posts
- 42
Update 3-26-13
Thanks for the A/C tip. I'm going to look into costs on both options for the new system. I spent the past two saturdays at the shop with a good pressure washer, some Purple Power, and Simple Green. Got the car up on 4 jacks and went to work on the engine bay and undercarriage. 45 years of grease and dirt does not come off easy and that's probably the dirtiest work I've ever done. When I arrived at the shop they had already removed most of the side windows, emblems, handles, locks, and interior panels. Wasn't expecting it, so it was a nice surprise.
I'll shoot some more pictures this weekend when the front and rear windows are removed. From there it's into the shop and the body work starts.
I've also started restoring the tail light assemblies and other parts. Will post some pics a bit later.
03-31-2013 #7
Registered User
- Join Date
- Sep 2010
- Location
- SoCal
- Posts
- 42
Update 3-31-13
I was able to spend a little time re-doing the tail light assemblies. Started on the first one to make sure everything was going to come out OK. I'm pretty happy with the results. I started on the back casing with a couple of rounds of degreaser, then a fine grit paper, then some steel wool for prep. Then primed and gave it a nice matte aluminum color finish. I polished the lenses with a polishing ball and some compound. Cleaned, primered, and used some black enamel between the lenses. And finally cleaned the original rubber gasket and applied some trim and rubber restorer. The restored unit basically looked about identical to the unrestored one in the pics.
I think next week the shop will be pulling the remaining front and rear windows and starting the body prep work.
03-31-2013 #8 Registered User
- Join Date
- Feb 2006
- Location
- Idaho Falls, Id
- Posts
- 1,342
Looks like a pretty solid car to start with. Can't wait to see some progess
Traven
04-02-2013 #9
Registered User
- Join Date
- Sep 2010
- Location
- SoCal
- Posts
- 42
Yeah, the car was not bad when I got it. Luckily it's been in southern CA it's whole life, so no real rust issues to deal with. I am replacing the front fenders, due to some lower rust, but that's about it. Should have some new progress pics soon.
04-02-2013 #10
Registered User
- Join Date
- Oct 2012
- Posts
- 36
Great project! Love the early firebirds.
04-02-2013 #11
Registered User
- Join Date
- May 2009
- Location
- Minnesota
- Posts
- 615
If the front fenders are original it might be easier to fix them over trying to get repops to fit correctly. Looks like a nice solid car for a great project.
04-03-2013 #12
Registered User
- Join Date
- Sep 2010
- Location
- SoCal
- Posts
- 42
Except for the new tail light panel and trunk pan we recently replaced, the rest is original. I would like to keep the original front fenders, but I was speaking with my body shop guy, and his feeling was replacments would be better. Beside's the lower rust, one's pretty rough inside due to some previous damage. I've read that AMD is doing some decent replacements. Anyone know anything about the Firebird metal from them or have other suggestions?
04-04-2013 #13
Registered User
- Join Date
- Jul 2012
- Posts
- 46
If you decide to have your a/c box restored, this is what it should look like when finished.
04-05-2013 #14
Registered User
- Join Date
- Sep 2010
- Location
- SoCal
- Posts
- 42
Looks like good work on the AC box. I'll reply to your PM.
04-05-2013 #15
Registered User
- Join Date
- Jul 2012
- Posts
- 46
Sorry if sent you two pms as my pc froze.
04-23-2013 #16
Registered User
- Join Date
- Sep 2010
- Location
- SoCal
- Posts
- 42
Project update 4-23-13
So the shop called me last week when I was out of the country and informed me that when they removed the front windshield, the top dash metal had been basically eaten away as you can see in the pic. Went down to CI this weekend and picked up a new one. You can see it laying accross the dash in a couple of the pics. I'm assuming this must be a common issue, even on good cars. They accomplished quite a bit in the past 2 weeks, removing the doors for sanding and primer. Same with the trunk lid and the front lower valance pieces. They also repaired some poorly done previous repairs on the back passenger quarter. I'm thinking we'll get the rest of the body sanded and prepped in the next couple of weeks. Seems to be making some steady progress.
04-23-2013 #17 Registered User
- Join Date
- Mar 2009
- Location
- overseas
- Posts
- 3,434
nice progress!
 Kevin S. (overseas in Germany)
1963 Chevrolet Impala 2d ht Coupe
www.CruznArt.com
CRUZN - Automotive Artworks
05-03-2013 #18
Registered User
- Join Date
- Sep 2010
- Location
- SoCal
- Posts
- 42
Thanks Kevin. More pics coming tomorrow. Got another call yesterday and front fenders are off and the new dash panel should be in place. Will post new pics this weekend.
05-11-2013 #19
Registered User
- Join Date
- Sep 2010
- Location
- SoCal
- Posts
- 42
Finally got over to the shop today. Some progress. Front fenders pulled. The removed the old top dash metal that was rusted out and welded in the new piece (see pic). Got the back quarter that was repaired with a shot of primer.
I picked up all of the interior panels, hood hinges, windows, moldings, and other misc. parts.
I'll probably be taking the hinges and front core parts, including the radiator support, over this week to get blasted and coated.
Starting to think about colors a bit.
05-11-2013 #20 Registered User
- Join Date
- Aug 2011
- Location
- Connecticut
- Posts
- 926
Nice color
1967 Firebird "Poor-Boy Build"
New updated thread
https://www.pro-touring.com/threads/...bird-(Updates)
Follow me on Instagram @NaturalLivingMan
Tags for this Thread

 Reply With Quote


