


Results 781 to 800 of 949
Hybrid View


-
01-11-2022 #1

 Registered User
- Join Date
- Apr 2005
- Location
- Chicago
- Posts
- 2,788

Final Fuel Line Connection To Fuel Rail ( 10-24-21 )
Having to make the last cut on the fuel line was fun and yes I was worried about cutting it to short.
This was the final line which goes under the throttle body.
I also want to make sure that the line wouldn't rub on anything.
marty-mj
GarageScene.net High Speed Welding KDHotrods RecoveryRoomInteriors WegnerAutomotive Autometer Ride-Tech
-
01-11-2022 #2
Registered User
- Join Date
- Apr 2005
- Location
- Chicago
- Posts
- 2,788
The last of the wiring under the Sniper Intake ( 10-24-21 )
Making sure the last bit of wiring under the intake manifold will be safe from harm.
If you look closely you can see the fitting that Holley supplied are useless.
When we build in the intake tube we are going to weld tabs under the tube so we can zip tie the MAF wire harness under the tube.
I also ran the Drive By Wire harness under the manifold.
All of the wiring has been heat wrapped going to the starter.
marty-mj
GarageScene.net High Speed Welding KDHotrods RecoveryRoomInteriors WegnerAutomotive Autometer Ride-Tech
-
01-11-2022 #3
 -Moderator/Sponsor-
- Join Date
- Apr 2001
- Location
- The City of Fountains
- Posts
- 16,125
Looking good Marty!
Andrew1970 GTO Version 3.0
1967 Cougar build
GM High-Tech Performance feature
My YouTube Channel Please Subscribe!
Instagram @dr__efi
I deliver what EFI promises.
Remote Holley EFI tuning.
Please get in touch if I can be of service.
"You were the gun, your voice was the trigger, your bravery was the barrel, your eyes were the bullets." ~ Her
-
01-12-2022 #4
Registered User
- Join Date
- Apr 2005
- Location
- Chicago
- Posts
- 2,788
Thank you Andrew and I am hoping to work on it tonight when I get home Originally Posted by andrewb70

Thanks Martin it's nice having a clean work surface Originally Posted by Martin71RS
marty-mj
GarageScene.net High Speed Welding KDHotrods RecoveryRoomInteriors WegnerAutomotive Autometer Ride-Tech
-
01-12-2022 #5
 Registered User
- Join Date
- Apr 2001
- Location
- The Netherlands
- Posts
- 1,507

man...I wish my car was that clean... nice job buddy!
-
01-12-2022 #6
 Registered User
- Join Date
- Nov 2006
- Location
- Ma.
- Posts
- 5,560
It looks sweet Marty! Getting close!!!
Wayne
Car FINALLY home !!!!!! lol
Project FNQUIK https://www.pro-touring.com/showthre...ghlight=FNQUIK
-
01-12-2022 #7
Registered User
- Join Date
- Apr 2005
- Location
- Chicago
- Posts
- 2,788
Originally Posted by Motown 454
Thank you Waynemarty-mj
GarageScene.net High Speed Welding KDHotrods RecoveryRoomInteriors WegnerAutomotive Autometer Ride-Tech
-
01-12-2022 #8
Registered User
- Join Date
- Apr 2005
- Location
- Chicago
- Posts
- 2,788
Yep, I am still playing with the Trans Coolant Lines ( 10-24-22 )
I found these clamps on Amazon and they do a great job securing the lines.
Checking for clearance under the upper control arm and there is plenty.
Yep, I cut the wrong length of the heat sleeve when I made my last cut so now I have to order more.
So, I jumped over to the battery wires as I needed to do something a little different and then I called it a night.
marty-mj
GarageScene.net High Speed Welding KDHotrods RecoveryRoomInteriors WegnerAutomotive Autometer Ride-Tech
-
01-15-2022 #9
Registered User
- Join Date
- Apr 2005
- Location
- Chicago
- Posts
- 2,788
Thank you and I am finally seeing the light at the end of the tunnel and it's not a train. Originally Posted by Motown 454
Wayne, how did the surgery go ?marty-mj
GarageScene.net High Speed Welding KDHotrods RecoveryRoomInteriors WegnerAutomotive Autometer Ride-Tech
-
01-12-2022 #10
Registered User
- Join Date
- Apr 2005
- Location
- Chicago
- Posts
- 2,788
Holley Cylinder Head Ground ( 10-30-21 )
Cylinder Head grounds are complete ( 10-30-21 )
JIC anyone wants to know this is the size of the bolt that is on the back of head.
marty-mj
GarageScene.net High Speed Welding KDHotrods RecoveryRoomInteriors WegnerAutomotive Autometer Ride-Tech
-
01-12-2022 #11
 Registered User
- Join Date
- Nov 2018
- Posts
- 985
I'd suggest moving the disconnect to the negative terminal on that battery. And, assuming the second set of wires on top are going to the fan. Is there a fuse/circuit breaker for that pair?
-
01-13-2022 #12
Registered User
- Join Date
- Apr 2005
- Location
- Chicago
- Posts
- 2,788
Ya know I have been going back and fourth on this for weeks if not months. For years I have done it this way but that doesn’t mean it’s correct. Any chance you can help my brain and explain to me why it should be on the ground side. Which I feel is where it should be. Originally Posted by Vimes
marty-mj
GarageScene.net High Speed Welding KDHotrods RecoveryRoomInteriors WegnerAutomotive Autometer Ride-Tech
-
01-13-2022 #13
Registered User
- Join Date
- Nov 2018
- Posts
- 985
The same reason that GM went to ground switching - inrush current. It's harder on components to have current rush through than it is to have current present. Think of it this way - electricity acts a lot like water in a hose. Voltage is like pressure, and current is like flow. Say you have a 100 ft water hose that's empty, and you turn on the faucet at the wall. When you open the hose sprayer on the other end, it jumps, kicks and spurts until the hose is full. For a short time, you'll even see more pressure on the hose than the water main makes due to the water's velocity as it goes through the hose. When it slams into the end, it pushes pressure back down the hose until everything equalizes. That would be a positive switch. On the other hand, if the hose is already full and you pull the hose sprayer trigger, it sprays smoothly. That would be a negative switch. Inrush current will act much like water rushing to fill an empty hose, and it apparently causes enough problems that GM was willing to spend the money to retool every car they make to use positive switching. Originally Posted by syborg tt
About the only place you'd want a positive switch is on a racing emergency disconnect - the idea being that in an emergency you want power killed completely. The disconnect should isolate both the battery and the alternator from the power circuit because the alternator should be connected directly to the battery and not passing through the disconnect. When the disconnect is opened, the alternator's output wire is no longer connected to the car's electrical system. An emergency battery disconnect is only concerned with not catching fire, not component life.
-
01-13-2022 #14
Registered User
- Join Date
- Apr 2005
- Location
- Chicago
- Posts
- 2,788
Thank you Thank you Vimes
Thank you, Thank you
I am not sure you could have explained that any better for me as I feel like i completly understand why and this is why I love these boards.
So on a side note what is your toughts on leaving it and just adding another one on the ground since I don't have a master disconnect ?
Originally Posted by Vimes
marty-mj
GarageScene.net High Speed Welding KDHotrods RecoveryRoomInteriors WegnerAutomotive Autometer Ride-Tech
-
01-15-2022 #15
Registered User
- Join Date
- Apr 2005
- Location
- Chicago
- Posts
- 2,788
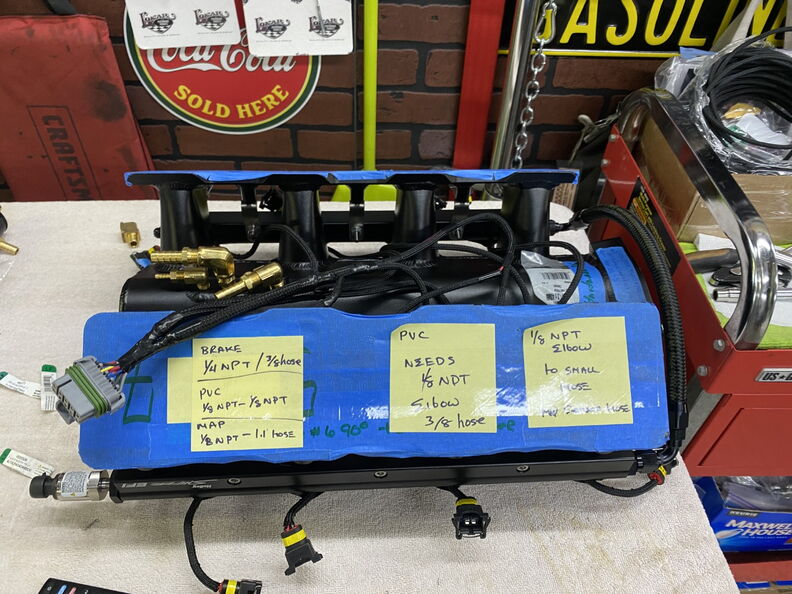
Intake Manifold Fittings ( 10-30-21 )
Planning ahead before I run over to Ace Hardware for some fittings as the one's that are supplied are useless.
So the Earl fitting that I happened to have looked like it was going to work. However, It did not as it hit the valley cover.
So I found my Mike Norris Catch can and I used these fitting to start mocking up the fittings I needed.
After a quick trip to Ace I think I have the fittings I need.
Only at Ace can you find a 1/8" Hose Barb (trust me I looked everyone else)
First Mock Up
 marty-mj
GarageScene.net High Speed Welding KDHotrods RecoveryRoomInteriors WegnerAutomotive Autometer Ride-Tech
-
01-15-2022 #16
Registered User
- Join Date
- Apr 2005
- Location
- Chicago
- Posts
- 2,788
Water Neck and Intake Manifold Plumbing ( 10-31-21 )
I had time to do a couple simple projects so out to the garage I went.
I decided to mock up some of the hoses.
Thankfully the auto parts store is close
Nope, I don't like the way this hose looks.
I ordered this custom hose with all kinds of crazy bends in it.
marty-mj
GarageScene.net High Speed Welding KDHotrods RecoveryRoomInteriors WegnerAutomotive Autometer Ride-Tech
-
01-15-2022 #17
Registered User
- Join Date
- Apr 2005
- Location
- Chicago
- Posts
- 2,788
Last one for the night Upgrading to a Waterproof Relay ( 10-31-22 )
Way back somewhere in this thread I installed Painless fan relay and I screwed up and didn't order a standard fan relay. So I ordered a new Water Proof Fan Relay kit.
Since it is in between the battery and the radiator the batter once again needs to come out.
Thankfully I used a weather pack connector as I was able to just remove the ground from the plug.
marty-mj
GarageScene.net High Speed Welding KDHotrods RecoveryRoomInteriors WegnerAutomotive Autometer Ride-Tech
-
01-15-2022 #18
Registered User
- Join Date
- Apr 2005
- Location
- Chicago
- Posts
- 2,788
Vacuum Hose Installed ( 11-09-21 )
My molded hose arrived
I also received another fitting for the Fuel Pressure Sensor
Looks like I need a longer hose.
Found an all in one fitting that will be replacing two of the fittings.
marty-mj
GarageScene.net High Speed Welding KDHotrods RecoveryRoomInteriors WegnerAutomotive Autometer Ride-Tech
-
01-15-2022 #19
Registered User
- Join Date
- Nov 2006
- Location
- Ma.
- Posts
- 5,560
It looks like you got a lot of stuff figured out in the last few posts. That stuff can drive you crazy. It looks good.
Wayne
Car FINALLY home !!!!!! lol
Project FNQUIK https://www.pro-touring.com/showthre...ghlight=FNQUIK
-
01-15-2022 #20
Registered User
- Join Date
- Apr 2005
- Location
- Chicago
- Posts
- 2,788
Optima Batter Charger Plug ( 11-09-21 )
Since I keep the car on the optima charger when it is parked in the garage I decided to mock up the wire and see if I could hide it when it's not in use.
I can easily tuck it in the frame rail when not in use.
marty-mj
GarageScene.net High Speed Welding KDHotrods RecoveryRoomInteriors WegnerAutomotive Autometer Ride-Tech

 Reply With Quote


