


Results 1 to 14 of 14
Thread: Gapping and Narrowing Bumper
-
03-15-2010 #1

 Registered User
- Join Date
- Dec 2007
- Location
- Carlsbad, Ca
- Posts
- 1,213

Gapping and Narrowing Bumper
i tried various search terms and came up with some answers, especially on shaving, but i still have more questions.
the bumper on my 70 chevelle needs some work to make it fit right. not only is it too wide (needs narrowing), but it doesnt fit as tight as i would like and it doesnt follow the contour of the rear sheet metal very well.
so, my main question is whether you guys get the bumper to fit the sheet metal, the sheet metal to fit the bumper, or a little of both? obviously i need to narrow, but my concerns are the gap on the side (first pic), and how it doesnt flow well from the deck lid to the quarter (second pic). ive checked out dse and b.a.d's sites and it seems that they add to the sheet metal and work the bumpers. what would you guys do?


Tim
The WidowMaker: Garage Built 70 Chevelle
Special Thanks To: Rushforth Wheels, MuscleRodz, Kore3 & SC&C
Build Thread Link
-
03-15-2010 #2 Registered User
- Join Date
- Jan 2009
- Location
- Jacksonville Florida
- Posts
- 667
it's easier to work the bumper,you have acess from both sides unlike the sheetmetal
 Do what's right,not what's easy
69 Firebird
71 Cuda
98 Supra 6speed white APU
98 Lexus GS400tt widebody
Elite Custom Body
Stefan B.
03-16-2010 #3 Registered User
- Join Date
- May 2002
- Location
- Northern California
- Posts
- 10,716
The first thing you want to do is modify the bumper brackets so the bumper will fit closer. After the bumper is closer than you can work on the body sheet metal just to make it uniform to the other side. Then modify the bumper to match the body line.
GM body lines where the bumper gaps are really suck. Its a lot of work but you can really tell when its done.
from Neds project.... note 3/16" stock to maintain gap....
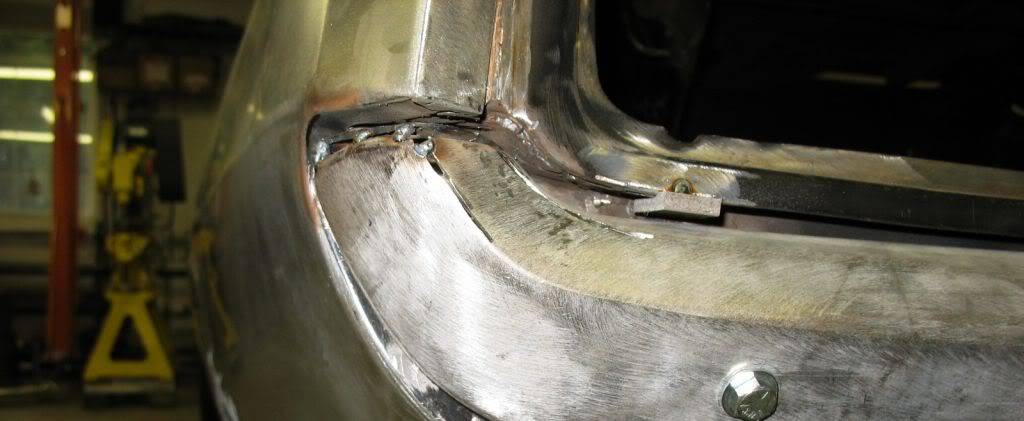
On your Chevelle, I'd work the top edge of the body to match the contour of the bumper. You are going to have to fill the section behind the tail point. might be easy to pull the bumper brackets off then hang the bumper up to the body, that would give you an idea of where you need to work.
Good luck, sounds like a fun project.
vinceMrQuick ΜΟΛ'ΩΝ ΛΑΒ'Ε
03-20-2010 #4
Registered User
- Join Date
- Dec 2007
- Location
- Carlsbad, Ca
- Posts
- 1,213
thanks for the replies. im currently working on the trunk gaps before i reallly start on the bumper. but, what im finding is that there is no way to suck the bumper in any more without cutting it. in the pictures, its acutally hitting the sheetmetal in the middle, and the decklid is resting on the top of it (again only in the middle) with no gap. my thought is to slice the bumper down the middle so i can move the ends up and in without moving the middle. i shouldnt have to do much to make a big difference on the outsides. once thats done i'll have to work the quarters to make the rest fit.
any other pics or suggestions?
Thanks!!Tim
The WidowMaker: Garage Built 70 Chevelle
Special Thanks To: Rushforth Wheels, MuscleRodz, Kore3 & SC&C
Build Thread Link
04-26-2010 #5
Registered User
- Join Date
- Dec 2007
- Location
- Carlsbad, Ca
- Posts
- 1,213
so ive cut the crap out of the bumper. i have about 10 hours into it and im only about half way. big improvment so far though.
heres are some photos
bumper and trunk lid flowing nicely
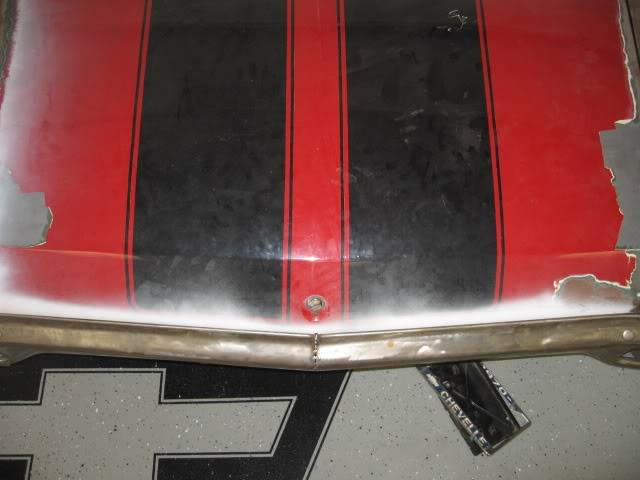
you can see here how the bumper curves a little early. it also makes it difficult since the tail light is right below this, meaning that an easy correction would place a bend where the light is. you can also see how the corner of the quarter and the corner of the bumper flow nicely. they no longer do this with the bumper moved in 3/8" per side. although the side flows perfect, this corner is an area thats going to need some serious surgery.
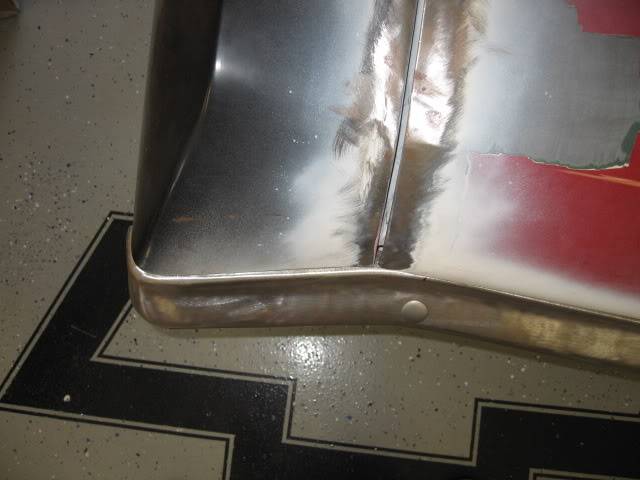
bumper sticking out before narrowing
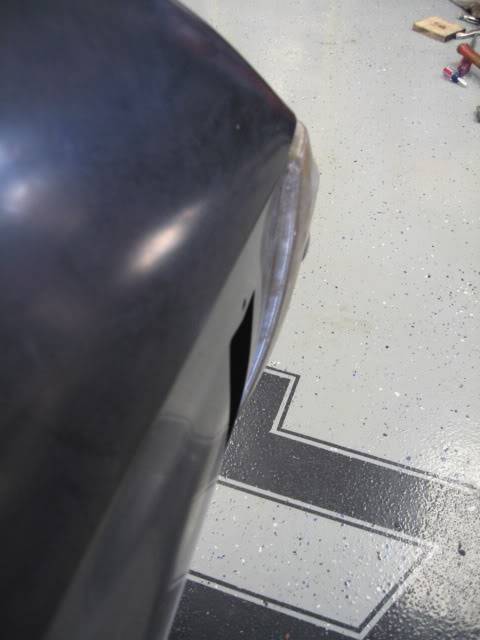
bumper moved in 3/8". i need to get one at the same angle as the above pic for a better comparison. it really made a HUGE improvement.
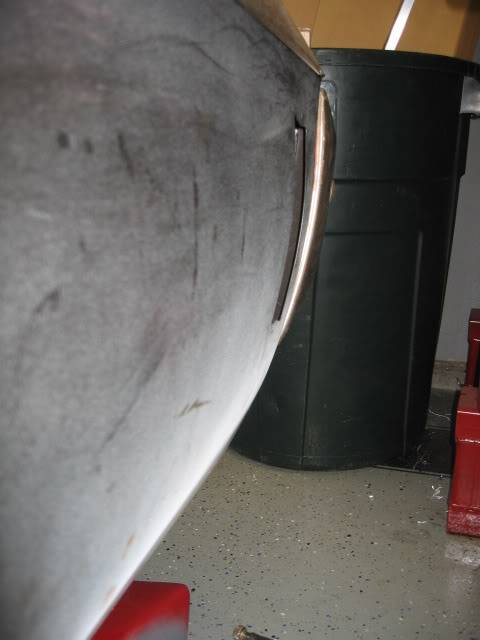
before with the bumper pushed in fully and bottomed out on the brackets. its sitting about 3/8" too far in at the middle of the trunk and still has a large gap on the sides.
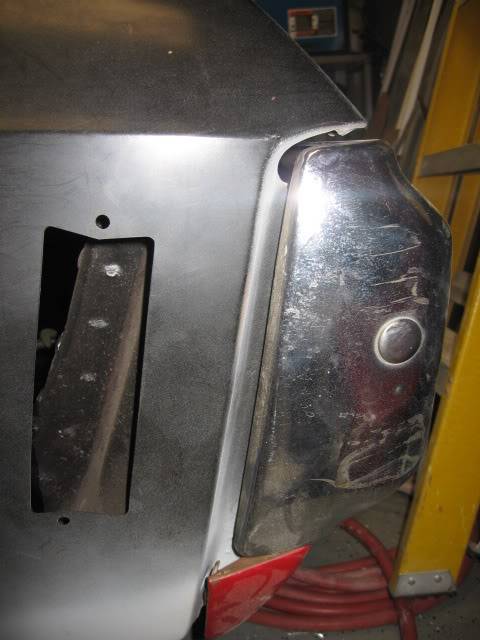
still needs a lot of work, but its better and the middle is pulled out where it needs to be.
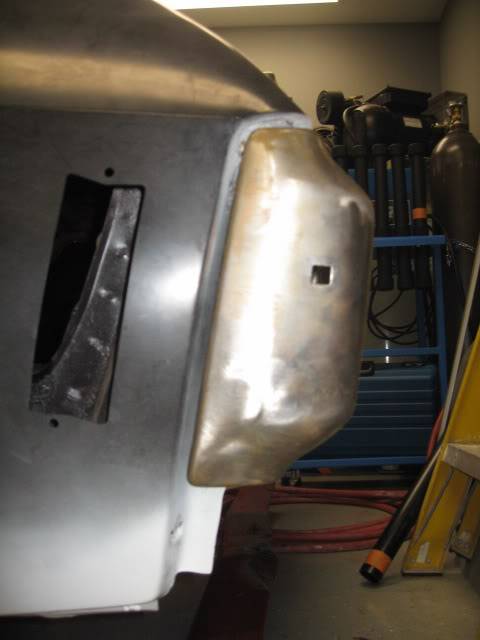 Tim
The WidowMaker: Garage Built 70 Chevelle
Special Thanks To: Rushforth Wheels, MuscleRodz, Kore3 & SC&C
Build Thread Link
04-26-2010 #6
Registered User
- Join Date
- Dec 2007
- Location
- Carlsbad, Ca
- Posts
- 1,213
any reason not to weld the brackets to the bumper? they still have adjustments on the body, and the brackets dont really have any on the bumper. i dont see how it would be any different, other than the bolts will be gone.
Tim
The WidowMaker: Garage Built 70 Chevelle
Special Thanks To: Rushforth Wheels, MuscleRodz, Kore3 & SC&C
Build Thread Link
04-26-2010 #7
Registered User
- Join Date
- Sep 2007
- Location
- Denver
- Posts
- 325
Looks sharp, good job. Whether you want to weld brackets to bumper I guess would be determined partially by whether you want them chromed as well as the bumper....granted looks like you won't likely see the brackets with it nice and close to the body.Maybe someone else will chime in here as to why to or not to weld. I've thought about modding mine when I get to that point so enjoying your thread and will keep an eye on it. Thanks
 David Beckstrom DVM
05-02-2010 #8 Registered User
- Join Date
- Aug 2004
- Location
- Manteca, CA
- Posts
- 383
Tim welded my bracket to my bumper..... the adjustment is all in the holes on the body...
Mines the Cuda pix that was posted early in this threadNed
Manteca, CA
My '69 Camaro
My Camaro Movie
My '70 Cuda Project Thread
My Cuda Project Pix
Cuda Project Sponsors/Builders
Bruning Auto Design,
Bowler Transmission, Air Ride Technologies, American Autowire, Vintage Air, Comp Cams/F.A.S.T
Carter Hickman Designs
05-02-2010 #9
Registered User
- Join Date
- May 2002
- Location
- Northern California
- Posts
- 10,716
outstanding work....
MrQuick ΜΟΛ'ΩΝ ΛΑΒ'Ε
05-02-2010 #10
Registered User
- Join Date
- Feb 2008
- Posts
- 229
very nice work.its these little details that will set your car apart
05-02-2010 #11
Registered User
- Join Date
- Feb 2008
- Location
- Minneapolis, mn
- Posts
- 214
In reference to the taillight location and it dictating where you can cut and move, is it possible to cut around the taillight and leave it right where it is and move the metal around it? Kind of like what people do with the rear window when chopping a top? sometimes they simply cut the rear window out, cut and chop the remaining metal and then put the window back in.
Sean
50 Willys Pick up.
05-02-2010 #12
Registered User
- Join Date
- Dec 2007
- Location
- Carlsbad, Ca
- Posts
- 1,213
its hard to explain without pics (i'll take some this week), but i placed a straight cut in the top horizontal piece, and then a 45* cut through the vertical part. so the cut started above the light and ended up next to it. it actually took 4 cuts over about a 3" area to get it right, but it hugs the quarter within a 1/8th now.In reference to the taillight location and it dictating where you can cut and move, is it possible to cut around the taillight and leave it right where it is and move the metal around it? Kind of like what people do with the rear window when chopping a top? sometimes they simply cut the rear window out, cut and chop the remaining metal and then put the window back in.In
now i just need to work on the contour of the passenger side where it meets the quarter when sighting down the side of the car. one of the pics above shows the drivers side and its pretty even, but the other side isnt that close.Tim
The WidowMaker: Garage Built 70 Chevelle
Special Thanks To: Rushforth Wheels, MuscleRodz, Kore3 & SC&C
Build Thread Link
05-02-2010 #13
Registered User
- Join Date
- Dec 2007
- Location
- Carlsbad, Ca
- Posts
- 1,213
thanks for the info on welding the brackets. i just need to clean them up from all the cutting, then get it all positioned and welded on.
ive also been debating on chromed, brushed or painted, but i think im going to send them to tri-city to get them chromed. all the chevelle guys give them great reviews. i just need to make sure they can still do it with all the work ive done.Tim
The WidowMaker: Garage Built 70 Chevelle
Special Thanks To: Rushforth Wheels, MuscleRodz, Kore3 & SC&C
Build Thread Link
05-02-2010 #14 Registered User
- Join Date
- Nov 2006
- Location
- Ma.
- Posts
- 5,560
That looks great. Nice work.
Wayne
Car FINALLY home !!!!!! lol
Project FNQUIK https://www.pro-touring.com/showthre...ghlight=FNQUIK

 Reply With Quote