


Results 61 to 80 of 129
Thread: and so it begins
-
10-01-2009 #61

 Registered User
- Join Date
- Feb 2009
- Location
- Long island, New York
- Posts
- 668
other than spacers, why dont they fit 100%? did u have to oblong the holes? because i found a decent set that i dont want to pass up on if they can work. thanks for the help-dom
Dom Buffa
69 Camaro- 2JZ /Garrett 67MM, Ls1 13" Front disc conversion, 18" ROH 3 piece Modenas
-
10-01-2009 #62 Registered User
- Join Date
- Aug 2004
- Location
- Rustburg, Virginia
- Posts
- 3,436

Hey Trey,
What is all that green tape on the wiring?....LOL
.
.
.
.
.
.
.
.
.
..
.
..
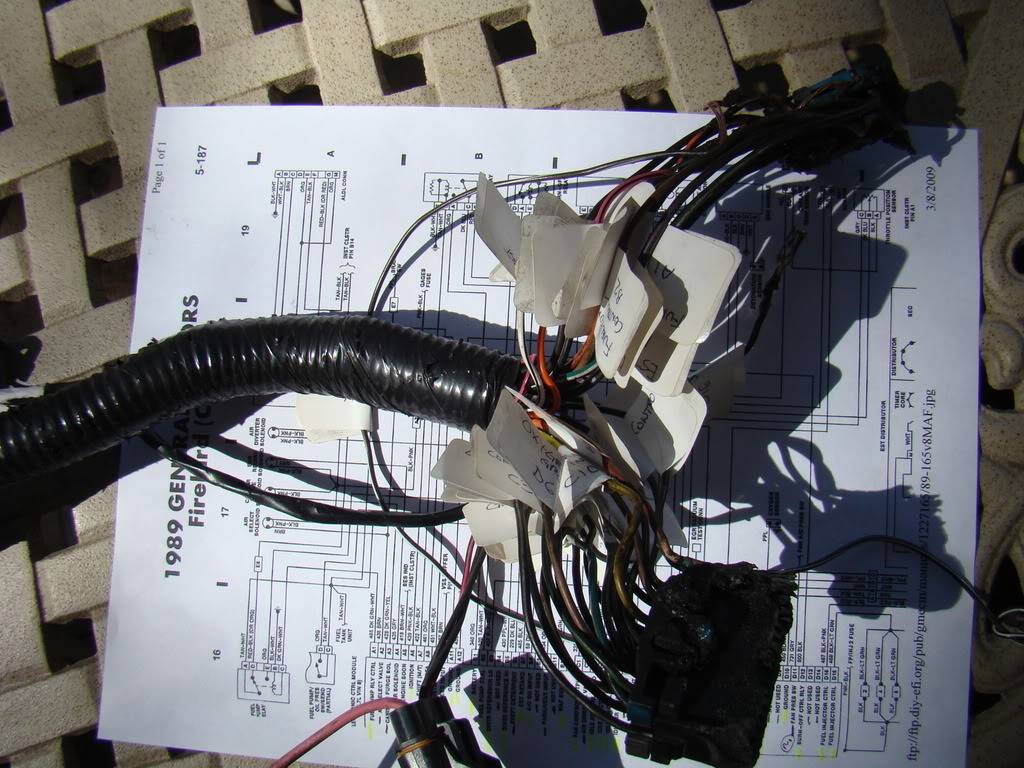
At least your tape is colorful, mine was ole shipping labels.1970 RS/SS350 139K on the clock:
89 TPI motor w/ 1pc rear seal coupled to a Viper T56 via Mcleod's modular bellhousing w/ hydraulic T/O bearing from the Viper, 12 bolt rear w/ 3.73 gearing, SC&C upper control arms, factory lowers with Delalums, C5 brakes at all four corners, Front Wheels 17x8's with Sumi 255/40/17 and Rear Wheels 17x9's with Sumi 275/40/17.
Brief description of the work done so far can be found here: http://www.nastyz28.com/forum/showthread.php?t=112454
10-02-2009 #63
Registered User
- Join Date
- Aug 2004
- Location
- Dunwoody, GA
- Posts
- 4,983
lol, yep. The surveying tape works great for making tags. I do this on cars I am working on that I may not be 100% familiar with.
Dom, it's the metric pattern compared to the SAE pattern. It's very close. You can put the wheel right on and torque it down as is. You just have to be careful that the lugs stay tight. Some people use loctite. The only other issue is making sure the center cap fits on the rim and getting hub centric spacers if you run spacers or adapters. Always choose adapters if you can. The thinnest I have found is 3/4" though which is why I may run spacers.Trey
"The early bird may get the worm, but the second mouse gets the cheese."
~ Jon Hammond
1979 WS6 Trans Am stock LT1/T56 drive train out of my Formula. BMW M-parallel rims. C5/C6 brakes
build thread https://www.pro-touring.com/showthre...ghlight=begins
10-02-2009 #64
Registered User
- Join Date
- Feb 2009
- Location
- Long island, New York
- Posts
- 668
ohh ok, now i understand lol, i am going to look at the set of wheels this weekend and hopefully they are in decent shape, i appreciate the help again.. thanks-dom
Dom Buffa
69 Camaro- 2JZ /Garrett 67MM, Ls1 13" Front disc conversion, 18" ROH 3 piece Modenas
01-25-2010 #65
Registered User
- Join Date
- Aug 2004
- Location
- Dunwoody, GA
- Posts
- 4,983
wow! Has it really been four months since I made an update? Damn! I knew I had been slack about posting an update over xmas break. I just didn't realize October was the last time I updated. Anyway, on with the update. I've been working on the car since I last updated but it has been slow. School just got very busy and this semester is just as bad. I'll do my best though.
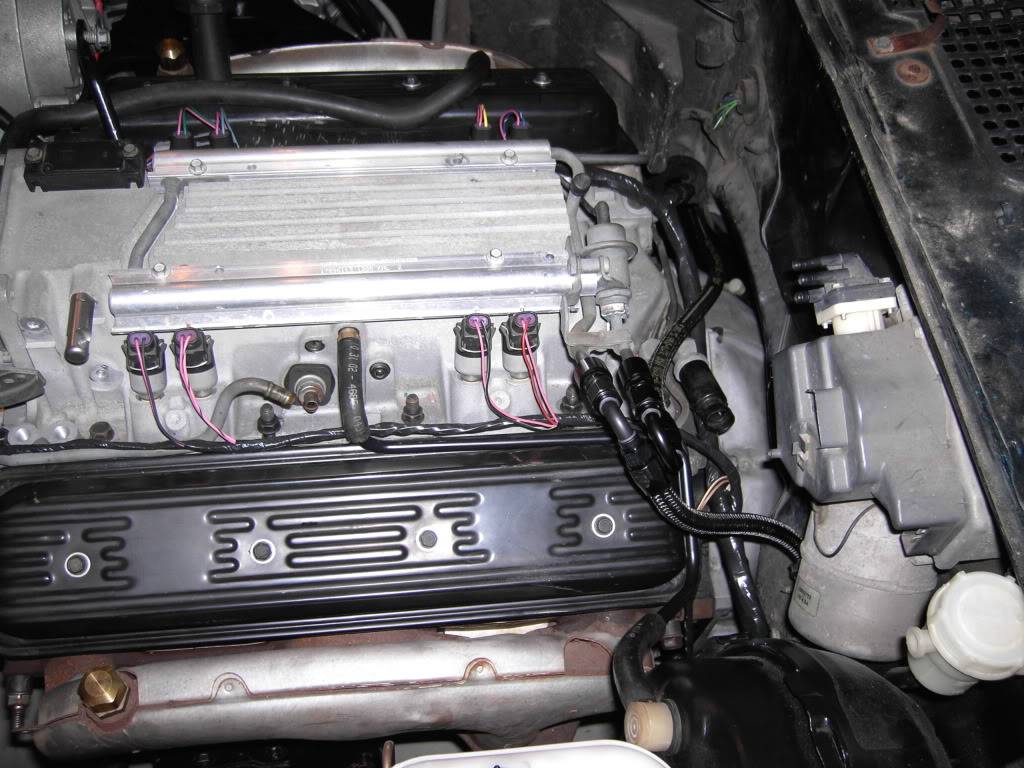
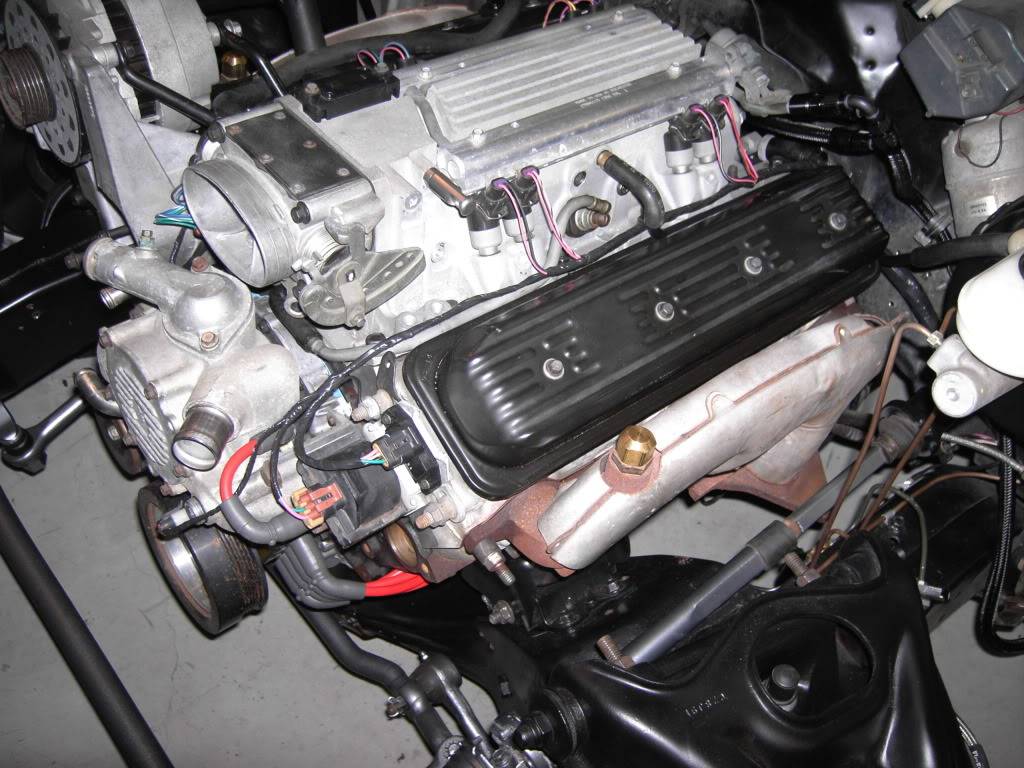
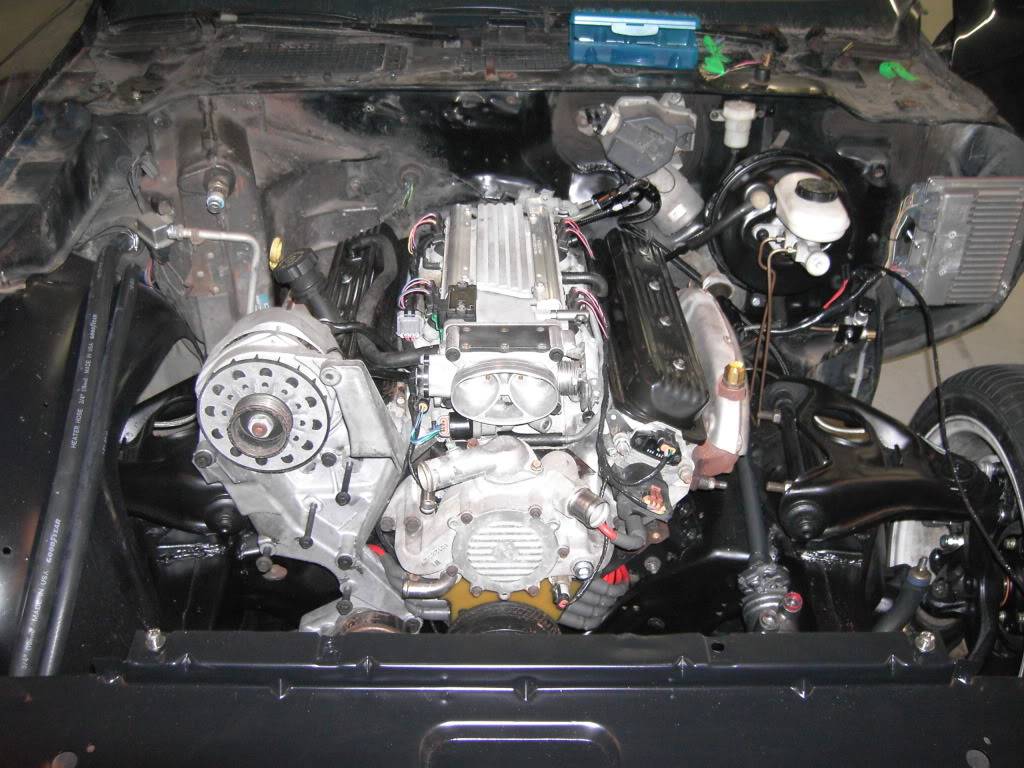
Wiring is basically done. I need to check everything once my fuel pump arrives but other than that, I have a short section I need to do for the MAF and IAC once those are mounted. I prefer wrap to convoluted tubing. The wrap is what GM used back in the 60s and 70s. It looks so much cleaner to me.
Here's the engine wiring and what I did for vacuum line connection to the booster.
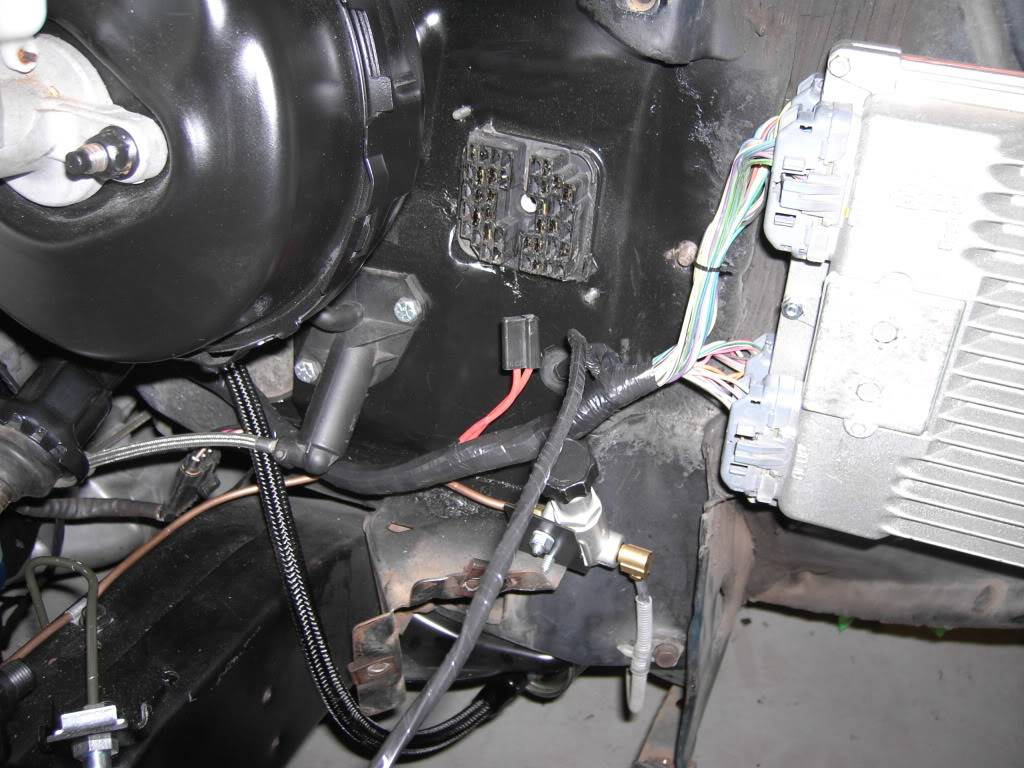
Here's were the wires go into the inside the car to the fuse panel and ignition. The two red wires will plug into what is left of the factory harness and prove power to the car itself. This includes all lighting, windows, controls, etc etc.
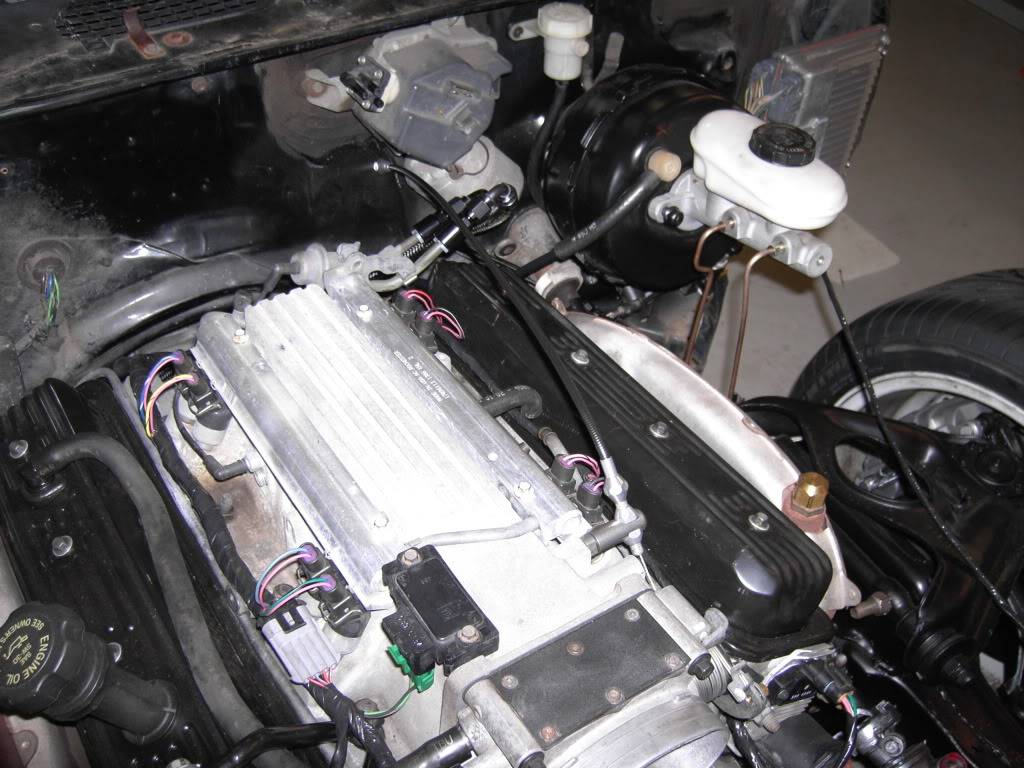
This is my throttle cable. It's made by Lokar. It doesn't look it but there is plenty of slack in there to allow for flexing and engine movement. I had to drill the hole in my throttle body cable bracket to accept the thing on the end of the Lokar cable whose name is escaping me at the moment that actually allows the cable to operate the throttle body. I'll also have to figure out what to do about getting the scoop to clear this. I think there will be plenty of room but I won't know until I get the hood on. The stainless steel cable bracket that is holding the cable to the intake is a part I made for my business that allows people to run a Lokar cable on their LSx motors when doing a swap like this. Turns out it works just fine on my LT1 too, lol. I don't mind as I like it of course.
 Trey
"The early bird may get the worm, but the second mouse gets the cheese."
~ Jon Hammond
1979 WS6 Trans Am stock LT1/T56 drive train out of my Formula. BMW M-parallel rims. C5/C6 brakes
build thread https://www.pro-touring.com/showthre...ghlight=begins
01-25-2010 #66
Registered User
- Join Date
- Aug 2004
- Location
- Dunwoody, GA
- Posts
- 4,983
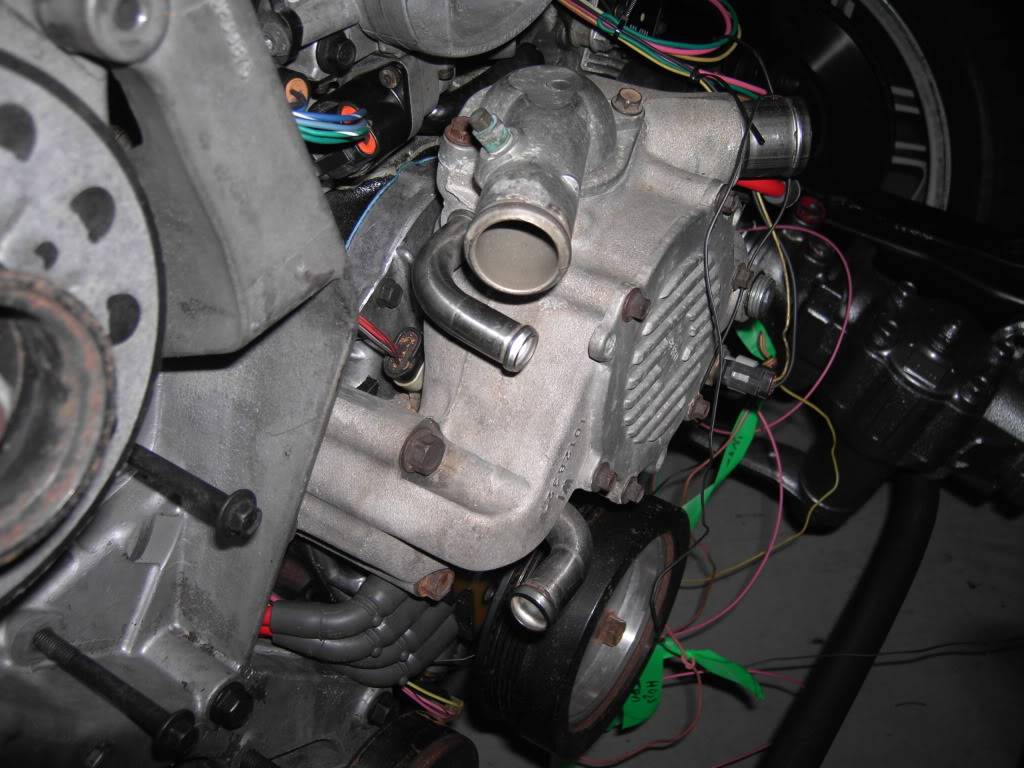
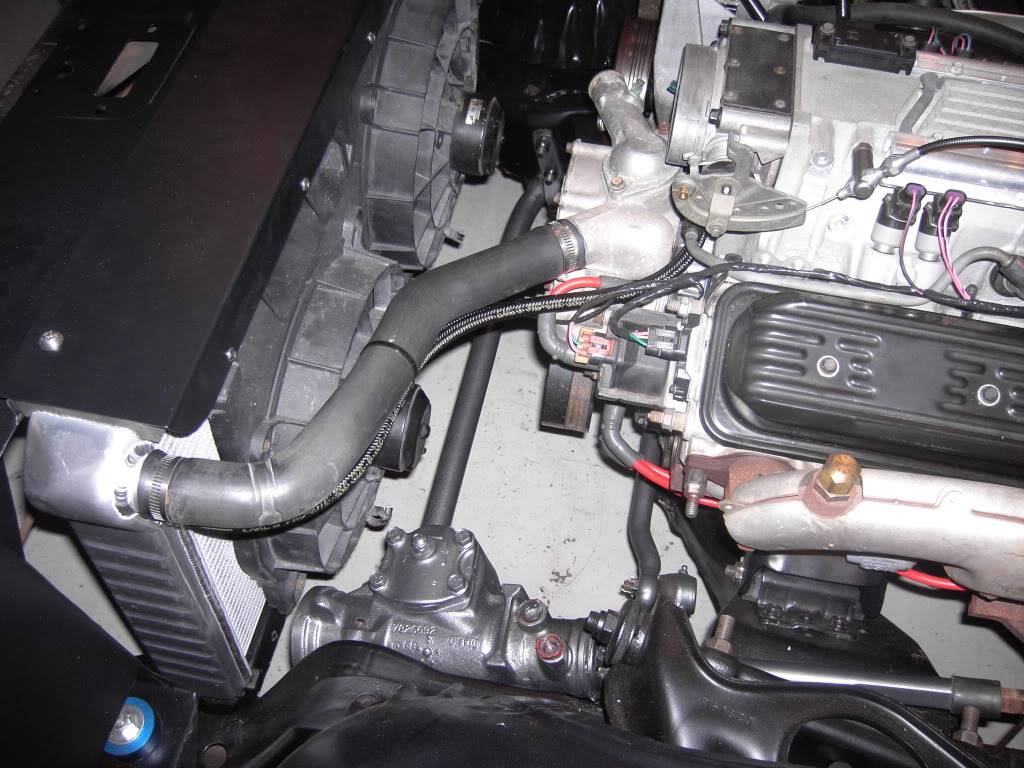
On the water pump I took the heater hose that was pointing straight up and rotated it to just below horizontal facing the front. I thought it would look better to have the heater hoses running to the front of the engine together.
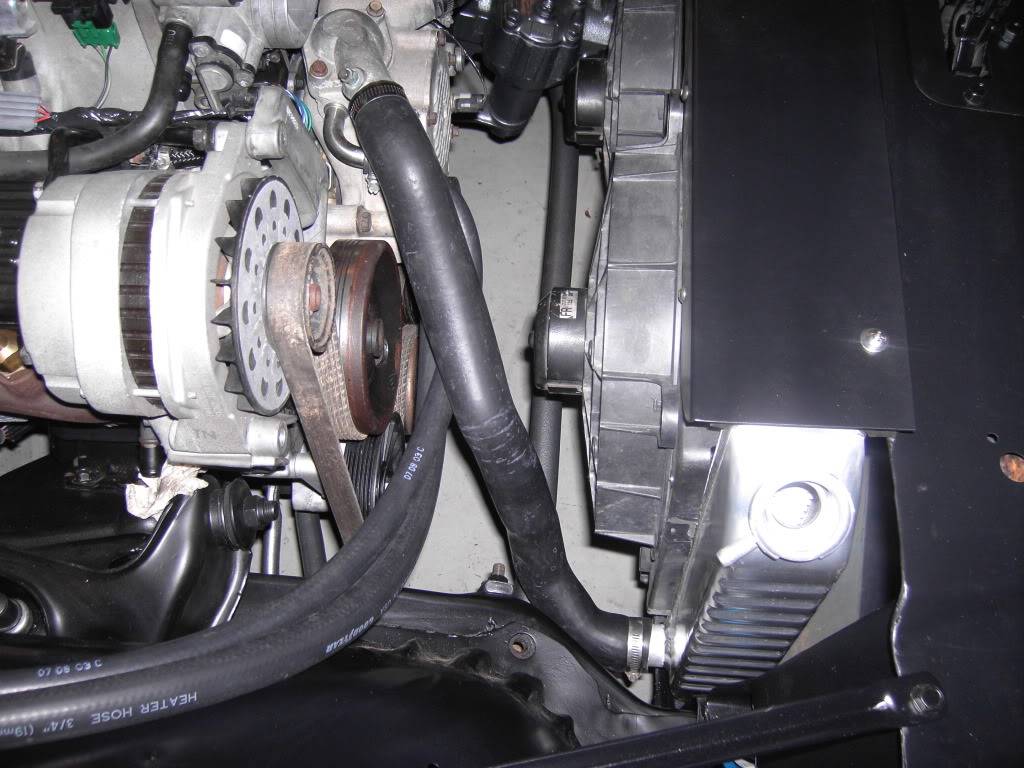
Here you can see the lower radiator hose I ended up using. Part number is L1000 from autozone. It's not perfect but I think it'll work for me. As you can see here, the heater hoses look good and tucked in tightly to the engine.
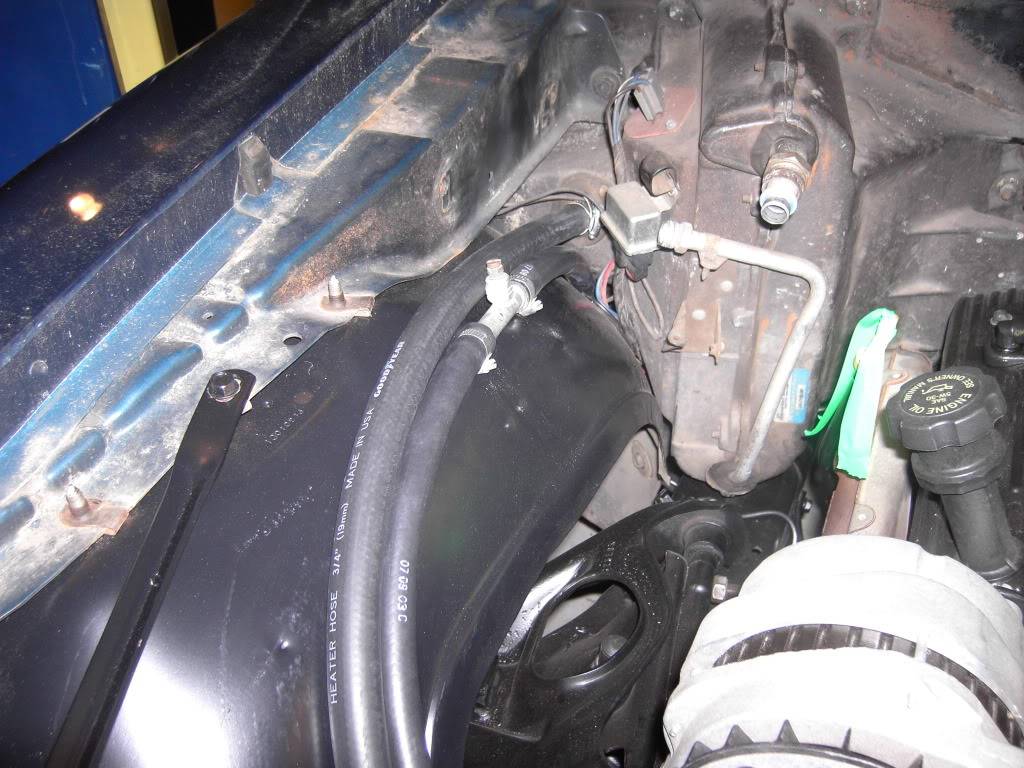
Something that you guys doing LT1 swap must remember is to add this bleeder valve. The Fbody had two valves because the heater hoses in a 4th gen went higher than the radiator and engine. In order to bleed the heater system, this valve was put in place. On a C4 vette, the reservoir was the highest point so only the bleeder at the thermostat housing was needed. Now on these 2nd gens, I'm betting that the small 5/8" hose is the feed and not the return. That means this bleeder may only work so so. I'll find out soon enough. I wanted it there all the same because it will help. If you don't do this, you may have issues with the coolant temp as you must bleed the coolant system on an LT1 for it to function properly.
Here's the upper radiator hose and steam port line. I routed the steam port line under the throttle body and under the upper hose to the radiator. I wanted to hide this as much as possible. That's Earl's Pro-lite 350 hose that I used for the steam line. The radiator hose is the upper hose off my 96 formula. Just go to autozone or the like and get the upper radiator hose for a 96 fbody with the V8 engine and they will hand you that. Oh and in case I missed it earlier, that's my radiator cover i made. I just used some .090 aluminum along with the radiator isolators to hold it in place. It holds the fans in place too.
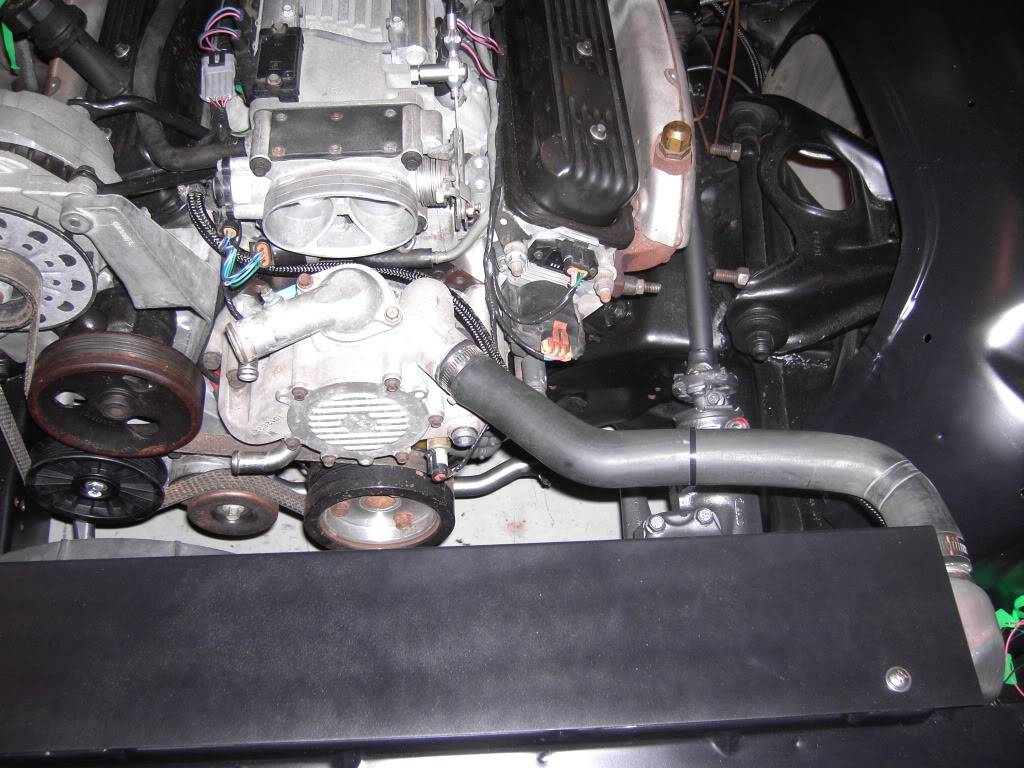
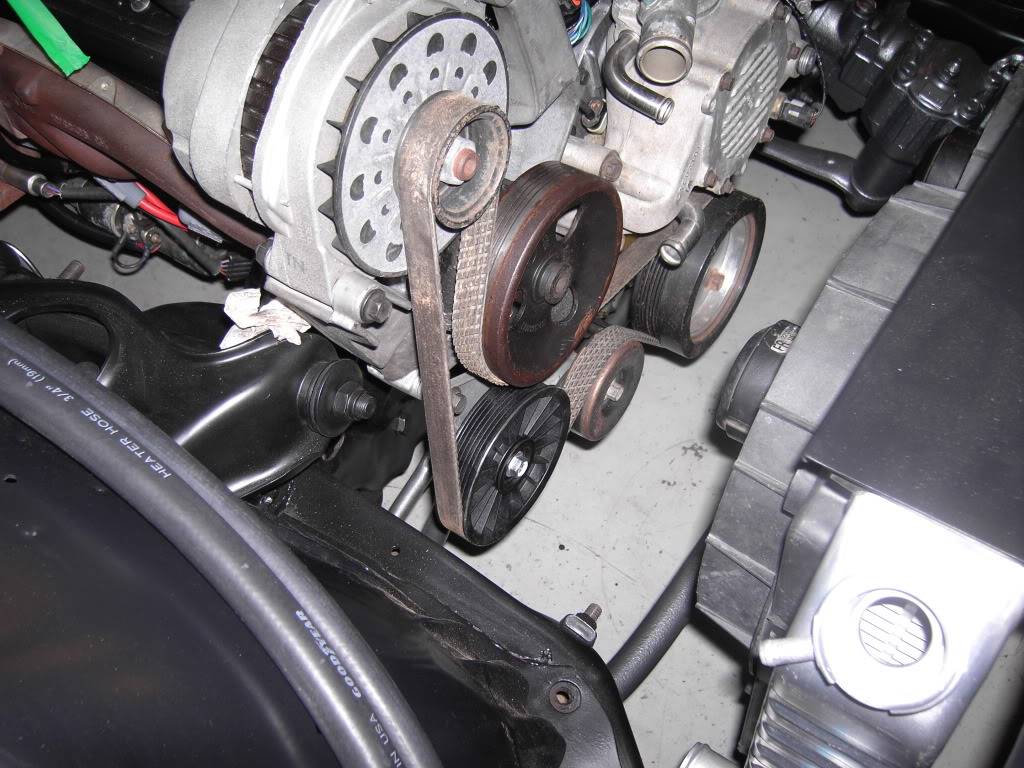
Since I am not running AC at the time I needed to delete the pulley. This is a Dorman part number 34209. I had to drill out the mount holes as they had them threaded for some reason. I also had to add a washer behind the pulley to space it out. Pretty lame but it was half the cost of a GM delete pulley so I'll take my chances for now.
 Trey
"The early bird may get the worm, but the second mouse gets the cheese."
~ Jon Hammond
1979 WS6 Trans Am stock LT1/T56 drive train out of my Formula. BMW M-parallel rims. C5/C6 brakes
build thread https://www.pro-touring.com/showthre...ghlight=begins
01-25-2010 #67
Registered User
- Join Date
- Aug 2004
- Location
- Dunwoody, GA
- Posts
- 4,983
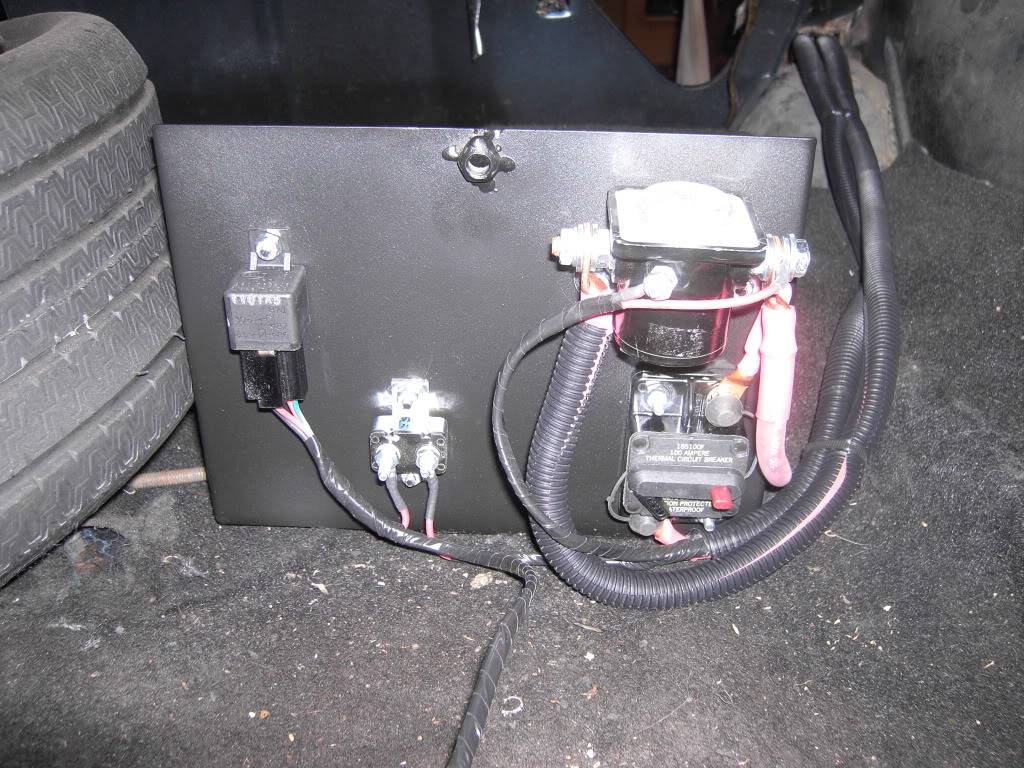
On to some more electrical. I built a box to hold my red top. It's nothing fancy but it works and it didn't cost me anything which is good considering the cost of that damn battery
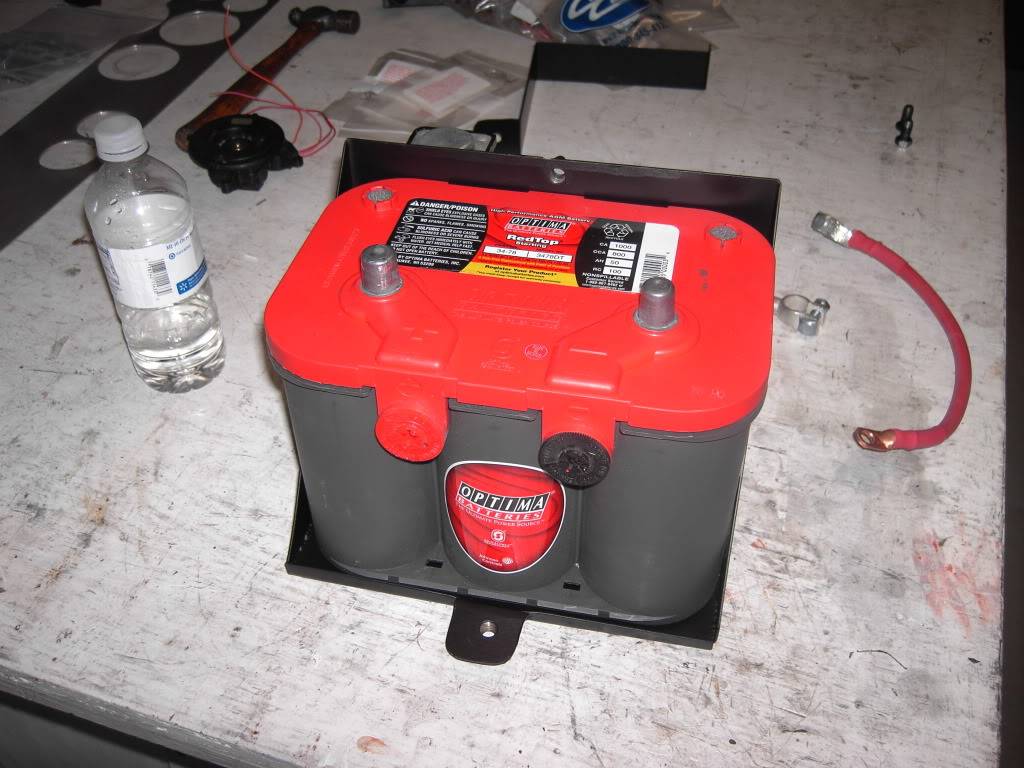
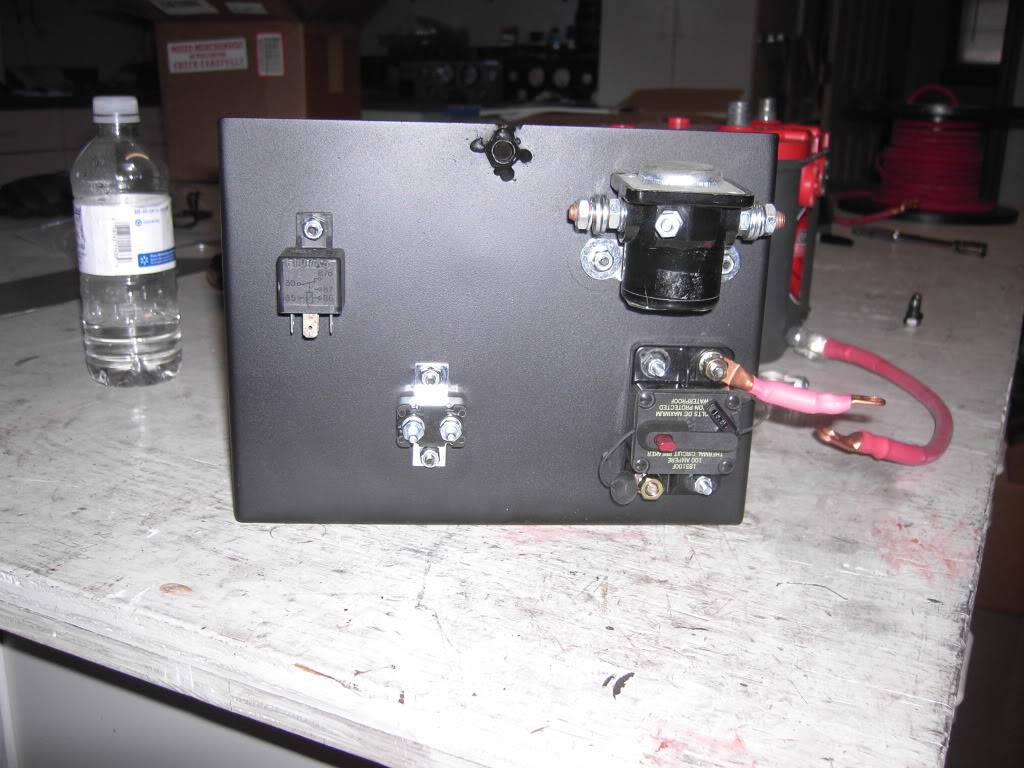
This is the back side with my fuel pump relay and circuit breaker. My main circuit breaker for the alternator, and the starting relay. The main circuit breaker is 105amps. If it is not enough, I have another one I can put in its place. The test function(red button) can work as a kill switch for the entire car. If it's open, the car is completely dead. 100% nothing. Considering it is tucked behind the box which sits off to the side of a small truck and is covered by wires, I think it'll function well as a kill switch.
Some good eyes my notice that the starter relay is actually the wrong kind. Oooops. It's been switched out. Just go to autozone and ask for one from a V8 mustang 1970 model or so.
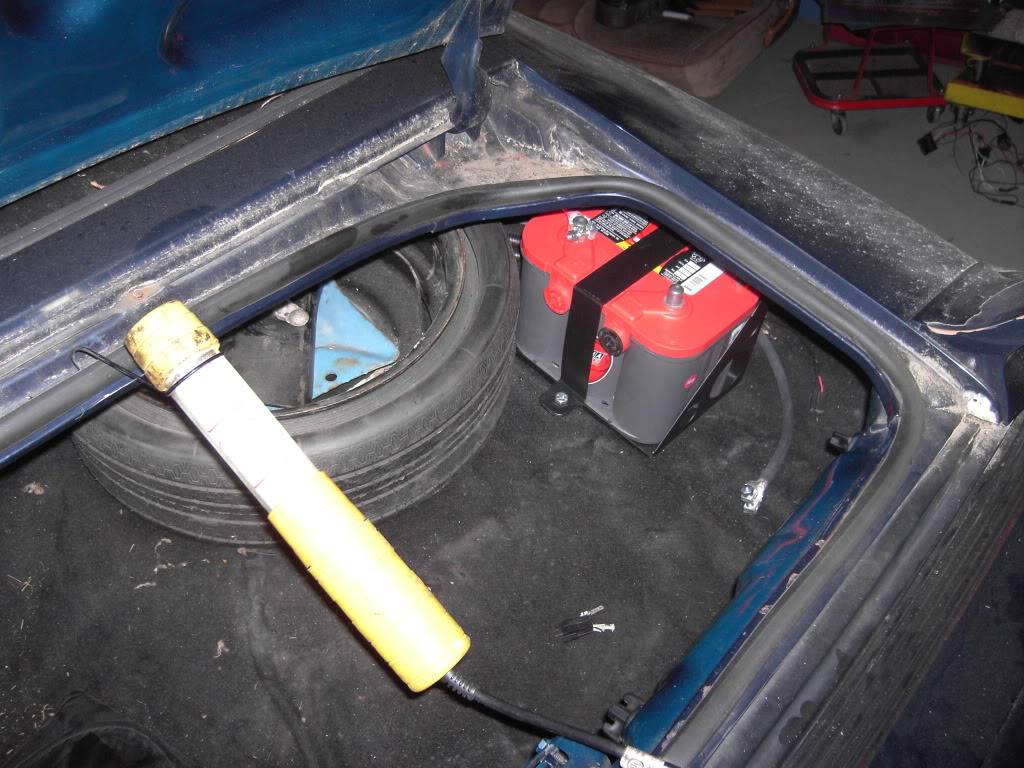
Here's the box in the trunk with all the wires hooked to it ready to tuck into the corner and bolt down. I have four 3/8" grade eight bolts going through the box and into the frame rail flange holding this box in. It's not going anywhere.
And what it looks like tucked in and bolted down. Nice and out of the way for the most part.
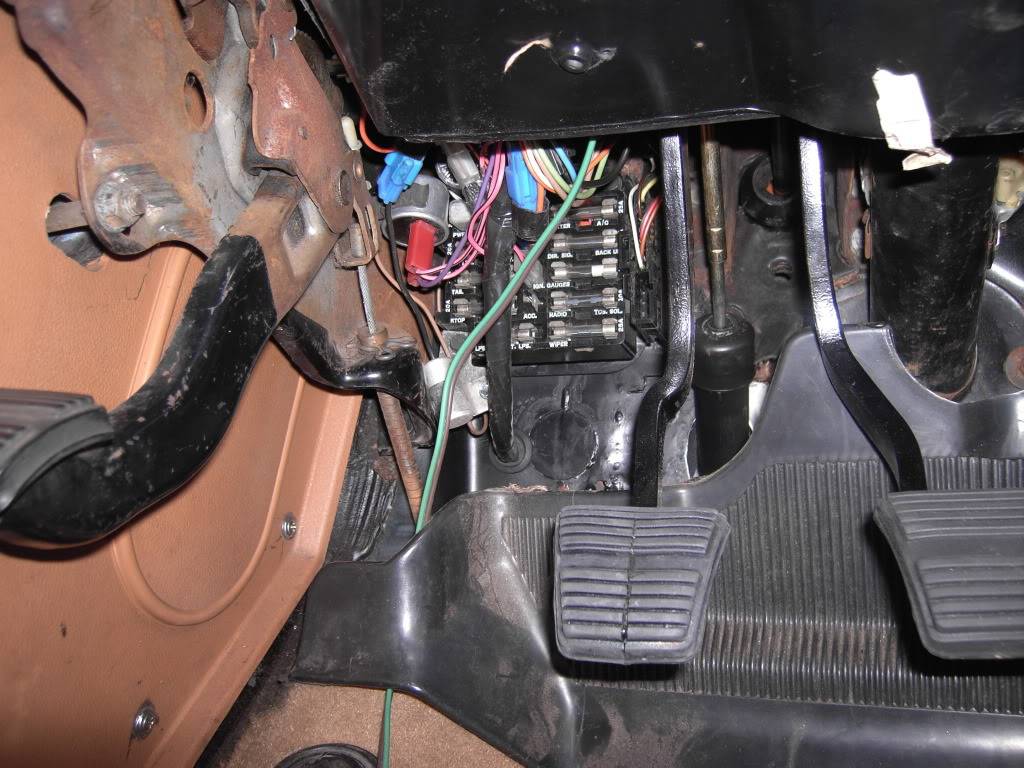
Remember those wires I had running through the fire wall into the car? here they are from the inside of the firewall. Just below the factory fuse panel. Admittedly they are a little in the way but everything is tucked away cleaning and nicely.
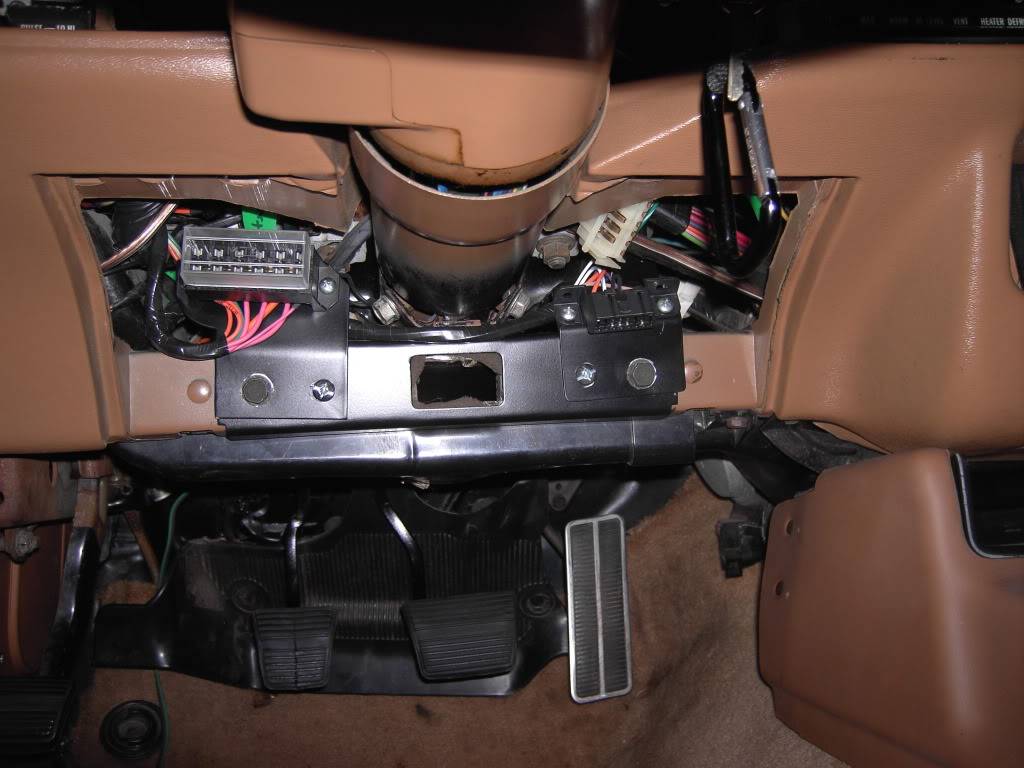
Here's where they terminate. I have the fuse panel on the left and the ALD on the right. The lower dash panel fits and covers these two items up nicely. I can easily get at them with a simple coin if need be.
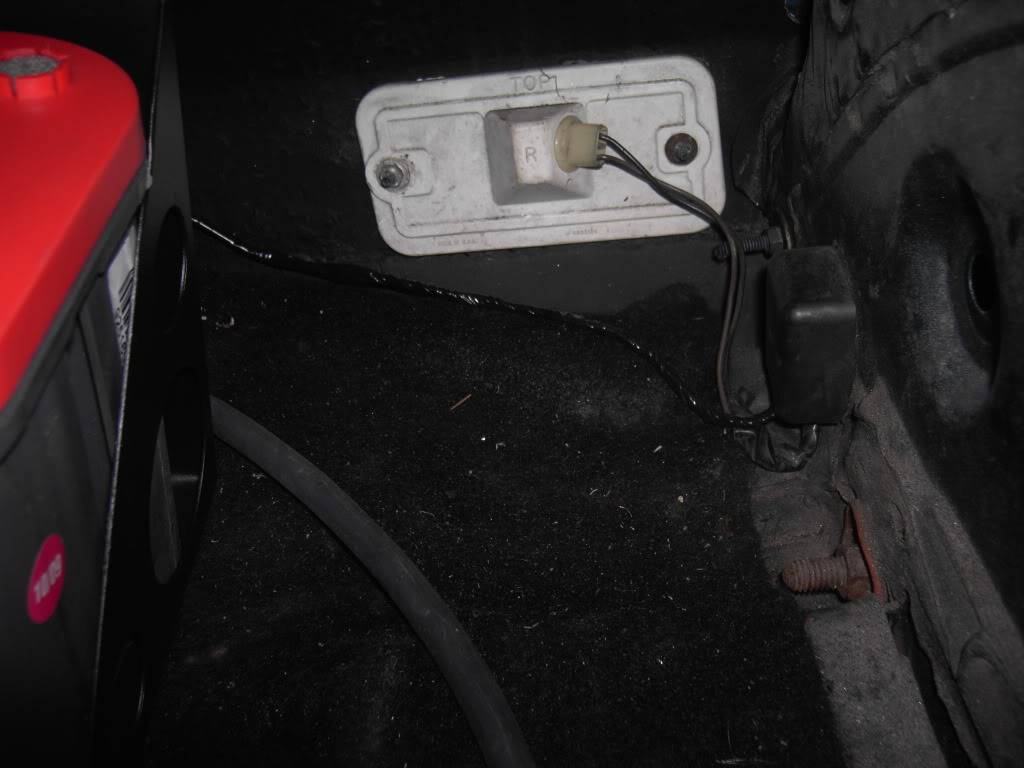
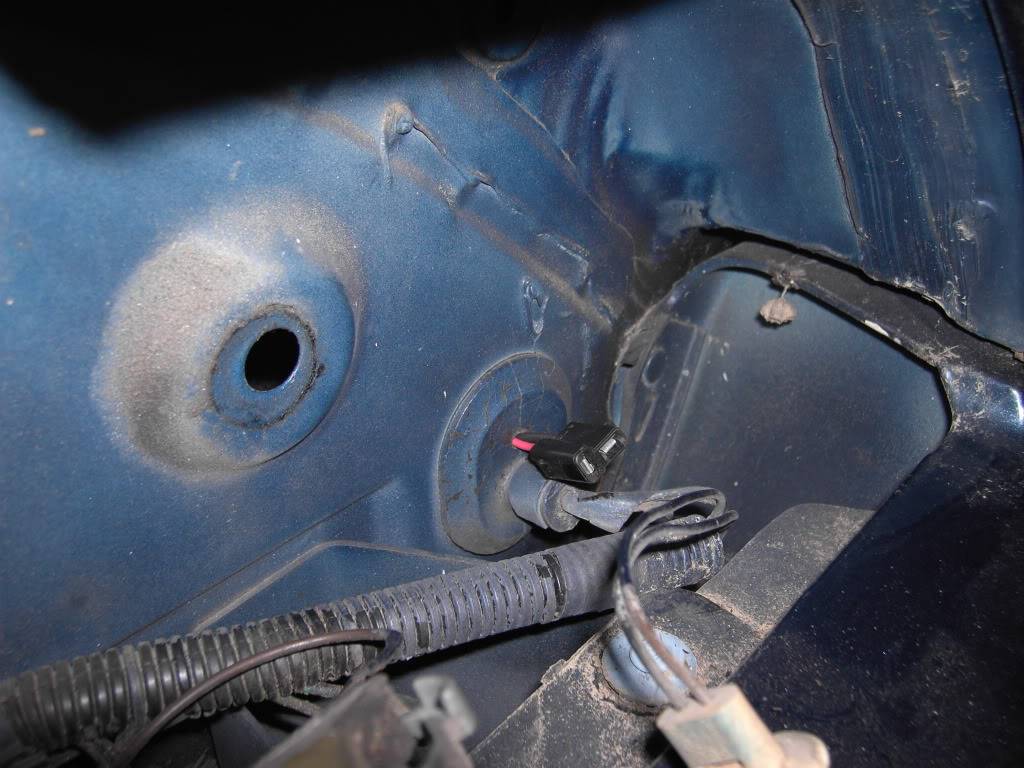
In the back of the car I had to go from the battery box which had the fuel ump relay mounted on the back to the outside of the car to the fuel pump. I went through the same place as the tail lights go through. I drilled another hole in the grommet and fed the fuel pump wires through the hole and put a connector on the outside just behind the tail light.
 Trey
"The early bird may get the worm, but the second mouse gets the cheese."
~ Jon Hammond
1979 WS6 Trans Am stock LT1/T56 drive train out of my Formula. BMW M-parallel rims. C5/C6 brakes
build thread https://www.pro-touring.com/showthre...ghlight=begins
01-25-2010 #68
Registered User
- Join Date
- Aug 2004
- Location
- Dunwoody, GA
- Posts
- 4,983
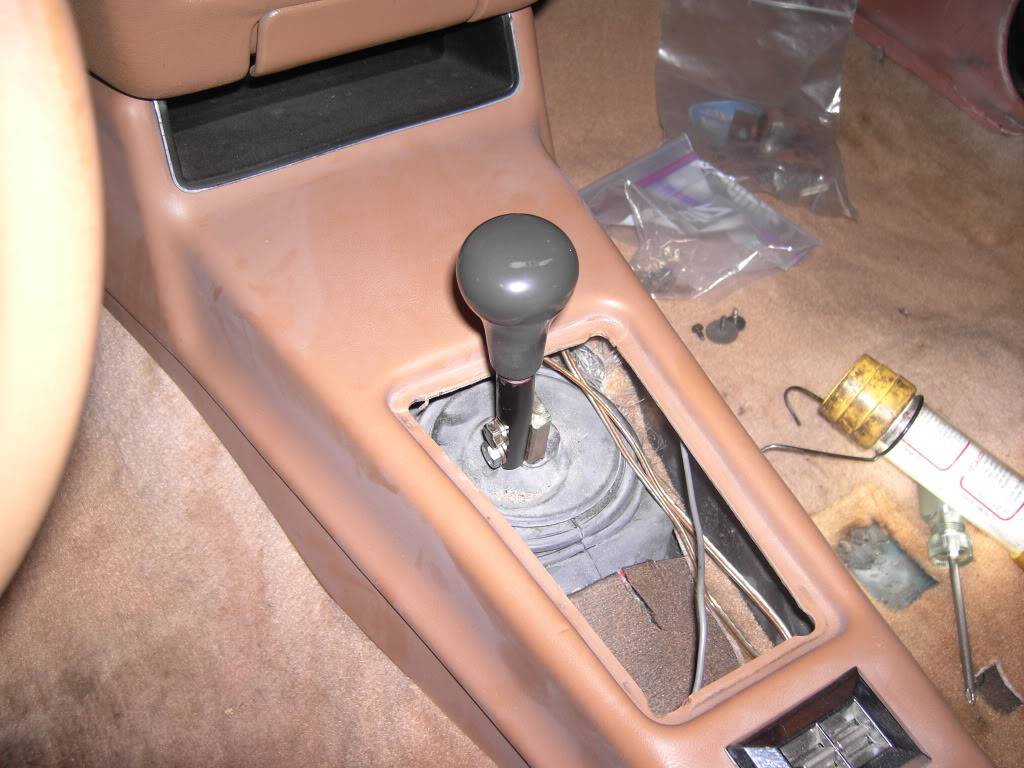
And a few odds and ends to finish this update. the center console fits and the shifter clears barely. I won't be able to run any sort of boot with it like this but whatever. I'll get to it eventually. For now I'll have an arm rest and place to mount my window switch
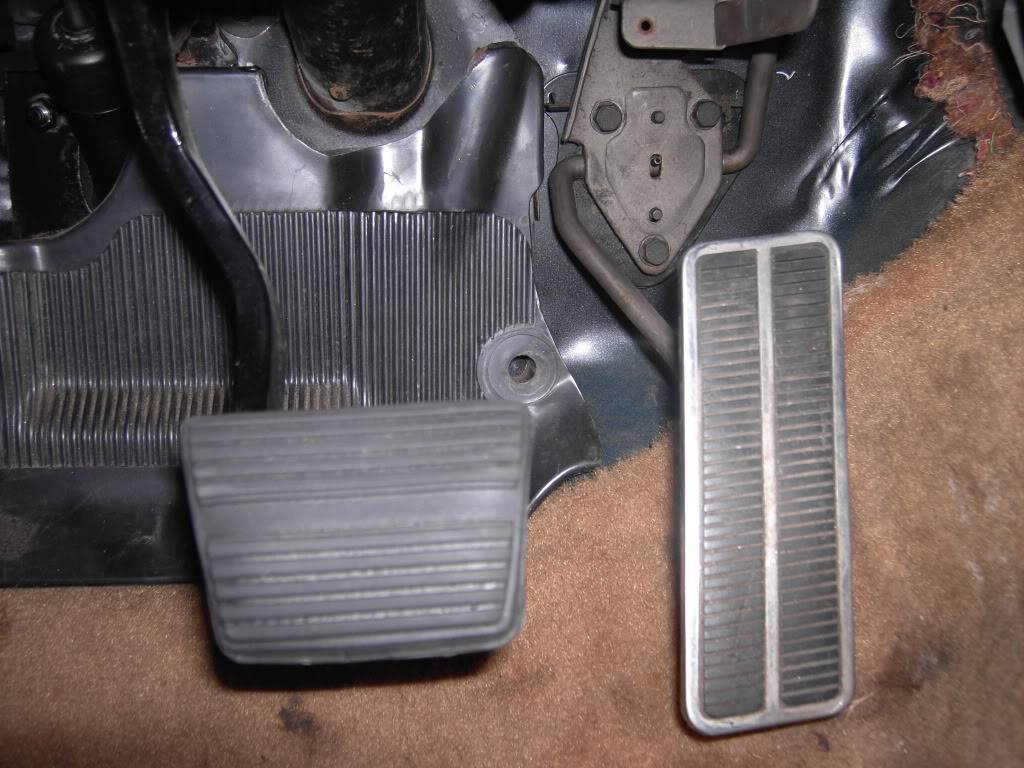
Because I moved the gas pedal over to towards the brake pedal, the panel right behind the pedals needed trimming. here it is all nicely trimmed. Looks almost normal doesn't it?
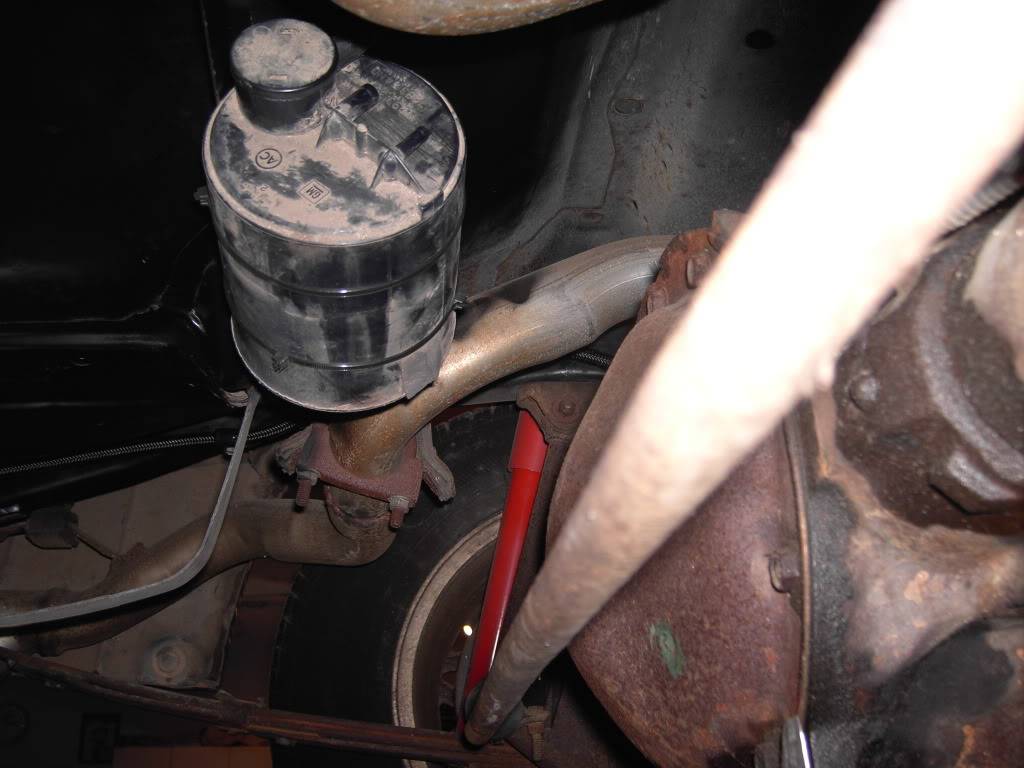
I've mounted my 96 formula's charcoal canister on a simple strip of metal right behind the gas tank. It's out of the way of everything in this location. Not sure if it will work for me or not like this but it's worth a try
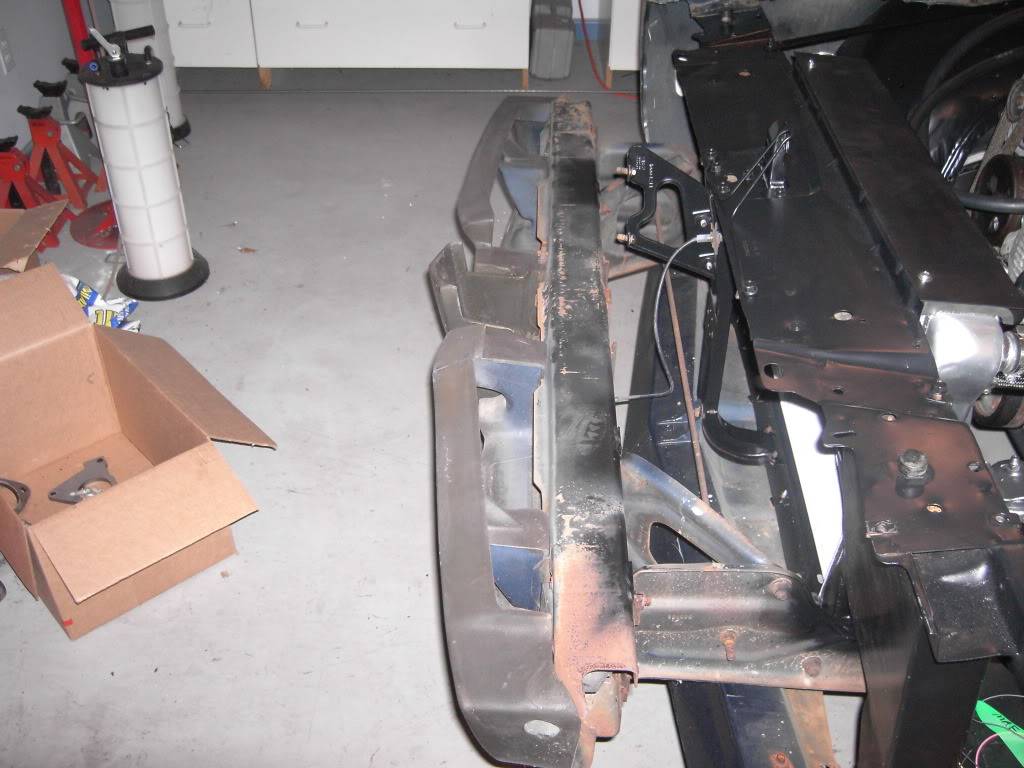
Something that always nagged me about my car was my nose was warped. If discovered it's because of the support not fitting against the bumper correctly. I corrected that I hope. I used a hole drill and sent some tek screws through the bumper to better hold this foam support up. I'll see if it helps any. I may have to replace the foam support eventually.
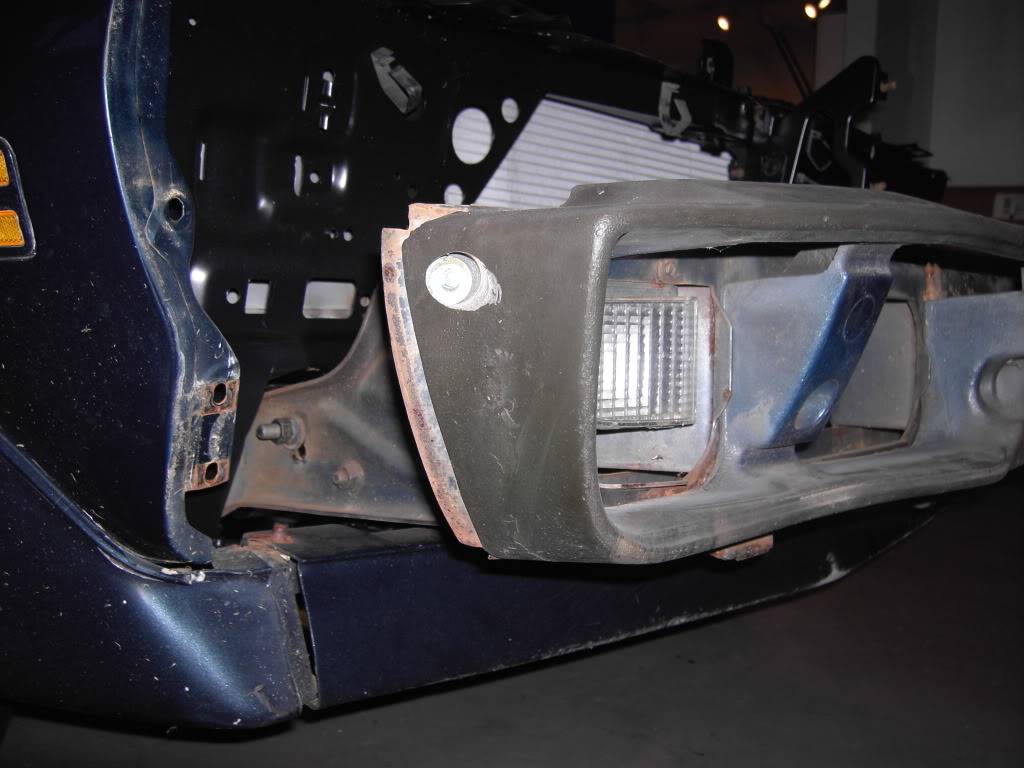
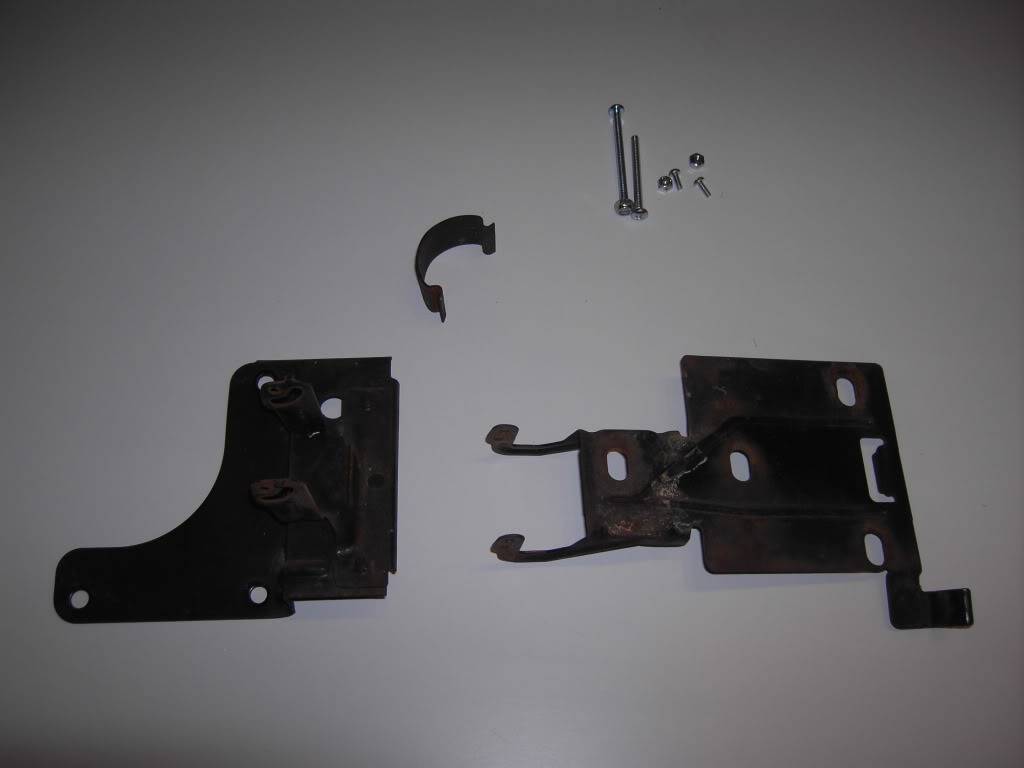
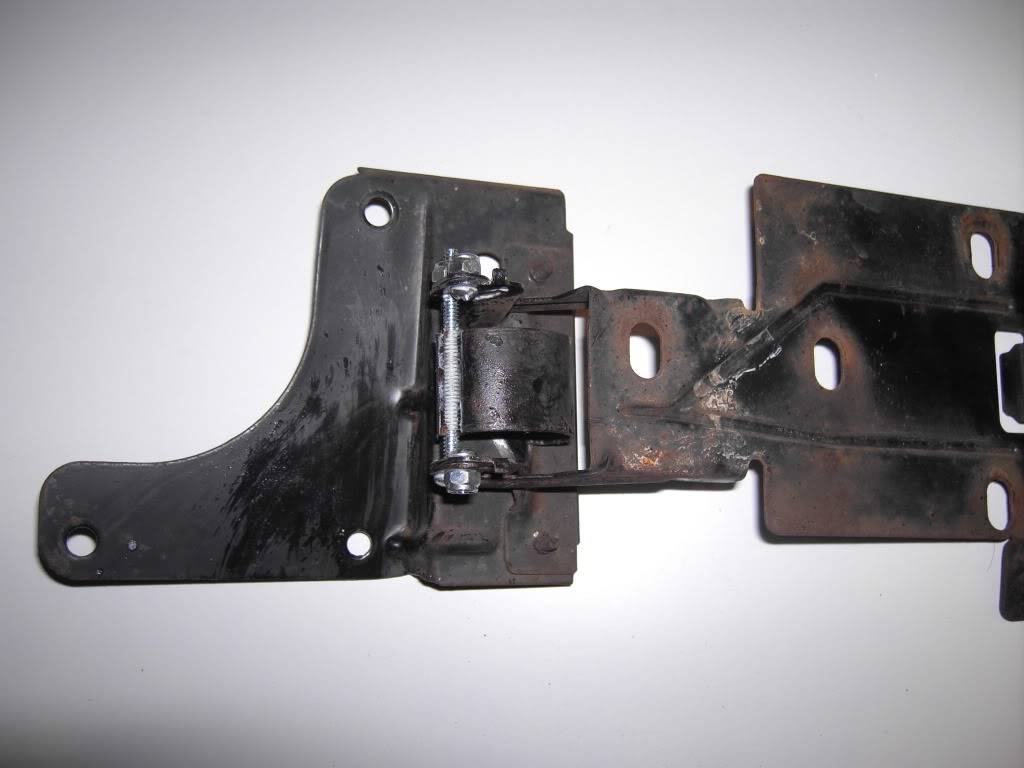
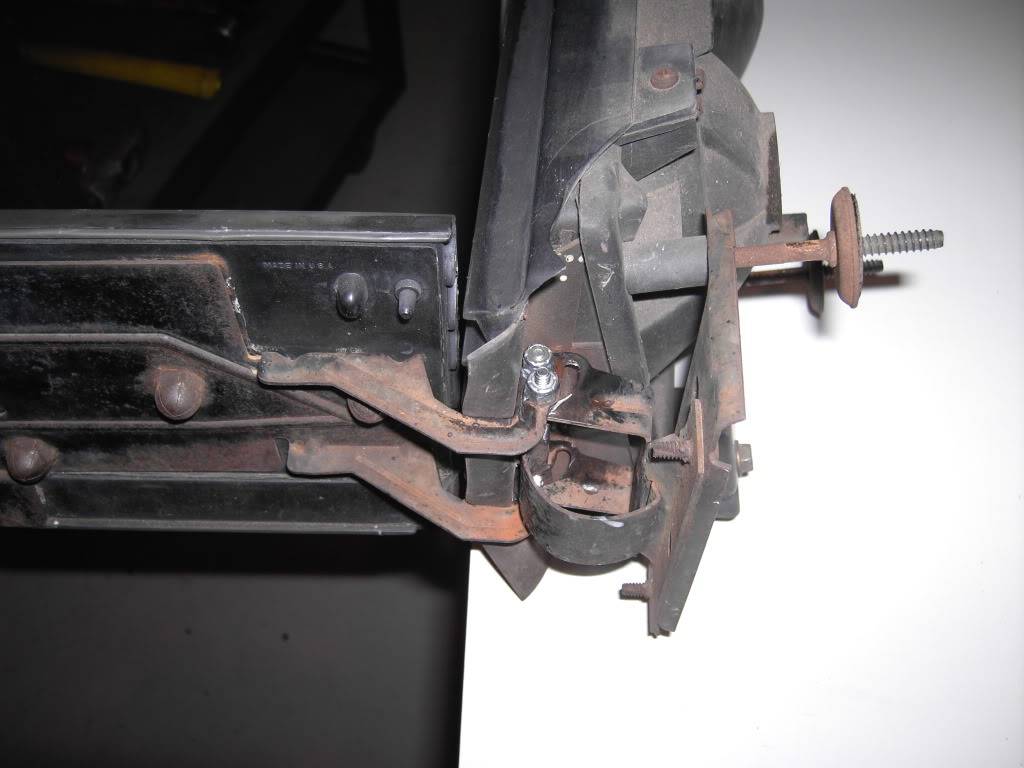
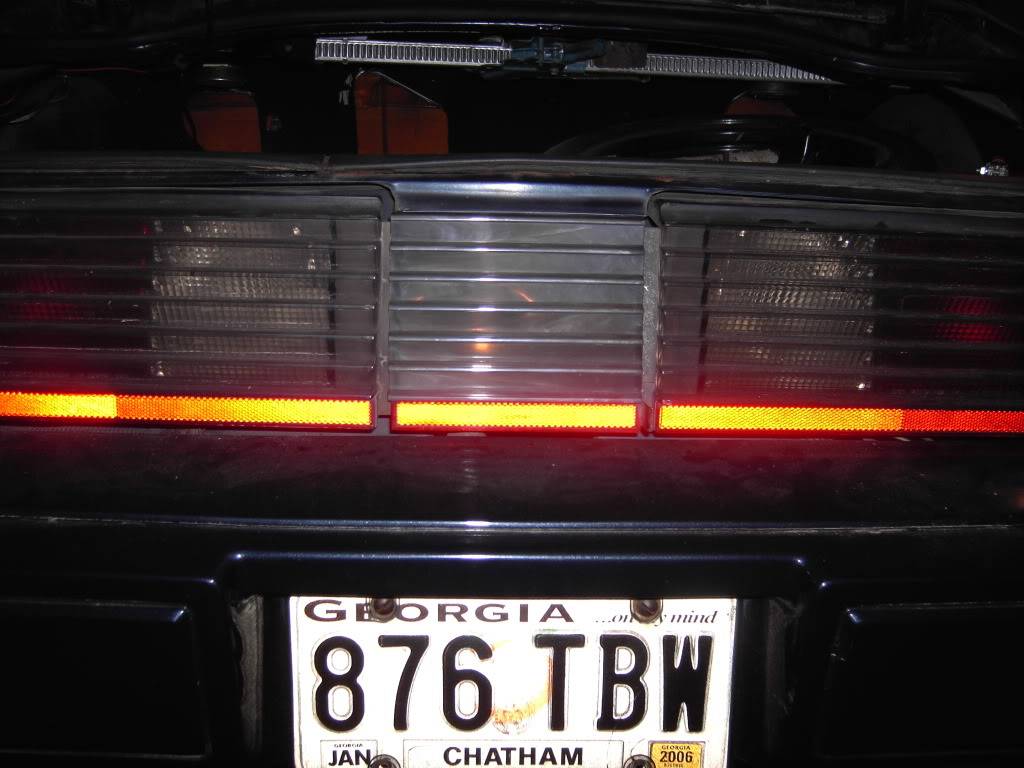
At the other end of the car was the gas door. It always hung down and made the tail light look dumb. So I decided I wanted that fixed. I couldn't believe how crappy of a design it was. They used two long roll pins to hold a spring back and act as a pivot. They were both early worn through. I decided to fix this again for cheap with two #8 screws and one long #10. I had to drill the holes out for the #10 screw just a little bit. The #8s fit right through the holes. I used teflon lock nuts and tightened everything up just enough to remove slop. Sprayed some white lithium grease into the ares and voila, it works great. As you can see, the screws and hing area is well hidden so I don;t have to worry about people saying how bad it looks. The door stays closed 99% of the time anyway so what do I care. Now it looks correct and doesn't look like it's half way falling down even if I can't hold the camera level. Now to find a way to make it light up at night hmmmmmmm......
Ok that's it for now. I have some I will try to do in another day or so. Thanks for lookingTrey
"The early bird may get the worm, but the second mouse gets the cheese."
~ Jon Hammond
1979 WS6 Trans Am stock LT1/T56 drive train out of my Formula. BMW M-parallel rims. C5/C6 brakes
build thread https://www.pro-touring.com/showthre...ghlight=begins
01-26-2010 #69 Registered User
- Join Date
- Feb 2006
- Location
- Idaho Falls, Id
- Posts
- 1,341
Just saw this for the first time. I always like to see what people can do with a low budget and a lot of creativity.
I like the wheels. I like split 5 spoke designs but I've never seen those. They look great on the car.Traven
01-26-2010 #70
Registered User
- Join Date
- Oct 2009
- Location
- Reno, NV.
- Posts
- 482
I just read through this whole thread; Nice progress, keep up the good work

01-26-2010 #71 Registered User
- Join Date
- Jan 2010
- Location
- SLC. UT
- Posts
- 368
Great work! Love all the progress pictures.
Before I had a mustang, I had a 72 Firebird.
Jeff -- 96 Mustang - 2V Stroked Modular Turbo // 13 RAPTOR // 67 Mustang Fastback build - Coyote 5.0
01-26-2010 #72
Registered User
- Join Date
- Aug 2004
- Location
- Rustburg, Virginia
- Posts
- 3,436
Trey,
Shifter can be located back into the center of your console fairly easy.
something like this will work, and not effect the throw.
 1970 RS/SS350 139K on the clock:
89 TPI motor w/ 1pc rear seal coupled to a Viper T56 via Mcleod's modular bellhousing w/ hydraulic T/O bearing from the Viper, 12 bolt rear w/ 3.73 gearing, SC&C upper control arms, factory lowers with Delalums, C5 brakes at all four corners, Front Wheels 17x8's with Sumi 255/40/17 and Rear Wheels 17x9's with Sumi 275/40/17.
Brief description of the work done so far can be found here: http://www.nastyz28.com/forum/showthread.php?t=112454
01-26-2010 #73
Registered User
- Join Date
- Aug 2004
- Location
- Dunwoody, GA
- Posts
- 4,983
Thanks guys. I may have to try that John. So far its location isn't bad. Move it back a couple inches and it should be better. Guess I could use that as an excuse to move the engine back
 Trey
"The early bird may get the worm, but the second mouse gets the cheese."
~ Jon Hammond
1979 WS6 Trans Am stock LT1/T56 drive train out of my Formula. BMW M-parallel rims. C5/C6 brakes
build thread https://www.pro-touring.com/showthre...ghlight=begins
01-26-2010 #74
Registered User
- Join Date
- Aug 2004
- Location
- Rustburg, Virginia
- Posts
- 3,436
I've got that goofy, offset to the side, Viper shifter on my T56 to contend with.
1970 RS/SS350 139K on the clock:
89 TPI motor w/ 1pc rear seal coupled to a Viper T56 via Mcleod's modular bellhousing w/ hydraulic T/O bearing from the Viper, 12 bolt rear w/ 3.73 gearing, SC&C upper control arms, factory lowers with Delalums, C5 brakes at all four corners, Front Wheels 17x8's with Sumi 255/40/17 and Rear Wheels 17x9's with Sumi 275/40/17.
Brief description of the work done so far can be found here: http://www.nastyz28.com/forum/showthread.php?t=112454
01-26-2010 #75
Registered User
- Join Date
- Oct 2009
- Location
- Reno, NV.
- Posts
- 482
 Originally Posted by John Wright

Me too, what are you going to do about it?
01-27-2010 #76
Registered User
- Join Date
- Aug 2004
- Location
- Rustburg, Virginia
- Posts
- 3,436
Trey, please pardon the thread derail. Originally Posted by 67rstbkt
I'm going to look into the aftermarket options for a different shifter. No sure yet how that will play out. I believe the aftermarket shifter will just bolt in place of the stock Viper shifter. The top plate seems to just unbolt and the shifter has a ball/socket configuration on the end. /derail off1970 RS/SS350 139K on the clock:
89 TPI motor w/ 1pc rear seal coupled to a Viper T56 via Mcleod's modular bellhousing w/ hydraulic T/O bearing from the Viper, 12 bolt rear w/ 3.73 gearing, SC&C upper control arms, factory lowers with Delalums, C5 brakes at all four corners, Front Wheels 17x8's with Sumi 255/40/17 and Rear Wheels 17x9's with Sumi 275/40/17.
Brief description of the work done so far can be found here: http://www.nastyz28.com/forum/showthread.php?t=112454
01-27-2010 #77
Registered User
- Join Date
- Oct 2009
- Location
- Reno, NV.
- Posts
- 482
Thanks for the info. Originally Posted by John Wright
Sorry for the thread-jack Trey, next time I'll send a PM.
01-27-2010 #78
Registered User
- Join Date
- Aug 2004
- Location
- Dunwoody, GA
- Posts
- 4,983
No worries guys. I've done my thread in such a manner as to be a lesson on this particular swap. There are a lot of different things that also come up and could certainly help someone out.
Trey
"The early bird may get the worm, but the second mouse gets the cheese."
~ Jon Hammond
1979 WS6 Trans Am stock LT1/T56 drive train out of my Formula. BMW M-parallel rims. C5/C6 brakes
build thread https://www.pro-touring.com/showthre...ghlight=begins
02-18-2010 #79
Registered User
- Join Date
- Aug 2004
- Location
- Dunwoody, GA
- Posts
- 4,983
ok more pictures and details
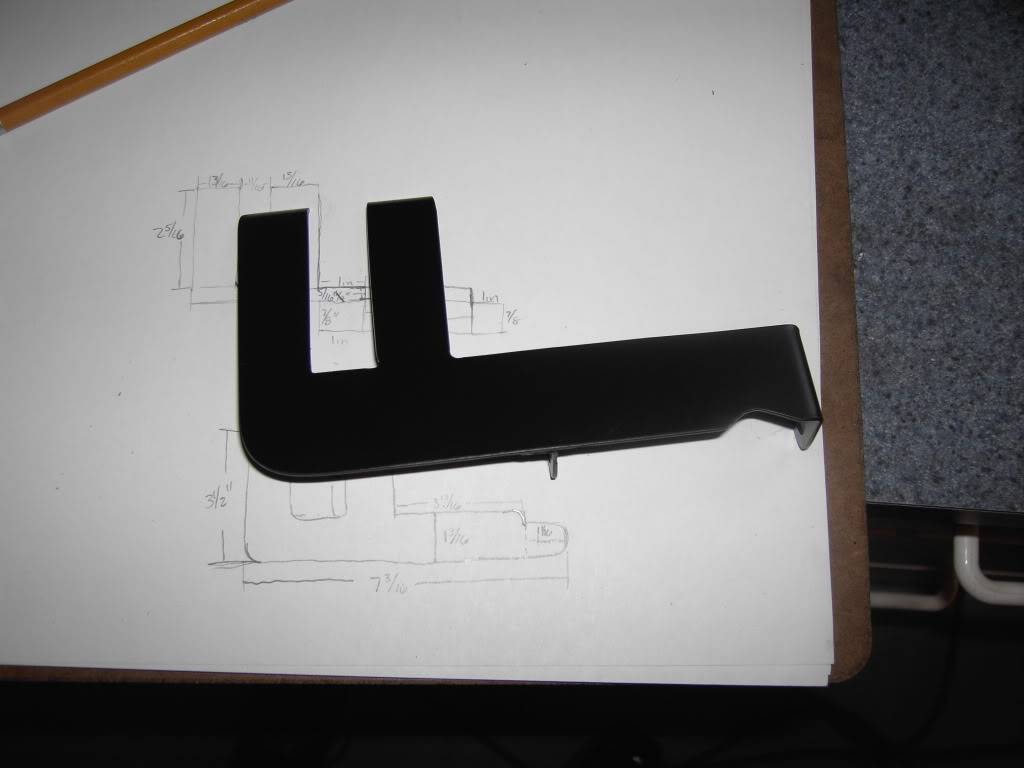
Here's a bracket I made up to hold the power steering reservoir. I just laid it out on 3/16" steel and bent it up and welded it together. Should work out just fine.

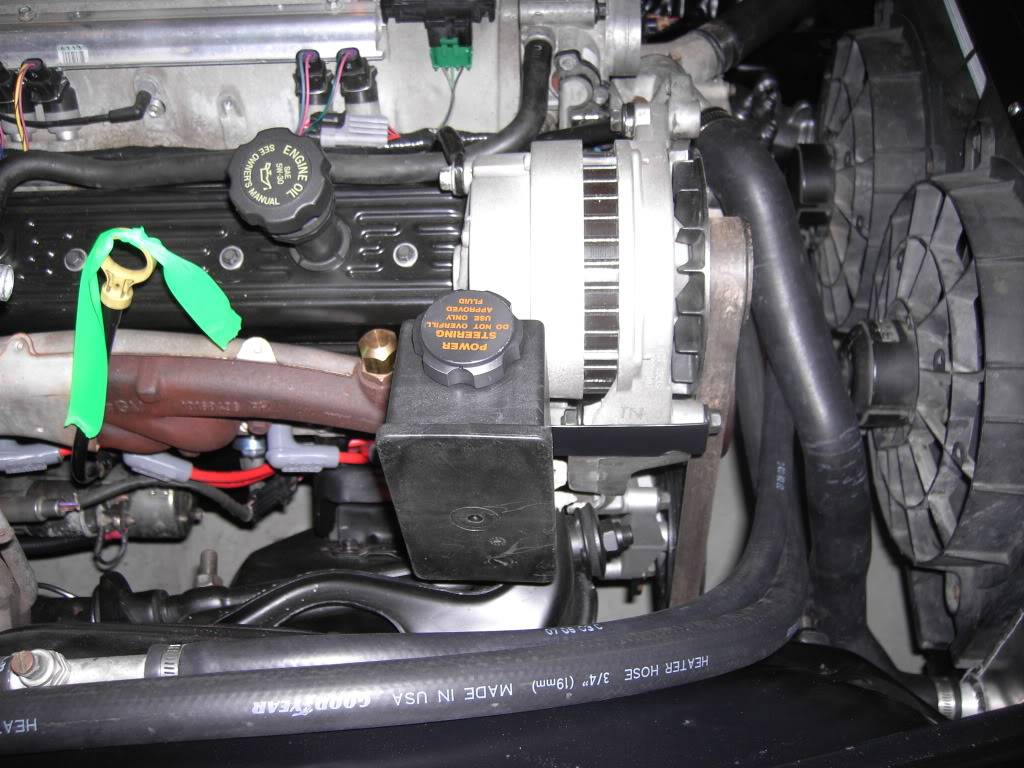
I picked up a reservoir for a 97+ v6 fbody off Ebay. C4 Corvettes have a similar style that may be usable also.
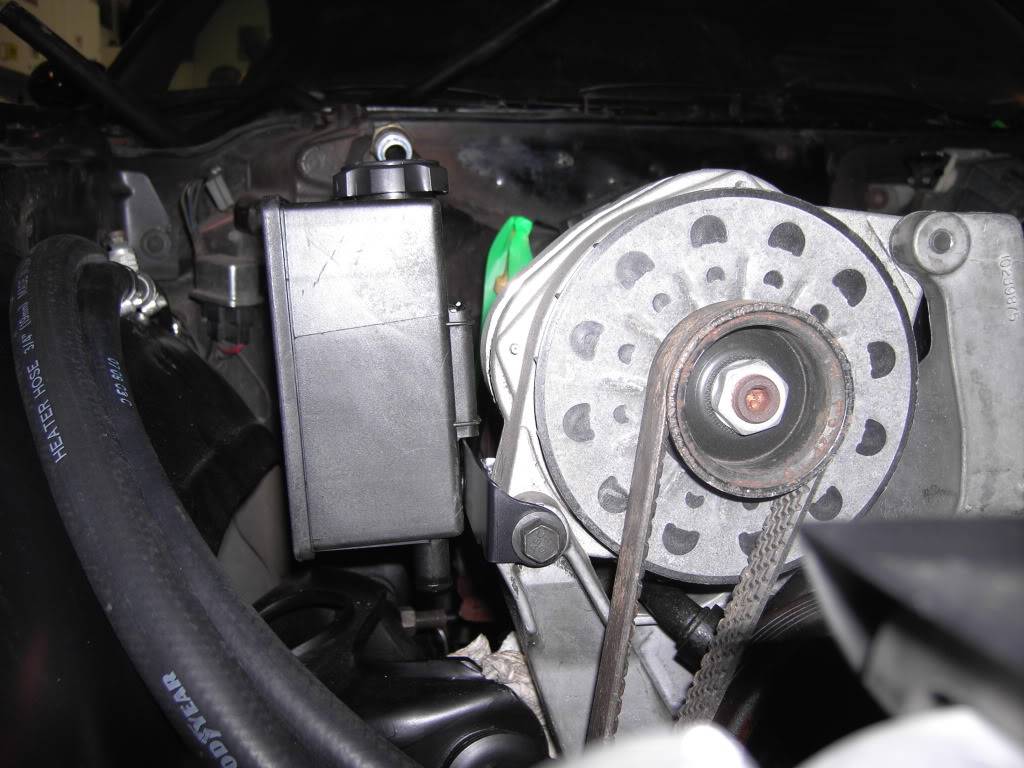
There should be plenty of room between the hoses and the upper control arm but I'll need to double check once I get the power steering plumbed in.
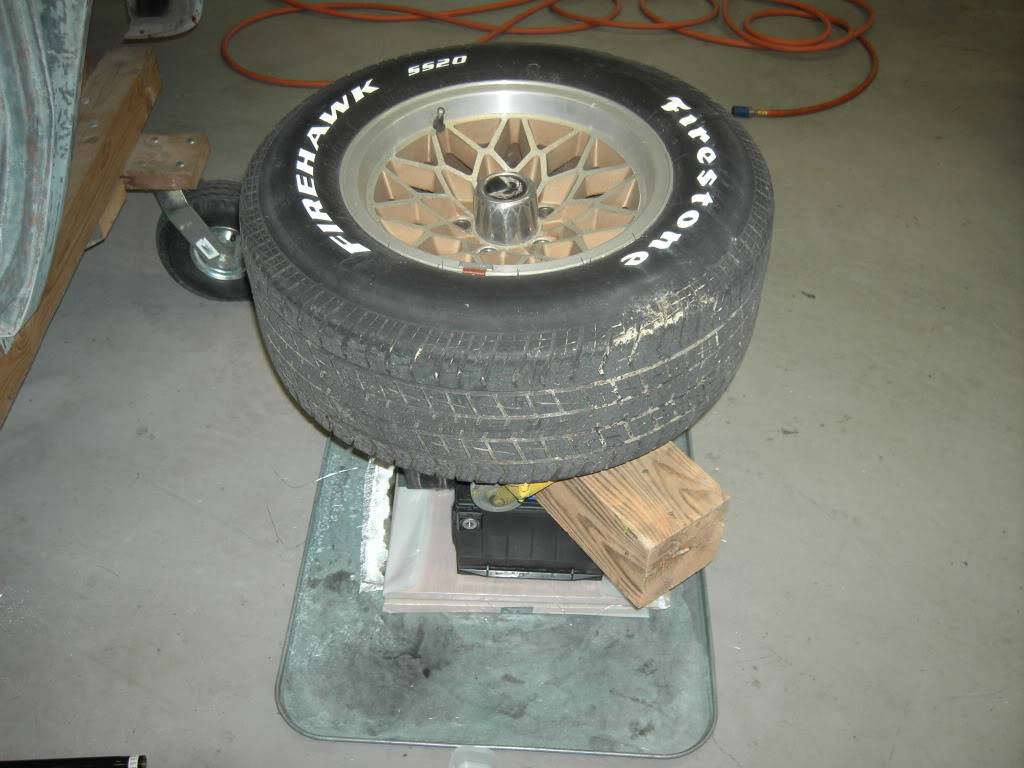
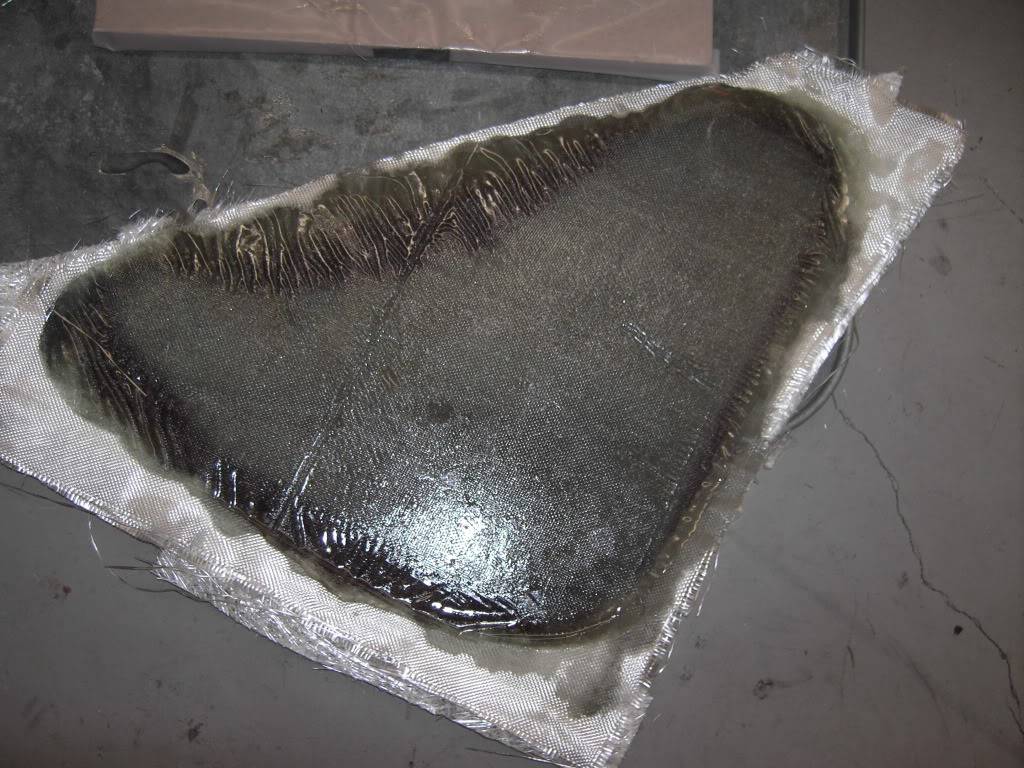
Next up is a close out panel for the air intake for the engine. I decided to make it out of fiberglass instead of metal. I didn't want to take the time to setup a vacuum bag system and I really didn't want to do a whole bunch of sanding and leveling to get the panel to look right. So I placed a lot of weight on the fiberglass while sandwiching it between two 3/4" panels wrapped in plastic
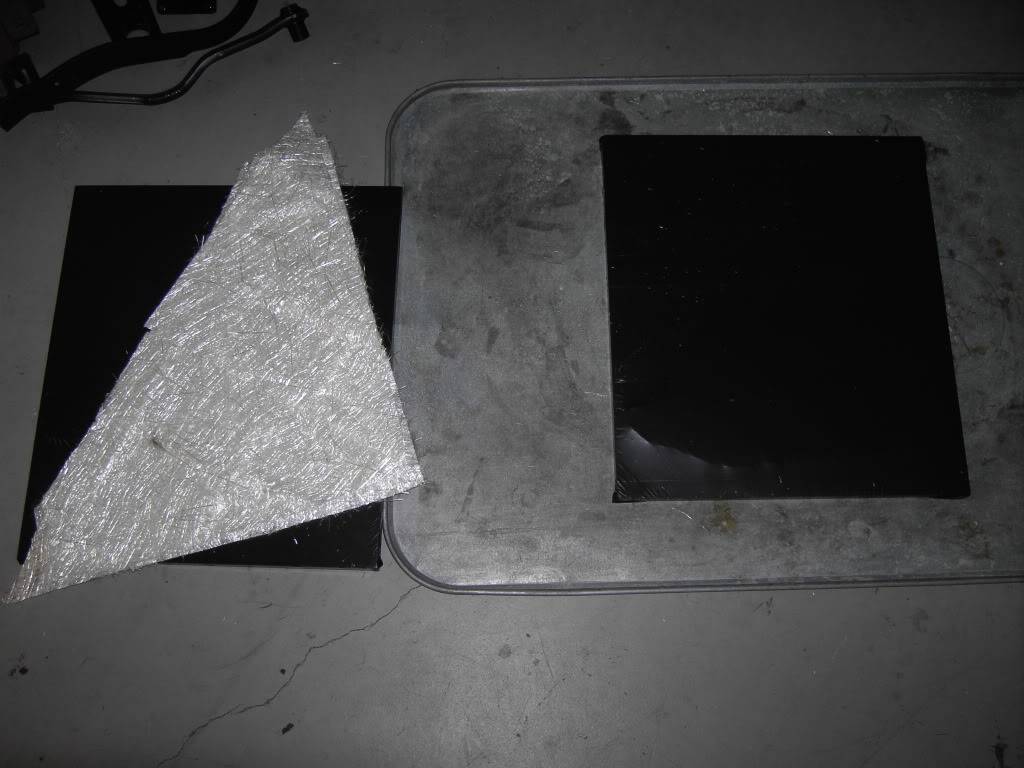
I put two batteries, a 6x6, a home made caster, and a snow flake rim and tire on top for weight. Easily 80 lbs of stuff.
Here's how it looked once cured and ready for finishing
I still had to do some sanding and leveling with bondo and filler but nothing terrible. Shaping the contours was a pain but well worth it. Here it is primed and ready for painting.
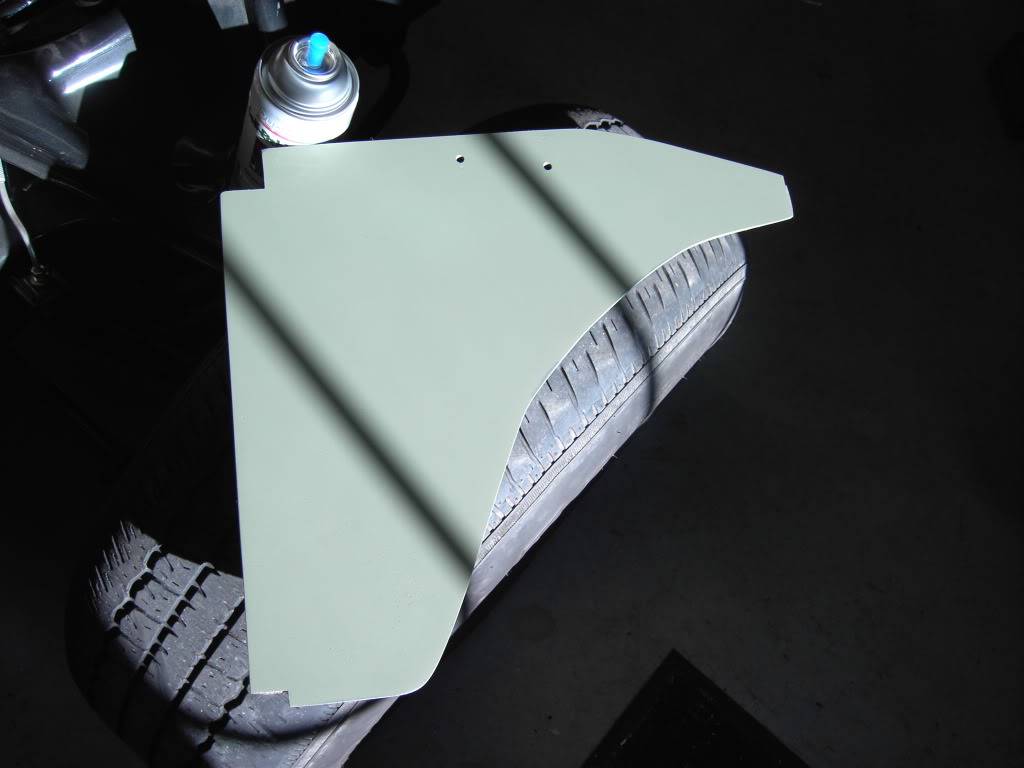
I forgot to mention that I made a template out of cardboard first. I placed that under one of the layers of plastic so that the fiberglass would form to it. That worked ok. I probably could have just made it flat and them traced the template onto the fiberglass and sanded it from there.
Here is a quick shot of how I will be routing the intake tube. I thought I had more pictures but this is it for this time.
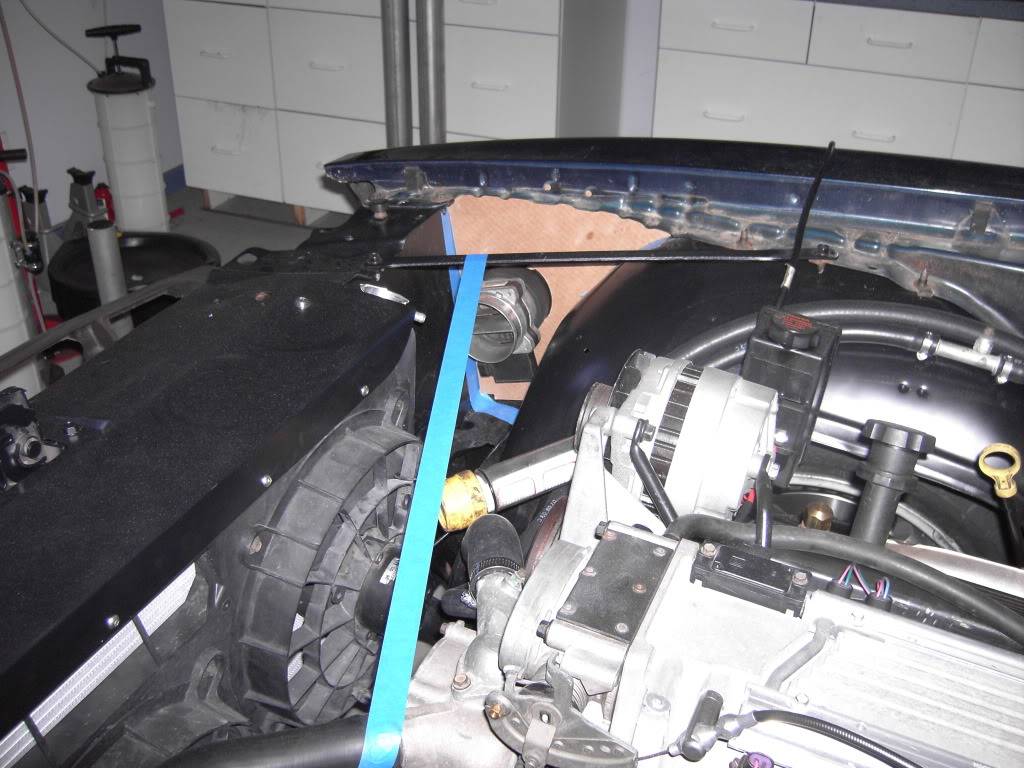
I'll get some more this weekend and hopefully get them uploaded soon. I have the intake tube done and painted as well as the close out panel. I need to wire in the IAT and that's it under the hood. Out back I'm still waiting for the fuel pump. It should be in by now but until I get there on Saturday, I won't know for sure.
I'm close to test firing the car. The fuel pump is the last thing. I've measured for my driveshaft and confirmed that the TH350 slip yoke fits the T56 as well. So no combination Ujoint for me, woot! Power steering is next on the list. Exhaust is done and I need to get pictures. So I'm close. Rear brakes are still needed as are adapters for the rims. Hopefully by my 30th birthday I'll have it rolling on its own again. That gives me til the end of April.
Thanks for looking.Trey
"The early bird may get the worm, but the second mouse gets the cheese."
~ Jon Hammond
1979 WS6 Trans Am stock LT1/T56 drive train out of my Formula. BMW M-parallel rims. C5/C6 brakes
build thread https://www.pro-touring.com/showthre...ghlight=begins
02-19-2010 #80 Registered User
- Join Date
- Dec 2005
- Location
- Birmingham, AL
- Posts
- 3,355
Nice progress, the closeout is going to look trick. Keep us posted.
Stephen

 Reply With Quote



