Results 181 to 200 of 763
Thread: 1970 GTO Version 2.0
-
05-05-2008 #181

 -Moderator/Sponsor-
- Join Date
- Apr 2001
- Location
- The City of Fountains
- Posts
- 16,118

So after being a little ticked off this morning about the whole tachometer ordeal I decided to make some calls. I called my buddy John Parsons and he gave me a quick run down of Ohms Law. So I decided that instead of getting a collection of various resistors I would get a 10K Ohm potentiometer and see what works best. So I hooked up the potentiometer to the tach and set it to the 10K setting. Fired up the car and the tach seemed to work fine at low RPM. I then kept reducing the resistance until the tach stopped responding. The I zeroed in on the lowest setting where the tach responded smoothly. I then turned off the car and measured the resistance across the potentiometer. It rea 3.9K Ohms. So I gave myself some headroom and installed a 4.7K Ohm resistor. So far so good. The tach does seem to flutter ever so slightly at about 800 RPM, but there are no random fluctuations to zero. I think that will do it.
I also went to Napa and they had the Gates heat shrink hose clamps in stock. They only had a couple of sizes, but I was able to do the upper radiator hose:
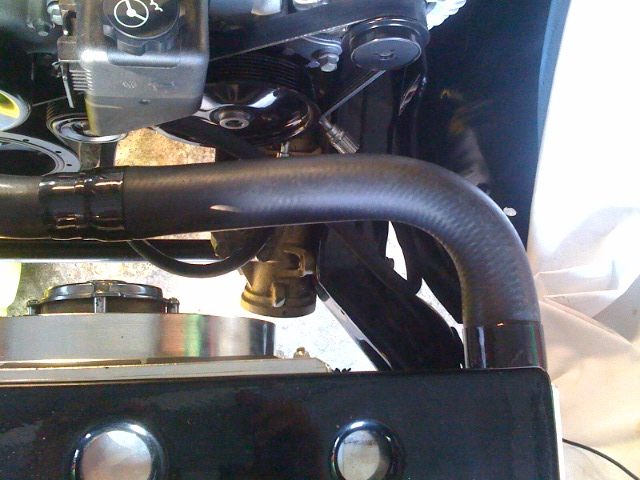
I have to say that the hose clamps work as advertised. I will order some extras from McMaster just to have them around.
I also finished bleeding the brakes, filled up the transmission with fluid, and tightened up the rear suspension bolts. Hopefully next weekend I can get it into the fabricator to have the exhaust finishes up.
Andrew1970 GTO Version 3.0
1967 Cougar build
GM High-Tech Performance feature
My YouTube Channel Please Subscribe!
Instagram @dr__efi
I deliver what EFI promises.
Remote Holley EFI tuning.
Please get in touch if I can be of service.
"You were the gun, your voice was the trigger, your bravery was the barrel, your eyes were the bullets." ~ Her
-
05-06-2008 #182 -Moderator-
- Join Date
- Jul 2001
- Location
- Detroit, Michigan
- Posts
- 6,854
How do those work, Andrew? Do you shrink them with a heat gun to compress them onto the pipe? Are they reuseable?
1968 Pro-Touring Camaro LS1
Project: Next Year
- Start date; June '01
- Completion; Sometime next year or the year after.....
05-06-2008 #183
-Moderator/Sponsor-
- Join Date
- Apr 2001
- Location
- The City of Fountains
- Posts
- 16,118
You got the idea Tony. They are just thick sections of heavy duty heat shrink tubing. They are not reusable. To take them off you have to cut them off. There is a special tool that McMaster sells, or they also recommend using a soldering iron to melt it without the risk of cutting the hose. Originally Posted by trapin
Andrew1970 GTO Version 3.0
1967 Cougar build
GM High-Tech Performance feature
My YouTube Channel Please Subscribe!
Instagram @dr__efi
I deliver what EFI promises.
Remote Holley EFI tuning.
Please get in touch if I can be of service.
"You were the gun, your voice was the trigger, your bravery was the barrel, your eyes were the bullets." ~ Her
05-07-2008 #184 Registered User
- Join Date
- Apr 2005
- Location
- dayton, oh
- Posts
- 952
I'm not saying it won't, but I'll be impressed if they hold pressure well for a long time.
they look trick, though.
05-07-2008 #185 -Moderator/Sponsor-
- Join Date
- Jun 2001
- Location
- Orlando, FL
- Posts
- 10,604
Those clamps will work indefinitely. Their only downside is that they aren't reusable.
jpJohn Parsons
UnRivaled Rides -- Modern upgrades for your ride.
UnRivaled Rides recent project -- LS9-powered 69 Camaro
05-07-2008 #186 Registered User
- Join Date
- Aug 2004
- Location
- Canada
- Posts
- 134
heat shrink clamps
Freightliner uses the same thing on all their hose connections now on the big trucks as well as Volvo I believe. Haven't seen a leak yet.
05-07-2008 #187
Registered User
- Join Date
- Apr 2005
- Location
- dayton, oh
- Posts
- 952
cool. i'm in.
05-08-2008 #188
-Moderator/Sponsor-
- Join Date
- Apr 2001
- Location
- The City of Fountains
- Posts
- 16,118
The Big Brown truck showed up today with the hose clamps from McMaster Carr. I got the big clamps to do the 1.75" section of the lower radiator hose, as well as some smaller clamps to do the heater hose.

In retrospect, I should have installed the little hose reducer a little further back in the heater hose so it would not be so visible, but oh well. It's done.
One thing that I learned while working on the RX7 is that the LSx engines are a little finicky to "burp." One trick that really helps is to fill the engine through the upper radiator hose. What this does is fill the block as much as possible before the engine is even started. After filling the engine through the upper hose, I fired it up and topped off the radiator. I don't think that cooling will be an issue at all with this engine. I have a huge Be Cool radiator and it took about 20 minutes for the engine to reach 210. Once the thermostat opened I topped off the radiator again. The fans kicked on at just over 210 (the ECU documentation said they are supposed to kick on at 212) and it only took about 10 seconds for the temp to drop enough for the fans to shut off. Driving around I don't think the fans will kick on at all.
Andrew1970 GTO Version 3.0
1967 Cougar build
GM High-Tech Performance feature
My YouTube Channel Please Subscribe!
Instagram @dr__efi
I deliver what EFI promises.
Remote Holley EFI tuning.
Please get in touch if I can be of service.
"You were the gun, your voice was the trigger, your bravery was the barrel, your eyes were the bullets." ~ Her
05-08-2008 #189
-Moderator/Sponsor-
- Join Date
- Apr 2001
- Location
- The City of Fountains
- Posts
- 16,118
In a previous update I mentioned that I swapped out my brake master cylinder for another one. I did this mainly to resolve an issue with the push rod retention method. The MC that I am currently using has a nice deep pushrod hole as well as a clip on the tip of the pushrod that retains it inside the MC. Just because everything bolted up fine, doesn’t mean that this MC will work in my application. The pedal seemed to be very high and the pedal effort is rather high. So I decided to see what was really happening at the caliper. I went to my local hydraulic hose retailer and picked up an inexpensive pressure gauge. After installing the gauge in a bleeder screw in my caliper I had a friend step on the break pedal and to see what kind of pressure was being generated. Keep in mind that Wilwood rates their calipers at a maximum of 1200psi. From what I understand, past that point the caliper starts to deflect. So here is the result:
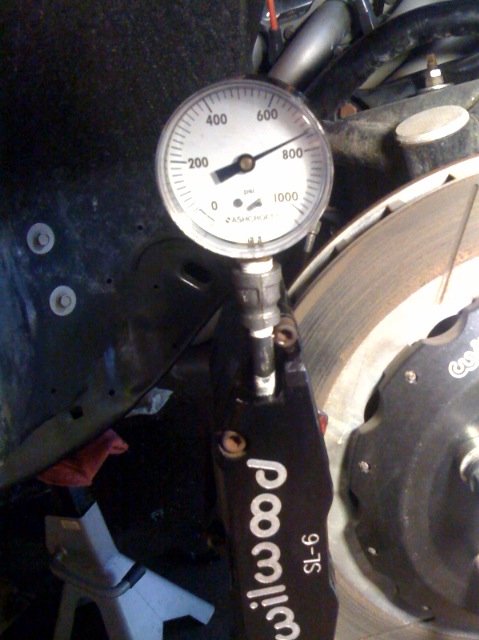
With moderate pedal effort my friend was able to generate a fairly easy 800-1000psi at the caliper. By pushing a little harder I am sure that he was going past 1200psi. With all that being said, I think that this MC will work just fine. The pedal effort will be moderate and the braking will be excellent!
Andrew1970 GTO Version 3.0
1967 Cougar build
GM High-Tech Performance feature
My YouTube Channel Please Subscribe!
Instagram @dr__efi
I deliver what EFI promises.
Remote Holley EFI tuning.
Please get in touch if I can be of service.
"You were the gun, your voice was the trigger, your bravery was the barrel, your eyes were the bullets." ~ Her
05-09-2008 #190
Registered User
- Join Date
- Jan 2006
- Location
- Oregon
- Posts
- 1,773
Very nice build Andrew...just (re)read through the whole thread and it's amazing what you've been able to accomplish in such a short time. I wish my projects moved half that fast but I've got no one to blame but myself. For now I'll just have to live any future LSx swap vicariously through you.
Tobin
KORE3It's what I does.
05-09-2008 #191
-Moderator-
- Join Date
- Jul 2001
- Location
- Detroit, Michigan
- Posts
- 6,854
Andrew...manual brakes in this car?
1968 Pro-Touring Camaro LS1
Project: Next Year
- Start date; June '01
- Completion; Sometime next year or the year after.....
05-09-2008 #192
-Moderator/Sponsor-
- Join Date
- Apr 2001
- Location
- The City of Fountains
- Posts
- 16,118
Yes Sir. I've always had manual brakes in this car. Love them! Originally Posted by trapin
Andrew1970 GTO Version 3.0
1967 Cougar build
GM High-Tech Performance feature
My YouTube Channel Please Subscribe!
Instagram @dr__efi
I deliver what EFI promises.
Remote Holley EFI tuning.
Please get in touch if I can be of service.
"You were the gun, your voice was the trigger, your bravery was the barrel, your eyes were the bullets." ~ Her
05-10-2008 #193 Moderator / Sponsor
- Join Date
- Feb 2003
- Location
- Houston, TX
- Posts
- 3,446
I just spent over an hour reading through this. Great write-up Andrew! The only thing I'd recommend is putting all the part #'s down if you were to do it again.
Looking forward to seeing that GTO perform with the new combo.
Tony
05-10-2008 #194
-Moderator/Sponsor-
- Join Date
- Apr 2001
- Location
- The City of Fountains
- Posts
- 16,118
Thanks for the compliments Tony! Originally Posted by Nine Ball
One thing I would like to clarify. I mentioned in a previous thread that the brake MC is from 1979 Malibu. It fact it is from a 1977 Malibu . I am using a Raybestos PN MC39946. It includes the pushrod, but it must be modified to mate with the A-body pedals.
Andrew1970 GTO Version 3.0
1967 Cougar build
GM High-Tech Performance feature
My YouTube Channel Please Subscribe!
Instagram @dr__efi
I deliver what EFI promises.
Remote Holley EFI tuning.
Please get in touch if I can be of service.
"You were the gun, your voice was the trigger, your bravery was the barrel, your eyes were the bullets." ~ Her
05-12-2008 #195
-Moderator/Sponsor-
- Join Date
- Apr 2001
- Location
- The City of Fountains
- Posts
- 16,118
Big day today. After a rather dismal, windy day yesterday, the weather today was just amazing. I needed a little inspiration so I decided that it was time for the GTO to move under its own power. I so installed a seat, put on some wheels, cleared out the tools, and pulled it out of the garage.


Of course I couldn't resist. So I went around the block. The clutch is silky smooth. Converting from the old Z-bar to the hydraulic release was definitely worth it. The clutch actuation is just like on a modern car. Super smooth. I still don't have exhaust so the drive was short. The brakes felt solid so the MC is working well. I also noticed some noises which I think are the result of my messing around with driveline angles. I raised the back of my transmission to get the angles perfect, but now the u-joint is grazing the floor. More on driveline angles later.
Notice how much higher the front sits. I bet it's up a minimum of 2". I can't wait to get the thing scaled. I am also contemplating getting a fiberglass hood and ditching the shaker. The stock hood is probably 40-50 lbs, plus another 10 lbs for the shaker. A Glasstek fiberglass hood is probably about 25 lbs. I am open to opinions.
AndrewLast edited by andrewb70; 05-12-2008 at 04:39 PM.
1970 GTO Version 3.0
1967 Cougar build
GM High-Tech Performance feature
My YouTube Channel Please Subscribe!
Instagram @dr__efi
I deliver what EFI promises.
Remote Holley EFI tuning.
Please get in touch if I can be of service.
"You were the gun, your voice was the trigger, your bravery was the barrel, your eyes were the bullets." ~ Her
05-12-2008 #196
Registered User
- Join Date
- May 2005
- Location
- St. Augustine, FL
- Posts
- 1,529
Awsome! I say if you can get a fiberglass hood to fit right do it. How low do you think your gonna go in the front?
Andrew Petty

05-12-2008 #197 Registered User
- Join Date
- May 2007
- Location
- Houston, Tx
- Posts
- 2,200
looks good!
Colin Russ
05-12-2008 #198
Registered User
- Join Date
- Mar 2008
- Location
- Wichita, KS
- Posts
- 375
ill take any spare parts, lol. i love the car, cant wait till you get it completely driveable.
67 GTO, LS2, T56
WILWOOD, FORGELINE, RIDETECH
05-14-2008 #199
-Moderator-
- Join Date
- Jul 2001
- Location
- Detroit, Michigan
- Posts
- 6,854
When did you find time to paint the car orange?
LOL!! Joking. Gotta love cell phone camaras.
That's awesome news about getting to drive it. That point seems so far away for me. I can't even imagine the feeling.Last edited by trapin; 05-14-2008 at 08:05 AM.
1968 Pro-Touring Camaro LS1
Project: Next Year
- Start date; June '01
- Completion; Sometime next year or the year after.....
05-14-2008 #200
-Moderator/Sponsor-
- Join Date
- Apr 2001
- Location
- The City of Fountains
- Posts
- 16,118
This is an update for the techno geeks. If you like looking at pretty pictures, stop reading now, and move on. If being diligent about every little technical detail of your car is something that you enjoy doing, than please read on.
Ever since I have owned my car, all 23 years, I have had some sort of vibration in the driveline at speeds about 70 MPH. Most of the equipment on my car has changed numerous times. The only constant being the ride height. In recent weeks I have really been studying what actually happens with these cars when they are lowered. I give a lot of credit to Troy, I forget his user name here. LOL He and I have exchanged some messages back and forth and he has really helped me to understand what it will take to make my car smooth. This is a thread that he started on Chevelles.com:
http://www.chevelles.com/forums/showthread.php?t=213271
There is also another great website that I used:
http://www.vibratesoftware.com/html_...aft_Angles.htm
This is by far the best website for explaining and measuring driveline angles.
The problem with GM A-bodies is that as the cars are lowered in the rear and front working angle increases dramatically. While it is possible to match the the rear working angle to the front working angle with adjustable upper control arms in the rear, this still does not address the problem of just having too much working angle.
I have no doubt that I will get 10 different opinion on this post. There seems to be a lot of conflicting information when it comes to driveline angles. I feel that the information in the above website is the most accurate that I have seen to date.
For the sake of this discussion I will always refer to something pointing UP when it is pointing from the back to the front of the car. Like this:
[front] \ [rear] = UP
[front] / [rear] = DOWN
I made a spacer which raised the back of the transmission about 1/2". My final readings were as follows:
Transmission: 2.5* UP
Driveshaft: .3* UP
Pinion: 2* DOWN
Front working angle: 2.5 - 0.3 = 2.2*
Rear working angle: 2 + 0.3 = 2.3*
I ran the car on jackstands and took it up to about 4000 RPM in 6th gear, which is over 5000RPM driveshaft speed. It seemed very smooth. Much more so than at other setting. The ultimate test will be how the car feels at speed.
Andrew1970 GTO Version 3.0
1967 Cougar build
GM High-Tech Performance feature
My YouTube Channel Please Subscribe!
Instagram @dr__efi
I deliver what EFI promises.
Remote Holley EFI tuning.
Please get in touch if I can be of service.
"You were the gun, your voice was the trigger, your bravery was the barrel, your eyes were the bullets." ~ Her

 Reply With Quote