Results 41 to 60 of 62
Thread: 1967 Camaro project updates
-
07-07-2011 #41

 Registered User
- Join Date
- Jun 2011
- Location
- Ohio
- Posts
- 263

Man the splitter and the black wheels look great!
-
07-07-2011 #42 Registered User
- Join Date
- Jan 2008
- Location
- Charlotte
- Posts
- 1,295
Those wheels look familiar!
Love blacked out z06 wheels!2005 LeMans Blue Corvette w/ T56 & Z51 & C6Z06 Brakes, Build Thread: https://www.pro-touring.com/showthread.php?64496
2005 GMC Sierra 2500HD LLY / Allison
2014 Chevy SS LS3 / 4 Door
07-08-2011 #43 Registered User
- Join Date
- Apr 2006
- Location
- Atlanta GA
- Posts
- 7,477

This looks fuggin awesome!.. like a smokey yunik street fighter type deal..
love the fact you made the chinspoiler!
07-08-2011 #44 Registered User
- Join Date
- Jan 2007
- Location
- CT
- Posts
- 782
Thanks for the comments guys. I need to address the tire profile they are a touch low for my liking but that's easy!
Thanks Mr.V that is the style i was going for. The car was an original gold car i think the 2 tone helped a bunch. Especially since the rear quarters and the door needed some metal work it was an easy decision.________________
Nick S.
Gold/Gray 1967 Camaro
07-09-2011 #45 Registered User
- Join Date
- May 2011
- Location
- central Pa, USA
- Posts
- 189
I like the paint, it looks real mean. what did you make the splitter out of?
Tom
trailers are for boats and broke stuff.
07-09-2011 #46 Registered User
- Join Date
- Aug 2004
- Location
- Houston TX
- Posts
- 292
looking good! like the paint combo.
07-28-2011 #47
Registered User
- Join Date
- Jan 2007
- Location
- CT
- Posts
- 782
here is some info on the splitter
https://www.pro-touring.com/showthre...ns!&highlight=________________
Nick S.
Gold/Gray 1967 Camaro
07-29-2011 #48 New to Pro-Touring
- Join Date
- Jul 2011
- Location
- Weatherford,Tx
- Posts
- 86
Nice work.
Keep at it...
10-03-2018 #49
Registered User
- Join Date
- Jan 2007
- Location
- CT
- Posts
- 782
Ok lets get caught up 2 years on this next round of posts.
I'm going to move the car into a new direction. Less "race" more "street". I want to use the car more with my family and the roll cage / no A/C and no rear seat don't help with that. I also need to do routine maintenance to the 409 and when adding the upgrades i wanted to do i came to the why bother scenario. SO.......Here is the plan.
SpeedTech Pro Touring subframe
SpeedTech LS Swap Components (Mounts, T56 Tunnel, Clutch, Oil Pan, Headers)
PSI Harness
Vintage Air
DSE Subframe connectors and firewall fill plate
AAW Classic Update
Griffin LS Radiator
Afco Heat Exchanger
RestoMod tank Duel Pump with corner pickups
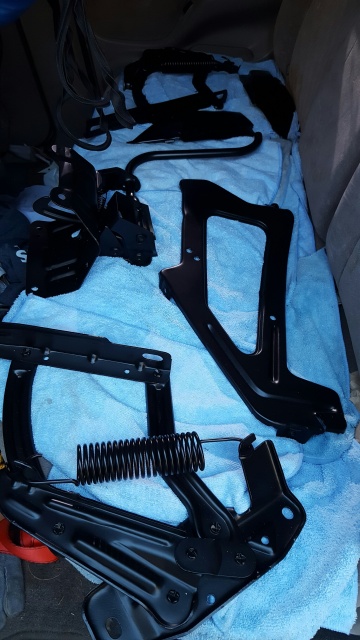
Clean and paint misc small parts under the hood
Oh and of course LS swap.
First Purchase is in LSA

Part of the project was to create more room in the Garage. I have a fairly wide 2 car that is under the house. It is insulated and has easy access to the 200 amp panel. Some minor upgrades to the garage space are 100amp sub panel, 240v heater, and Pushing my 8' wide bench back 40". This makes the bench recessed into the basement more.
Original Studs

Recess made
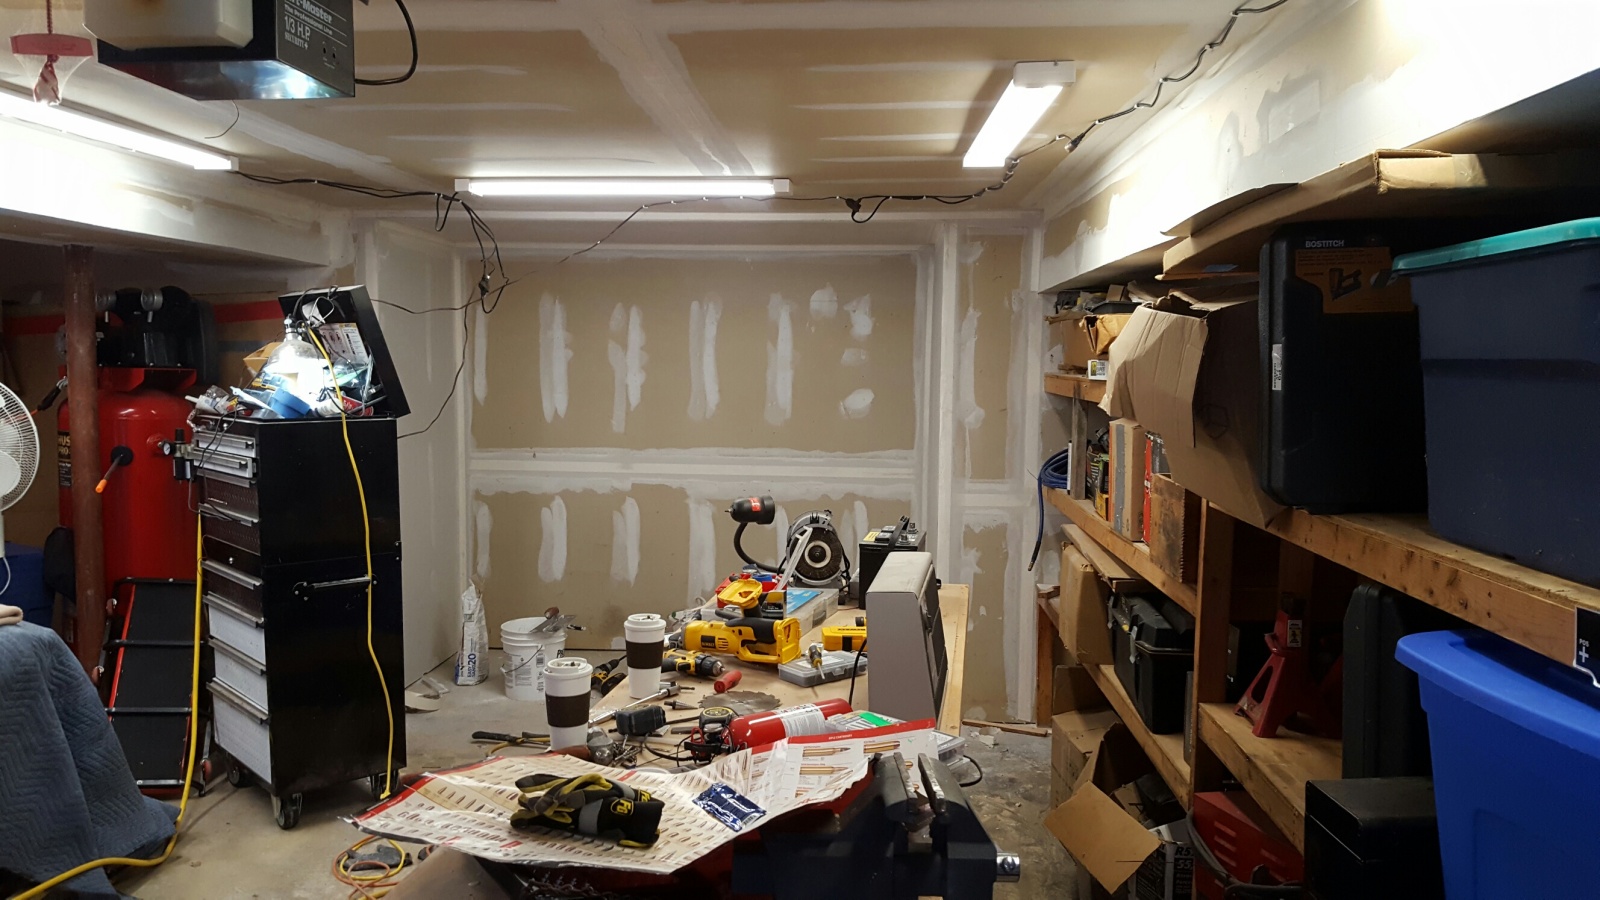
Front of the car work area
[IMG]http://i68.t________________
Nick S.
Gold/Gray 1967 Camaro
10-03-2018 #50
Registered User
- Join Date
- Jan 2007
- Location
- CT
- Posts
- 782
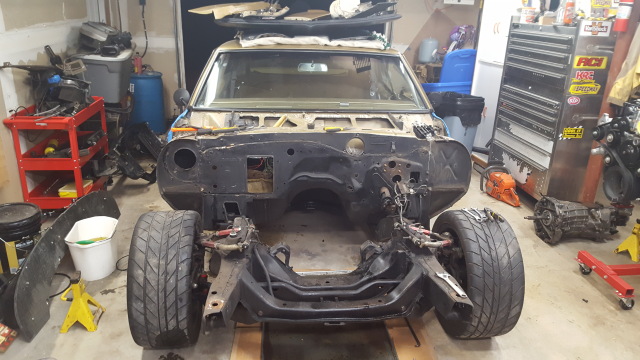
Front down to the subframe
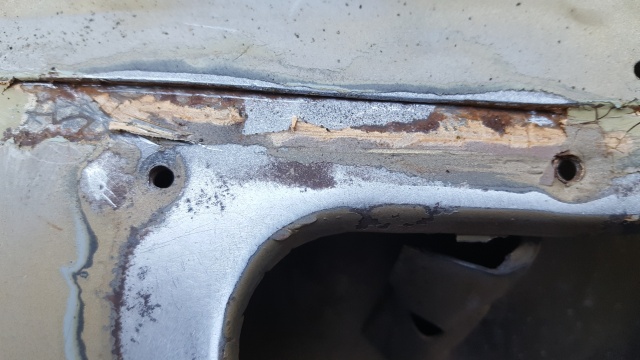
Firewall is free of all components
Wiring is out
I hate seam sealer
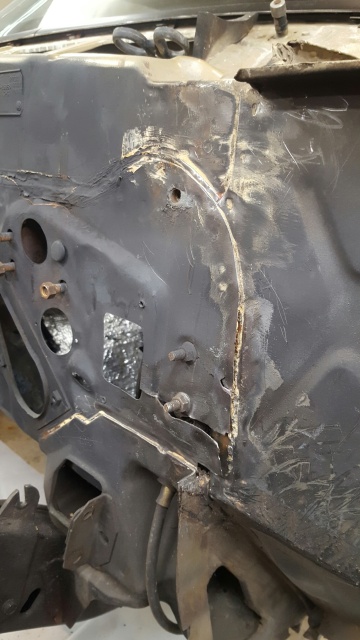
and found this.....I think the ebrake some how stressed the this area and it cracked all the way to the fuse block opening?

Been busy selling old parts and buying one ones:
Parts in so far:
Vintage air with low mount ac bracket
Mcleod RST twin disc with flywheel
ridetech Front coilovers
Speedtech upper and lower control arms
On order but not arrived
Speedtech subframe
trans tunnel cover
speed tech firewall clutch assembly
speed tech down bars
Still need to order
Mast Oil Pan
Cooling system (Engine / SC Heat Exchanger)
Fuel System
T56 Magnum
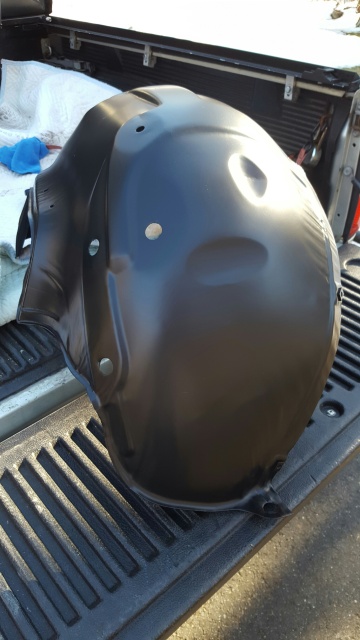
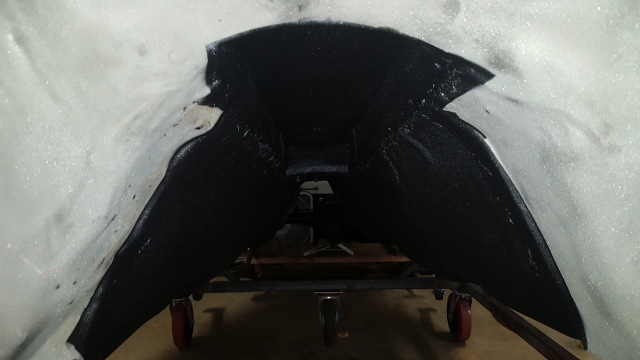
My radiator support / Inner Fenders / hood latch support and hinge assmebly / head light buckets are all blasted and ready for my paint guy to spray.
MORE RUST

Seam Sealer nearly removed

- - - Updated - - -
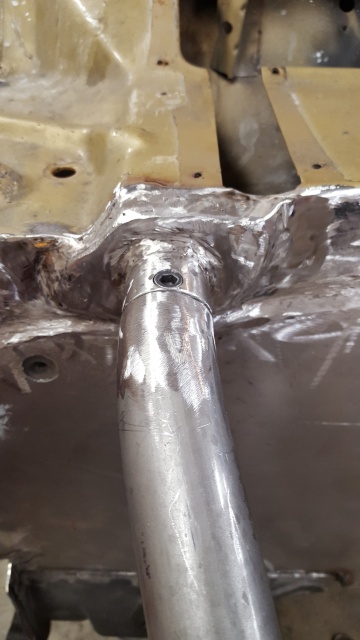
Getting some painted parts back! Need to get time to finish the firewall and subframe connectors
Firewall fill plate just about in. Need to finish some bottom a little but its just about done.
Tack

ground down

up next Sub frame connectors and Engine mock up and frame down bar installation!
Got some stuff done.
DSE subframe connectors are in
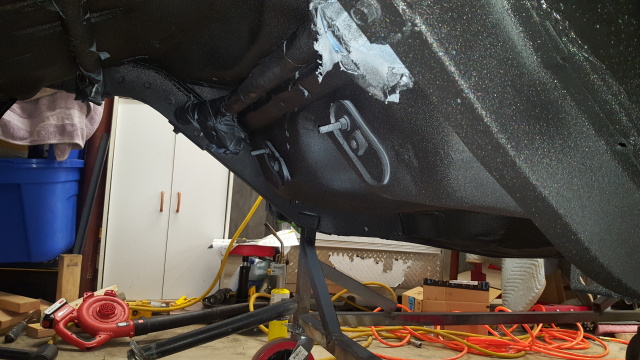
Down bars are in. I decided to weld them in with a removable tube adapter and the plates welded to the firewall. I have some clean up to do still. Next is to finish the trans tunnel with the speedtech cover then power wash / steam the underside and get the whole thing ready for undercoating and firewall paint.


Engine Mockup:
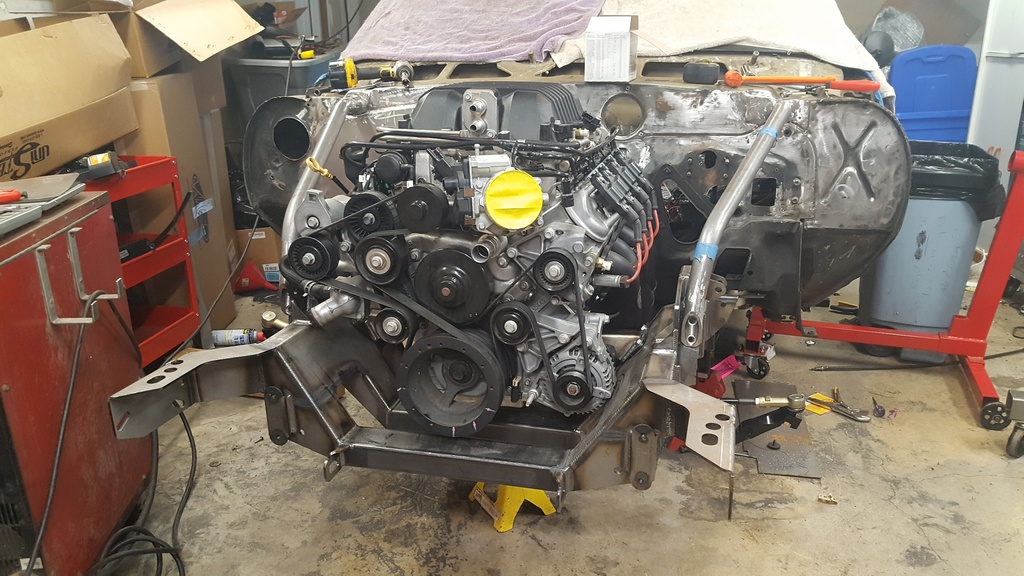
The Good
Mast Oil Pan fits nice
The engine fits
the steering rack clears the pan and rack.
The not so good:
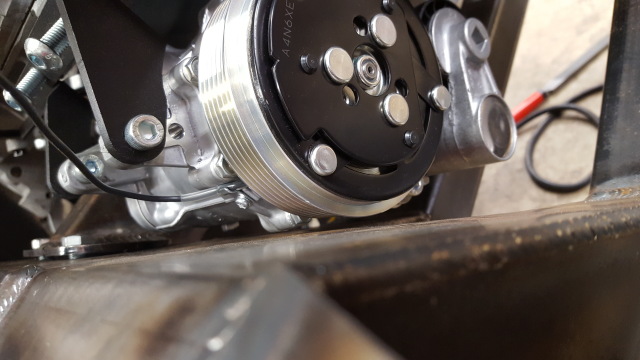
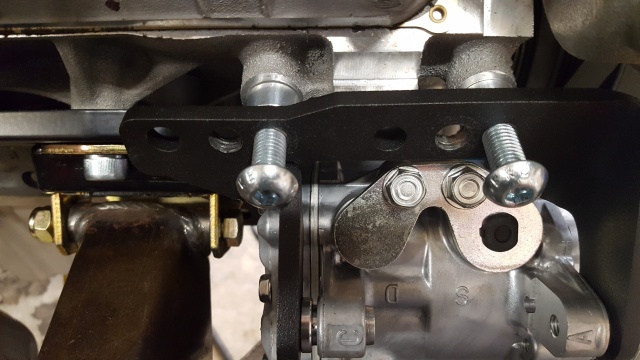
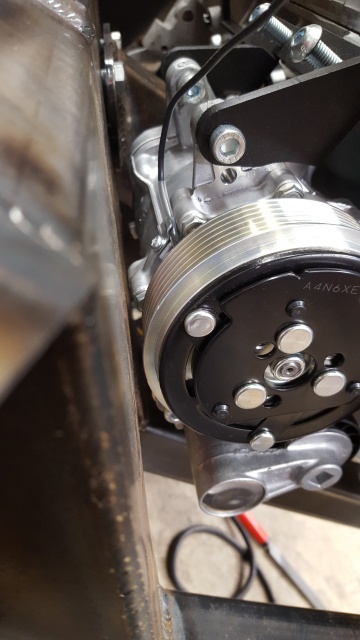
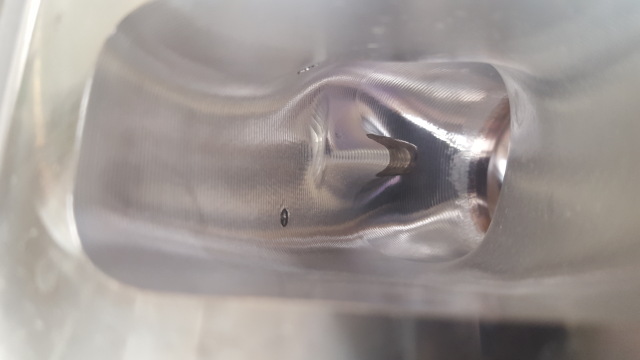
The crank pulley will interfere with the crossmember when i use the over drive LSA Pulley. The alternator is also very close. I will make pockets to fit these better.

I need to verify the Dirty Dingo low mount A/C will fit and then I can begin modification on the frame.
- - - Updated - - -
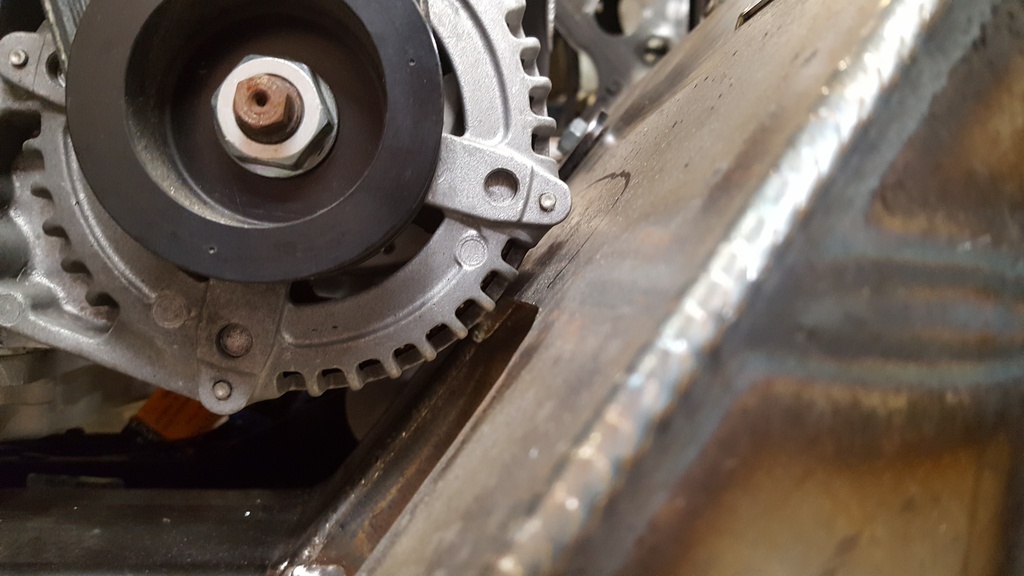
I will need to make some room for the dirty dingo low mount.

I barely can get the belt on
Good alignment
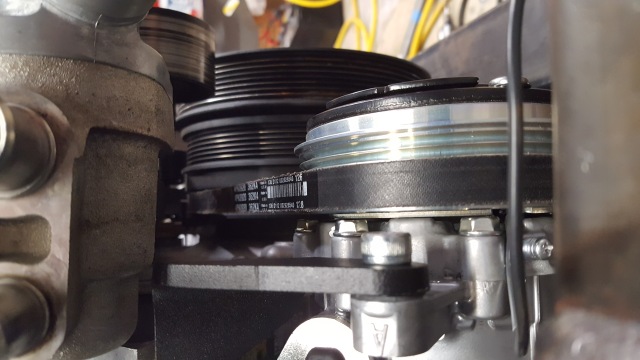
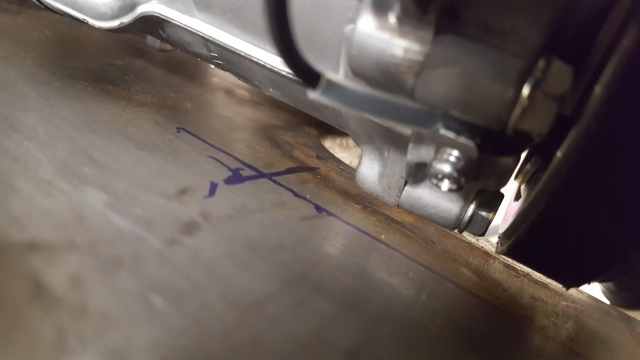
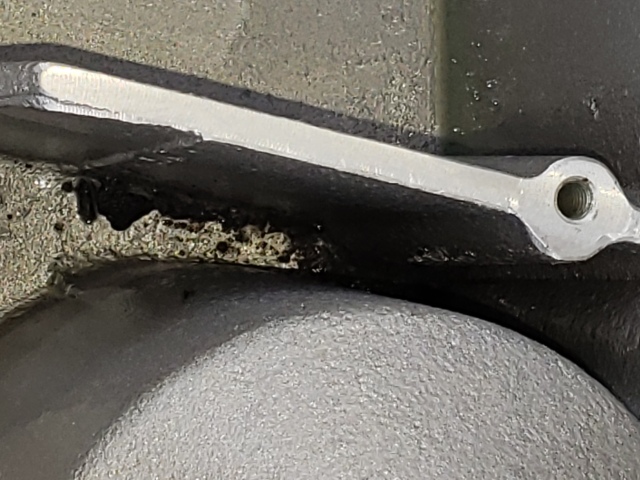
made 2 of the 3 pockets. For the supercharger pulley clearance i wanted to keep in tack as much of the cross member as possible. Still need to do some finish grinding and make the alternator pocket but all in all i'm happy with it.

These are the best pictures of the interference I have. you can see there are 2 spots that come really close to the frame. It was so close that i could just barely slip on the belt onto the pulley. You can see the blue outline. I cut the 2 lines (one not shown in front of the pulley) going to the bottom of the frame and cut along the bottom just above the welds. I then used a hammer and punch to evenly move the metal back to make a pocket. I then welded it all up and ground everything smooth. I just looks like a soft pocket with smooth transitions. I'll take better pictures when i do the alternator side tomorrow. I think there may have been just enough room on the alternator side but since I got a good process i'll just make it to match the A/C side.

- - - Updated - - -
Some better shots of how I made the pocket. There maybe better ways but this works for me.
Initial slices and pushed in
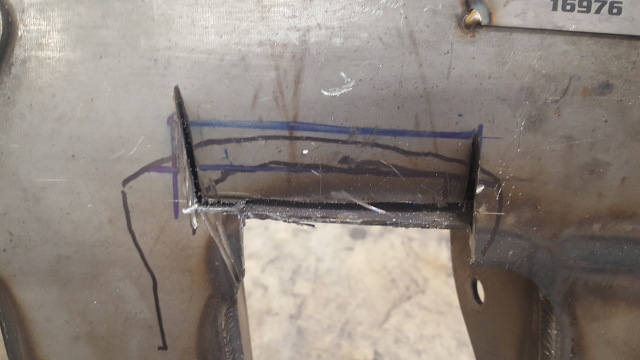
Welded up

Ground down
 ________________
Nick S.
Gold/Gray 1967 Camaro
10-03-2018 #51
Registered User
- Join Date
- Jan 2007
- Location
- CT
- Posts
- 782
I've been sanding a lot on the frame and firewall getting it ready to paint.

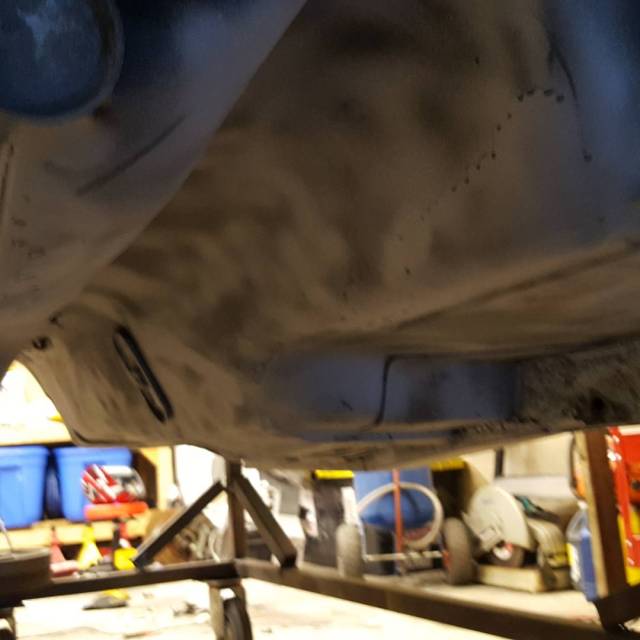
Then i started to clean the rubberized gunk off the bottom with the plan to reapply a rubberized undercoating. Well after looking at Curtis and his nice raptor liner underside I took out my sand blaster and started hitting the trans tunnel when the gunk came off pretty easy it was all down hill from there.
I wrapped the whole thing

Then started blasting.
I then started picking the last of the old seam sealer off the cowl/firewall area and found some stuff festering. This will be cleaned the best I can then my paint guy will take care of the rest.
I also scored a low mileage close ratio t56 Magnum!
Next up
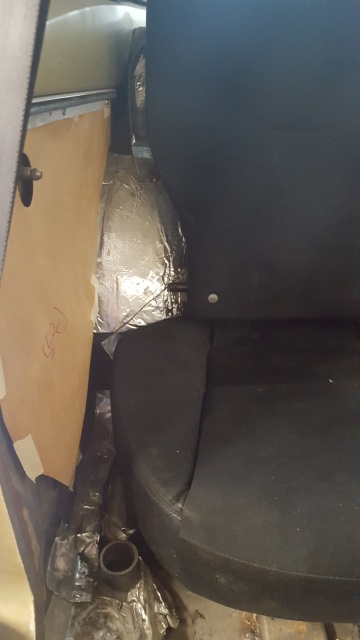
Retro Fit 2011 Impreza rear seat (i hope this works)
LSA heads off to be CNC'd
Cam / Pulley swap on the LSA
- - - Updated - - -
As part of the effort to make the car more usable I wanted a rear seat that was more modern. This is a 2011 impreza cloth rear seat assembly. I was able to retain most of the mounting hardware with some modification. They also fold down. Here are a couple pics.
Upper section was by far the most time consuming. The main rod that allows the seat to fold needed to be shortened about 1.5" per side. I then drilled and pins the ends like subaru did to allow for the slotted bracket to fit.
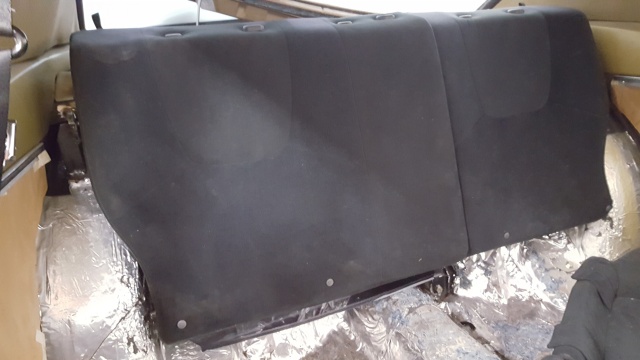
The lower section was easier. It was a basic wire frame with padding. After some manipulation i was able to get about where i wanted it. I still need to add a small platform and filler foam to help level it.
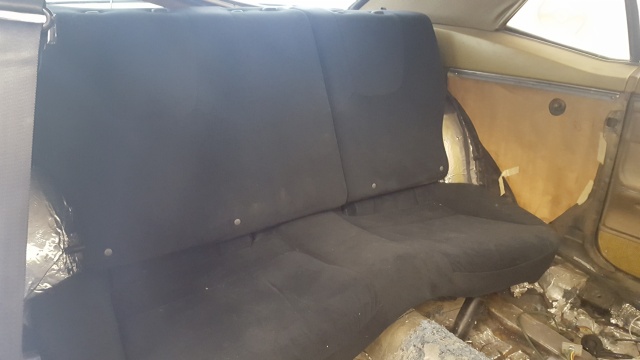
The contour is pretty good by the tub
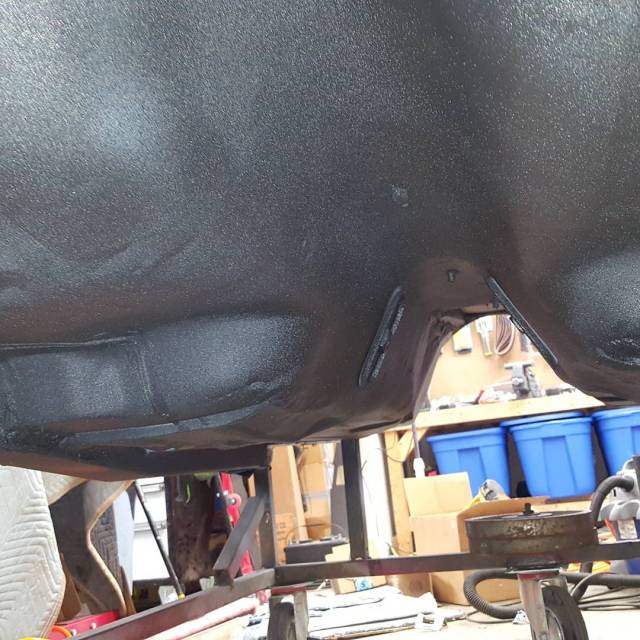
After spending what felt like an eternity on back sandblasting under the car the weather and my schedule were in agreement to spray the car with Raptor Liner.
I used the entire Upol line of Products:
1. 2002 Panel Wipe
2. Acid 8 Etching primer (no sanding needed)
3. Adhesion promoter (I'll use for touch up hard spots)
4. Raptor liner black
5. Adjustable gun sold separately (better than the supplied one)
6. Upol seam sealer - Probably my least favorite product used i feel like the 3m fast and firm stuff spreads better. I used it since it was all made to work together
I am really happy with it. If you want a finer texture you must buy the other gun. I am so glad I did. I have one or two spots that need a touch up but it came out better than i thought. I'm glad I took the extra time to do this.
Primer - The trans tunnel is ugly not my best work but its welded good, clean, and functional.


Raptor liner sprayed the transition from the firewall will get cleaned up when my body guy does the firewall in black.
- - - Updated - - -
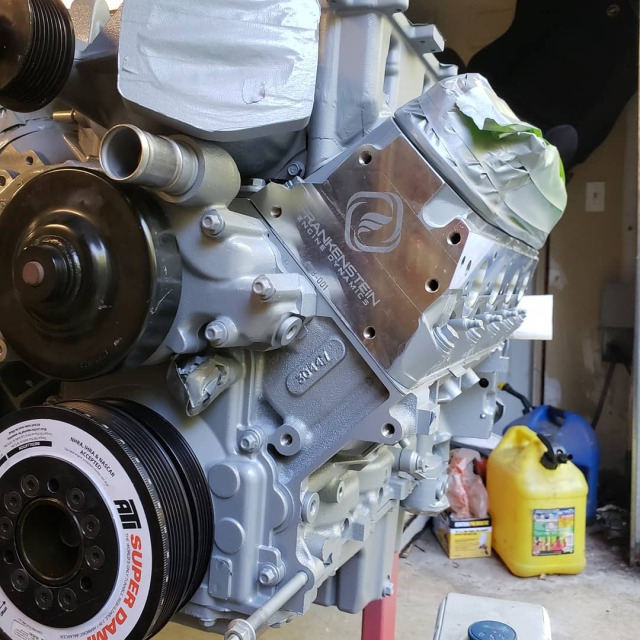
Well its been a while since my last update but progress is made. In the quest for power i wanted to make sure not one component was over powering another. Typical builds with LSA are big pulley and cam. While that is still the plan all that extra boost and cam won't do any good unless it get in and out head easier. So.....FED did their stage 2 cnc work with Manley stainless 2.180″/1.600″ intake and exhaust valve combination. This also includes their PAC spring kit. Cam will likely be BTR stage 3. My goal is 750-800 crank which seams pretty attainable without over boosting the crap out supercharger. The blower case and snout will be enlarged like most builds to help air flow. Car should be delivered this week to my paint guy to finish the firewall and frame.


Full Head Detail here
https://frankensteined.net/shop/gm-l...4821823lsals9/
Firewall is all set. It never looked this good.


- - - Updated - - -
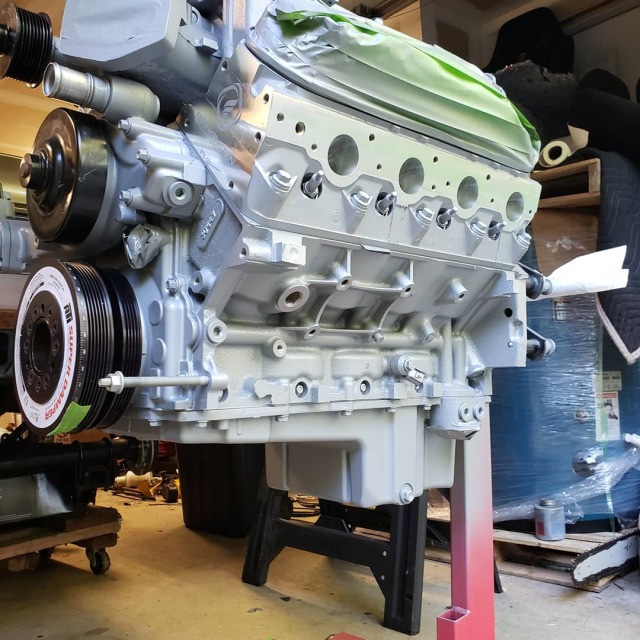
Cam Swap done, mast pan is on, ATI damper is on, supercharger case is getting ported.
Once the case is back i can put the rest of the engine together.
Clean everything. The Mast pan had remnants of the sand from casting.
drilled and taped for a 1/2npt to 12an for blower lid
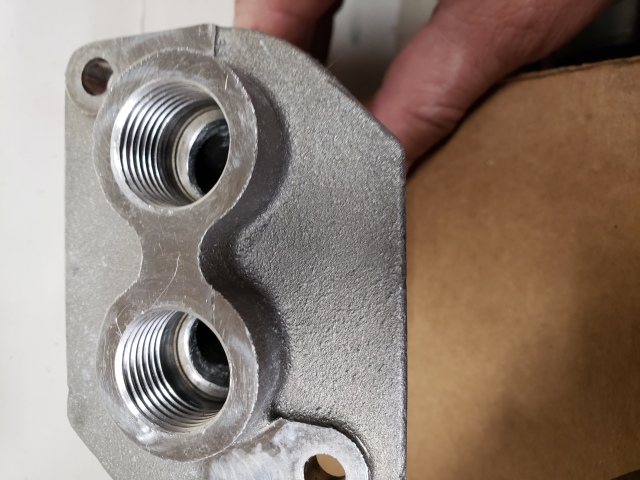
Blower machining - This will help it breathe!

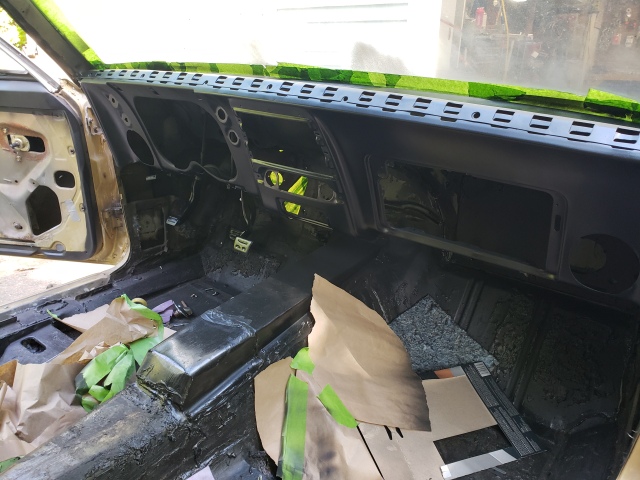
Cleaned, Sanded, and Repainted the interior black.
Assembled the heads, supercharger, and painted it. I left the Frankenstien logo visible

- - - Updated - - -
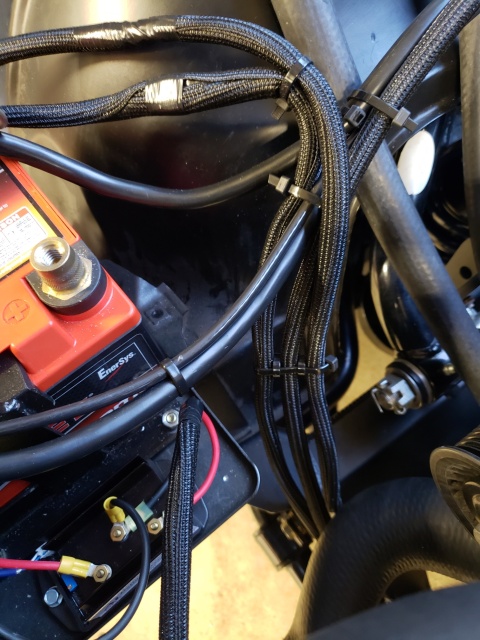
been moving forward....I have been wiring the car. I wanted everything loomed and clean and accessible.
Engine in.

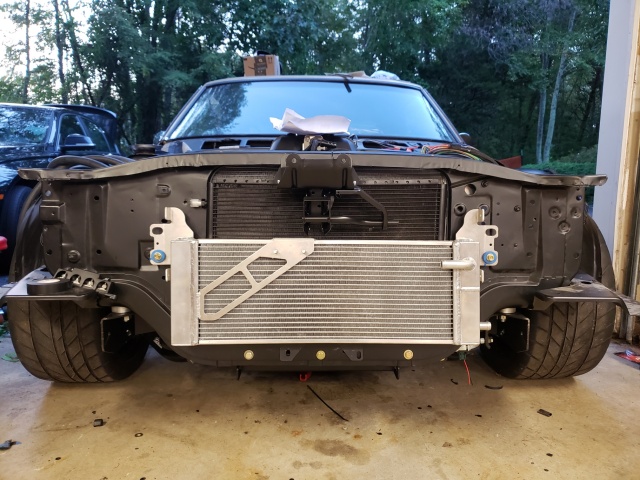
I used a C&R universal radiator with oil cooler. I made my own mounting bracket and running a spal fan with DCC pwm fan control.
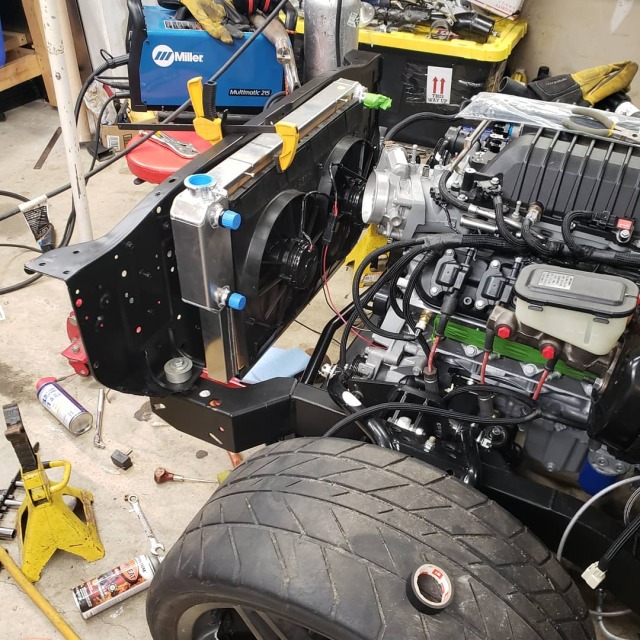
need to move around some wires but here are some of the looms everything is wrapped, taped, i used a combination of zip ties and plastic ring clamps that attached into bolt holes
I have the VA condenser in. I will need to modify the hood latch and support to clear the supercharger hx. The ac dryer will need to be moved as well. I will also tape the core off and paint the sides and tab black. then lightly paint the core to help black it out.
Whats next:
Rock Valley / vaporworx fuel setup
Ubuild it Air Raid intake
Test fire.________________
Nick S.
Gold/Gray 1967 Camaro
10-03-2018 #52 -Moderator/Sponsor-
- Join Date
- Jun 2001
- Location
- Newbury Park, CA
- Posts
- 5,837
Nice work moving forward Nick.
Along with the other engine work a set of injectors will likely be needed. The OEM injectors won't handle much more than stock horsepower.VaporWorx. We Give You Gas http://www.vaporworx.com
10-03-2018 #53
Registered User
- Join Date
- Jan 2007
- Location
- CT
- Posts
- 782
Thanks Carl! I've got a set of DW950cc injectors already installed. I'm installing my BEAUTIFUL vaporworx controller soon!
________________
Nick S.
Gold/Gray 1967 Camaro
10-03-2018 #54 Registered User
- Join Date
- Sep 2009
- Posts
- 2,960
Wow, this car has gone through quite the transformation! Nicely done.
1955 Nomad project LC9, 4L80e, C5 brakes, Vision wheels
1968 Camaro 6.2 w/ LSA, TR6060-Magnum hybrid and etc SOLD
1976 T/A LS1 6 Speed, and etc. SOLD
Follow me on Instagram: ryeguy2006a
10-03-2018 #55
Registered User
- Join Date
- Jan 2007
- Location
- CT
- Posts
- 782
Thanks! Its been a ton or work but starting to come together. Originally Posted by ryeguy2006a
 ________________
Nick S.
Gold/Gray 1967 Camaro
10-16-2018 #56
Registered User
- Join Date
- Jan 2007
- Location
- CT
- Posts
- 782
Upgrade the CTS-V pump to AEM pumps. Installed on my Rock valley tank.
Still need to wire in the vaporworx controller.

Needed to clean up the trunk
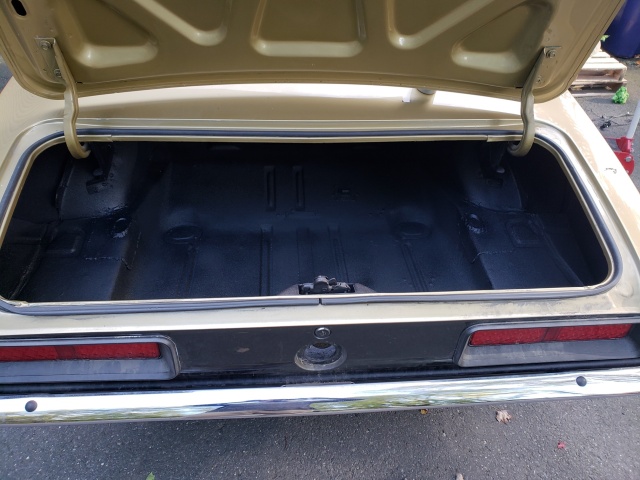
Painted the HX and mounted it. Had to move around the A/C Lines to clear it.
[IMG]http://i6________________
Nick S.
Gold/Gray 1967 Camaro
10-18-2018 #57
Registered User
- Join Date
- Jun 2015
- Posts
- 175

hi, not sure if you still have the dash out but if you do are you able to post/pm me pictures of the bottom of the opening where the colunm support rods pass though from on top and from under ? regards george
Last edited by Gmc427; 10-18-2018 at 02:33 AM. Reason: gramma
10-18-2018 #58
Registered User
- Join Date
- Jan 2007
- Location
- CT
- Posts
- 782
I'll try to get some taken tonight. Originally Posted by Gmc427
________________
Nick S.
Gold/Gray 1967 Camaro
11-26-2018 #59
Registered User
- Join Date
- Jan 2007
- Location
- CT
- Posts
- 782
Its Alive!
It have some bugs to work out. I have a MAF code (P0102) and my oil pressure and tach aren't reading. I have another clip but there is too much swearing in it from excitement!________________
Nick S.
Gold/Gray 1967 Camaro
01-23-2019 #60 Registered User
- Join Date
- Aug 2011
- Location
- Connecticut
- Posts
- 926
Cool car! Maybe Ill see you around sometime (also from CT)
1967 Firebird "Poor-Boy Build"
New updated thread
https://www.pro-touring.com/threads/...bird-(Updates)
Follow me on Instagram @NaturalLivingMan

 Reply With Quote