

Results 1 to 11 of 11
Thread: Total control Coil over
-
07-26-2018 #1
 Registered User
- Join Date
- Mar 2013
- Posts
- 154

Total control Coil over
Hi All,
Finally my Rear coilover suspension arrived.
Got issues straight from the start...
Please look at the pictures below to understand what the problem is.
Suspension i am talking about ( video in there also) : https://www.cjponyparts.com/total-co...970/p/5804M20/
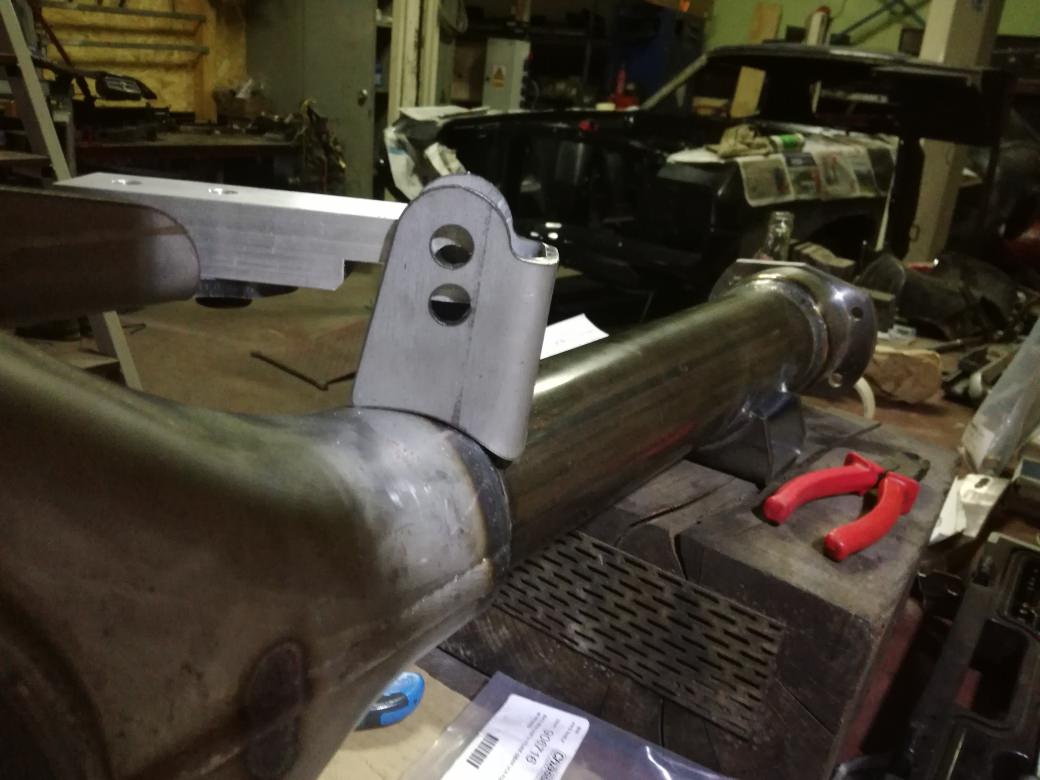
Bought a new rear end from moser.
This is stronger then the original one and you can see its reinforced at some spots.
Now in the installation video from the suspension ,on their rear end there is no reinforcment and the brackets for the suspension fit well.
My brackets are half way on the rear end and half way on the reinforced part, thus not connection...
Only option i see is cutting some metal of the brackets, but before i do that i would like to hear your solutions or experiences.
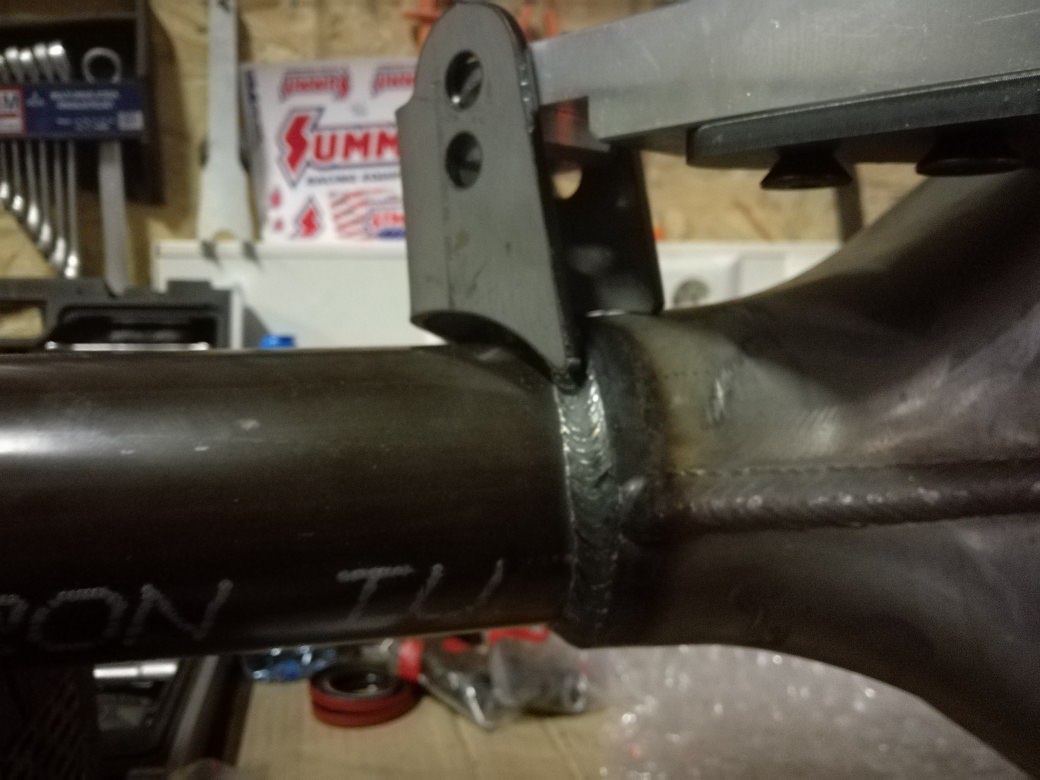
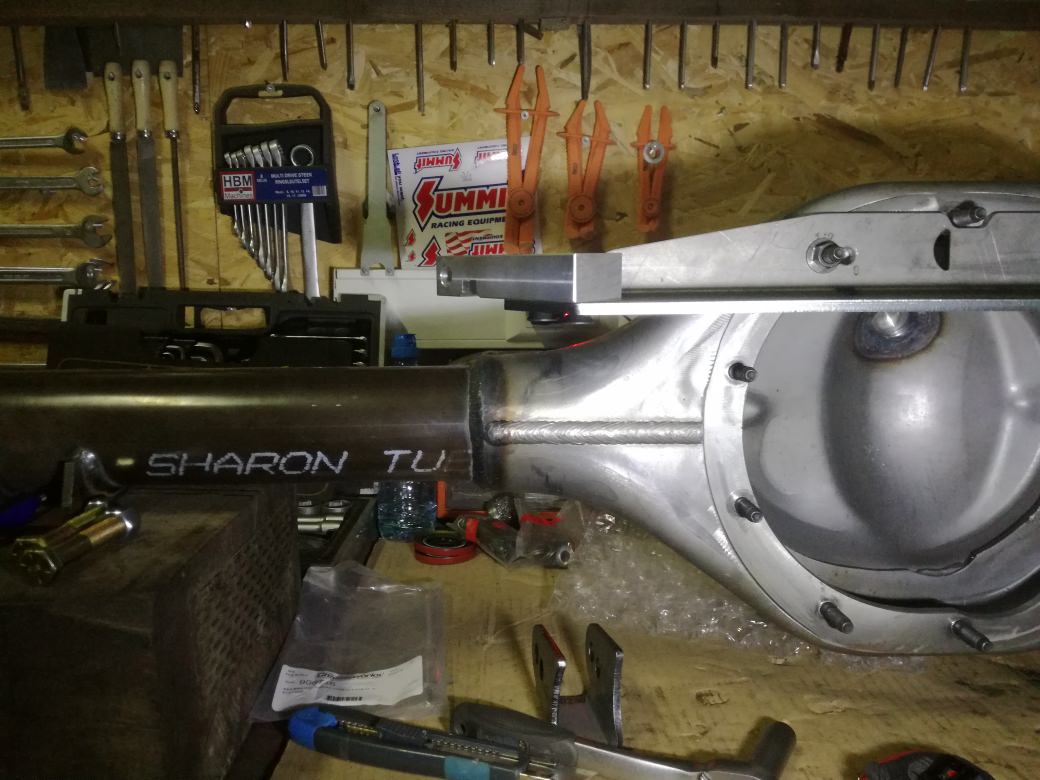
This is just the alignment tool to mark the place for the brackets.
But as you can see , its right over the welded connection...Building a pro-touring cougar
https://www.pro-touring.com/threads/...gar-(-Bullit-)
-
07-26-2018 #2 Registered User
- Join Date
- Oct 2004
- Location
- IL/TN
- Posts
- 908

I would not call that a problem, just variations between parts manufacturers, most of the time parts have to be fitted.
https://www.protouringf-body.com "doing what they say can't be done"
07-26-2018 #3
Registered User
- Join Date
- Mar 2013
- Posts
- 154
First time doing a coilover and first time doing a protouring, Originally Posted by 79T/Aman

so always on the safe side i guess...
Thanks!Building a pro-touring cougar
https://www.pro-touring.com/threads/...gar-(-Bullit-)
07-26-2018 #4
Registered User
- Join Date
- Oct 2004
- Location
- IL/TN
- Posts
- 908
got to look at is as just fitting parts, no different than fitting a window in a wall or fitting roll bar tubes.
https://www.protouringf-body.com "doing what they say can't be done"
07-27-2018 #5
Registered User
- Join Date
- Mar 2013
- Posts
- 154
True!
Hope end of next week or the week after i got this suspension installed, big step forward again then.
CheersBuilding a pro-touring cougar
https://www.pro-touring.com/threads/...gar-(-Bullit-)
08-29-2018 #6
Registered User
- Join Date
- Mar 2013
- Posts
- 154
New issue ,please see pictures for more information.
The instructions say : adjust the upper control arms to 9.5 inch.
Done that,attached them to the housing.
Then attachted the lower control arms to the housing, perfect fit.
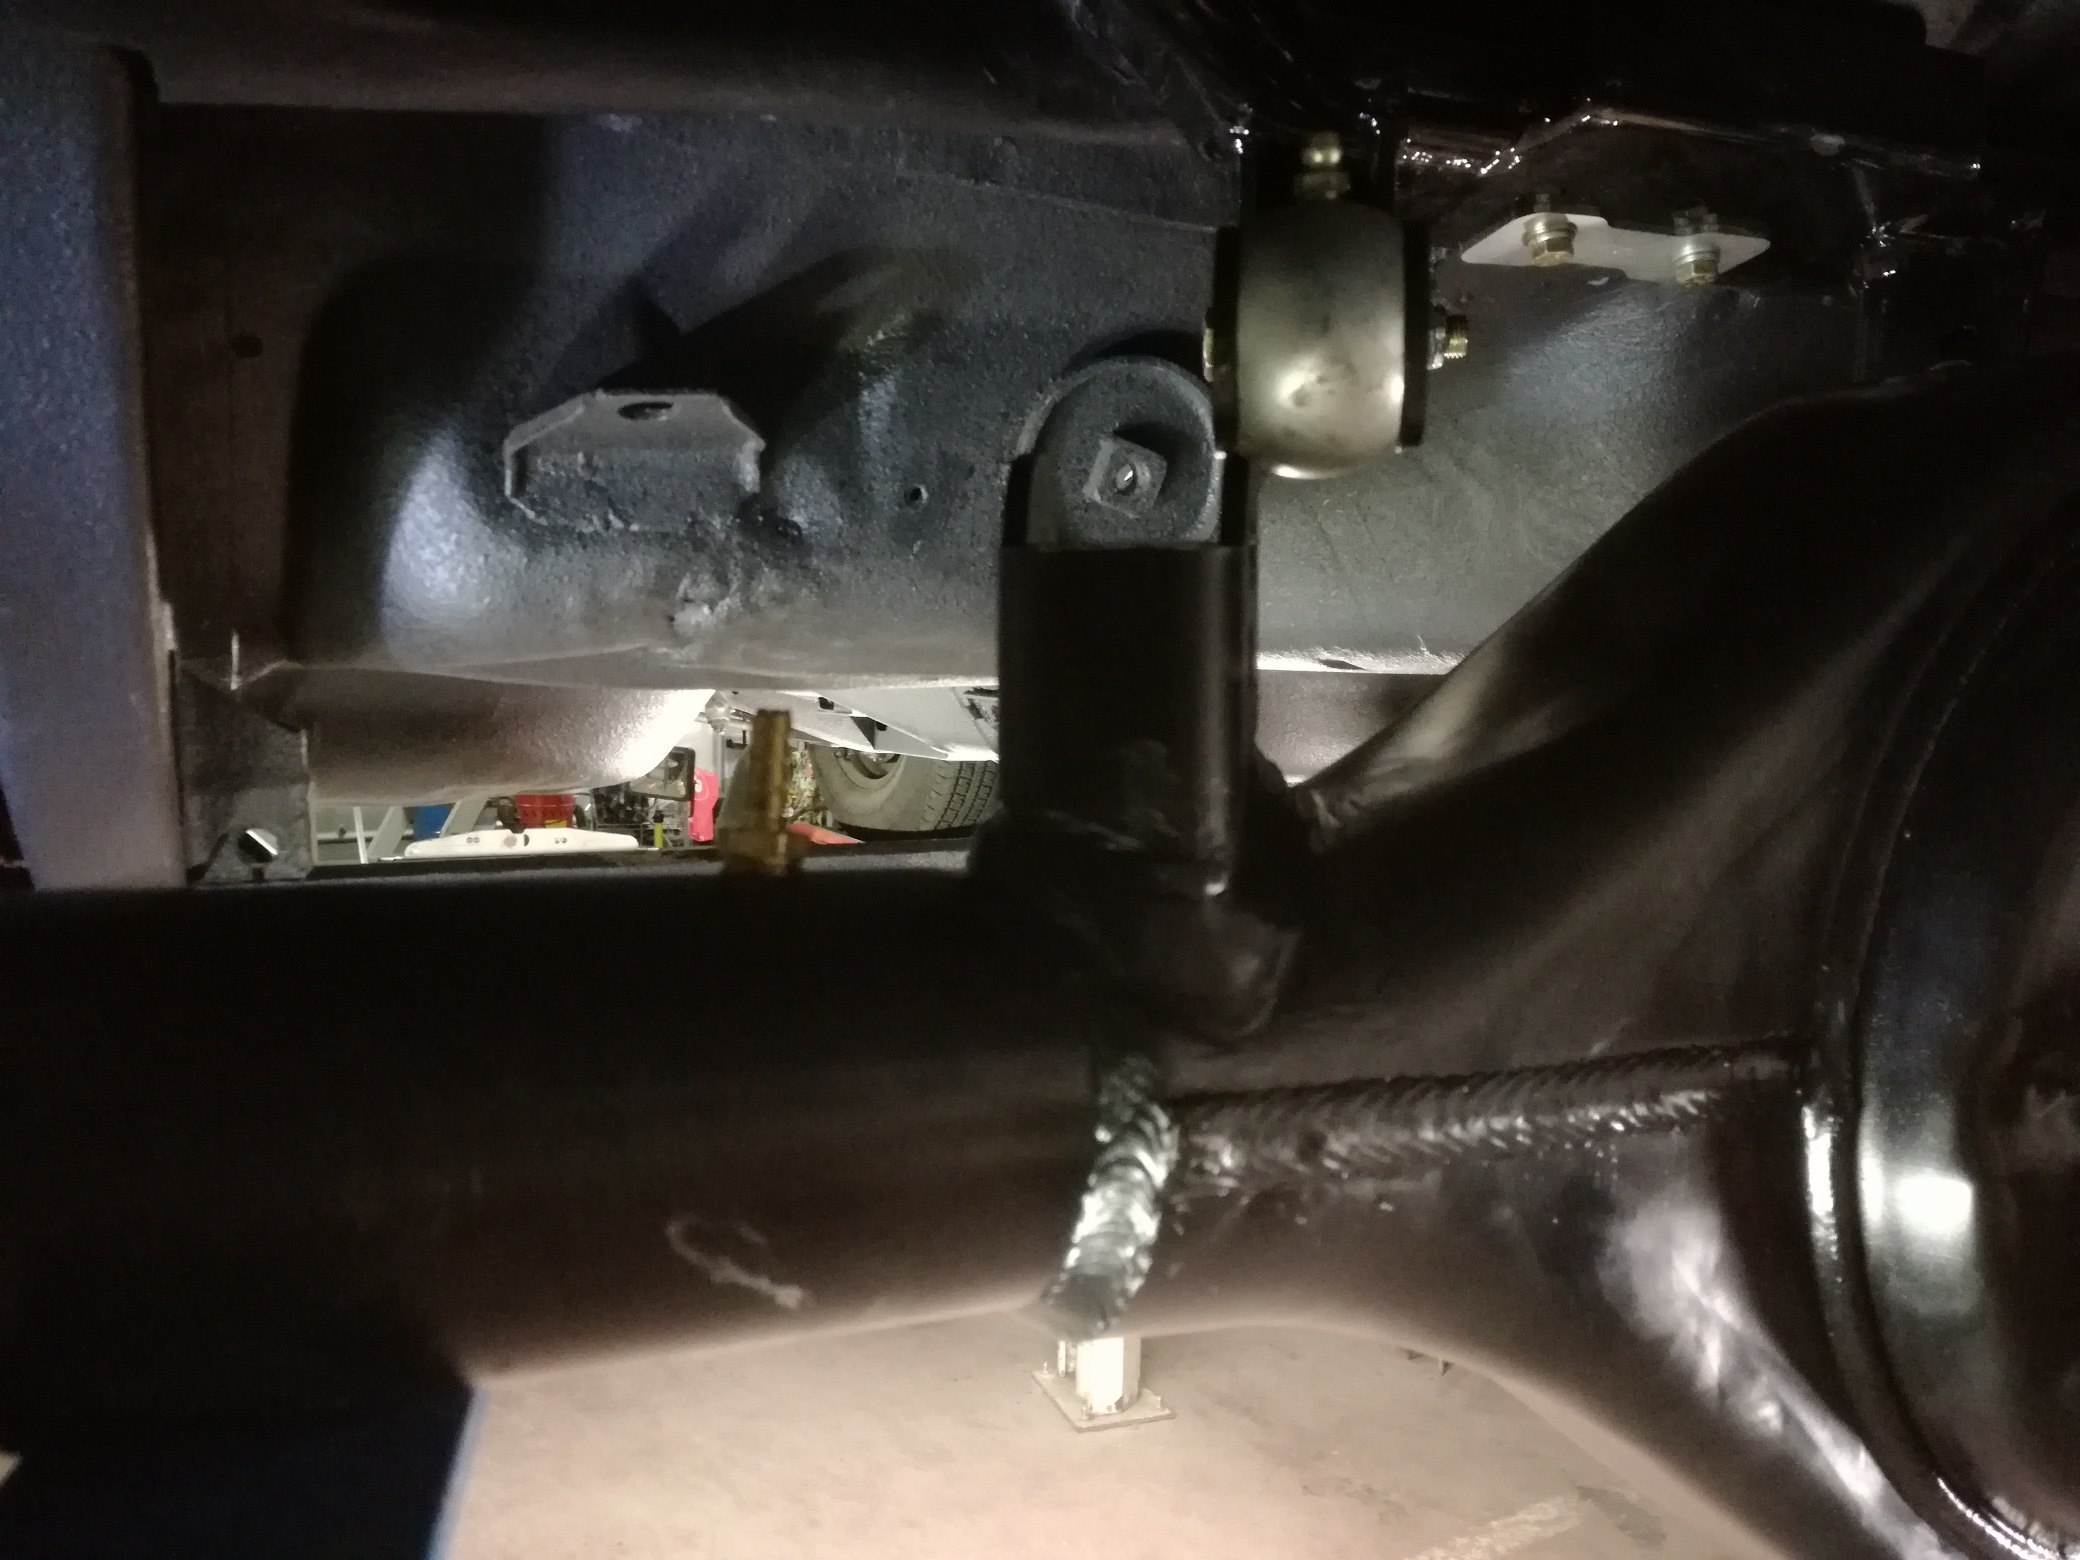
Then i see that my rearend is not in a straight position,but leaning backward.
Easy fix i think, adjust the upper control arms ( make them shorter so the rearend sits straight). (Lower control arms are non adjustable).
But when i shorten the lower control arms, they no longer align with the brackets on the rear end.
Which makes sense!!
Only way i can make them fit is when i leave them at the described lenght in the instructions ( 9.5inch).
So what i think is that my lower control arms are to short....
Reason why i am thinking this is, if i connect my lower control arms and make the rearend sit straight then i have a shorter distace between the front of my wheelhousing (fender) compared to the rear of the wheelhousing.
If i connect it this way it meas my rearend is not centered in the wheelhousing. ( just my thoughts why they are to short).
What are your thoughts ?
They sel adjustable lower control arms to but since this kit was ordered for a cougar specifically and it was stated on the website that it fits ,it should fit anyway.
Look forward to your answer, still had no respone from the company ( chris alston/total control products).

 Building a pro-touring cougar
https://www.pro-touring.com/threads/...gar-(-Bullit-)
08-29-2018 #7
Registered User
- Join Date
- Nov 2014
- Posts
- 243
is the rear end at ride height? On my Camaro (G-Link suspension) the lower links are parallel to the ground. This would swing your link up and move rotate the rear counter clockwise from your photo view. This should also effectively shorten the between you upper mounts by moving your upper link above parallel.
Sounds complicated, but if you cycle the rear suspension with a jack, I think you will see what i mean
08-29-2018 #8
Registered User
- Join Date
- Mar 2013
- Posts
- 154
Hi matt,
Yeah i understand what you mean, yes the rear end is at ride height.
tried playing with the lower control arm attachment points ( 3 points of contact possible on the rear end bracket)
Still not achieving enough 'room' for it to work out as it should.....
Also have 2 points of attachment on the upper control arms ,still no good.
Have been working on this for some time and it just would not work out, frustrating!! ( knowing these parts got lost for 4 monts during shipping)...
Thanks so far already!Building a pro-touring cougar
https://www.pro-touring.com/threads/...gar-(-Bullit-)
08-30-2018 #9 Registered User
- Join Date
- May 2010
- Location
- Livermore CA
- Posts
- 131
This is why you need to tack weld everything first. You probably need to cut the upper mounts off, mock it up in the car and set your pinion angle. Cycle the suspension with the shocks mounted and springs removed to make sure everything is correct and the burn it in.
Double check your ride height. The pictures look way too high. Typical there will be about 3” from the axle tube to the frame rail.
Good luck.Build Thread:
http://www.lateral-g.net/forums/showthread.php4?t=39876
08-30-2018 #10
Registered User
- Join Date
- Nov 2014
- Posts
- 243
hmm, yours definitely looks much different than mine. I posted a pic showing orientation of the links at ride height. My pinion angle orientation is similar to yours because it is higher than the transmission yoke (yes, my driveshaft runs uphill). My cars is together and performs well; we do have a little wheel hop i hope to cure by raising the lower link in the axle housing bracket. i also add that Mark Savitske at SC&C customs was a huge help getting this all together
08-30-2018 #11
Registered User
- Join Date
- Mar 2013
- Posts
- 154
Thanks for the response so far.
at the pictures it was not at ride height,so my mistake there...
When i started the install i first measured the distance between the axle tube and the car ( mid of the "rear fender")
This is the distance that i have now to...will take a picture tomorrow for a better view.
@ Matt,
See your upper control arms are pointing upward, what is the distance between the axle mid and "'rear fender" ( no idea how you call it in english).
First pro touring project, already loving all the complications :DBuilding a pro-touring cougar
https://www.pro-touring.com/threads/...gar-(-Bullit-)

 Reply With Quote


