


Results 81 to 100 of 208
Thread: My 66 Chevelle P/T build
-
01-19-2015 #81

 Rat Pack Member

- Join Date
- May 2007
- Location
- Mooresville, Indiana
- Posts
- 1,874

Bummer about the broken wrist! Sam did the same thing playing tennis while we were thrashing to get ready for OUSCI back in 2010. I made him turn wrenches with his other hand... ;-)
Tom Farrington
66 Chevelle hardtop (ours) https://www.pro-touring.com/showthre...PT-build-(ours)
64 Chevelle 4-dr wagon (wife's) https://www.pro-touring.com/showthre...HAUL-LONG-ROOF
The new shop build https://www.pro-touring.com/showthre...53#post1016553
-
01-19-2015 #82 Registered User
- Join Date
- Aug 2009
- Location
- Chandler, Az (from west NE)
- Posts
- 240
Sorry about your son's wrist. Car is looking great. Nice job on the tubs and trunk pans!
Ric
2002 s10, DD and AutoX.
1966 Malibu owned since 1971. Drag car converting to track toy!
01-19-2015 #83
Registered User
- Join Date
- Sep 2014
- Location
- Rochester, IL
- Posts
- 143
Thanks guys!
My 66 Chevelle build thread- https://www.pro-touring.com/threads/...elle-P-T-build
01-21-2015 #84
Registered User
- Join Date
- Sep 2014
- Location
- Rochester, IL
- Posts
- 143
One small update. Saturday I took my chassis to a friends body shop. I was able to find a printout with the factory frame dimensions and tolerances. The frame was square and everything looked good except the expected frame sag in the engine cradle.
This coming Saturday it will go on the frame machine and he said he can correct this issue with little effort. He said they have done several A Body frames with great results.
I'm really hoping to have it back Saturday afternoon so I can began the Frame notch. I'm at a stand still right now and I can't stand having nothing to do.
I also found a damaged LS2 aluminum block that I will use for mock up of engine mounts, trans cross member, headers etc... I have access to a set of bare 243 Cathedral port heads to mock up header fitment. I will be using square port LS3 heads when I build the engine for the car though. Can anyone tell me if exhaust port location is the same between the 243's and the LS3/L92 heads. I don't want to mock up with the older heads if they are different.
Thanks,
MikeMy 66 Chevelle build thread- https://www.pro-touring.com/threads/...elle-P-T-build
01-21-2015 #85
Registered User
- Join Date
- Aug 2009
- Location
- Chandler, Az (from west NE)
- Posts
- 240
Don't remember if I already asked this, but are you planning to box the frame's center section? No better time than now. Might want to gusset/box the frame's rear axle lower arm mounting points. The front lower rear a-arm boxes tend to pull off the frame too, especially if there is a lot of sag at the front crossmember. I started my mechanical career working in a frame shop in Scottsbluff, NE and we probably pulled one A-body crossmember a month while I worked there back in the '70's. Check all the welds as factory quality back then wasn't good.
Ric
2002 s10, DD and AutoX.
1966 Malibu owned since 1971. Drag car converting to track toy!
01-21-2015 #86
Registered User
- Join Date
- Sep 2014
- Location
- Rochester, IL
- Posts
- 143
Ric,
I will be boxing the frame and welding up all of the factory seams. Great idea on gusseting the front a arm pick up points, I may add that to the list.
MikeMy 66 Chevelle build thread- https://www.pro-touring.com/threads/...elle-P-T-build
01-21-2015 #87
Registered User
- Join Date
- Aug 2009
- Location
- Chandler, Az (from west NE)
- Posts
- 240
Cool, Mike. I meant to box the rear axle lower arm pickup points and check the welds for cracks at the rear pickup points of the front lower arms, as headers don't leave much room for gusseting in the front. I edited my first post on this to be a lot more clear. Sorry to be confusing( or just confused, lol).
Ric
2002 s10, DD and AutoX.
1966 Malibu owned since 1971. Drag car converting to track toy!
01-22-2015 #88 Registered User
- Join Date
- Feb 2006
- Location
- Tennessee
- Posts
- 814
Mike, Originally Posted by MMcMasters

There is no difference in the exhaust port location between an LS2 head and a LS3/L92 head. You're good to go.
Even better is when you're done with the 243 heads, they're worth a $3-400 when sold.
Kerry66 Chevelle - LS-Leap
LQ9 / T56 Complete - Phase 2 in process!!
https://www.pro-touring.com/threads/...t-LS-Heap-quot
SC&C, Kore3, Detroit Speed, BBS, Advanced Induction, TickPerf, Currie, Moser, Holley, Hellwig, Edelbrock LS-Kit, Mast, Wilwood, BP-Automotive, StopTech, Ridetech, Hotchkis, UMI, Energy Suspension, AAW, B&B Classic's, PPG, Aeromotive, Canton, C&R, Sparco, Ididit, Spectre, Bridgestone, DakotaDigital, Alpine, RockfordFosgate
01-22-2015 #89
Registered User
- Join Date
- Sep 2014
- Location
- Rochester, IL
- Posts
- 143
That's good to know Kerry, thank you!
MikeMy 66 Chevelle build thread- https://www.pro-touring.com/threads/...elle-P-T-build
01-31-2015 #90
Registered User
- Join Date
- Sep 2014
- Location
- Rochester, IL
- Posts
- 143
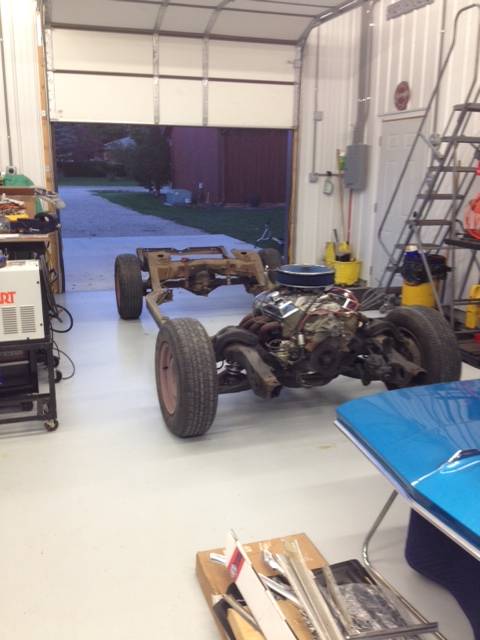
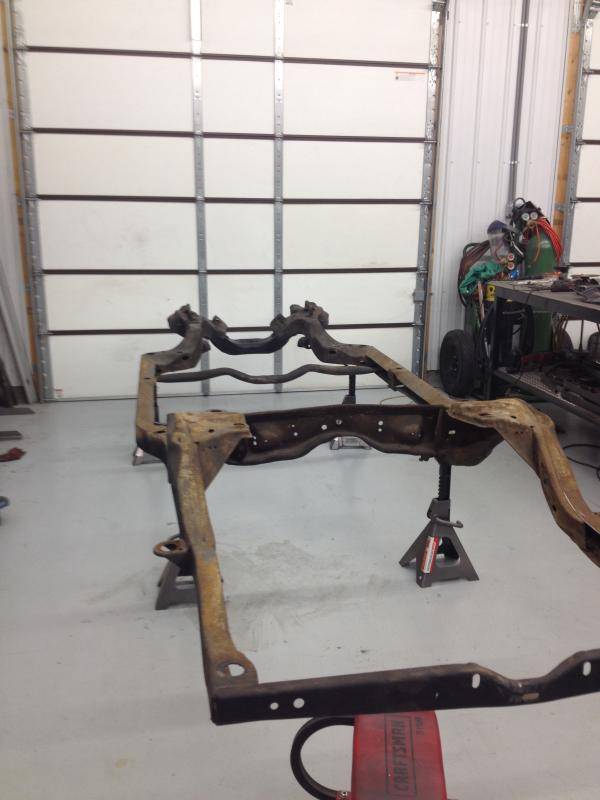
Today we put my chassis on the frame machine and corrected a little sag in the engine cradle. Other than that, it's square and in pretty good shape for it's age. I got it home and immediately started taking it apart.
When I bought the car last year, the previous owner had just put new Hotchkis lowering springs in the rear and new QA1 coil overs in the front but I'm not using them.
The frame is going to the media blaster this week and I hope to start on the ABC frame notch next weekend. I will document every step of this process so hopefully it may help someone in the future. I have searched high and low and I haven't had much luck finding a detailed description/documentation on a 66. ABC sends instructions but they aren't as detailed as I expected. They are probably fine for most of the population but I'm a few fries short of a happy meal
MikeMy 66 Chevelle build thread- https://www.pro-touring.com/threads/...elle-P-T-build
02-08-2015 #91
Registered User
- Join Date
- Sep 2014
- Location
- Rochester, IL
- Posts
- 143
I got back to work this weekend. Saturday morning I thought I would media blast the open channels on the frame "real quick". That turned into 4 hours of dealing with clogging due to my POS harbor freight pot blaster. I finally got it done though.
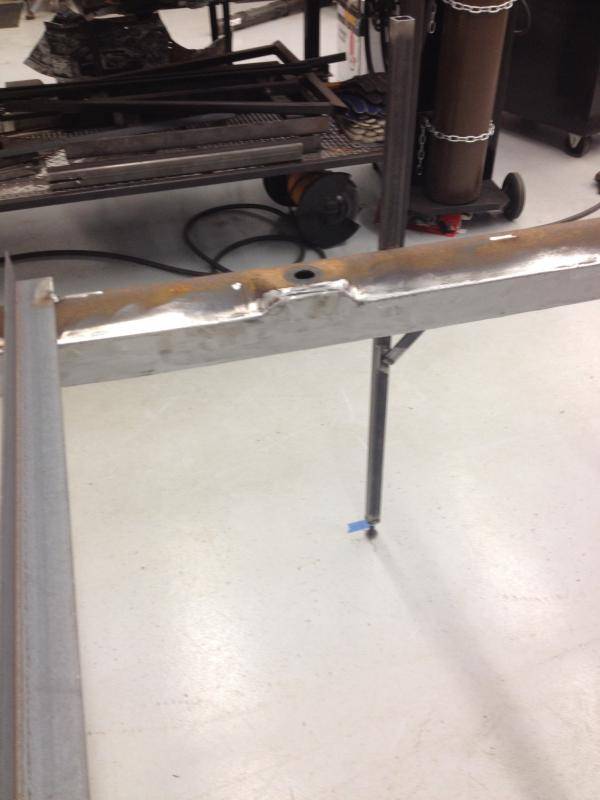
I'm following the ABC performance playbook for the rest of the frame mods. First thing I needed to do was make 6 adjustable legs that I can weld to the frame to allow me to get it to a workable level and square/ level everything up.
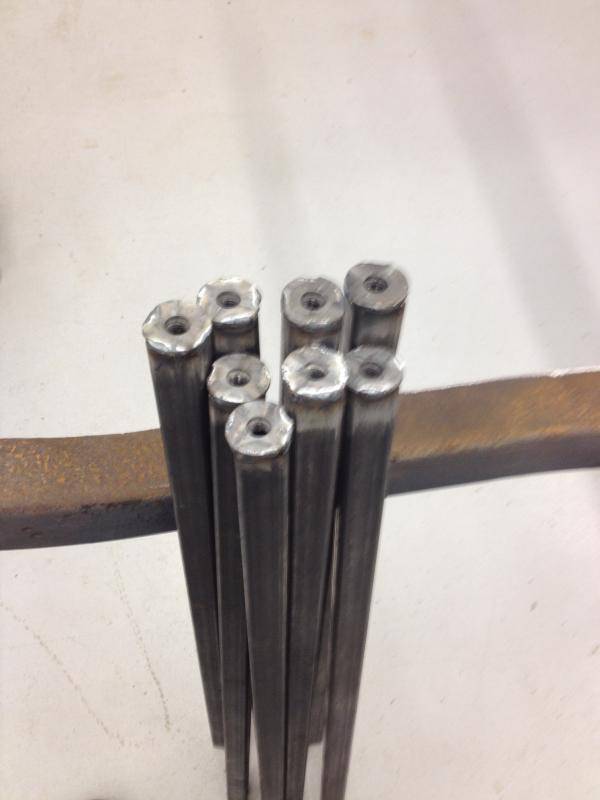
Once I had all 6 legs welded on and gusseted, I leveled the frame front to back and side to side. I used 1/4" strap in the rear, 1" tubing at the c notch and I welded in 2" angle across the center of the frame rail to keeps things in place once I start cutting. The center body mounts should be 53" center to center. I got lucky I guess because mine were dead on.
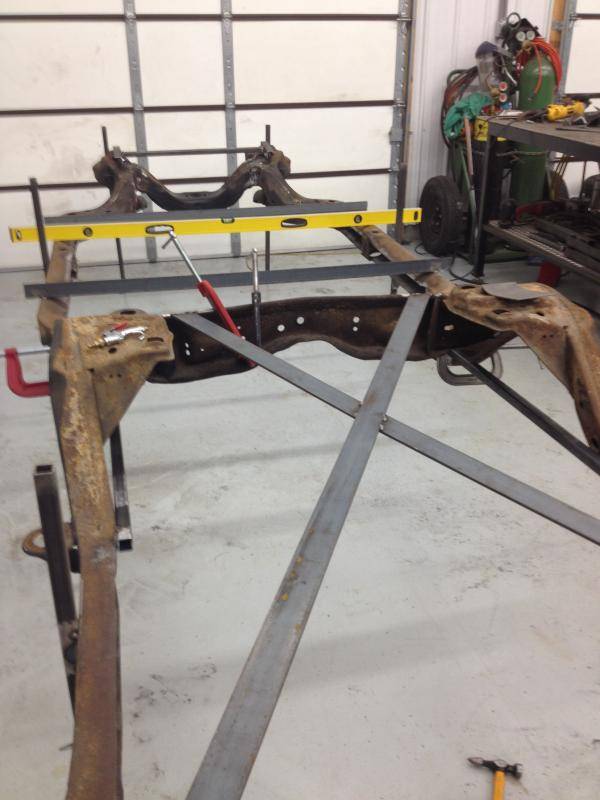
After dealing with the frame sag issue last week, I wanted a little extra piece of mind so I made a brace to put between the upper control arm mounts.
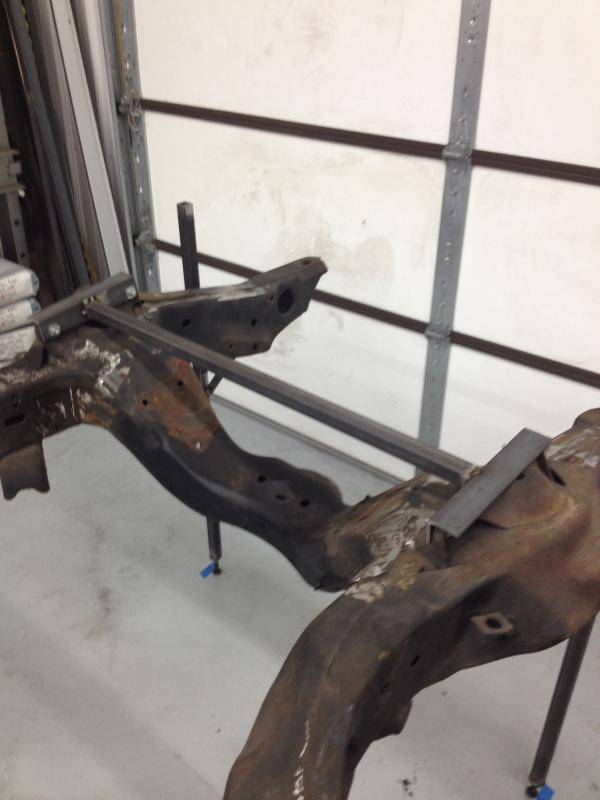
The bottom of my center frame rails were pretty bent up from years of use and probably from being used as a jacking point. I took a piece of 2x2 square steel and cut a slot in it so I could use it as a lever to bend the rails back up into shape and fit the boxing plates. ABC's laser cut plates fit very well and needed only minimal trimming on one end. I got both sides tacked in a few hours.
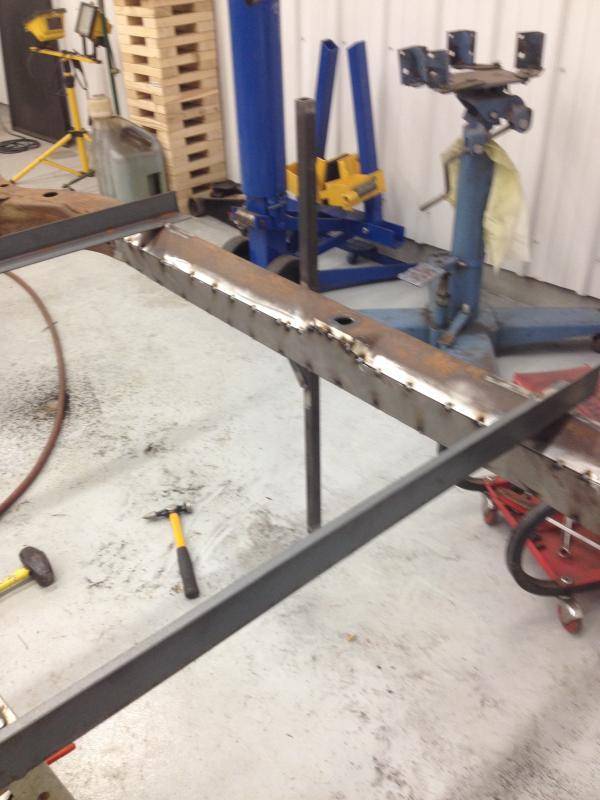
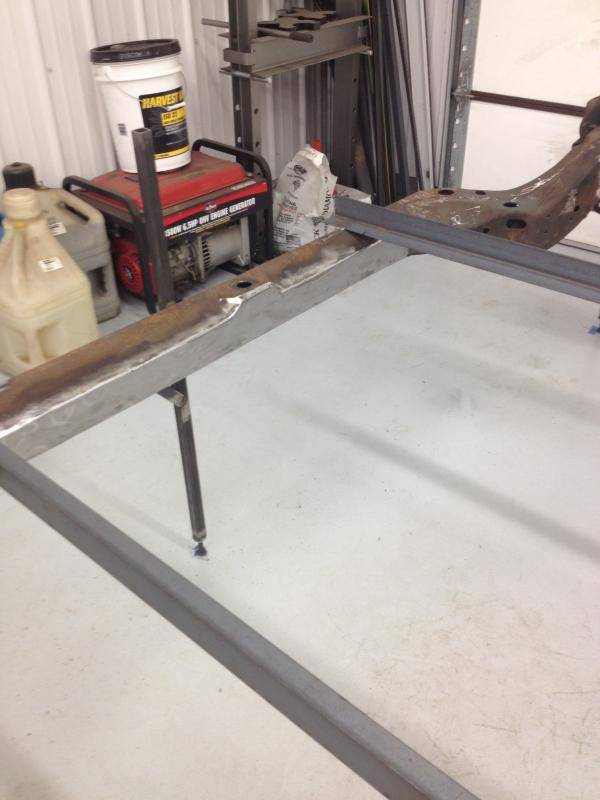
The rest of the afternoon today I spent welding them in for good. I was patient and took a great deal of time welding them up to minimize heat and distortion. I used 2" stitch welds and moved around a lot. Once I was done I dressed all of the welds and gave them a nice radius. I am very happy with the results but not very happy it took me a whole weekend to get this done.
MikeMy 66 Chevelle build thread- https://www.pro-touring.com/threads/...elle-P-T-build
02-09-2015 #92 Registered User
- Join Date
- Nov 2006
- Location
- Ma.
- Posts
- 5,560
Nice job, the frame is looking good.
Wayne
Car FINALLY home !!!!!! lol
Project FNQUIK https://www.pro-touring.com/showthre...ghlight=FNQUIK
02-09-2015 #93
Registered User
- Join Date
- Sep 2014
- Location
- Rochester, IL
- Posts
- 143
Thanks Wayne!
My 66 Chevelle build thread- https://www.pro-touring.com/threads/...elle-P-T-build
02-12-2015 #94
Registered User
- Join Date
- Sep 2014
- Location
- Rochester, IL
- Posts
- 143
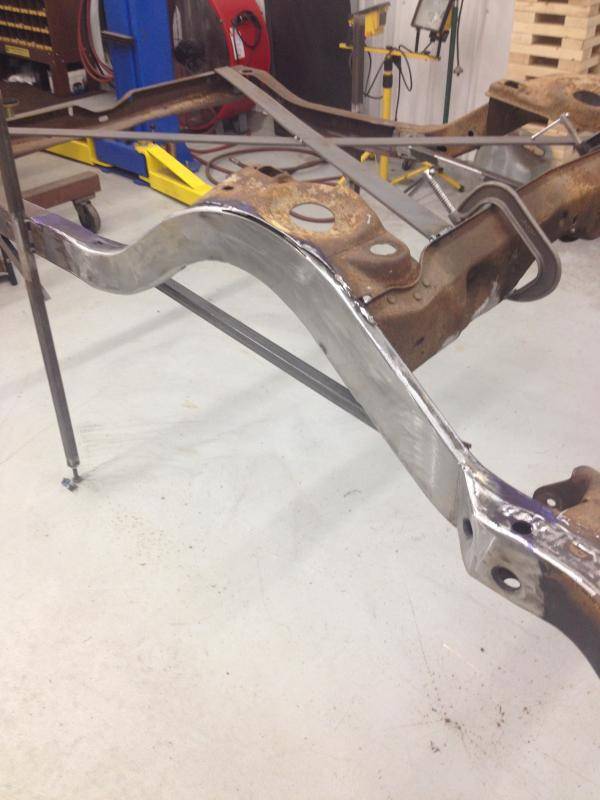
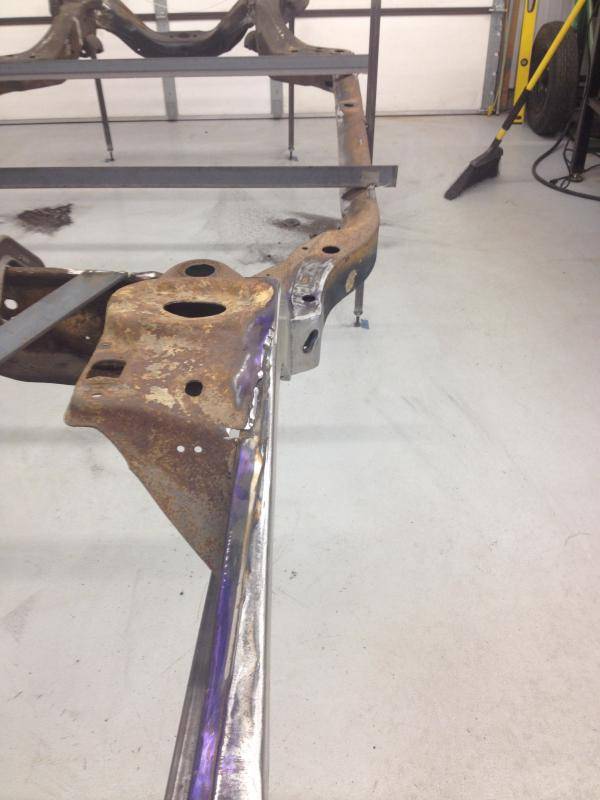
I took today off and made some good progress today. I started by welding in a reinforcement plate inside of the c notch.
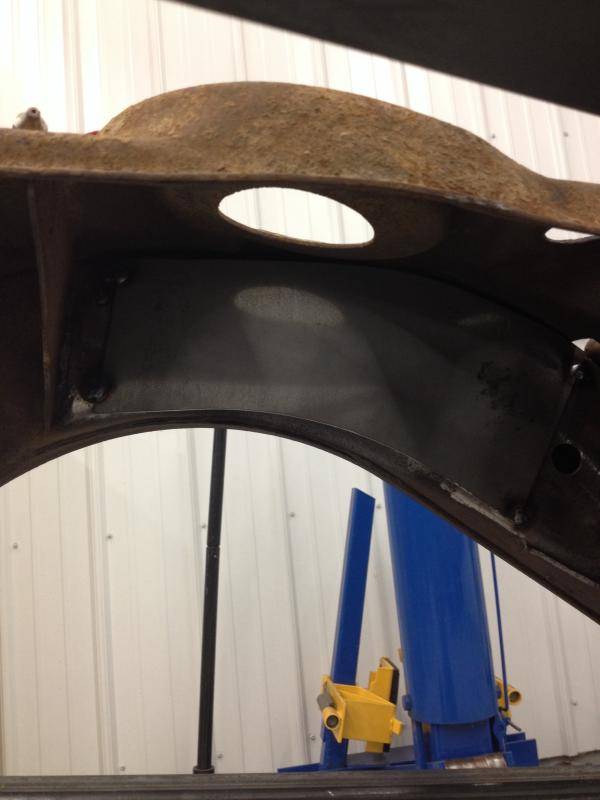
Then I laid out my cut line. I used Dykem so I had a clear scribe line. I put tape on my line and used a 4 1/2" cut off wheel to make my cuts.
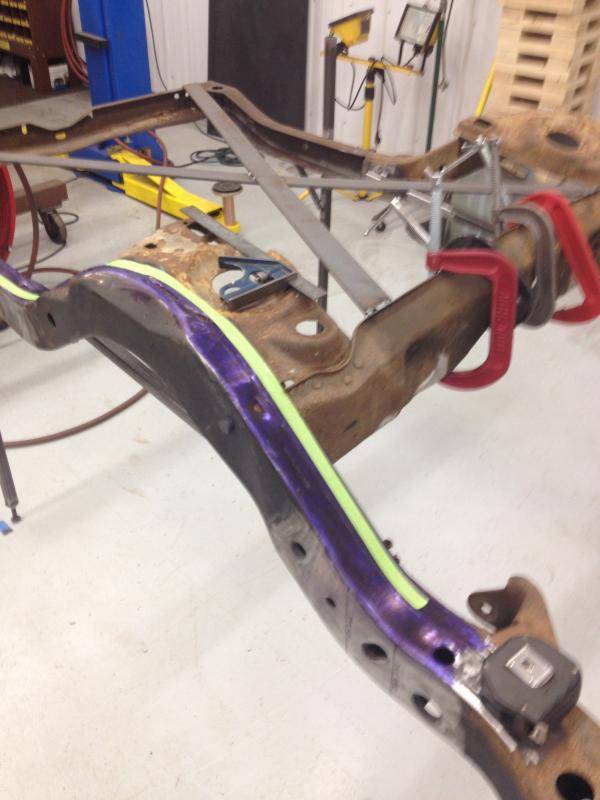
ABC provides a template to mark your front cut/bend lines to blend the new outer box plate to the front of the frame.
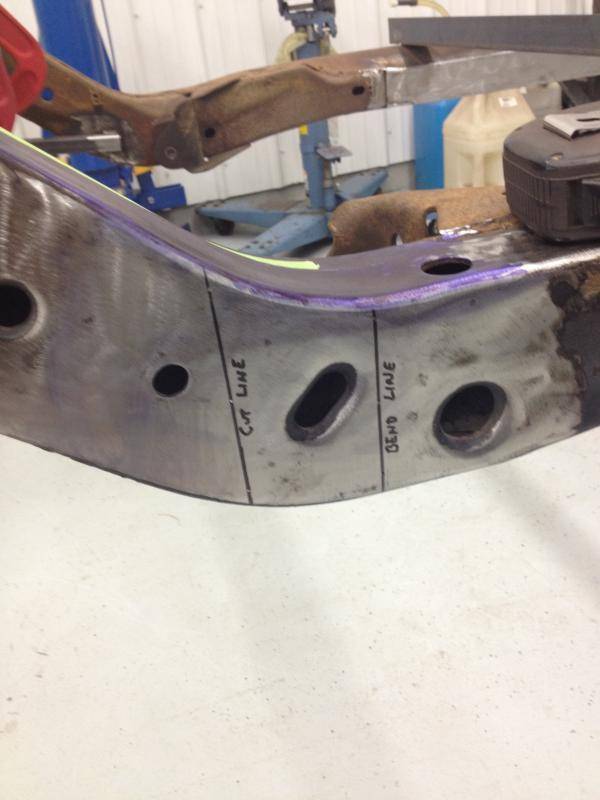
Outer rail removed. You can see where I marked a new cut line just inside of my penetration line. This area gets removed and you weld the edge to the reinforcing plate I put in earlier.
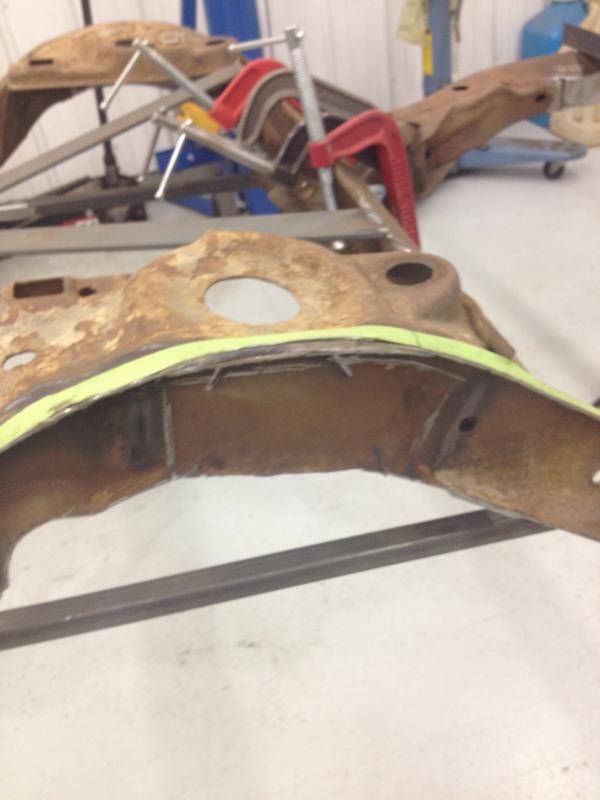
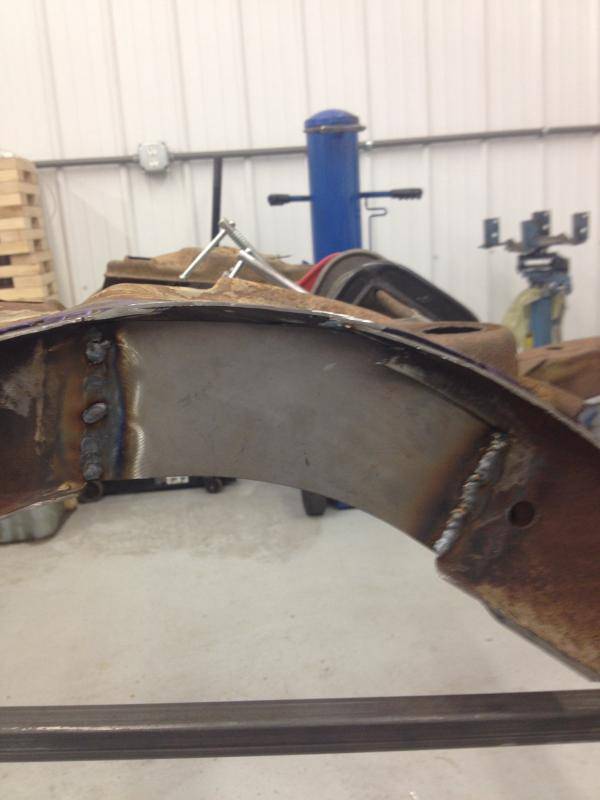
New outer boxing plate fitted and tacked in.
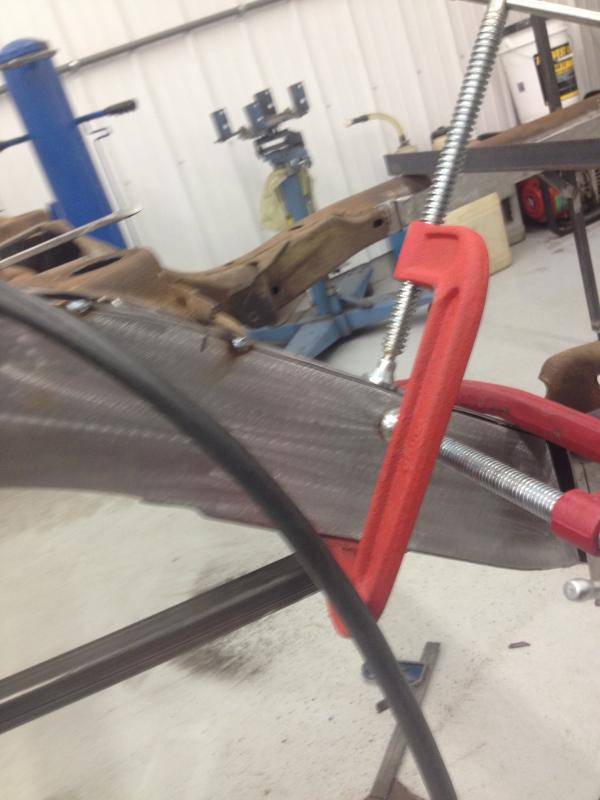
Pie cut where the new box plate meets the rear frame rail.
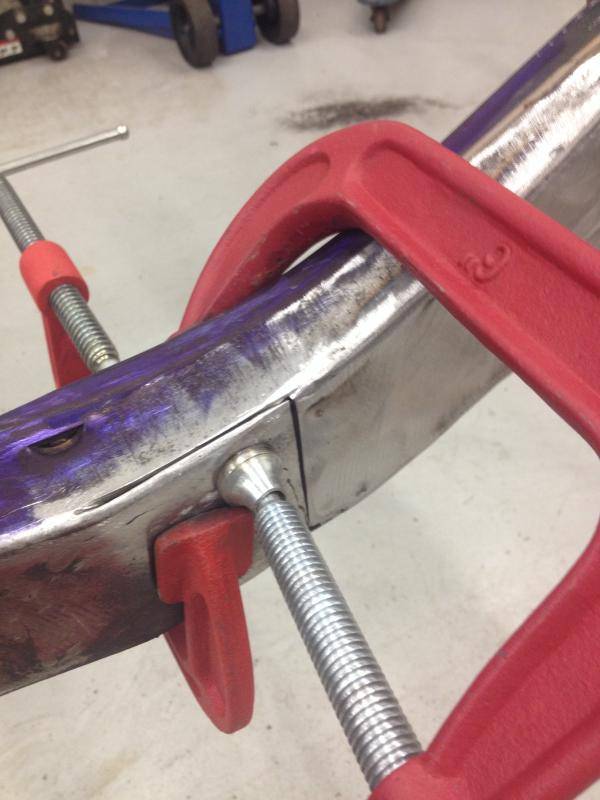
All weld dressed to a nice radius. I'm going to start on the inner c notch tomorrow. All in all, I have 8 hours in this and maybe 2 more tomorrow to finish this side. Then I get to re load and do the other side:D
MikeMy 66 Chevelle build thread- https://www.pro-touring.com/threads/...elle-P-T-build
02-12-2015 #95 Registered User
- Join Date
- Apr 2011
- Location
- Omaha, NE
- Posts
- 10
Wow moving right along... You sure work fast. It would have taken me 8 hours to get brave enough to make the first cut. I'm thinking of doing the ABC kit so I am definitely following this build!
Subscribed
T.J.T.J. Vedral
1966 Chevelle
1971 Nova
1977 Nova
02-13-2015 #96
Rat Pack Member
- Join Date
- May 2007
- Location
- Mooresville, Indiana
- Posts
- 1,874
Amazing work as always! Kind of makes me want to get on Sam's frame sooner than later.
Tom Farrington
66 Chevelle hardtop (ours) https://www.pro-touring.com/showthre...PT-build-(ours)
64 Chevelle 4-dr wagon (wife's) https://www.pro-touring.com/showthre...HAUL-LONG-ROOF
The new shop build https://www.pro-touring.com/showthre...53#post1016553
02-13-2015 #97
Registered User
- Join Date
- Sep 2014
- Location
- Rochester, IL
- Posts
- 143
I appreciate the kind words Tom!! I'm willing to come hang out and help when you do Sam's frame. I can sweep the shop, go pick up food or just generally get in the way
My 66 Chevelle build thread- https://www.pro-touring.com/threads/...elle-P-T-build
02-13-2015 #98
Registered User
- Join Date
- Sep 2014
- Location
- Rochester, IL
- Posts
- 143
Well I only got a couple hours in the shop today. In typical fashion for me, I waited until the last minute to get something for my better half for Valentines Day. I cut my shop day short, went and got her a few things and made reservations for dinner.
Here are a few pictures of what I got done this morning. First thing was removing the spring pocket and upper shock mount. Then I fit the new inner c channel and tacked it in.
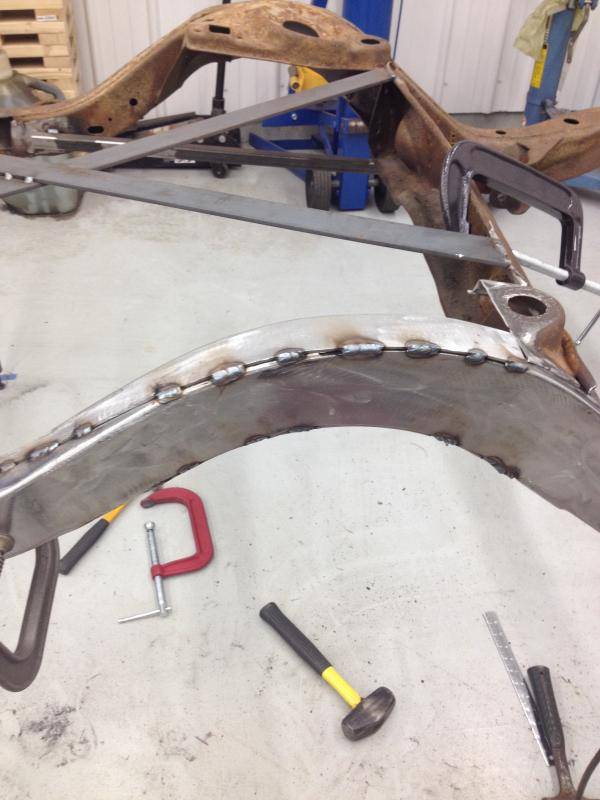
When the spring pocket is removed, you measure 3 1/4" from the rear crossmember and make a cut line. This leaves the body mount which must be boxed in.
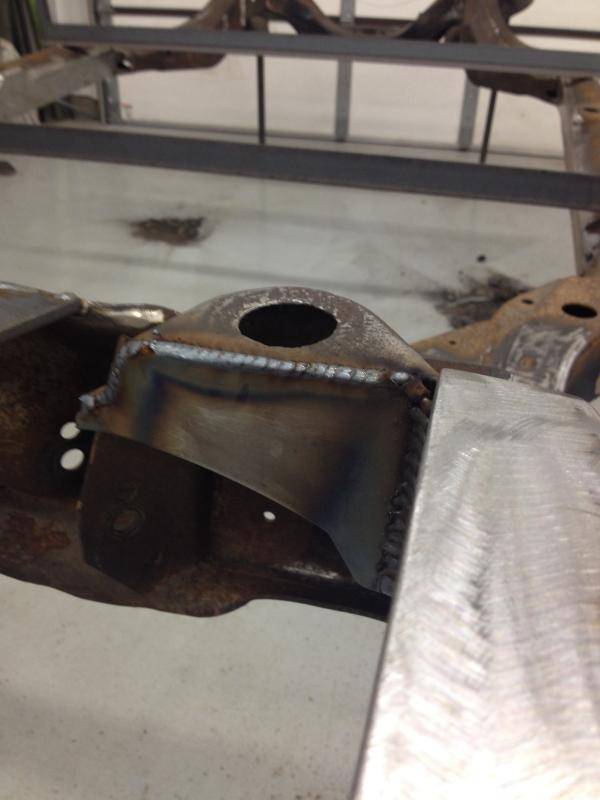
Next step is to weld in a reinforcement plate in the kick up just in front of the rear crossmember.
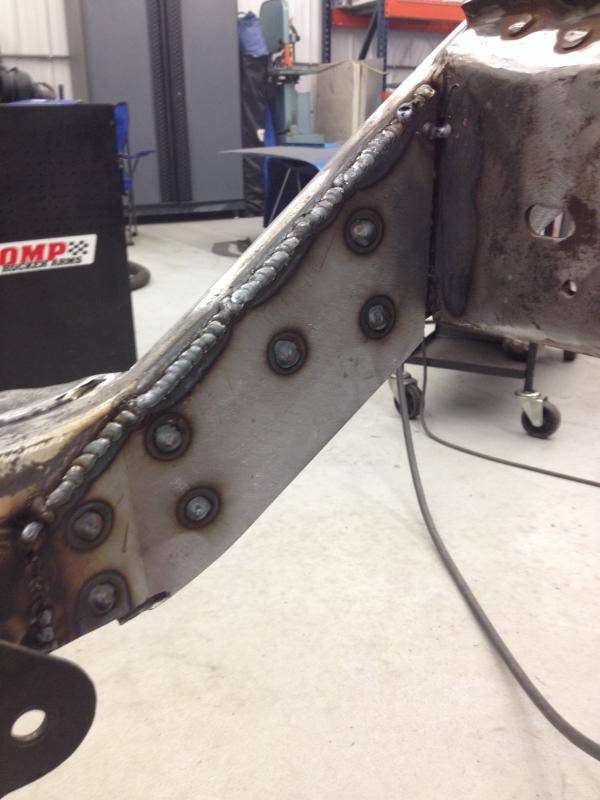
Once I dressed the welds on the kick up plate, I welded in this gusset at the kick up.
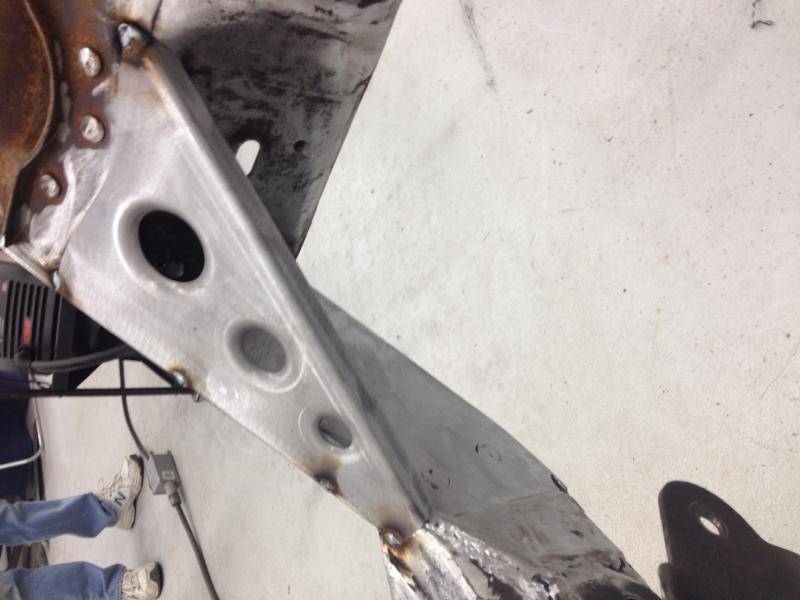
Passenger side is done, now on to the drivers side. Now that I have a better idea of what I'm doing, the other side should go a little quicker. Here is the finished rail.
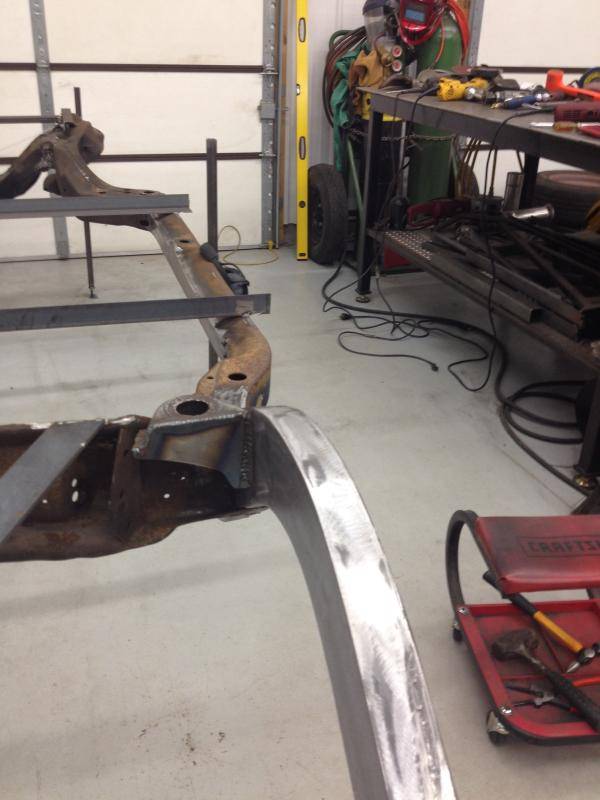
MikeMy 66 Chevelle build thread- https://www.pro-touring.com/threads/...elle-P-T-build
02-13-2015 #99
Registered User
- Join Date
- Aug 2009
- Location
- Chandler, Az (from west NE)
- Posts
- 240
Moving right along, Mike, and looking very good! I back-halved and caged my Malibu to fit 14-32 tires years ago, so now I have to try to make it work on the street. Will probably be adding a few more tubing braces and the ABC plates to the frame rails. Don't know if I can afford wheels and tires big enough to fill up the rear wheel wells. Probably be doing some horse trading. I like your choice of suspension, but don't think it will work for me.
Your pics could be used in an instructional manual for ABC!Ric
2002 s10, DD and AutoX.
1966 Malibu owned since 1971. Drag car converting to track toy!
02-14-2015 #100
Registered User
- Join Date
- Sep 2014
- Location
- Rochester, IL
- Posts
- 143
Thanks Ric..I hope the pictures are some help to someone down the road as others posts and pictures have helped me on other projects.
MikeMy 66 Chevelle build thread- https://www.pro-touring.com/threads/...elle-P-T-build

 Reply With Quote





