

Results 61 to 80 of 121
Thread: 1970 Trans Am Project
-
02-23-2014 #61
 Registered User
- Join Date
- Apr 2012
- Posts
- 385

Guys, I just installed my TKO 600 from American power train. Please take a look at this video. Is the engine suppose to lean back this much? I know they do lean back a little but not sure if this transmission mount needs to be higher.
-
02-26-2014 #62
Starting The Transformation
- Join Date
- Jan 2005
- Location
- marina ca
- Posts
- 152
Purple is the gm color for the starter. The others should you the the bat post Originally Posted by jtwoods4

02-26-2014 #63
Registered User
- Join Date
- Apr 2012
- Posts
- 385
Thanks hessdawg
03-01-2014 #64
Registered User
- Join Date
- Apr 2012
- Posts
- 385
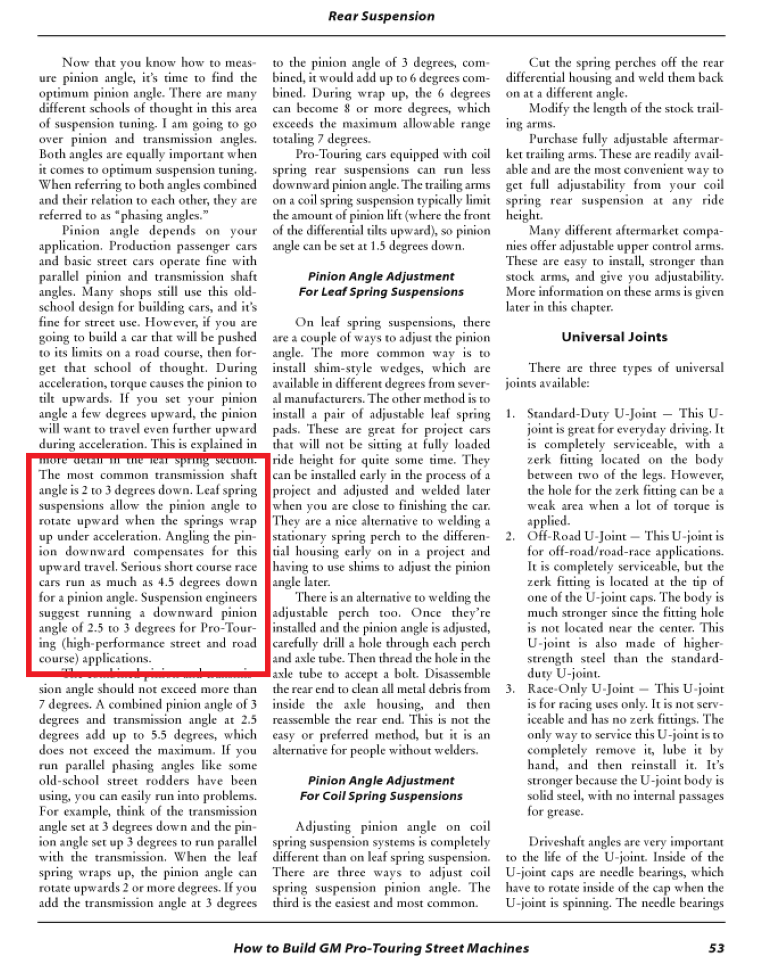
Well today I measured the pinion angle and started running the fuel lines. Turns out the TKO-600 is around 3 degrees negative angle (towards the ground) which is normal, we want a negative angle at the transmission tail shaft. My pinion angle at the differential was -2.6 degrees towards the ground. This is with the pro touring f-body competition leaf springs. I have done extensive research on pinion angles and most people say you want a -3 degree angle at the transmission and a +3 degree angle at the pinion. Equal but opposite angles. This is the old school way to do it and this is how most passenger cars are setup.
After reading a book by Tony Huntimer called "How to Build and Modify GM Pro-Touring Street Machines" I deicide that a -3 degree angle at the trans and -2.6 degree angle at the rear pinion was optimal for a pro touring car that will be driven hard on road courses. Under the hard acceleration the pinion on a leaf spring car will climb, having a slight negative angle is the perfect setup for this , that is, if the PTFB competition leaf springs allow some spring wrap and aren't to stiff.
Here is the book where I read about pinion angle. I took a screen shot of the page discussing pinion angle for a "pro-touring" setup
http://books.google.com/books?id=Ump...page&q&f=false
Anyway, here are the videos for the fuel line install.
03-02-2014 #65
Registered User
- Join Date
- Apr 2012
- Posts
- 385
Fuel Line Complete
03-08-2014 #66
Registered User
- Join Date
- Apr 2012
- Posts
- 385
This weekend I finished installing most of the engine accessories. Still need to throw in the MSD box and distributor. I also ordered a new 3 inch Chromoly Driveshaft from the drive shaft shop, should be here in the next couple weeks. I decided to go with the Chromoly shaft because it allowed me to use a smaller 3 inch diameter instead of the 3.5 inch alluminum shaft. This frees up some space in the trans tunnel. I have had cars in the past with 3.5 inch driveshafts that would knock the trans tunnel on a hard bump with passengers in the car.
Haven't decided on a Radiator yet. I would like to use the original style shroud with the mechanical fan and clutch. Any aluminum radiator recommendations that fit well in the stock shroud?
Anyway, Enjoy the video
03-12-2014 #67
Registered User
- Join Date
- Apr 2012
- Posts
- 385
Now on to the distributor...
The MSD Pro Billet distributor comes with several different colored bushings. The default bushing installed is blue and stops total advance at 21 degrees. It also has a black bushing that can be installed that limits the advance to 18 degrees, a silver bushing for 25 or a red bushing for 28. Uggggg, which one should I use????
There are also different Springs I can install that control how quick the total timing comes in. At what RPM should the total timing come in? The default Springs bring in total timing at 5500 rpm but that seems way too high for a Pontiac. The kit includes Springs to change it from anywhere between 2000 to 5000.
03-15-2014 #68
Registered User
- Join Date
- Apr 2012
- Posts
- 385
Well guys here it is. The first engine fire up after a year of hard work :-P
03-16-2014 #69 Registered User
- Join Date
- Apr 2001
- Location
- The Netherlands
- Posts
- 1,509

congrats, sounds great! starting a new motor is one of the best parts of a build :-)
03-16-2014 #70
Registered User
- Join Date
- Apr 2012
- Posts
- 385
Yeah definitely. Most exciting day of this year
03-16-2014 #71 Registered User
- Join Date
- Aug 2006
- Location
- austin
- Posts
- 358
I would go with the default bushing. That way you can run 15 degree init timing and have 36 degrees total. Engine could prob take more, but if you're running it long and hard (road race) better to be safe than sorry. Originally Posted by jtwoods4
As for the brake lines, going from 1/4" to 3/16 should not make any dif in pedal feel. The master pushes the same volume of fluid regardless of brake line ID. The smaller ID would be more resistant to sponginess however if you're fluid wasn't 100% fresh. I guess you can make the opposite argument for resistance to boiling, but the brake fluid doesn't circulate very well. I run the motul 600 in my viper. There are more expensive fluids, but for the money it works really well. Change it every time to change your motor oil if you're tracking hard. I don't see a down side to the 3/16" lines.
Nice build! I like your brake setup. Maybe one day I'll try those hats/rotors, but I'll use Brembo brakes off the gen 1/2 viper instead. The 13" rotor fits inside factory 17" wheels so it should work.Greg
1976 Trans Am SacrilEdge
twin turbo 455
Ttops and 4spd
one of 110 made
https://www.pro-touring.com/showthre...ect&highlight=
https://www.pro-touring.com/showthre...ilEdge-is-free!
03-16-2014 #72
Registered User
- Join Date
- Apr 2012
- Posts
- 385
Thank you Greg! I will be sure to use some of the high temp brake fluid like you do in your viper. Speaking of that....
Brake line on drivers side is very close to header so I wrapped it with a 500 degree heat resistant wrap. Not sure if this is going to work so I will have to keep an eye on it.
03-16-2014 #73 Registered User
- Join Date
- Jan 2007
- Posts
- 206
Beautiful car, one of my favorites. Nice work so far, the undercarriage brought back some memories, removing all of that undercoating is quite a job! Love the wheels too.
WWW.SPEEDINC.COM 1957 Eldorado Brougham.......in progress
03-18-2014 #74
Registered User
- Join Date
- Apr 2012
- Posts
- 385
Well I worked out the drivers side brake line issue. Bent the line down about an inch and got about a 1/2 inch clearance from header. Then I double wrapped the line in 500 degree constant heat resistant wrap. The double wrap should really do the job. Today I finished the alignment and the Pro Touring F-Body Pro G-Brace install. They are tricky to install with 3.75 inch tall valve covers but I called Dave over at PTFB and he gave me some great suggestions that worked. Here is the video for today.
In the video I mention camber settings and I meant to say -.5 on drivers side.
03-18-2014 #75
Registered User
- Join Date
- Nov 2010
- Posts
- 44
The red one goes to the battery terminal on the starter, the purple one goes to the solenoid terminal (the smaller terminal on the starter), and just discard the yellow one, its just used for the old contact type ignition and its not used with the newer types of ignition systems (MSDs and the likes). Originally Posted by jtwoods4
03-19-2014 #76
Registered User
- Join Date
- Apr 2012
- Posts
- 385
Thank you Kamaro. I was wondering about that loose wire. Originally Posted by kamaro
03-26-2014 #77
Registered User
- Join Date
- Apr 2012
- Posts
- 385
New Magnaflow exhaust installed. Kit 15899
03-27-2014 #78
Registered User
- Join Date
- Apr 2012
- Posts
- 385
Well after 2 days of driving, totaling about 50 miles. I started "feeling" a grinding in my clutch pedal. So I pulled in the driveway and dropped the transmission. The input shaft bearing retainer, you know the piece the throwout bearing rides on, was sheared right off! Then I looked down through the clutch and saw the pilot bearing also fell out.... what the hell.
My only thought of what could cause the bearing retainer to shear off after 50 miles is that the clutch linkage geometry was wrong and the bearing was pressing incredibly hard against the bearing retainer sleeve. When I assembled it everything felt great.
I have the stock original 1970 GM Clutch fork, z-bar (bell crank),pushrod, and pedal.
I have the QuickTime bell housing
TKO 600 transmission
Check out the video
03-28-2014 #79 Registered User
- Join Date
- Jul 2005
- Location
- Texas
- Posts
- 255
Really digging this build. And thanks for the vids and the education on things I was wondering about....such as pinion angle. I am not comfortable enough with pinion angles, so I'm having to have my 4 link installed by a shop.
Great work so far!1969 Nova SS Build Thread https://www.pro-touring.com/threads/...da)-69-Nova-SS
03-28-2014 #80
Registered User
- Join Date
- Apr 2012
- Posts
- 385
and make sure you align your bell housing if you're installing a TKO or you will bust something like I did in the video above. luckily I am close to american powertrain so I just drove over there and Lonni swapped out the busted bearing retainer. Originally Posted by novajess1972

 Reply With Quote


