

Results 61 to 80 of 174
Thread: Madaguy 1955 Nomad Build
-
04-17-2023 #61

 Registered User
- Join Date
- Sep 2009
- Posts
- 2,725

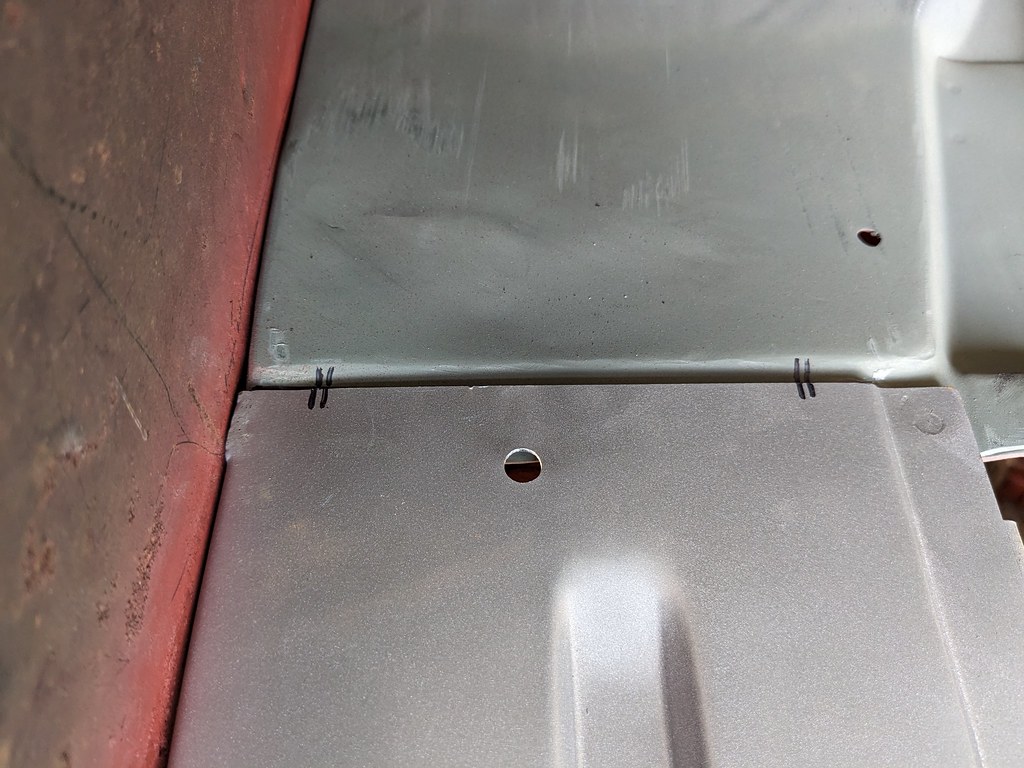
Slow and steady I'm making progress. I was able to get the rest of the rear floor section butt welded together.
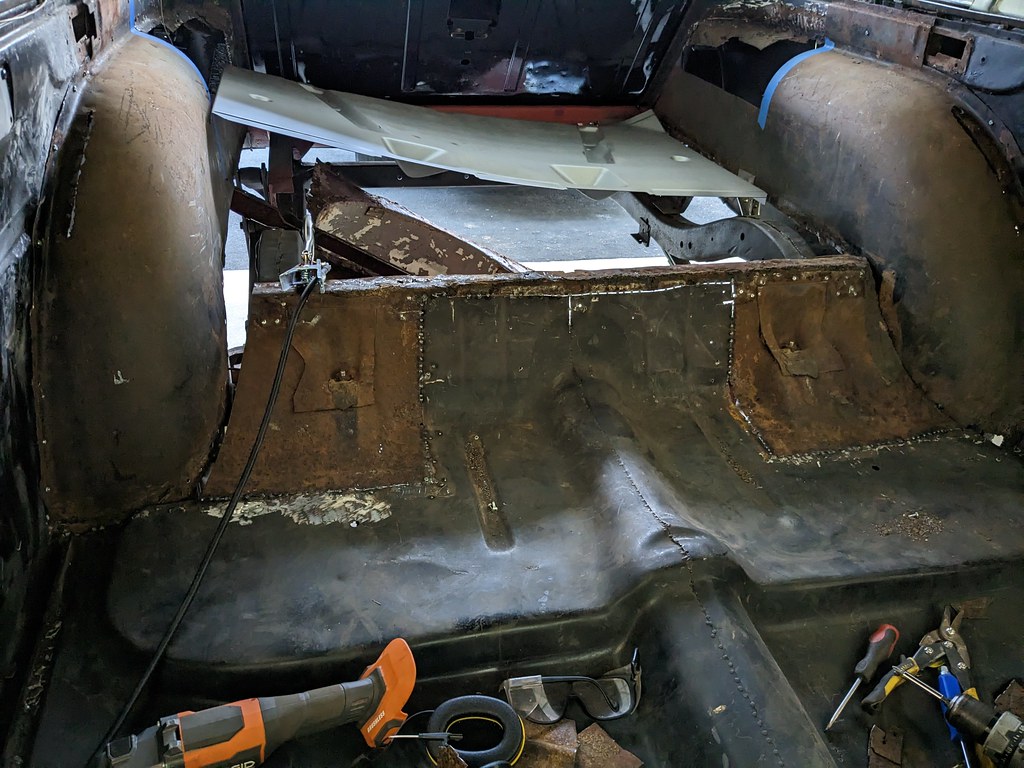
I ground down the spot welds then used a body hammer and dolly to level out the two panels to make for a flatter butt weld. Then I sprayed some black paint down because I was sick of looking at that rusty piece. I was able to get it fully welded and ready to install some patch panels.
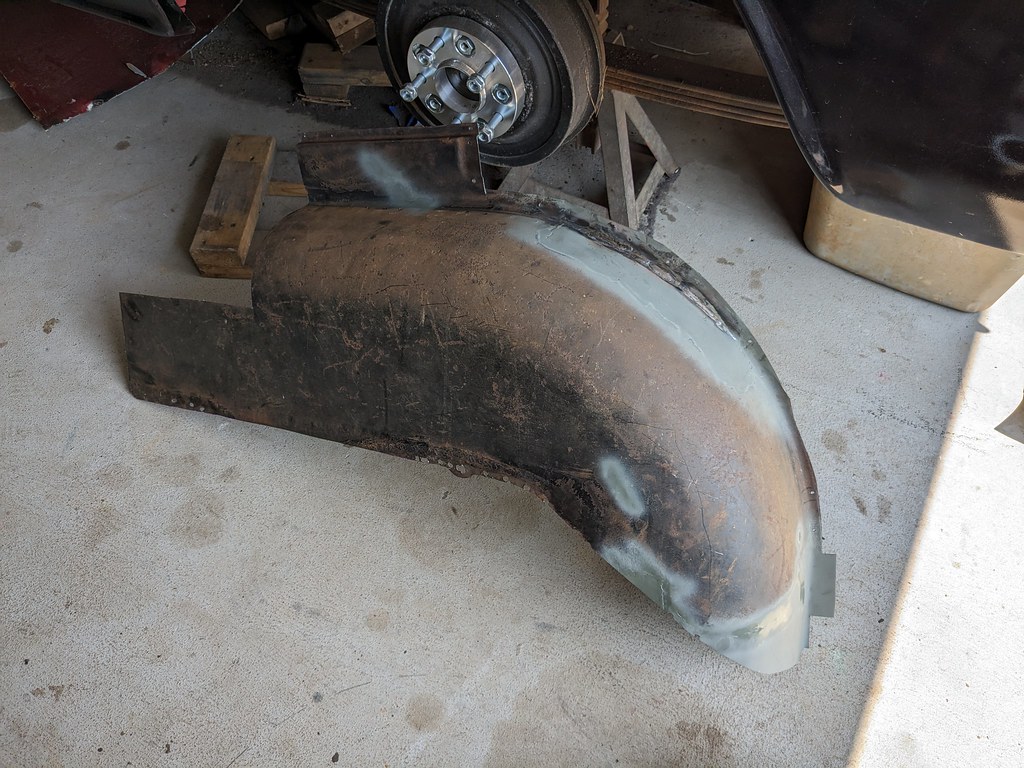
I started to mock up the repair for the side of the floor that was cut off, but I realized that before I could build that piece I needed to repair the wheel well and inner structure prepped for welding. I used the original intact lower section as a template for the new piece.


Then the upper panel. Rinse and repeat.
Before I pulled off the mocked up wheel well, I marked it for the rusted inner section that I needed to cut out. I then cut out the section, drilled spot welds and then used my dolly and hammer to straighten out the flange.

I cleaned up this section and it's solid right above that rusty lower section and I've got a good upper piece that will give a clean solid repair for. Was glad that there wasn't anything crazy with this panel other than someone spread a layer of body filler over the tar undercoating

I put the wheel well back on as a test fit and I'm very pleased with how it's all lining up. Just needs a little trimming and it will make a very clean repair.

Then another bad/good news situation. As I was grinding the inner structure to prep it for welding, I found some other bad repairs with body filler... I cut it all out and bought new panels to replace. The good news is that was the last of the bad repairs and it was all solid clean metal around it. I couldn't really go any further though since I have to wait for those panels to come in. I also ordered a new front wheel house section as these were in pretty bad shape as well.
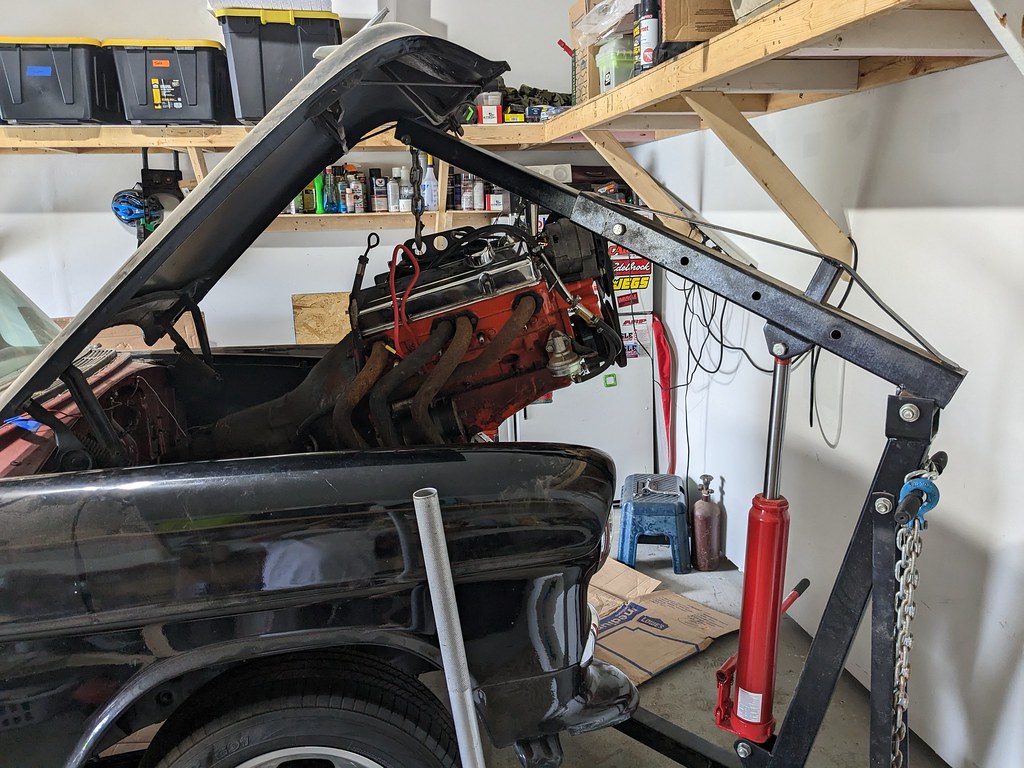
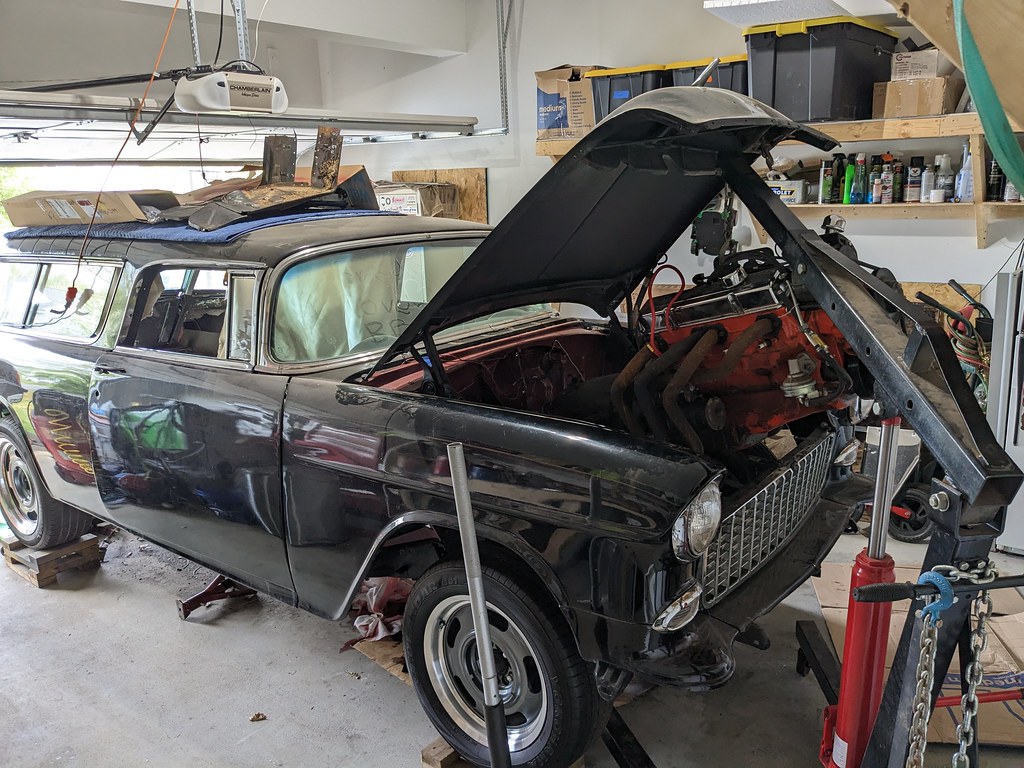
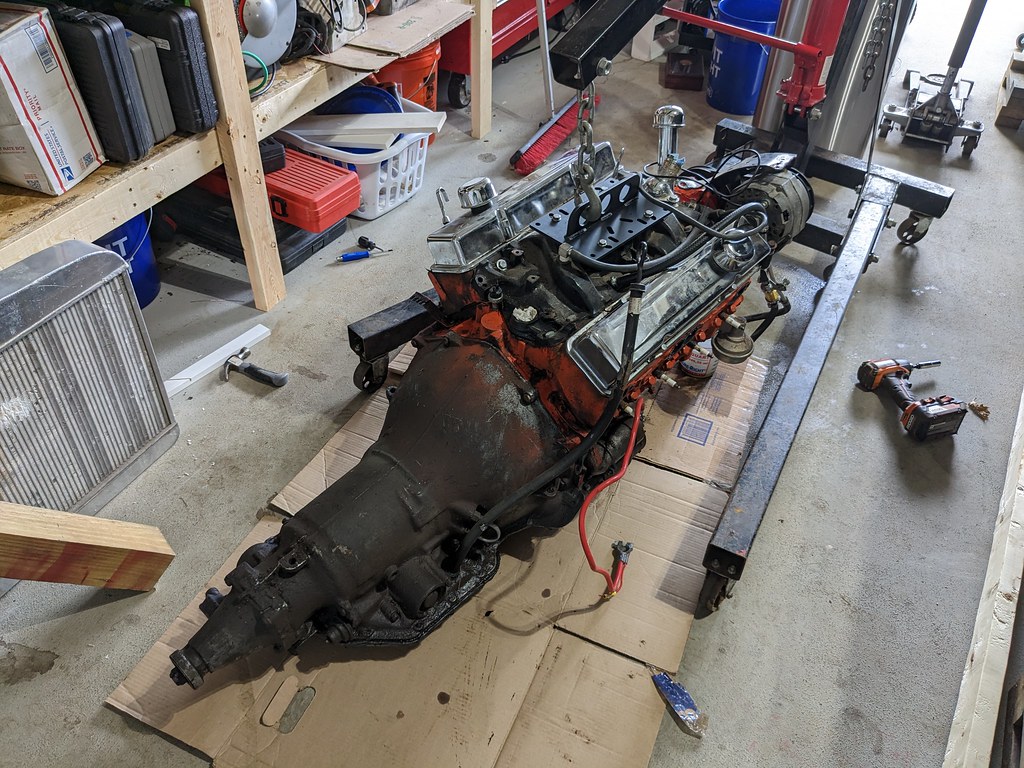
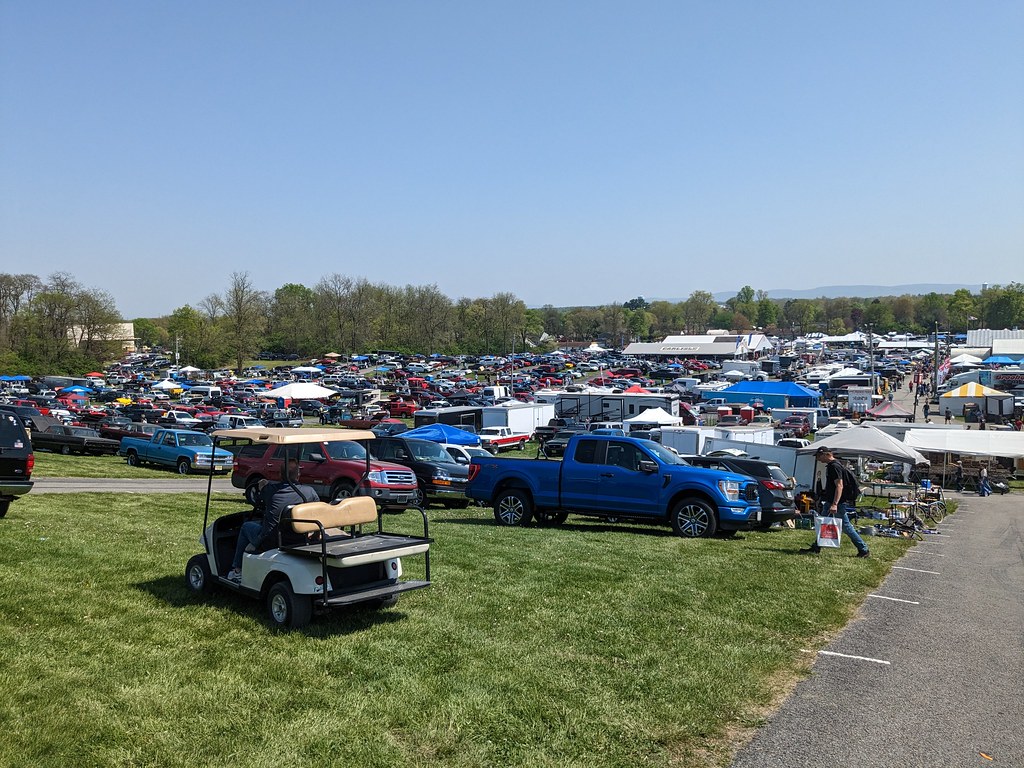
I sold the motor and transmission to my friend Kerry a while back, but I held onto it for a while until we could arrange to meet up. I just left it installed in the car since it was pretty happy there and took up less floor space that way. Well I'm meeting him at Spring Carlisle next Saturday and that meant that I needed to get it out of the car. Really wasn't too bad as there wasn't that much holding it in the car. Just a few wires, hoses and bolts. I only had to remove the core support and radiator and then it cleared the grill. I forget how much iron block/head engines are! I'm definitely going to need to get new coils and/or cut a coil out to lower the front with the all aluminum engine going back in.
My new panels should be in today so I'm hoping to get them test fit and get them installed this week. I'd much rather be doing electrical or mechanical work over the body work. But thankfully it's just floor pan work and not exterior body work where I need to sand and prep panels. Things should go much quicker when I can just spot weld rather than butt welding.
Cheers,
Ryan
1955 Nomad project LC9, 4L80e, C5 brakes, Vision wheels
1968 Camaro 6.2 w/ LSA, TR6060-Magnum hybrid and etc SOLD
1976 T/A LS1 6 Speed, and etc. SOLD
Follow me on Instagram: ryeguy2006a
-
04-18-2023 #62 Registered User
- Join Date
- Dec 2017
- Posts
- 61
Man, if I had time I'd meet up with you two! Good to know it's going to a good home! Looks like you're making great progress!
1951 Ford F1, 1967 RS Camaro, 1979 Firebird Formula, 1979 Trans Am/LS swap.
04-18-2023 #63
Registered User
- Join Date
- Sep 2009
- Posts
- 2,725
We're meeting on Saturday at Spring Carlisle. Come on down!
1955 Nomad project LC9, 4L80e, C5 brakes, Vision wheels
1968 Camaro 6.2 w/ LSA, TR6060-Magnum hybrid and etc SOLD
1976 T/A LS1 6 Speed, and etc. SOLD
Follow me on Instagram: ryeguy2006a
04-24-2023 #64
Registered User
- Join Date
- Sep 2009
- Posts
- 2,725
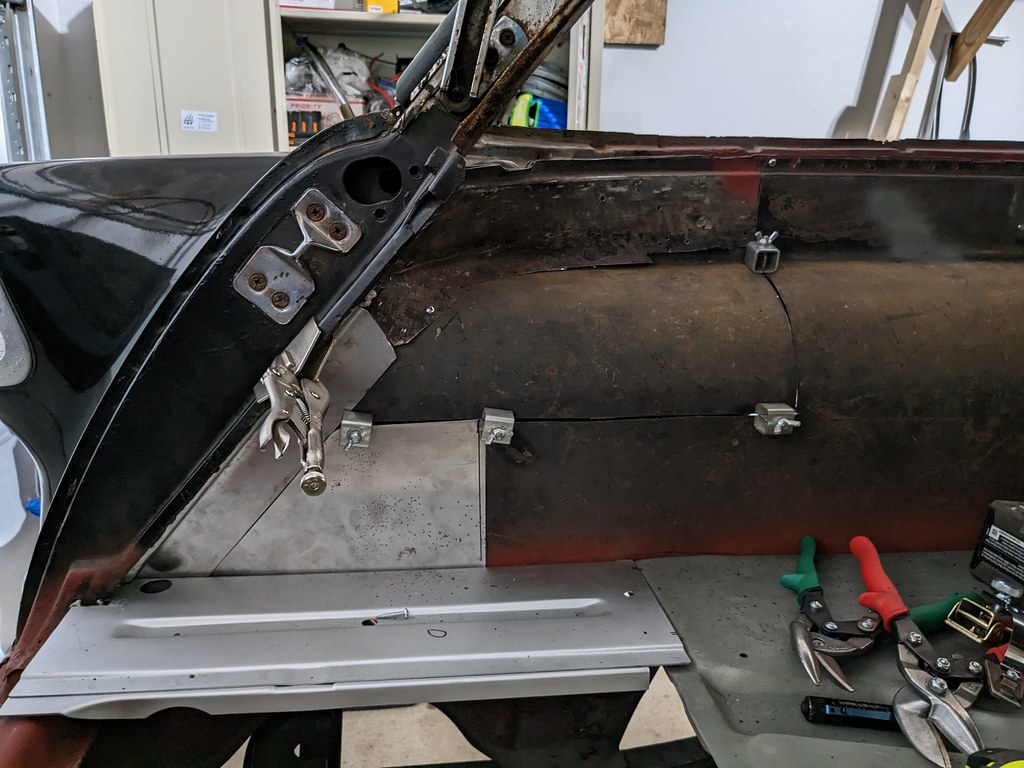
Well after I was left with this large hole, I needed to find a way to fill it. I had started to make my own replacement panel, but I didn't have a proper metal brake so the panels turned out so so. Got to looking online and a guy actually makes a piece and sells them on trifive.com and eBay. So I grabbed two and they were just what I needed and they fit perfectly. Plus it came with the curved piece for the door jamb that would have been very difficult for me to create from scratch.


I got it all mocked up and the inner panel trimmed up on the car.

The panel was short by about 4.5" so I got a new piece and roughly cut it to fit, then installed it, used a sharpie to trace the hole outline, and then trimmed the panel to fit the contours.

Got the piece welded together and extended. Here's the last test fit before final welding.

That's as far as I got building the panel last week. I always try to go to the Spring Carlisle event as a kick off for spring. Great show and I love checking out the swap meet. I can usually pick up a bunch of good parts.
I had been communicating with a vendor Jay Hammond who has a huge supply of tri five parts. What caught my eye was a complete set of 1955 Nomad door panels he had with ALL trim including the 6 1955 only waffle pieces! The door panels were also in very good condition for being originals. I've got a plan for those as they do need to be reinforced and some TLC before they can be installed. More on that later.

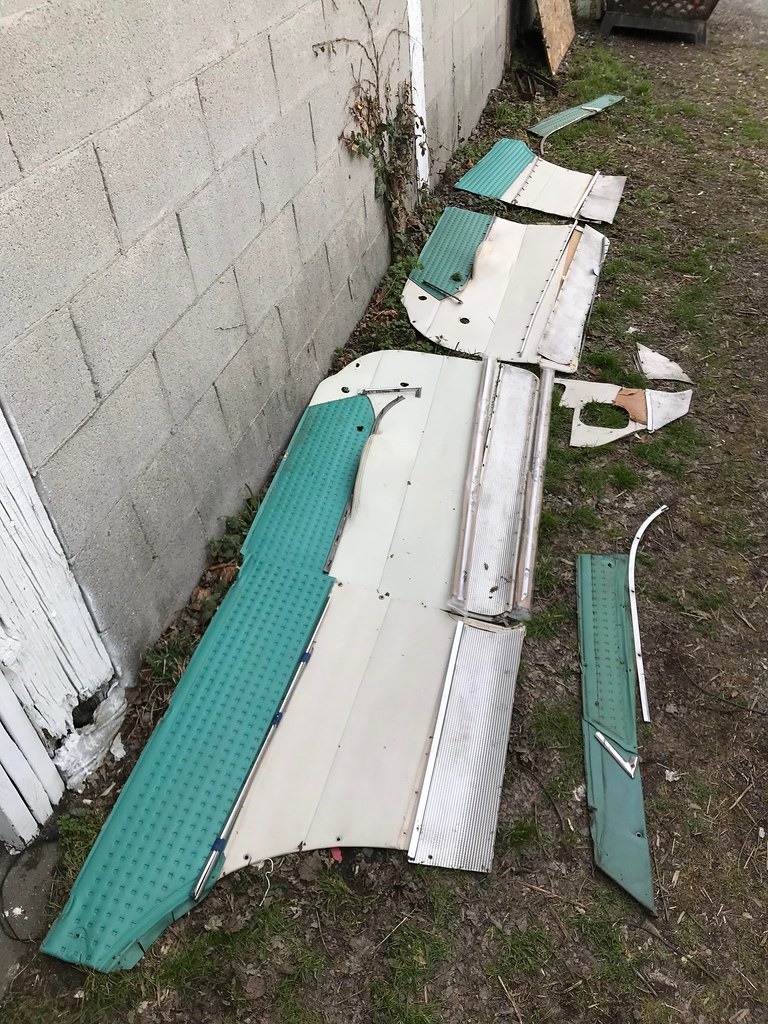
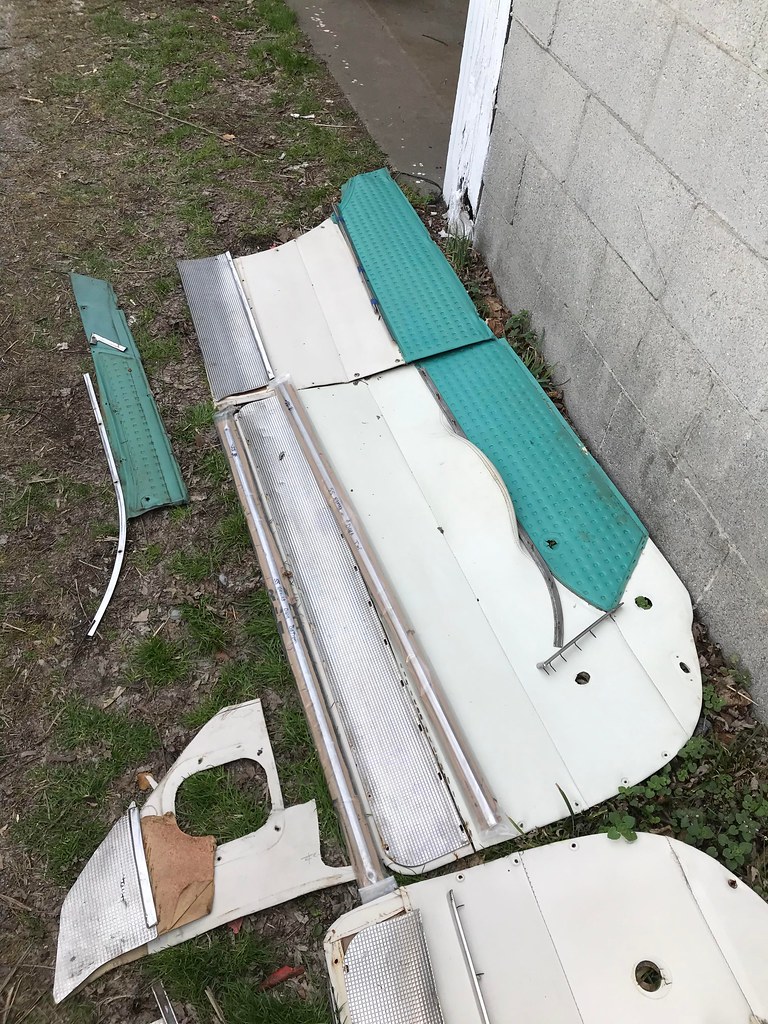

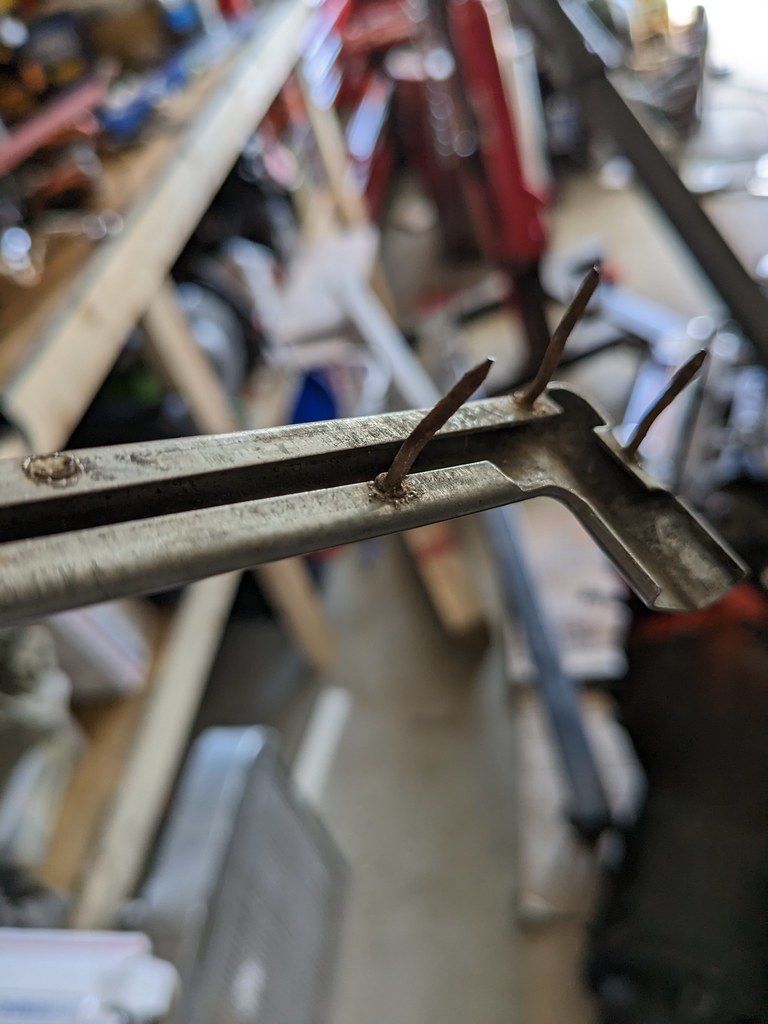
Here's a close up of the waffle panel. It's a really cool pattern that is unique 1955 Nomad's only. Pretty happy to get my hands on a really good condition set of originals. They will polish up really nicely.
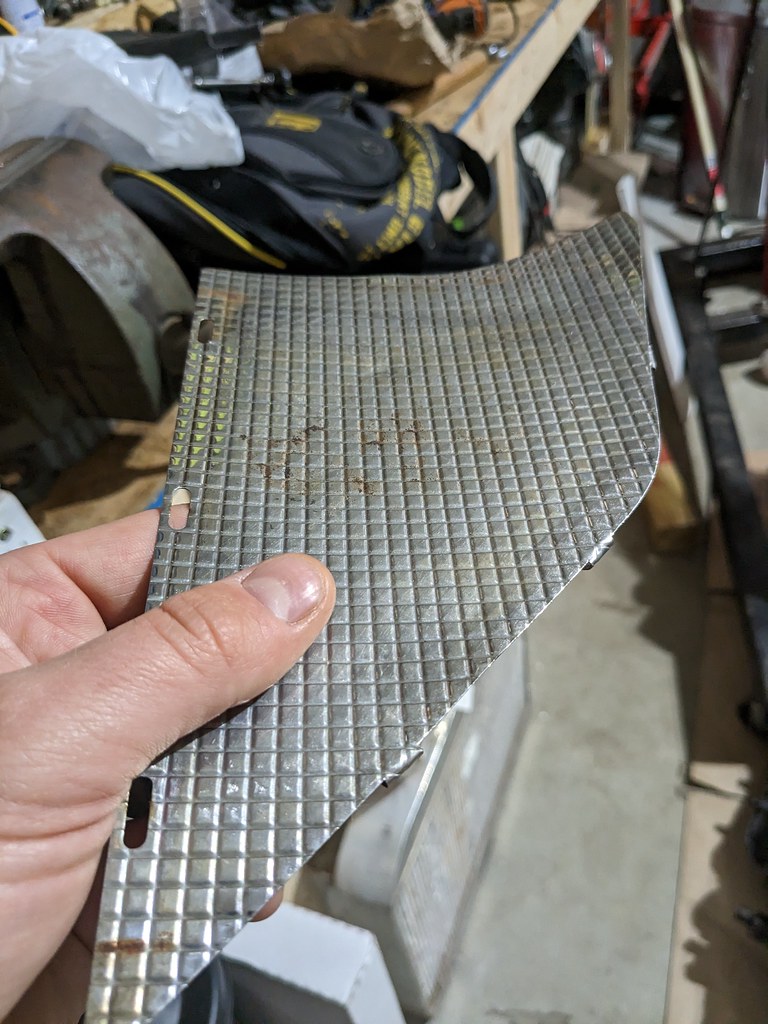
I also found that the 50's tech that they used was very fascinating. It's literally a nail spot welded to the trim!
I also found two pairs of coil packs for $30 bucks! Not sure which set I'm going to use, but I'm leaning towards the heat sync pair. The other set didn't come with the coil bracket, but are LS1 style.
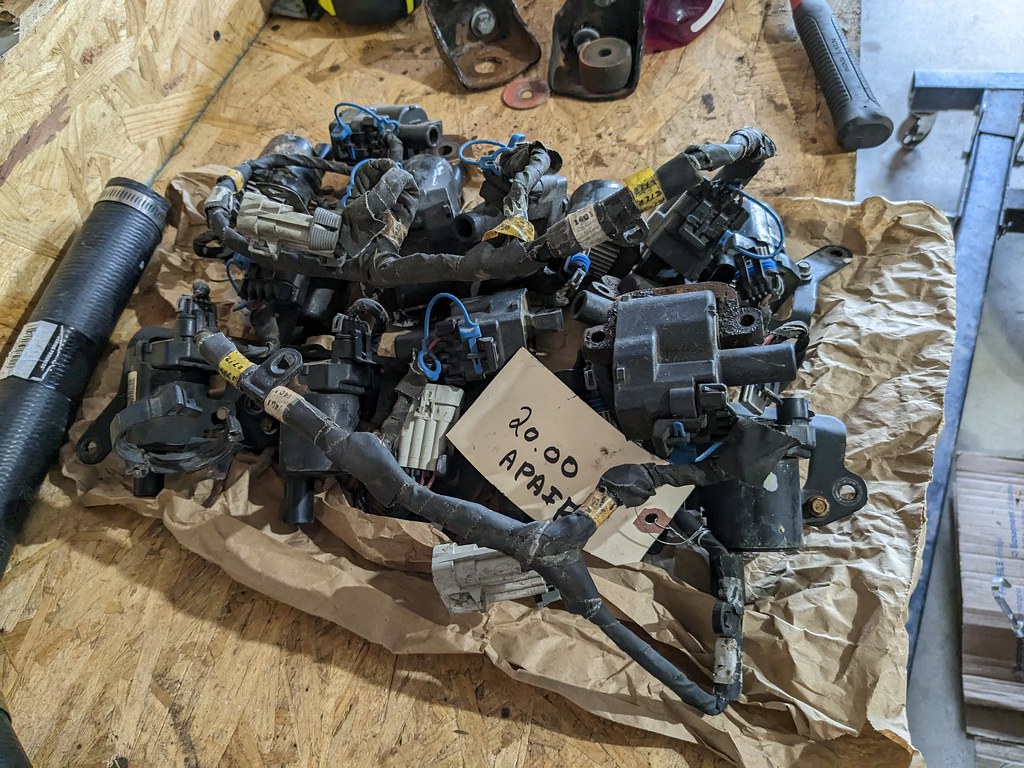
Not sure what it came off of, but I also found this nice looking transmission cooler. It's made by Long and it appears to be really nice quality. I think that should be good enough to cool the 4l80e. I'll flush it before I use it to make sure that it's not full of junk.


Last thing I found was an electric wiper motor. For those that aren't aware, most tri five's came with vacuum powered wiper motors. The guy I bought the motor from wasn't sure if it worked, but when I got it home and bench tested it, it turned right on and operated very quiet and smooth. Very happy about that.

I had a great time and talked to a lot of great tri five vendors. I learned a lot about the differences between the years and how so many of the parts have very small variances between years. I'm hoping to get the lower patch panel welded together this week and get the wheel wells buttoned up soon.
Cheers,
Ryan
1955 Nomad project LC9, 4L80e, C5 brakes, Vision wheels
1968 Camaro 6.2 w/ LSA, TR6060-Magnum hybrid and etc SOLD
1976 T/A LS1 6 Speed, and etc. SOLD
Follow me on Instagram: ryeguy2006a
05-02-2023 #65
Registered User
- Join Date
- Sep 2009
- Posts
- 2,725
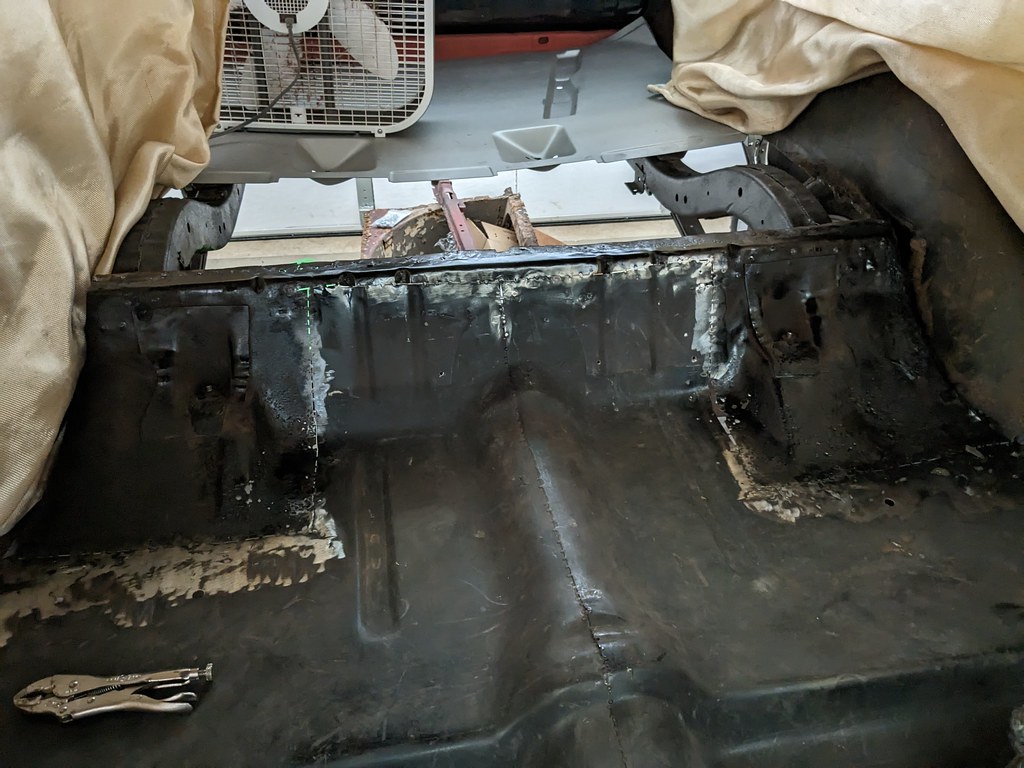
I was able to get the inner panel patched up and a final weld done. I still need to knock down the welds then coat the entire inside of the panel. Now that this panel is welded in, I can get the rear floor pan patch panel made and welded in. I had my wire feed up a little to high on the spot welds, but they are all solid with penetration.

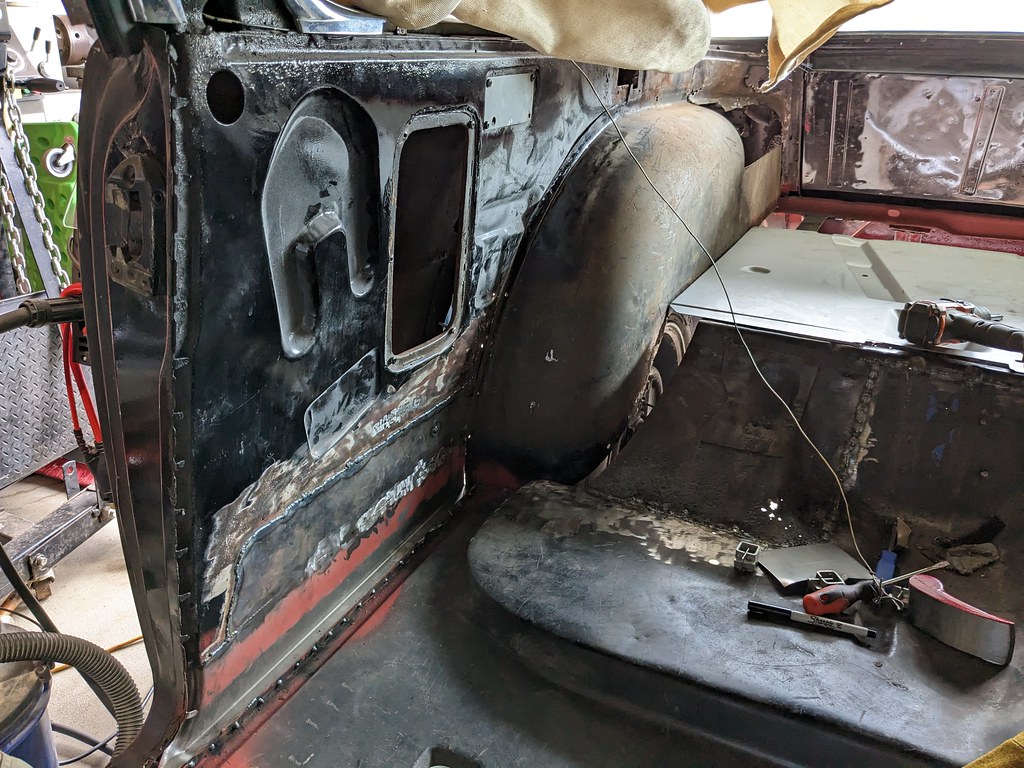
Then I turned my attention to the driver's side, with a very similar bad repair. It was the same style where they crudely threw a panel over the existing rust. You can see through that access hole where the panel was put over the original metal. No prep or seam sealer was used so the rust was left to thrive. Glad I caught it when I did. That inside panel went up to the red line...


For some reason when the floor was installed, they cut the rear flange off where it meets the lower pillar section. So I'm re-creating this panel so I have something to spot weld to. Needed to seek the help from a professional for this one though.

Once I get these panels welded I'll resume my work on the wheel wells and rear floor sections. I can't wait for the metal work to be over...
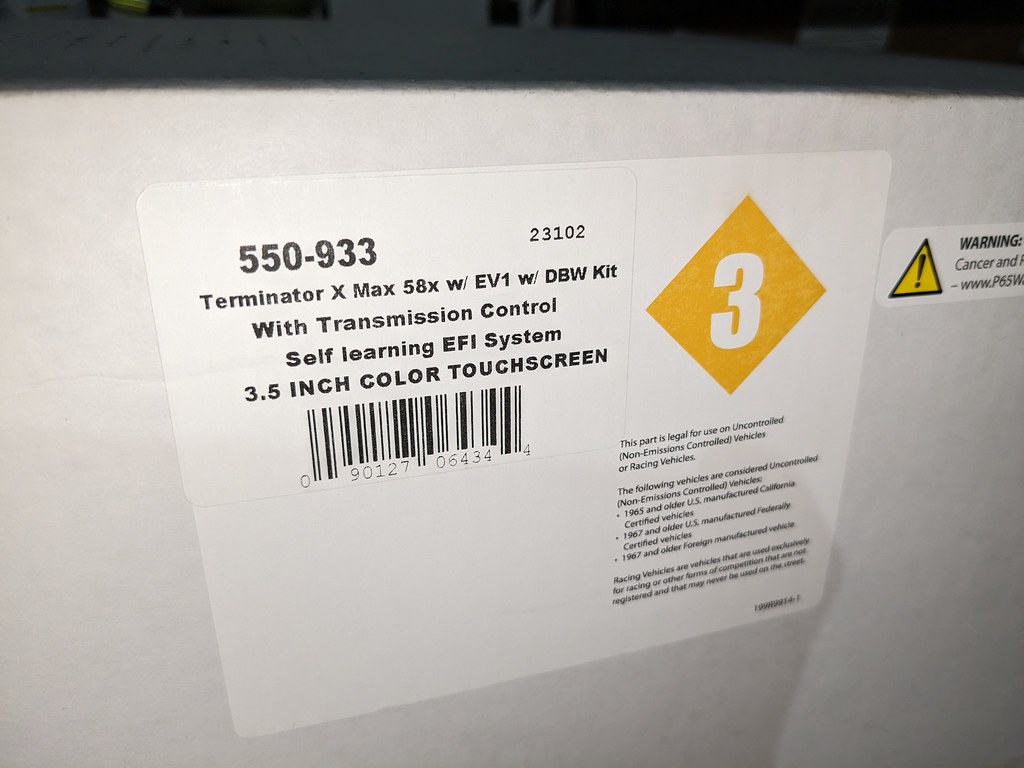
Seems to be a common theme here, but I have a really exciting parts update! I had been searching all around with vendors and even used, but came across a few Terminator X Max kits for sale at Summit. I wasn't sure if it was true or not, but they showed 4 550-933 in stock, so I bought one. Was very surprised when this showed up a few days later!! It was everything I needed other than the wrong injectors for me, but I had a buddy who had an EV6 set and we were able to swap, so it was a win win for both of us.

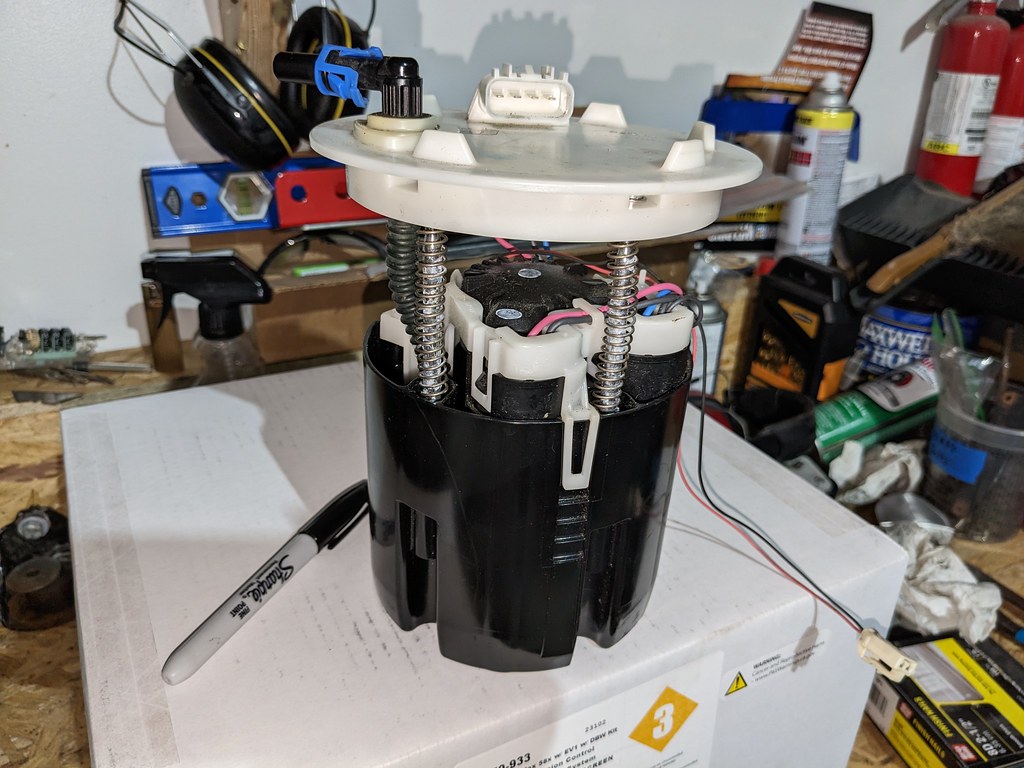
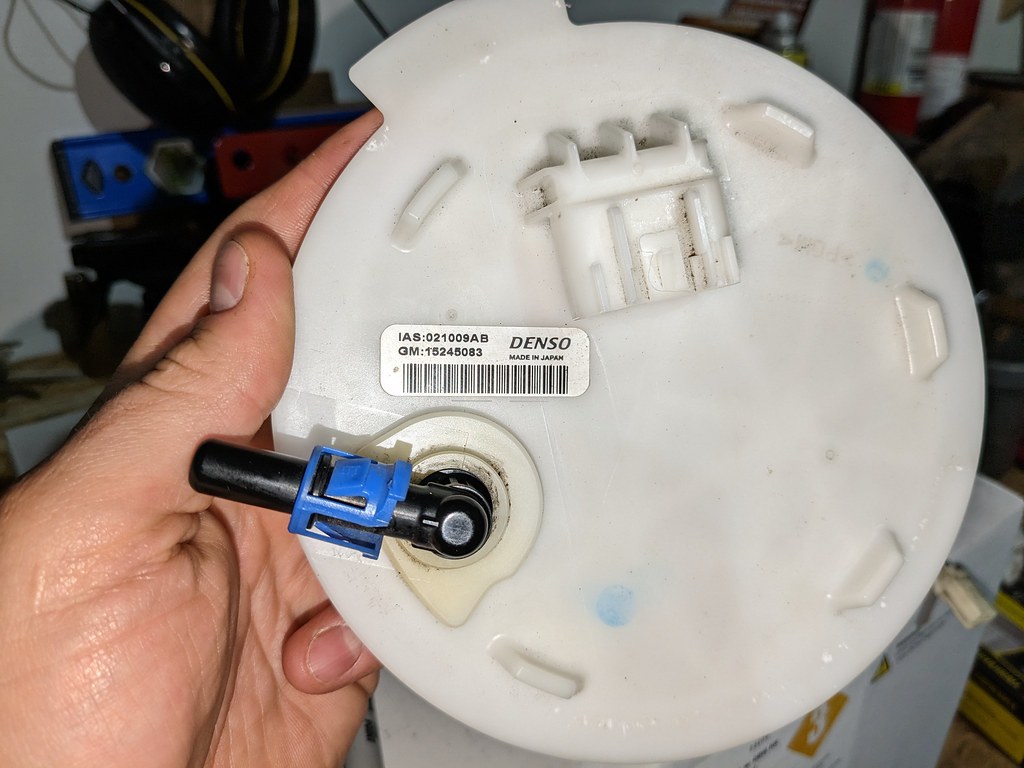
Then I was on FB marketplace and found a guy locally who was parting out a wrecked 2011 CTS-V. He still had the fuel pump assembly and got that for a really good price! Only had 66k miles on it.
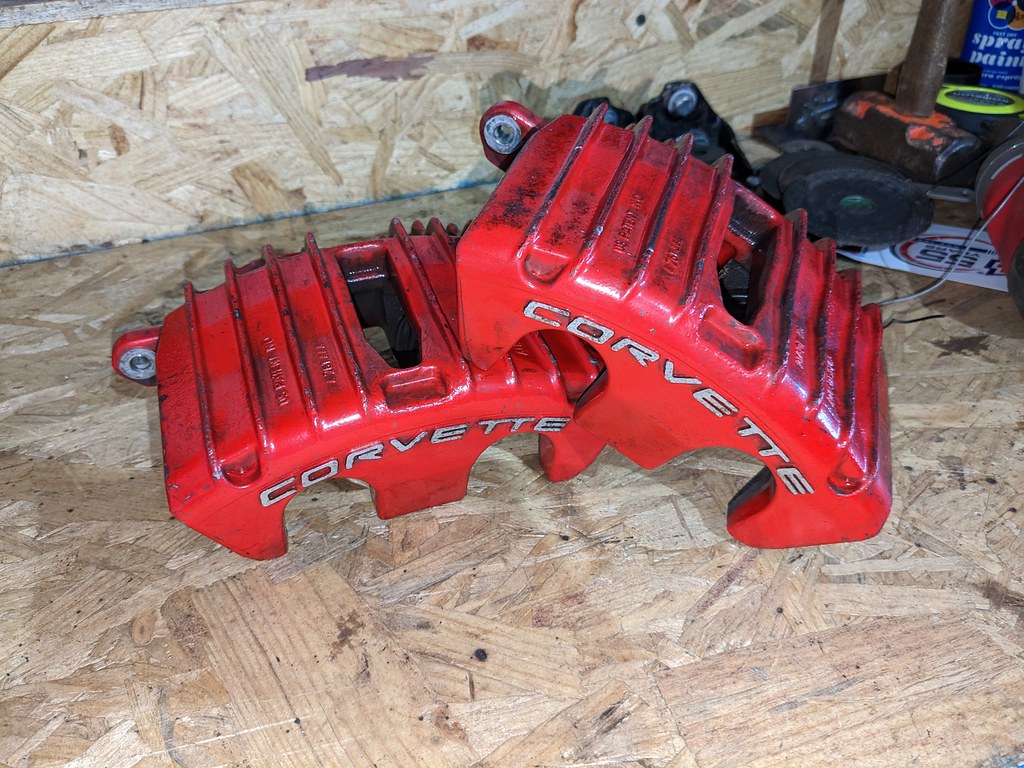
I also was able to find a good used set of C5 Brake calipers with mounting brackets. They aren't in the best shape, but are good enough for what I need. I know the calipers are the same, but they are off of a real Z06, so they are factory powder coated red. I got a rebuild kit for them, Kore3 brackets, EBC Red pads, and will be ordering a new pair of rotors soon. I also picked up a pair of 66 Impala brake hubs which will give me a tapered roller bearing upgrade for my factory spindle. I'll need to turn the diameter down to work with the C5 rotors, but otherwise it's a very budget friendly big brake upgrade. Should work nicely with my Tesla Model S brake booster assembly too.
Hopefully I'll knock out some more metal work in the next few days. Only way to eat an elephant is one bite at a time...
Cheers,
Ryan
1955 Nomad project LC9, 4L80e, C5 brakes, Vision wheels
1968 Camaro 6.2 w/ LSA, TR6060-Magnum hybrid and etc SOLD
1976 T/A LS1 6 Speed, and etc. SOLD
Follow me on Instagram: ryeguy2006a
05-08-2023 #66
Registered User
- Join Date
- Sep 2009
- Posts
- 2,725
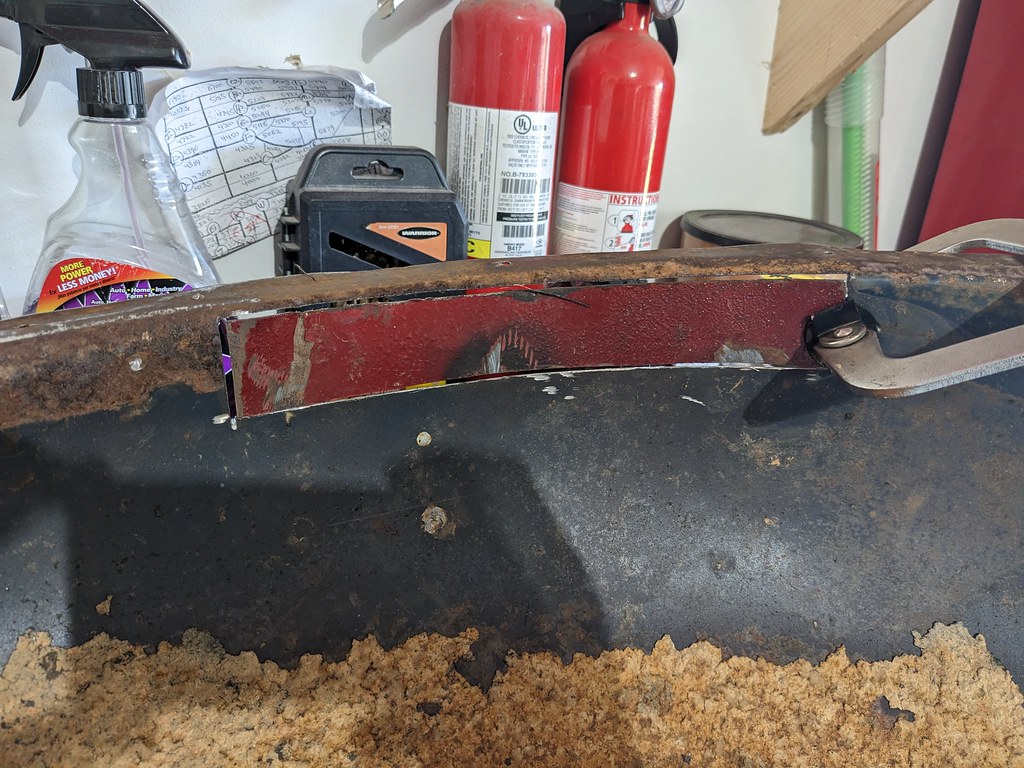
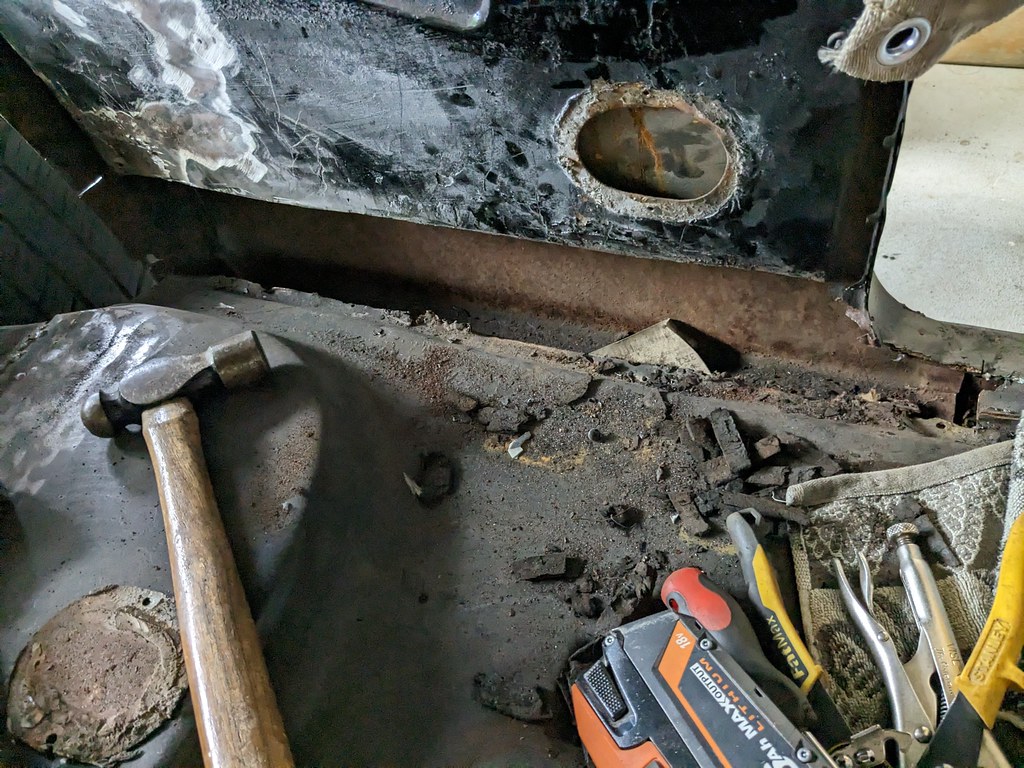
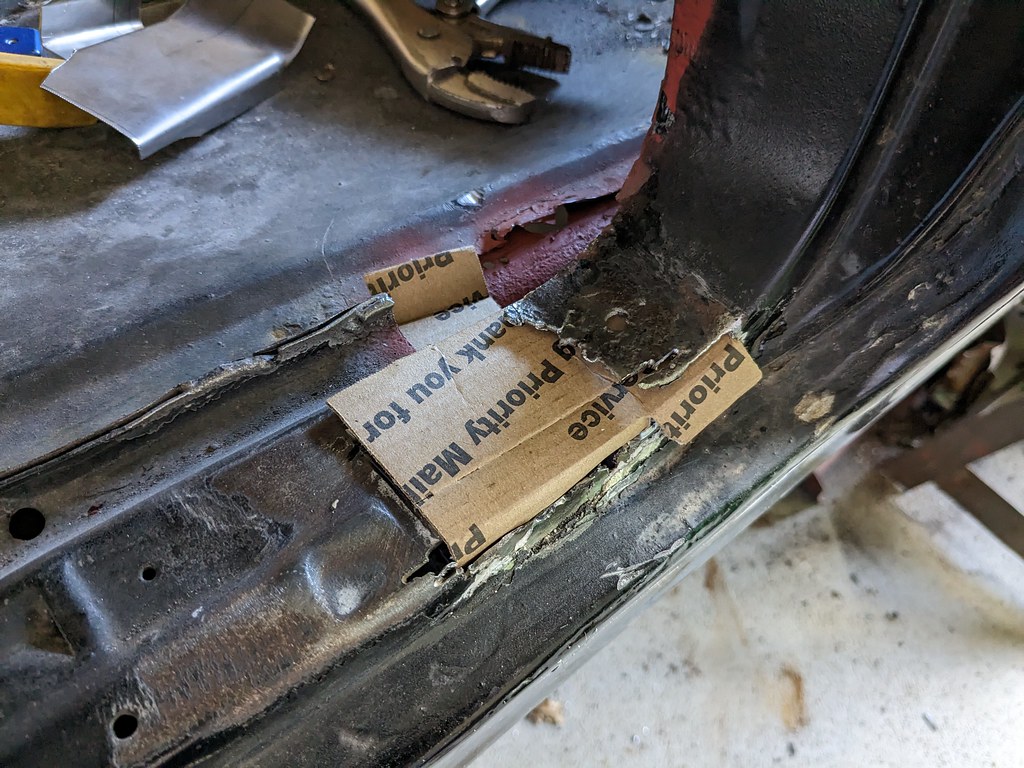
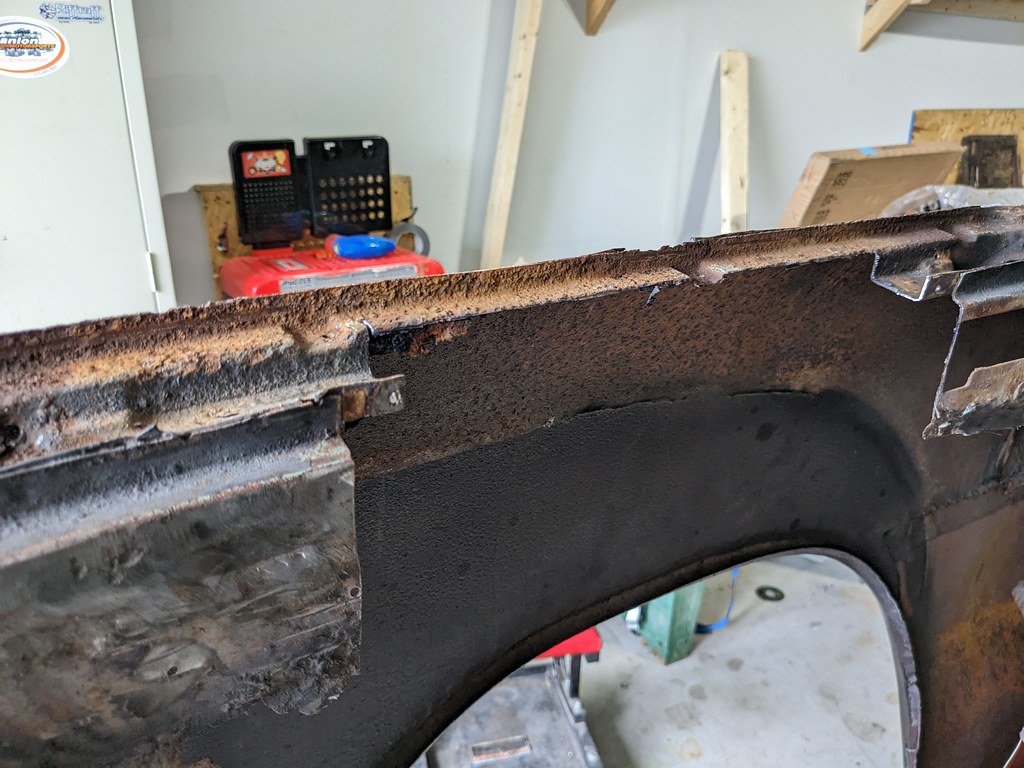
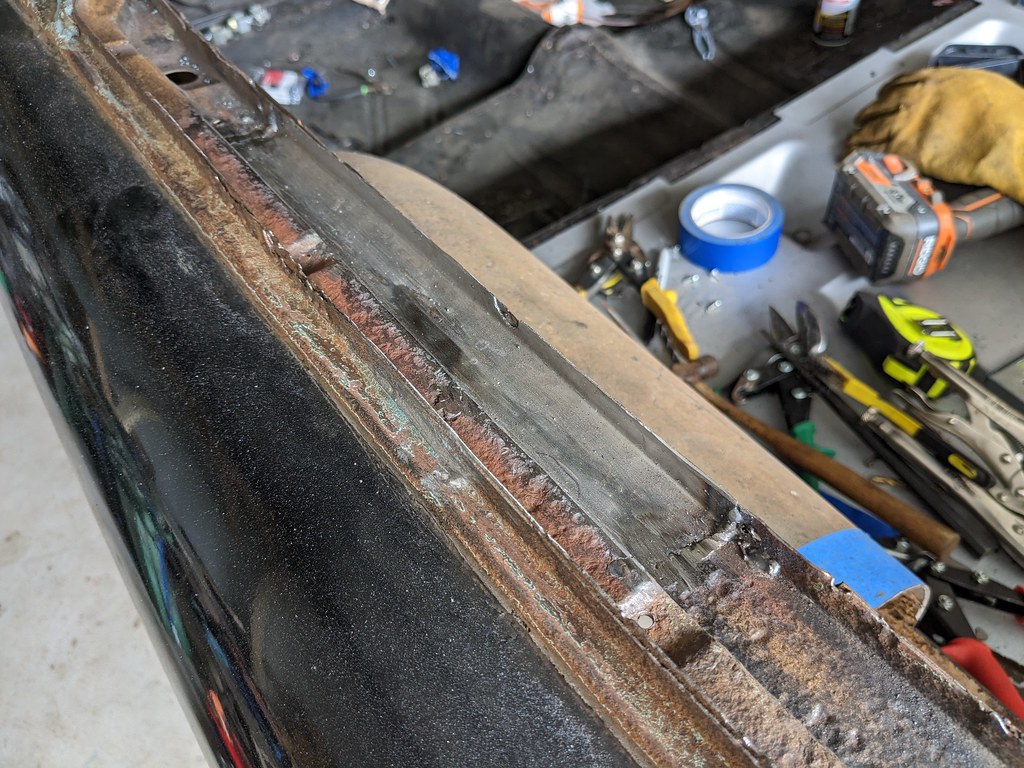
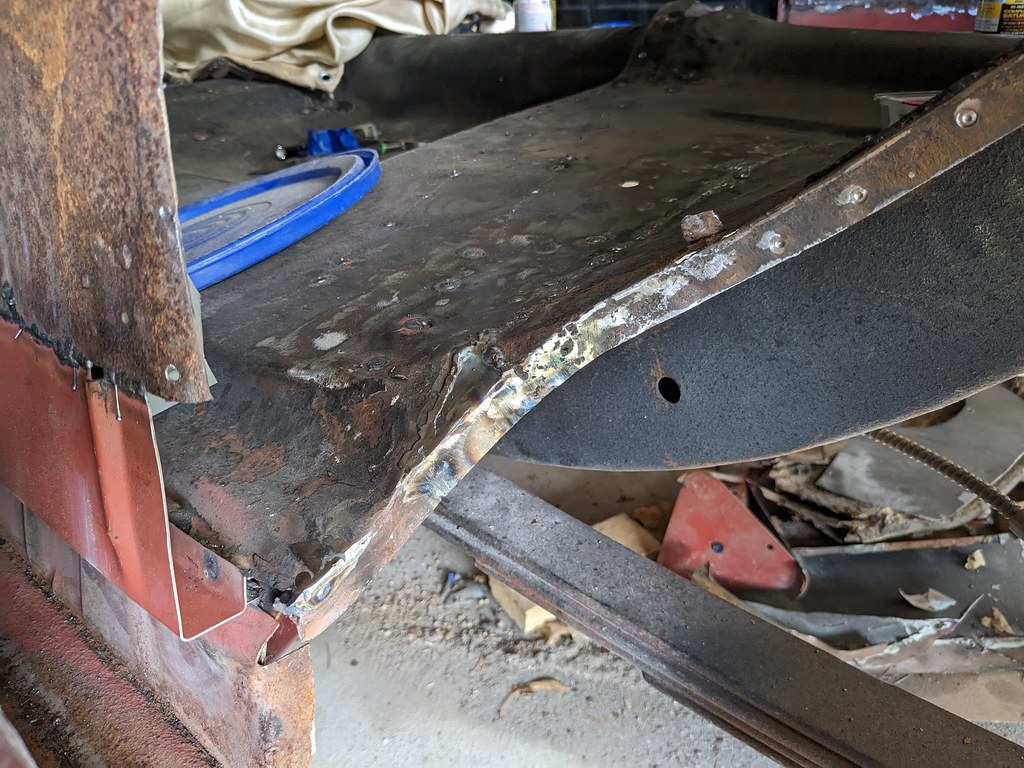
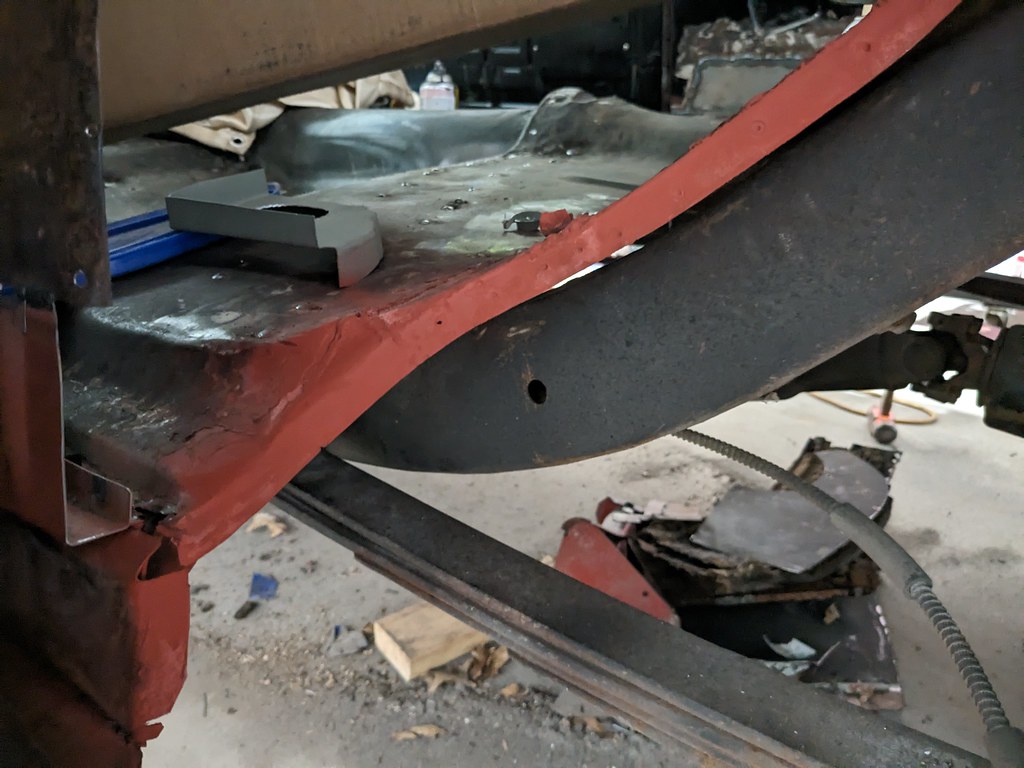
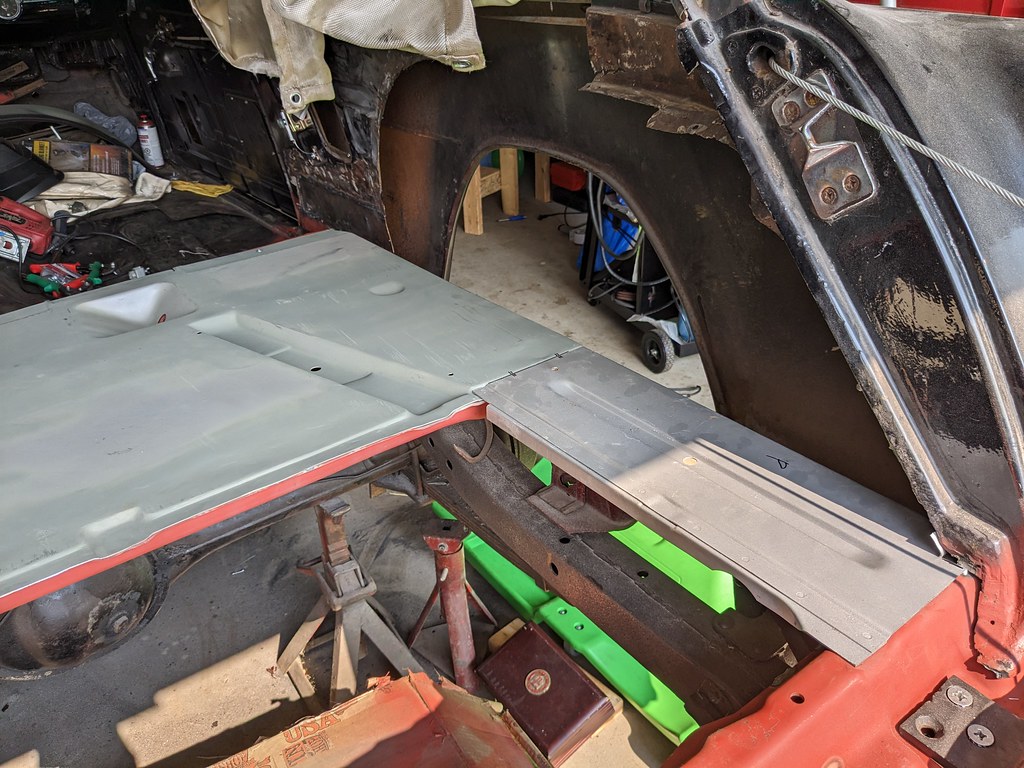
Here's another tedious and boring metal working update. I continued on adding a flange to the rear floor plan section for whatever strange reason the previous person working on the car cut off. I got it trimmed down and fit up so that I could spot weld the new lower panel to it.


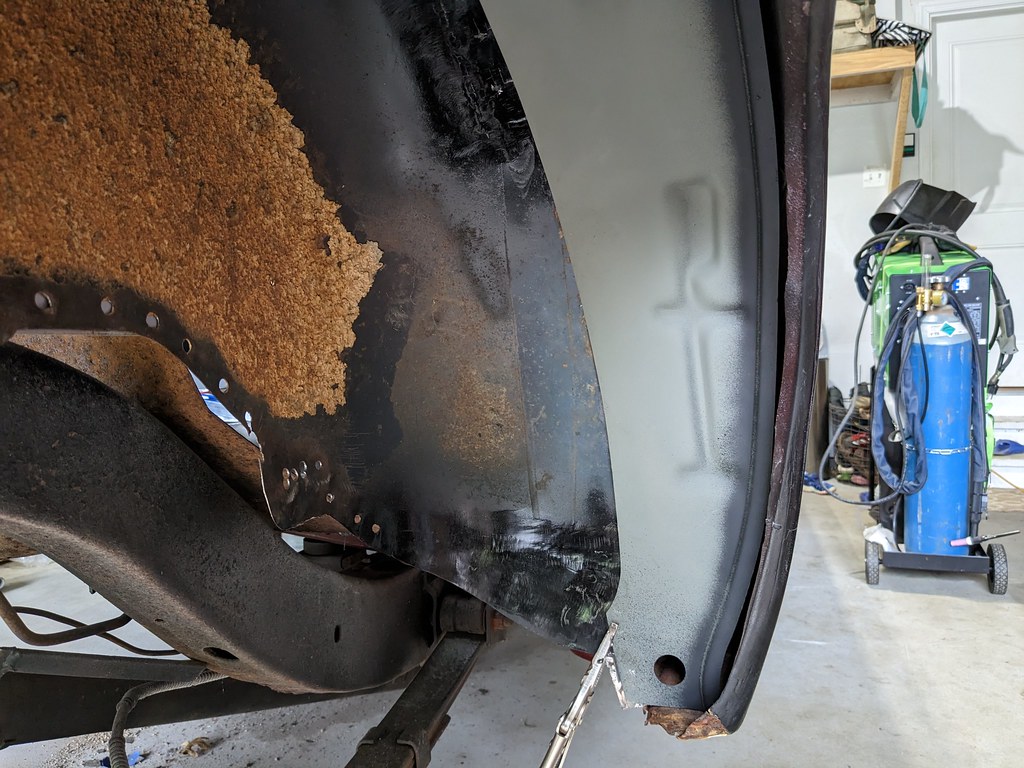
As I was test fitting the panel, I noticed something off about the rocker panel and as I hit it with the wire wheel I found another bad repair covered with body filler. That rusty piece was tack welded into place with no prep (weld through primer) and then smoothed over with body filler. Prime spot for rust to thrive...
[url=https://www.flickr.com/gp/98271343@N03/5B5X3782iQ]
Whipped up this cardboard template pretty quickly and then transferred it to steel. Lots of bending, trimming and tweaking before it fit really nice.

Before I welded it in, the back of the panel was coated in weld through primer. Carefully tacked it all in and tapped it back into place as I was going.

Then I decided it would be a good idea to get the flange and lower panel mocked up before I final welded the panel in place. It's always a good idea to do that so that you aren't surprised later on with bad news if it doesn't fit. It only took about 5 extra minutes, but could have saved me hours later down the road. I also coated both sides of the flange piece with the weld through primer.

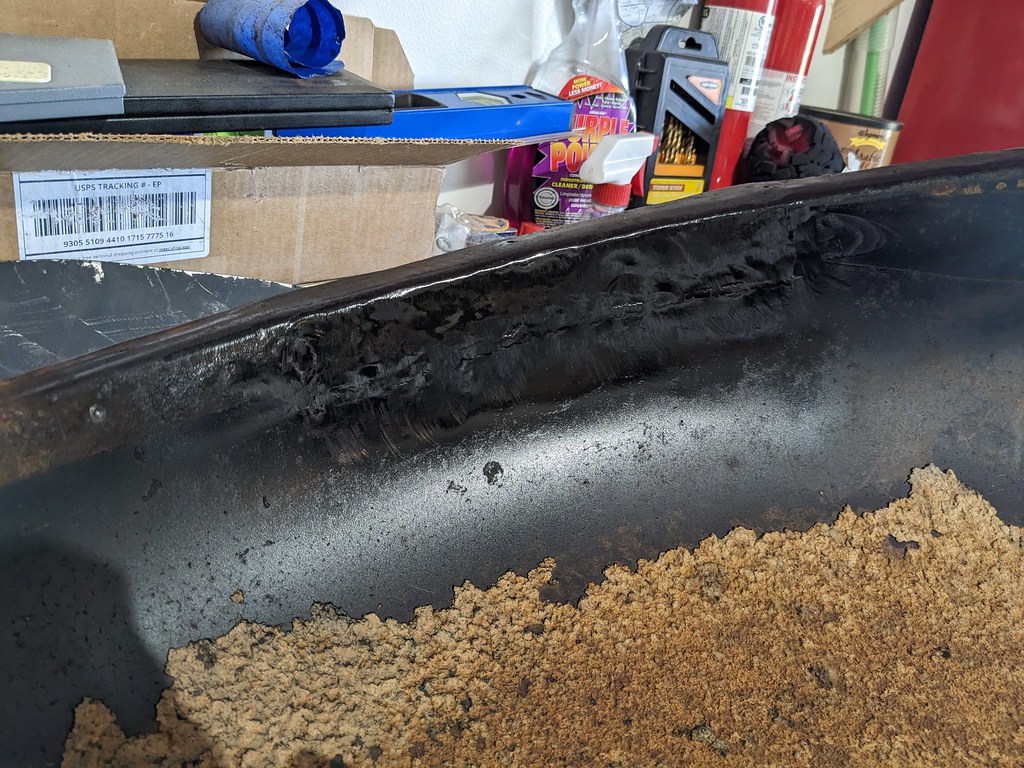
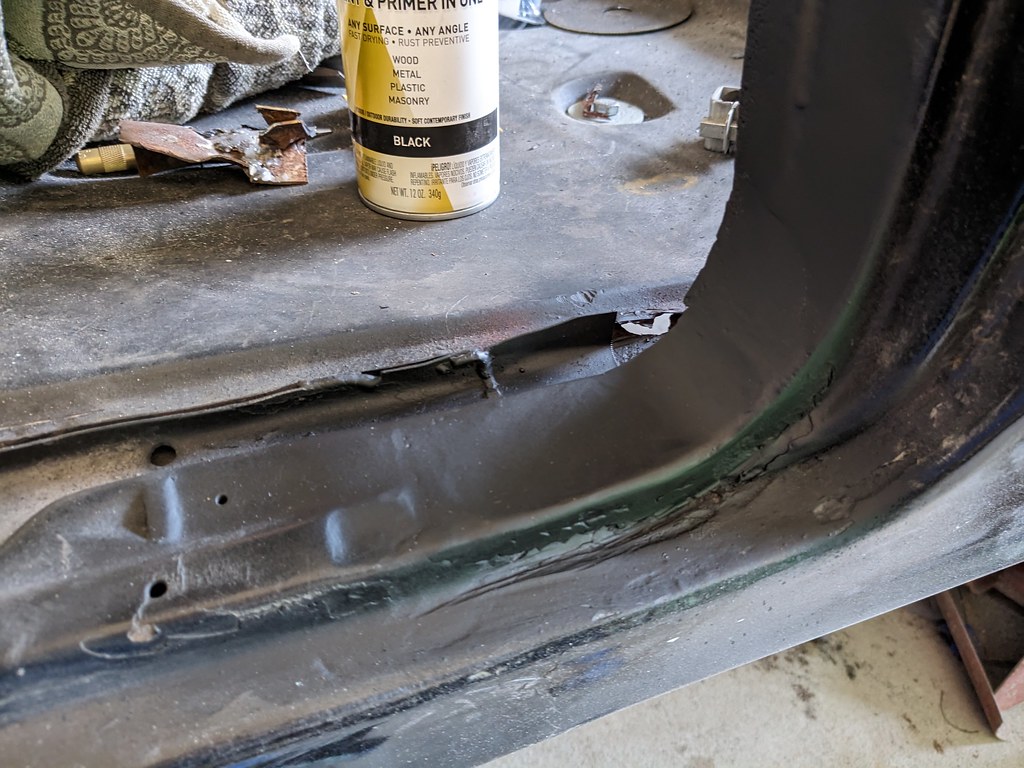
Once it all fit together really nicely, I burned it all in and hit it with a flap disk. Once I'm done welding I'm going to go back through and coat the back sides of where I welded the panels with some oil based brush on paint. Where the rocker panel meets the panel I repaired will be addressed at another time. It's not perfect, but way better than before.

Now, I can get back to the repair on the lower interior panel. I used my wire wheel to clean off all of the body filler that was left over so that I could make good clean welds on the new panels. I got busy welding and working along and didn't get any pictures of the progress. I discovered that there weren't as many spot welds as I would like on the braces under the floor pans as well as some undesirable gaps so I worked on locating them from the underside with self tapping screws, then drilling some holes in the sheet metal from the top.
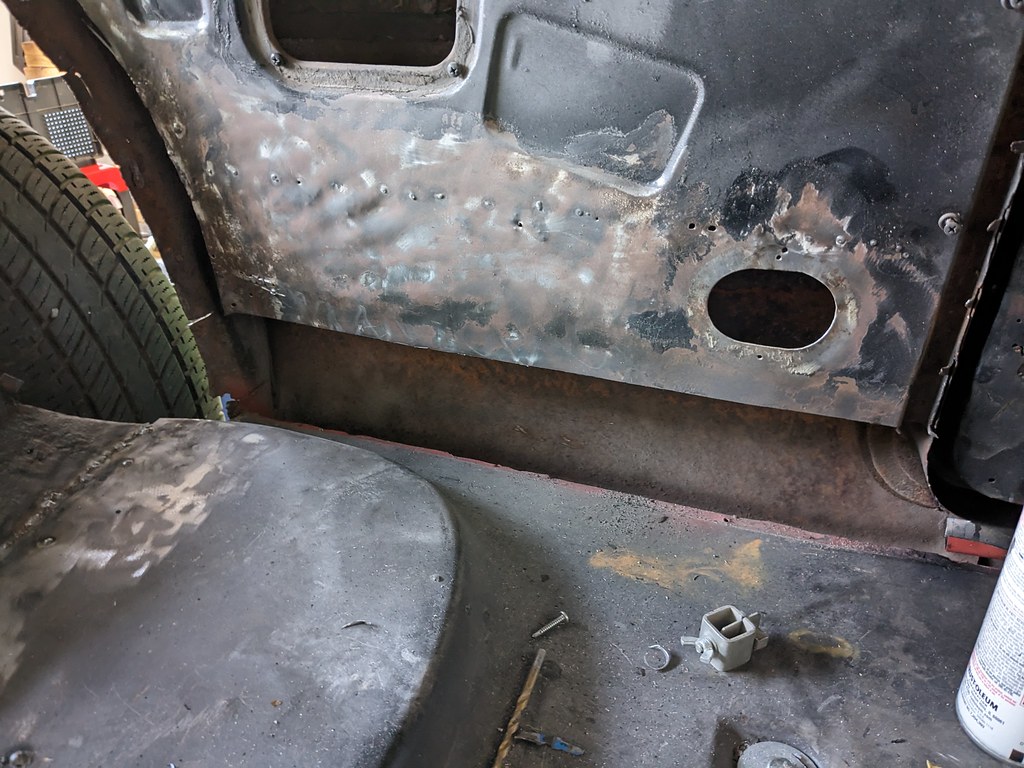
Now that the lower interior panel is repaired, I could get a good and true mock up of the panels. Everything is fitting together really well. Now I need to make some patches on the inner wheel wells and a small patch on the rear floor pan section that is missing.

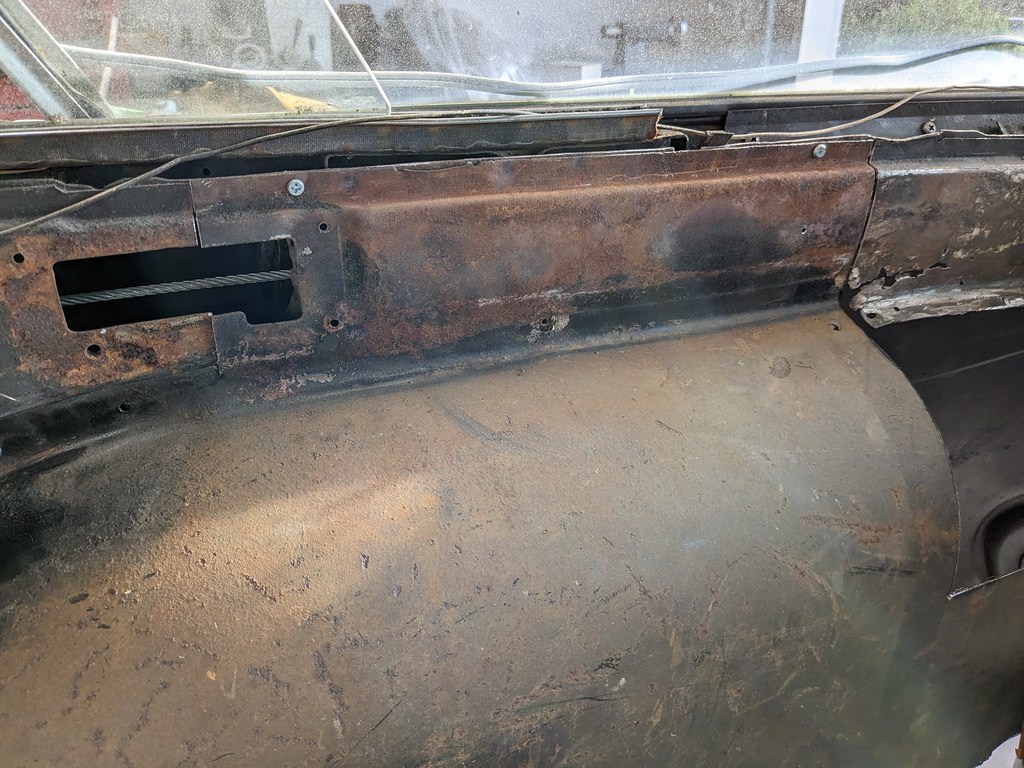
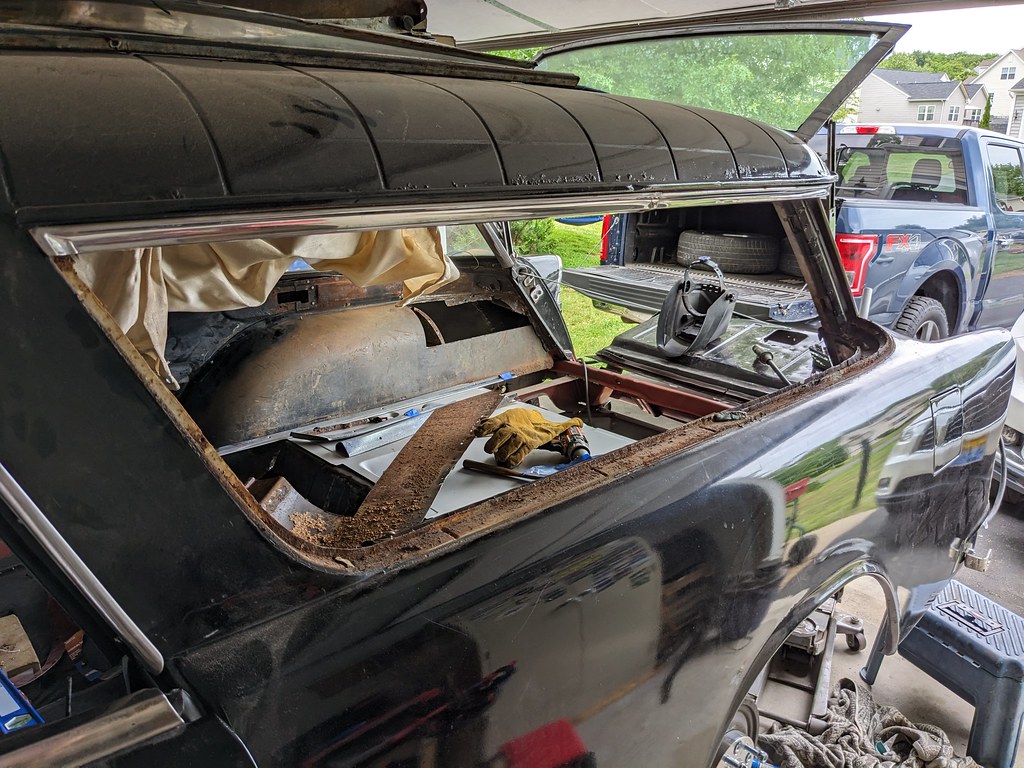
Then I needed to remove the section all the way up to the window channel. The flange is pretty solid, but unfortunately I did find some rust that was through on the outer section of the window channel. I'll have to remove the rear windows to fix that panel.

Next task at hand was figuring out what to do about this little pass through panel that also acts as a brace for the outer front wheel house. That is what attaches the upper window channel to the outer wheel house. Mine were in pretty bad shape, and with some brand new front outer wheel houses, I wasn't going to re-use those crusty pieces. They are not reproduced, so I'm left to fabricate them.
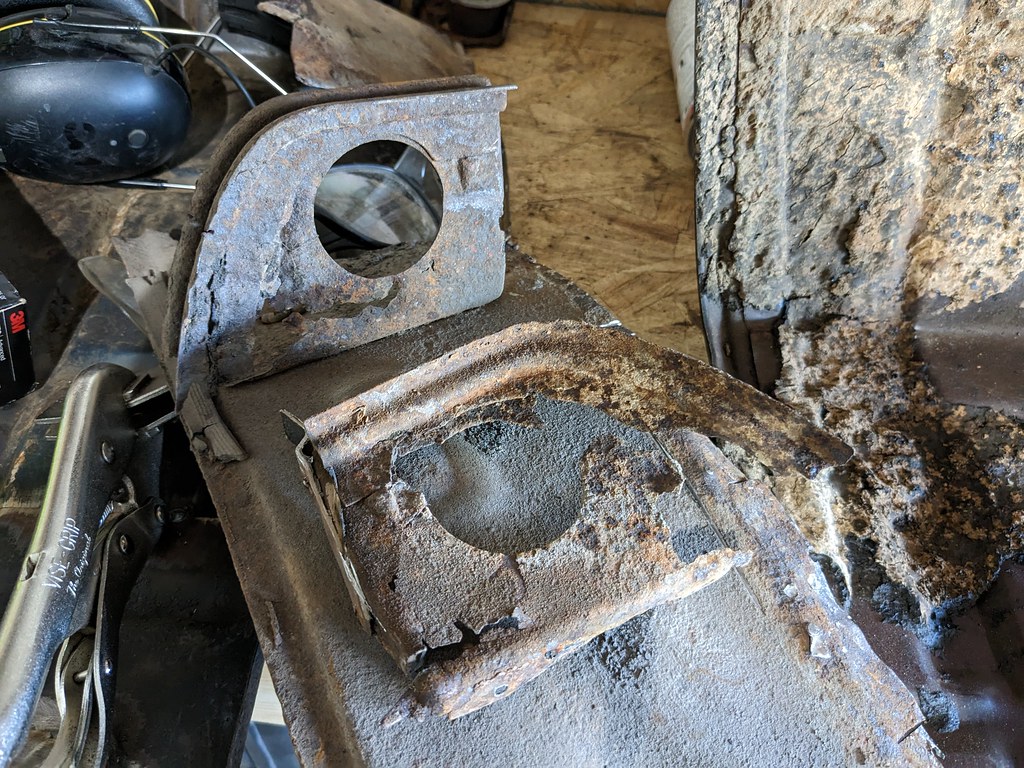


Not too bad for some hand tools and cardboard.

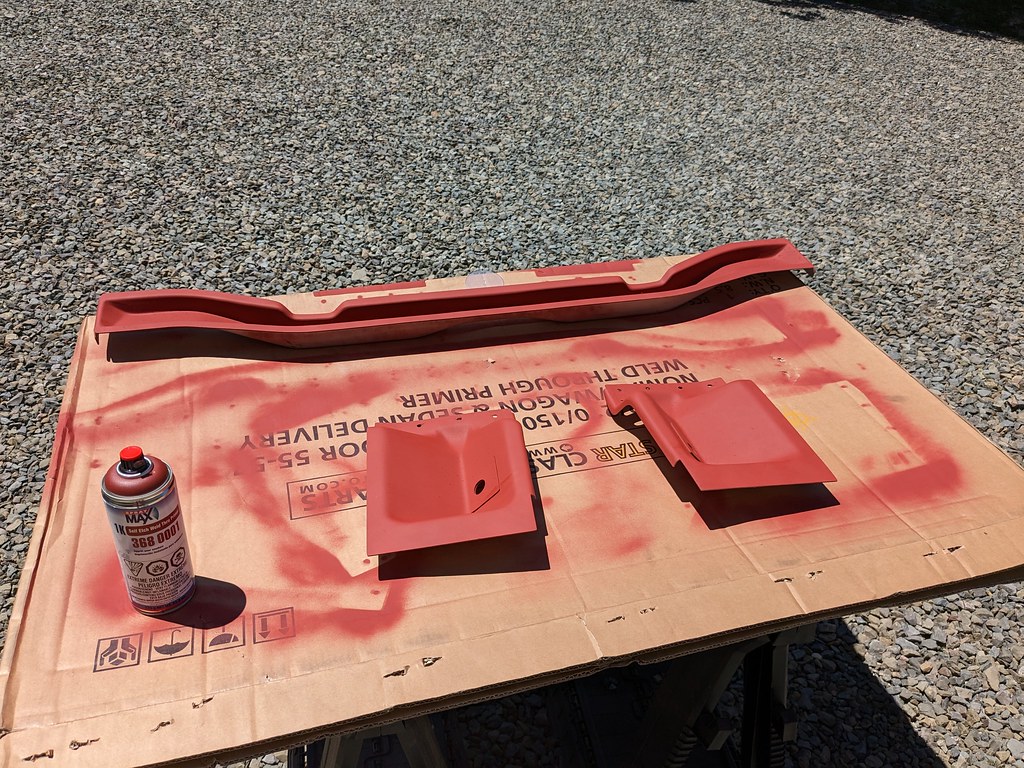
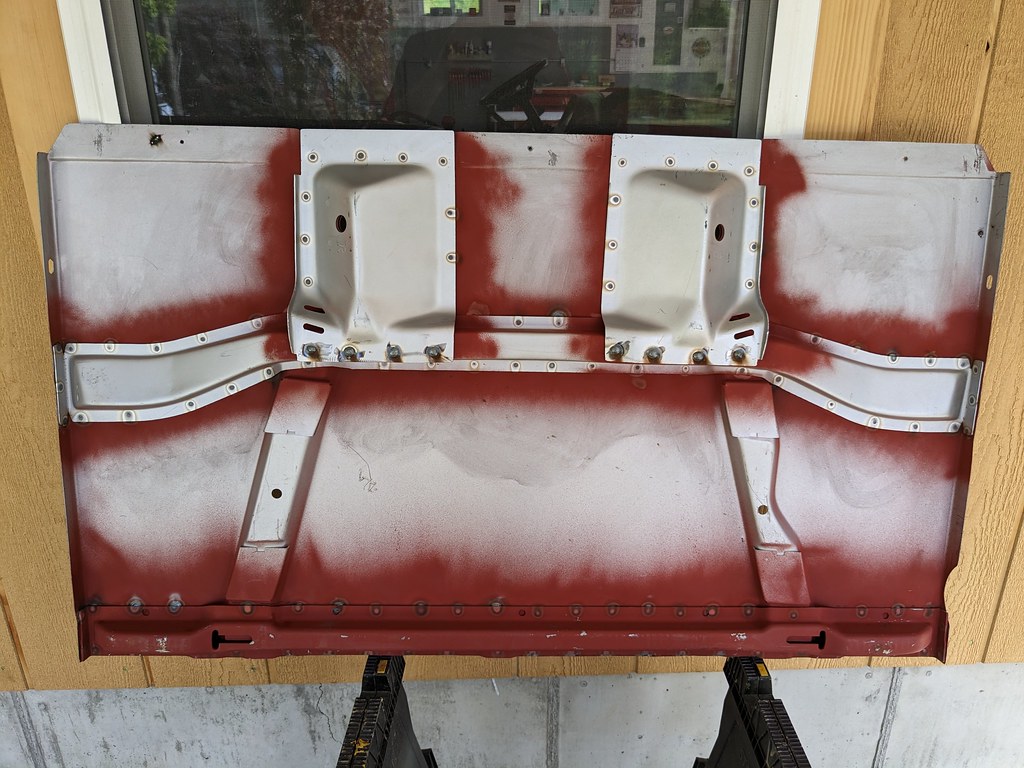
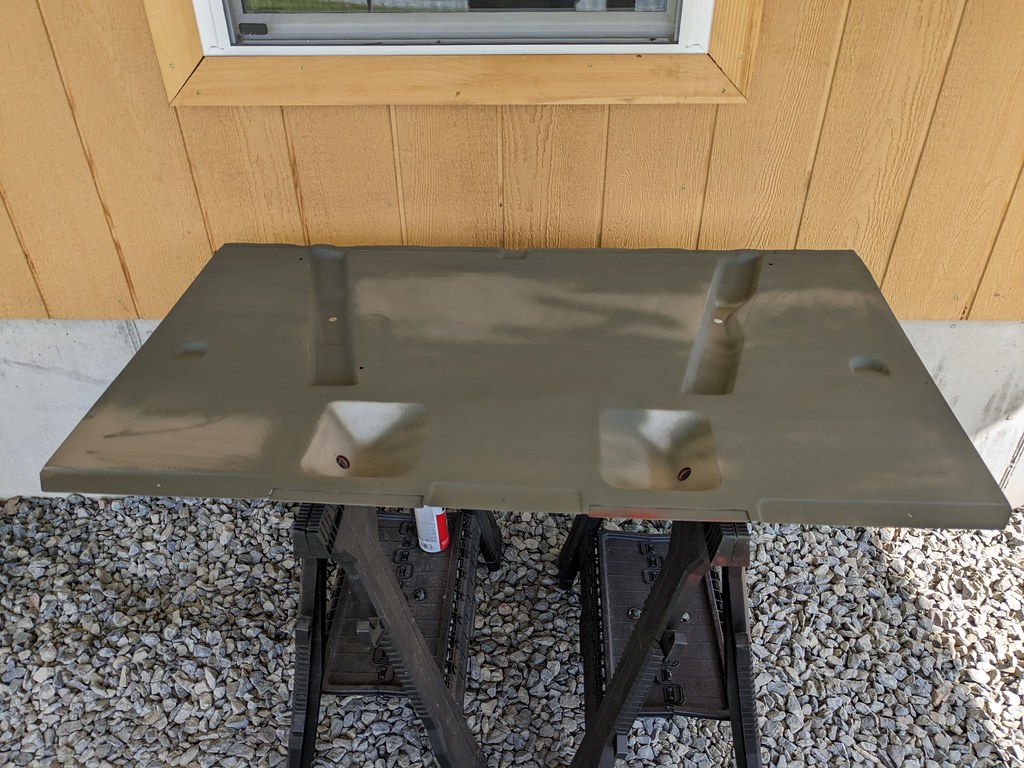
Next up was getting the outer wheel houses prepped for installation. I got the ends sprayed with weld through primer, and the middle section sprayed with an etching primer.

That was as far as I got on Saturday. Some more parts came in and then I'll be able to start actually installing some of these panels!
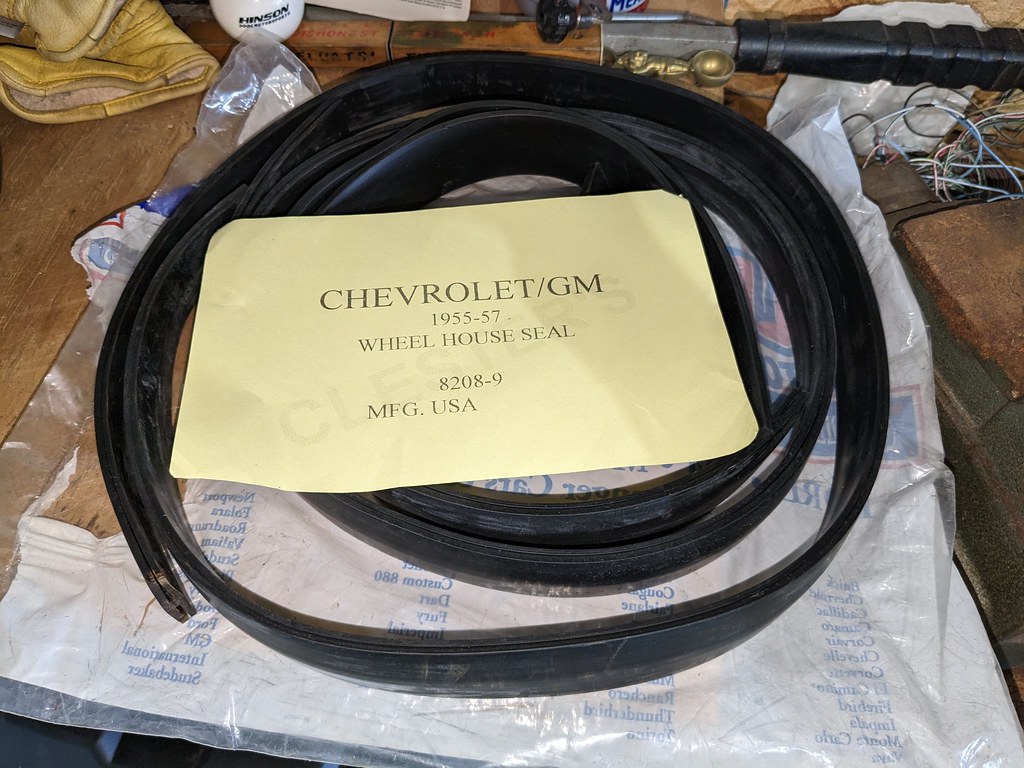
First up was getting the outer wheel well seals. They need to be glued onto the outer wheel houses, and then can be installed once dried.
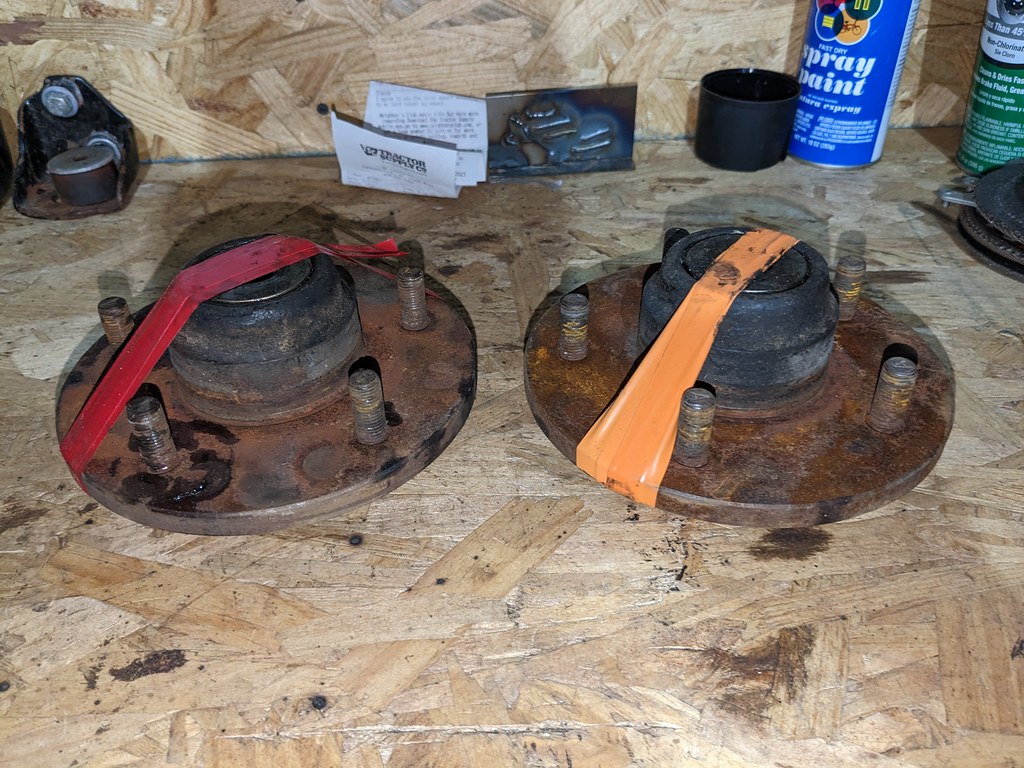
I also received my 61-68 full sized drum hubs which is an upgrade for earlier cars to a tapered roller bearing. These will be used for when I upgrade to my big front brakes. They need to be turned down to accept the C5 rotors, and install new bearings/longer wheel studs.

Also my buddy Ian helped me out big time and had an EV6 injector harness that he traded me for the EV1 harness that came with my Terminator X Max kit. After talking with him, he also had a vaporworx fuel pump ring! Thanks again man.


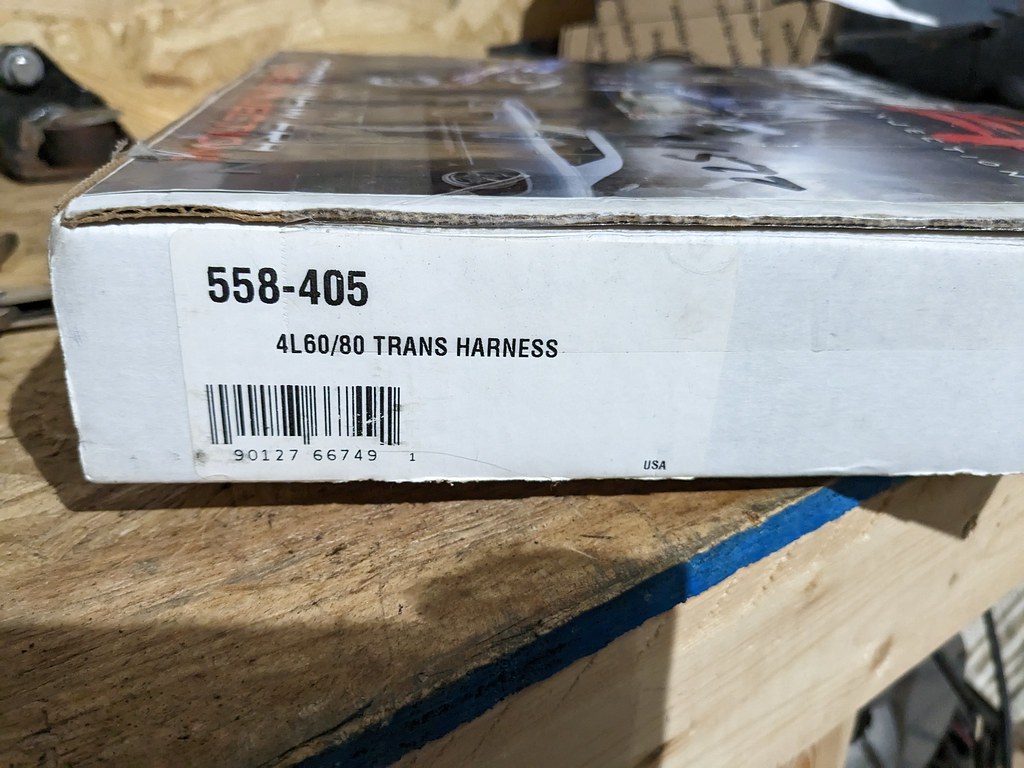
Lastly, I found a guy selling a brand new Holley Transmission harness a big discount since he wasn't able to use it. That is the last piece that I needed for my wiring, so I should be all good to go when it comes to that point.
I need to keep my head down now and get some work done on cargo area of my car and let my wallet cool down. I should have all of the sheet metal I need now, so I just need to keep plugging away whenever I have a few minutes to do something. Really motivated to get this car back together.
Cheers,
Ryan
1955 Nomad project LC9, 4L80e, C5 brakes, Vision wheels
1968 Camaro 6.2 w/ LSA, TR6060-Magnum hybrid and etc SOLD
1976 T/A LS1 6 Speed, and etc. SOLD
Follow me on Instagram: ryeguy2006a
05-08-2023 #67 Registered User
- Join Date
- Sep 2004
- Location
- Orlando, FL
- Posts
- 1,078
Any thoughts on removing the divots in the outer wheel houses for more tire clearance?
And are you still going to minitub the rear by adding a couple of inches to the rear inner panels or is that no longer needed or nor longer the plan?
IMHO the minitubs may not be needed! I know from experience that Michelin has the PS4 in a 285/40/18 that's a great sized tire for the rear of our PT cars and rides like a Cadillac! Albeit you may need an 18x10 to run the 285 or a 295 out back... Falken still makes their 295/40/18 in the RT660 but it's much wider than the RT615 in the same size. For a Pro-Cruiser which is where I think you're going with the Nomad I can't recommend the PS4 enough!!
GREAT WORK btw!! I'm always excited to see your updates!SMSgt Ty Ingle, USAF
"CF71" - Freedom BirdHoodpins.com, Inland Empire Driveline, Billet Accessories Direct, Modo Innovations, AutoRad Radiators, Morris Classic Concepts, Marquez Design, Anvil Auto, Fesler Billet, US Collision (DOOM), AGR Performance, Pro-touringF-body.com, Phoenix Transmission Products, Shiftworks, ACC Carpet, Hedman Hedders, BMR Fabrication, American Autowire, MityMounts, TIN INDIAN Performance, Kauffman Racing Equipment, Pypes, RobbMc Performance, WMC, Holley, NOS, PST
05-08-2023 #68
Registered User
- Join Date
- Sep 2009
- Posts
- 2,725
Thank you sir! Yes, my plans have changed since I bought the car originally and decided to keep it simple with the stock wheel tubs. I would have had to modify the rear seat among other things and just wanted to make less work for myself. I found out that with the leaf springs relocated inboard, I can fit 295 or 305 since the 55 Nomad has a unique wheel opening.
 That is plenty of tire for me, so that is the direction that I'm headed right now. The vision wheels that I have are 18x9 so I may look into that 285 PS4, although I'd really like to find a 28" tire for the rear.
1955 Nomad project LC9, 4L80e, C5 brakes, Vision wheels
1968 Camaro 6.2 w/ LSA, TR6060-Magnum hybrid and etc SOLD
1976 T/A LS1 6 Speed, and etc. SOLD
Follow me on Instagram: ryeguy2006a
05-08-2023 #69
Registered User
- Join Date
- Sep 2004
- Location
- Orlando, FL
- Posts
- 1,078
My 295/40/18 Falkens (200TW) were 27.4" inches tall if that helps... and I'd bet that the (better imo) PS4 (300TW) 285/40/18 on the 9" rim would get you very close to 28".
The PS4s on a 10" measure right at 27" and are 11lbs lighter per tire than the Falken RT660s FWIW!
Glad to hear that's your plan! Keep up the great work!SMSgt Ty Ingle, USAF
"CF71" - Freedom BirdHoodpins.com, Inland Empire Driveline, Billet Accessories Direct, Modo Innovations, AutoRad Radiators, Morris Classic Concepts, Marquez Design, Anvil Auto, Fesler Billet, US Collision (DOOM), AGR Performance, Pro-touringF-body.com, Phoenix Transmission Products, Shiftworks, ACC Carpet, Hedman Hedders, BMR Fabrication, American Autowire, MityMounts, TIN INDIAN Performance, Kauffman Racing Equipment, Pypes, RobbMc Performance, WMC, Holley, NOS, PST
05-19-2023 #70
Registered User
- Join Date
- Dec 2014
- Posts
- 13
Hey Ryan, nice job so far, looks to be a lot of work! I'm excited to see the finished product!
05-22-2023 #71
Registered User
- Join Date
- Sep 2009
- Posts
- 2,725
Thanks Brian! Great to hear from you again. You should definitely post up your Camaro builds here. I know people would love to see them. Especially that RS. Originally Posted by jetfixrguy

1955 Nomad project LC9, 4L80e, C5 brakes, Vision wheels
1968 Camaro 6.2 w/ LSA, TR6060-Magnum hybrid and etc SOLD
1976 T/A LS1 6 Speed, and etc. SOLD
Follow me on Instagram: ryeguy2006a
05-22-2023 #72
Registered User
- Join Date
- Sep 2009
- Posts
- 2,725
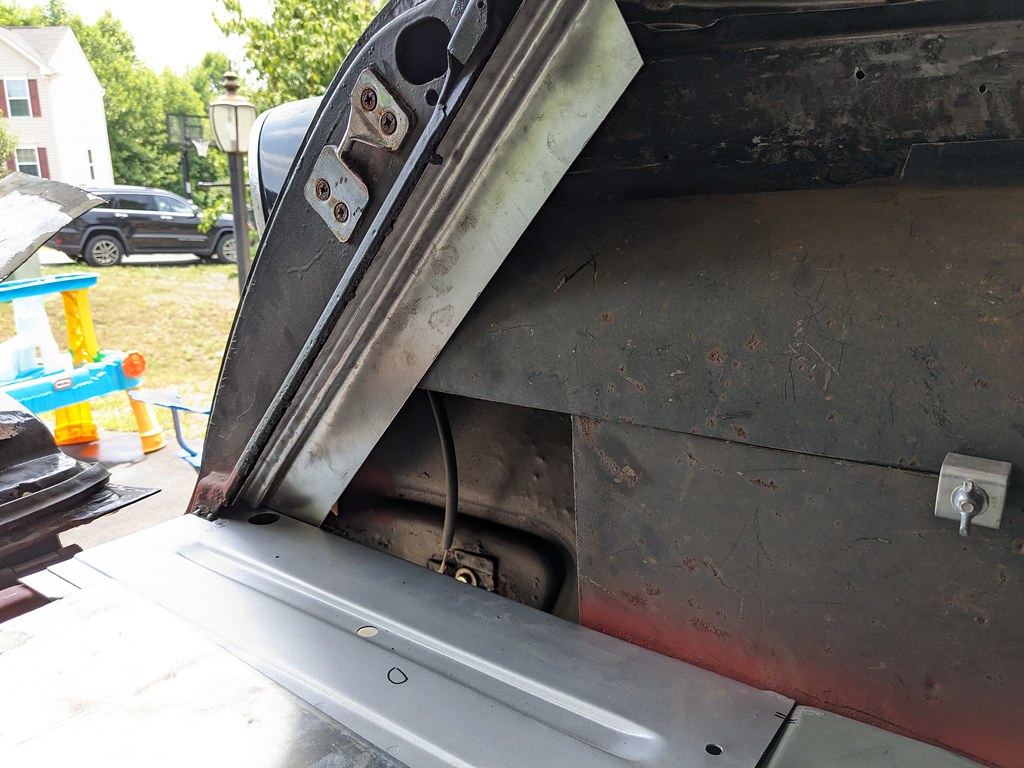
I wanted to see how the pass through panels that I made fit with the outer wheel houses, and I'm happy that they were 95% great. The hole that I used was a tad higher than it should have been so I need to open up the bottom of the hole and it will not contact the cable at all. It held the front outer wheel house exactly where it needed to be so that is fantastic. I need to scrape off that under coating from the inner wheel house...

Glad those parts are fitting right. I need to replace the old seals with the new ones, and then I can do a final mock up before welding.
Next up was something I had been dreading... removing the driver's side window's to repair the rusty window channel. The good news is that most of the screws came right out and only fought with two stubborn screws.

I could have just forgot that I saw these large rust holes, but I couldn't let it go.

The outer window trim requires that you remove the windows before you can remove the trim. Most of the screws came out easy with some PB Blaster and my impact drill, but the last two were too rusty. I was trying to drill the head of the one screw to just remove the trim then worry about the screw later, then my bit broke...

I was mad at first, but then realized that 1) it builds character/patina, and 2) the paint job is a solid 15 footer so it's not that big of a deal. I walked away and then came back and decided to try the old weld a nut to the top trick and I won with no damage to the trim.

Once the trim was off I realized that the trim has never been off of the car since it was new! It was a little more crusty than I would have liked, but I'll treat the rust with something before the trim goes back on. It was also really cool to see the original paint for the car. My trim tag is missing so I didn't know for sure what the color was, but now I'm confident it was Ivory top, but not sure what shade of green that is. I think there were three that year.
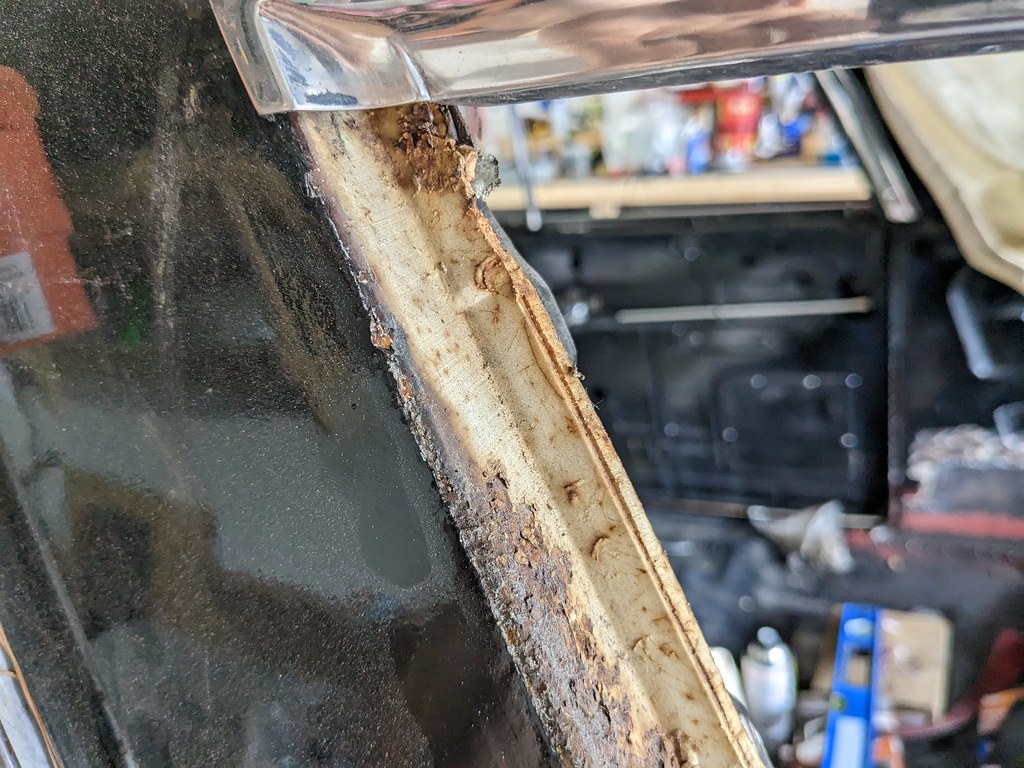


Here's the bad spot.

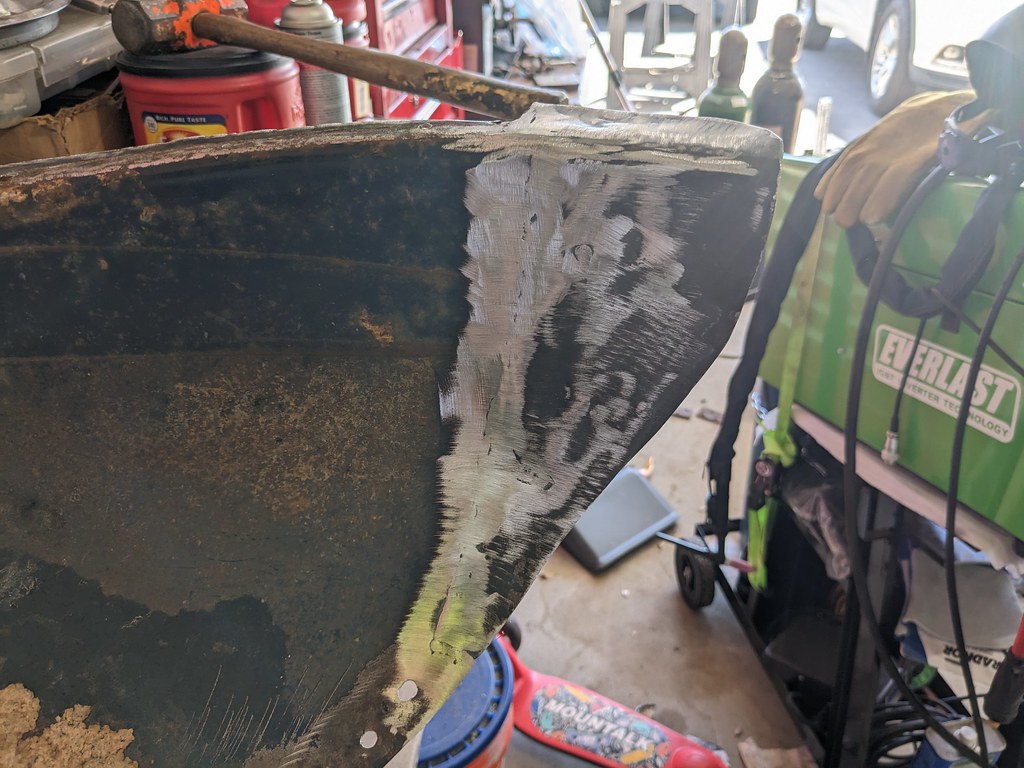
I cut it out right at the corner so that I could retain as much of the original metal as I could and keep some of the intricate shapes in the metal.

A metal brake would come in really handy during this stage, but instead I'm working with what I have. A 1/2" plate of steel, vice grips, and a hammer. Turned out pretty good and I got the width of the channel spot on. Mocked it up several times to get the angles right and the fitment spot on.


I bought this really cool tool for filling in spot weld holes that worked great for a few of those large pits. Highly recommend this tool, it worked great.

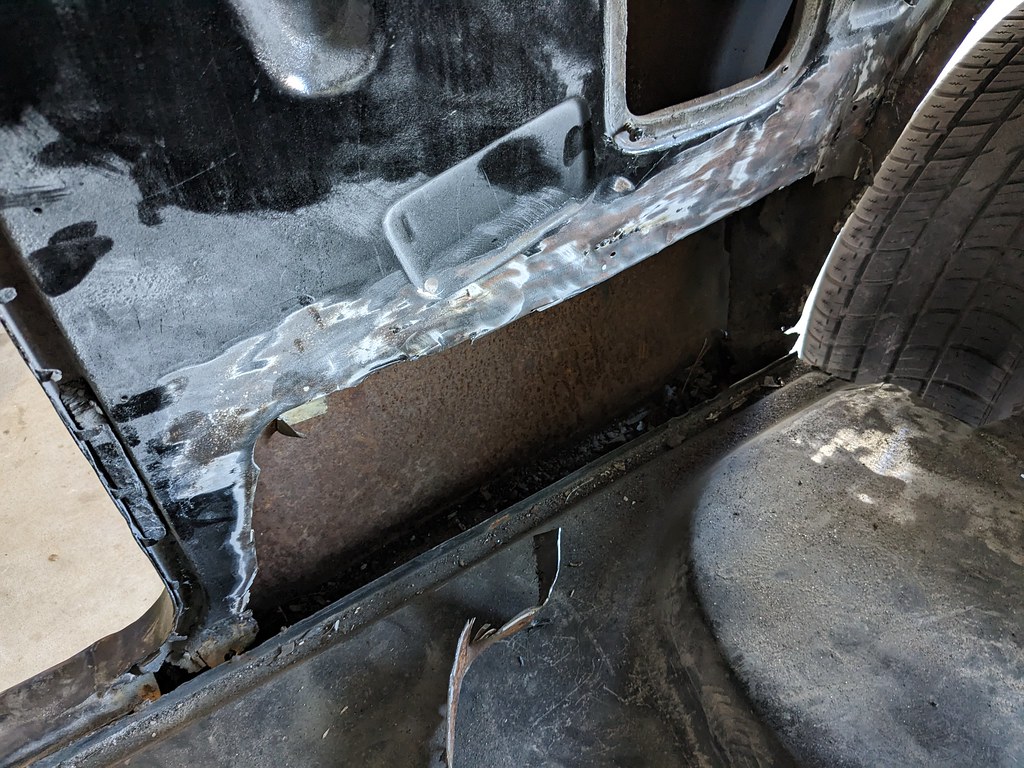
I installed the inner wheel well for the first bit of welding so that I knew that it was in the right position and no surprises later. Ground with a flap disk and I was very pleased with that repair.

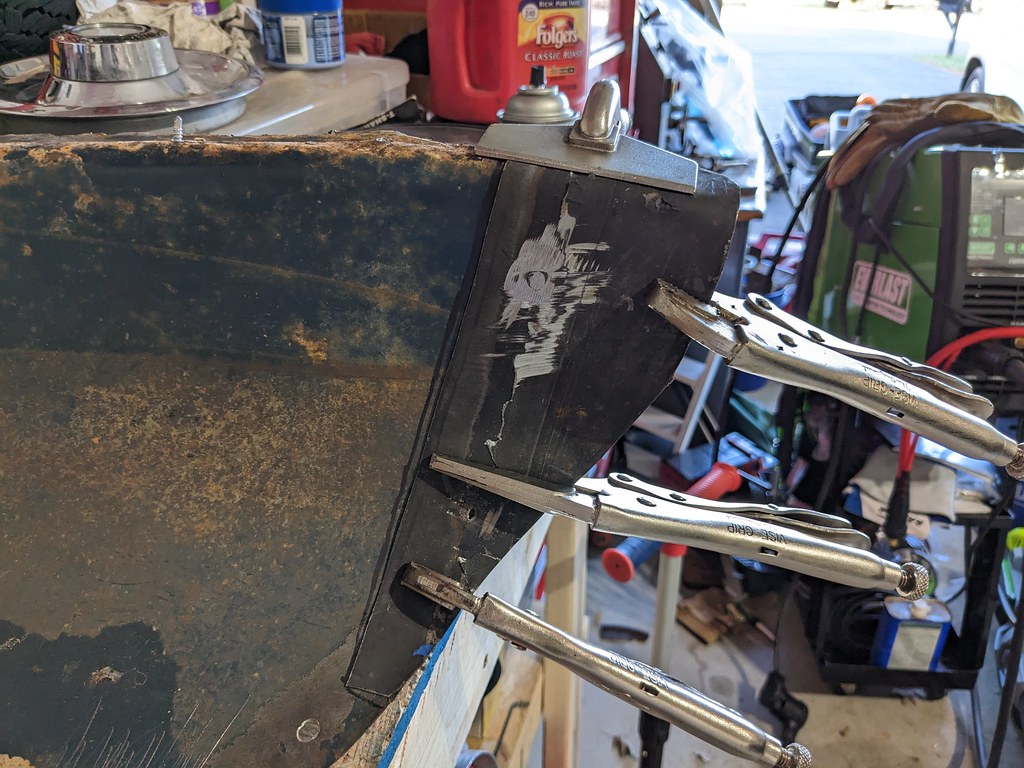
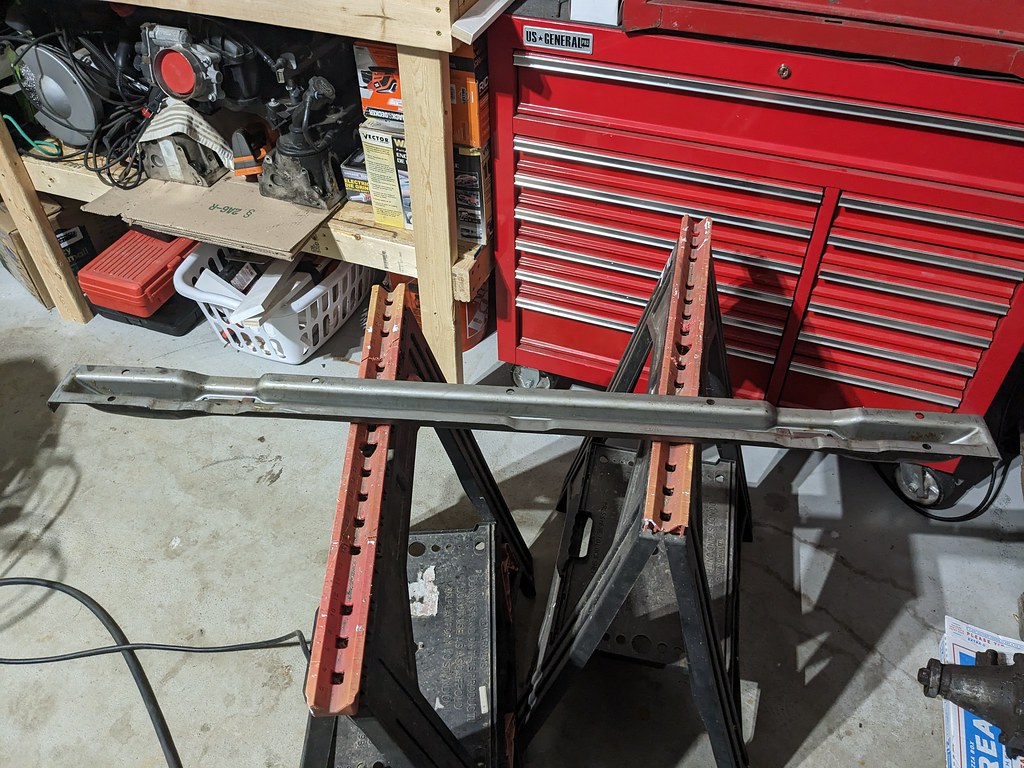
Next up was a repairing this flange. There was a small triangular section missing from the flange. Quick little patch and it was good as new and hit it with some weld through primer.
Next was making an upper and lower patch for the wheel inner well. I used the new floor pan flange as a template for where the lower inner wheel well patch needed to be. Got busy working and didn't take pictures, but here's the final product.

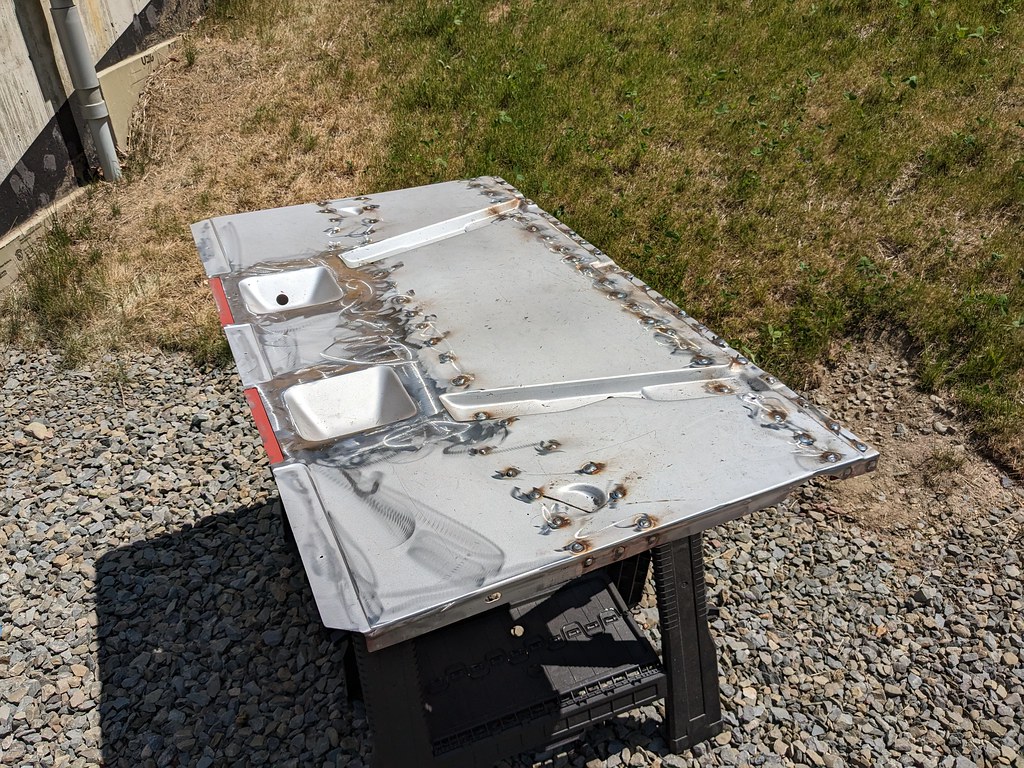
I didn't get a picture of it, but I found the last piece of new metal that I needed to buy which was the gas tank brace. I found someone selling on eBay for almost $80 off, which was perfect timing for me. I also found a guy selling a Gen 6 cooling fan off of a 2017 SS Camaro for really cheap on a FB group. These fans are bad to the bone, 19" SPAL fan with an 850 Watt motor that is controlled by pwm. I think I saw somewhere that they are rated around 4k cfm. Best part is they are nearly a direct fit on a stock tri-five radiator support!


Now that my window channel, floor pan flange and inner wheel house are both repaired, they are ready to install for good. I just need to drill some holes for spot welds, spray weld through primer and final weld the panels. Very exciting to get to this stage. I think once I get the driver's side wheel well all welded and back together, I may pull off the passenger's side windows and trim to treat that side as well. I'm this far I might as well. Plus I won't have to worry about hurting the windows with weld spatter.
Cheers,
Ryan
1955 Nomad project LC9, 4L80e, C5 brakes, Vision wheels
1968 Camaro 6.2 w/ LSA, TR6060-Magnum hybrid and etc SOLD
1976 T/A LS1 6 Speed, and etc. SOLD
Follow me on Instagram: ryeguy2006a
05-22-2023 #73 Registered User
- Join Date
- Oct 2016
- Location
- Auckland, New Zealand
- Posts
- 68

Lots of nice work there. You are one clever guy!
cheers Russell
My 1957 Pontiac Star Chief powered by a 5.3 LS with a 4L60E transmission, on 18" US Mags Big Slots.
05-23-2023 #74
Registered User
- Join Date
- Apr 2021
- Posts
- 103

Man these repairs are looking great! Can’t wait to see what you do with the fan, they really are a wicked fan!
05-24-2023 #75
Registered User
- Join Date
- Dec 2017
- Posts
- 61
Chasing the tin worm can get exhausting. Looks like you've almost got him! Keep at it! The drill bit incident really stinks, I dropped a jumper cable clamp on my TA fender and I almost cried... but hey, it's going to happen, especially if you use the car. Keep up the good work!
1951 Ford F1, 1967 RS Camaro, 1979 Firebird Formula, 1979 Trans Am/LS swap.
05-24-2023 #76
Registered User
- Join Date
- Sep 2009
- Posts
- 2,725
Thanks guys! Yes, the drill bit was unfortunate, but I'm over it now. If it was on my Camaro, it would be a very different reaction haha
1955 Nomad project LC9, 4L80e, C5 brakes, Vision wheels
1968 Camaro 6.2 w/ LSA, TR6060-Magnum hybrid and etc SOLD
1976 T/A LS1 6 Speed, and etc. SOLD
Follow me on Instagram: ryeguy2006a
05-24-2023 #77 -Moderator/Sponsor-
- Join Date
- Apr 2001
- Location
- The City of Fountains
- Posts
- 15,988
Nice score on that fan. Pay attention to the wire gauge on that fan. The Vintage Air instructions have excellent instructions about wiring the power side of that fan:
https://www.vintageair.com/custom/pr....php?pn=371253
Andrew1970 GTO Version 3.0
1967 Cougar build
GM High-Tech Performance feature
My YouTube Channel Please Subscribe!
Instagram @projectgattago
Dr. EFI
I deliver what EFI promises.
Remote Holley EFI tuning.
Please get in touch if I can be of service.
"You were the gun, your voice was the trigger, your bravery was the barrel, your eyes were the bullets." ~ Her
05-30-2023 #78
Registered User
- Join Date
- Sep 2009
- Posts
- 2,725
Thanks Andrew, I'll remember that when the time comes to wire it up.
Here's the last piece that I needed to buy for my sheet metal adventures. It's the rear gas tank brace. I could have re-used the original one, but it would have been a shame to put an old rusty one in place with the new sheet metal.
Coated the inside with weld through primer.

Next job was to get the passenger side floor pan flange repaired so that I can attach it to the wheel well. I decided to make this in two pieces to save myself a bunch of time with the shrinker/stretcher. I started with a cardboard template to get the curvature right for the floor piece, then transferred it to sheet metal for a final fitment. Once I was happy with that fitment, I laid down some painters tape to get the right curvature for the flange piece.


Carefully pealed off the tape and transferred it to sheet metal. I always make my templates as accurate as I can, and cut my metal slightly larger to account for any variations.


Once I had my two pieces I got it all back together to start tacking it together for final welding. I would tack, trim, grind, and fit multiple times. I noticed at the top of the floor pan flange on the driver's side that there was a triangular indentation, so I did my best to replicate that.

I'm very happy with how the final piece turned out, and glad that it fits really nicely as well.


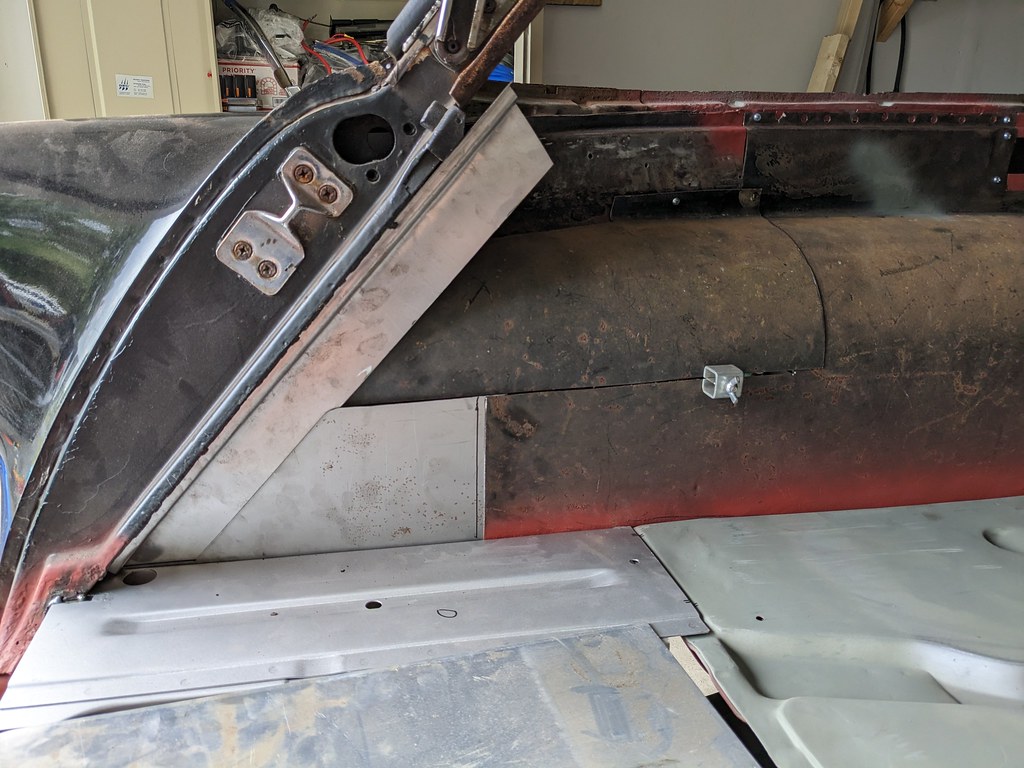
Driver's side wheel well is all ready for welding now. I also took one of the rear pieces that I had left over to see how the fitment was and looks like it will need a small filler panel, but otherwise fits very nice with the curve at the back.

Then my family and I decided to go up to NY to visit family, and brought some parts for my father-in-law to work on since he's been itching to work on my car ever since I got it. Figured it would be a great project to fit up the center cross brace and shock re-enforcement plates. Brought the weld through primer, and we got to work.

We got the whole family involved! My wife, brother in law, sister in law and father in law all got to try out some spot welds on the panels. We dialed in the welder before hand, and gave them all some pieces to practice on and they all did surprisingly well. Cool that we all have a part in it now.
My wife getting some instruction from her Dad. Yes, before the comments come those are OSHA approved Birkenstocks.

The final piece turned out really great with a tight fitment just like I wanted.
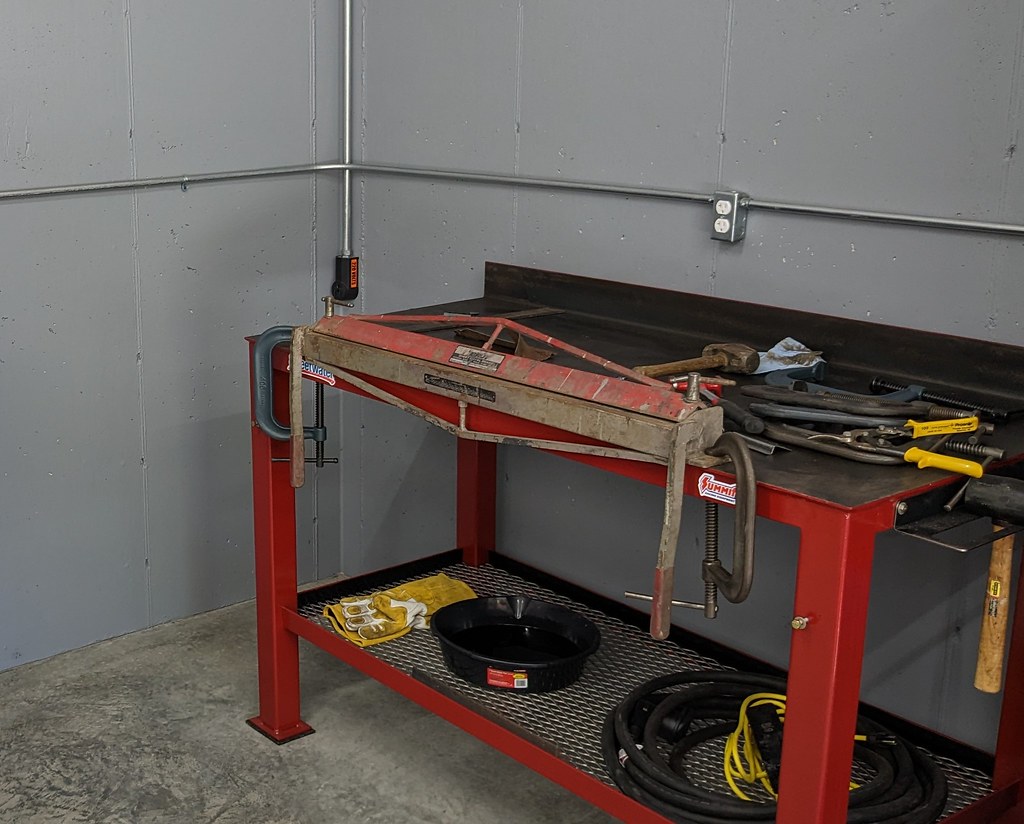
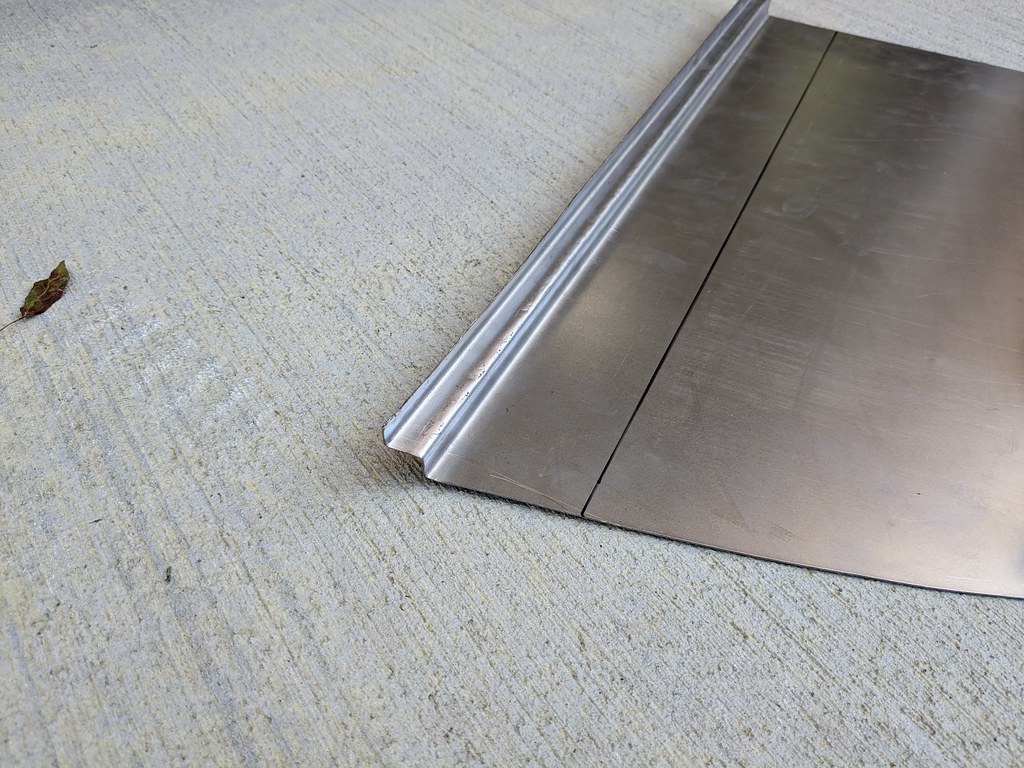
I was also able to borrow a tool from my grandpa that I didn't even realize that he had. I've been wanting a metal brake for a long time and this one is perfect as it bolts to the bench top and is 36" wide. I needed to build a zig zag piece for where the inner wheel well meets the tailgate opening. This was just the ticket, and worked great after several test pieces. They were actually much harder to make than they appear.

It worked out great because my FIL got to use his new garage. He's just finalized everything on it and is on the hunt for a new project, so he got to use a lot of his new tools and I got a lot of progress done on my car. Everyone wins!
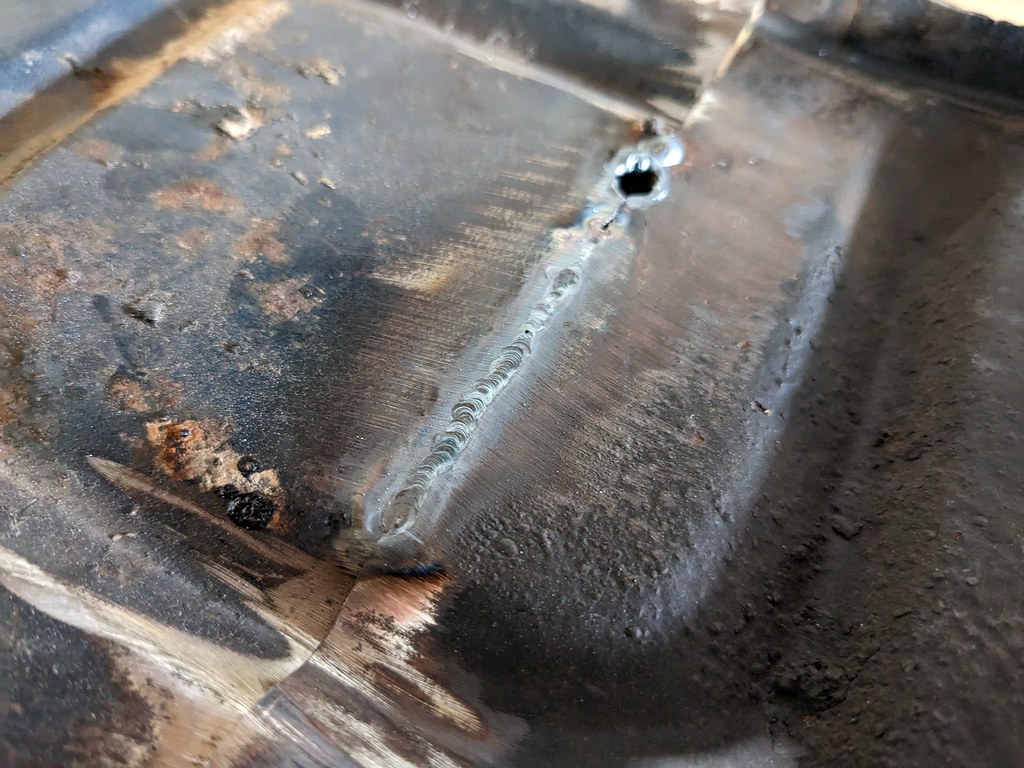
We were only there from Friday through Sunday, so when we got back yesterday when everyone was napping, I got my TIG welder all set up to try for the first time with all the right gas and equipment. I sharpened up my tungsten and had a full tank of 100% Argon. I tried a few spot welds at first to practice my initiations, then a few straight lines with no filler to get a feel for the torch. After I felt more comfortable, I started doing some straight lines with adding filler rod. Definitely a learning curve, but actually not as bad as I had made it out to be in my mind. Here's the best one that I was able to lay down this go around. It looks good to me other than the small divots? Any feedback would be greatly appreciated!

After I felt pretty confident with the coupons that I had, I attempted to go live action with my outer wheel house. I had a nice tight fit up and this run only took a small amount of filler at the end.
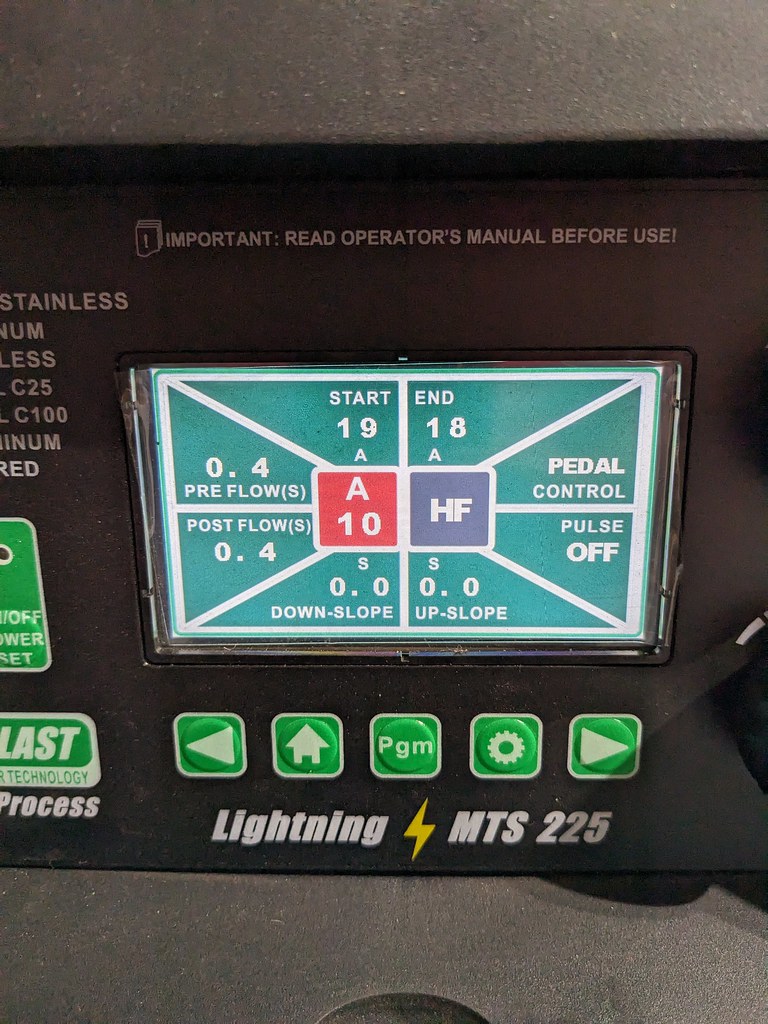
These were my settings. I watched several youtube videos on what people are running for settings and this was just what I came up with based on several that I watched. Again, feel free to critique.
Cheers,
Ryan
1955 Nomad project LC9, 4L80e, C5 brakes, Vision wheels
1968 Camaro 6.2 w/ LSA, TR6060-Magnum hybrid and etc SOLD
1976 T/A LS1 6 Speed, and etc. SOLD
Follow me on Instagram: ryeguy2006a
06-12-2023 #79
Registered User
- Join Date
- Sep 2009
- Posts
- 2,725
I feel like this weekend I made a huge step forward with the metal work. I've been working diligently this week and Sunday I was able to sit back and enjoy my work. Earlier in the week, I had a grinding session to finally knock down the welds on the inside and bottom side of the rear floor pans. I hate grinding on my back under a car... I've tried in the past to grind my butt welds flush with the panels, but for whatever reason I usually end up doing more harm than it's worth. So I just knocked them down because at the end of the day it's going to be covered in carpet. I spent more time on the bottom side since that will be more likely to be seen.


All patched up and ready to move onto the next step. I'm leaving that for now as I want to coat it with POR15.

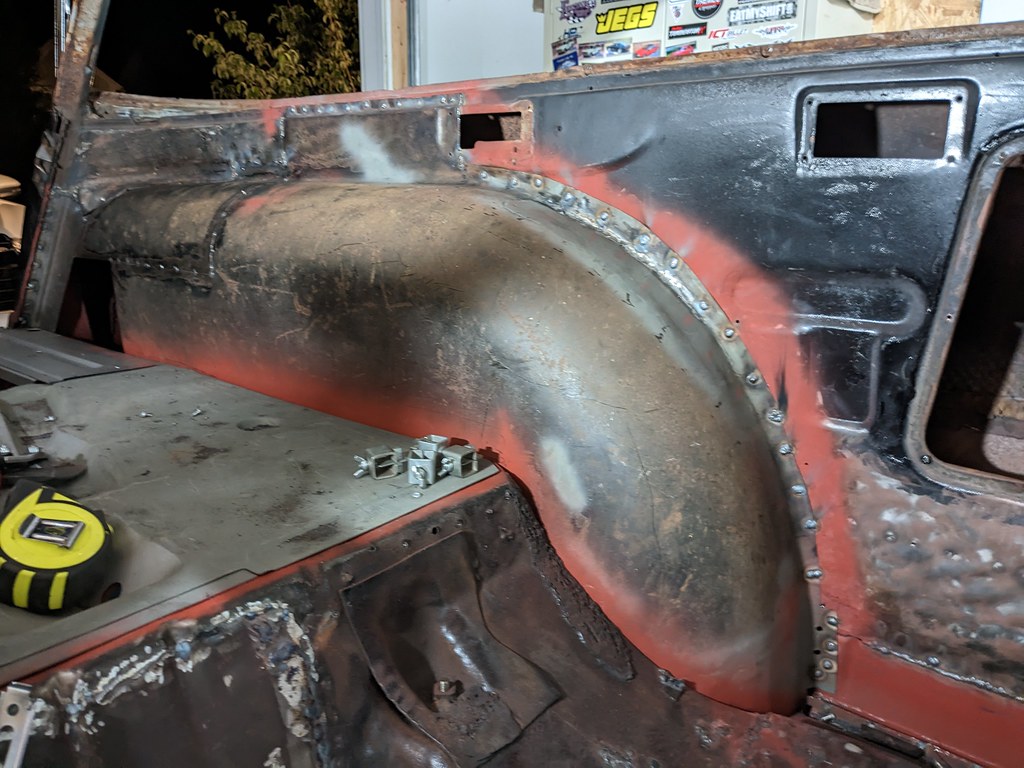
The wheel well is now mocked up for a final time and all surfaces have been sprayed with weld through primer. It was time to figure out the rear patchwork that is needed to modify a wagon wheel tub to fit a Nomad. Unfortunately the Nomad wheel tubs are not reproduced, so it's necessary to modify a wagon wheel tub to fit. I bought these a while ago, but the rear side panels that fit on either side of the spare tire well needed to be fit up. What I did was put a straight edge on them off of the car and marked where they were straight so that I could have a nice straight wheel tub.
I had to notch the panels on the end so that they sat on top of the rear brace.

Now that those panels are where they need to be, I can build off of that plane. I know that the wheel wells will be covered with something eventually, but it was important to me to get them as good as I could. Now I can test if the panels I made in the metal brake.

Next was getting an initial piece cut and mocked up to fill the hole.
Trimmed everything down closer and tighter to where they need to be.


There wasn't much to take pictures of, but it took a lot of time fitting and playing with the panels so that they were level, straight and fit on the same plane. My spot welds would sometimes shrink the metal too much and I had to cut and repeat the process. I was happy with the fitment and decided to finally spot weld the wheel well into the body. I still need to remove the cargo panel, drill spot weld holes and spray with weld through primer, so I stopped welding at the rear floor pan.


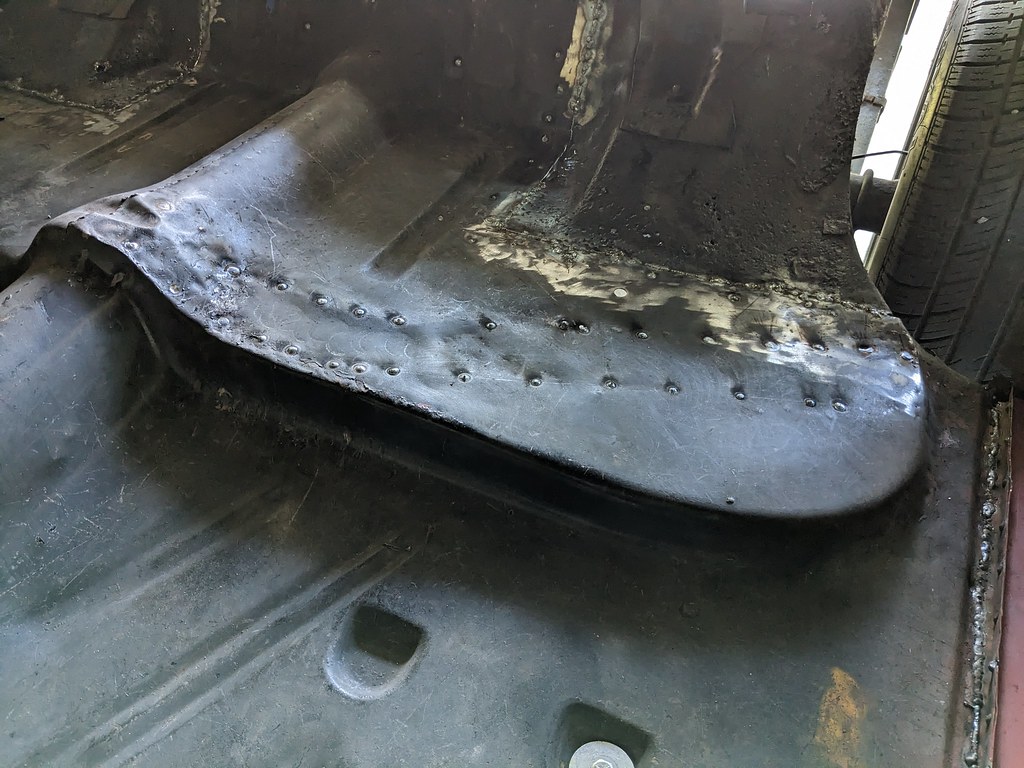
Now it's really starting to look like something. I slowly worked my way around the panels to keep the heat down and make sure that the panels weren't moving when I was welding. If they move off of the same plane from one another it will be very obvious. Once I worked my way around, I ground the welds down a little so that I could see the panel better and get a feel for the shape.


Again, I skipped around didn't get any picture of the in between process, but I worked my way around and filled the gaps in. Kept my heat spaced out and kept feeling the panel with my bare hands. Even doing this, the panel moved around, but I kept experimenting as I was going. I would get a little tin canning, and would try to add more heat to the side that looked like it needed to be shrunk. I was surprised that it worked to significantly reduced the tin canning it had at one point. Also kept my grinding wheel moving. I used a 36 grit flap disk for the first pass and stayed moving. I read an article that sometimes it's actually the grinding after the welding that can cause the panels to warp. Then I swapped to a 120 grit flap disk and tried to smooth off the panel without taking off too much of the original panels and thinning them out. I coated all the bare metal in an etch primer followed by a few coats of satin black. I'm very pleased with how it all turned out, although the satin is more glossy than I was hoping for. May hit it with a flat black.
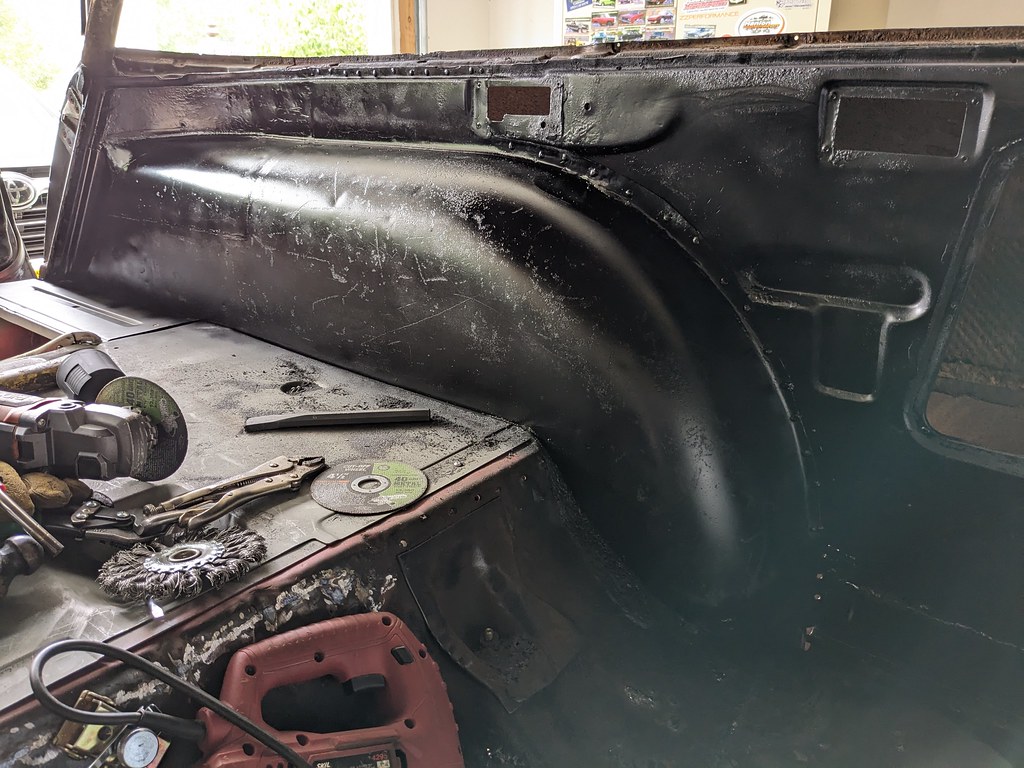

This took way longer than I had initially thought, due to some surprise previous repairs that needed to be redone, but I'm happy with the results. I'm hoping that the second side is going to go much faster since it is in better shape than the driver's side. Once I'm done with the inner wheel wells, I'm moving towards installing the outer wheel wells.
Cheers,
Ryan
1955 Nomad project LC9, 4L80e, C5 brakes, Vision wheels
1968 Camaro 6.2 w/ LSA, TR6060-Magnum hybrid and etc SOLD
1976 T/A LS1 6 Speed, and etc. SOLD
Follow me on Instagram: ryeguy2006a
06-12-2023 #80
Registered User
- Join Date
- Sep 2004
- Location
- Orlando, FL
- Posts
- 1,078
Looks AMAZING!!! Great work!
Is that curved transition at the back near the latch a factory piece or did you make that?SMSgt Ty Ingle, USAF
"CF71" - Freedom BirdHoodpins.com, Inland Empire Driveline, Billet Accessories Direct, Modo Innovations, AutoRad Radiators, Morris Classic Concepts, Marquez Design, Anvil Auto, Fesler Billet, US Collision (DOOM), AGR Performance, Pro-touringF-body.com, Phoenix Transmission Products, Shiftworks, ACC Carpet, Hedman Hedders, BMR Fabrication, American Autowire, MityMounts, TIN INDIAN Performance, Kauffman Racing Equipment, Pypes, RobbMc Performance, WMC, Holley, NOS, PST

 Reply With Quote


