Results 61 to 80 of 82
Thread: A Tale of two TA's
-
04-17-2025 #61

 Registered User
- Join Date
- Oct 2004
- Location
- Garden Ridge TX
- Posts
- 80
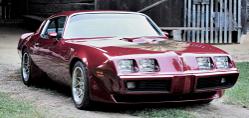
Here's the finished roadstershop spec chassis with the LS3/T-56 combo plus detailing the firewall and body
-
04-02-2026 #62
Registered User
- Join Date
- Oct 2004
- Location
- Garden Ridge TX
- Posts
- 80
Sorry Guys, I plumb fogot to post the rest of the pics of Roofus. The build was a great success. The client loves it and has already put 7k miles on it. I ended up getting Joe Martin of Iron Ressurection to paint one of his signature birds on the hood after I painted the whole car. Here's some pics
E.
Anyone know how to rotate photos during upload?
-
04-03-2026 #63
 Registered User
- Join Date
- Feb 2013
- Posts
- 1,542

Awesome thread, I love these cars. Great work, sir!

-
04-03-2026 #64
Registered User
- Join Date
- Nov 2021
- Location
- Omaha, NE
- Posts
- 43
Fantastic builds Evan! I enjoyed reading about the process and attention to detail you put into this classic birds! I also like the fact you built a few trucks along the way for your kids! I bought the 64 (STEEVE) I restomodded to enjoy with my kids. And I have a 78 Big Ten that I will be building sometime in the future once I get 'Fool's GOLD' done! Look forward to seeing more updates on your 74!

1964 Chevy C20 Restoratmod (STEEVE)
1973 Firebird Formula (Fool's Gold)
1978 Chevy C10 BIG10 (Big Ted)
2024 Chevy 1500 3.0L Duramax (Jack)
-
04-03-2026 #65
Registered User
- Join Date
- Oct 2004
- Location
- Garden Ridge TX
- Posts
- 80
Thanks Guys! Ive really enjoyed building these birds. After the black TA "Roofus" was done, I finally got a chance to dive into rebuilding my '78 "Goldie". Its finished now and Im having a blast cruising it around. Ill try and catch up this thread with some pics of the Gold car build.
Evan Q.
-
04-03-2026 #66
Registered User
- Join Date
- Oct 2004
- Location
- Garden Ridge TX
- Posts
- 80
So the Gold car build finally commenced about this time last year. The body was prepped to go over the RS spec chassis with the Lt-4 and 8L90 combo. I went ahead and put in some mini tubs to fit some wider rubber in the rear. The Spec can handle 335s but I chose to use the 315/18 in the rear as it fits better. The firewall was smoothed like the others and the bottom of the body was stripped, seam sealed and Raptor Lined. I was not expecting the 8l90 to be so damn big and have the pan hang down so low below the frame. I ended up raising the engine/trans combo up in the chassis 1.25" to get more ground clearance for the pan. Kept all the same driveline angles to that part was easy. Most time consuming part was putting in a new tunnel for the trans.
Evan Q.
-
04-03-2026 #67
Registered User
- Join Date
- Oct 2004
- Location
- Garden Ridge TX
- Posts
- 80
Continued.
Had to build a pocket to hold the '15 Impala shifter at the correct angle so that I could still utilize the stock console auto shifter location.
-
04-03-2026 #68
Registered User
- Join Date
- Oct 2004
- Location
- Garden Ridge TX
- Posts
- 80
Next up was getting the wheels sorted. I went with Forgeline TA3C which is the concave version of the snowflake. Fronts are 18/9 and 18/11.5 rears
-
04-03-2026 #69
Registered User
- Join Date
- Oct 2004
- Location
- Garden Ridge TX
- Posts
- 80
Cont.
After that I installed the Fesler flush mount glass on the rear. I took the glass to the tint shop before install to get it one piece tinted.
-
04-03-2026 #70
Registered User
- Join Date
- Oct 2004
- Location
- Garden Ridge TX
- Posts
- 80
Installed the Fesler flush mount windshield and built a sub box for the trunk. Using the Focal dual coil 10" sub in a home made box that fits into the side of the trunk. Then commenced wiring up the whole car with a new AAW harness.
-
04-03-2026 #71
Registered User
- Join Date
- Oct 2004
- Location
- Garden Ridge TX
- Posts
- 80
Lots of work later I finished up the interior with most of the original panels except I used the Year One door panels so I could fit a 6.5" speaker in the door and be able to fit power windows. I got a full Y88 correct seat cover set from Legendary interiors to round it out.
-
04-03-2026 #72
Registered User
- Join Date
- Oct 2004
- Location
- Garden Ridge TX
- Posts
- 80
Once the interior was done, It was time to finish up the engine bay. I like using Wizard Cooling's bigger radiator and dual 14' pwm brushless fan setup. I had to do some mods to the core support to fit it but it works well. Added the vintage air condenser and the intercooler heat exchanger plus mounts for the PSC steering reservoir and lots of plumbing.
04-03-2026 #73
Registered User
- Join Date
- Oct 2004
- Location
- Garden Ridge TX
- Posts
- 80
Those with sharp eyes will notice the passenger side Camaro battery tray and A/C lines ran around the outside of the core support.
04-05-2026 #74
Registered User
- Join Date
- Oct 2004
- Location
- Garden Ridge TX
- Posts
- 80
Next up was the exhaust system. I did a full length 2 1/2" stainless system for the back car. I decided to challenge myself and do a 3" stainless system for Goldie. Once I found a good supplier of pre cut pie pieces in 3" i was off to the races. Tried to back purge most of the welds but had to skip a few when I ran out of Argon so quick.
Evan Q.
04-05-2026 #75
Registered User
- Join Date
- Oct 2004
- Location
- Garden Ridge TX
- Posts
- 80
While I was in welding mode, I also built a 4' stainless intake tube that places the air filter where the battery used to be. Hence the camaro pass side battery tray.
04-05-2026 #76
Registered User
- Join Date
- Oct 2004
- Location
- Garden Ridge TX
- Posts
- 80
Next order of business was to sort out the nose section. Anyone who's built one of these birds knows how much of a PITA the nose is. The original nose for this car was rather perished and had been patched numerous times before. I decided to try out a fiberglass nose I found online from Showcars rob from Canada I think.
Sooooo Glad I did because it fit almost perfect with very little filling and was easily painted with no cracking or chipping. The only drawback was that it didnt have a mount for the front splitter/spoiler. I added about 1" of glass to the bottom of the bumper to extend rearward enough to mount the chin spoiler and it worked well.
Some time in the paint booth and they were all color matched to the gold that was on the car. Its not quite solar gold but very very close. I went ahead the painted the driver fender while I was at it because the paint was not very well applied on that fender.
04-05-2026 #77
Registered User
- Join Date
- Jul 2006
- Location
- Chesapeake, VA
- Posts
- 675
Great looking cars. Can't disagree with the fiberglass nose. A lot of times the stock noses didn't fit that well when the cars were brand new.
Cars are meant to be driven.
John B
04-05-2026 #78
Registered User
- Join Date
- Oct 2004
- Location
- Garden Ridge TX
- Posts
- 80
Thanks John B. Yeah, even when they did line up they were saggy in all the wrong places. So once I got the nose all together and mounted, I tackled fitting the hood. The Hood bird along with the hood bird on the black TA were both painted by Joe Martin from Martin Bros. Customs or you may know em by the Iron Resurrection tv show. I did all the bodywork and base coats and commissioned Joe to paint the hood birds. They both came out fantastic. Joe is a true artist and has done many different examples of the screamin chicken. Once Joe was finished with both birds, I put the hoods in the paint booth and shot 6 coats of PPG2002 on them and let cure for a bit. I then proceeded to color sand the clear through at least 6 blockings from 800 all the way to 8000 Trizact. 6 coats were needed so that I wouldnt break through the clear, especially around where the hand applied pin stripes were. Happy to say I didnt cut through on either hood and both were buffed up to a mirror shine.
Here's some pics of both birds
Evan Q.
04-11-2026 #79
Registered User
- Join Date
- Oct 2004
- Location
- Garden Ridge TX
- Posts
- 80
So once the clear had a few weeks to cure, I started on the sanding and buffing. Started with 800 grit on the Linear blocks and you can see the highs and lows on different parts of the bird. Worked up to 3000 grit then 8000 trizact. Then 4 stages of buffing compounds and the bird really starts to come alive.
Evan Q.
04-12-2026 #80
Registered User
- Join Date
- Oct 2004
- Location
- Garden Ridge TX
- Posts
- 80
last few items to finish up. Mounting the shaker to the intercooler of the Lt4. There wasn't a lot of room between the intercooler and the hood as I had to raise the drivetrain in the chassis to get more pan clearance for the 8l90. However, it did fit with a smaller size weatherstrip around the shaker perimeter. I made some small brackets to mount to the intercooler studs which bolted to the bottom of the shaker. Topped it off with a 3d printed honeycomb insert for the shaker. I also took my homemade intake tube to get Ceramic coated. Looks much better. Ive put about 500 trouble free miles so far. The car handles great and is very smooth.
Evan Q.

 Reply With Quote