


Results 301 to 320 of 388
Hybrid View


-
05-30-2014 #1
 Registered User
- Join Date
- May 2014
- Posts
- 6

Thanks for the info Ron.
What is the best tool/way to measure the angle and rack travel for the home builder?
-
06-03-2014 #2
Registered User
- Join Date
- May 2014
- Posts
- 6
OK.nother dumb question. My project car should weigh between 2500 and 2800 pounds. It has a 94.5" wheelbase. I am running Mustang II front suspension, narrowed 9" Ford triangulated 4 bar, sbc 350/330 horse and a 700R4 trannie. Power steering or manual? I have disc on the front and drum on the rear. Power brakes or manual? I need all the advice I can get
06-27-2014 #3
Registered User
- Join Date
- Jun 2014
- Location
- Auburn, Mi.
- Posts
- 44
Wow Lance! Great post! After reading this and talking to you, I decided you were right! I just signed up! Thanks my friend!
Doug
06-30-2014 #4 Registered User
- Join Date
- Aug 2012
- Location
- Peoria, AZ
- Posts
- 1,758
I just had a very interesting weekend with my car. Saturday I attended a SCCA Starting Line Autocross school taught by Jenny Williams, Heyward Wagner, John Hunter and Craig Wilcox...all very experienced autocrossers and instructors. The school was patterned after the Evolution Performance driving schools and featured an oval setup which converted into a figure 8, a slalom setup, and then the afternoon session was making runs on an autocross course.
The students were split up into 2 groups and 2 instructors were assigned to each group. The instructor would get in the passenger seat, tell us what to do with live instructions, then get in the driver's seat and SHOW us what to do in our cars, then get back in the passenger seat and instruct us some more. Lots of repetition over and over and over again to learn what they were teaching and put it into play.
It rained... My time on the oval was dry, but as our group moved to the slalom it started to rain. The class kept going because we autocross in the rain, why not learn in the rain. We then broke for lunch (I had to make a quick run to get some gas if that gives you any indication how much we ran during the morning). Then as we started the afternoon session on the autocross course, it REALLY started to rain. At one point the lightening got too close so they pulled the workers off of the course, one of the instructors got in his car and went to the back stretch watched for cones and would flash his lights at the start for the next car to go. Here is a picture I took while sitting in my car waiting for my turn at the course.
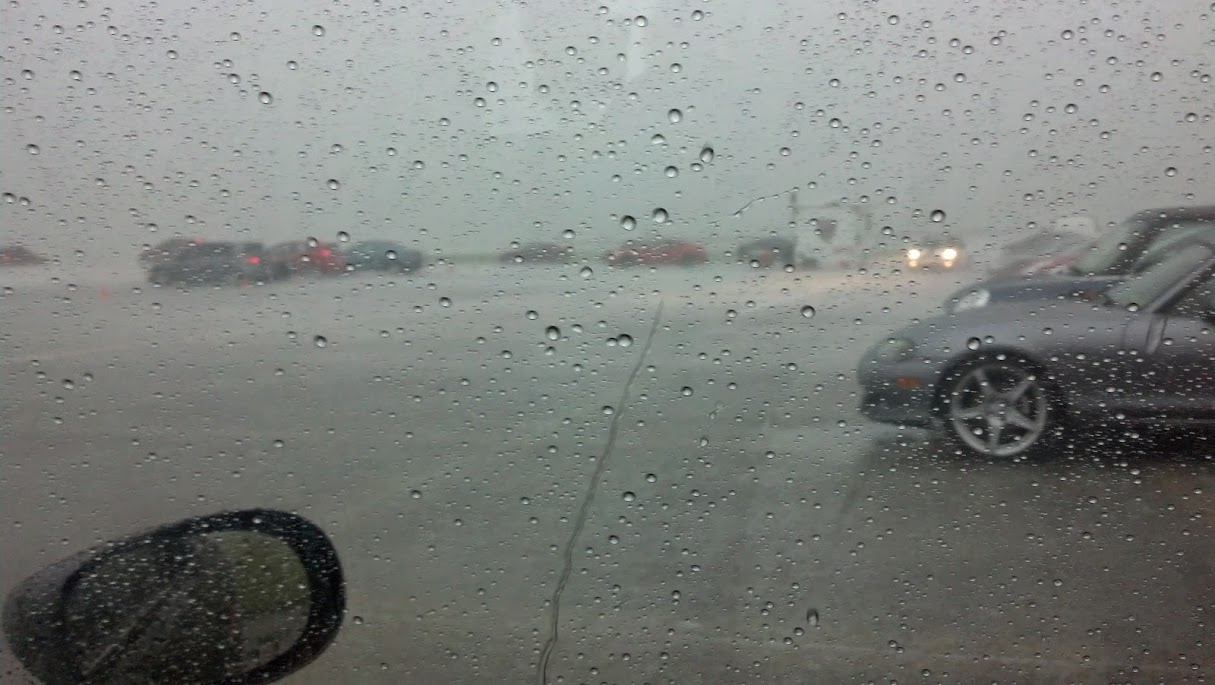
Yes, that is a car coming off the course in that weather!!!
If you want to learn how to make your car grip to it's maximum level, what better way to do it than in rain like that!!
It did let up some by the time I ran but it was still very wet. Here were my last two runs on the course after my instructor Heyward had gotten out of the car to go on to the next student.
I was taught Saturday exactly how to make transfer the weight where it needed to be to make the car stick. Period...
It was eye opening to say the least. I never touched a shock, tire pressure, worried about my line...nothing. All we worked on was transferring weight to make the car work.
The car performed great. 3 of the 4 instructors all got time in the car, 2 of them drove it in different conditions...and they all were very impressed with how well it worked. Heyward said to me "This car just works". Big thanks to Ron Sutton for that...
At Sunday's race, it was time to put all that learning into motion. My first two runs were off a bit, on my second run John Hunter got in the passenger seat with for the first time (the instructors came back on Sunday to the event on their own time, had a little race competition between themselves and also rode with a bunch of racers to help them as well, how cool is that?). After the run he told 1 or 2 things I could do to tighten things up. My next run I shaved over 2 seconds off my time...from a 51.70 to a 49.6! Again, never touched the car once. All driver...
Here's the run I picked the 2 seconds up on.
I ended up 23rd in Raw time out of 113 drivers...
http://www.kcrscca.org/results/solo/...event5_raw.htm
What I learned this weekend was more important though...if the driver transfers the weight properly, this car just flat out works, rain or shine.
Big shout out to Ron Sutton for the help with the setup and to the SCCA Starting Line School Program, they put on a fantastic school in the very worst conditions possible...and taught 24 of us SO MUCH about getting the most out of our cars on the course.Lance
1985 Monte Carlo SS Street Car
06-30-2014 #5
Registered User
- Join Date
- Jun 2014
- Location
- Auburn, Mi.
- Posts
- 44
Very cool videos Lance! I watched them and thought about how FUN that must be!
Doug
06-30-2014 #6
Registered User
- Join Date
- Nov 2012
- Location
- Sacramento, CA
- Posts
- 1,918
Nice Job Lance !
Second in class & 23rd in Raw time out of 113 other cars & drivers. That is a SWEET list of cars you beat with your ... wait for it ... 85 Monte Carlo. Awesome job !

07-01-2014 #7
Registered User
- Join Date
- Jun 2014
- Location
- Auburn, Mi.
- Posts
- 44
Lance,
Every time I watch your videos, I find myself with a big grin and thinking how much fun that's got to be! Now, I want to throw a question at you (please don't duck because I'd like your opinion!).
As you know, I've got a bare El Camino frame in my shop. I've keep looking at the posts (#168 & #171) about correcting the LCA geometry (the buckets or receivers for the LCA's). Ron mentioned that the car needed to be at its final rake angle before correcting the LCA axis to horizontal (or slightly nose down toward the front). ... Do you think, or know, if the LCA axis could be achieved with the frame off the car (and it being for a high performance street car? Thanks,,,,and continue having fun driving your SS!
Doug
07-02-2014 #8
Registered User
- Join Date
- Aug 2012
- Location
- Peoria, AZ
- Posts
- 1,758
Man, I'm not sure Doug. I guess it could be if you knew exactly what the ride height was going to be at all 4 corners and you figured out some sort of jig to hold the frame in that exact location securely while making any changes necessary. I'm not sure how you could determine what changes to do to the LCA pivot points without getting a baseline first though...and it seems to me that the car would have to be at least partially assembled to do that.
My frame had an issue with the LCA pivots being different from left side to right side when measured with the car in full trim at ride height. I'm certain that most cars have some sort of this same issue, the degree will vary from car to car though. While correcting that issue that was affecting my handling...we just took it a step further and really made it better since we were already knee deep into fixing the original problem.
And trust me, I'm having a ball driving this car now... Lance
Lance
1985 Monte Carlo SS Street Car
07-02-2014 #9
Registered User
- Join Date
- Jun 2014
- Location
- Auburn, Mi.
- Posts
- 44
Lance,
I can understand your reply in post #317. What I can't see (you know me, I can't see the forest for the trees! LOL) is correcting the LCA mounting bucket geometry to the ride height and rake of your body on frame measurements and after all that, you installed adjustable (to change weight balance at each wheel, ride height and or rake) coilover shocks w/ springs. My plan was to make a fixture to hold the frame level and square before grinding and welding the factory seams and boxing the frame channels. I certainly want things done right the first time (if possible) and not having to do things a second or third time!... Oh, I think I saw a post somewhere that you changed the body bushings on your Monte and you used Polygraphite. Is that correct, and if so, any comments?
Doug
07-02-2014 #10
Registered User
- Join Date
- Nov 2012
- Location
- Sacramento, CA
- Posts
- 1,918
Hi Doug ! Originally Posted by oldtinsmith

As long as you have adjustable ride heights via coil overs or spring adjusters ... and know what height & rake you want the chassis to ride at ... then you can absolutely do this with the body off the frame.
Just for giggles ... if you decide you want the ride height to be 5" in the front (say at the outer tip of the frame dog leg behind the front tire) ... and 5.5" rear (at the dog leg in front of the rear tire) then just cut some blocks to hold the frame at that height.
The only tricky thing is your floor is not level. So where ever you plan to place the "ride height blocks" ... mark the floor and use a level to figure out how much those spots vary & cut your blocks accordingly, so the frame is truly level side to side & the front-to-rear rake is accurate & consistent side to side.
P.S. Don't use my numbers. They're just so we could discuss it. Pick your own ride height numbers.
07-02-2014 #11
Registered User
- Join Date
- Jun 2014
- Location
- Auburn, Mi.
- Posts
- 44
SSLance & Mr. Ron Sutton,
I'm sorry for the highjack of this thread! I'll finish with a thank you for answering my questions. My post in "Suspension" (1980 El Camino frame and suspension help) will be used for my questions in the future. Thanks again!
Doug
07-02-2014 #12
Registered User
- Join Date
- Aug 2012
- Location
- Peoria, AZ
- Posts
- 1,758
You may be able to do what you want to do on the bare frame first, I'm just not sure how you'd pick a starting point. Maybe you can get there by taking measurements on your existing frame on the car and transferring them over to the new frame. That's pretty far above my pay grade though. I think you'll need the measurements of all of the pivot points of the front suspension in order to optimize them all.
Because we had done all of that on my existing setup, we knew the ride height we were going to run once it was all done. The adjustable spring perches (and later coil over springs) were used to get the car to the ride height we wanted from the start.Lance
1985 Monte Carlo SS Street Car
08-25-2014 #13 Registered User
- Join Date
- Nov 2002
- Location
- state of confusion
- Posts
- 1,499
Why not build a set of four ramps, each with a flat length at a height equal to the height of the scales? A come-along ought to be sufficient to pull the car up the ramps and leave you with less (maybe none) of the jacking and relocating of scales and other problems associated with large amounts of lateral tire scrub.
Norm'08 GT coupe, 5M, suspension unstockish (the occasional track toy)
'19 WRX, Turbo-H4/6M (the family sedan . . . seriously)
Gone but not forgotten dep't:
'01 Maxima 20AE 5M, '10 LGT 6M, '95 626, V6/5M; '79 Malibu, V8/4M-5M; '87 Maxima, V6/5M; '72 Pinto, I4/4M; '64 Dodge V8/3A
08-25-2014 #14
Registered User
- Join Date
- Aug 2012
- Location
- Peoria, AZ
- Posts
- 1,758
I'm really liking having these set up flat, level and square...with lots of room for me to still get under the car and my lift to raise and lower the car right there.
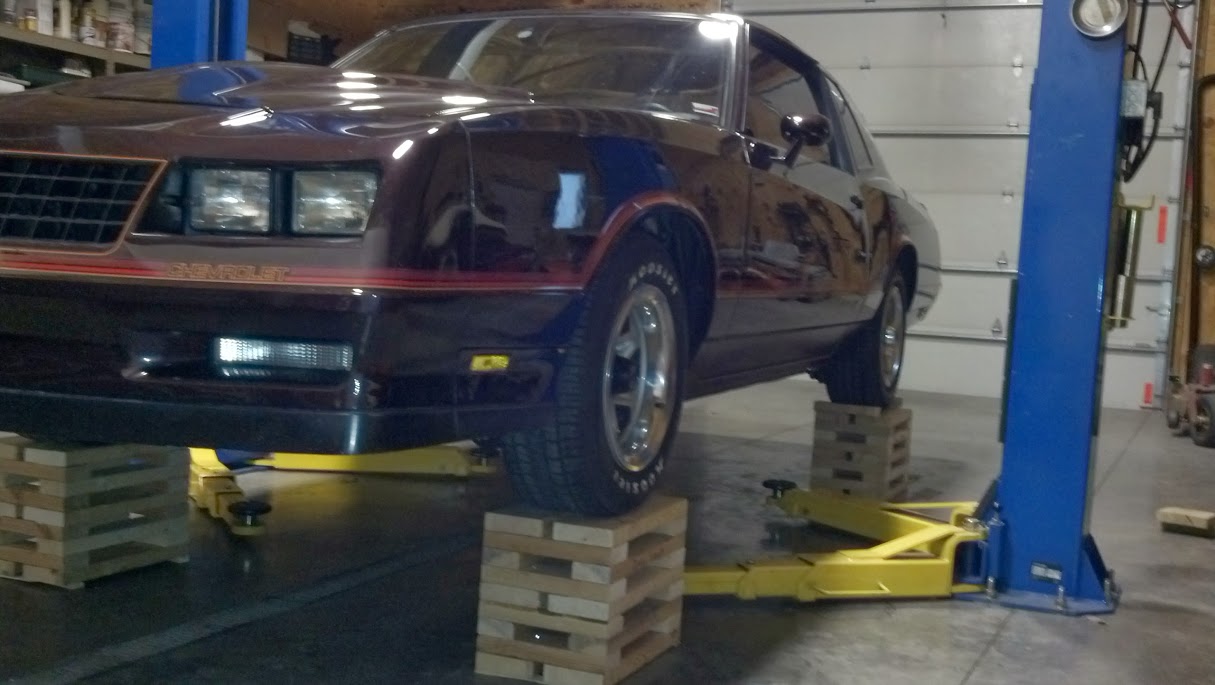
I've made slip plates that I'll put under the front tires on top of the scales. Should work like a champ...Lance
1985 Monte Carlo SS Street Car
08-28-2014 #15
Registered User
- Join Date
- Aug 2012
- Location
- Peoria, AZ
- Posts
- 1,758
4 corner weighed the car last night and ended up here:
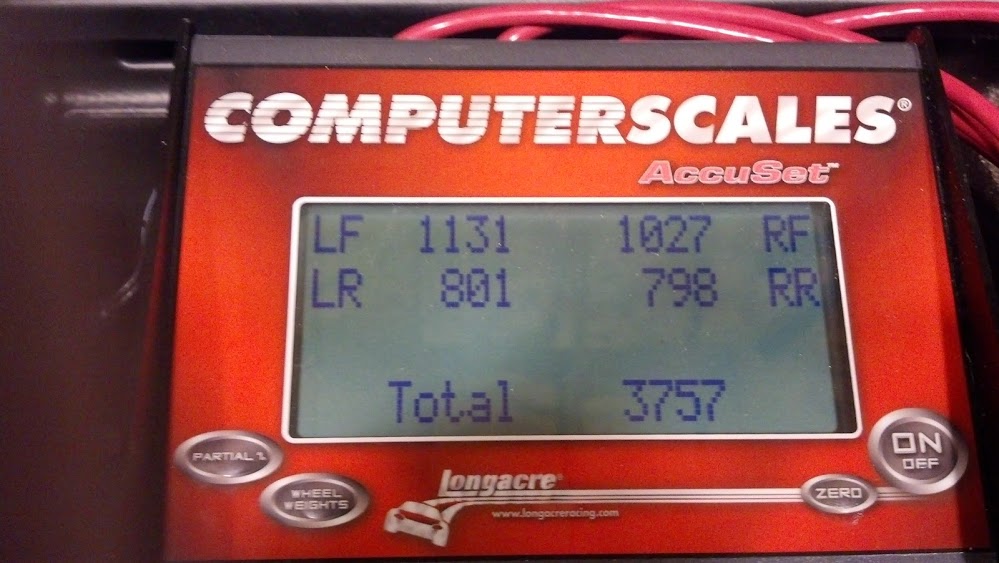
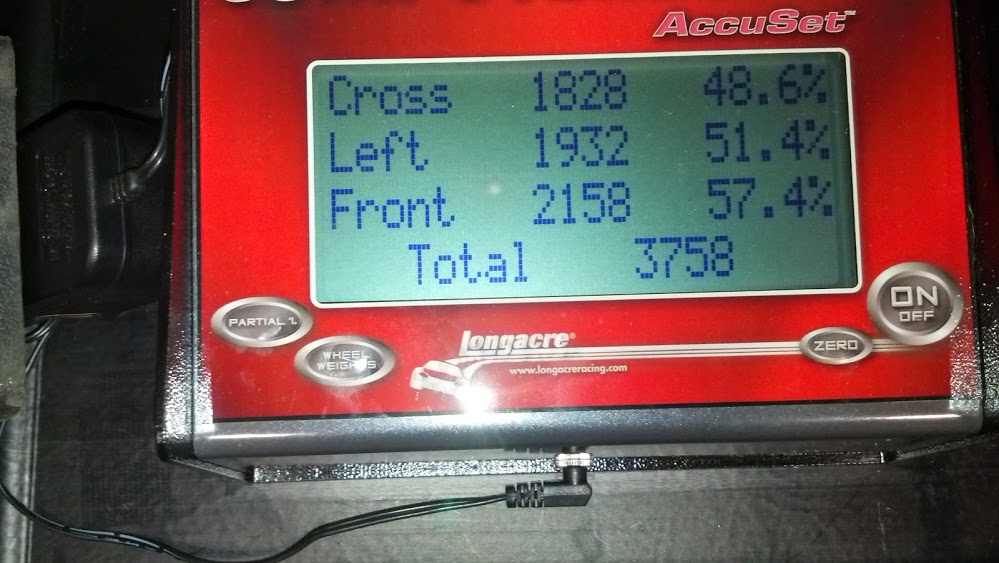
That was with me sitting in the driver seat and a full tank of gas which is usually how I start out an event. The ride height was adjusted right where we needed it as well, 25 7/8" at each front fender and 26 7/8" at each rear fender.
I'm pretty happy with how it turned out, especially since it's a fully trimmed street car with AC, battery up front...the whole nine yards.
Between those adjustments, the new 9.6* of caster and -1.2* camber settings, the new stiffer front sway bar and rear springs to match...plus a brand new shiney set of Falken rubber...it should run pretty well at the SCCA Nationals next week. I'll post up the results when I get them.Lance
1985 Monte Carlo SS Street Car
08-28-2014 #16
Registered User
- Join Date
- Nov 2012
- Location
- Sacramento, CA
- Posts
- 1,918
Looking Sweet Lance!
For those that are following along with us on Lance's thread ...
The concept of making the diagonal weights ... aka cross weights ... 50/50 ... is only correct if the car also has 50/50 left & right side weights. In race cars, we offset the powertrain more & shift placement of weight to achieve a 50/50 left-to-right side weight balance. And then we also corner balance the car to achieve 50/50 cross weights. Since most production cars do not weigh 50/50 left & right with the driver in the seat ... if you make the cross weights 50/50 ... the heavier left side weight will add rear grip on left hand turns and reduce rear grip on right hand turns. That's not the goal. The goal is to corner balance a car so it has similar grip on left & right hand corners.
To better balance the car on left & right hand corners ... of a left side heavy car ... we need to reduce the cross weight percentage of the LR & RF wheels & increase the cross weight percentage of the RR & LF wheels. Over the years I have found a good rule of thumb is the cross weight percentage of the LR & RF wheels need to equal the car's ride side weight percentage & the cross weight percentage of the RR & LF wheels need to equal the car's ride side weight percentage. Or said another way, the cross weight percentage of the LR & RF wheels & the car's left side weight percentage need to add up to 100% & the cross weight percentage of the RR & LF wheels & the car's right side weight percentage need to add up to 100%. It isn't perfect in all situations, because there are other factors that affect left & right hand cornering grip. But I have found it to be a good baseline to start from.
P.S. The left & right side ride heights need to be the same with the driver in the car.
That is what Lance has achieved here.
02-06-2015 #17
Registered User
- Join Date
- Feb 2015
- Posts
- 17
This thread had been very interesting and helpful as I am looking at setting up a G body for road racing.
The series I would be running in is very restrictive on what parts I can use (Chump), meaning no ridetech shocks and such. I can however do a lot of moving around of suspension pick up points,modding control arms, springs, swaybars etc.
Basically what I am curious about is if the setup Lance had before the ridetech's would be good for long course road racing as well. Specifically Road America. Setup was shown in this post; https://www.pro-touring.com/threads/...99#post1022599 Here is the pertinent info from that post;
Let's recap what you did for anyone following along:
Mapped the roll center & corrected a RC migration problem
Raised car 1" to increase front travel with spring adjusters
Installed larger front sway bar ... kept same 575# springs
Installed stiffer rear springs from 125# to 225# ... kept same rear sway bar
Installed DSE LCA's to add caster
Modified LCA holes to get a little more caster
Increased caster from 5.5° to 7.5° (Better but still about 1.0° -1.5° less than optimum)
Front sway was a 36MM Camaro bar and rear was 7/8's stock as I recall.
Just curious if this is a good starting point for my setup and what might be different for a strictly road course setup.
btw-The car weight would likely be about 700 pounds lighter than Lance's ride as it would be gutted with a full cage, which has the side benefit if stiffening the flexi flyer frame.
Once again, great thread and Lance's car looks great. It's nice to see a Super Sport carving corners
02-07-2015 #18
Registered User
- Join Date
- Nov 2012
- Location
- Sacramento, CA
- Posts
- 1,918
Originally Posted by BanditDarble
Hey ... Bandit,
The specs you gave on Lance's car are back at Stage 1. Since then we upgraded the UCAs & LCAs to Ridetech, allowing Lance to achieve 9° + caster & longer shocks for the increased travel. It has Ridetech Coil Overs on all 4 corners with my Street-Star Digressive valving & a special thick wall Ridetech sway bar that I call the Monster Bar. I came from a wide background of racing, but a majority of my most experience in from road racing. When the rules restrict what you can do ... that is what makes having all the geometry, spring & bars rates optimized the key to the best handling car.
IMHO, you should:
1. Decide on a suspension strategy: Low Travel/High Roll, High Travel/Low Roll or Moderate Travel/Roll.
2. Optimize the geometry of your car for the suspension strategy you chose.
3. Work up the best spring & sway bar combination you can that will give you the optimum TRS, FLLD & RLLD.
4. Run the best shocks you can under the rules & revalve them (if allowed) towards a digressive, high rebound, high zero number profile if possible.
As Lance mentioned, I offer a wide range of technical services to car guys in Autocross, Road Racing, Pro Touring, etc. The most popular is my #40 Tech Service, which is what I did for Lance. It goes like this:
A. We discuss suspension options & you pick the path you want
B. You measure your car's suspension points ... just as Lance did
C. I evaluate your current geometry & can tell specifically how the car has been handling
D. I map out a plan of change to optimize your geometry (Details Below)
E. I work up the optimum sway bar & spring rate package for your goals (Details Below)
F. You make the suspension changes
G. I'm available to help with any fine tuning when you take it to the track
You can see or purchase RSRT Tech Service #40 HERE. It includes:
Full Front & Rear Suspension Geometry, Steering, Total Roll Stiffness, Front & Rear Roll Angles, Spring & Bar Rates – Optimum Work Up:
Full Front Suspension Geometry - Optimum Work Up:
• Optimum Roll center @ ride height + dive & roll
• Optimum Static Camber
• Optimum Camber change in dive + dive & roll
• Optimum Caster change @ dive & roll
• Optimum Dynamic Camber for application
• Dynamic Camber at 15-20-25° steering @ dive & roll
• Optimum Spindle KPI (Standard or Custom)
• Static & Dynamic Scrub Radius
• Optimum Anti-Dive / Pro-Dive Percentage
Steering Geometry - Optimum Work Up:
• Optimum Ackerman from Spindle & Tie Rod angle
• Optimum Bump Steer Settings
• Inner & Outer tie rod pivots
• Optimum Toe setting
• Optimum Dynamic Ackerman @ cruise height + dive & roll
Full Rear Suspension Geometry - Optimum Work Up:
• Optimum Anti-squat percentage
• Optimum General ratio of lift vs push
• Optimum Instant center, swing arm length & pick up point
• Roll center (can only optimize with TRS work up)
• Optimum engine/trans, driveshaft & pinion angle work up
TRS & Front & Rear Roll Angle – Optimum Work Up:
• Optimum Total Roll Stiffness work up
• Roll angles provided for different corner loads
• Front & Rear Lateral Load Distribution Work Up
• Optimum Front & Rear roll angles & difference work up
• Optimum Front & Rear Spring rates & wheel rates
• Optimum Front & Rear Sway Bar rate & wheel rate
• Optimum Front & Rear roll center & CG work up
• Spring motion ratios – as-is or optimum relocation
• Sway bar motion ratios – as-is or optimum relocation
• Car measurements provided by client
Cost for Tech Service #40, outlined above, is $379 as of 2015. Tech Service #41 is the same as #40 ... plus brake optimization for $50 more. See #41 HERE.
For those that care to, you can see the full menu of Tech Services I offer Car Guys & Racers HERE.
02-06-2015 #19
Registered User
- Join Date
- Aug 2012
- Location
- Peoria, AZ
- Posts
- 1,758
I've got a friend that runs a Miata in Chump and WRL races across the Midwest and he on occasion sends me pictures of dilapidated G-Bodies he's found with the caption "Chump candidate?". He also is constantly hounding me to come racing with him in his car which I'm certainly considering as it looks like a blast.
I only ran the setup you are referencing at 2 autocross events I believe before upgrading to the ridetech triple adjustable shock setup. Geometry wise the setups were pretty similar and drove similar...the major difference was the adjustable race specific shocks which changed the way we traveled the suspension considerably. There was a spring rate change in the rear mainly because of the motion ratio change moving the spring from on top of the axle to the lower shock mount...and the front spring was pretty close to the same. Truthfully, the setups drove similar except for being able to tune the shocks to let the suspension work better. One correction is I run a 1" solid LCA mounted rear sway bar. When I ran this setup at Gateway on the road course, it worked great...the only changes I made as I went along were tire pressure changes and tightening down the rebound on the shocks both front and rear. The balance was great...the balance has always been great ever since stage 1...which makes this car so much fun to drive.
I don't see any reason this setup wouldn't be a good starting point for your car as well. The wildcard is the reduced weight and where exactly that weight loss comes from. Ron I'm certain will step in here and point out where I misspoke and offer up additional guidance. I highly suggest utilizing his services to help get a setup under your car that maximizes how you are going to use it. He'll help you get it right the first time which is worth every penny.
What area of the Country are you from? Do you plan on running more than a few Chump races with this car or just Road America?Lance
1985 Monte Carlo SS Street Car
02-07-2015 #20 Registered User
- Join Date
- Nov 2008
- Location
- Lawrenceburg, TN
- Posts
- 4,098
here is my advice about having Ron Sutton help you...do it...after you look at the price (which is VERY reasonable) you will think you can save some money and copy a setup or do it yourself...and your wrong...the weight balance, ride height, roll centers, pitch and yaw axis, tire Dia. track width and wheel offsets are all areas that impact the chassis setup..so after you buy 2 or 3 sway bars at $200 plus each, a few sets of springs at 75 bucks each and a few dollars for wheel spacers...it will still be wrong and you could have saved money just by getting Ron to help
just my humble opinion

 Reply With Quote


