Results 21 to 40 of 244
Thread: Garage built Buick....GN
-
01-10-2013 #21

 Registered User
- Join Date
- Sep 2007
- Location
- York, Pa
- Posts
- 457
Justin Snow
-
01-10-2013 #22
Registered User
- Join Date
- Sep 2007
- Location
- York, Pa
- Posts
- 457
Justin Snow
01-10-2013 #23 Registered User
- Join Date
- Jun 2006
- Location
- New York
- Posts
- 132
Real sexy!!!!!
01-10-2013 #24
Registered User
- Join Date
- Aug 2004
- Location
- St. Louis
- Posts
- 191
Nice work going on there, I like to see daughters involved. ;). I have three of them.
01-10-2013 #25
Registered User
- Join Date
- Sep 2007
- Location
- York, Pa
- Posts
- 457
I wanted to block off the rear trunk area and add some stiffness to the body so I made a rear firewall out of 18ga steel. I dont have a sheetmetal break so I did it ghetto style on my workbench.
Justin Snow
01-10-2013 #26
Registered User
- Join Date
- Sep 2007
- Location
- York, Pa
- Posts
- 457
Ha, my daughters five. Every other day she ask's "Whens your car going to be done?" Originally Posted by Jon69RagTop
 Justin Snow
01-10-2013 #27
Registered User
- Join Date
- Jul 2012
- Location
- Iowa
- Posts
- 399
 Is the trunk bracket still in the stock location? It looks like you just extended the base to mount to the wheel well for support. Do you have any idea what you will do for the arm that holds the trunk lid or will that just be something that you figure out when you get that far? Originally Posted by GNon18s
Miles Boyer
Is the trunk bracket still in the stock location? It looks like you just extended the base to mount to the wheel well for support. Do you have any idea what you will do for the arm that holds the trunk lid or will that just be something that you figure out when you get that far? Originally Posted by GNon18s
Miles Boyer
The car hobby is dangerous,if the speed doesn't kill you, the cost of parts will.
91 V8 S10
88 Cutlass Pro-Tour
97 Chevy lifted Z-71
96 Corvette
01-10-2013 #28 Registered User
- Join Date
- Mar 2010
- Location
- Okinawa, Japan
- Posts
- 305
Love the direction this is headed, really should have pulled the body off of mine, it would have been easier in the end.
So what's the plan for the frame? I just hammered my inner fender in the inch and a half a notched the frame, but am probably limited to 315s definitely no 345s going back there...81 Regal, impersonating a Grand National with a 488 Olds
Build thread: https://www.pro-touring.com/showthre...ith-a-488-Olds
01-11-2013 #29
Registered User
- Join Date
- Sep 2007
- Location
- York, Pa
- Posts
- 457
SilverMonte, yes the trunk hinge brackets are still in the stock location. Just rebuilt them back into the new wheel tub. Im just going to modify the hinges/brackets to clear. I have them mocked up and they work great. The only downside is the deck lid just doesnt open as high. I like using the stock parts when I can, it usually gives it a cleaner look IMO.
Justin Snow
01-11-2013 #30
Registered User
- Join Date
- Sep 2007
- Location
- York, Pa
- Posts
- 457
Im going to cut the frame and move the frame rails in, then box everything. Originally Posted by carguykeith
Justin Snow
01-11-2013 #31 Registered User
- Join Date
- Sep 2008
- Location
- Elkhart, Indiana
- Posts
- 64
01-11-2013 #32
Registered User
- Join Date
- Sep 2011
- Location
- Lawler, IA
- Posts
- 569
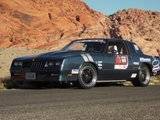
Nice Build. Very clean work. When I tubbed my Monte Carlo I recessed the hinge into the tub 1/2". This way I did not have to modify the hinge and there is zero tire interference with 335/30/18's. 345's would also clear.
01-11-2013 #33
Registered User
- Join Date
- Sep 2007
- Location
- York, Pa
- Posts
- 457
Honestly im not sure how much it would help. Im guessing it will help a little but not a lot. I originally wanted to bead roll those panels but the first one i bead rolled warped like crazy. I probably didnt have the bead roller setup right for that. I said heck with it and left them flat. Also, i just wanted to cover that area with some type of "Dynamat" to keep noise (and smoke) out of the passenger compartment. Originally Posted by Cutls67
Justin Snow
01-11-2013 #34
Registered User
- Join Date
- Sep 2007
- Location
- York, Pa
- Posts
- 457
I followed along with a lot of your build, very nice and already hit up some events i see!! Originally Posted by howehot
Justin Snow
01-11-2013 #35
Registered User
- Join Date
- Apr 2006
- Location
- MD
- Posts
- 232
Very nice work. You make that look easy. I'm doing the exact same thing. I only moved mine in 3" though, figuring it would be plenty for 345's. Did you really need 4.5"? 275's fit in the stock wheel well and an extra 3 inches should allow a 350 mm tire, theoretically. I'm hoping to get the rear seat back in (modified of course) and useable, for two at least.
Oh, and how did you get the fuel tank braces off of the trunk floor without gouging up the floor?
01-11-2013 #36
Registered User
- Join Date
- Sep 2007
- Location
- York, Pa
- Posts
- 457
I guess it depends on if you want to tuck the tire in the fender or not. I had my 345 stuffed in the fender, then build the wheel well around it basically. Not sure how low I will have the back sit. I guess it depends on where the front ends up. ...the fuel tank mounts were removed with a spot weld cutter and a lot of patients. Originally Posted by SickSpeedMonte
Justin Snow
01-11-2013 #37
Registered User
- Join Date
- Sep 2007
- Location
- York, Pa
- Posts
- 457
I had to modify the stock fuel tank mounts to fit their new location on the trunk floor (moved them so they are centered). I basically had to swap one flange to the other.
Justin Snow
01-11-2013 #38
Registered User
- Join Date
- Sep 2007
- Location
- York, Pa
- Posts
- 457
Justin Snow
01-11-2013 #39
Registered User
- Join Date
- Sep 2007
- Location
- York, Pa
- Posts
- 457
Quick round of filler just to fill in some low spots and slight imperfections, then it will get epoxy primer. Looks worse than it is I think.
Justin Snow
01-11-2013 #40
Registered User
- Join Date
- Sep 2007
- Location
- York, Pa
- Posts
- 457
Seam sealed everything before primer.
Justin Snow

 Reply With Quote
 1967 Oldsmobile Cutlass