

Results 81 to 100 of 112
Hybrid View


-
12-03-2012 #1

 Registered User
- Join Date
- Dec 2007
- Posts
- 284
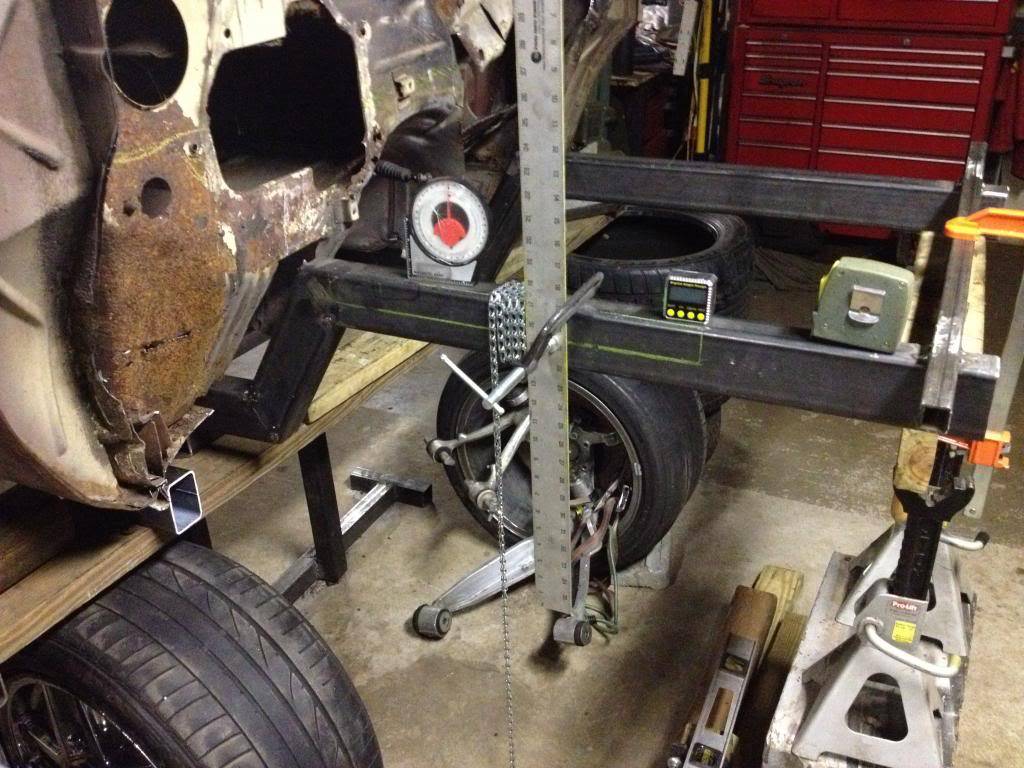
ok, so armed with a little info looks like if i move the upper control arm mounts forward .375 inches it should lower the caster to approximately 6 degrees.
I was thinking, when we did alignments of course we could not move the pick up points forward or backward or up or down, to add subtract caster you
had to stagger the upper shims if I remember right.
I think its coming together, I should have a rack in this week so thats the next and probably biggest part of this puzzle to come.
Thanks for all the help. I am trying to push my knowledge this is the biggest project I have taken on.
Rick
-
12-04-2012 #2 Registered User
- Join Date
- Oct 2009
- Location
- New Derry, PA
- Posts
- 1,265
 If your floor is level, or you have a "smart level", you can use this simple fixture to "pre-set" the caster on the spindle. This one is for that same truck I posted pics of earlier.
 Originally Posted by avewhtboy


Ray Kaufman - Wyotech Chassis Fab and High Performance Instructor. Words of Wisdom from an old master... at Asylum Custom Interiors website
12-04-2012 #3
Registered User
- Join Date
- Dec 2007
- Posts
- 284
thanks Ray I will be looking to set something like that up once I get all the pieces to the puzzle.
12-04-2012 #4
Registered User
- Join Date
- Dec 2007
- Posts
- 284
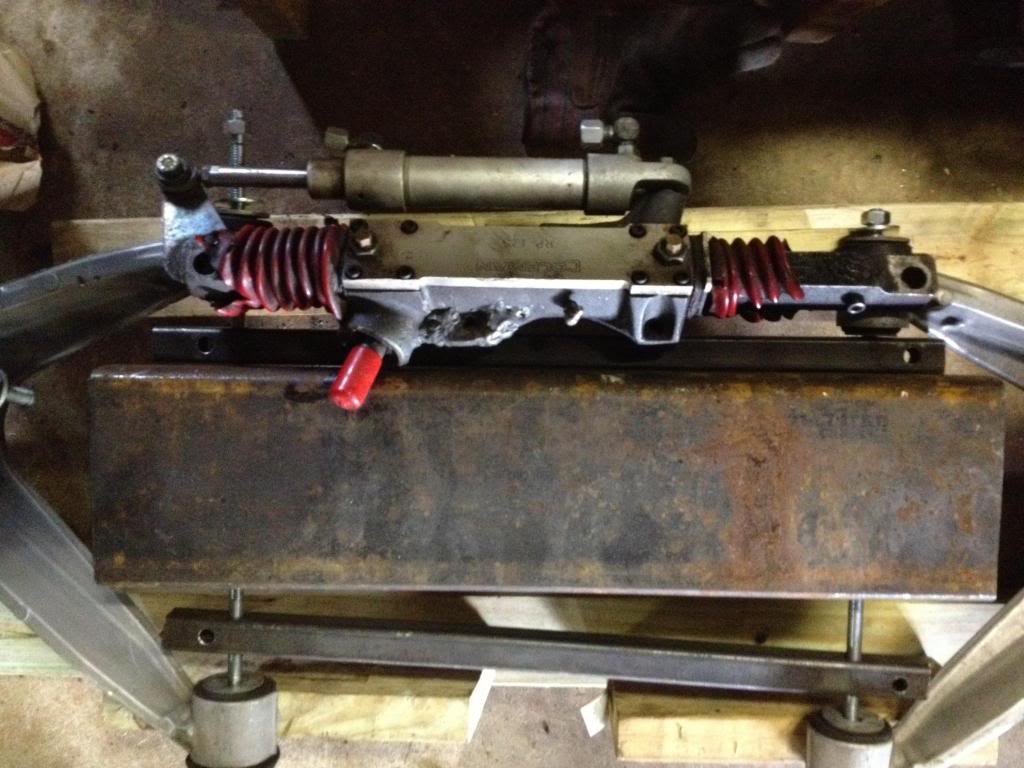
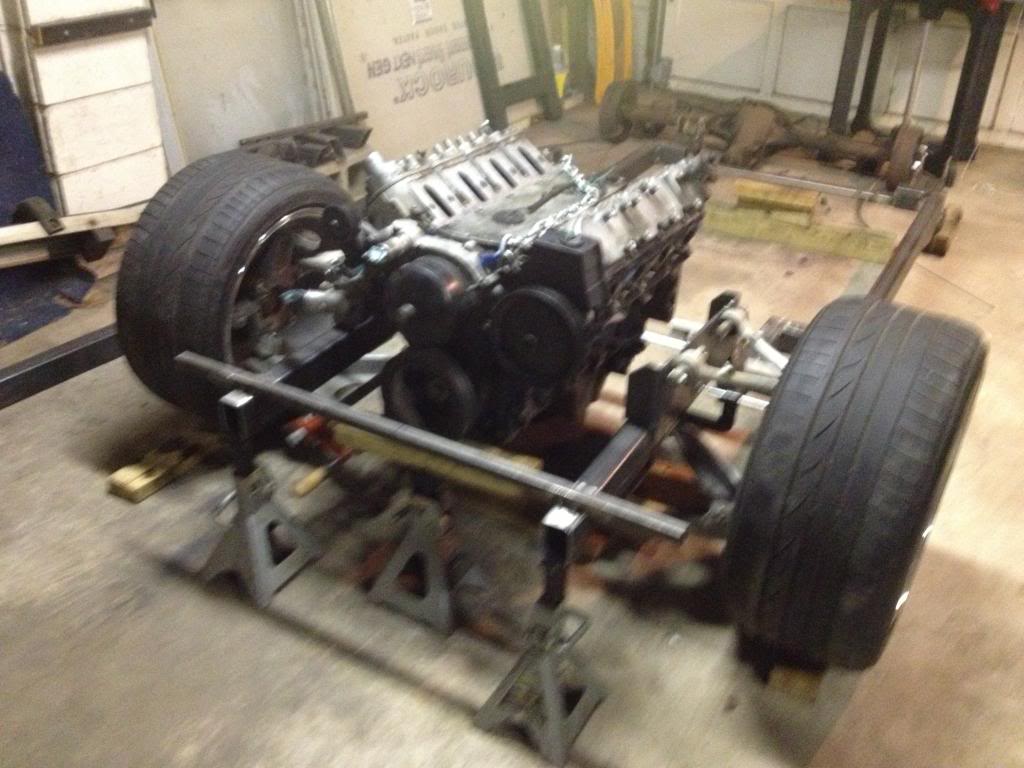
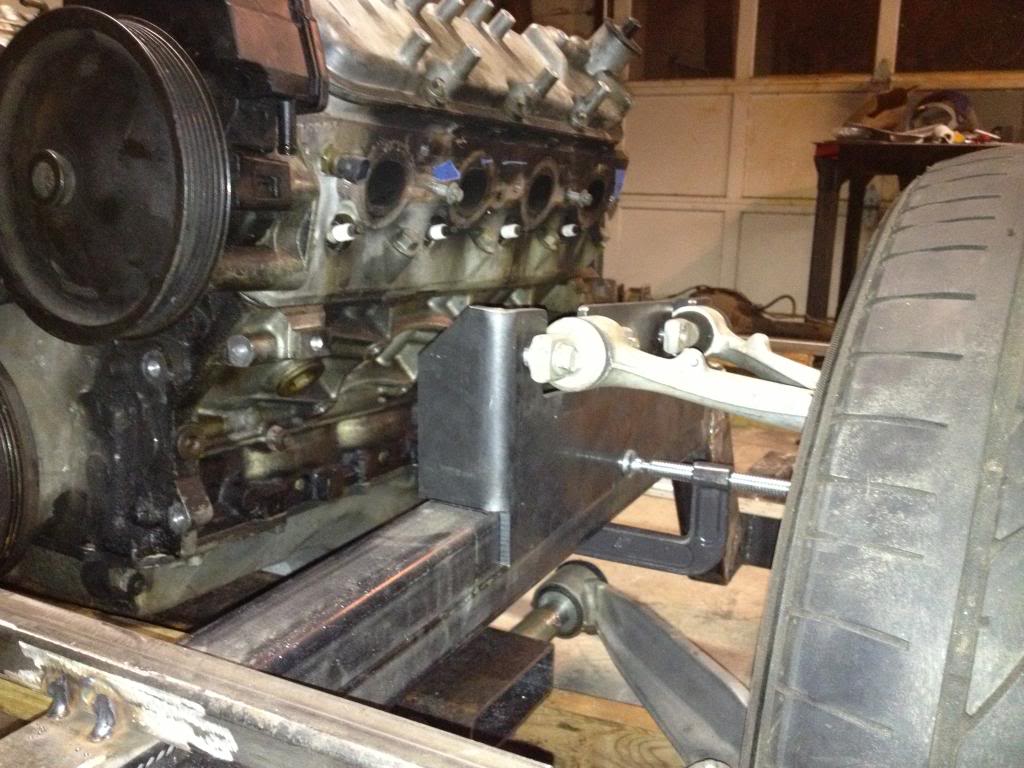
Got the steering rack I won off of ebay, a little rough around the edges, but really needed something just to stick in place for measuring.
I hope this works, I think the make one narrower by about a half inch if I need to.
12-06-2012 #5
Registered User
- Join Date
- Dec 2007
- Posts
- 284
Got some upper control arm brackets cut
12-06-2012 #6 Registered User
- Join Date
- Sep 2007
- Location
- Buford, GA
- Posts
- 923
Good progress.
Did you cut into the firewall? Any progress on the framerails or crossmembers?Adam
1985 S10 - LT1 + T56
1964 Chevy II 4-Door - LS1 + T56
12-18-2012 #7
Registered User
- Join Date
- Dec 2007
- Posts
- 284
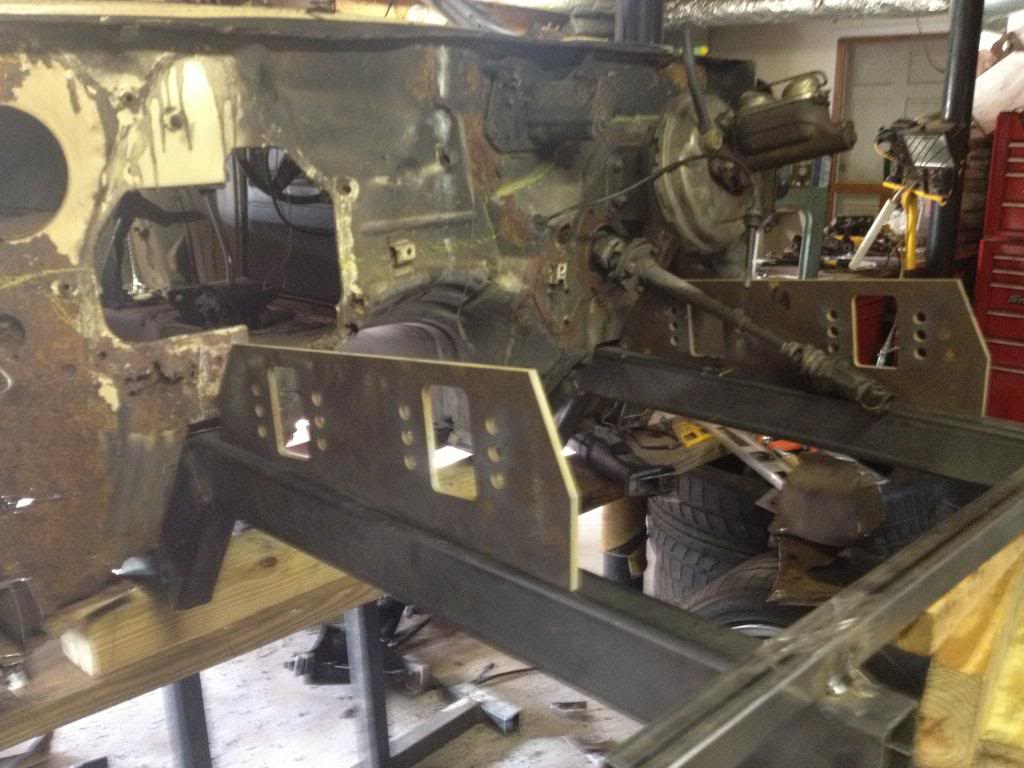
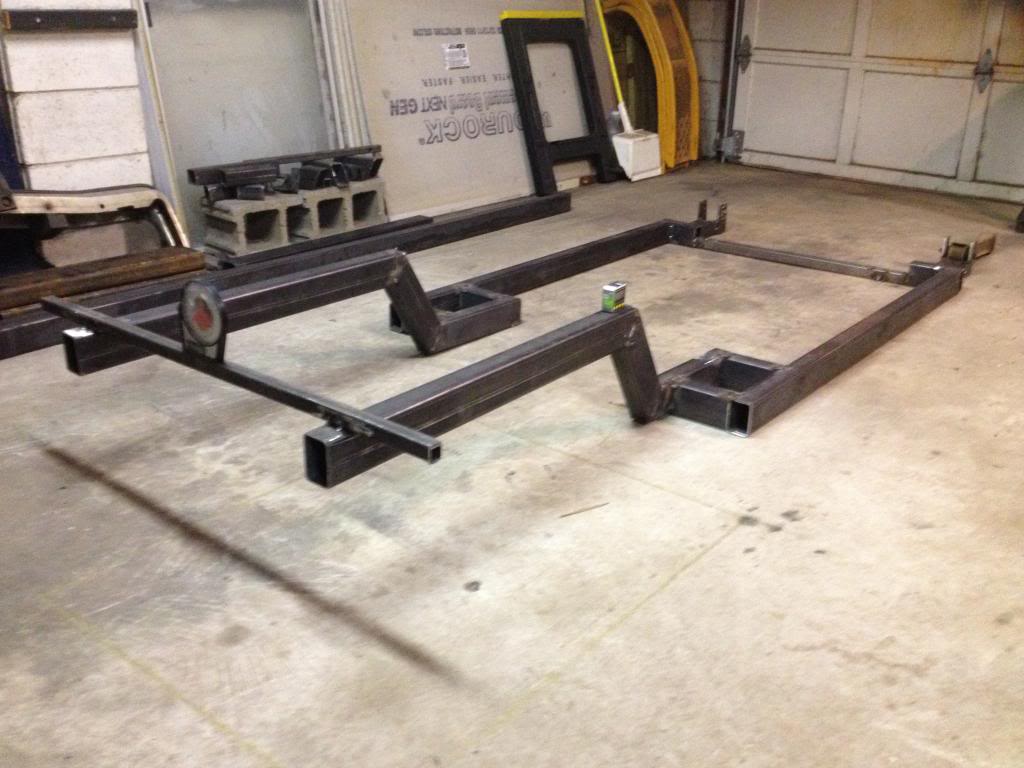
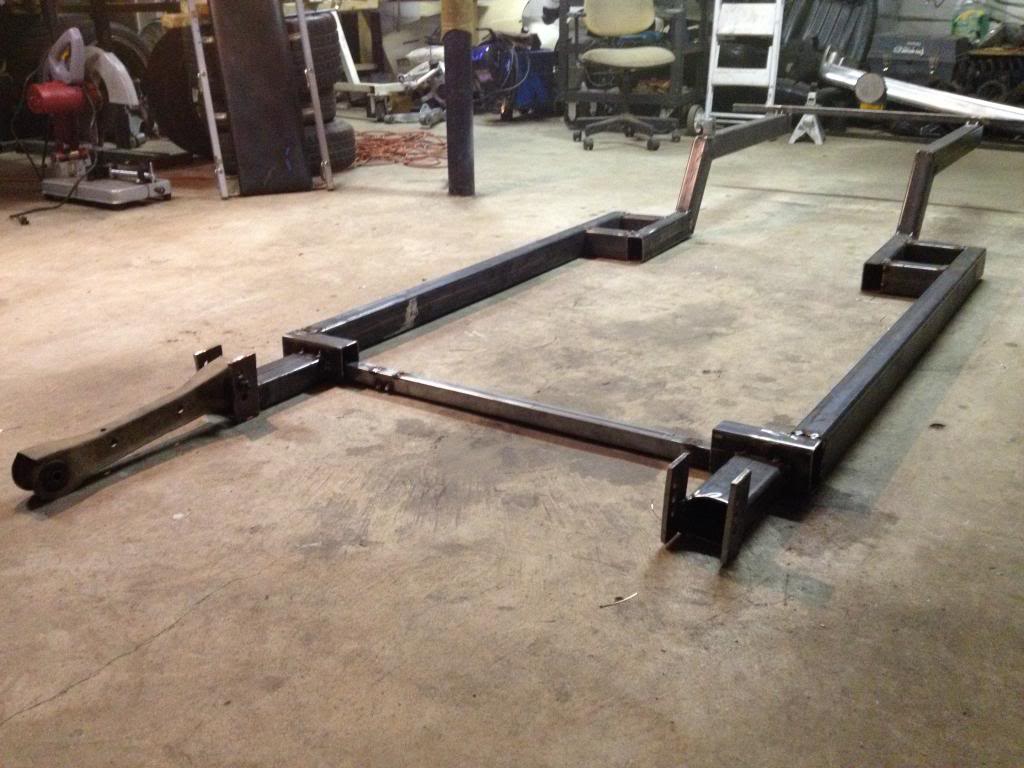
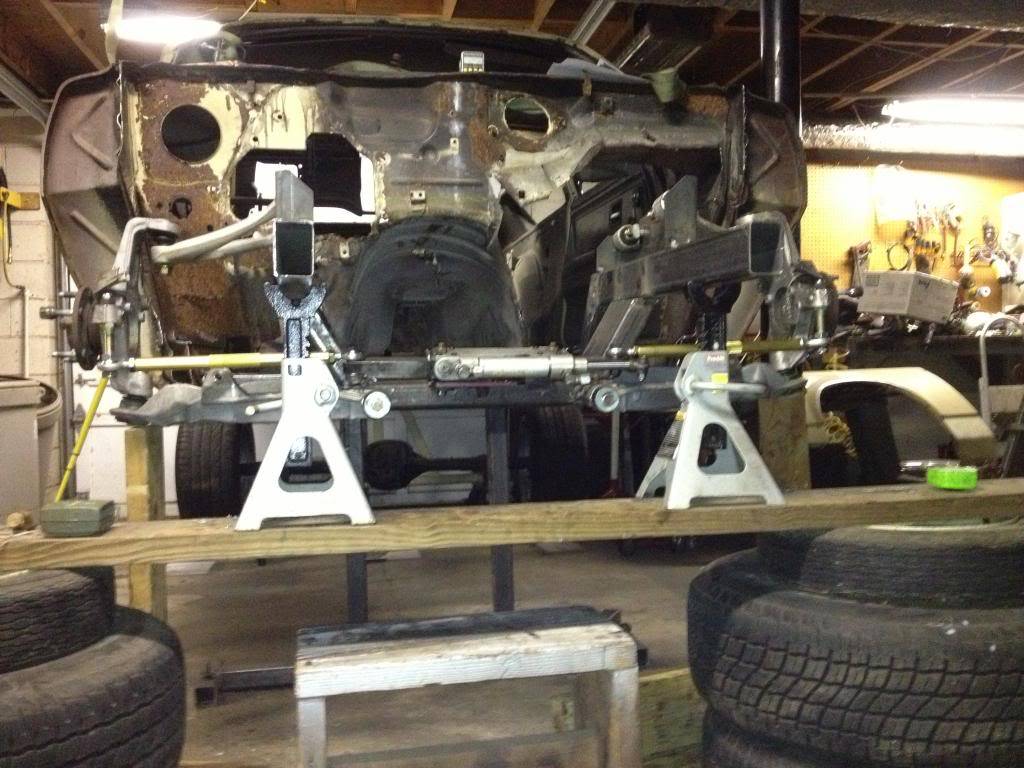
So moving along slowly with this little project. The brackets I had made were just massive, so decided to have a second set
made, thanks Scott!.
I cut the firewall out more and fabbed up the subframe connectors that will meet up with the new frame rails.
Also I got some tubing to make the front lower control arm mounts.
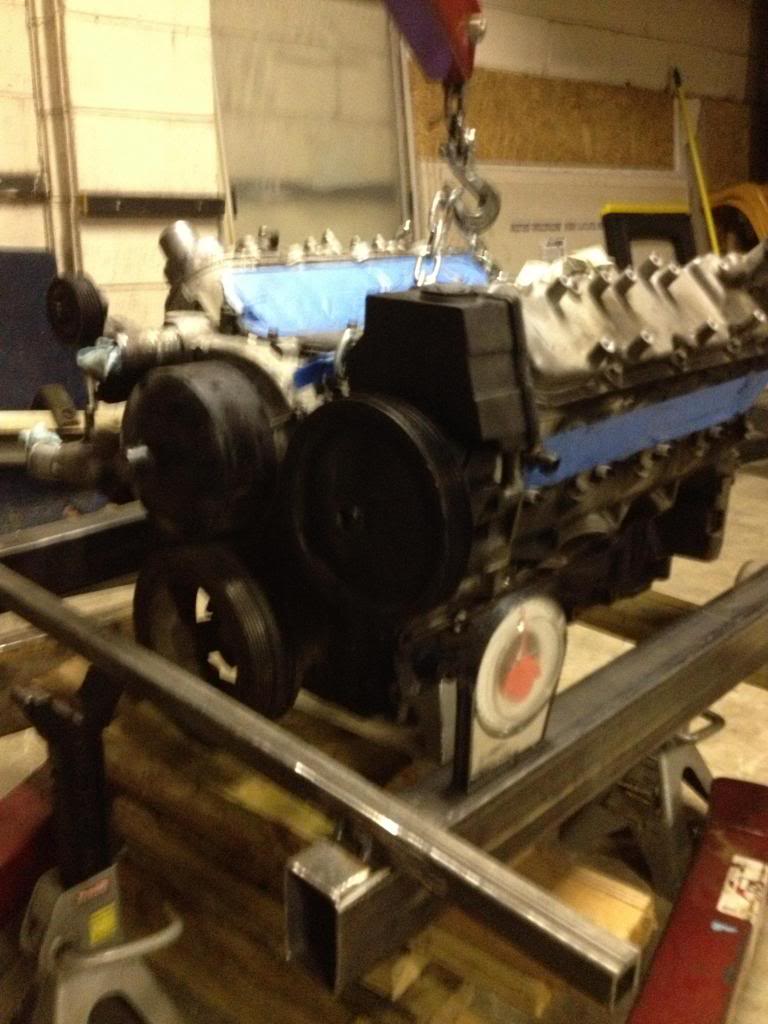
Then I got scared that I was going to get all this welded up and have no room for a motor so I bought one, I think
there is going to be plenty of room.
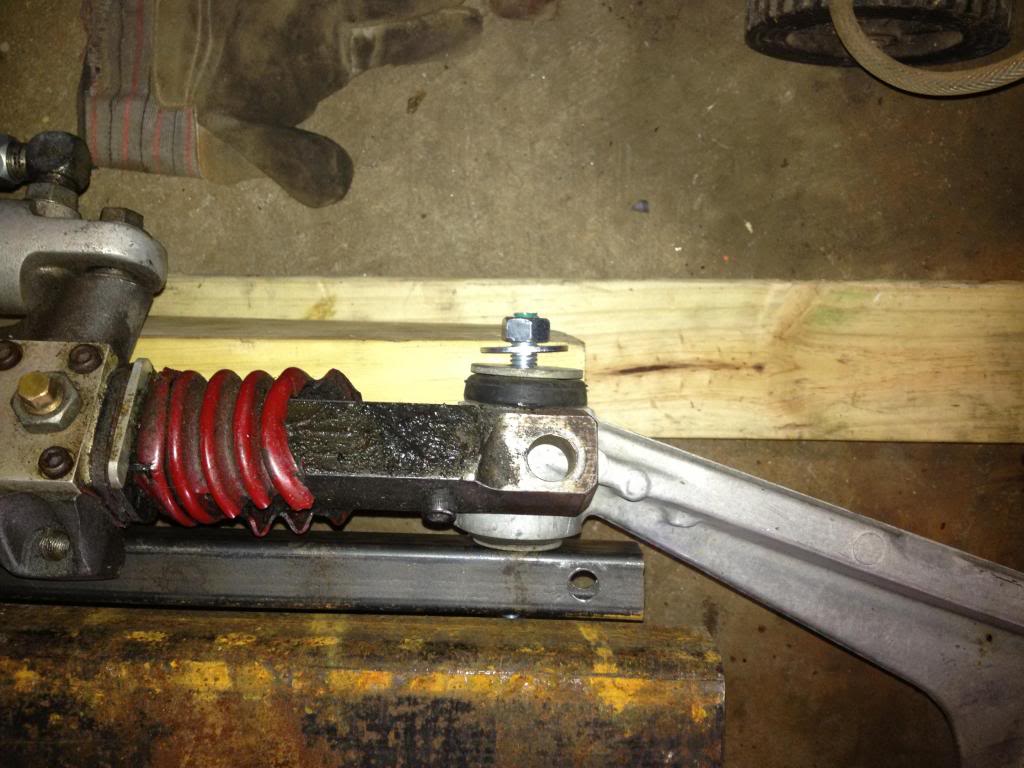
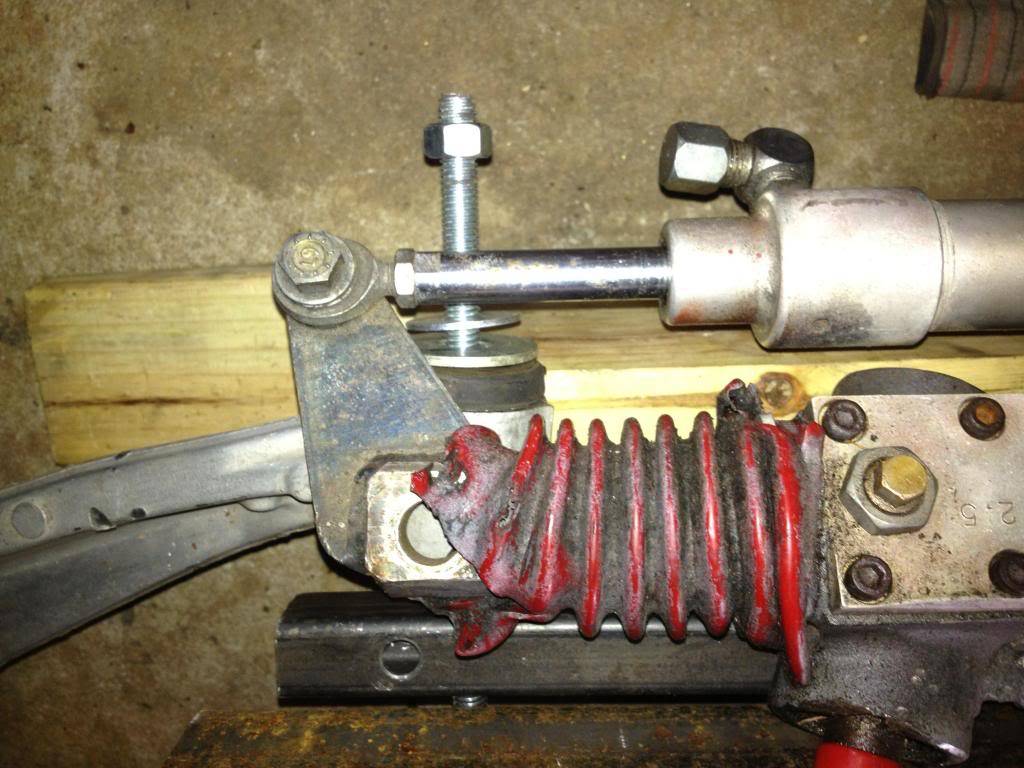
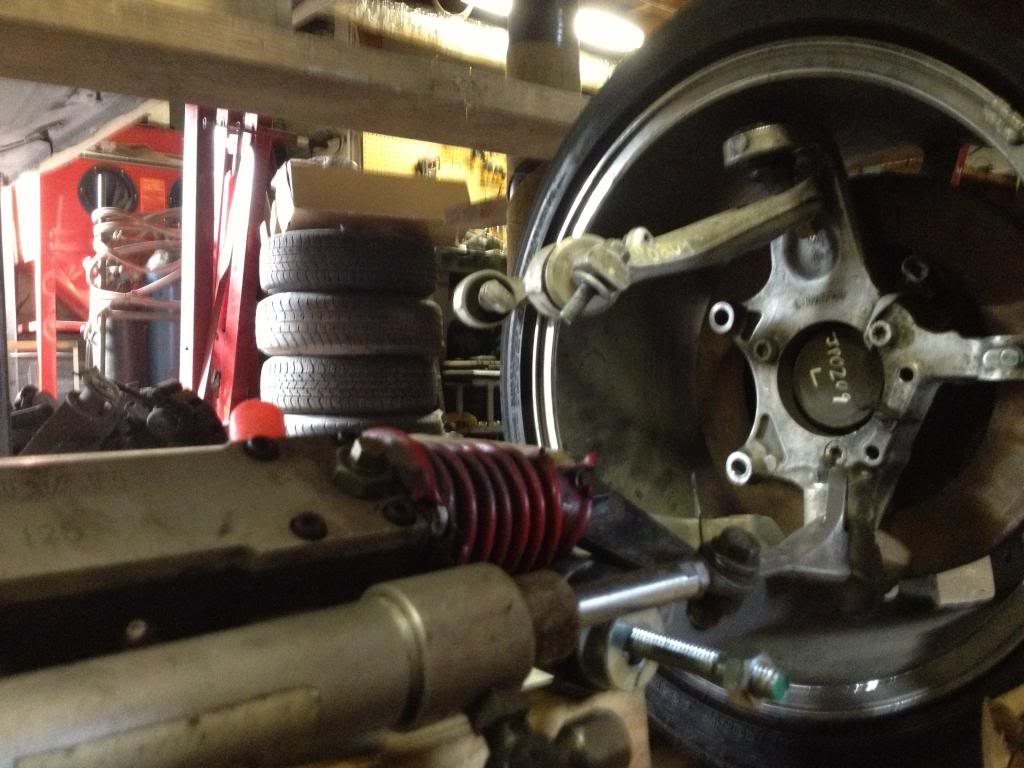
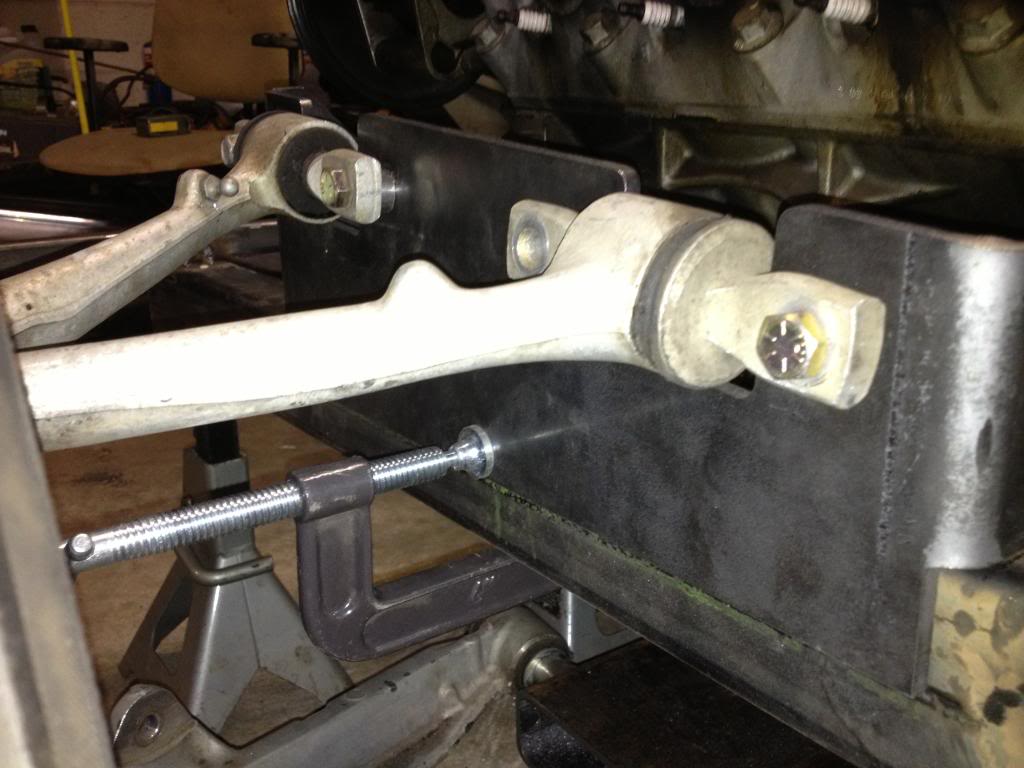
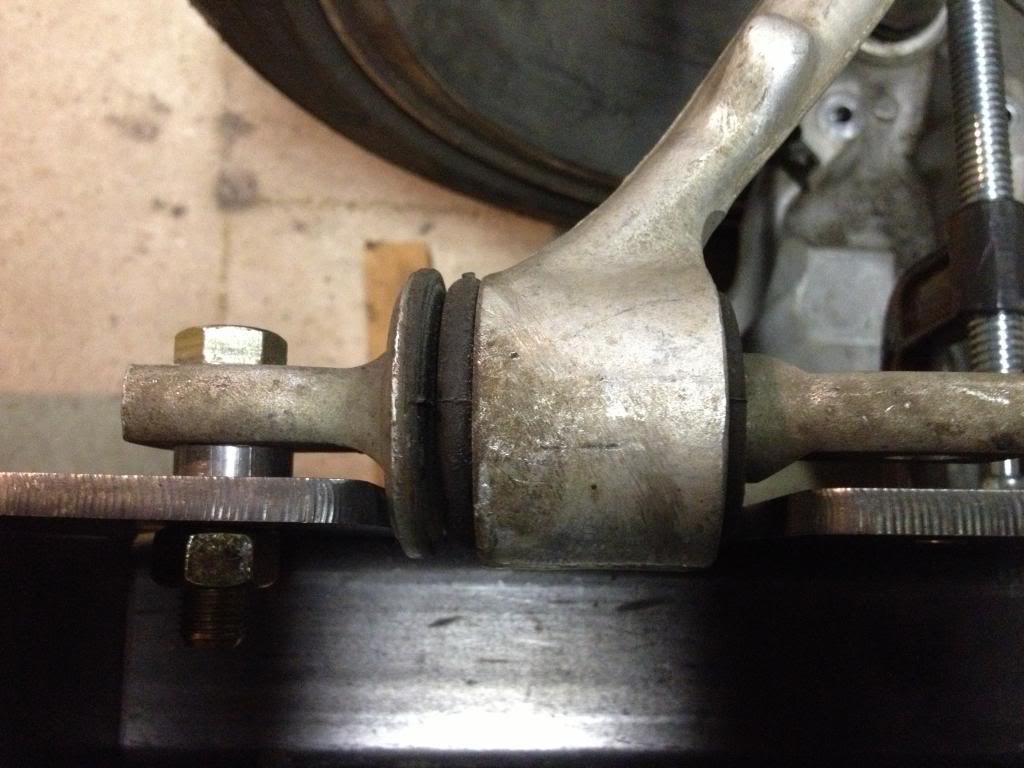
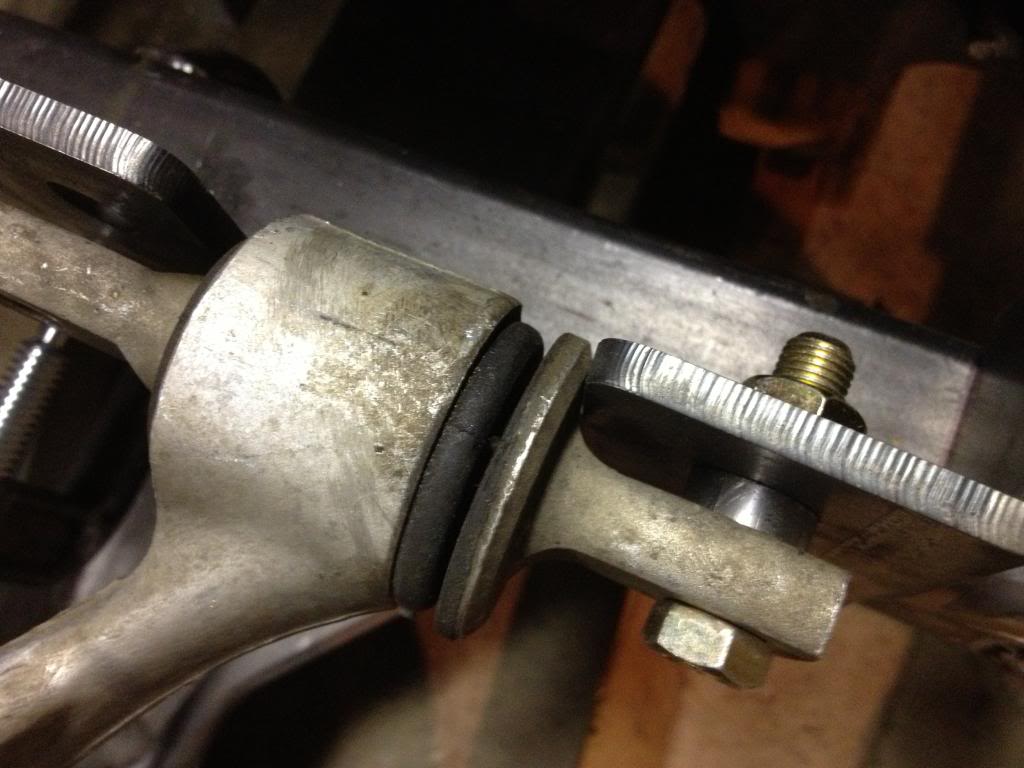
I need to find some way to connect the Coleman rack end to the corvette spindle. What I am wondering is the taper
on the corvette tie rod end the same as other GM spindles? The corvette tie rod end has 14mm thread where I believe
I believe I need 5/8 since sleeves etc are more readily available.
12-18-2012 #8
 Registered User
- Join Date
- Jul 2005
- Location
- Eastern Virginia
- Posts
- 3,963
New brackets in the mail:

Scot
86 Monte SS

12-19-2012 #9
Registered User
- Join Date
- Sep 2004
- Posts
- 86
New brackets in the mail
maybe i missed it..but where can i get some of these?
12-18-2012 #10
Registered User
- Join Date
- Oct 2009
- Location
- New Derry, PA
- Posts
- 1,265
You can solve your tie rod attachment problem with a bump steer kit. It's a stud that has a tie rod taper on one end, and a straight shank for a heim on the other. I don't know if they are made specifically for Corvettes, but I'd bet the steering arm taper is common GM...
Then use heims at the rack and the steering arm with adjustable sleeves.
Ray Kaufman - Wyotech Chassis Fab and High Performance Instructor. Words of Wisdom from an old master... at Asylum Custom Interiors website
12-18-2012 #11
Registered User
- Join Date
- Dec 2007
- Posts
- 284
Thanks Scot and Ray, I think I may go to the local auto parts store and try to do some comparison shopping, Maybe I will buy a few different style
rod end and see which one fits best.
Once I figure out which rod end to use then I can get the rest sorted out. I would rather do that then the bumpsteer kit, but I may find that I need
that kit anyway!
12-19-2012 #12
Registered User
- Join Date
- Oct 2009
- Location
- New Derry, PA
- Posts
- 1,265
I was kind of thinking that as well... Originally Posted by avewhtboy
Ray Kaufman - Wyotech Chassis Fab and High Performance Instructor. Words of Wisdom from an old master... at Asylum Custom Interiors website
12-19-2012 #13
Registered User
- Join Date
- Dec 2007
- Posts
- 284
I got them from a member here, the guy that posted the pictures as a matter of fact.
May want to send him a private message. Great guy, saved me a lot of time trying to make these.
12-22-2012 #14
Registered User
- Join Date
- Dec 2007
- Posts
- 284
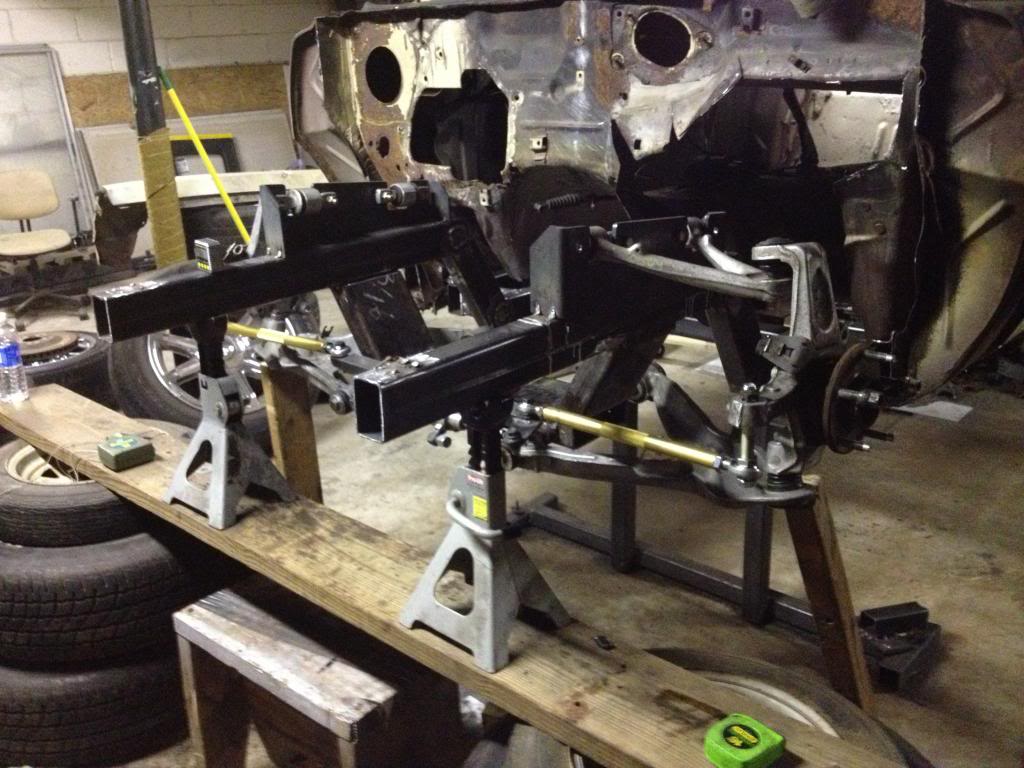
Got the upper control arm brackets in and mocked up. They look much better fit pretty good.
The rear relief for the rear control arm bushing is too close on one side, will probably need
to open that a little but other than that seems to fit really nice.

12-23-2012 #15 Registered User
- Join Date
- Sep 2006
- Location
- Southern Indiana
- Posts
- 4,709
Well many people say a Vega has a bad suspension, yet several have made them handle. As for bad design, not really. I know of three Vega/Monza cars with simple redesigned arms and different spindles and after some minor mods the cars handled pretty good. I got to see IMSA race car once, all the front end was welded up good as the cars lacked enough pinch welds and limited pinchweld gap clearance attention. WHY these cars were meant as cheap economy cars, at the time attention to close gaps and fitment were not considered critical.
Jeff at Schwartz Performance proved they could be made to handle and run good and didnt even take huge wheels or large amounts of power, his was powered by a aluminum 5.3 from Buick version of Trailblazer.
As for fitting huge wheels, well yeah then you need to cut a car up, and drop it on another frame.
Lots of work.
Me, I am working with what my car has. If I need to make slight tweaks to the control arms, ok. But to cut a car up well you have to be ready to destroy something.
You seem to forget that many people think MustangII frontends are lousy YET so many people have adapted them to fit and actually work.
I see a lot of work, and dont get me wrong, I understand why, I just see a lot of work designing a frame.
Why not simply buy one of the race car frames like Alston (I heard guy in Ill bought them and is still in business.) S&W and others. buy one of those, add in a suspension that fits and works and drop the body OVER it?
Then you could have a perfect platform to add in ANY front or rear design you wanted.
I have several plots of a H body front end from an alignment machine, just got them from friend who wanted to know if his car was bent. He made adjusting lock places for lower arm adjusters. He set lower arms in and out and front out and back in and so forth.
Marcus says that the design is bad, yet so far I havent seen anything horrible. It was just built for utilitarian use, NOT turning a corner.
After some minor fixes the Fbody subs do pretty good, most of the companies have redesigned bolt on parts, maybe drilled some new holes but the actual mounting point wasnt changed, just the height of the pivot point.
As for me I am working on ways to make what I have on my Monza work better. If it takes making new arms, guess I might. But one guy started making lower arms, may look into what "fixes " they make or if I can modify those. But Marcus said he could make me upper control arms so after new year I am gonna send him some H body uppers, well at least one, to make me SPC adjustables. I figure if done right I could use either H body upper joints OR S10 also so if I need takk uppers G body stuff will work for me.
My next fix is proper fixes for the steering as I will have Lee go through my box next year too.
But good luck with your project, hope it comes out like you want.Lee Abel
AFTERMARKET PERFORMANCE
1977 Chevy Monza 2+2:Project "Cheap Trick"
1978 C10 Long bed , On air and trailer puller
2006 Buell Blast ,Just a bike to ride and for mileage
1966 Caprice 4dr Sports Roof fact.327/now 350/SOON 454???? Project "II Old,,,ZERO BUDGET OR LESS CAPRICE!"
12-24-2012 #16
Registered User
- Join Date
- Dec 2007
- Posts
- 284
Hey Lee, thanks for your thoughts, I have read a lot of your posts here and there so I realize you have put a lot of time and
effort into all things h-body and pro touring.
This project has been in my mind for at least 5 years so I am enjoying finally getting along with it. For me, after weighing the
pros and cons of the stock front suspension and how far you can take it verses a custom front clip I decided to front clip it.
I did this after reading many threads on hbody forum regarding the front suspension and speaking with Marcus.
Once I decided to front clip it I contacted several manufacturers regarding what they have available or could build and came close
to buying the mustang two clip, but there was just enough negative reasons (for me) to not use that set up.
So next, If say I want to spend $5-7k, I need to provide a list of all the specs so they can build it. By the time I came up with
the specs I decided I can build it myself and save $4-6K. Now it will not be as pretty and I am sure to encounter some problems
along the way, but I am as much about learning new things and pushing myself to do more than about just bolting things on because
people say this is the way to go.
As far as those fast Vegas out there road racing. I think that says more about the ability of the drivers wheeling those things
than the cars themselves. I however am no hot shoe driver so I hope to create a better platform to hone my driving skills on
with the added opportunity to keep improving on the platform the car is built upon.
01-04-2013 #17
Registered User
- Join Date
- Dec 2007
- Posts
- 284
Odd, just noticed in upper right hand corner this thread is listed under "items for sale" ???
I have been piddling in the garage over the holidays got a little further with this.
01-05-2013 #18
Registered User
- Join Date
- Sep 2007
- Location
- Buford, GA
- Posts
- 923
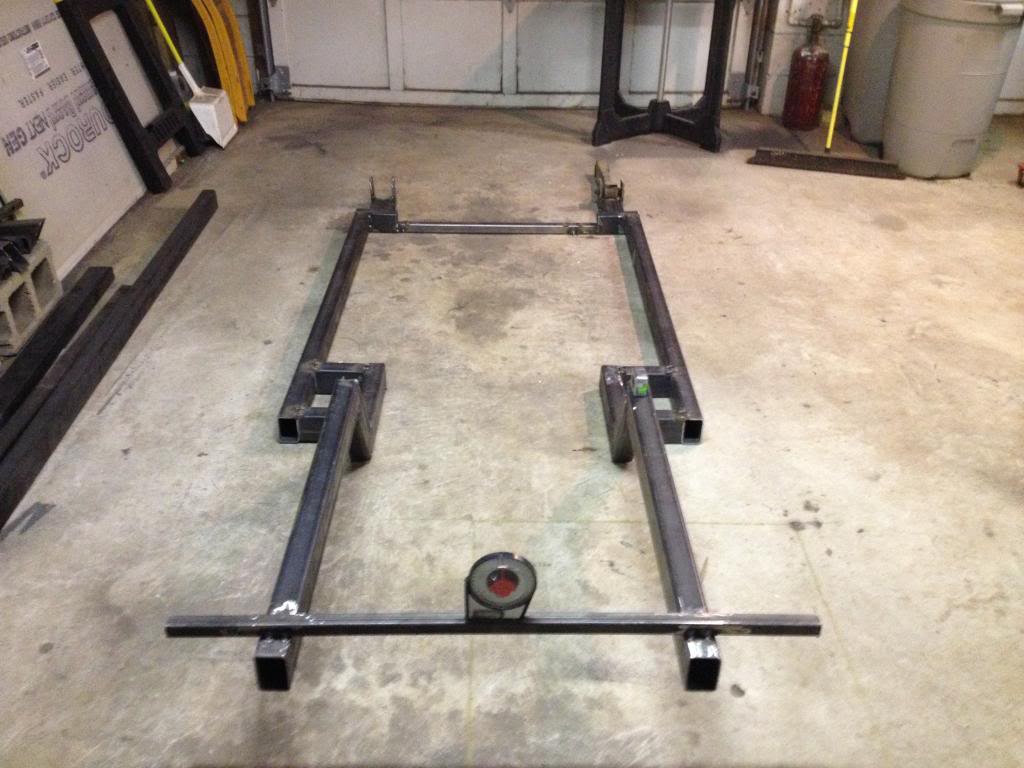
Your crossmember "kick-downs" should have been notched so they hit both the sides and bottoms of the framerails. That's the connection point that's going to handle the "loads" of the suspension and transfer them to the frame. Just a thought.
Adam
1985 S10 - LT1 + T56
1964 Chevy II 4-Door - LS1 + T56
01-06-2013 #19
Registered User
- Join Date
- Dec 2007
- Posts
- 284
Not sure what you are talking about, they do touch everywhere and that crossmember is 2x6 rather than 2x4 that most people use so it should Originally Posted by HectorM52
be plenty strong.
01-06-2013 #20 Registered User
- Join Date
- Dec 2006
- Location
- Out of the Burbs of Detroit to SoCal, then onto my ancestral homeland, the woods of Cascadia
- Posts
- 1,753
Originally Posted by HectorM52
I think Hector is suggesting you would improve strength of the assembly, and fatigue resistance, if the top of the kick down, where you currently engage the bottom of the frame rail , was narrower; and you were to engage both the bottom of the longitudinal rail and the inner vertical surface of the rail. Results in putting some of the shear load into compression and generally increases weld area. Originally Posted by avewhtboy
I. watching this thread, as I'm also interested in a narrow track front suspension to replace the Mac Strut in my Capri....Greg Fast
(yes, the last name is spelled correctly)
1970 Camaro RS Clone
1984 el Camino
1973 MGB vintage E/Prod race car
(Soon to be an SCCA H/Prod limited prep)

 Reply With Quote


