Results 241 to 260 of 268
Thread: 1976 Trans Am Resto-Mod
-
04-08-2013 #241

 Registered User
- Join Date
- Dec 2005
- Location
- Birmingham, AL
- Posts
- 3,355

I have thought about notching one too. The Spectra tank seems to get mixed reviews. It seems like somebody was coming out with a plug and play First gen tank, but they hadn't done a second gen tank yet. I figure when they do, it will be a 70-73 tank.
Stephen
-
04-08-2013 #242
Registered User
- Join Date
- Aug 2007
- Posts
- 1,239
Man, lots of good work!! Looking good.. you and I will be finished right around the same time..
 My brakes and Hydraulic clutch are done.. Im hoping to do a road test on this Saturday or Sunday
04-08-2013 #243 Registered User
- Join Date
- Sep 2009
- Posts
- 2,951
Spectra already has a plug and play 70-73 tank Originally Posted by srh3trinity

1955 Nomad project LC9, 4L80e, C5 brakes, Vision wheels
1968 Camaro 6.2 w/ LSA, TR6060-Magnum hybrid and etc SOLD
1976 T/A LS1 6 Speed, and etc. SOLD
Follow me on Instagram: ryeguy2006a
04-08-2013 #244
Registered User
- Join Date
- Sep 2009
- Posts
- 2,951
Kevin, you will be done way before me. I am hoping to have mine done by the end of the month but that may be a stretch. Originally Posted by qnitro
1955 Nomad project LC9, 4L80e, C5 brakes, Vision wheels
1968 Camaro 6.2 w/ LSA, TR6060-Magnum hybrid and etc SOLD
1976 T/A LS1 6 Speed, and etc. SOLD
Follow me on Instagram: ryeguy2006a
04-15-2013 #245
Registered User
- Join Date
- Sep 2009
- Posts
- 2,951
I made a lot more progress this weekend towards getting the car back on the road. And what everyone has been asking for, finally a video of the car running to prove that I really did get it running. I will start with the things that lead up to me getting it running for more than just 30 seconds.
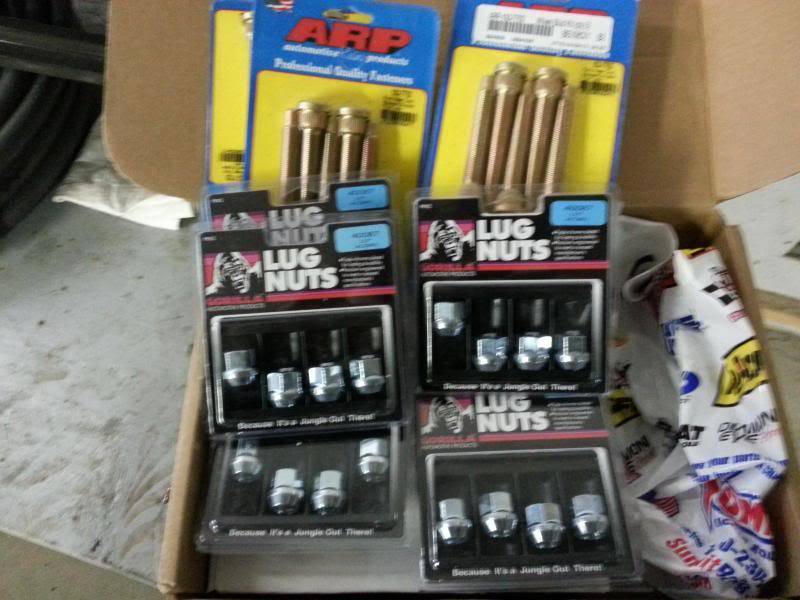
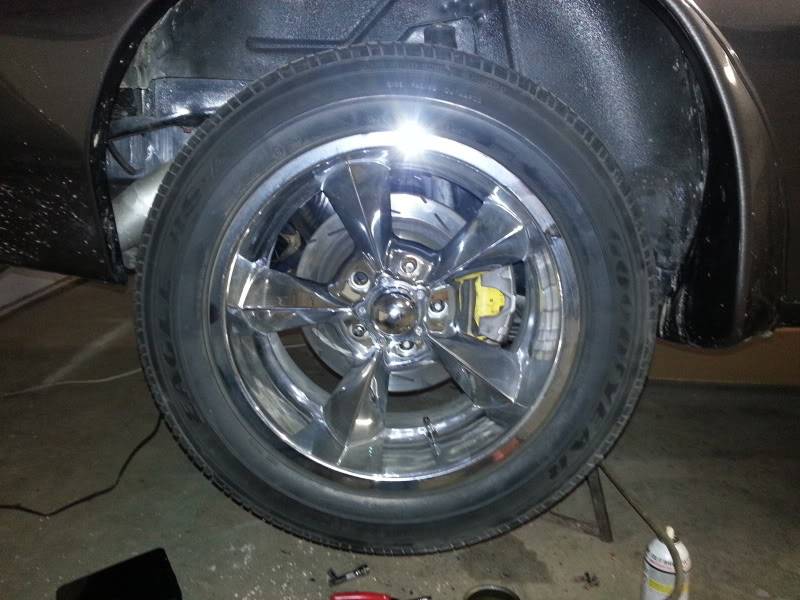
In preparation for the rear disk brakes I will be running and the front brake upgrade I have currently. I needed to upgrade my wheel studs. Since it is going to cost the same, I decided to upgrade to the 1/2 ARP studs with open face Gorilla lugs. With these I will be able to get full lug nut thread engagement, and will more than likely trim the extra length off of the lugs for a cleaner look. I will need to pull my hubs and axles off and drill out my holes in a drill press and then have the new studs pressed into place. Also, what isn't shown is the wheel spacers that I bought for the front. With new brake pads in the front, the caliper would be pressed out too far and contact the spokes of my wheel. The spacers are slightly more than 1/4" so it shouldn't affect the fitment of my front wheels too drastically.
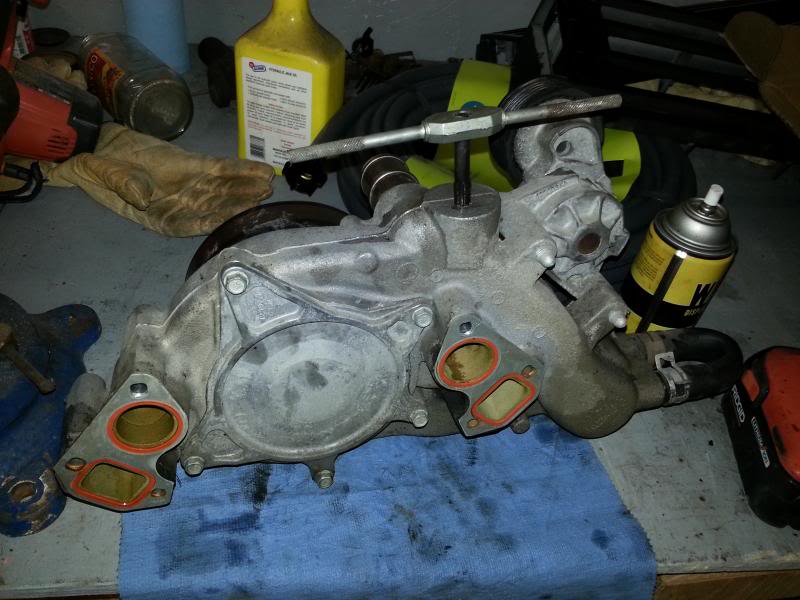
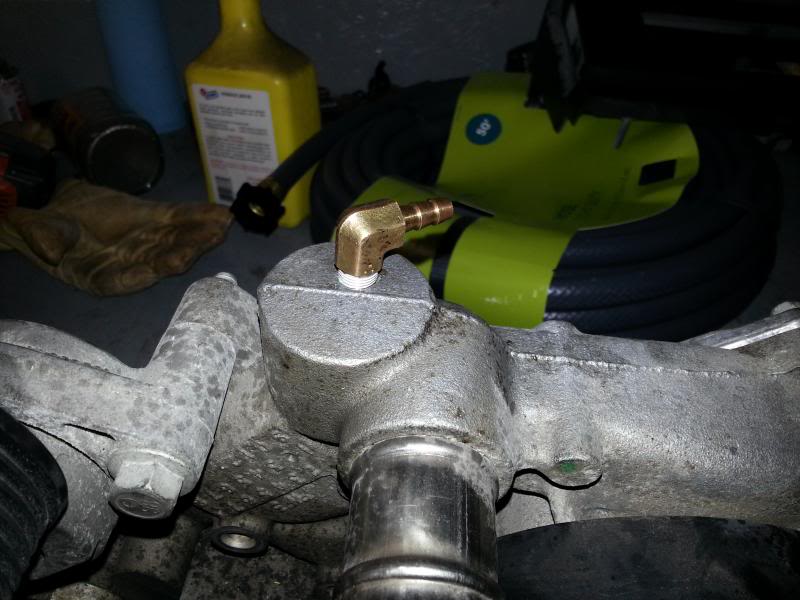
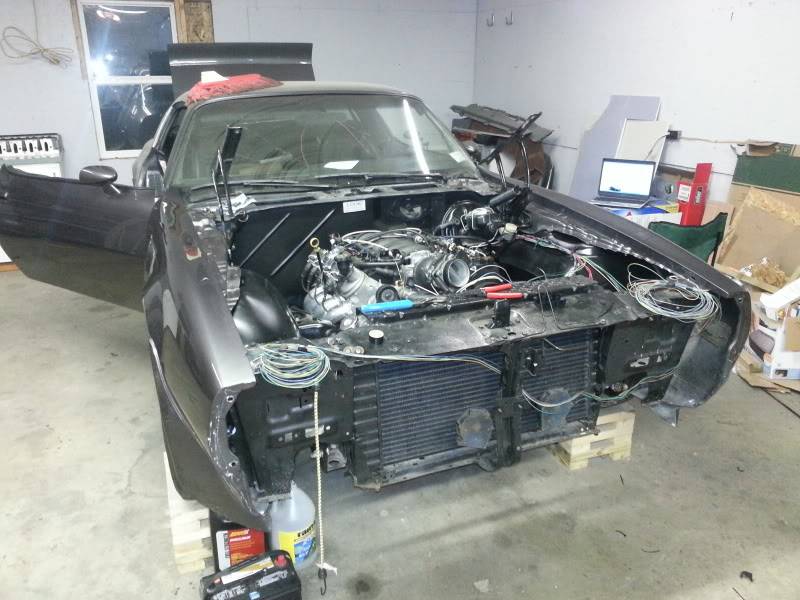
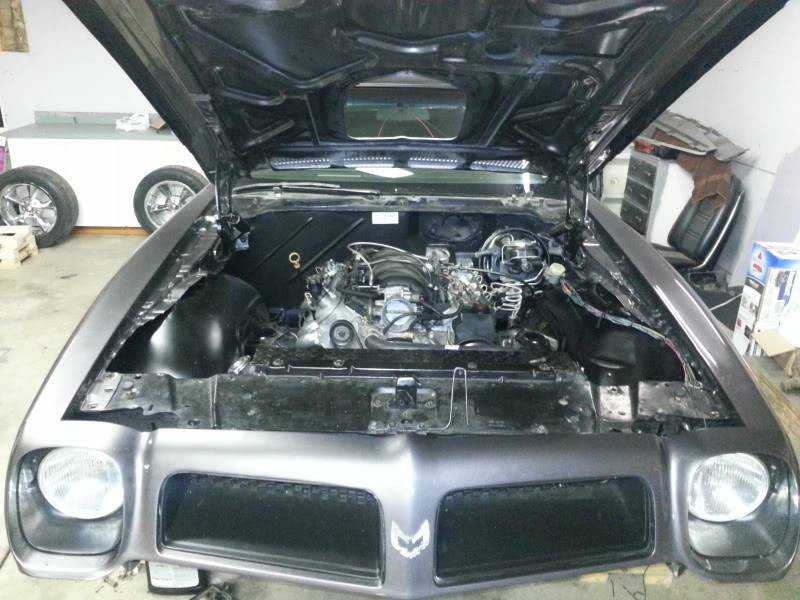
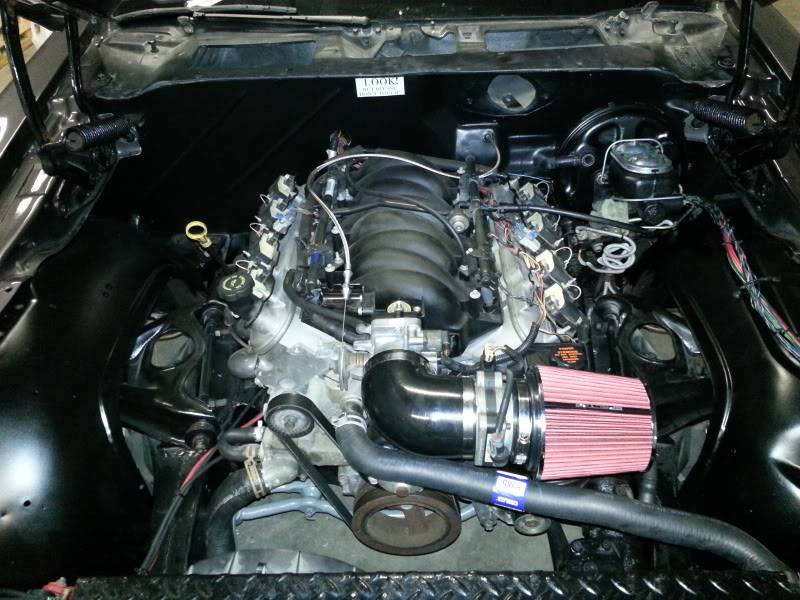
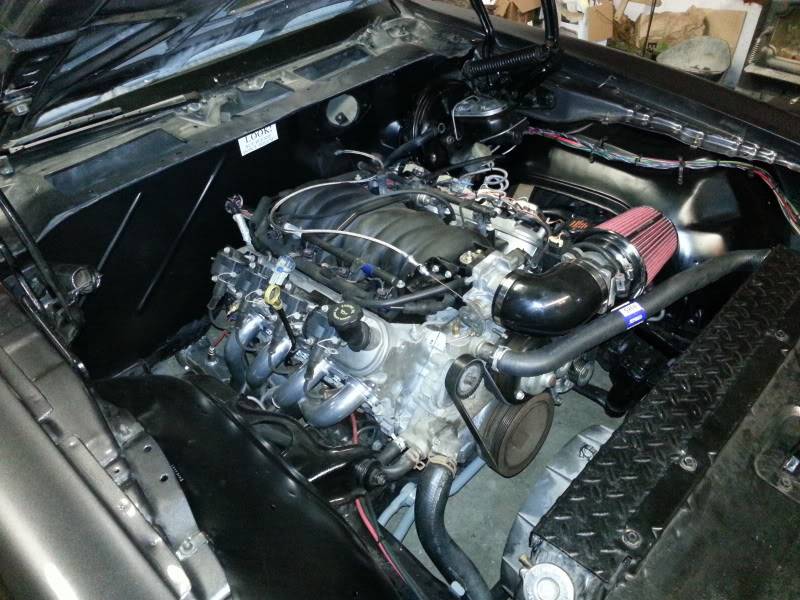
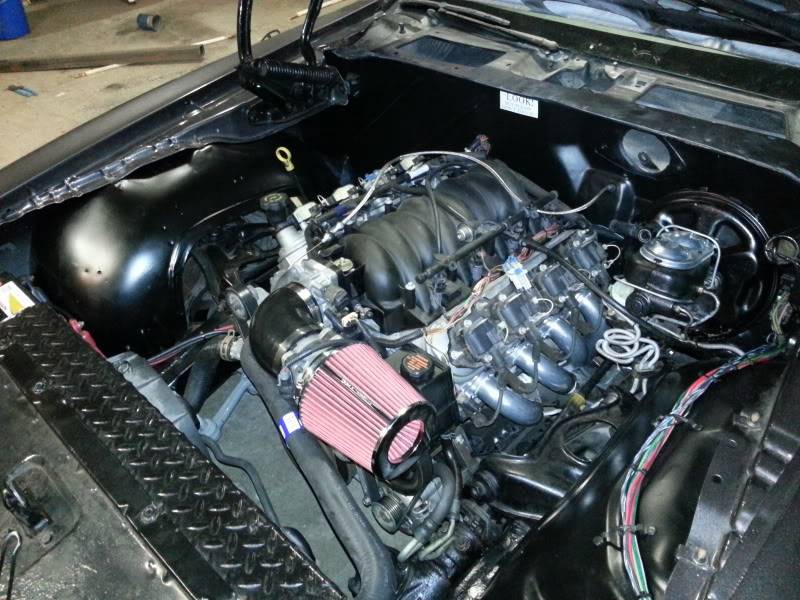
After much research and going back and forth, I decided that the most effective way to deal with the steam ports on the LS1 was to route the coolant through to the water pump. I had to drill and tap my water pump for 1/8" NPT and will put in a 90* barbed fitting and re-routed the steam coolant passages to the water pump. On the stock coolant system in the Camaro, the coolant was routed throught the throttle body, then to the radiator. So, by not having 200* coolant flowing through my throttle body, I should pick up ~5 HP and it makes for a cleaner look. And for those that may ask, there is no interference with the throttlebody or cable.
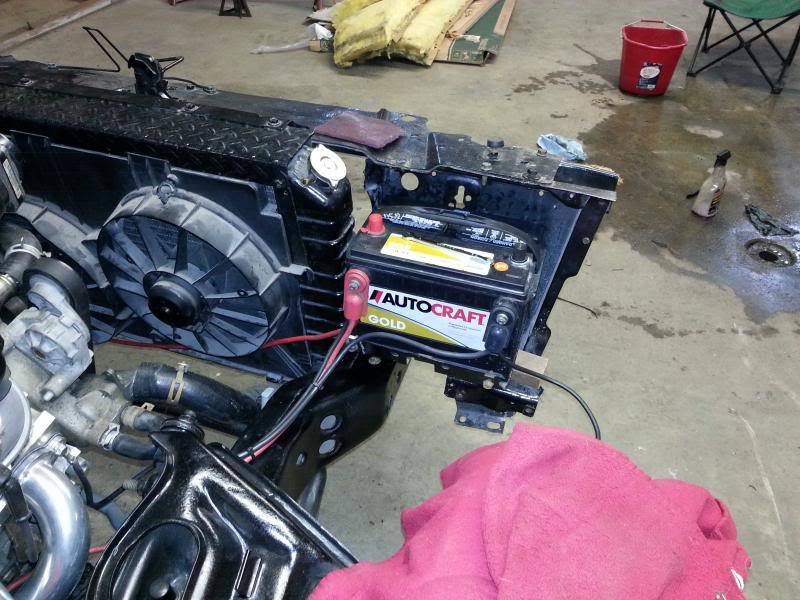
Due to the way that the LS1 motor is setup, I had to relocate my battery to the passenger's side. Great thing about the way that GM made our cars, is that the core support is symetrical, so it just bolted in. Always cool when stuff like that works out!
One other obstacle that I had gone back and forth with was what to do about my power steering pump and lines. The LS1 has metric fittings on the lines, and the stock 1976 steering box I had was metric, and also used different fittings. So, I either took the lines and had them reflared, or I could use a metric box. So, after looking around on the good old internet, I found out that there are several boxes out there in Junkyards that are bolt in and metric. But what gets even better, is that some of the boxes not only bolt into the car and have the correct fittings for the lines, but have a quick ratio steering! I have a buddy who had the exact box I needed. So, after a little elbow grease and paint, I took my old box off and bolted this new box on. Almost too easy.

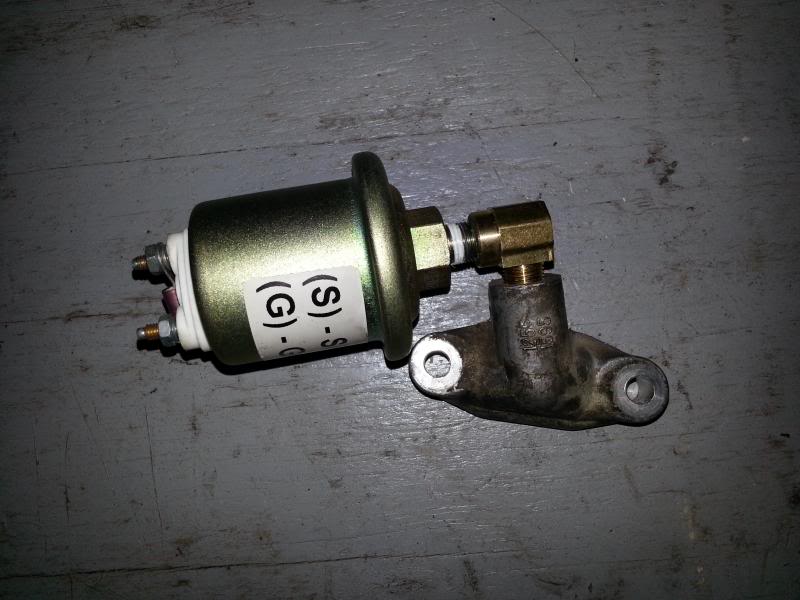
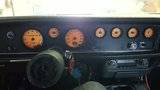
The last sensor that I needed to hook up was my oil pressure sensor. Now, with the Speedhut gauges, they require their own sensor for the gauge to fully function, so I had to find a port for the sensor. I don't like the look of the redundant sensors, but unfortunately I don't have a choice on this one. A little research yielded me some nice results. The block off plate above the oil filter on the LS1's can be tapped to put a sensor, and great thing is it is down low and completely hidden from sight. The sensor was too close to the exhaust so I needed to get it in a different direction. I bought a 90* fitting from Lowes (I plan to buy a 45* in, but that was all they had) and installed it so it was closer to the engine and away from the headers.
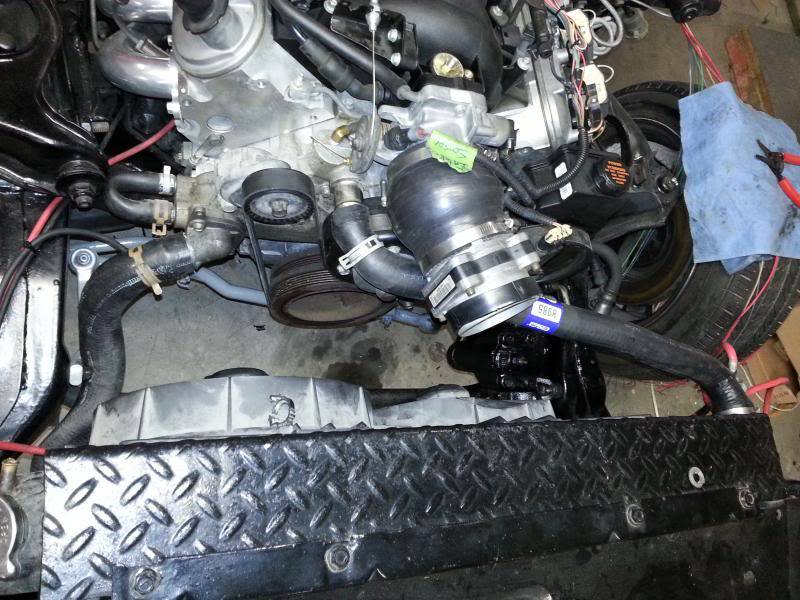
I forgot to get a picture before I put the radiator on again, but the serp belt and all accessories are installed.
Ok, so what everyone has been waiting for. Now please keep in mind that I am having some issues with my tune and that is the reason that it isn't idling down properly. I think I have a vacuum leak somewhere as it is running at 1200 rpms in the video. I will get my tune figured out and get a good video of the car at idle. I also wanted to mention that I have had many things off of the engine so while I was making this video I was checking everything for leaks etc. I am happy to say that the only leak I have is a slight weap from the thermostat housing.
All for now.
1955 Nomad project LC9, 4L80e, C5 brakes, Vision wheels
1968 Camaro 6.2 w/ LSA, TR6060-Magnum hybrid and etc SOLD
1976 T/A LS1 6 Speed, and etc. SOLD
Follow me on Instagram: ryeguy2006a
04-15-2013 #246 Registered User
- Join Date
- Jun 2009
- Location
- New Hampshire
- Posts
- 85
Nice job!
04-15-2013 #247
Registered User
- Join Date
- Nov 2012
- Location
- Frozen, MN
- Posts
- 91
Very nice to hear it running!
04-15-2013 #248 Registered User
- Join Date
- Feb 2011
- Location
- Maple Ridge, BC Canada
- Posts
- 209

Sounds wicked!!!
1981 Firebird "BlackOut"
Build by Speed Tech Performance
http://www.speedtechperformance.com/...rod/prd287.htm
https://www.pro-touring.com/showthre...275-Project-Bl
04-15-2013 #249
Registered User
- Join Date
- Aug 2007
- Posts
- 1,239
thats great, soon she will be back on the road
05-20-2013 #250
Registered User
- Join Date
- Sep 2009
- Posts
- 2,951
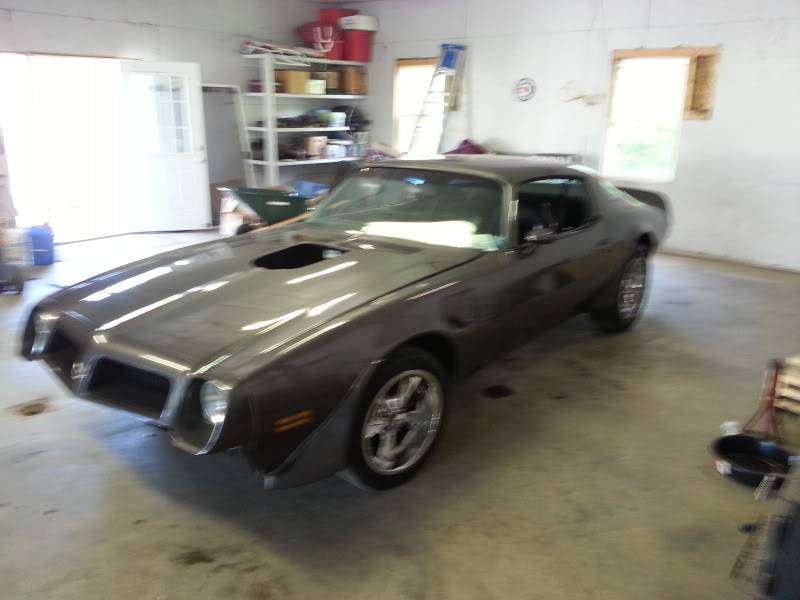
It has been a fast moving few days for me. It started when I got a phone call on Thursday morning about my Daily Driver Mustang GT I was selling. The guy wanted to take a look at my car so we set up a time to meet that night. To my surprise, he brought a pocket full of cash, and a dealer plate. Looked my car all over and bought it on the spot. Now, at this point I was happy I sold the car, but worried because I don't have anything to drive. I wanted to take my time when buying my next car, so what to do. I have an almost complete 76 Trans Am that is begging to get driven. So the rush begins.(Although I am cutting any corners)
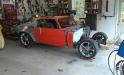
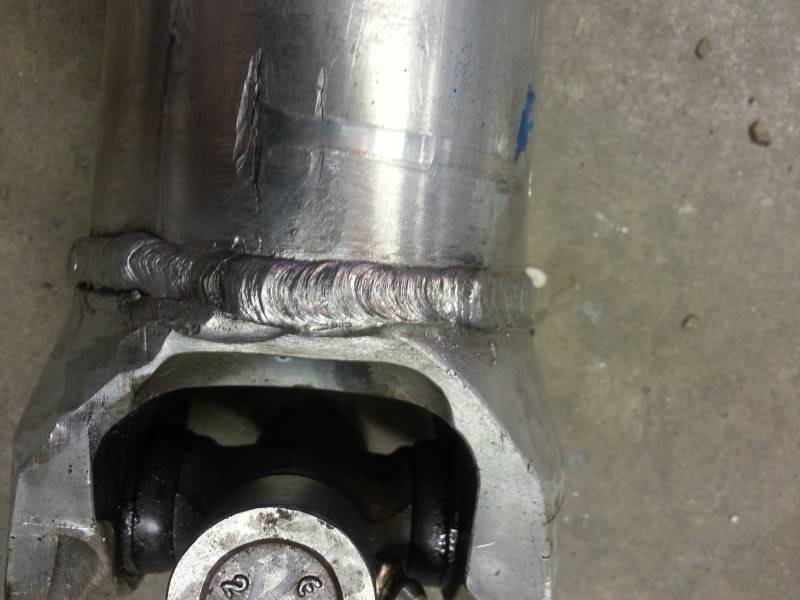
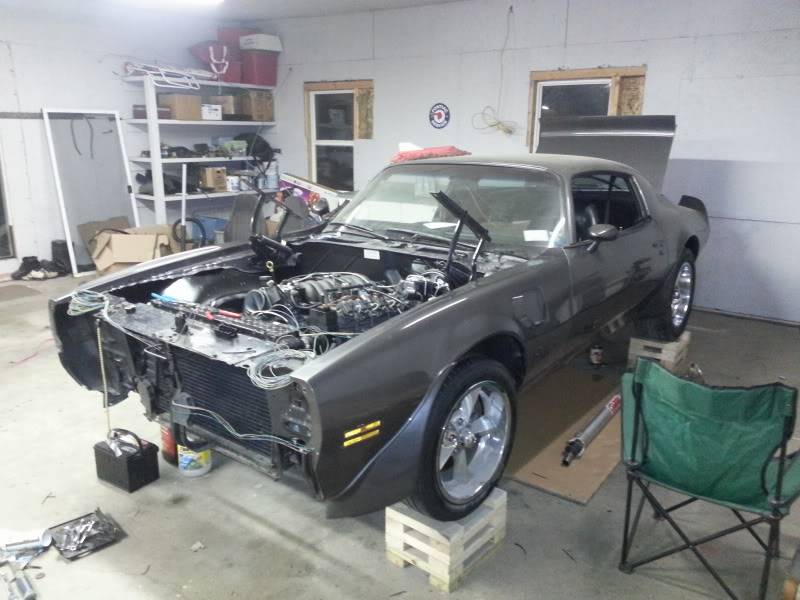
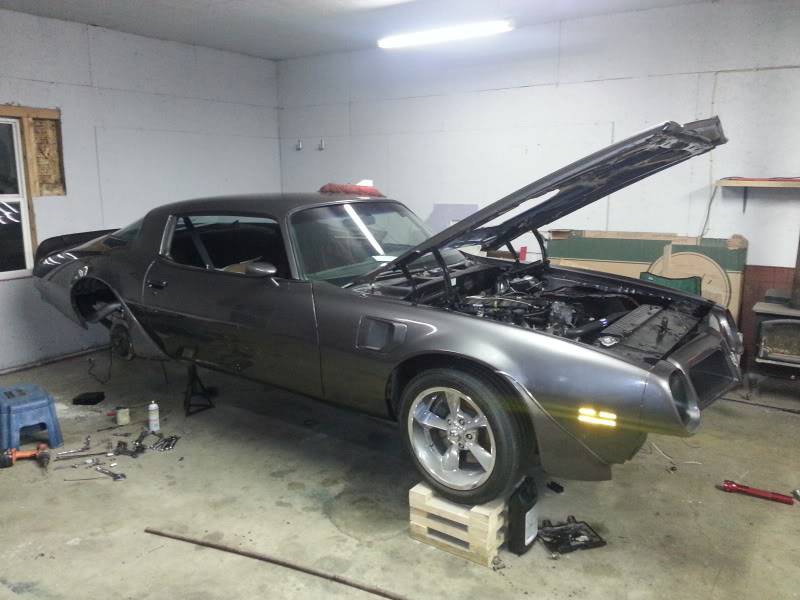
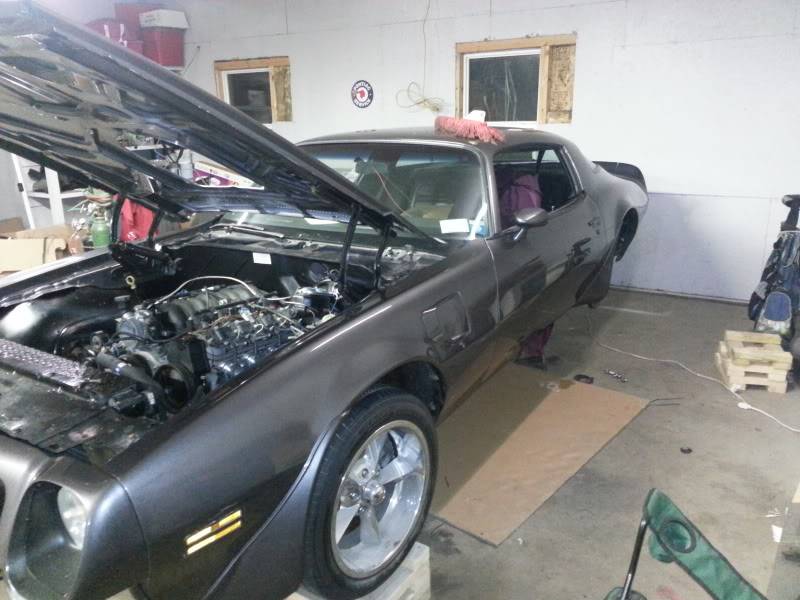
So, in order to get the car ready, I have been very focused and prioritizing my time as it is limited. Also a few late nights, . Now, let me get to the pictures. I was confident that everything was finished on the passenger's side. Time to mount the fender and inner fender. It is starting to look like a car again.
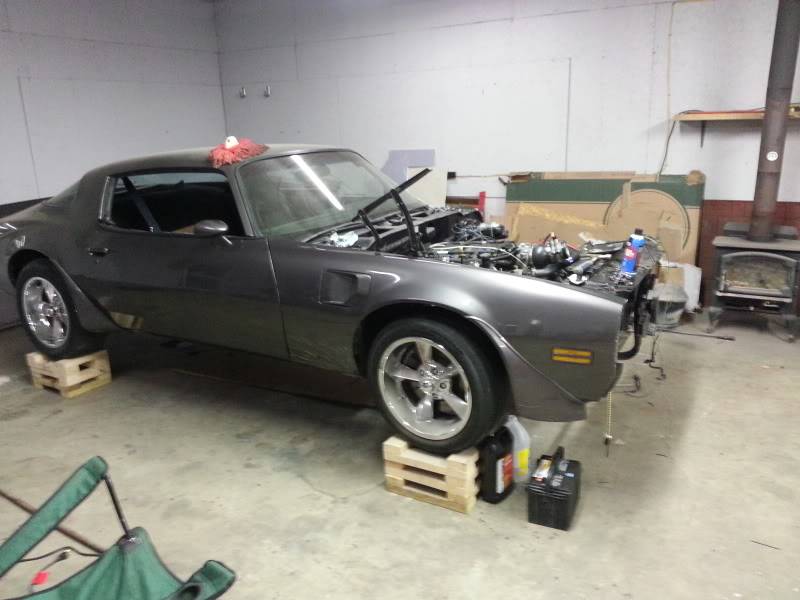
After a few attempts, I finally got my driveshaft back from the local shop. I took it to them with the measurements they asked for, and it was an inch too long. So, back to the shop and they took another 1" off of it and now it fits perfectly. It also too me a long time to find some place that carried a 1310 to GM 3R U-joint, but finally tracked one down. I got this driveshaft down in Carlisle for $35, Cut and balance $77, new U-joint $12. Grand total for an Aluminum driveshaft that will handle 600-700 HP, $124 bucks. NICE

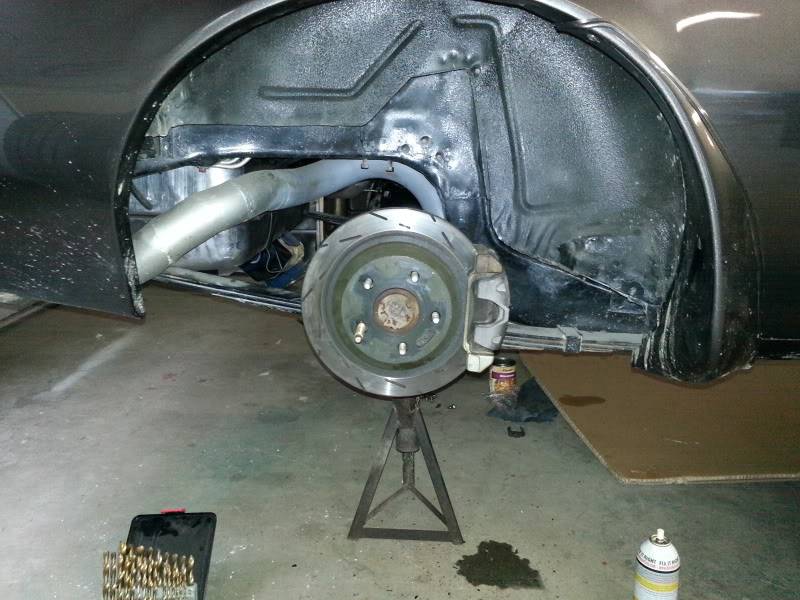
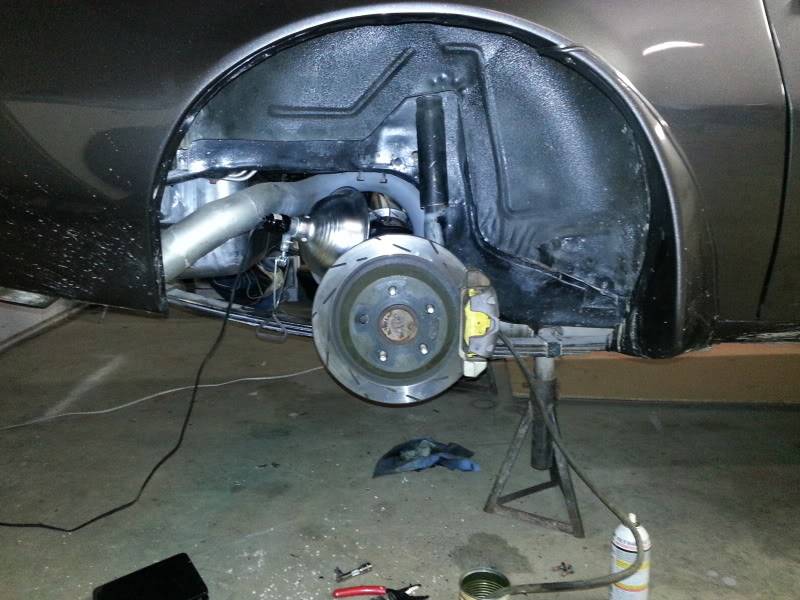
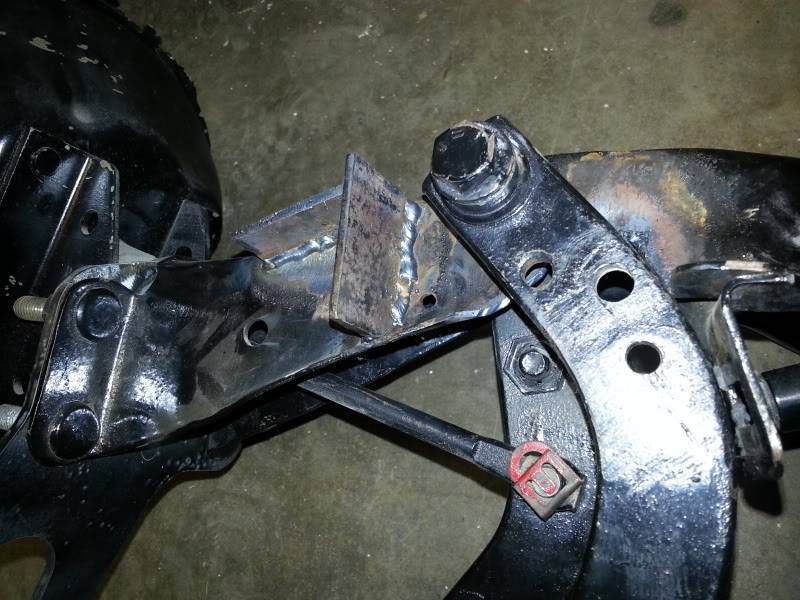
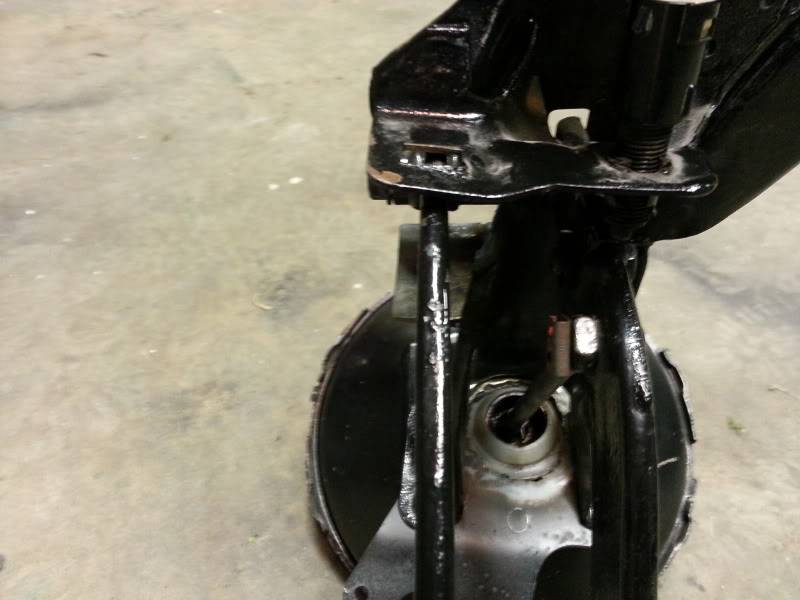
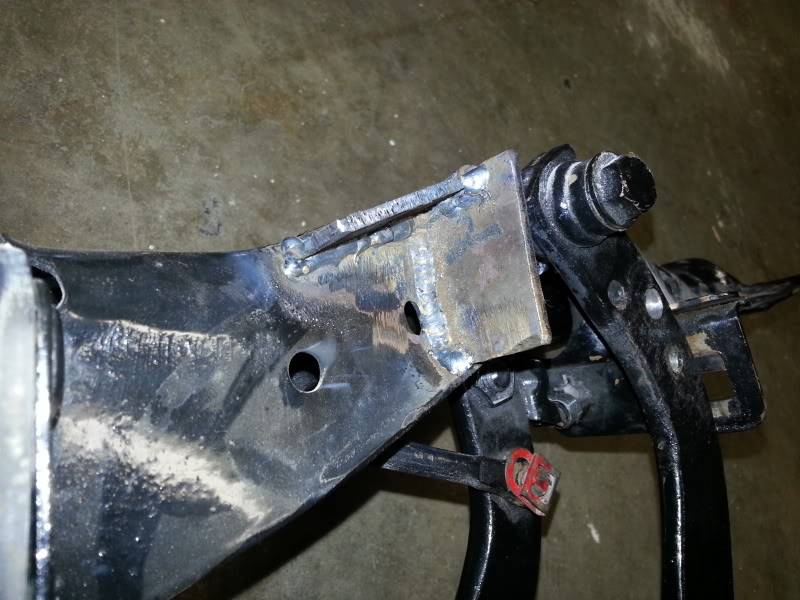
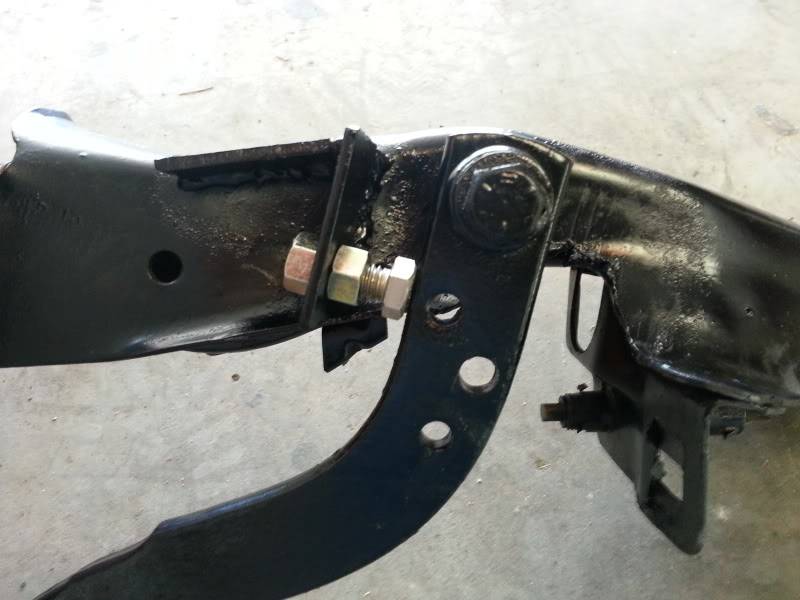
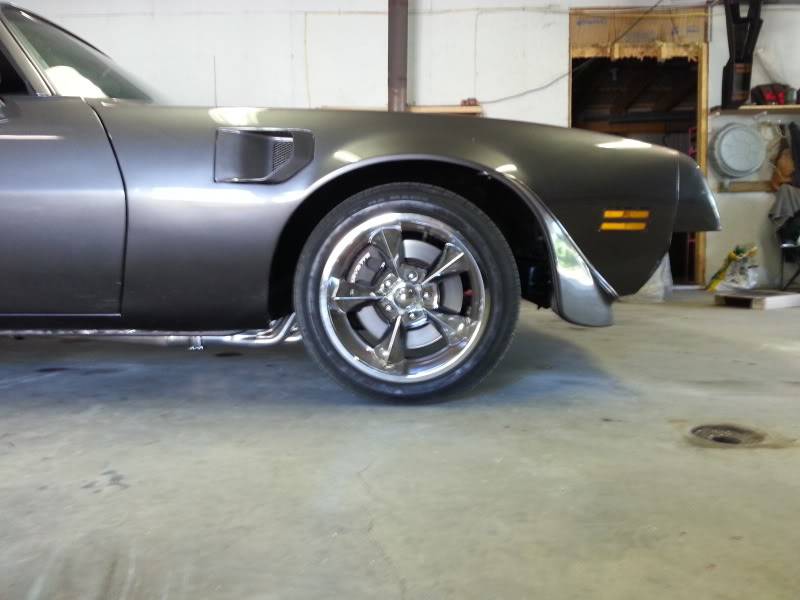
I started working on the brakes. They were the biggest thing I was putting off. I didn't grab any pictures, but I had to "gut" my stock proporting valve, which turned it into a distribution block. Essentially it is just removing the valving and springs inside that restrict the rear brakes at a hard stop. Not too difficult to do, just time consuming. Once that was done, I installed the inline adjustable proportioning valve right below where the rear hose connects to the hard line. Real easy and very accessable. Then ran the lines and installed the rear backing plates and brackets. Once, they were intalled I test fit the passenger's side shock and drilled a hole to relocate it to clear the caliper. It was about 1 1/2" rearward that I relocated. Very easy and thanks to Eroc022, I didn't need to do the swap with two left sides. Now both calipers face the front. I like when things are symetrical. Once, the shock was relocated, I bolted everything down and tested the wheel. No clearance issues at all. Repeat on the other side, and bleed the brakes. DONE.
For those that may ask about E-brake cables, I haven't bought or installed those yet. I will be using the universal Lokar cables when the time comes. For now, its leaving it in gear. That will change shortly.
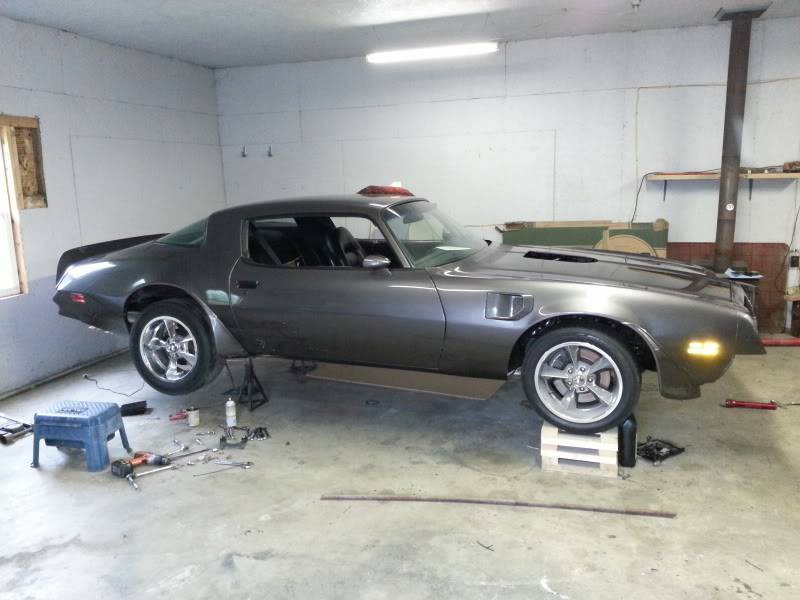
Once, the brakes were done, it was time to put the other fender on and the front nose. Because I was thinking ahead, I saved the shims and adjustments for all the body panels. I recommend this to anyone because everything fell into place. This is after about 15 mins of adjusting.

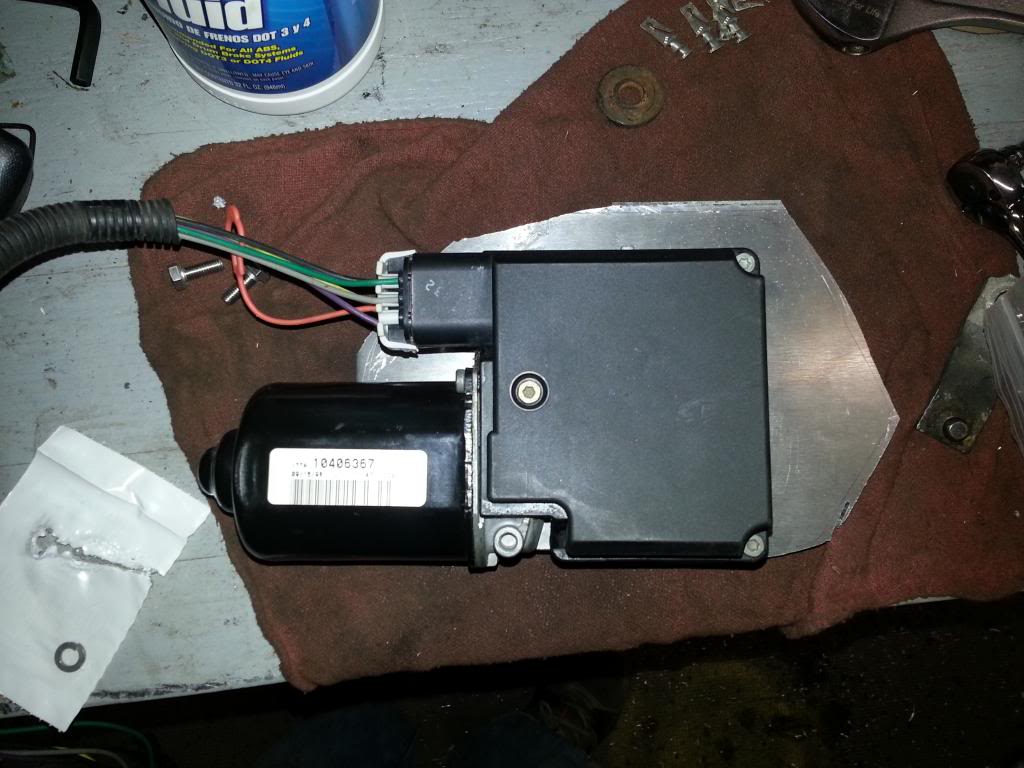
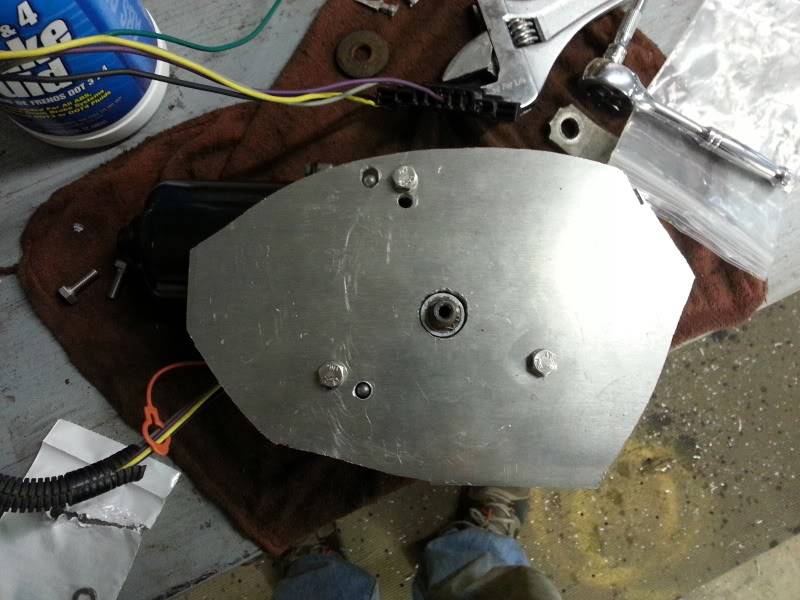
I changed pace, and decided to work on my wiper motor upgrade. Here is what I came up with so far. I made this bracket out of 1/4" aluminum plate, and drilled holes for the motor to mount to, and then I will drill holes in the plate and the firewall to attach the plate to the firewall. pretty simple, and at this point it is crude, but I will smooth off the edges and finish the wiring on it. All in good time.
After that, my father-in-law stopped by and we installed the hood and nose piece. Even with all the same shims in place the hood still too us an hour to fit properly. :? Anyway, its done now and I can worry about other things.
Here is the car this morning. As you can see I didn't quite finish last night. I was able to borrow a car for today to get to work, but after tonight it will be all ready. I still need to finish a few little bits of wiring, such as the headlights, marker lights, and the cooling fans. Once those are done, I just need to fill the transmission with fluid, put the ont bumper on and take it for a spin!
That's all for now. Should have some more pictues and maybe a video later tonight.
Thanks,
Ryan
1955 Nomad project LC9, 4L80e, C5 brakes, Vision wheels
1968 Camaro 6.2 w/ LSA, TR6060-Magnum hybrid and etc SOLD
1976 T/A LS1 6 Speed, and etc. SOLD
Follow me on Instagram: ryeguy2006a
05-20-2013 #251
Registered User
- Join Date
- Dec 2005
- Location
- Birmingham, AL
- Posts
- 3,355
That is one way to get a build into gear.
Stephen
05-28-2013 #252
Registered User
- Join Date
- Sep 2009
- Posts
- 2,951
Lots of progress over the long weekend. There were so many little things that I had to finish up, I won't list them all. I will show the larger tasks that may help others. My first order of business was to figure out what was wrong with my brakes. Ever since I installed the DSE hydraulic clutch master cylinder bracket, my brakes weren't working correctly. I realized that I needed to clearance the bracket because it caused a bind with the petal lever. I clearanced the hole, and then reinstalled everything. Still had a bind? Still not sure what caused the issue, but I took the master cylinder off and to the bench to verify it was working. Then reinstalled and the brakes worked great. :???: Anyway, that is done, just need bench bleed it and reinstall.
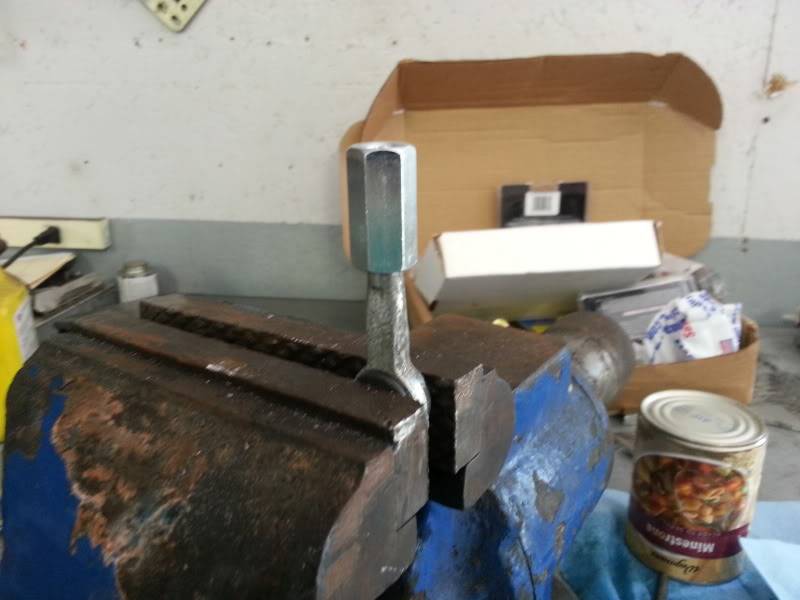
While I had the booster off because of the clutch bracket, It was time to figure out a method for making a petal stop. If I don't do something about that, a hard shift could over extend the clutch MC and ruin it. Which in turn would leave me stranded. Here is what I came up with.
And the final product. It works great and is fully adjustable.
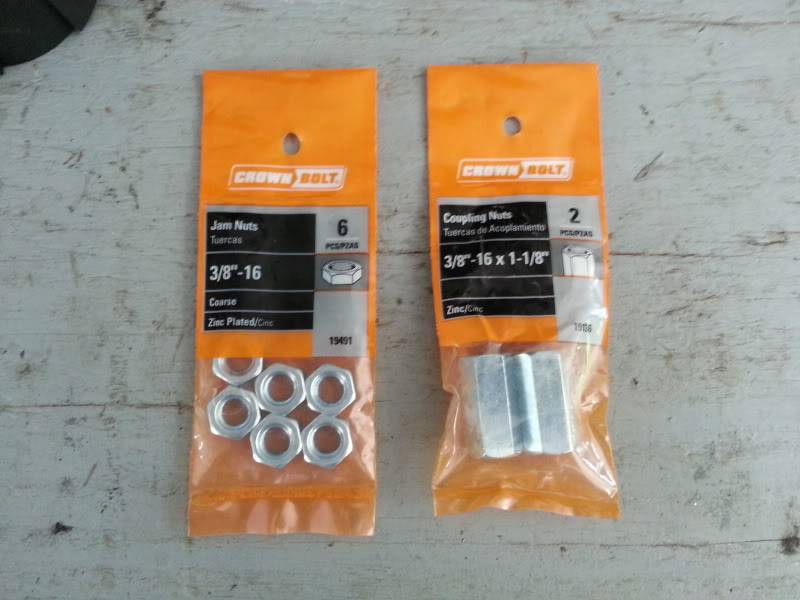
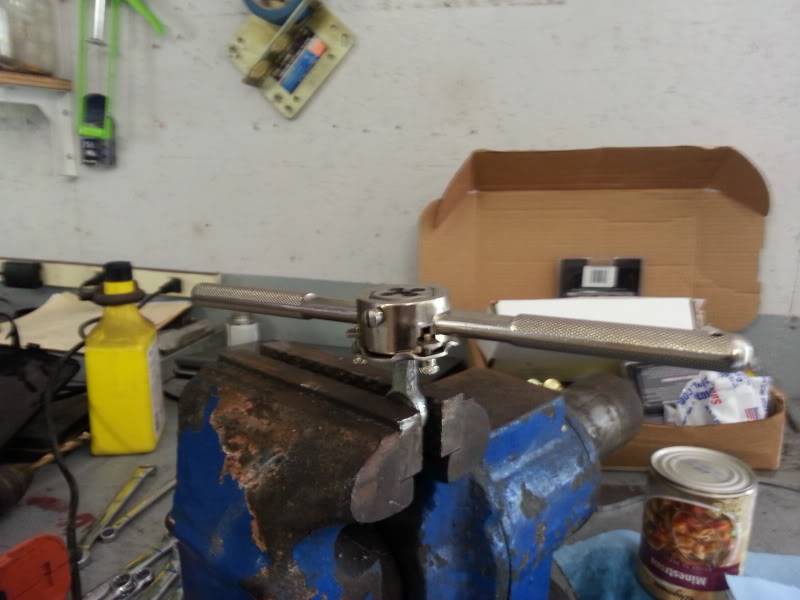
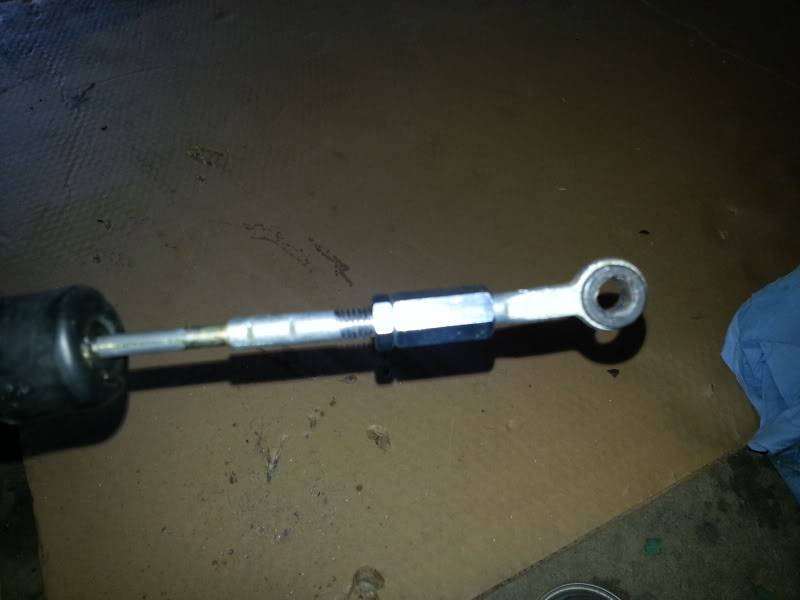
Another issue that I ran into is making sure that the clutch throw is sufficient to fully engage and disengage the clutch. My solution came from someone on LS1tech.com. I used a 3/8 - 16 coupler and jam nuts, cut and threaded the shaft, and made my own adjustable clutch master cylinder! If you do decide to copy me make sure that when you cut the shaft, that you actually cut about an inch out of it in order to make sure you can shorten it if necessary. Also, don't thread the shaft all the way down. A section towards the bottom is hollow, which causes a weak point and people have had problems where on a hard shift that the shaft will break.
After all the work for the clutch it works great! It took some time making sure that the clutch was working properly, but well worth it. It works just like stock. The only think I haven't finished is the neutral safety switch. But the clutch grabs really nicely, and is much different than the stock set-up. Something that I will have to get used to.
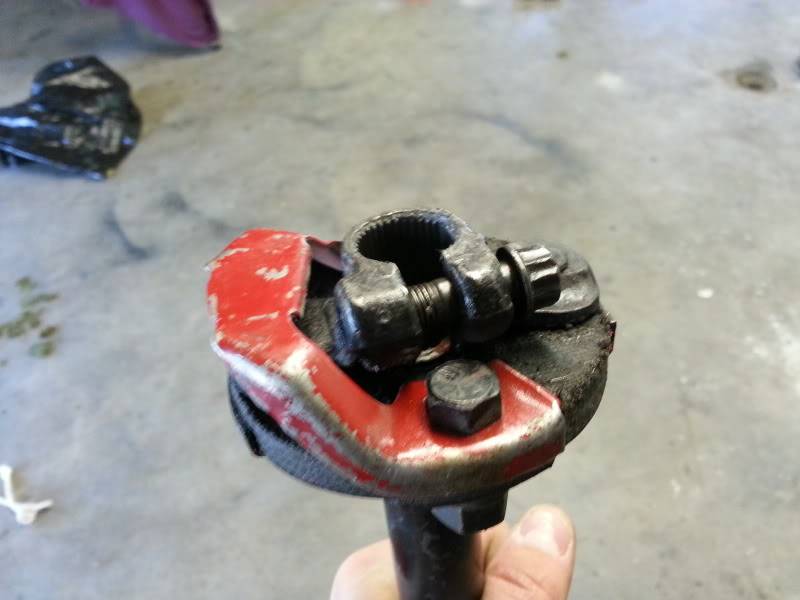
The last hickup( or so I thought), was making sure that I had the correct rag joint. It took me about an hour of messing around to realize that the metric box I have, had a smaller diameter than my stock box. So, after messing around and talking to some car friends of mine, I found one! I don't know what the breakdown of years is, but this was out of a '77. Not sure if that is a mid-year thing, or if the box was actually off of a later metric box. Either way, I got it on and it worked great.
Now, the fun part. I test fit everything and double checked to make sure that everything I had done was tight, etc. I finally took it off of the jack stands. Since I know that I had the wheels off a few times I went around with a torque wrench to ensure they were tight. I am not going through that again... :shock: Anyway, I forgot how low to the ground the car was.
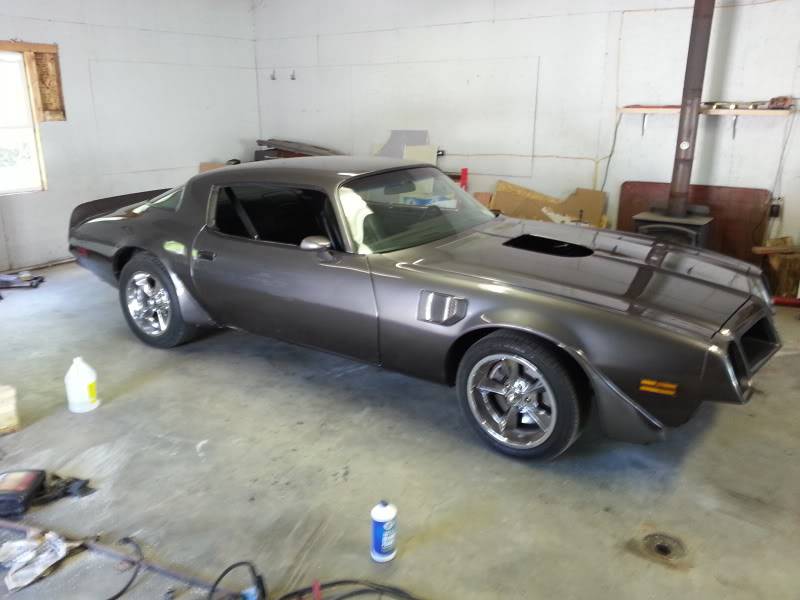
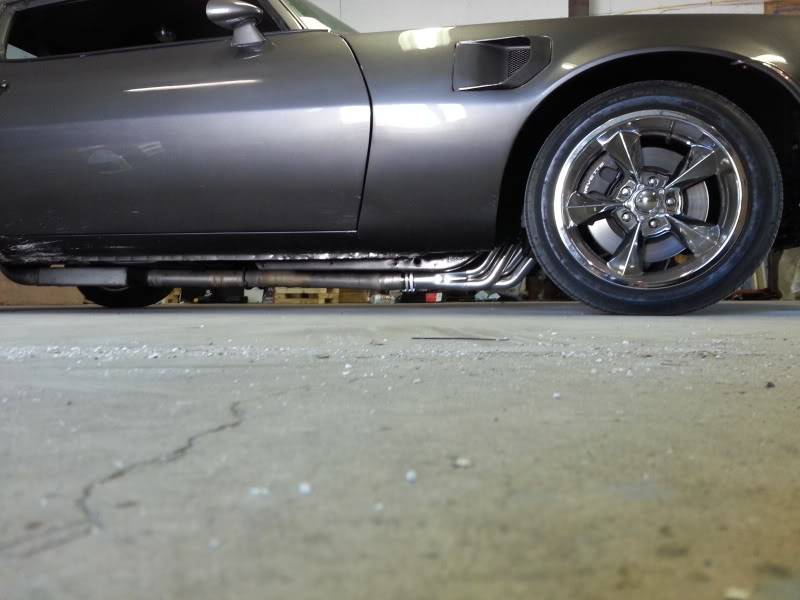
Sorry, its blurry.
Here are some gound clearance pictures. Just have to be aware of those when I am driving. Although, they aren't any lower than the hooker headers I had.
Well, I suppose it was time for a test drive. Being really excited to finally get the car out and drive it around and listening for anything out of the ordinary, I forgot one thing. GAS!!! Here I am stranded at what used to be a gas station. I couldn't be mad and I was only about a mile from my house, so my wife came and got me and we threw some more gas in it. I think it was a good think that I ran out of gas anyway because the axle bearings were screaming at me. I needed to replace them, but thought I could get away with them for a little while. Nope, they need it asap. I think for the summer I will get two saver bearings and let it ride.
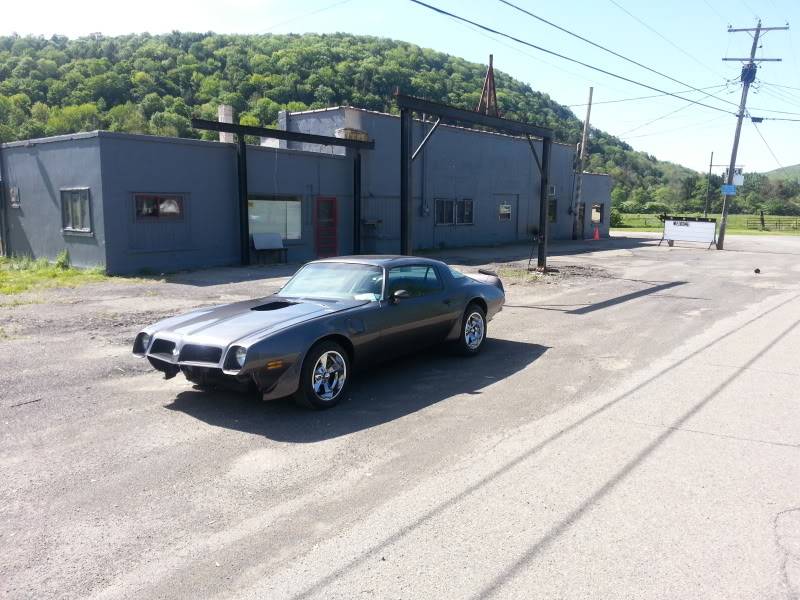
Yes, I know this was my initial shake down run. So no shaker, passenger seat or front bumper. What can I say, I was excited. It was hard to say how the car really ran because I couldn't hear anything but the axle bearing. I will say that the car had great throttle response, and with the 3.73 gears it will be very fast. I churped or spun the tires everytime I started from a stop. It will be very fun! Another thing I noticed is the car is quieter than with my Pontiac? Weird. Overall really happy with the progress and I can't wait to put some miles on it!
Cheers,
Ryan
1955 Nomad project LC9, 4L80e, C5 brakes, Vision wheels
1968 Camaro 6.2 w/ LSA, TR6060-Magnum hybrid and etc SOLD
1976 T/A LS1 6 Speed, and etc. SOLD
Follow me on Instagram: ryeguy2006a
05-28-2013 #253 Registered User
- Join Date
- Aug 2009
- Location
- ERIE, PA
- Posts
- 307
what's the headders you used?
-Bennyhaha
05-28-2013 #254
Registered User
- Join Date
- Sep 2009
- Posts
- 2,951
They are Dynatech Musclemaxx LS1 swap headers.
1955 Nomad project LC9, 4L80e, C5 brakes, Vision wheels
1968 Camaro 6.2 w/ LSA, TR6060-Magnum hybrid and etc SOLD
1976 T/A LS1 6 Speed, and etc. SOLD
Follow me on Instagram: ryeguy2006a
05-29-2013 #255
Registered User
- Join Date
- Sep 2009
- Posts
- 2,951
I got some more pictures last night. I can't believe I didn't get any shots of the engine!
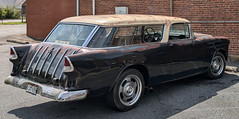
Here is a better shot of the rear disk brakes.
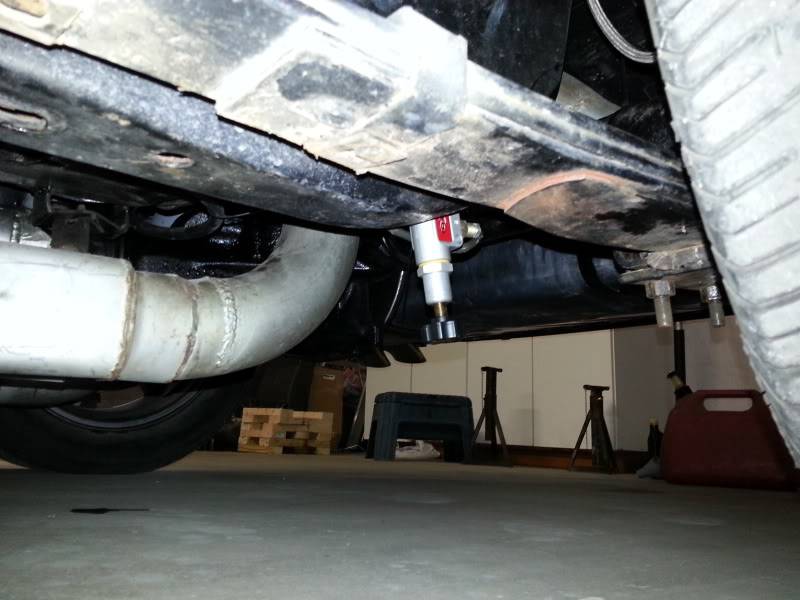
And here is were I put the rear adjustable proportioning valve. Very accessable, but completely hidden. And you can also see my stainless steel braided rear lines.
1955 Nomad project LC9, 4L80e, C5 brakes, Vision wheels
1968 Camaro 6.2 w/ LSA, TR6060-Magnum hybrid and etc SOLD
1976 T/A LS1 6 Speed, and etc. SOLD
Follow me on Instagram: ryeguy2006a
05-29-2013 #256 Registered User
- Join Date
- May 2006
- Location
- Rhode Island
- Posts
- 676
Lookin sweet! I'm jealous of all you guys with the LS power! someday...... keep up the great work.
05-29-2013 #257 Registered User
- Join Date
- Apr 2004
- Location
- Cedar Rapids, IA
- Posts
- 999
Wow asome build. Just went through all 13 pages.
Some times I'm fast sometimes I'm half-fast
05-29-2013 #258
Registered User
- Join Date
- Sep 2009
- Posts
- 2,951
Thanks for the compliments. I am looking forward to putting lots of miles on the car this year.
1955 Nomad project LC9, 4L80e, C5 brakes, Vision wheels
1968 Camaro 6.2 w/ LSA, TR6060-Magnum hybrid and etc SOLD
1976 T/A LS1 6 Speed, and etc. SOLD
Follow me on Instagram: ryeguy2006a
05-30-2013 #259
Registered User
- Join Date
- Aug 2009
- Location
- ERIE, PA
- Posts
- 307
Looks good man!.... job well done
-Bennyhaha
06-03-2013 #260
Registered User
- Join Date
- Sep 2009
- Posts
- 2,951
Thanks man, I really appreciate it.
1955 Nomad project LC9, 4L80e, C5 brakes, Vision wheels
1968 Camaro 6.2 w/ LSA, TR6060-Magnum hybrid and etc SOLD
1976 T/A LS1 6 Speed, and etc. SOLD
Follow me on Instagram: ryeguy2006a

 Reply With Quote