

Results 1 to 20 of 27
-
02-21-2012 #1

 Registered User
- Join Date
- Nov 2011
- Location
- Chicago, IL
- Posts
- 35

Project: Temp Goat 1965 Pontiac Tempest
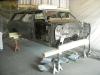
I just bought 1965 Pontiac Tempest from a guy in California back in October. My plan is to make this thing a nice driver with with a 400 or 455 motor and do some suspension updates. I have 3 boys renging from 7 years old to 2 years old and wanted a project that we could work on as a family. I have very limited budget, so my plan is about a 10 year project or so. If I get it done early than lucky me! I am currently in the deconstruction phase and will be starting on the frame and suspension this spring and summer. I hope to get the frame and suspension complete this year. Below are some pics of the car when I picked it up. First pick is the first time I saw the car live at the shipping dock. the 2nd pick is 2 of my boys helping back the car into the garage after a day of some deconstruction. The last pic is a unusually warm Novebmer day my uncle came down from Michigan to help with some more deconstruction. Slowly but shurley I will get this all apart.
Mark
Attachment 55817
-
02-21-2012 #2 Registered User
- Join Date
- Feb 2005
- Location
- Sydney, Australia
- Posts
- 1,797

Very cool car....I do love my Pontiacs.
Word of advice....you will not remember what everything is when it comes time to put it back together...clean and label everything well now, lol.Regards,
Leigh
Sydney, Australia
1971 Firebird 455
https://www.pro-touring.com/showthre...Project/page27
02-21-2012 #3
Registered User
- Join Date
- Nov 2011
- Location
- Chicago, IL
- Posts
- 35
Hi Leigh,
Thanks for you comments. I know I have been pretty particular on labeling everything. I hope I can get it all back together right. lol.
02-21-2012 #4 Registered User
- Join Date
- Dec 2007
- Location
- Lombard, IL
- Posts
- 545
cool. The first car I ever wet sanded (as a kid) was the neighbor's 65 GTO.
That car is big, it dwarfs the Cadillac in the picture.Dan
1971 Chevelle Maliboo Convertible 496/4L80E
1956 210 2 door Sedan 8-71 blown 468/T400
02-23-2012 #5
Registered User
- Join Date
- Nov 2011
- Location
- Chicago, IL
- Posts
- 35
Thanks Zanie. My first project. The Caddy dosn't need this much work though. I also have a hard time fitting in it. Ha Ha Ha. Have a good one.
02-29-2012 #6
Registered User
- Join Date
- Nov 2011
- Location
- Chicago, IL
- Posts
- 35
Is any one running these on their GM A-body? Tell me what you thing of them. Interested in getting some feed back.
Pro Shocks GM Coil-Over Conversion Shock C200SR500
03-01-2012 #7
Registered User
- Join Date
- Nov 2011
- Location
- London, UK / San Diego, CA
- Posts
- 161
Tempests are really starting to grow on me. If you don't mind me asking, approximately how much did you pick this one up for?
Eric
1969/72 Corvette Coupe - https://www.pro-touring.com/showthre...uring-Corvette
454 Block / Heads For Sale - https://www.pro-touring.com/showthre...ads-SD-LA-Area
Corvette Parts & Service:. www.vansteel.com
03-01-2012 #8
Registered User
- Join Date
- Nov 2011
- Location
- Chicago, IL
- Posts
- 35
I picked this up for a pretty fair average price. 3g. Solid Car!
03-22-2012 #9 Registered User
- Join Date
- Aug 2011
- Location
- Burleson, TX
- Posts
- 130
Hey Mark,
Looks like you have a good start on your project. It does take time to disassemble everything. I can not agree more with LeighP about lableing everything. One more idea that I have found usefull as well is to take pictures of everything taking even more of the odd and hiden things like bolts, brackets and shims that you don't normaly see regularly. I found this to be very important as my factory 67 shop manual lacks quit a bit of this assembly stuff.
Looks great and it is a great way to spend some time with your boys over the years. Please take all the teachable moments you can. It will give you time to teach them how to be a man. But that is a whole different subject for a differnt forum.
Keep it up and I look forward to visiting your thread regularly!-Ken
03-26-2012 #10
Registered User
- Join Date
- Nov 2011
- Location
- Chicago, IL
- Posts
- 35
Ken. Thanks for your encouraging words. I hope to teach my boys about hard work and dedication to a project. I am trying to take my time as much as I can. I am labeling as much as possible and then putting parts into rubbermaid storage bins.
Made some more progress on the dismanteling of the Temp Goat. I removed the carpet and padding.
I was slightly worried about the front drivers side. Lots of rust turned out to be only surface rust. The floors are solid.
The head liner and interior panels are off and it is ready to come off the frame.
I need to wait till I can secure some space for the body at my uncles place. I hope to get started on the frame with in the next month or so. I also need to find some money for parts! Oh well slowly but surely it will come together.
03-26-2012 #11 Registered User
- Join Date
- Apr 2009
- Location
- LI,NY
- Posts
- 304
 Man that car is clean! '65 is my favorite year...will be looking forward to this!
65 Vista Cruiser
67 Delta 88 Vert
70 Vista Cruiser Pro-Tour Project
96 T-Bird
69 BSA A65L
48 Ford F5
https://www.pro-touring.com/showthre...o-Tour-Project
03-26-2012 #12
Registered User
- Join Date
- Feb 2011
- Location
- Kalamazoo, MI
- Posts
- 144
Nice, glad to see another Pontiac on here being built up!
1969 Pontiac GTO
-The Nameless project.
0331, USMC, Semper Fi.
03-26-2012 #13
Registered User
- Join Date
- Aug 2011
- Location
- Burleson, TX
- Posts
- 130
Mark your metal couldn't be better! You can save a boat load of cash at the body shop with a body that clean. Looking forward to your updates. Ken
03-26-2012 #14 Registered User
- Join Date
- Sep 2009
- Location
- Corpus Christi, TX
- Posts
- 183
awesome! That sure is clean, I took my headliner down on my 67 and there was this thin layer of black stuff that is stuck to the roof.. UGH yours is sooo clean compared to mine =( Im gonna have to soak it or steam it off some how.. Keep up the work, and its awesome you got your boys involved.

1967 Pontiac LeMans in the works
05-26-2012 #15
Registered User
- Join Date
- Nov 2011
- Location
- Chicago, IL
- Posts
- 35
The weather startarded to get nicer and I actually had some time to work on the car. My new jack arrived the other day and I finally made some progress on my project. A buddy and I were able to get the body off the frame with a couple of jacks and lots of pieces of wood. The frame looks pretty good. Once I can get the body out of my garage and up to my uncles then I can start on my frame.

05-26-2012 #16
Registered User
- Join Date
- Feb 2005
- Location
- Sydney, Australia
- Posts
- 1,797
Very nice...thats a really clean starting point for a project.
Regards,
Leigh
Sydney, Australia
1971 Firebird 455
https://www.pro-touring.com/showthre...Project/page27
05-26-2012 #17
Registered User
- Join Date
- Mar 2012
- Location
- Redmond, Oregon
- Posts
- 19
My 66 goat was already disassembled when I bought it, I have parts that I have no idea where they go. I am working my way through the piles and tagging and bagging them now. My biggest mistake was not having a firm idea of what I wanted when I was finished, I knew it I had no intention of a complete nut and bolt, but was thinking more along the lines of stock, until I found this site and got really excited about the thought of a cool older car that handled and rode like todays. Needless to say I have done things a few times over.
05-27-2012 #18
Registered User
- Join Date
- Aug 2011
- Location
- Burleson, TX
- Posts
- 130
Mark, Dude you are making great progress. Your frame looks great. Keep plugging away! Ken
06-09-2012 #19
Registered User
- Join Date
- Nov 2011
- Location
- Chicago, IL
- Posts
- 35
I finally got the front suspension disassembled. I found it kind of difficult with just the fame on jack stands to get the control arms and springs off. So I decided that I would cut them off. This was kind of a scary thing for me. I never cut a spring on a car before. It did not look like there was much action left in the spring. Man I was wrong. I took some precausins even just to be safe. With a 3000 lb ratchate strap I straped up the lower control arm and took a grinder to the spring. Here gowes nothing! It was really scary when you see the spring move a bit and then POW! It releases its energy. I do not really want to do that again. Hopefully getting the new ones in will be much easier and safer! Oh well on to the rear end.

06-09-2012 #20
Registered User
- Join Date
- Mar 2012
- Location
- Redmond, Oregon
- Posts
- 19
Holy shnikees. I just did mine last week preparaing for ride tech install, I used spring compressor, there was a little pucker factor going on when I released the jack but no surprises. Slick as a whistle. I hope to have the front end kit in this week sometime, so I have a lot of paint work to do this weekend.
Looks like you are moving right along, keep up the good work. I just got back from a car show and that always seems to get me motivated. Now off the computer and back to work I go.
Cavmsg

 Reply With Quote


