

Results 1 to 20 of 22
Thread: Invisible wiring? how to?
-
01-30-2012 #1
 Registered User
- Join Date
- Sep 2011
- Location
- Eagle Point, Oregon
- Posts
- 66
Invisible wiring? how to?
Hey all! First of all I hope this hasn't been discussed in length elsewhere (I searched a lot), but I am looking for ideas and pictures of what and how people are hiding all of their wiring & hoses; routing/plumbing anything and everything. I look at all these cars and some of the engine compartments are cleaner than the plates I eat off of yet they are running heaters, a/c, stereo systems, fuel injection, etc, etc...How do you do it?! Engine harnesses, coil relocation (LS motor), loom material (kinda like that funky stock plastic stuff only classy), bulkheads through the firewall for heater hoses, fuse blocks, grounds, powered distribution blocks, filler panels, suppliers...I want to smooth my firewalls and have a minimum of things poking through and I want as much of my wiring to be hidden or blend into its surroundings. The last vehicle I did was my '55 chevy truck with a TBI and everything about the engine compartment screamed amateur, it was cluttered and has always bugged me, but it was my daily driver...! I am now re-doing it with a 6.0LS and will be doing the same engine swap in my '69 Camaro. Oh and to make it more fun/difficult I would like to keep things reasonably priced
 . I thank you all in advance for sharing your tips, tricks and experince
-
01-31-2012 #2 Registered User
- Join Date
- Oct 2006
- Location
- Morristown, NJ
- Posts
- 154
Hiding wires takes planning before you finish painting anything.
I moved the wiring bulkhead into the fender well and ran your wires through the fender to the front headlights.
For the engine you try to run wires up from the back of the engine and through the tunnel.
For the alternator you can mount it low and then you see no wires or run the wire straight down the front of the block behind the mounts.
I have seen people also run wires through braided hoses so you can't tell they are wires.
Hope this helps.1973 Camaro Type LT/RS
http://www.apiem.com/camaro
02-01-2012 #3 Registered User
- Join Date
- Apr 2005
- Location
- Cartersville, GA
- Posts
- 1,299

First, I'd recommend using some type of aftermarket wiring harness (AAW, Painless, E-Z Wire, something of that nature), since you're going to need a lot of extra wire in most cases to properly route it out of sight. It can be done with factory style harnesses, and I have done it that way, but count on making lots of splices, or adding quick disconnects (Weatherpak, round Mil-Spec style, etc.) or bulkheads to accommodate it. You'll also need a lot of extra wire, which can be pulled from late model cars in salvage yards to get all the odd colors necessary to keep the color codes the same. I did this on an '87 Firebird show car several years ago, and gutted the harness from two other cars to get all the wire I needed. For new wire, connectors, sleeving, etc. I mostly use Del City and Aircraft Spruce and Specialty. Aircraft Spruce offers lots of nice wiring harness sleeving, which I use whether it can be seen or not for wiring protection, and also shrink wrap in rolls in a variety of sizes.
Joe Hinds
02-01-2012 #4 Registered User
- Join Date
- Nov 2009
- Location
- Richfield, Wisconsin
- Posts
- 79
You will also need patience, it takes more time and planning to do it correct, figure out where to hide what components, like relays, ign. box, etc...so you have a plan on where and how to route what circuits.
When I did mine I ran all the wires to their destination then wrapped the bundle, anchored where needed. I did't cut and terminate anything until I was sure I had it routed the way I wanted it and all needed wires in the bundle...adding a wire into an already finished bundle is a pain. Also try and think of anything you may want add down the road, and run the wires for those things now, not later...
Lots of wire ties, connectors, solder, heat shrink, and loom material....
Have fun, and the results are well worth the extra time and effort....Steve R.
68 Camaro
02-01-2012 #5
Registered User
- Join Date
- Sep 2011
- Location
- Eagle Point, Oregon
- Posts
- 66
Great ideas, thank you! Any of you guys have pictures (in progress, hiding spots, or other?)
02-01-2012 #6 Registered User
- Join Date
- Sep 2004
- Location
- Metamora, Illinois
- Posts
- 1,619
What he said! Originally Posted by rivs68

02-01-2012 #7 -Moderator/Sponsor-
- Join Date
- Jun 2001
- Location
- Orlando, FL
- Posts
- 10,604
One can go too far with hiding wiring. Electrical components need to be viewable for service, and well-routed wiring can be visible and good looking.
John Parsons
UnRivaled Rides -- Modern upgrades for your ride.
UnRivaled Rides recent project -- LS9-powered 69 Camaro
02-02-2012 #8
Registered User
- Join Date
- Apr 2005
- Location
- Cartersville, GA
- Posts
- 1,299
Very good points, John. Its easy to go too far, and have a vehicle that is very tough to service. Originally Posted by parsonsj
Joe Hinds
02-02-2012 #9 Registered User
- Join Date
- Jan 2008
- Location
- Castro Valley, CA
- Posts
- 530
 John S.
68 "Bloodline" Camaro in assembly...
Speedtech Sub, Alston G-Billet/Fab 9 rear, Ridetech coil overs, Moser axles, Fesler 19's, Lots of Anvil parts,Twin tubo LS3/T56, Carbon fiber manifold, and the list goes on and on..........
02-02-2012 #10 Registered User
- Join Date
- May 2002
- Location
- Northern California
- Posts
- 10,716
invisible electrical tape...right next to the gap reduction spray. LOL
Clean is just as nice as unseen.MrQuick ΜΟΛ'ΩΝ ΛΑΒ'Ε
02-02-2012 #11 Registered User
- Join Date
- Feb 2002
- Location
- Santee, CA
- Posts
- 387
Hiding wires
Did someone ask for pictures?

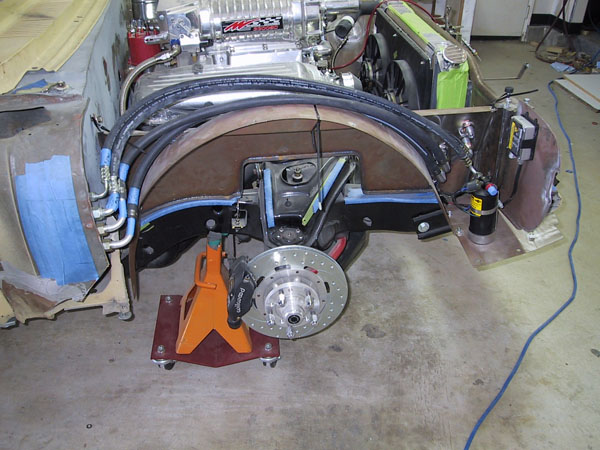
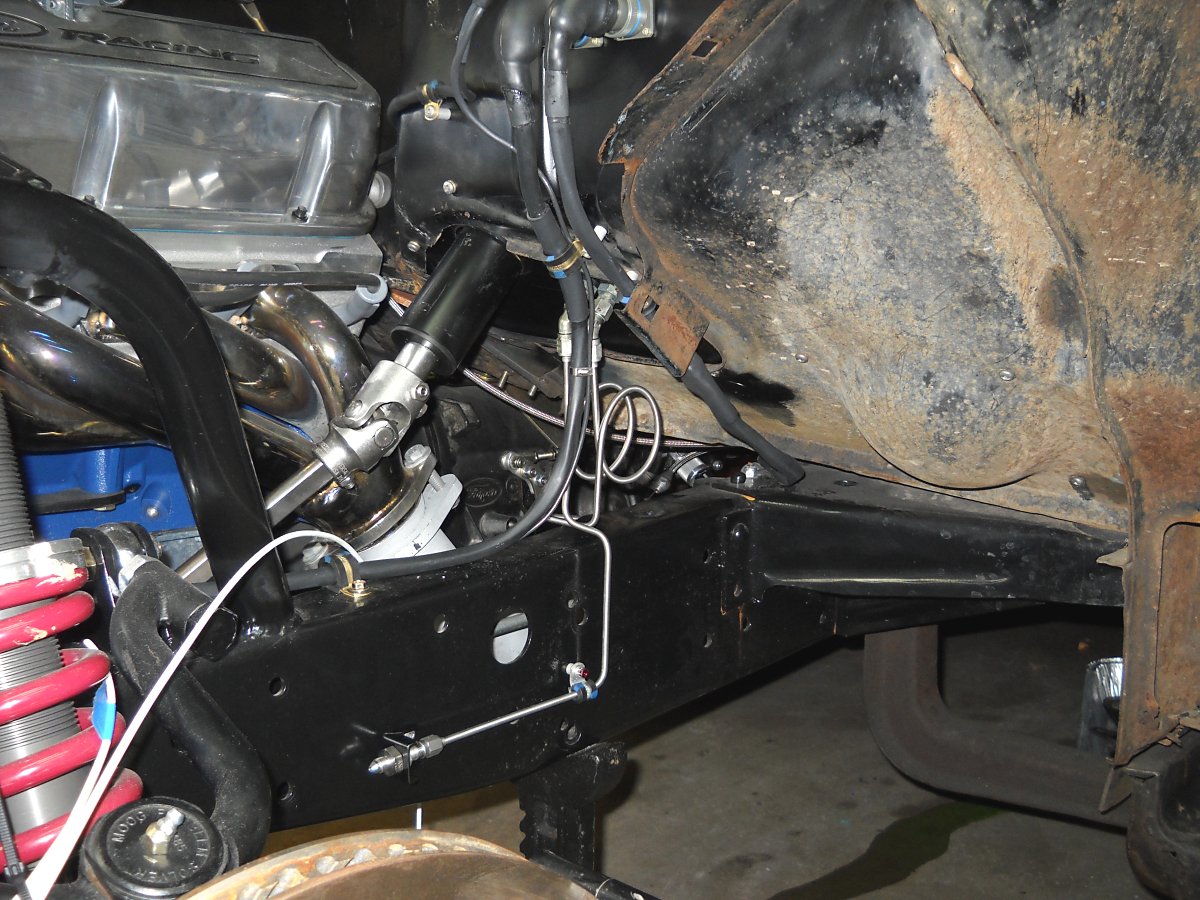
For my project, I used braided stainless sleeving from JEGS to hide my wires. Just make sure that the wires are well protected. I used vinyl wrap around the wires first, then covered with the braided stainless, and then used a short piece of shrink wrap at each end of the braided sleeve to give it a finished look. Here's the driver's side in progress:
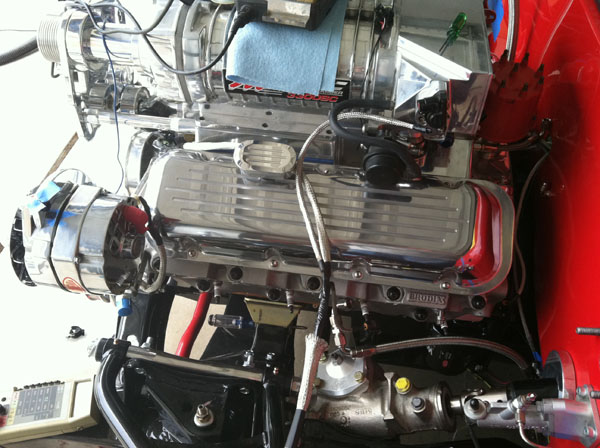
I ran my main harness through a billet firewall port (B16) directly behind the motor as low as I could. Would be more hidden if you routed them through the tunnel, but in my case, there wasn't enough room between the tunnel and the scattershield. You can barely see the port behind the fuel line:
Wires to accessories (alternator, AC, etc.) are run through braided along the edge of the intake. Most people don't even notice them. I also ran the wires underneath my accessory brackets and used a small line clamp to hold them in place.
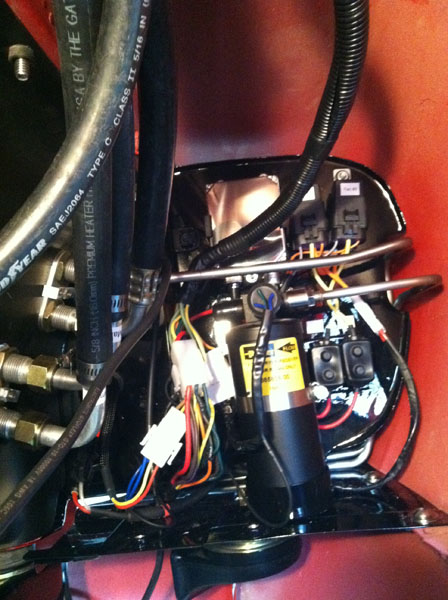
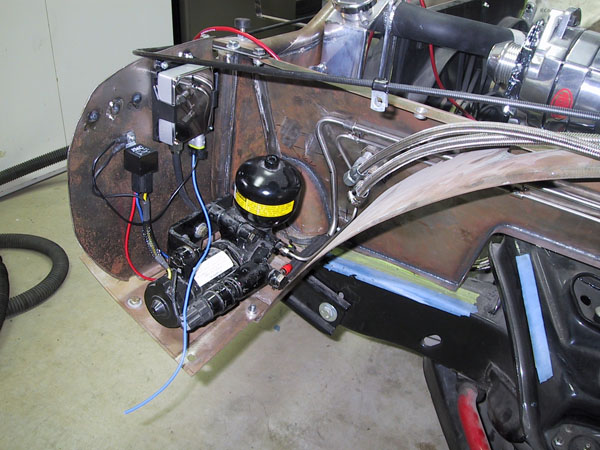
For wiring to the front end (headlights, parking lights, horns, electric fans, etc.), I ran my wiring through the kick panel and through the firewall under the fender. I mounted breakers and relays on a block off plate under the fenders. I also hid my HID ballasts and my dryer there. To get to parking lights and to the driver's side, I ran a harness up under the lower cowl panel.
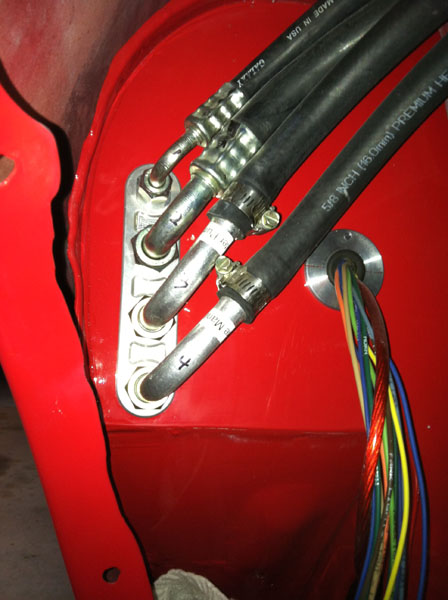
For my hoses, I also ran them under the fenders and put bulkheads on my inner fenders up near the core support. Passenger side has my heater and AC hoses and the driver's side has the brake lines as well as the hoses from my power steering box.
Bulkheads on the firewall:
Here's some early pictures during mock-up:
Here's a couple of current pics:
I understand what others are saying about easy of access, but if you are going for the look, you may have to make some sacrifices. I'm not saying form over function, just a balance of form and function. It all depends on what your own goal is.
---Eric
02-03-2012 #12 Starting The Transformation
- Join Date
- Feb 2010
- Location
- El Segundo, CA
- Posts
- 268
I have to agree also. I personally am not in favor of the current trend to try to "hide" everything in the engine compartment. Some go so far as to fabricate intricate covers to hide the engine completely. It's an engine! Why would you want to hide it? Celebrate it! Isn't this one of the number one complaints that many people have with modern engine compartments, that you cannot even see the engine? And we've got cool hot rods or muscle cars where the engine can be proudly displayed, and yet choose to hide or disguise it? Originally Posted by BulldawgMusclecars
It is true that wiring and plumbing can be a real eye sore. But it can also be really cool. It does take a lot of thought and planning about how to route things cleanly. And it requires use of the right (usually more expensive) components.
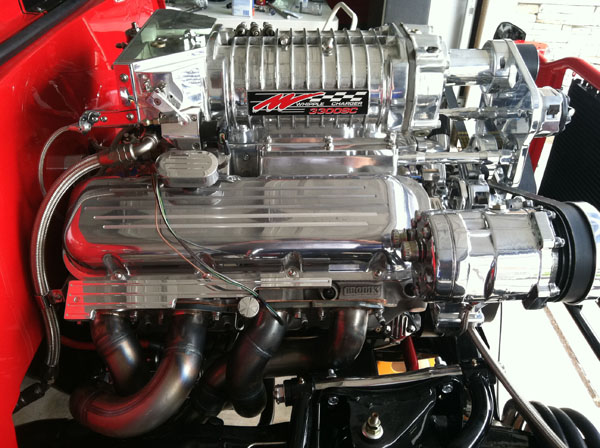
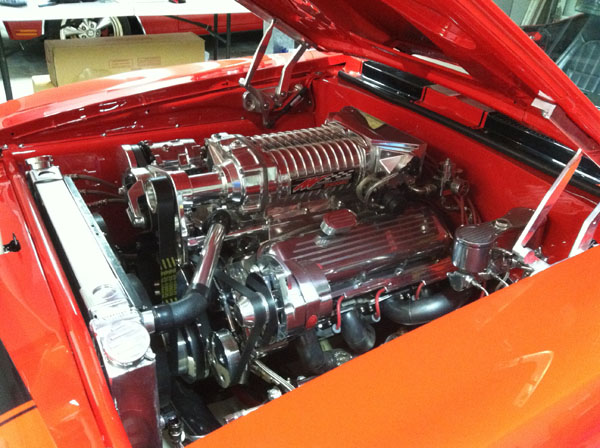
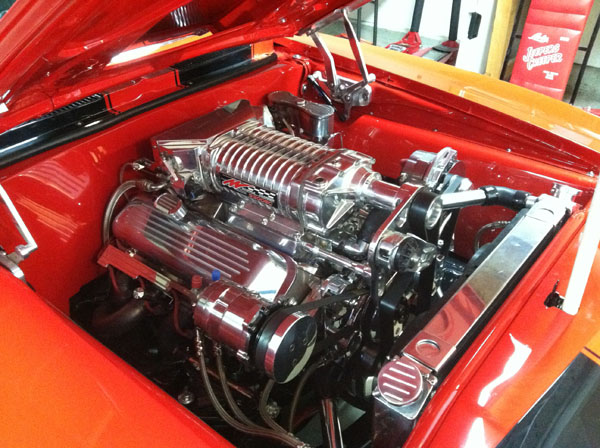
Here are some pics of my engine compartment after re-wiring and redoing a lot of the plumbing, and changing the engine. This is on a 56 F100.

02-03-2012 #13 Registered User
- Join Date
- Dec 2006
- Location
- Out of the Burbs of Detroit to SoCal, then onto my ancestral homeland, the woods of Cascadia
- Posts
- 1,753
Can I ask where you got the bulkhead grommet for the wiring pass-thru? Originally Posted by esenior
Greg Fast
(yes, the last name is spelled correctly)
1970 Camaro RS Clone
1984 el Camino
1973 MGB vintage E/Prod race car
(Soon to be an SCCA H/Prod limited prep)
02-04-2012 #14 Registered User
- Join Date
- Dec 2009
- Posts
- 1,607
It was a link in his post, Mr. Fast: Originally Posted by Twentyover
http://www.watsons-streetworks.com/b...wall_trim.htmlRon in SoCal
69 Camaro in progress
http://www.lateral-g.net/forums/showthread.php4?t=31246
Used to be known as flash911
02-04-2012 #15
Registered User
- Join Date
- Feb 2002
- Location
- Santee, CA
- Posts
- 387
Yep, like Ron said, I bought these from Watson's streetworks. The one behind the motor is the B16 and the one in the picture is the B01ST (split and pinned).
02-04-2012 #16
Registered User
- Join Date
- Dec 2009
- Posts
- 1,607
Props eSenior. Your engine bay looks great! I'm wondering if the B05 will fit an LS harness. Looks a bit small? Originally Posted by esenior
Ron in SoCal
69 Camaro in progress
http://www.lateral-g.net/forums/showthread.php4?t=31246
Used to be known as flash911
02-04-2012 #17
Registered User
- Join Date
- Apr 2005
- Location
- Cartersville, GA
- Posts
- 1,299
Earl's sells a product called Seals-It for running plumbing through, but wiring bundles should work just as well. I'm thinking about ordering a few of these in different sizes to play around with.
http://www.holley.com/HolleyNews/article.asp?ID=111Joe Hinds
02-04-2012 #18
Registered User
- Join Date
- Dec 2006
- Location
- Out of the Burbs of Detroit to SoCal, then onto my ancestral homeland, the woods of Cascadia
- Posts
- 1,753
Originally Posted by Ron.in.SoCal
Must begetting old. Took me three reads, after you pointed it out, before I found it. Must be bad eyesight. Yeh, that's the ticket, my eyes are going bad....Greg Fast
(yes, the last name is spelled correctly)
1970 Camaro RS Clone
1984 el Camino
1973 MGB vintage E/Prod race car
(Soon to be an SCCA H/Prod limited prep)
02-04-2012 #19
Registered User
- Join Date
- Dec 2006
- Location
- Out of the Burbs of Detroit to SoCal, then onto my ancestral homeland, the woods of Cascadia
- Posts
- 1,753
Double post- Must be sumptin seriously wrong in my head
Greg Fast
(yes, the last name is spelled correctly)
1970 Camaro RS Clone
1984 el Camino
1973 MGB vintage E/Prod race car
(Soon to be an SCCA H/Prod limited prep)
02-05-2012 #20
Registered User
- Join Date
- Feb 2002
- Location
- Santee, CA
- Posts
- 387
Thanks for the props, of course my friends all think I have OCD...they're probably right! Originally Posted by Ron.in.SoCal
The hole in the billet plate is 15/16" and the ID of the grommet is 5/8". If 5/8" is too tight, you could always wrap the harness and put it through without the grommet, or you could even drill out the plate and install a larger grommet.

 Reply With Quote


