


Results 321 to 340 of 573
-
06-02-2013 #321

 Registered User
- Join Date
- Jan 2011
- Location
- Boston, MA
- Posts
- 1,180

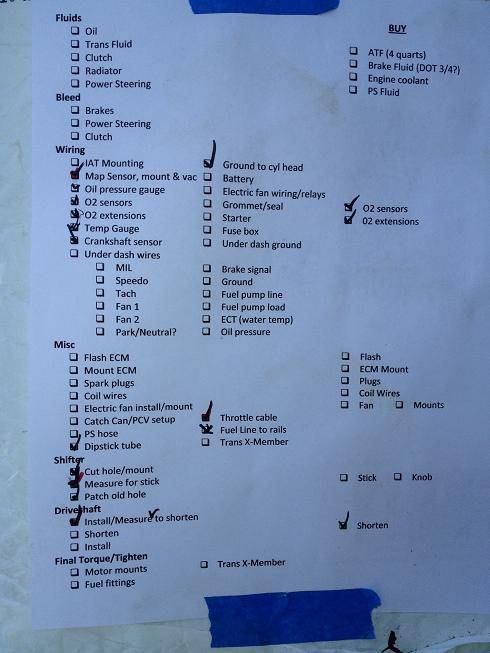
Only a few pics, but I got a lot of stuff done, including wiring and sensors. I created a punch list on Friday and am checking them off as I go. Motivation to get it done. The left and center colums are the to do list. The right column is stuff I still need to buy.
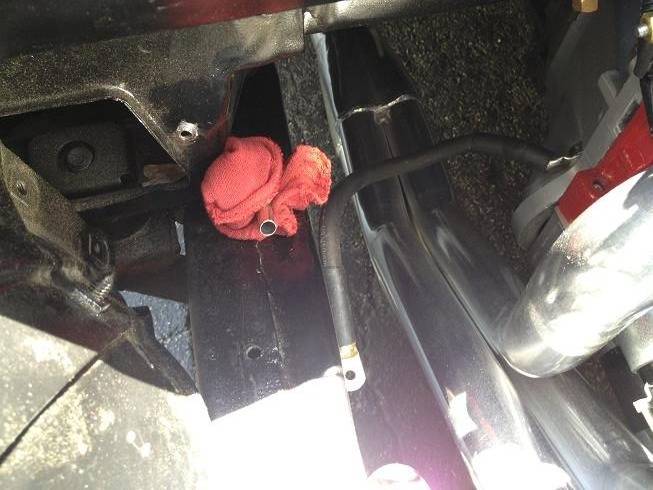
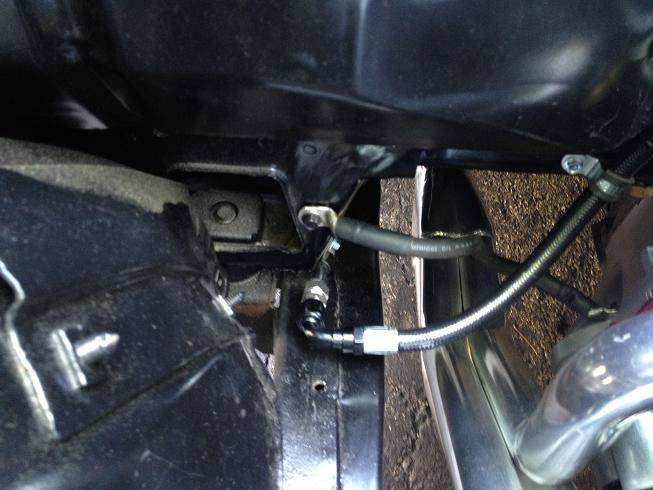
Here's where I cut the 3/8" hard fuel lines and transitioned to -6an lines. The fuel hose looks a lot closer to the headers than they really are, there's 3-4" of space, just a wierd angle:
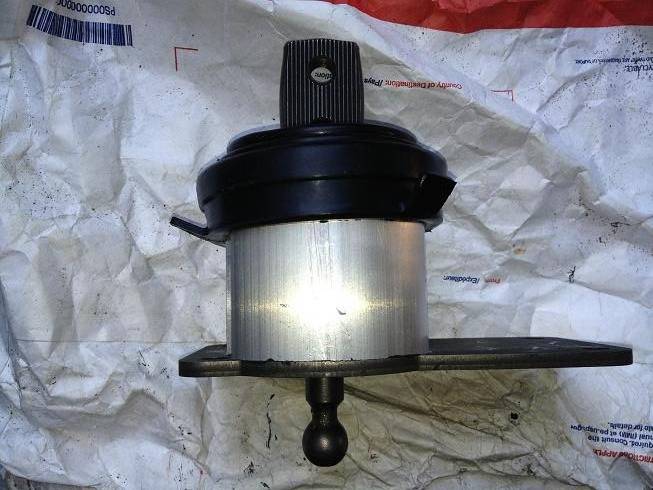
Here's the new shifter from Core-Shifters. This one is setup for a GTO shifter cup which is different than the F-bodies.
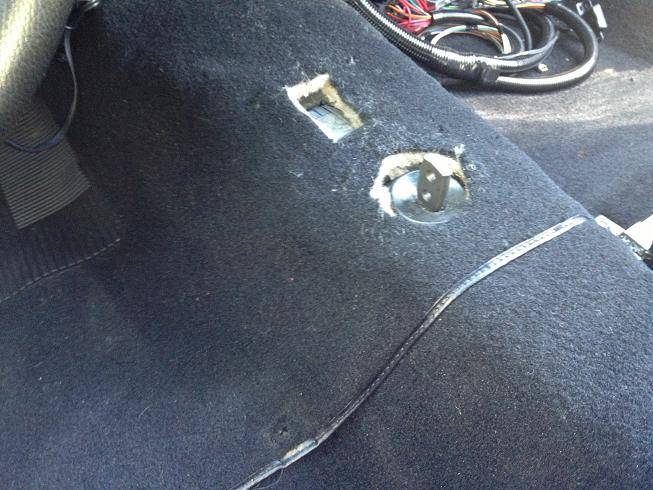
I cut a new hole for the shifter and used the scrap of floor to patch the old hole. The new shifter sits 4-5" further back than the Saginaw did:
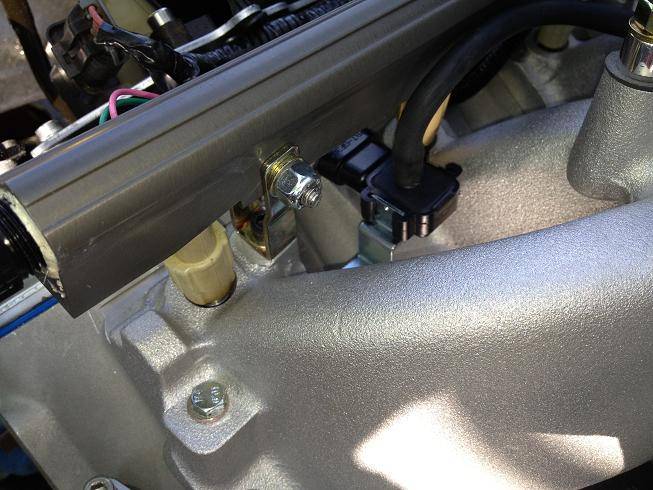
Here's where I mounted my MAP sensor (the black sensor with a vacuum hose attached to the top of it), and it connects to the vacuum port on the throttle body.
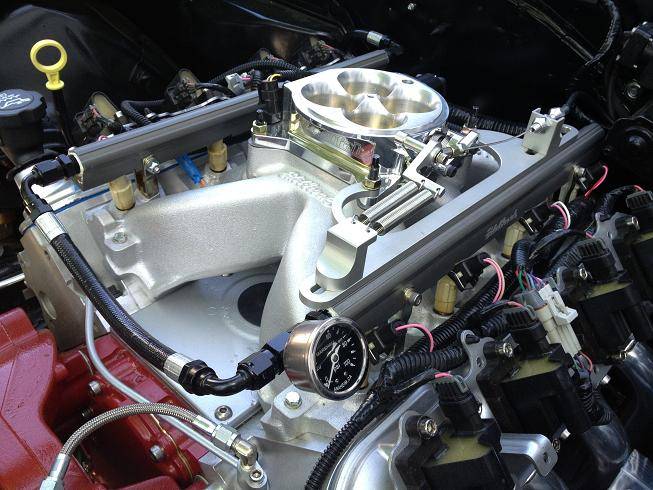
This is where I left off. All the fuel lines are done. I installed a fuel pressure gauge on the end of the fuel rail. The Lokar throttle cable is installed and tightened down. The new oil dipstick tube is installed.
-
06-06-2013 #322
Registered User
- Join Date
- Jan 2011
- Location
- Boston, MA
- Posts
- 1,180
I'm happy with my progress over the past few days, and I'm crossing things off the punch list although I've added a few things as well.
-I got my gauges (MIL, Speedo, Tach) wired up.
-I got my driveshaft back from the shop and installed. I realized the tranny wasn't perfectly centered, so I re-centered it, and set the engine and pinion angles.
-I got my ECU programmed with a base tune. I went down to Slowhawk Performance and met with Don, and he took good care of me. He's got a rep of being one of the best tuners in the country, and luckily only about 30 minutes from me. My tune will be complicated, since I'm not using a Mass Airflow Sensor (MAF), it will have to be a Speed Density Tune. Too complicated to explain here.
-I replaced my reverse lockout solenoid after finding out the plastic end of it wasn't a good place to wedge a 2x4 against while trying to center the tranny. :p Another sensor, another $75.
-I mocked up a few different shifter sticks I made out of plywood and found the perfect height, but the offset was wrong, so I ended up taking apart my brand new shifter from Core-Shifters and flipping the shifter handle base around so I could mount the shifter on the opposite side (pics later will make sense)
-I filled the transmission through the shifter hole, while the shifter was out.
-I ordered a new fan belt, since the one that was supposed to fit with the LS Brackets setup was a couple inches short.
-I also ordered my new dual Electric Fans, fan mounting brackets, coil wires, spark plugs, upper and lower radiator hoses, and a block off hose since I still don't have a heater box yet.
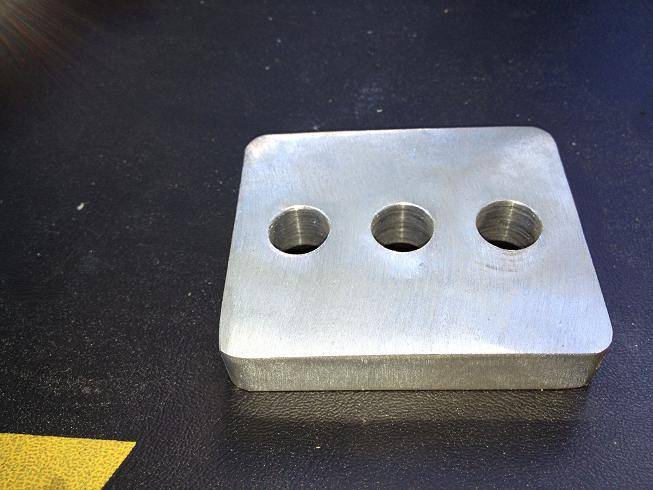
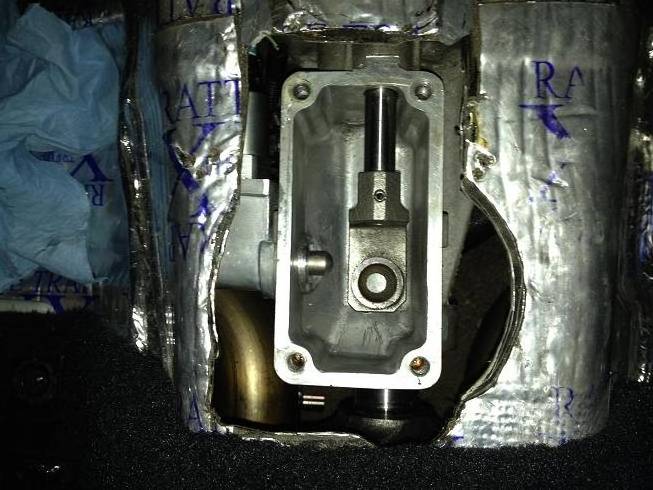
Here's a shot of the billet transmission mount that I modified. This was supposed to be for use with the auto tranny. I had too much downward angle of my engine and transmission, compared to my pinion angle, and my pinion angle was exactly where I wanted it to be. This mount was originally .750" thick. I drew a line around it with a sharpie (wish I had taken pics), placed it in a vice and sliced a 1/3 of it off. I wasn't sure how it would come out. I was looking for around 1/2" thick rather than using a stack of washers. I measure it on all 4 sides with a micrometer and came out with .481", .481", .479" and .491". Pretty darned close for eyeballing it, so I took my grinder with a sanding wheel and knocked .010" off the tall side. I came out with exactly 2* rearward engine angle, which is exactly where I wanted to be.
Here's a closeup of the cutout for the shifter hole. I've seen guys just cut a circle, but if you ever need to change out the shifter assembly, you have to drop the tranny. This way I can lift it straight up. I did have to widen the hole after I realized I had to shift the tranny 3/8" towards the passenger side.
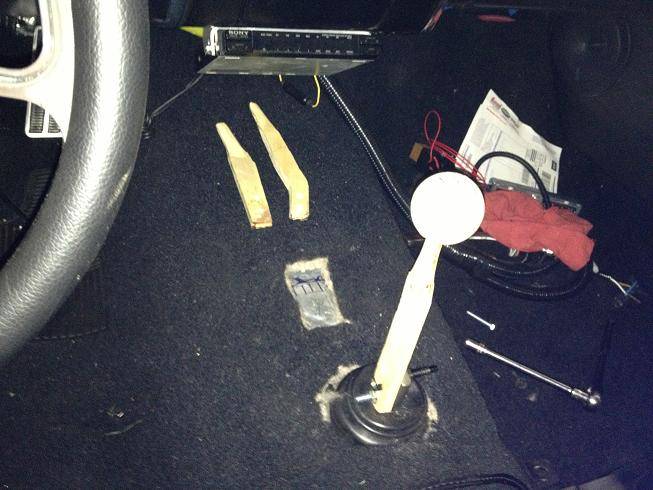
Not a great pic, but here's a shot of the shifter stick mockups. I had planned on going with a curved handle, but it put the shifter way to far back. The three Hurst shifter sticks I was looking at were 538-0015 (8" tall angled back 3"), 538-7238 (7.5" tall straight), and 538-7201 (6.38" tall with a 10* rear angle). I ordered from core-shifters.com, since I ordered my shifter there as well. They are super responsive to e-mails, I have contacted them a half dozen times and never waited more than 2 hours for a response. Here's a link to pics of all of their Hurst sticks: http://www.core-shifters.com/hurst2004sticks.pdf
538-7238 mocked up (you can see the other two wooden sticks lying on the trans tunnel). This is designed to be mounted on the passenger side of the shifter. There are ridges on one side of the shifter base and one side of the stick that need to line up, so they in effect lock together. The height was perfect, but it was about an inch too far to the passenger side (sounds fussy, but it was important with my console. More on that later.....)
-
06-06-2013 #323
Registered User
- Join Date
- Jan 2011
- Location
- Boston, MA
- Posts
- 1,180
Just documenting this for the sake of documenting it. This may never help anyone other than myself. This is the shifter base from core-shifters.com. As you can see in the pics, one side of the handle base is grooved and one side is smooth. I wanted to mount my shifter handle on the drivers side, but that was the smooth side. I decided to pull the shifter base apart to see if I could flip the handle around.
Here's the shifter in stock form. The left side is the rear, the right side is the front (as if looking at from the passenger seat)
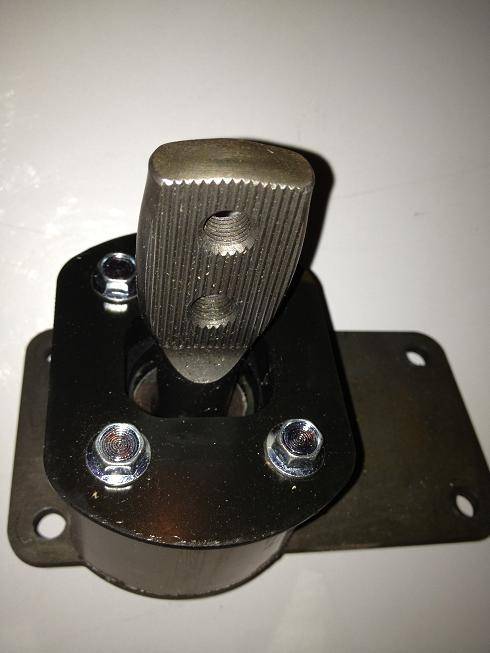
I unbolted the top 4 bolts:
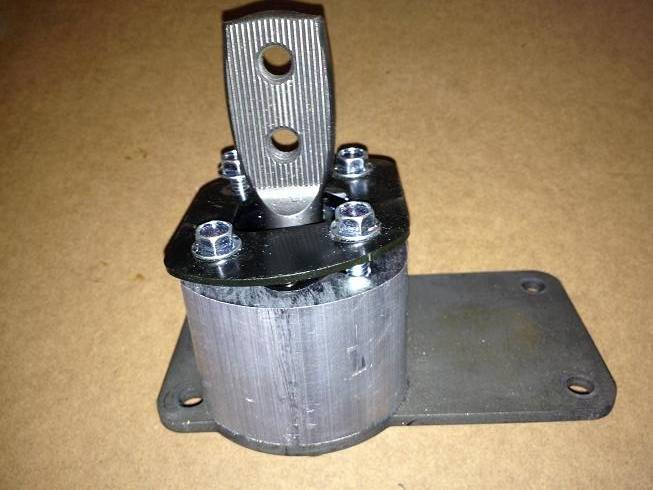
Removed the top plate and found 2 springs, one each side, that are for centering the shifter:
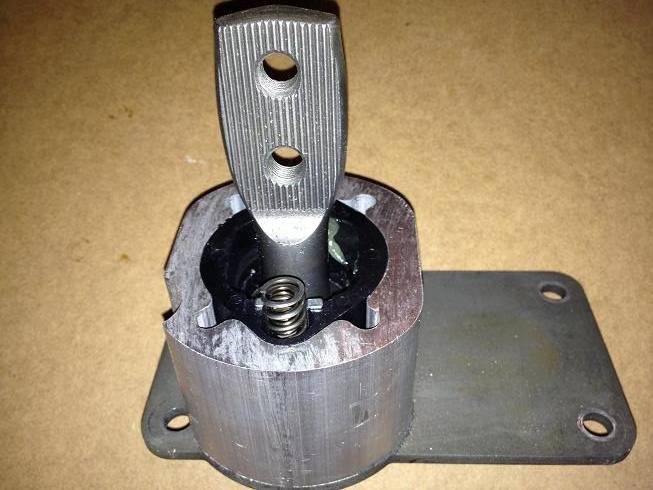
Remove the springs and this is what you see:
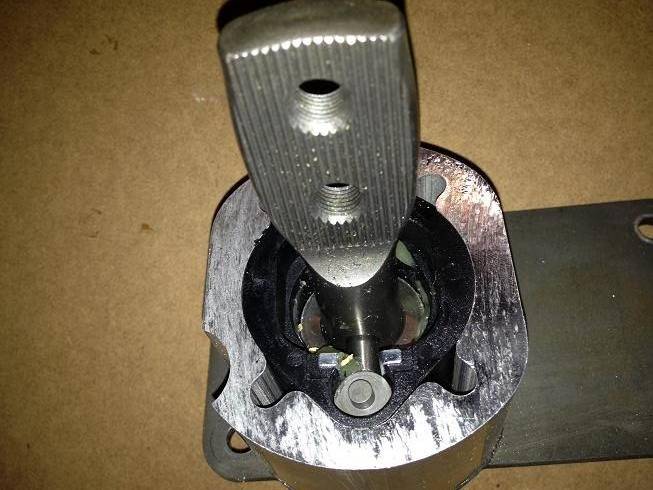
Lift the shifter handle straight up:
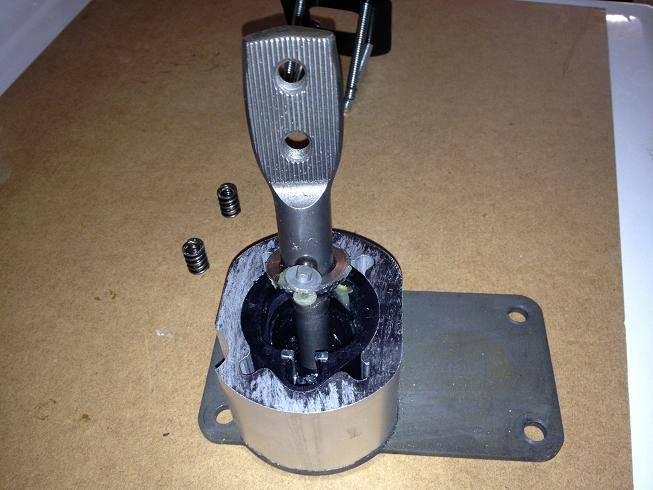
Rotate it 180*:
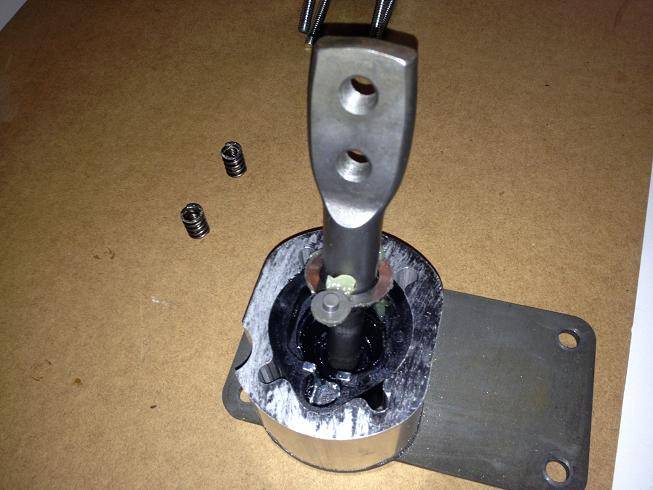
And reverse the process:
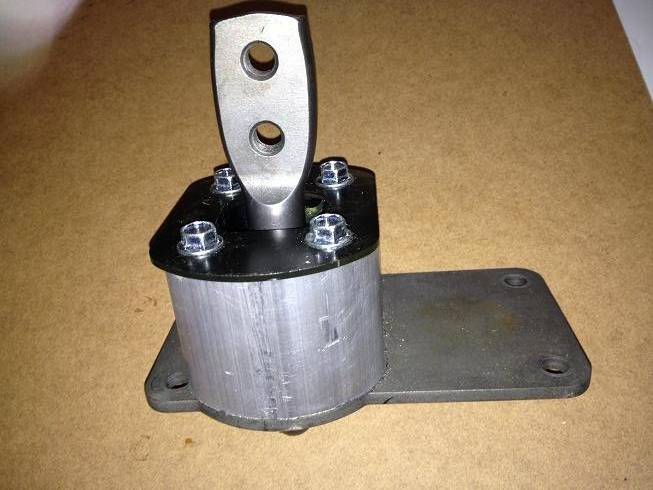
Now here it is looking from the drivers side:
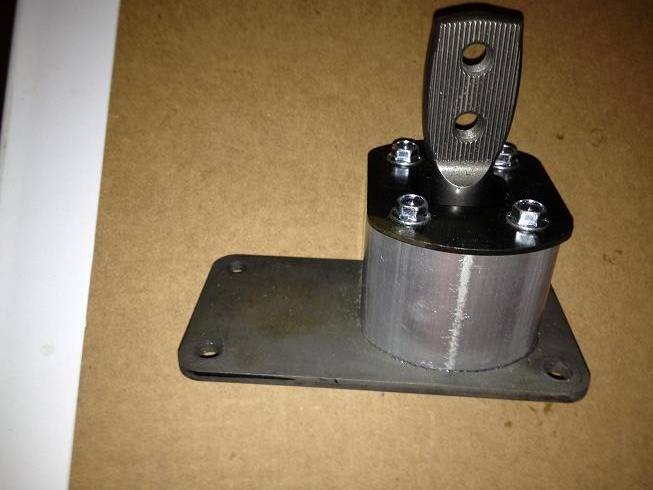
This literally took less than 10 minutes, including taking the pics. The only thing I didn't show was I used a little RTV black on the tip of the 4 bolts, since that's what was on there when I took them out.
This will allow you to mount any of the dozens of shifters that Hurst sells in the opposite direction they intended. Perfect for customizing your setup.
-
06-07-2013 #324
 Registered User
- Join Date
- Aug 2009
- Location
- ERIE, PA
- Posts
- 307
do you have the AN part number you used in the back of the PS pump?
-Bennyhaha
-
06-07-2013 #325
Registered User
- Join Date
- Jan 2011
- Location
- Boston, MA
- Posts
- 1,180
I haven't plumbed the PS pump up yet. I'm going to see if the fitting from my sbc pump fits, in which case I can just re-use the old setup. If not, I have a hydraulic hose company that will add the right fitting to my old hose. I'll find out this weekend which route I'm going. Originally Posted by LUV2XLR8

-
06-07-2013 #326
Registered User
- Join Date
- Aug 2009
- Location
- ERIE, PA
- Posts
- 307
i believe it's 1/4" to -6an... but just wanted to be positive... good job on the car... nice build btw... Originally Posted by 67rally
-Bennyhaha
06-10-2013 #327
Registered User
- Join Date
- Jan 2011
- Location
- Boston, MA
- Posts
- 1,180
Thanks. I was able to remove the fitting from my old pump and use it in the LQ9 pump, and then re-use my stock '67 Camaro PS hoses. Originally Posted by LUV2XLR8
06-13-2013 #328
Registered User
- Join Date
- Jan 2011
- Location
- Boston, MA
- Posts
- 1,180
Finally an update...
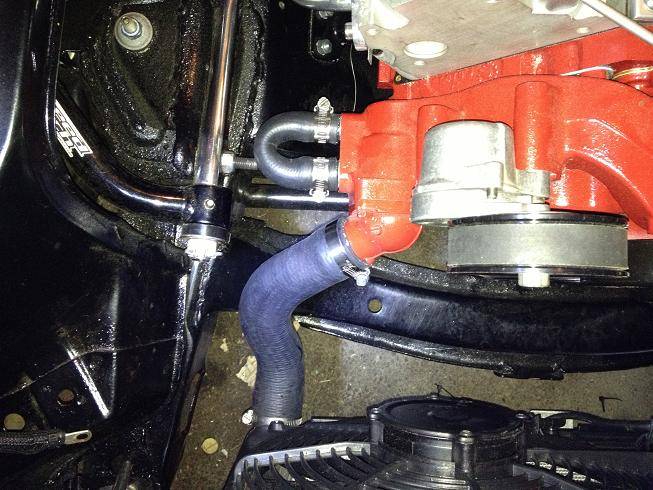
I tried using the lower radiator hose from an 04-06 GTO, but my lower radiator outlet is 1 3/4" and the GTO hose was 1 1/2". I managed to force it on, but it looked distorted, and I figured it would be a stress point.
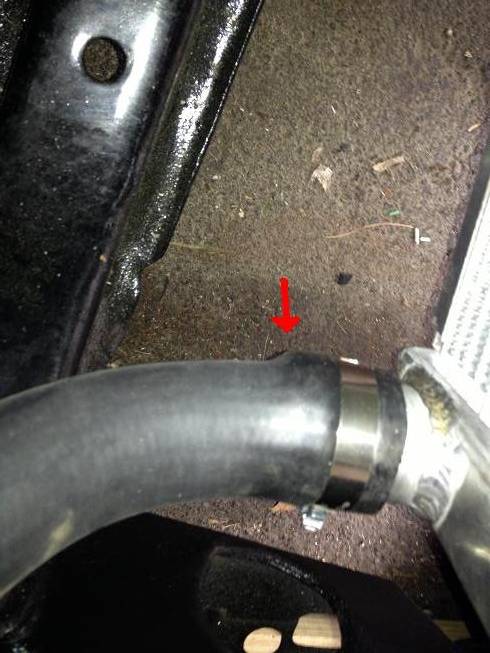
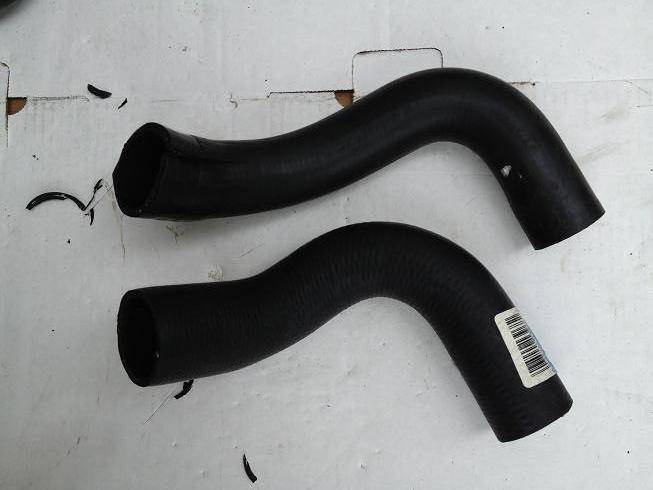
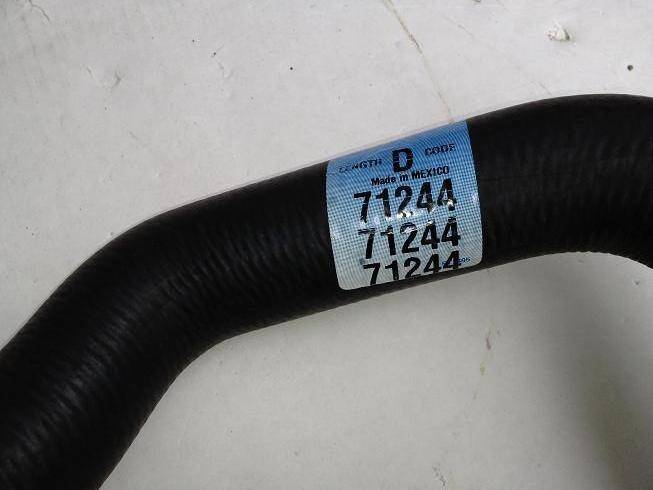
I bent up some heavy gauge non-stranded wire to the shape of the GTO hose, took it down to Pep Boys and went through their rack of hoses and found one for an 85-95 GMC/Chevy 1500/2500, etc. It had the perfect bend, with a 1 3/4" opening on one end, and 1 1/2" on the other. I cut the hose down to the right length and it worked perfectly.
GTO hose on top, 85-95 GM truck hose on bottom (after cutting down):
Here's the part number:
And the fitment:
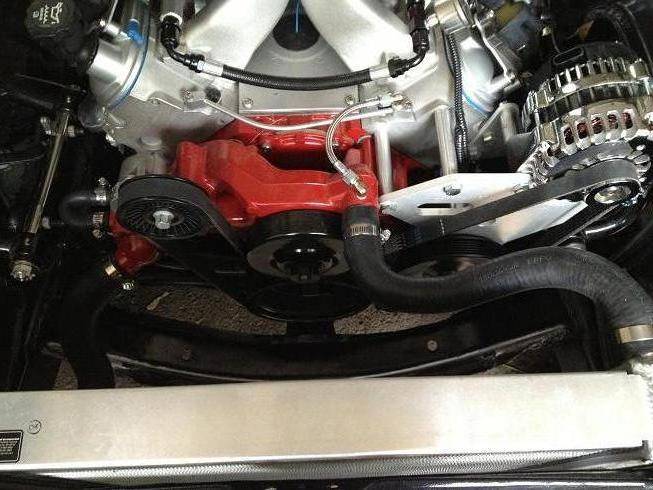
Here's the upper hose I used. I didn't have to do any trimming. The part number is in an earlier post:
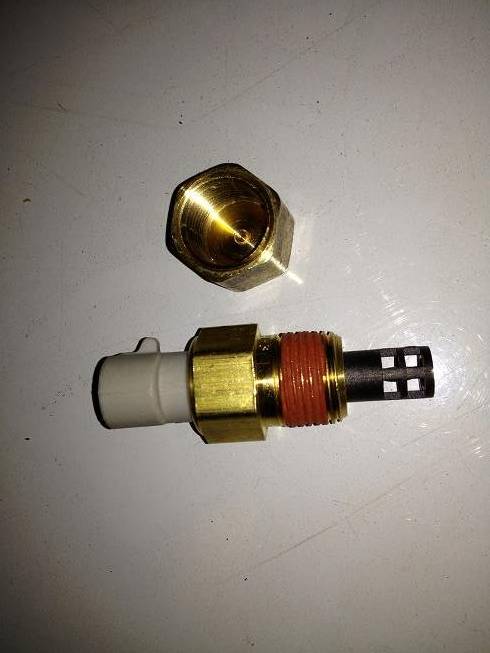
I thought I was going to get clever and mount my IAT (intake air temp) sensor in the base of my air cleaner, but my tuner said it would give me a false high reading. He suggested mounting it near the grille and tuning off ambient temps. I had already bought this sensor with a threaded base (AC Delco 213190) and I also thought it would thread into this fitting I found at the hardware store, but the thread sizes were not a match:
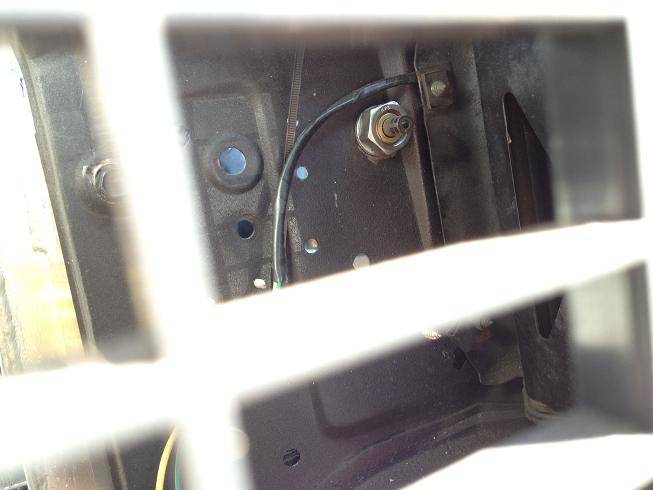
I drilled a larger hole through the radiator support and ended up mounting it here:
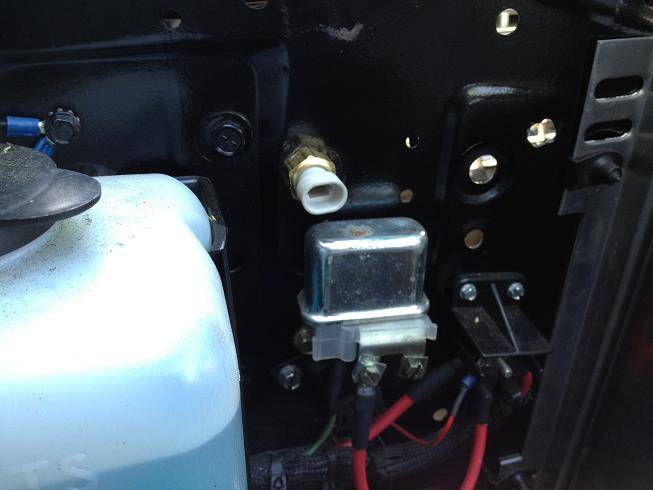
And used a bolt I had lying around (I think from my old LQ9 alternator) to thread it on. Here's a view looking through the grille:
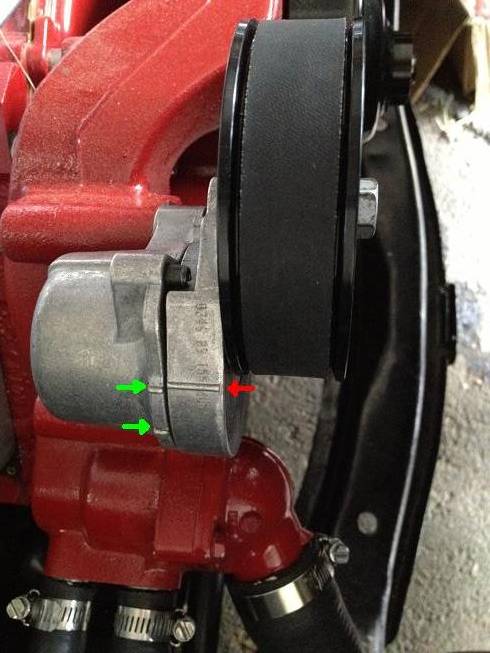
The first serpentine belt I bought was 73.5" long and it was far too short. It was supposed to work with my alt/ps bracket, but not even close. I wrapped a long piece of string around all the brackets and then measured the string and came up with 75.5", so I bought that one and it was closer, but still didn't fit, so I returned it. I special ordered one at 76.5" and it fit great, but then I realized it's still 1/2" short. The single line on the tensioner is supposed to line up between the double lines. So I ordered my 4th belt at 77.0". It should be here tomorrow. Part number is Gates 5060770. Belts are identified by the last 3 digits. The 73.5" one was 5060735. The 6 in the middle of the sequence is the number of ribs. I'm keeping the 76.5" one as a spare, just in case I break a belt and need to limp home:
06-13-2013 #329
Registered User
- Join Date
- Jan 2011
- Location
- Boston, MA
- Posts
- 1,180
I did a bunch of wiring, filling fluids, power steering hoses, etc.
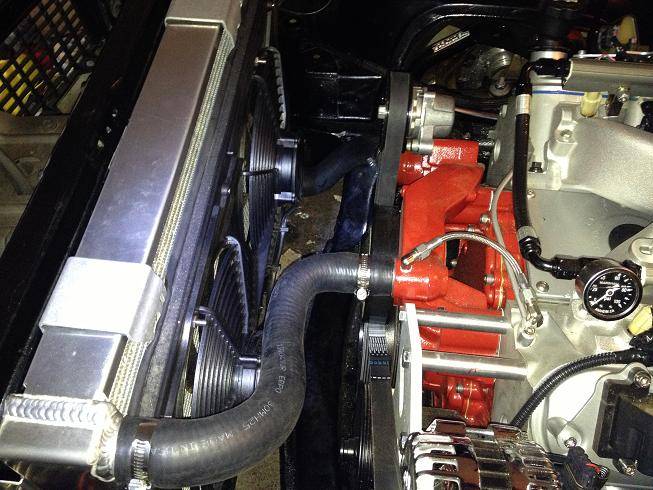
Then it was on to the electric fans. I'm using a dual fan setup from Summit Racing.
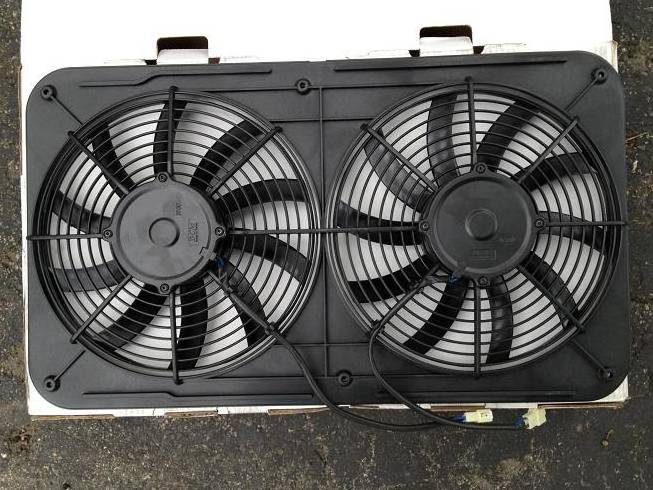
They did not fit. They were too wide, and hit the upper and lower radiator hose. If I wasn't on a time crunch I would have returned them and just bought the right ones to go with my BeCool radiator. Instead I modified them to fit by cutting out a section out of each corner. And fabricated some horizontal brackets out of aluminum.
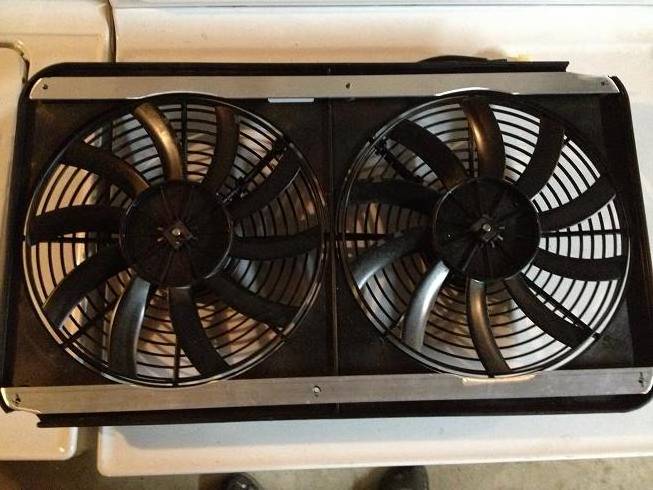
I ran new wire between the passenger wheel well/fender area to a couple of relays. I also picked up some brackets from eBay to mount to the brackets I fabricated:
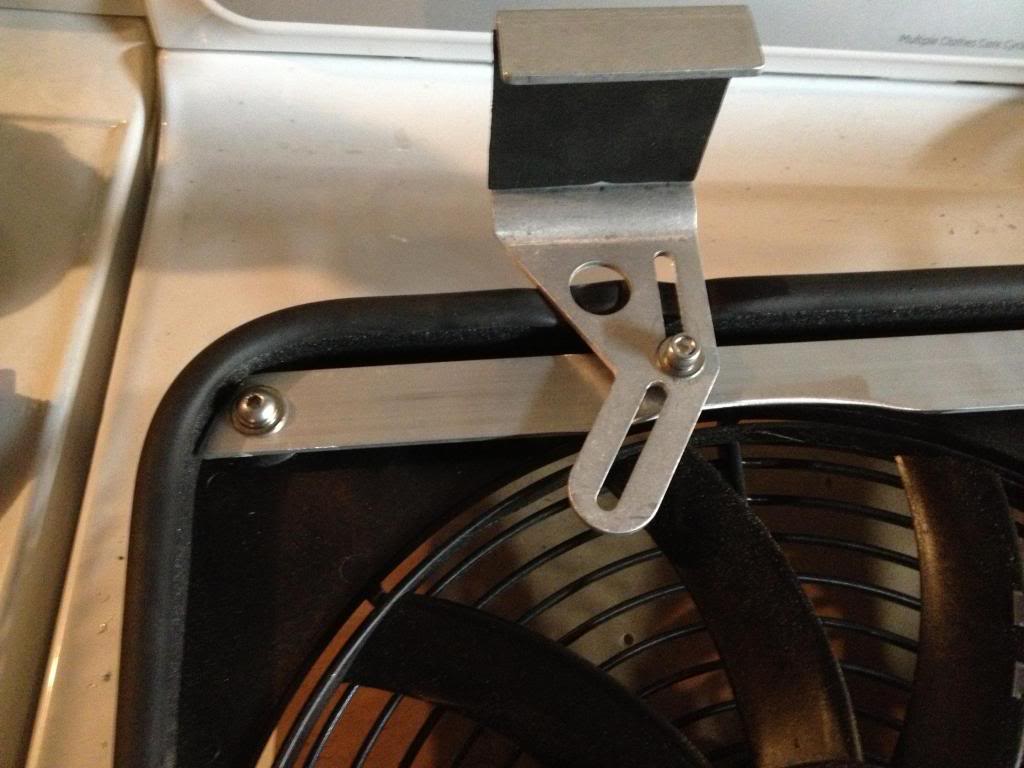
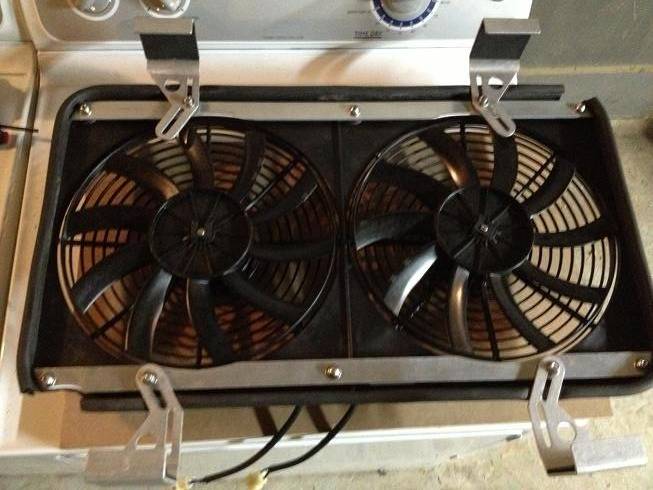
Here they are mounted and wired up:
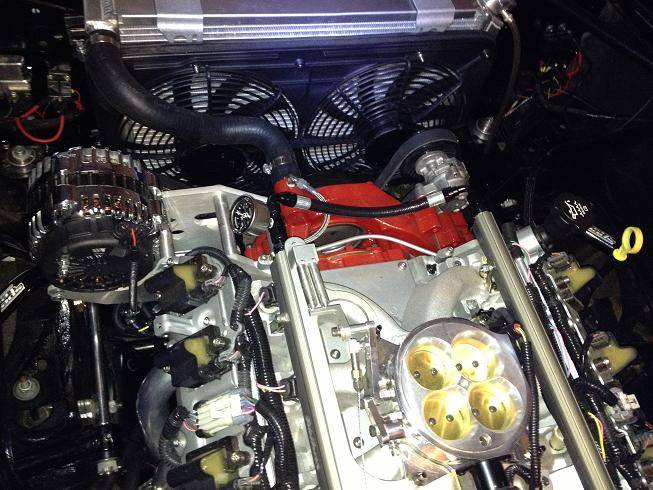
This shows how much clearance I have, tons of space:
And this is what's left on my punch list:
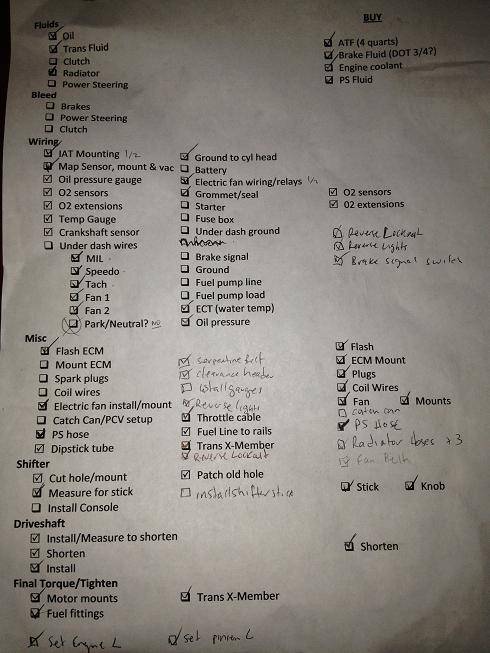
Actually, the starter is wired and the shifter stick is mounted as well, I just forget to check them off. I'm going to try to finish up by Saturday or Sunday at the latest. Then turn the key and see what happens.
06-13-2013 #330
Registered User
- Join Date
- Mar 2009
- Location
- Houston, TX
- Posts
- 1,197
Looks great there. Progress on my swap had been really slow. I'm about 6 wks behind on my initial schedule.
I went back on your earlier posts and did not see a p/n for the upper rad. hose. Do you have it handy?
Thanks.
tuTu Ho
Firebird V2-LS swap
06-14-2013 #331
Registered User
- Join Date
- Jan 2011
- Location
- Boston, MA
- Posts
- 1,180
Sorry, I thought I posted it, but it looks like I forgot. Here are the radiator hoses I used that worked with the BeCool radiator and LQ9 engine with an L99 water pump: Originally Posted by rickpaw
Upper: Gates 22373 (this is a lower hose for something like a Buick LaCrosse, but it's a great fit)
Lower: Dayco 71244 (this a lower hose for some kind of 85-95 Chevy/GMC truck)
U-Shaped return for heater delete: Gates 18743 (this has a 5/8" end and a 3/4" end, it just needs to be cut to length)
06-14-2013 #332
Registered User
- Join Date
- Mar 2009
- Location
- Houston, TX
- Posts
- 1,197
Thanks. I'm using similar set up (5.3 truck engine, L99 water pump, stock radiator), but with Holley access drive.
Tu Ho
Firebird V2-LS swap
06-17-2013 #333
Registered User
- Join Date
- Jan 2011
- Location
- Boston, MA
- Posts
- 1,180
A long weekend of trying to finish up the car resulted in a no start on Saturday evening. I spent all day Sunday troubleshooting. First no fuel pressure to the rails (fuel pump wasn't working due to my wiring mistake), and then no spark.
In the end, it turned out I had a wire going to the ECU that needed to be HOT with ignition on and while cranking, and it was only hot with ignition on. It had no power while cranking. I slept on it last night, and spent a few hours going through all the grounds, and connections, trying to rule everything out before calling PSI Conversions, or Slowhawk (my tuner). After straightening out he wiring, she fired right up. I let it run for about 2 minutes, but had to get back to work.
A long weekend of trying to finish up the car resulted in a no start on Saturday evening. I spent all day Sunday troubleshooting. First no fuel pressure to the rails (fuel pump wasn't working due to my wiring mistake), and then no spark.
In the end, it turned out I had a wire going to the ECU that needed to be HOT with ignition on and while cranking, and it was only hot with ignition on. It had no power while cranking. I slept on it last night, and spent a few hours going through all the grounds, and connections, trying to rule everything out before calling PSI Conversions, or Slowhawk (my tuner). After straightening out he wiring, she fired right up. I let it run for about 2 minutes, but had to get back to work.
I still need to finish a few things up and then try to get it down to my tuner. Hopefully I can take it out of the garage under it's own power tomorrow.
06-17-2013 #334 Registered User
- Join Date
- Aug 2006
- Posts
- 381
sounds awesome, great job man
72 Camaro RS:SOLD
68 Camaro:
LS6 Engine,Tremec TKO 600,5 Speed
Complete Speedtech Subframe Kit,Speedtech Torque Arm, 9" Rearend from Strange, Wilwood Brakes, Minitubbed, Hotchkis Subframe Connectors
06-18-2013 #335
Registered User
- Join Date
- Mar 2009
- Location
- Houston, TX
- Posts
- 1,197
Nice. Congrats. Gives me motivation to get mine done.
Tu Ho
Firebird V2-LS swap
06-18-2013 #336
Registered User
- Join Date
- Jul 2005
- Location
- Grain Valley, MO
- Posts
- 92
Nice! Hearing it fire up for the first time is a big milestone, congratulations!
06-18-2013 #337
Registered User
- Join Date
- Jan 2011
- Location
- Boston, MA
- Posts
- 1,180
Thanks guys, big relief getting it started.
I got some of the finishing stuff buttoned up, but not everything. I mounted the ECU and fusebox where the old heater box used to be. It will get moved again next year when I do Vintage Air, but gotta stop spending money for a little while.
I cleaned up some wiring looms, then started the engine back up. I let it get up to temp today and one of the fans kicked on which is a good sign. The other one is set to come on 5 degrees higher, but never needed to. Oil pressure looked good, temp was good.
I have a Power Steering hose leak (dribble), that I found yesterday, new hose should be here tomorrow. I bent the hardline trying to get it off the old pump and it doesn't want to make a good seal any more, no biggie.
I was going to bleed the brakes, and had it up on jack stands ready to remove the wheels and the sky turned black. I decided to re-install my hood instead, and just after I got it close enough the skies started to open up. Pushed it back into the garage and called it a day. I'm going to see if I can get it finished up and down to my tuner by Friday.
Quick exhaust clip:
06-27-2013 #338
Registered User
- Join Date
- Jan 2011
- Location
- Boston, MA
- Posts
- 1,180
Oops, looks like I forgot to update here. I got the new PS hose on and took care of the leak, I bled the brakes, got everything buttoned up and started to drive down to see Don at Slowhawk Performance for the final tune. I had a bad knocking on the passenger side of the engine, so aborted the mission. It turned out to be a rocker arm bolt that I must not have torqued down to spec. I retorqued everything and all was well. I brought it down the following morning to leave in his capable hands.
Well, I got my Camaro back from Slowhawk today. They did a great job on the tune, and reworked the exhaust temporarily. It's a freaking rocket ship!!!
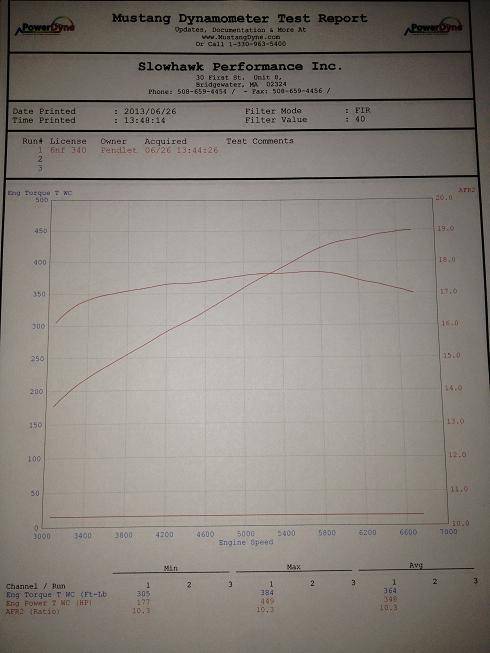
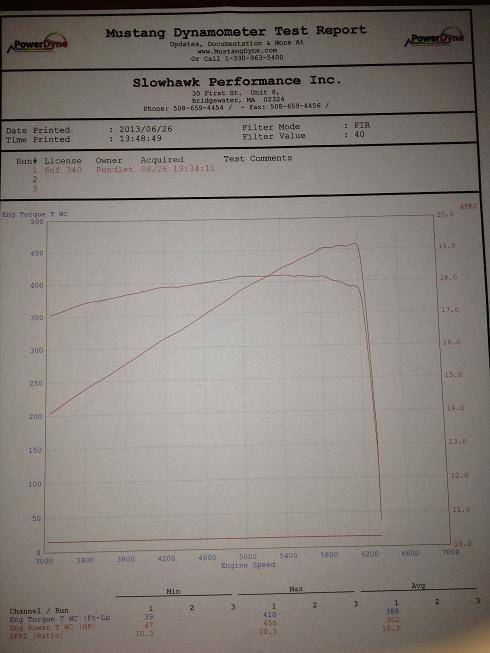
As always, there's good news and bad news. The bad news is that I must not have hit my pinion angle right, so I'll have to adjust that. Don had to shut down the dyno test in 4th gear at 6200rpm when it started to vibrate pretty bad. You can see where the line vibrates just before shutdown. So he did a final pull in 3rd gear. He said it wanted to pull to the moon, and set the redline in the ECU to 7k rpm.
Once I get the driveline angle perfect, I may jump back on the dyno, but it would just be for a final number, the tune is great the way it is. Maybe I'll wait for a Dyno Day.
3rd Gear Pull:
449 rwhp
384 ft-lb
4th Gear Pull, shut down at 6200rpm:
458 rwhp
410 ft-lbtq
06-27-2013 #339
Registered User
- Join Date
- Mar 2009
- Location
- Houston, TX
- Posts
- 1,197
Nice.
Tu Ho
Firebird V2-LS swap
06-28-2013 #340 Registered User
- Join Date
- Dec 2012
- Location
- Las Vegas, Nevada
- Posts
- 109
very nicely documented... thanks this is going to be a great help with my build when i do finally do the LS swap


 Reply With Quote





