


Results 41 to 60 of 536
Thread: Project 70 RS
-
08-28-2011 #41

 Registered User
- Join Date
- Feb 2005
- Location
- Sydney, Australia
- Posts
- 1,797

I gather they are "one use only" clamp? You have to cut them off?
Very neat looking......I went for heavy duty band clamps....a little annoying as they can only be tightened a certain distance. I like your CF top mount and the filler panel for the rad support to the nose....nice.
I also have a Champion radiator.....I imported a few of them for friends and then bought mine, it seems the design changed as the one in my car is a better design and better workmanship than the earlier ones I saw.

I designed my own shroud and then used a factory fan set from a late model sedan.
Regards,
Leigh
Sydney, Australia
1971 Firebird 455
https://www.pro-touring.com/showthre...Project/page27
-
08-28-2011 #42 Registered User
- Join Date
- Feb 2009
- Location
- N.J.
- Posts
- 690

The clamps you used were one of my favorites.
I almost went with them, they look industrial. Very cool.
My neighbor is building a firebird also. Car looks great.
Thanks for the input.- Paul
70 Camaro RS Project Build
https://www.pro-touring.com/showthre...-Project-70-RS
90 Mustang GT Project Build
https://www.pro-touring.com/threads/...ang-Gt-Project
My Garage Project
http://garagejournal.com/forum/showthread.php?t=189511
09-11-2011 #43
Registered User
- Join Date
- Feb 2009
- Location
- N.J.
- Posts
- 690
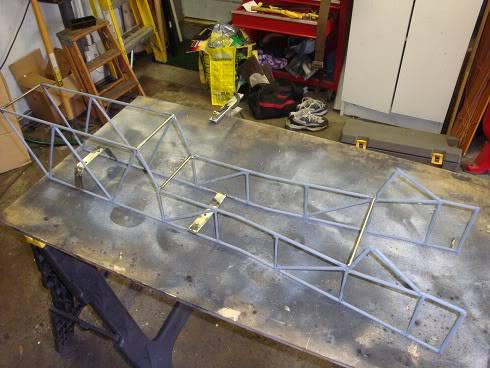
Started my center console today.
Was trying to decide wether to make it out of wood or metal.
I need to pracitce my welding so I decided to make it out of metal.
Got most of the frame put together. I wanted to attach it to the original console mounts so I fabed up the brackets too.
 - Paul
70 Camaro RS Project Build
https://www.pro-touring.com/showthre...-Project-70-RS
90 Mustang GT Project Build
https://www.pro-touring.com/threads/...ang-Gt-Project
My Garage Project
http://garagejournal.com/forum/showthread.php?t=189511
09-12-2011 #44
Registered User
- Join Date
- Feb 2009
- Location
- N.J.
- Posts
- 690
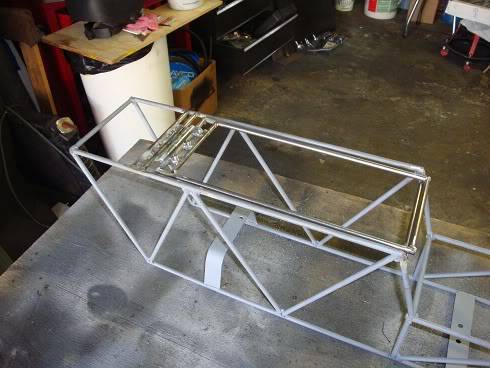
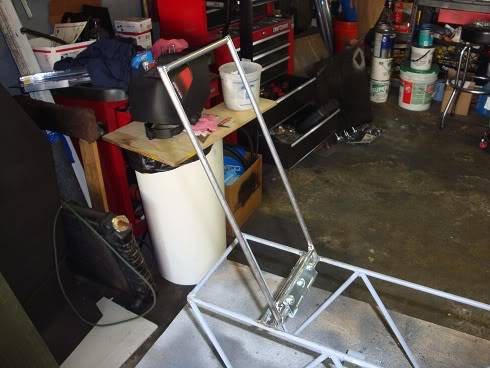
Started the flip top today.
Got the hinge in and most of the lid framed out.
Welded some nuts into the lid so it can be removable.
A couple more cross braces and I can start covering it with sheet metal.
Hopefully more tomorrow.
 - Paul
70 Camaro RS Project Build
https://www.pro-touring.com/showthre...-Project-70-RS
90 Mustang GT Project Build
https://www.pro-touring.com/threads/...ang-Gt-Project
My Garage Project
http://garagejournal.com/forum/showthread.php?t=189511
09-12-2011 #45 Registered User
- Join Date
- Nov 2006
- Location
- Ma.
- Posts
- 5,560
Nice job on the console frame.
Wayne
Car FINALLY home !!!!!! lol
Project FNQUIK https://www.pro-touring.com/showthre...ghlight=FNQUIK
09-13-2011 #46
Registered User
- Join Date
- Feb 2009
- Location
- N.J.
- Posts
- 690
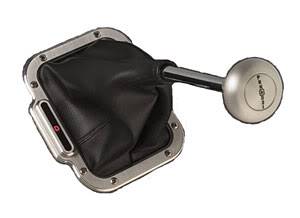
Have to stop construction now. I need the shifter, power window switches, and cup holders to finish up the frame construction.
Just ordered this shifter from Lokar. I also ordered the shorter shifter, 6" instead of the one shown in the picture.
Way too long. Got to change out the shifter knob also.
I really like the look of the boot and indicator though.
 - Paul
70 Camaro RS Project Build
https://www.pro-touring.com/showthre...-Project-70-RS
90 Mustang GT Project Build
https://www.pro-touring.com/threads/...ang-Gt-Project
My Garage Project
http://garagejournal.com/forum/showthread.php?t=189511
09-13-2011 #47 Registered User
- Join Date
- Apr 2005
- Location
- Chicago
- Posts
- 2,788
That is my favorite set up from them.
Really Nice choice
 Originally Posted by aps63
 marty-mj
GarageScene.net High Speed Welding KDHotrods RecoveryRoomInteriors WegnerAutomotive Autometer Ride-Tech
09-23-2011 #48
Registered User
- Join Date
- Feb 2009
- Location
- N.J.
- Posts
- 690
Thanks Marty,
I just got all the parts in, shifter, indicator, cup holders, etc...
I'm really pleased with the parts. They look awesome.
Can't wait to get in the garage this weekend. I want to mount the shifter so I can finish up the center console.- Paul
70 Camaro RS Project Build
https://www.pro-touring.com/showthre...-Project-70-RS
90 Mustang GT Project Build
https://www.pro-touring.com/threads/...ang-Gt-Project
My Garage Project
http://garagejournal.com/forum/showthread.php?t=189511
10-08-2011 #49
Registered User
- Join Date
- Feb 2009
- Location
- N.J.
- Posts
- 690
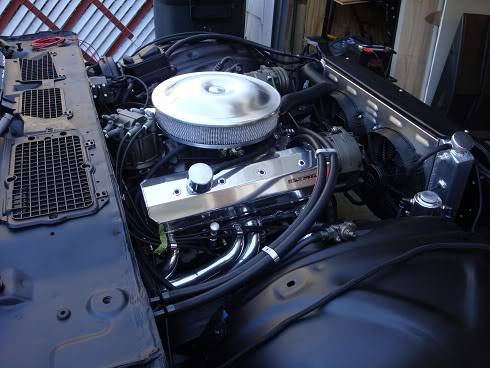
Finally got out to the garage for a little while.
Got alot buttoned up today.
Finished the wiring for the a/c, fans & controller, hooked up the fuel system and ran the ducts for the ac.
Almost ready to fire up.
Just need fluids, new spark plugs, and belts.
Hopefully by next weekend.
 - Paul
70 Camaro RS Project Build
https://www.pro-touring.com/showthre...-Project-70-RS
90 Mustang GT Project Build
https://www.pro-touring.com/threads/...ang-Gt-Project
My Garage Project
http://garagejournal.com/forum/showthread.php?t=189511
10-09-2011 #50
Registered User
- Join Date
- Feb 2009
- Location
- N.J.
- Posts
- 690
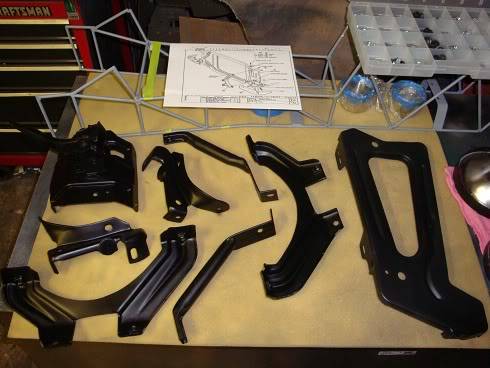
More parts coming off the parts shelf in the basement.
I sandblasted and painted all these parts about 2 years ago, when I took them off.
Now its time to start putting the front end back together.
Fresh parts and an assortment off new bolts. Love this part.
 - Paul
70 Camaro RS Project Build
https://www.pro-touring.com/showthre...-Project-70-RS
90 Mustang GT Project Build
https://www.pro-touring.com/threads/...ang-Gt-Project
My Garage Project
http://garagejournal.com/forum/showthread.php?t=189511
10-09-2011 #51
Registered User
- Join Date
- Aug 2011
- Location
- Michigan
- Posts
- 90
Keep up the good work!
10-09-2011 #52 Registered User
- Join Date
- Feb 2010
- Location
- Central NJ
- Posts
- 791
Everything is looking great and coming together nicely! I'm probably going add similar fans this winter... Keep up the great work!
-SeanMy 1973 Chevelle "Bad Buzz" build: https://www.pro-touring.com/showthre...velle-PT-Build
10-10-2011 #53
Registered User
- Join Date
- Feb 2005
- Location
- Sydney, Australia
- Posts
- 1,797
Looks terrific.....its great fitting all those pieces you restored way back, isn't it?
Regards,
Leigh
Sydney, Australia
1971 Firebird 455
https://www.pro-touring.com/showthre...Project/page27
10-10-2011 #54
Registered User
- Join Date
- Feb 2009
- Location
- N.J.
- Posts
- 690
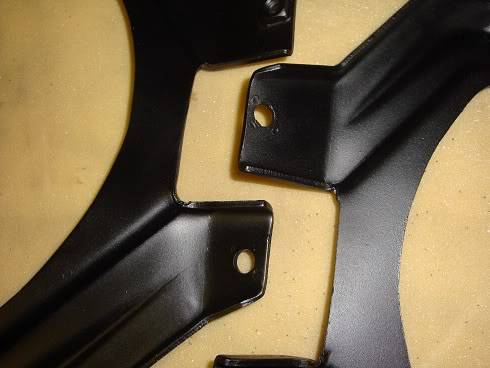
Started putting the front brackets back on the car and notice I am missing 2 nuts.
You can see where they were welded on.
Not sure how I missed that when I took it apart, and blasted it, and painted it.
Guess I'm doing some welding tomorrow.
Oh well , aleast I have extra nuts(that doesn't sound good).
 - Paul
70 Camaro RS Project Build
https://www.pro-touring.com/showthre...-Project-70-RS
90 Mustang GT Project Build
https://www.pro-touring.com/threads/...ang-Gt-Project
My Garage Project
http://garagejournal.com/forum/showthread.php?t=189511
10-10-2011 #55
Registered User
- Join Date
- Nov 2006
- Location
- Ma.
- Posts
- 5,560
It sounds fine! anybody who does one of these builds has plenty of nut... Its looking great.
Wayne
Car FINALLY home !!!!!! lol
Project FNQUIK https://www.pro-touring.com/showthre...ghlight=FNQUIK
10-13-2011 #56
Registered User
- Join Date
- Feb 2009
- Location
- N.J.
- Posts
- 690
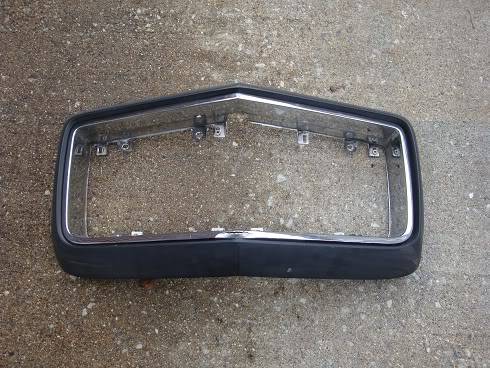
I just can't leave things alone, I think it's a sickness.
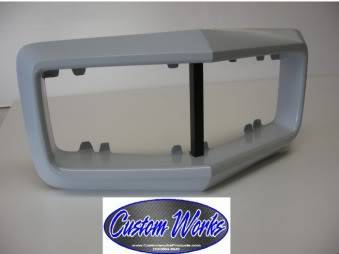
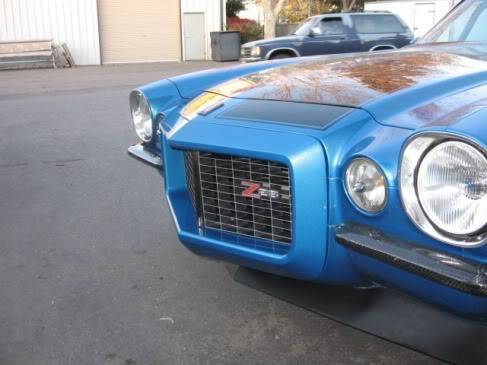
I love the nose on these RS's. But I really love the look of
Custom Works Products Fiberglass nose.
Trying to decide which one I like more.
 - Paul
70 Camaro RS Project Build
https://www.pro-touring.com/showthre...-Project-70-RS
90 Mustang GT Project Build
https://www.pro-touring.com/threads/...ang-Gt-Project
My Garage Project
http://garagejournal.com/forum/showthread.php?t=189511
10-13-2011 #57
Registered User
- Join Date
- Feb 2006
- Location
- Enumclaw, WA
- Posts
- 235
Very clean build...will have to share with my dad for inspiration on his '73 RS...

1970 Chevelle Pro-Touring Project
Plans- 6.0L H/C (TT later), T56, UMI suspension, Kore3 C6 Z06 brakes, and lots more....
10-13-2011 #58 Registered User
- Join Date
- Aug 2004
- Location
- Rustburg, Virginia
- Posts
- 3,436
Nice project...I think that I've seen this car elswhere on the worldwideweb today.
1970 RS/SS350 139K on the clock:
89 TPI motor w/ 1pc rear seal coupled to a Viper T56 via Mcleod's modular bellhousing w/ hydraulic T/O bearing from the Viper, 12 bolt rear w/ 3.73 gearing, SC&C upper control arms, factory lowers with Delalums, C5 brakes at all four corners, Front Wheels 17x8's with Sumi 255/40/17 and Rear Wheels 17x9's with Sumi 275/40/17.
Brief description of the work done so far can be found here: http://www.nastyz28.com/forum/showthread.php?t=112454
10-13-2011 #59
Registered User
- Join Date
- Feb 2009
- Location
- N.J.
- Posts
- 690
You have John, great people on both sites.
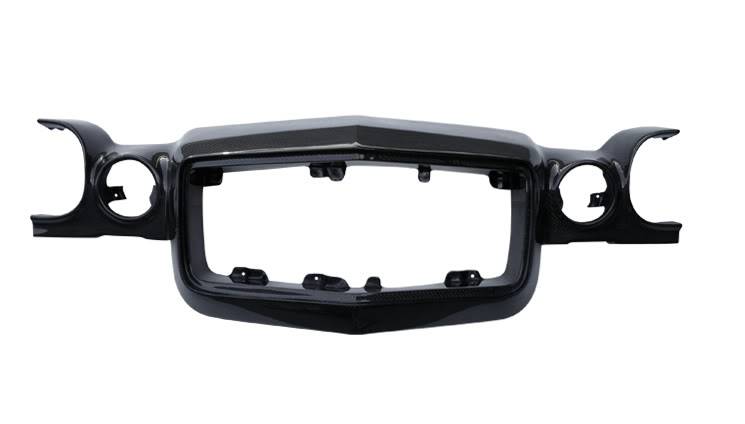
I'm also checking into this one piece carbon fiber piece from Anvil auto.
Bought a radiator closeout from them and the quality and fit was excellent.
 - Paul
70 Camaro RS Project Build
https://www.pro-touring.com/showthre...-Project-70-RS
90 Mustang GT Project Build
https://www.pro-touring.com/threads/...ang-Gt-Project
My Garage Project
http://garagejournal.com/forum/showthread.php?t=189511
10-13-2011 #60 Registered User
- Join Date
- Oct 2005
- Location
- New Washington, IN
- Posts
- 1,509
Looking great!
Love the console frame.1971 Camaro 427 in waiting
1988 C1500 Daily Driver
1955 Bel Air, blown BBC street car

 Reply With Quote


