

Results 1 to 17 of 17
Thread: lca bolts
-
05-24-2011 #1

 Registered User
- Join Date
- Aug 2004
- Location
- Holmes Hollow, Ontario Canada
- Posts
- 991
lca bolts
Right before (after) I lose my mind, can anyone tell me an easier way to lca bolts out of stock bushings? I've tried heat, wd40 on one front bolt it and must have taken me at least an hour to get out. I can't get at the back one ( who inserts the bolt from inside the frame?) with a drift or heat. Any tips?
____________________________________________
Scott
-
05-24-2011 #2 Registered User
- Join Date
- Oct 2004
- Location
- St.Anne Il
- Posts
- 3,924

if you have access to an air chisel those work good...the vibration will help it out..good luck..
Darrin Stalnecker
1969 Camaro Convert full pt pr
2007 Corvette Supercharged
1968 Camaro LS1 T56
http://www.fquick.com/dropit69
05-25-2011 #3
Registered User
- Join Date
- Aug 2004
- Location
- Holmes Hollow, Ontario Canada
- Posts
- 991
Thanks, I'll try that before I break out the grinder.
____________________________________________
Scott
05-25-2011 #4 Registered User
- Join Date
- Aug 2004
- Location
- Rustburg, Virginia
- Posts
- 3,436
One of mine was kind of stubborn and didn't want to surrender it's nice comfortable position where it resided for 35+ years....but I used an impact wrench and eventually the bolt kept spinning in the rubber to a point it became loose and I was able to slide it out while prying on it as it spun.
1970 RS/SS350 139K on the clock:
89 TPI motor w/ 1pc rear seal coupled to a Viper T56 via Mcleod's modular bellhousing w/ hydraulic T/O bearing from the Viper, 12 bolt rear w/ 3.73 gearing, SC&C upper control arms, factory lowers with Delalums, C5 brakes at all four corners, Front Wheels 17x8's with Sumi 255/40/17 and Rear Wheels 17x9's with Sumi 275/40/17.
Brief description of the work done so far can be found here: http://www.nastyz28.com/forum/showthread.php?t=112454
05-25-2011 #5
Registered User
- Join Date
- Aug 2004
- Location
- Holmes Hollow, Ontario Canada
- Posts
- 991
I tried that and got the first out that way after I added some heat. The second one doesn't want to spin with the impact because I have to use a universal joint to get inside the frame where for God knows what reason they inserted the bolt. It just doesn't seem to get enough torque so I've been using the torque wrench and elbow grease. When I do the other side I'm ging to cut off as much thread as I can, then add heat and a pry bar. I'm guessing the only thing that's going to work on the back ones will be the grinder.
____________________________________________
Scott
05-25-2011 #6
Registered User
- Join Date
- Aug 2004
- Location
- Rustburg, Virginia
- Posts
- 3,436
Well, you'll want to replace the bushings anyway...so heat 'er up...just don't catch the car on fire. It will stink pretty good.
1970 RS/SS350 139K on the clock:
89 TPI motor w/ 1pc rear seal coupled to a Viper T56 via Mcleod's modular bellhousing w/ hydraulic T/O bearing from the Viper, 12 bolt rear w/ 3.73 gearing, SC&C upper control arms, factory lowers with Delalums, C5 brakes at all four corners, Front Wheels 17x8's with Sumi 255/40/17 and Rear Wheels 17x9's with Sumi 275/40/17.
Brief description of the work done so far can be found here: http://www.nastyz28.com/forum/showthread.php?t=112454
05-25-2011 #7
Registered User
- Join Date
- Aug 2004
- Location
- Holmes Hollow, Ontario Canada
- Posts
- 991
Ya, maybe I should try to heat it from underneath instead of from the bolt. I can't heat the one end because of the brake line. At this point lighting the car on fire might not be a bad idea.
____________________________________________
Scott
05-25-2011 #8 Registered User
- Join Date
- Jan 2011
- Location
- Boston, MA
- Posts
- 1,180
Hey, just saw this thread over here as well as TC. Can you borrow a 90 degree impact wrench from someone to hit that bolt from inside the frame?
I'd still hit it with some PB Blaster first, let it sit overnight and see what happens.
05-25-2011 #9
Registered User
- Join Date
- Aug 2004
- Location
- Holmes Hollow, Ontario Canada
- Posts
- 991
That's my build thread. Its got wd40 on it now and I'm not touching it tonight so we'll see how it works tomorrow. I don't know anybody with a 90* impact. Tomorrow I'll hit it with heat if the wd40 hasn't helped. If those two don't work I'm cutting it out.
thanks for the help,
Scott____________________________________________
Scott
05-25-2011 #10
Registered User
- Join Date
- Jan 2011
- Location
- Boston, MA
- Posts
- 1,180
Throw the WD40 away and get some PB Blaster for $5. Way better in my opinion. Good luck.
05-25-2011 #11
Registered User
- Join Date
- Aug 2004
- Location
- Holmes Hollow, Ontario Canada
- Posts
- 991
Okay, PB it is!
____________________________________________
Scott
05-25-2011 #12
Registered User
- Join Date
- Jul 2005
- Location
- Marshall , MO
- Posts
- 699
Sawzall the bolt into between the mount and the arm. It will just fall out then.
Brad Shepard
69 Malibu
Marshall, MO
05-26-2011 #13
Registered User
- Join Date
- Aug 2004
- Location
- Rustburg, Virginia
- Posts
- 3,436
I bet....There is either rust between the the metal sleeve in the bushing and the shoulder of the bolt ...or worst case the bolt is slightly bent.
1970 RS/SS350 139K on the clock:
89 TPI motor w/ 1pc rear seal coupled to a Viper T56 via Mcleod's modular bellhousing w/ hydraulic T/O bearing from the Viper, 12 bolt rear w/ 3.73 gearing, SC&C upper control arms, factory lowers with Delalums, C5 brakes at all four corners, Front Wheels 17x8's with Sumi 255/40/17 and Rear Wheels 17x9's with Sumi 275/40/17.
Brief description of the work done so far can be found here: http://www.nastyz28.com/forum/showthread.php?t=112454
05-26-2011 #14
Registered User
- Join Date
- Aug 2004
- Location
- Holmes Hollow, Ontario Canada
- Posts
- 991
I'll have to spread it out to try that. I have to spread it out anyway. It might be worth a shot. I haven't been at it for a few days. After spending too much time on one bolt then finding the sawzall blade ws too short and smacking my forehead on a metal tab I decided it was time to walk away and I haven't had time or energy since. I'll let everyone know which way worked best as I still have three bolts.
thanks
Scott____________________________________________
Scott
05-26-2011 #15
Registered User
- Join Date
- Aug 2004
- Location
- Rustburg, Virginia
- Posts
- 3,436
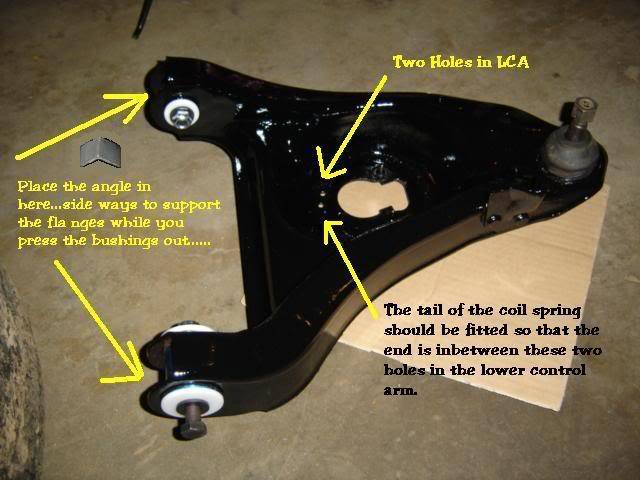
Scott...3 bolts? Are we talking about the bolt that goes through the frame tabs and the lower control arm bushing to hold the lower control arm to the car?.... Originally Posted by Ishmael


2gen LCA pictured, but just making sure we are talking about the same bolts(2 per arm)(see arrows pointing where the little piece of angle goes when pressing in the bushings)
 1970 RS/SS350 139K on the clock:
89 TPI motor w/ 1pc rear seal coupled to a Viper T56 via Mcleod's modular bellhousing w/ hydraulic T/O bearing from the Viper, 12 bolt rear w/ 3.73 gearing, SC&C upper control arms, factory lowers with Delalums, C5 brakes at all four corners, Front Wheels 17x8's with Sumi 255/40/17 and Rear Wheels 17x9's with Sumi 275/40/17.
Brief description of the work done so far can be found here: http://www.nastyz28.com/forum/showthread.php?t=112454
05-26-2011 #16
Registered User
- Join Date
- Aug 2004
- Location
- Holmes Hollow, Ontario Canada
- Posts
- 991
Ya two bolts in each arm, I've already got the spring, spindle and top arm off one side. I still have the back bolt to get out. Then I have to do the other side.
____________________________________________
Scott
05-29-2011 #17
Registered User
- Join Date
- Aug 2004
- Location
- Holmes Hollow, Ontario Canada
- Posts
- 991
PB didn't seem to get in. Couldn't get the sawzall inbetween the arms and frames but I would think that would work well. I ended up opening up a hole with a cut off wheel on a die grinder then using the air chisel to open it right up. I tried head right on the inner tube and the bolt spun out no problem. Man that was nuts for one bolt.
____________________________________________
Scott

 Reply With Quote


