Results 21 to 40 of 50
Hybrid View


-
05-11-2011 #1

 Registered User
- Join Date
- Apr 2006
- Location
- Atlanta GA
- Posts
- 7,477
very nice work!
-
05-11-2011 #2 Registered User
- Join Date
- Dec 2007
- Location
- British Columbia, Canada
- Posts
- 723

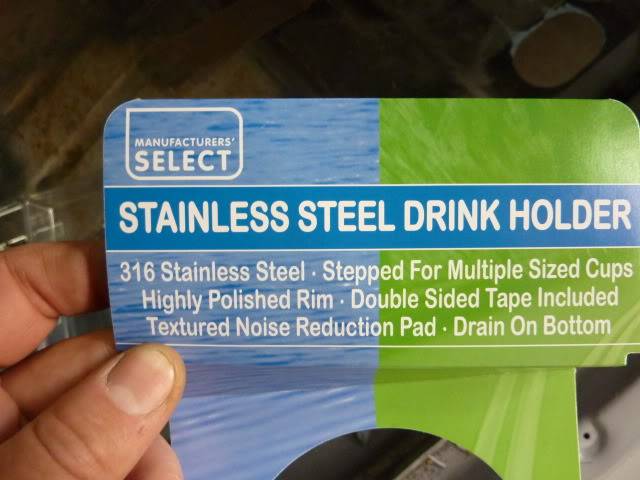
Thanks guys. Unfortunately I haven't had a chance to get any more done on it. I've been working on Project Remove that F'ing Post. (removing the center post from my shop so I have a complete two car garage without a post in the middle of it). I'm also ordering a MGW shifter so I want to get that and install it before I finalize the cup holders. As for the cup holders, I got them from one of our local boat shops. They brought them in for me. They were about $18 each. Here's the brand:
05-11-2011 #3 Registered User
- Join Date
- Nov 2008
- Location
- Templeton, CA
- Posts
- 561

Boat shops are great for the cup holders. That's where I got mine.
Nice job on the console. That might outlast the car!Robert
My sloooow build thread...https://www.pro-touring.com/showthre...hlight=Orngasm
"If happiness is in your destiny, you need not be in a hurry."
If I can only convince myself of this!
05-11-2011 #4 Registered User
- Join Date
- Nov 2009
- Location
- New York
- Posts
- 366
Ebay for the cup Holder they have both large and small

John
05-11-2011 #5
Registered User
- Join Date
- Feb 2010
- Location
- Corvallis Montana
- Posts
- 597
this looks good!! keep it up i would like to see how it comes out!!
11-28-2011 #6
New to Pro-Touring
- Join Date
- Jul 2009
- Location
- CT/RI Line
- Posts
- 23
Looks great.
69 Chevelle
11-28-2011 #7 Registered User
- Join Date
- Aug 2005
- Location
- SF, Bay Area
- Posts
- 447
where did you buy a quanity of round bar? a metal supply house of some sort?
11-28-2011 #8 Registered User
- Join Date
- Nov 2007
- Location
- Lafayette, LA, USA
- Posts
- 485
Thanks for the tip on cup holders. I get my round bar at my local steel place.
Life's journey is not to arrive at the grave safely in a well preserved body, but rather to skid in sideways, totally worn out, shouting - Holy cow - what a ride!!!
See my build
Jason
11-28-2011 #9 Registered User
- Join Date
- Feb 2009
- Location
- N.J.
- Posts
- 690
Mike-
Your build was the inspiration for my console build.
Looking forward to seeing the rest of it.- Paul
70 Camaro RS Project Build
https://www.pro-touring.com/showthre...-Project-70-RS
90 Mustang GT Project Build
https://www.pro-touring.com/threads/...ang-Gt-Project
My Garage Project
http://garagejournal.com/forum/showthread.php?t=189511
11-29-2011 #10
Registered User
- Join Date
- Dec 2007
- Location
- British Columbia, Canada
- Posts
- 723
Thanks guys. I got the round bar at Princess Auto. It's kind of like a big junk store. They sell a bit of everything. You can also get it at Homedepot, although I found it to be more expensive there. Unfortunately I don't have any updates to post, it still looks the same. I've been working on a lid for the storage compartment, but haven't made much progress. Have had a number of things get in the way of working on the car. We're heading to Vegas this weekend and I hope to start working on the car again once we're back. Should have more free time now.
02-06-2012 #11
Registered User
- Join Date
- Jun 2010
- Location
- Georgia
- Posts
- 2,177
any updates on the console?
02-16-2012 #12
Registered User
- Join Date
- Dec 2007
- Location
- British Columbia, Canada
- Posts
- 723
Thanks for asking. Unfortunately haven't made any progress at all. Haven't spent much time at all in the shop the past couple months, and the little time that I did I've been working on making my weld on hinge doors into bolt on hinge doors. Hope to do some more work on the console in the next couple weeks. Originally Posted by SparkyRnD

02-27-2012 #13
Registered User
- Join Date
- Oct 2011
- Posts
- 56
WOW, way cool, i know what i am doing when i get my MIG hooked back up.
02-27-2012 #14 Registered User
- Join Date
- Oct 2004
- Location
- St.Anne Il
- Posts
- 3,924
Looking awesome..and if you need round bar grab that shopping cart that made it to another parking lot..lol..
Darrin Stalnecker
1969 Camaro Convert full pt pr
2007 Corvette Supercharged
1968 Camaro LS1 T56
http://www.fquick.com/dropit69
03-13-2012 #15
Registered User
- Join Date
- Dec 2007
- Location
- British Columbia, Canada
- Posts
- 723
Thanks guys.
So I've had a few questions about building the console. Here's a response that I put in another thread and thought I would add it here in case more people are wondering what I've done.
As for the building of the console, it's actually very simple and no high cost tools needed. The biggest thing about building a console like this is time. It will take alot longer than building one out of mdf, but the nice thing is it's a custom piece that fits exactly how you want it to. It's all trial and error. Measure, cut, tack, test fit, fix, text fit and carry on :devil:
One of the tools is a ring roller, or a roll bender. Mine is a Magnum brand which I picked up from KMS Tools, a tool store that has a few locations throughout the province. I think I paid about $75 for it on sale. Here's the one that I have, it's very similar to the Baileigh one, I just didn't have to pay for the Baileigh name. I'm sure mine isn't as good as the Baileigh one though.
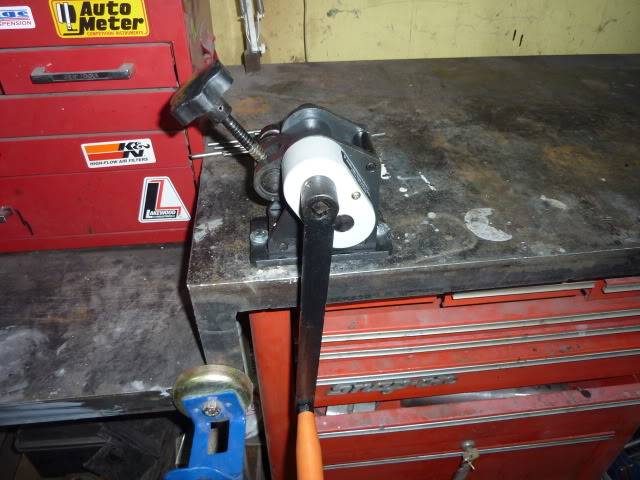
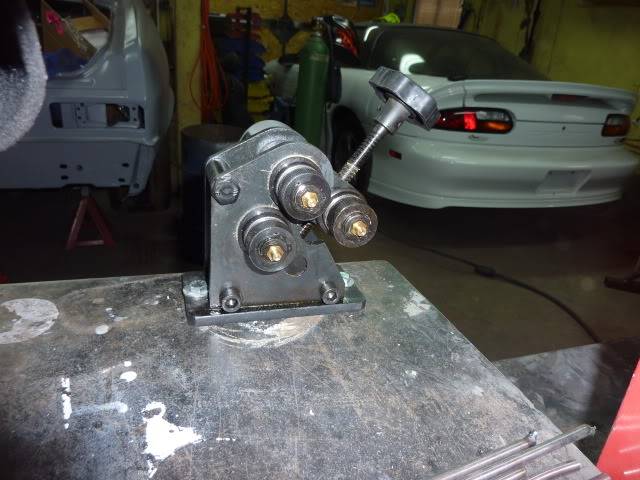
What this tools does is allow you to roll round bar or flat stock. You can roll it to a complete circle or just make a piece curved. I used this tool to do the pieces that fit over the trans hump in these pics
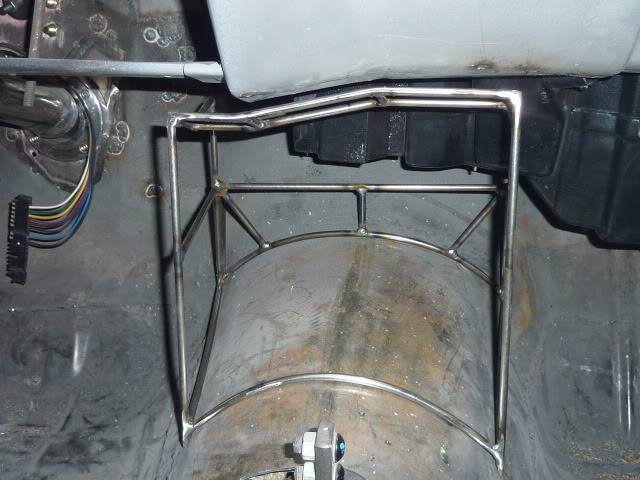
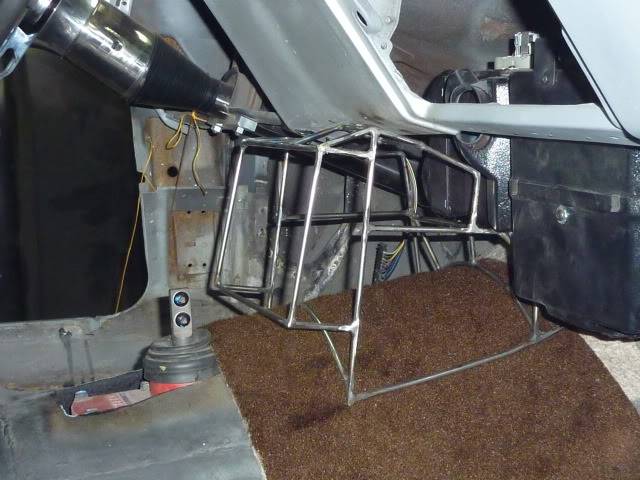
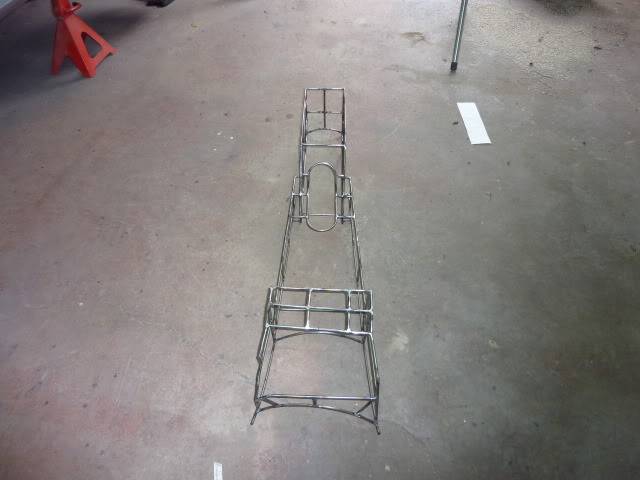
This allowed me to build the console so it would fit nicely on the hump. I thought about just using large barrel or tank to help shape the round bar, but for anyone that's seen my build knows..I like to buy tools so I decided I'd rather have the tools. I plan on using round bar in a few more areas of my build.
The second tool I've used is this.
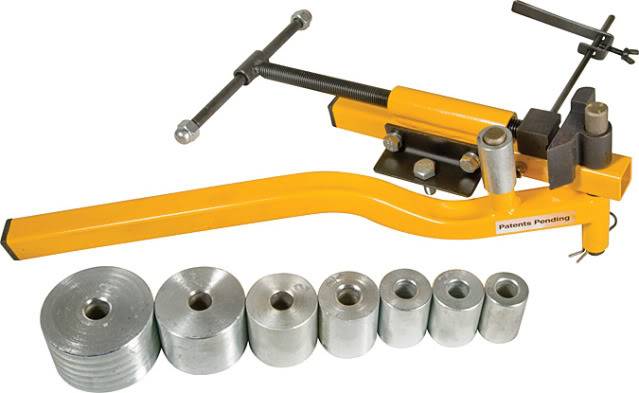
They just call it a universal metal bender and I think I paid $40 on a sale. You can change the dies and it allows you to make circles in the metal. I paid $10 extra to get a DVD that shows what the tool does. Looks like guys use these to make round bar art when there are lots of bends. I used mine to make the piece around the parking brake in this pic. I'm also going to use it to build some pieces to hold up the cup holders.
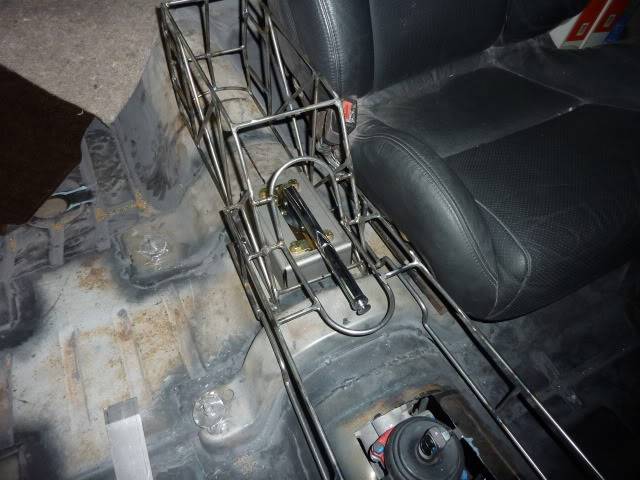
Those are the only two specialty tools that I've used for the console. The other tools I've used are: a hack saw, hammer, vice, measuring tape, welding magnets and of course a welder.
The round bar that I'm using is 1/4". I got all mine at Princess Auto....it's kind of like a tool junk store that has several stores throughout Canada. Not sure what store would be similar in the US. You can also get round bar at Home Depot and most places like that. You would also be able to get it at most steel supply stores, I just prefer to get mine as I need it. I usually pay $5.49 for a 5 foot piece. I think Home Depot charges $4.99 for a 3 foot piece.
When you start your console, measure the area that want it to fit into and start cutting. If you want to use a piece of cardboard to make a template, that might make it easier to get the design that you want. I just use the trial and error method and changed it as I went. Make sure that you allow for clearance of carpet, underlay and any sound deadner that you might use. When I started to do mine, I forgot to do this and had to cut it down to allow for it. Use the welding magnets to hold pieces in place and tack weld them. I eye balled all my bends and angles until they looked good. Now that I'm doing a lid for mine, I may have to make a few adjustments to make up for the "eye balling".
As for the 90 degree bends, I used a vice and a hammer. Mark where you want the bend to go and put it in the vice. You may want to try a couple practice bends to see where it bends in respect to where you mark it. I start by bending it by hand as the 1/4" stuff bends quite easily by and. The problem with bending a 90 degree by hand is that the bend ends up quite rounded. Once I have it done by hand, I use a heavy ball peen hammer while it's still in the vice and hammer it down to get a nice tight bend. These bends were done by hand and then with a hammer.
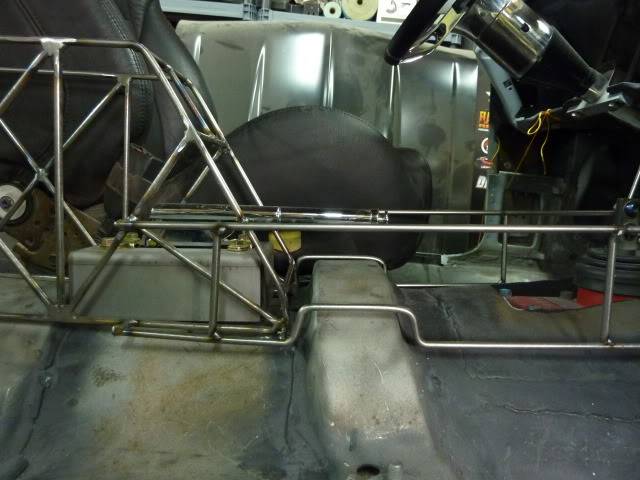
Alot of the 90 degree bends are welded. This piece of the console has quite a few bends and they were all welded into place. You can see how this piece has quite a few odd bends and angles on it. This is because I wanted to make it fit just right. I had to make alot of the bends and angles to fit around the Vintage Air unit that's shown in the second picture
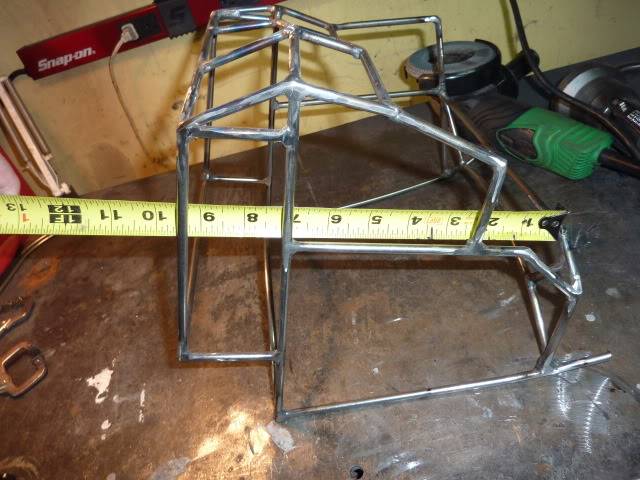
Like I said in the beginning, the biggest factor in building a console like this is time. I don't even know how many hours I've spent building this one. It adds up though once you tack things into place, fit, weld, clean the welds and test fit again and make any changes that you need to. Once mine is done, I plan on wrapping it with 20 gauge sheet metal and then with leather. The main reason I chose round bar was it allowed me to make a real custom piece that fit exactly how I wanted it to. It was also alot easier to make changes as I could just cut out the area I don't want and weld in a new piece. Not as easy to make changes with mdf or wood and still keep it strong.
With the questions I've been getting lately and seeing other guys make consoles with round bar, it got me motivated to do some more on mine. Here's what I've gotten done over the past few days:
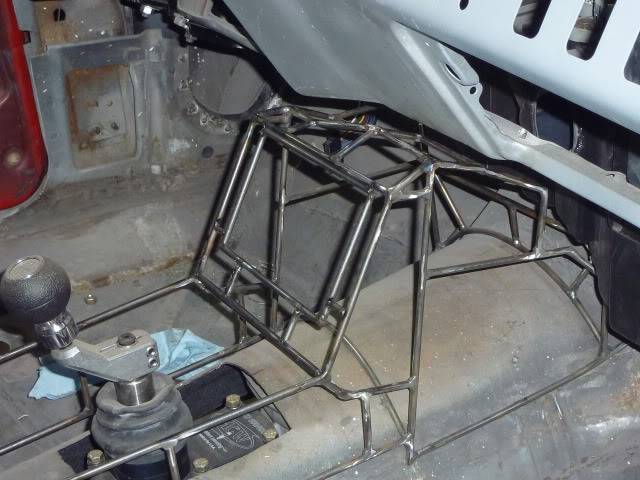

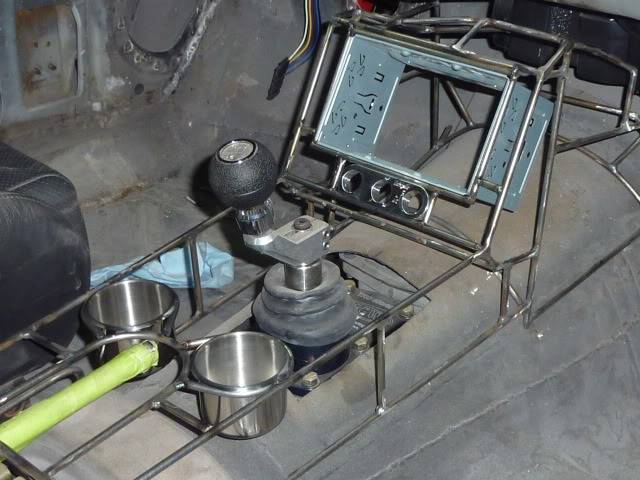
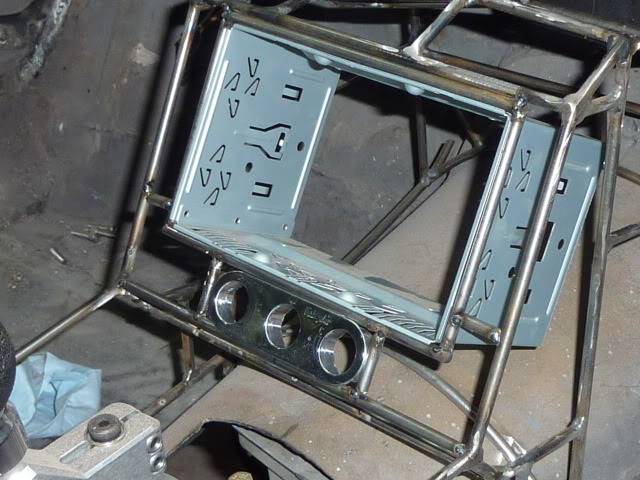
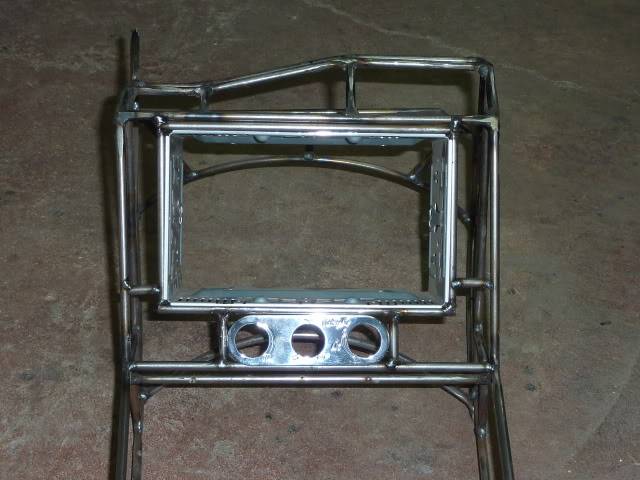
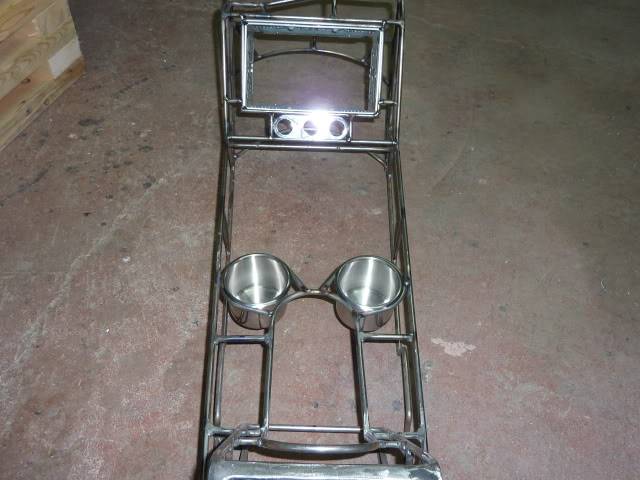
Looks like Mickey Mouse
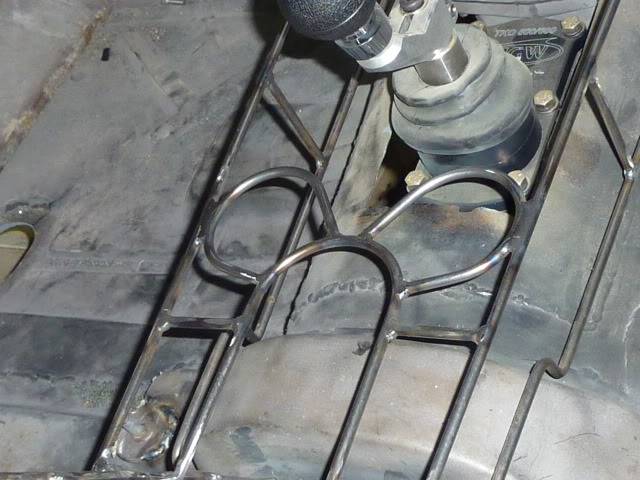
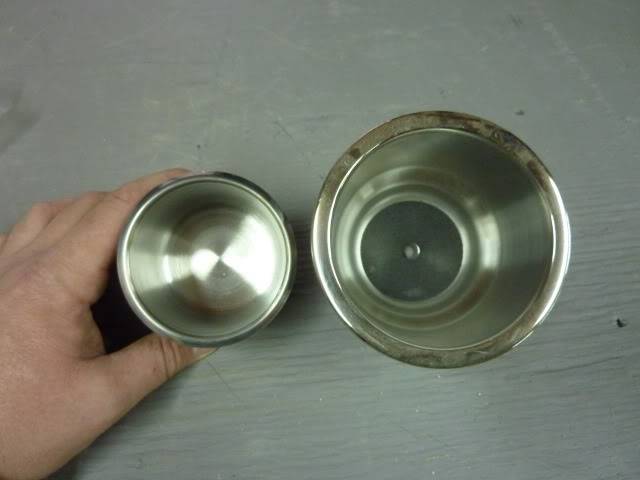
You may have noticed that I'm using different cup holders now. I ended up getting some smaller ones from a poker supply store. They are the same ones that they use in the Vegas poker tables. Thanks again for the idea Rene. Here's what they look like. I paid $30 shipped for all 4.
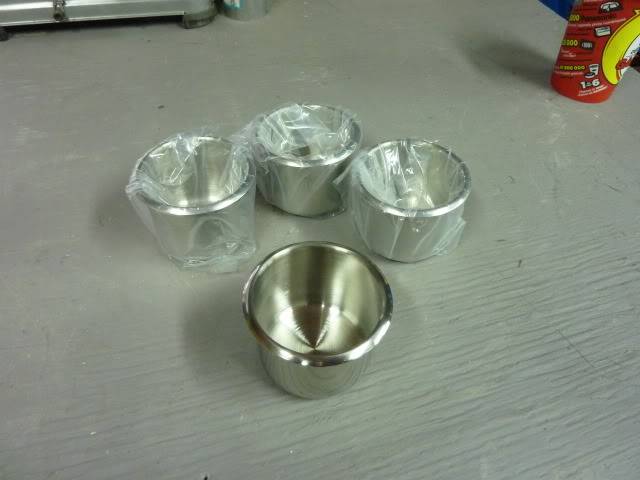
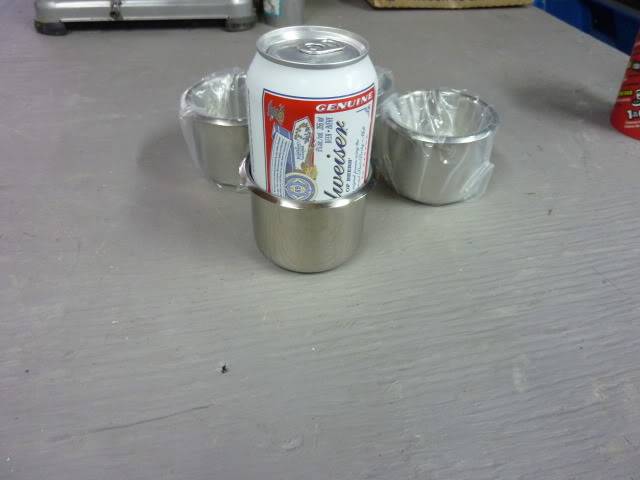
Much nicer than the ones I originally had
03-14-2012 #16
Registered User
- Join Date
- Nov 2007
- Location
- Lafayette, LA, USA
- Posts
- 485
Mike where did you get that DIN insert? I was looking for one awhile back but I don't even know what to call it. Originally Posted by scherp69
Thanks,Life's journey is not to arrive at the grave safely in a well preserved body, but rather to skid in sideways, totally worn out, shouting - Holy cow - what a ride!!!
See my build
Jason
03-14-2012 #17
Registered User
- Join Date
- Dec 2007
- Location
- British Columbia, Canada
- Posts
- 723
Originally Posted by csouth
Thanks guys. Originally Posted by fordsbyjay
What are you waiting for...get your hands dirty lol Originally Posted by Vicinity
Jason, this one is for a double din stereo. I just went to one of the local stereo places and asked if they had an extra one and they did. It probably helped that my buddy is the manager there. I'm sure any stereo place would have one. I just call it the cradle, not sure what else to call it. Originally Posted by fordsbyjay
03-13-2012 #18 Registered User
- Join Date
- Dec 2008
- Location
- Detroit
- Posts
- 2,664
One word, DAMN! I can't wait to see that finished
Big dreams, small pockets....
Chris--
'72 Cutlass S LSA/T56 Magnum
Bowler Performance, Forgeline, Speedtech, ATS, Speartech, KORE3, Ridetech coilovers
Project Motor City Madness
03-14-2012 #19
Registered User
- Join Date
- Nov 2007
- Location
- Lafayette, LA, USA
- Posts
- 485
Looking good.
Life's journey is not to arrive at the grave safely in a well preserved body, but rather to skid in sideways, totally worn out, shouting - Holy cow - what a ride!!!
See my build
Jason
03-14-2012 #20 Registered User
- Join Date
- Jun 2009
- Location
- Central FL
- Posts
- 1,231
Still want to learn to weld, might have to pick up some steel and give this a shot, you make it look easy, lol.
Dan


 Reply With Quote