


Results 1 to 20 of 22
Thread: Need help in Las Vegas
-
12-15-2013 #1

 Registered User
- Join Date
- Aug 2007
- Location
- Las Vegas, NV
- Posts
- 233
Need help in Las Vegas
I've been working on my '64 Fury for years and right from the start I've had nothing but trouble getting my Lincoln Power-MIG 200 to lay a good consistent bead. Not that I'm a professional welder, but I can lay a bead, though not anymore! Either a) I've developed some kind of degenerative disease that won't allow me to figure out simple settings, b) I've developed some other disease that won't allow me to read the settings on the welder and correctly turn the dials, c) there's an issue with my MIG or the gas I'm totally missing, or d) all of the above.
If there's anybody in the Vegas area that can run a consistent bead I'm begging you to come by my shop and help me diagnose WTF is wrong. If it's either "a" or "b" from above then I'll simply have to hire someone to do my welding, but if it's "c" then hopefully we can remedy the issue. Regardless, I could really use the help in figuring this out.
Thanks much in advance!
-
12-15-2013 #2
Registered User
- Join Date
- Feb 2011
- Location
- Indpls, IN
- Posts
- 613

Did your issues start with the last bottle? Argon/Co mix? Maybe they filled it with the wrong gas?
Or your regulator went bad? I had a regulator go bad before.
Post some pics, Before and after welds.
12-15-2013 #3 Registered User
- Join Date
- Dec 2004
- Location
- California
- Posts
- 794
Bob,
You should take some pictures of the welds and the setting and post them up. Most of the welders with experience on here can "diagnose" weld problems just by the visual. If there is something else wrong we can at least point you in the right direction.
12-15-2013 #4
Registered User
- Join Date
- Dec 2010
- Posts
- 709
It took me forever to realize the main problem with my crappy Eastwood MIG 135: The roller mechanism is plastic garbage, and has actually degenerated to the point where I have to pressurize it with Vise Grips; without this, the wire feed and all welding consistency frequently drove me to create more bodywork issues for myself, out of the sheer need for violence. Once I realized this, the thing worked like magic, well, maybe bird crap-magic...
12-15-2013 #5
Registered User
- Join Date
- Aug 2008
- Location
- ocala fl
- Posts
- 279

Run a few feet of wire off the feed wheel and blow out the dust from the machine the wire needs to be clean and feed at a constant speed. You may also need to change the gun tip and tip hood. Make sure there both clean as the wire feeds through the tip it makes the hole in the tip larger so you don’t get the good power feed required. Make sure your in a well ventilated area to weld but there’s not to much of a breeze or fan blowing away the gas as you weld. Good luck
''Courage is being scared to death
- But saddling up anyway''.......John Wayne...
Anthony
12-15-2013 #6 Registered User
- Join Date
- Oct 2012
- Location
- British Columbia
- Posts
- 614

The wrong gas was my first thought too but do post some pictures if you can. It would help if we can see what is actually happening with the welds.
Todd
'14 ZL1, 6 speed and 6.2L of Super Charged Awesome!
'67 Camaro SS in process. A long, slow, expensive trip...
How hard can it be...
Project Obsession
https://www.pro-touring.com/showthre...ject-Obsession
12-16-2013 #7
Registered User
- Join Date
- Oct 2013
- Posts
- 1
Need help in Las Vegas
Where are you in Vegas? My shop is near the Air Force base, but I live in the southwest part of town. I fabricate roll cages and off road suspension every day, for the last 8 years. I wouldn't mind meeting another car guy in the area.
12-21-2013 #8
Registered User
- Join Date
- Aug 2007
- Location
- Las Vegas, NV
- Posts
- 233
Hey everybody, I really appreciate the help and advice you've been giving about the welding, so here's where I am:
1) Picked up a new bottle of gas (25/75) - last bottle was both old (3+ years and near empty)
2) Checked every orifice and passage I could find on the welder for blockages, crud build-up, or anything that could impede the flow of wire or gas - found none
3) Checked for leaks in the gas line from the regulator to the gun - found none
4) Changed out the ground connector at the welder itself just to ensure it has a solid connection (already changed out the connection at the clamp)
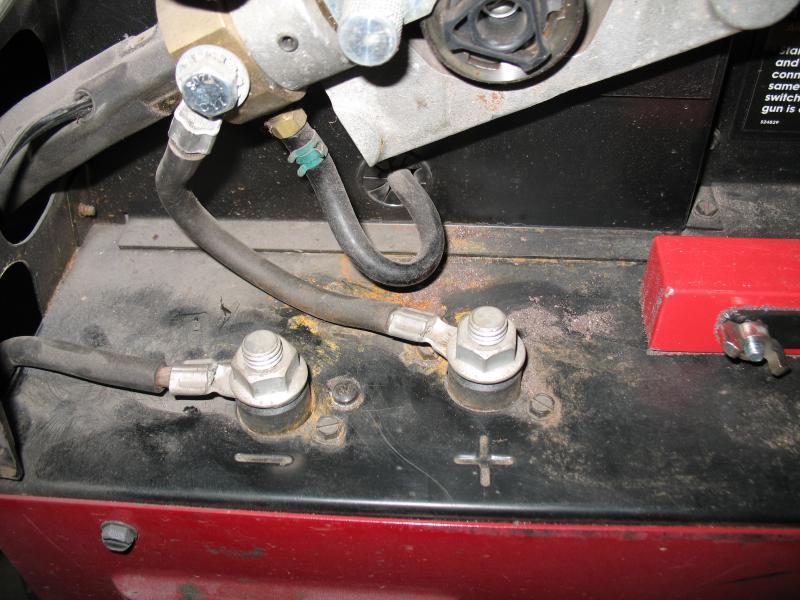
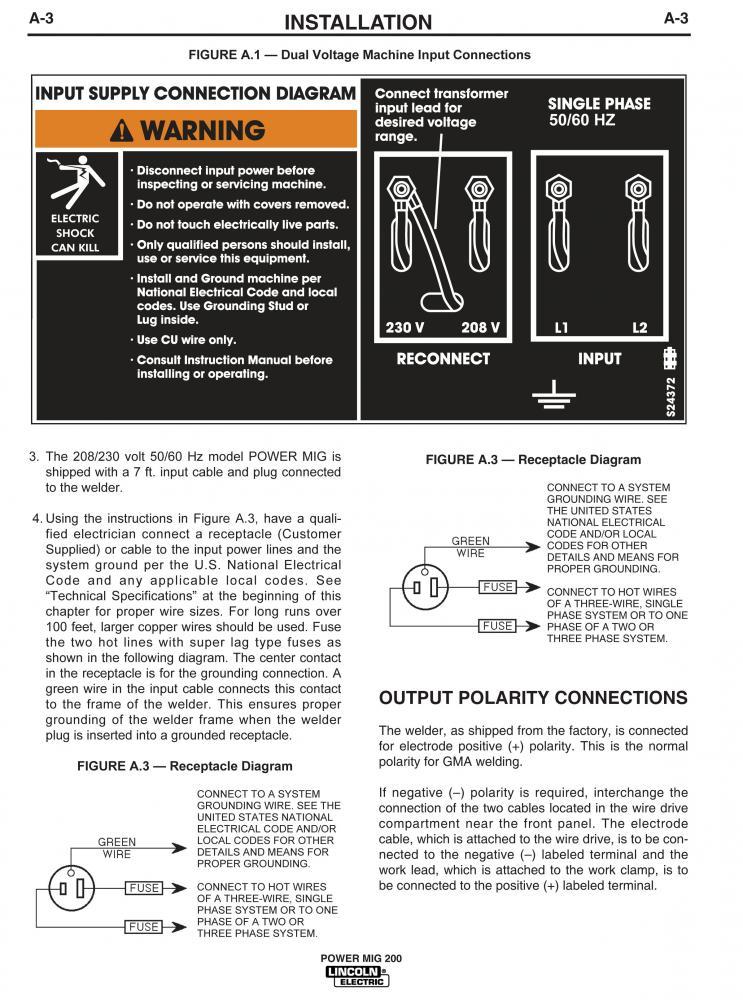
5) Checked the polarity against the factory manual - negative is connected to the ground and positive to the gun, just as the manual prescribes
5a) I actually switched the two and tried to weld and it was quickly obvious the polarity needs to be as the manual directs; there was NO welding going on, just spattering and crap buildup
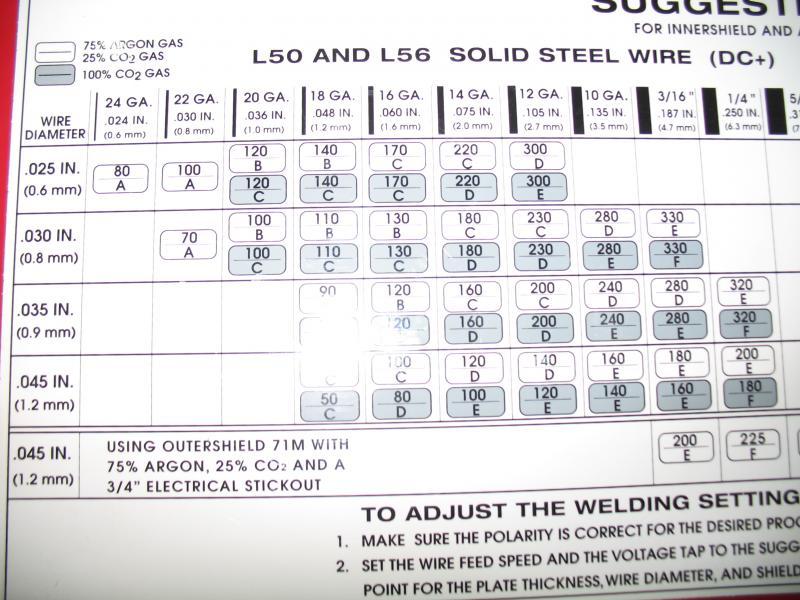
6) Re-checked the settings of the welder against the chart inside the welder itself (recommended settings for 16 gauge and a 25/75 mix are B/110)
7) I began taking pictures and video, as requested, in an effort to illustrate what the results are looking like
7a) I obviously know how to upload pictures but video is something new for me, so if the video doesn't link up as it should I'll figure something else out because they clearly illustrate the problem(s) I'm having, and I think they do so far better than the still shots, but regardless, here goes (this may take a couple replies to get it all in):
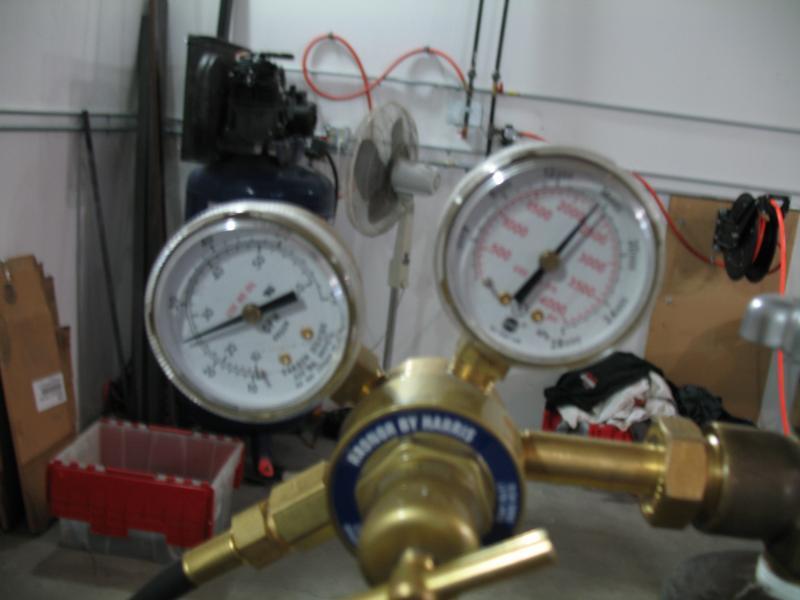
Sorry about the blurry picture but you can still make out the fact I have plenty of gas pressure in the bottle and my line is seeing 20+cfh of gas
The polarity is correct with the positive lead going to the gun and the negative to the clamp
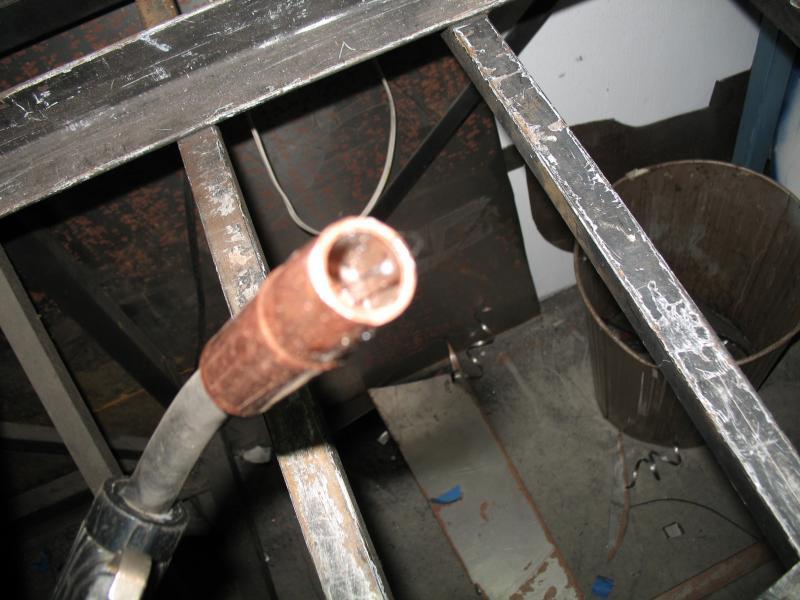
No obstructions at the gun tip; the gel is a waxy like substance that definitely helps keep crap from sticking. BTW - I'm using .030 wire and the tips are also .030 (checked them as well)
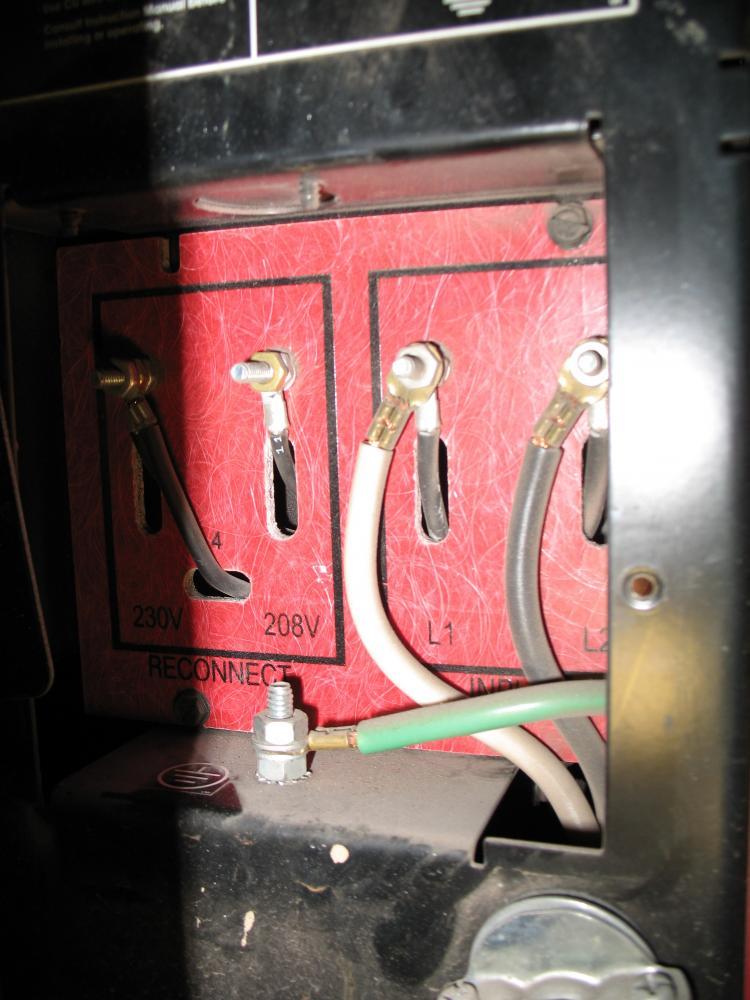
There's a panel on the rear of the welder that also has various possible settings, so I checked them against the manual and they appear to be correct as well, though I am unsure why my machine has multiple wires as opposed to the simplified illustration shown in the manual
12-21-2013 #9
Registered User
- Join Date
- Aug 2007
- Location
- Las Vegas, NV
- Posts
- 233
Here are the welder settings and the welds themselves:
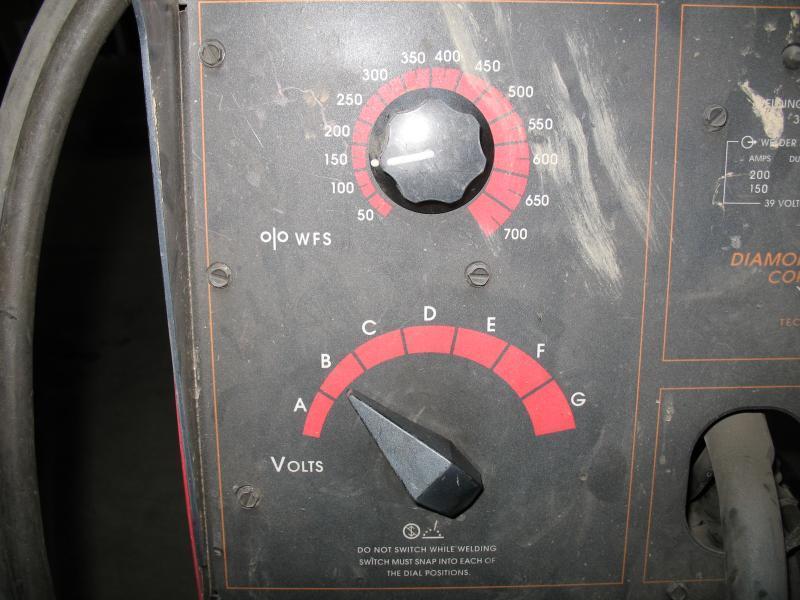
The Lincoln chart calls for B/130 when using a 25/75 mix on 16 gauge, so that's what I'm set at:
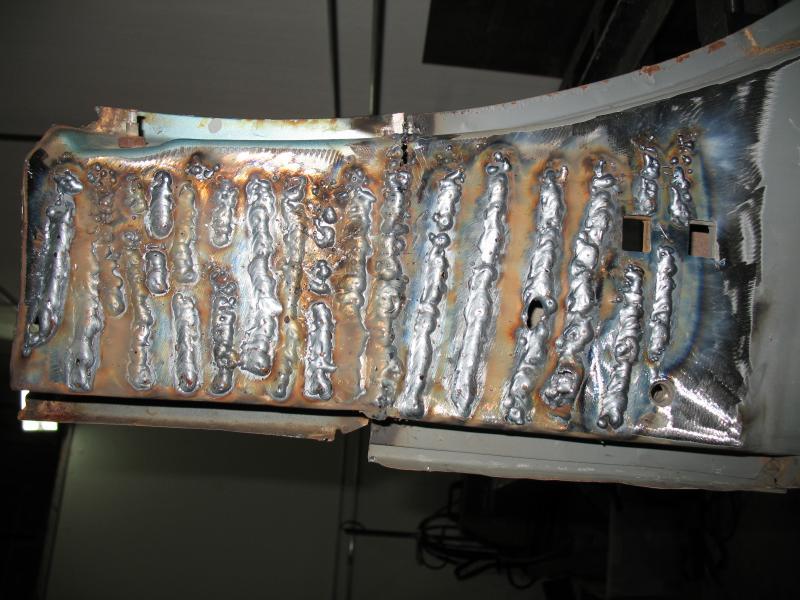
These are a number of practice beads I made on an area of the original and replacement cowl, where I've basically reversed the order of the pieces I used on the car itself. I figured it would be a good idea to practice on the same exact material I'd be working on for real, and do so with the metal in the vertical plane (which makes the problems worse). FUGLY!!!
These practice beads were all done with the material (unused 16 gauge sheet, ground clean) in the horizontal position, and while they're an improvement over the vertically mounted material above they are far from attractive. There are a number of different heat and feed settings used throughout but of particular interest is the comparison between the lower left corner with a setting of B/130 (as recommended) and the upper right with a setting of D/190-200
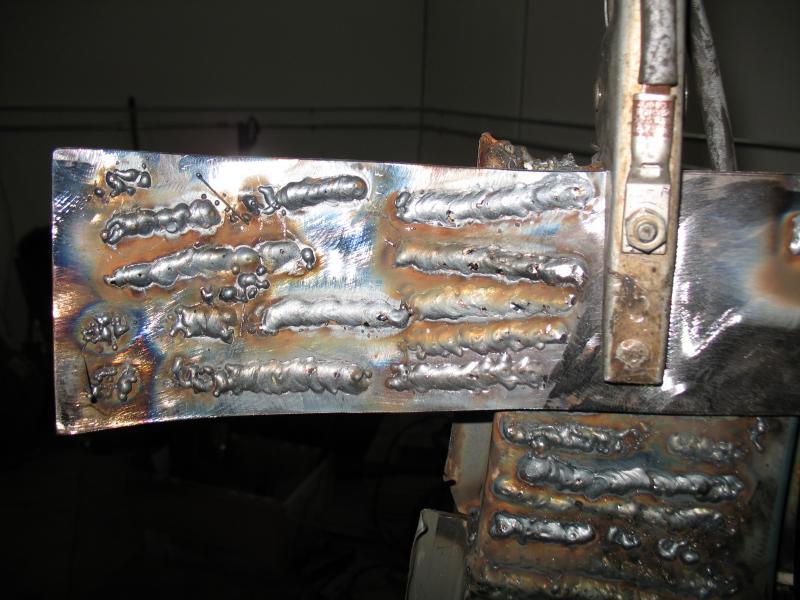
After cranking up the heat to setting D and increasing the wire speed enough to begin hearing a bit of the welding "sizzle" I'm supposed to, I tried welding with the sample material in the vertical plane, and while not a thing of beauty they are certainly better than what I'd been seeing on the old cowl.
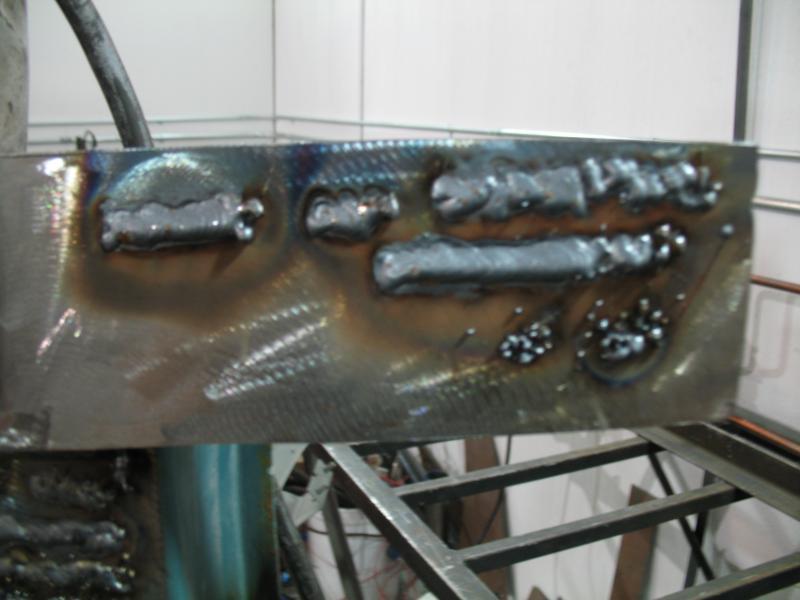
I tried the same setting (as in the last picture) on the old cowl section shown in the 3rd/middle picture above and the results SUCKED once again; it's as if the DP-40 primer, the age of the metal, the acid the car was dipped in, or any combination of those elements are combining to screw me.
My next post will hopefully have a couple of short videos that much more clearly give an idea of what I'm dealing with (or screwing up).
12-21-2013 #10
Registered User
- Join Date
- Aug 2007
- Location
- Las Vegas, NV
- Posts
- 233
This is probably the best bead I've been able to lay down, but the settings are SO high by comparison to what Lincoln recommends, meaning I'm on the verge of blow-through at every moment (clearly evident in my previous reply where you'll see some massive blow-through).
Of particular note, watch/listen to the first 12 seconds, where you'll hear the wire literally just banging against the metal as opposed to beginning the weld. After that point the weld actually begins to happen but throughout you'll hear the weld popping and "back-firing", literally stopping the weld in its tracks then picking up again.
12-21-2013 #11
Registered User
- Join Date
- Aug 2007
- Location
- Las Vegas, NV
- Posts
- 233
This video shows a comparison of how poorly the welder is working when I try and use the settings recommended by Lincoln; it acts as if the wire is simply bouncing off the sheet as opposed to melting into it. Like I say at the end, I'm TOTALLY lost at this point.
12-21-2013 #12
Registered User
- Join Date
- Jul 2011
- Location
- Plano, Texas
- Posts
- 355
Can you try a fresh piece of raw metal? It looks like you are not getting a good current flow or have some strange contamination issue. Is the contact tube the right size for the wire? Are you using the right type of wire?
12-21-2013 #13
Registered User
- Join Date
- Jul 2011
- Location
- Plano, Texas
- Posts
- 355
Just watched the video, it looks like you are having trouble creating an arc or maintaining. No heat is being put into the parent material. Sorry I can not be of more help. Originally Posted by mmosley

12-21-2013 #14 Registered User
- Join Date
- Nov 2009
- Location
- the dirty mitten
- Posts
- 1,217
For 16ga steel, that is a little thin to run a solid bead. I usually tack that stuff together. Thicker stuff like 1/8 will take more heat and may be better for you to keep practicing on. Also try out joints, butt and angle because that is what you are actually going to be welding, not just putting beads on a solid piece. Not saying that what you are doing is not helpful, just that is not what will be happening on the actual project. Also welding vertical are you going up or down? I like to go down, it makes a nicer bead and will not gum up in the middle if you are welding up
Steve
1968 Dodge Charger All Wheel Drive project Red Bull<script type="text/javascript" src="safari-extension://com.ebay.safari.myebaymanager-QYHMMGCMJR/5cce6da5/background/helpers/prefilterHelper.js"></script><script type="text/javascript" src="safari-extension://com.ebay.safari.myebaymanager-QYHMMGCMJR/85dc54c0/background/helpers/prefilterHelper.js"></script><script type="text/javascript" src="safari-extension://com.ebay.safari.myebaymanager-QYHMMGCMJR/85dc54c0/background/helpers/prefilterHelper.js"></script>
12-21-2013 #15
Registered User
- Join Date
- May 2010
- Location
- kitchener,Ontario,Canada
- Posts
- 2,357
I'm thinking check the voltage and amperage draw at the plug and the welder output. Another thing don't move around the nozzle..weaving a bead is only needed for "bridging" gaps and thicker material. Definitely not needed on 16ga. I can't tell from the videos but keep a eye on your distance from the material to the tip. Finally I agree with Steve, try welding on different material...1/8"and lap joints or Tuesday joints this will help you figure out if it's the machine..or you. Hell it could be a faulty switch inside the welder
Good luck
Ryan Austin
12-22-2013 #16
Registered User
- Join Date
- Aug 2007
- Location
- Las Vegas, NV
- Posts
- 233
Hey MM,
You are seeing/saying exactly what I have been trying to say; THANKS! It's as if the welder is feeding wire continuously but the electricity becomes intermittent once the arc finally initiates. As I've said, I am no electrical genius but it really does feel/seem like a continuity issue, especially in light of how much power it's taking to run the bead on 16 gauge.
Originally Posted by mmosley
12-22-2013 #17
Registered User
- Join Date
- Aug 2007
- Location
- Las Vegas, NV
- Posts
- 233
Hey Motor,
I used the 16 gauge merely as a test due to it's similarity to the material I'm currently working on (the cowl). Tacking it has similar issues (cold looking/feeling welds needing exaggerated temps) but I can certainly get the pieces bonded.
If you take a look through my thread you'll find many different thickness of materials and types of joints, all of which have given me fits. Luckily, until I got to the cowl it's been lots of heavier structural areas I could get away with the higher heat and uglier welds, but that is definitely not the case on the A-pillars and cowl.
When I said "vertical" I was referring to the material itself, not the weld. With the metal flat on the table I can run the bead FAR easier than when the material itself is held vertically (regardless of whether the bead is running vertically or horizontally), though if the video is any indication even the bead run with the metal flat on the table is pretty lame.
Originally Posted by Motorcitydak
12-22-2013 #18
Registered User
- Join Date
- Aug 2007
- Location
- Las Vegas, NV
- Posts
- 233
Hi Ryan,
I will be heading to the shop this afternoon and meeting with another board member to check exactly that, so thank you!
I am trying to keep the tip of the nozzle about 10mm off the surface, but with the inconsistency of the weld itself it has proven VERY diificult, but I'll keep trying.
If you take a look at other posts in my build thread you'll see the trouble is not limited to sheet metal, so either my crappy "skills" show up everywhere and on every material or my welder is on the blink. Sadly, I'm afraid it's me (really hope not) but need to eliminate the other variables to prove it.
Originally Posted by raustinss
12-22-2013 #19
Registered User
- Join Date
- Oct 2012
- Location
- British Columbia
- Posts
- 614
This is definitely above my skill level to help you. The only comment I've got is that I did have a similar popping with my welder but it just turned out to be poor ground and once I got the grounding tight and clean all has been well. , please do keep us informed on how it goes because there are a lot of guys/gals like me as well who are learning from your posts and others input.
Good Luck.Todd
'14 ZL1, 6 speed and 6.2L of Super Charged Awesome!
'67 Camaro SS in process. A long, slow, expensive trip...
How hard can it be...
Project Obsession
https://www.pro-touring.com/showthre...ject-Obsession
12-22-2013 #20
Registered User
- Join Date
- Aug 2007
- Location
- Las Vegas, NV
- Posts
- 233
I want to begin this reply with my most sincere thanks to everyone who took the time to reply; regardless of whether the advice worked or not the fact you took the time to answer my call for help is appreciated more than you know.
The problem, which turns out has been in place for years, was my 25' 8-dauge extension cord. Yep, it turns out there was a 6 amp drop from the outlet end to the welder end when the welder was set on it 's second lowest setting, so imagine what kind of loss there would be on a higher setting. As soon as I removed the extension, which I have ALWAYS used, the wonderful sound of sizzling was heard and consistent, penetrating beads resulted.
I shot a video, which I'll post tomorrow and the improvement compared to my earlier videos is clearly evident.
Enough welding issues, now it's time to get back to building!
Thanks again everybody.

 Reply With Quote


