


Results 1 to 20 of 21
Thread: Gutting a proportioning valve
-
08-15-2010 #1
 Registered User
- Join Date
- Mar 2010
- Location
- Tempe, AZ
- Posts
- 237

Gutting a proportioning valve
I'm looking to gut my proportioning valve (turning it into just a distribution block) to use an adjustable one on the rear circuit. The valve is originally from a '71 Camaro with discs/drums. First, is it possible to gut this valve? Second, how's it done? TIA!
1967 Camaro - LM7, T56, TVS, 12.7:1
1996 Impala SS - DD

-
08-16-2010 #2 Registered User
- Join Date
- Aug 2004
- Location
- Jacksonville, FL
- Posts
- 1,666
I had talked to Tobin at KORE3 about this. He mentioned removing the rear line fitting (on the combo valve assembly), take the spring and check ball (or whatever is in there) out and reinstalling the fitting back in. I am planning on doing the same with my system. Hope this helps.
Chris
1968 Chevy Camaro SS
LT4 (coming)/T56 DSE suspension
1969 Oldsmobile Cutlass S convertible (442 Clone)
LS3/4L70e, DSE suspension

08-16-2010 #3 Registered User
- Join Date
- Feb 2010
- Posts
- 176
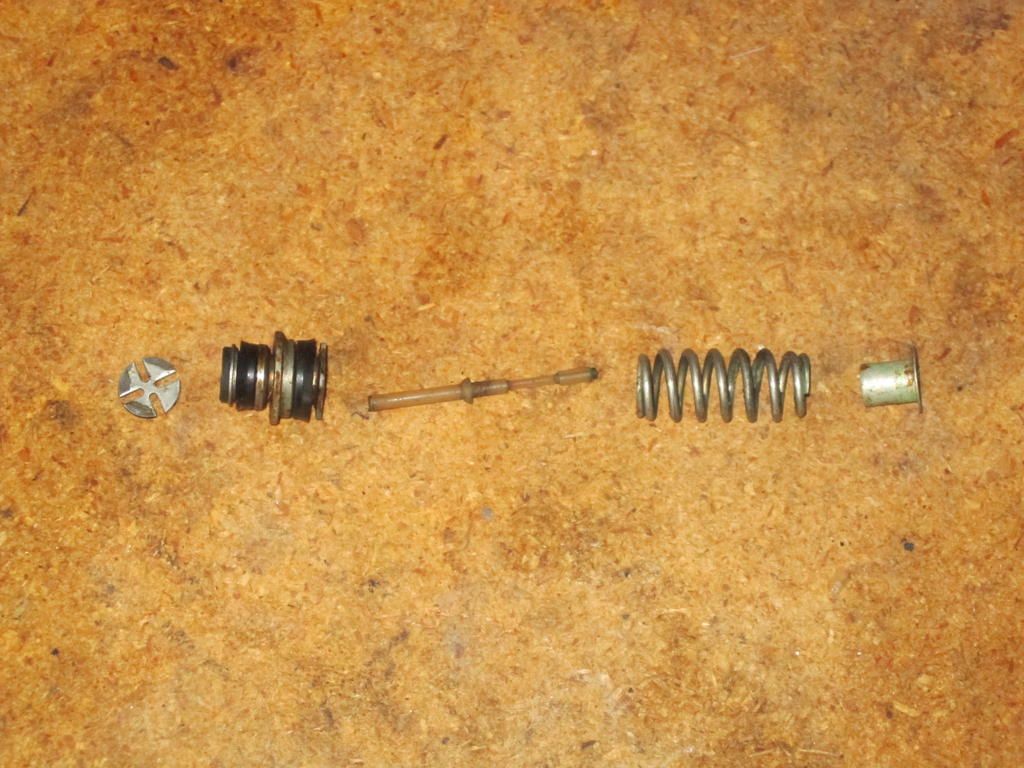
I did it to the combination valve in my '72 Monte. It's possible to do it without removing the valve from the car. Disconnect the rear brake line first, then unscrew the large fitting in the rear of the valve body using a socket or box end wrench. Mine was extremely tight due to years of corrosion, but it finally broke free. With this fitting out, the components that are responsible for the proportioning function can be removed. From what I understand, the particular pieces may vary from year to year. In my case, there was a spring, a slender rod, and an orifice plate that came out.
Clean up the threads and valve body internals and do the same for the outlet fitting. This fitting is sealed by an o-ring, and you'll most likely need a new one when you put it back together. I don't remember the size I used, but I can look at the packaging when I get home if you need it. Thread the fitting back in, and you're done. The proportioning function has now been eliminated. The warning light will still work as designed, and the hold-off function is still there (assuming this was a disc/drum valve), but that hasn't caused me any issues thus far. Hope that helps.
Nick
08-16-2010 #4
Registered User
- Join Date
- Jan 2006
- Location
- Oregon
- Posts
- 1,773
Nick pretty much nailed it. Something to note though, if you put your inline adjustable proportioning valve between the MC and the combination block, you might have your brake warning light come on under heavy braking since the brake balance switch is seeing the pressure differential created by the adjustable proportioning valve. Obviously, if you install the prop valve downline from the balance switch, it should behave the same as before.
Tobin
KORE3It's what I does.
08-16-2010 #5
Registered User
- Join Date
- Feb 2010
- Posts
- 176
Here's a picture of everything that I removed:
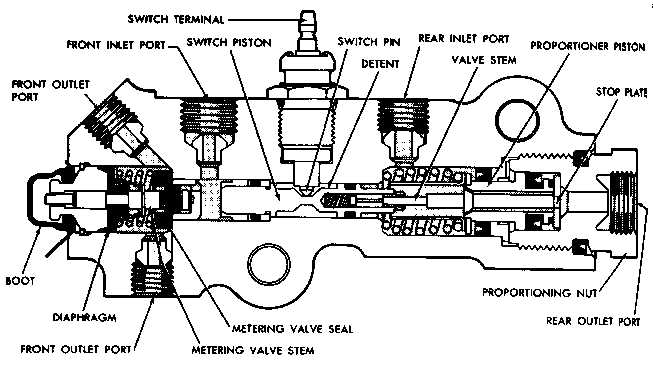
And here's a cutaway view of a typical combination valve:
The dimensions of my replacement o-ring are as follows:
OD: 15/16"
ID: 11/16"
Thickness: 1/8"
I picked it up at the local hardware store. I don't know what the compound is, but there has been no leakage thus far that would be indicative of any gross deterioration. Although the photo above is deceiving, the threads on the proportioning nut are not taper threads (i.e., NPT); they are straight threads, so thread sealer won't work.
Nick
08-16-2010 #6
Registered User
- Join Date
- Mar 2010
- Location
- Tempe, AZ
- Posts
- 237
Thanks for all the information guys. I'm going to put the APV after the combo block so it shouldn't affect anything.
So once I remove the proportioning nut, everything that falls out is what needs to come out?1967 Camaro - LM7, T56, TVS, 12.7:1
1996 Impala SS - DD
08-17-2010 #7
Registered User
- Join Date
- Feb 2010
- Posts
- 176
Yes. It should take minimal effort to remove the proportioning components. You should be able to see the end of the shuttle valve that actuates that warning switch when you get everything out (don't try to remove this, though). Originally Posted by LM7_67

Nick
10-07-2010 #8
Registered User
- Join Date
- Mar 2010
- Location
- Tempe, AZ
- Posts
- 237
Well crap, I don't think I have a PV that can be gutted. I took it out tonight and tried to take the internal components out. Once the rear nut was off nothing came out easily. It took a lot of prying with a needle-nose to get the middle piece out. I think that's the shuttle valve which you said shouldn't come out. In the second pic you can see all the pieces that make up the shuttle valve.

Even if I take out that spring and plunger, it looks like there might be some sort of mechanism within the rear nut. Could I do that and stick the shuttle valve back in and run it? Or find another PV to gut? Or is this not worth the effort and I should just eliminate the PV altogether? (I am running an APV on the rear line)1967 Camaro - LM7, T56, TVS, 12.7:1
1996 Impala SS - DD
10-08-2010 #9 Registered User
- Join Date
- Sep 2010
- Location
- Benicia, Ca.
- Posts
- 4,131
The spring and plunger in the back is for rear drum, its a resid pressure valve....thats the diff between a 2 disc and 4 disc prop valve.
MattMCB - Matt's Classic Bowties
5360 Gateway Plaza Dr.
Benicia, Ca. 94510
866-628-8746
TEXT ONLY: 925-989-9091 (Replied 8-4)
www.mcbparts.com
Email: [email protected]
Like us on Facebook for exclusive offers, info and chat: www.facebook.com/mcbparts
Hours: Monday to Friday 8am - 4pm Pacific
We ALWAYS enjoy talking to our customers!
We have a full time staff to answer ALL Questions, Tech Support or Order Status Tracking!
10-09-2010 #10
Registered User
- Join Date
- Feb 2010
- Posts
- 176
I don't believe that is correct. The difference between a disc/drum and disc/disc combination valve is the metering valve, which is in the front of the valve body. Combination valves don't include a residual pressure component. Originally Posted by MCB Matt
LM7_67, you have an MBM aftermarket valve (not sure which model). I bought one myself to gut like you are doing, but it's not constructed like the factory ones. The proportioning parts appear to be integral to that rear assembly. I punted with mine, and went back to the factory valve. I cleaned it up, pulled out the proportioning pieces like I mentioned before, and it works great with a Wilwood adjustable valve in the rear line. That's probably not what you want to hear; maybe someone else will chime in with a different experience with the MBMs.
10-10-2010 #11
Registered User
- Join Date
- Mar 2010
- Location
- Tempe, AZ
- Posts
- 237
kind of figured this was the case. how difficult is it to find a factory style prop valve? if they're hard to come by, I can just put a T-fitting on the front, and plumb directly for the rear, eliminating the factory block entirely. Originally Posted by quarterbooty
1967 Camaro - LM7, T56, TVS, 12.7:1
1996 Impala SS - DD
10-10-2010 #12
Registered User
- Join Date
- Aug 2004
- Location
- Belle Plaine, MN
- Posts
- 1,221
With my 4-disc setup I eliminated the prop valve completely. I run the front lines direct from the master, and have an adjustable valve inline to the rears. Once I adjusted it to where I wanted it relative to the fronts, it's all good. No issues ever.
Scott Parkhurst
2011 Car Craft Real Street Eliminator Winner
10-10-2010 #13
Registered User
- Join Date
- Sep 2010
- Location
- Benicia, Ca.
- Posts
- 4,131
We were told by CPP that this is the way to convert our props (exact same as MBM) to 4 disc. We have never had an issue. Remember factory disc cars had a resid valve on the frame rail on 2 disc cars.
MCB - Matt's Classic Bowties
5360 Gateway Plaza Dr.
Benicia, Ca. 94510
866-628-8746
TEXT ONLY: 925-989-9091 (Replied 8-4)
www.mcbparts.com
Email: [email protected]
Like us on Facebook for exclusive offers, info and chat: www.facebook.com/mcbparts
Hours: Monday to Friday 8am - 4pm Pacific
We ALWAYS enjoy talking to our customers!
We have a full time staff to answer ALL Questions, Tech Support or Order Status Tracking!
10-11-2010 #14
Registered User
- Join Date
- Feb 2010
- Posts
- 176
You can do exactly that. The only reason I went through the trouble of keeping the combination valve body in my system was because I had factory replacement stainless steel hardlines. I suck at bending tubing, so I needed the valve to remain just to be a distribution block. Originally Posted by LM7_67
10-11-2010 #15
Registered User
- Join Date
- Feb 2010
- Posts
- 176
Not true, at least for my car ('72 Monte). The residual pressure valve is in the master cylinder, which I replaced. Originally Posted by MCB Matt
10-11-2010 #16
Registered User
- Join Date
- Sep 2010
- Location
- Benicia, Ca.
- Posts
- 4,131
I am talking about aftermarket master/props....Are you speaking of factory master and valves or?
MCB - Matt's Classic Bowties
5360 Gateway Plaza Dr.
Benicia, Ca. 94510
866-628-8746
TEXT ONLY: 925-989-9091 (Replied 8-4)
www.mcbparts.com
Email: [email protected]
Like us on Facebook for exclusive offers, info and chat: www.facebook.com/mcbparts
Hours: Monday to Friday 8am - 4pm Pacific
We ALWAYS enjoy talking to our customers!
We have a full time staff to answer ALL Questions, Tech Support or Order Status Tracking!
10-11-2010 #17 Registered User
- Join Date
- Aug 2004
- Location
- Melbourne, FL
- Posts
- 1,046
So for a 4 wheel disc setup you can eliminate the prop valve and just run a single line with a tee somewhere for the front and an adjustable valve for the back?? Even when using a stock MC ??
67 Firebird Convert 455 +.060 Johnny Winters TH400 74cc KRE d-port flowed @ 310 cfm heads piston dished 16cc H-beam rods Comp Cam 305-AH-8 cam 108* LSA 253/260 @.050 duration .577/.594 lift w/1.65 rockers Ford 9" 3.55 Detroit Locker M/T Sportsman Radials 31x18x15 on Convo Pro 15x15s
Honest dad that 455 on the side of the block is a serial number
10-11-2010 #18 Registered User
- Join Date
- Oct 2009
- Location
- New Derry, PA
- Posts
- 1,265
Not sure about the stock M/C being suitable, but as far as the plumbing goes, yes. Originally Posted by 67 455 Bird ragtop
One question about gutting the stock combo valve... If you open up all those passages, aren't you mixing front and rear brake fluid, which makes proportioning impossible, and negates the safety feature of the dual master cylinder...I think?
Ray Kaufman - Wyotech Chassis Fab and High Performance Instructor. Words of Wisdom from an old master... at Asylum Custom Interiors website
10-11-2010 #19
Registered User
- Join Date
- Mar 2010
- Location
- Tempe, AZ
- Posts
- 237
I'm in a similar situation: new SS hard lines, and trying to avoid custom lines. I guess I'll try to find a stock-style PV, but if I can't, I'll just eliminate it. Originally Posted by quarterbooty
1967 Camaro - LM7, T56, TVS, 12.7:1
1996 Impala SS - DD
10-12-2010 #20
Registered User
- Join Date
- Mar 2005
- Posts
- 345
Yes, to correct this solder a plug into the bore between the two halves. The pressure differential switch function is lost. But the two circuits will still be independent. Originally Posted by exwestracer
And the adjustable proportioning valve can be placed under the hood up by the M/C.
Note that a lot of the newer M/C's have a low fluid level switch. Can connect that to the dash light instead.
It is also best to totally gut the combo valve for a 4-wheel disc set up. This includes the front metering valve. The combo valve becomes nothing more then a distribution block.
Bob.

 Reply With Quote


